Some of our readers have asked us how to remove Windows from their computers. Some of them want to remove Windows 10 or Windows 11 and empty their drives. Some have dual-boot configurations and want to keep only one Windows version. Others have Windows and Linux running alongside and prefer to delete Windows. We want to help, so here are all the steps you need to take in these situations:
IMPORTANT: Make sure that you back up the data you have on the Windows drive. If you don’t back it up before uninstalling Windows, you risk losing your data if something goes wrong along the way. One way to back it up is through File History.
1. How to uninstall Windows 11 or Windows 10 when that’s the only operating system you have
If you installed just one Windows operating system, regardless of whether that’s Windows 11 or Windows 10, uninstalling it is simple. Create a USB recovery drive or an installation CD/DVD or USB memory stick with the operating system that you want to use next, and boot from it.
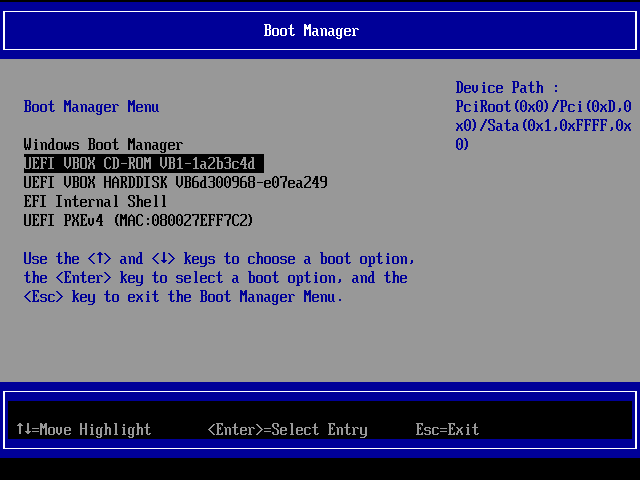
Choosing to boot from a CD in the BIOS/UEFI Boot Menu
Then, on the recovery screen or during the installation of the new operating system, select the existing Windows 11 or Windows 10 partition and format or delete it. Remember, this will erase all the data you have on that partition.
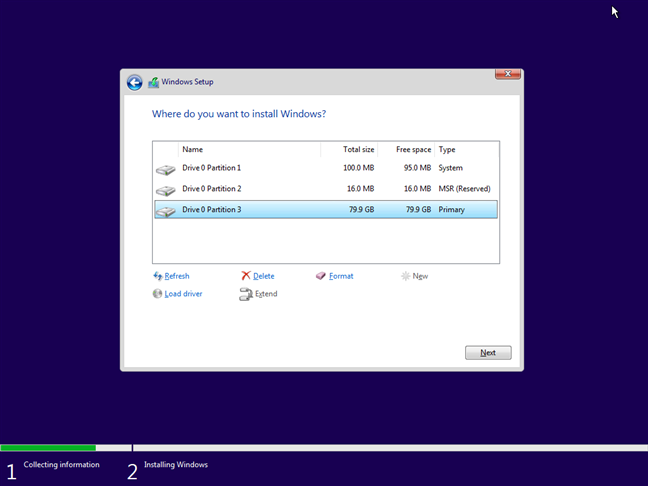
Deleting a Windows partition
Alternatively, you can boot from the recovery or install drive, load Command Prompt (Shift + F10), and then use the diskpart and format commands to remove or format the Windows partition(s) you no longer need. If you want to uninstall Windows 11 or Windows 10 like this and need guidance on how to use diskpart and format, follow the steps described in this tutorial: How to use diskpart, chkdsk, defrag, and other disk-related commands.
2. How to uninstall Windows 11 or Windows 10 when they’re both installed (in a dual-boot configuration)
What if you have two or more Windows operating systems installed on the same computer and want to uninstall one of them? For example, let’s assume that you have installed Windows 10 and Windows 11 in a dual-boot configuration. You may want to remove the older Windows 10 and use its space to create a new partition or to resize your existing Windows 11 partition. How do you delete Windows 10, for example?
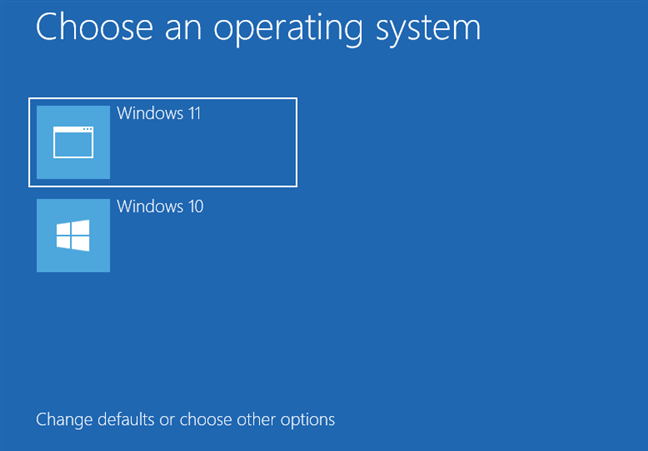
Windows 10 and Windows 11 in a dual-boot setup
First, remove the boot entry for the Windows version that you want to uninstall. In our example, that’s Windows 10. Perform this action from the version of Windows that you want to keep. In our case, that is Windows 11.
To do that, start the Windows operating system you intend to keep and open the System Configuration tool. A quick way to launch it is to use the Run window. Simultaneously press the Windows + R keys on your keyboard and, in the Run window, type msconfig. Next, press Enter or click/tap OK, and the System Configuration tool opens.
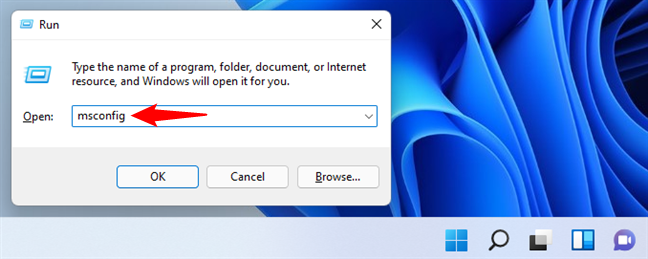
Running msconfig in Windows 11
We use the System Configuration tool because it’s available in all Windows versions. If you prefer, you can also use other boot managers, but make sure that the one you choose is compatible with all the operating systems you have installed.
In System Configuration, go to the Boot tab, and check whether the Windows you want to keep is set as default. To do that, select it and then press “Set as default.”
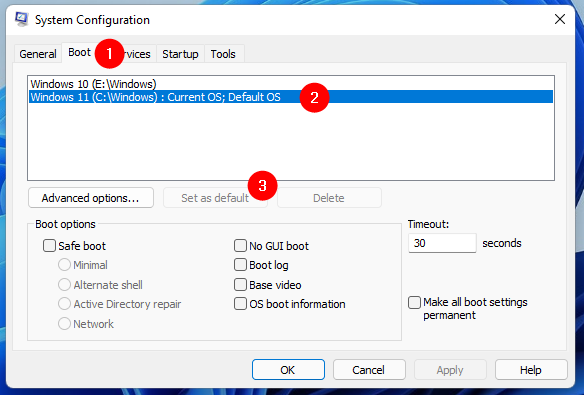
Setting the default operating system
Next, select the Windows you want to uninstall, click Delete, and then Apply or OK.
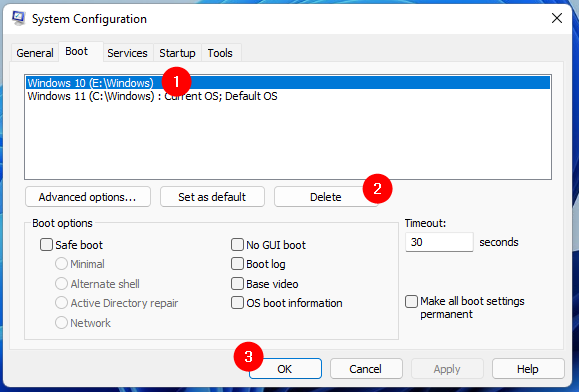
Deleting a Windows operating system from System Configuration
To test if everything is OK with the Windows you want to keep, restart your computer and see if you can boot without problems. You should be able to do that.

Restarting Windows 11 to apply the changes
If something terribly wrong happens and you cannot boot correctly, you can repair the boot entries using the Windows installation media. Read Fix problems that keep Windows from loading, with Startup Repair and How to use the Command Prompt to fix issues with your PC's boot records, if you need help.
Now that the boot entry is gone, it’s time to erase or format the partition used by the Windows you want removed. Format it if you plan to reuse that partition to install another operating system, or eliminate the entire volume if you would instead use that space to extend other partitions.
For both actions, you can use the Disk Management tool. Open it with a click/tap on its shortcut from the WinX menu (press Win + X on your keyboard), or use one of the methods we described here.
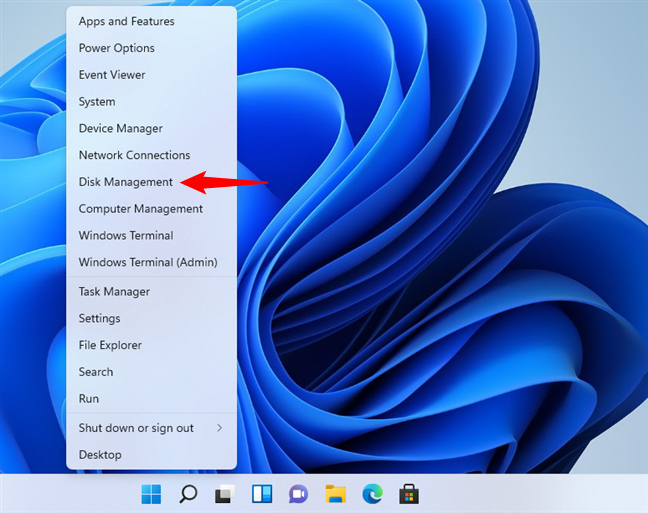
Opening Disk Management from the WinX menu
In the Disk Management window, right-click or tap and hold on the partition you want to remove (the one with the Windows that you uninstall), and select “Delete Volume” to erase it. Then, you can add the available space to other partitions.
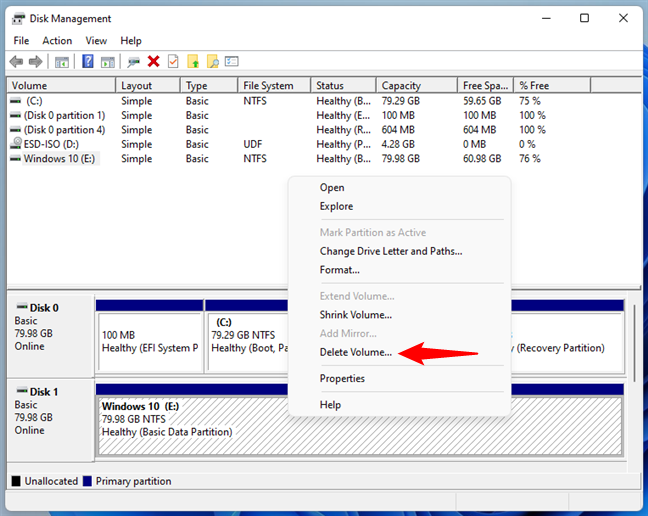
Deleting a Windows partition in Disk Management
If you want to reuse the same partition for another operating system, you should format it instead of deleting it. For example, if you want to remove Windows 10 to install another operating system, like Windows 11, select the partition, right-click or press and hold on it, and then click/tap on Format in the contextual menu.
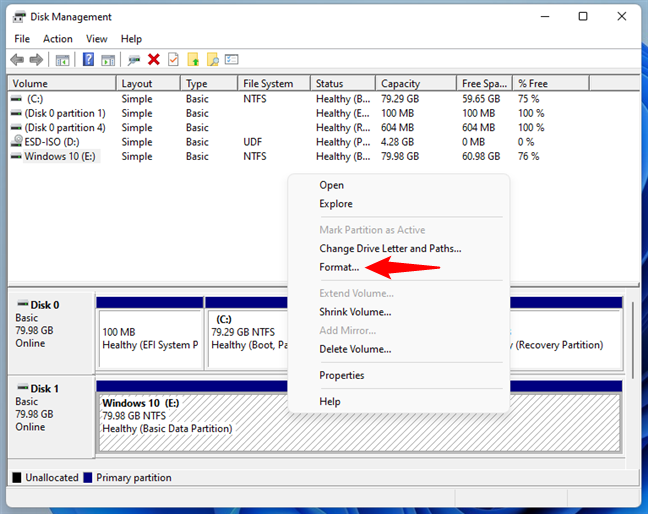
Formatting a Windows partition in Disk Management
Windows warns you that you are about to erase all the data stored on that partition, and you might also get a warning that the selected partition is in use. To continue the formatting, press Yes. Once you do that, you can see that the Windows you wanted to uninstall has been removed.
3. How to delete Windows from a dual-boot configuration with Linux
If you have a multi-boot setup that includes non-Microsoft operating systems, like Ubuntu Linux or Linux Mint, the steps are similar to those in the previous section. However, you have to perform them from Linux. For example, let’s assume that you have a dual-boot setup with Linux Mint and Windows 11 running alongside on the same computer. How do you get rid of Windows 11 and keep Linux Mint?
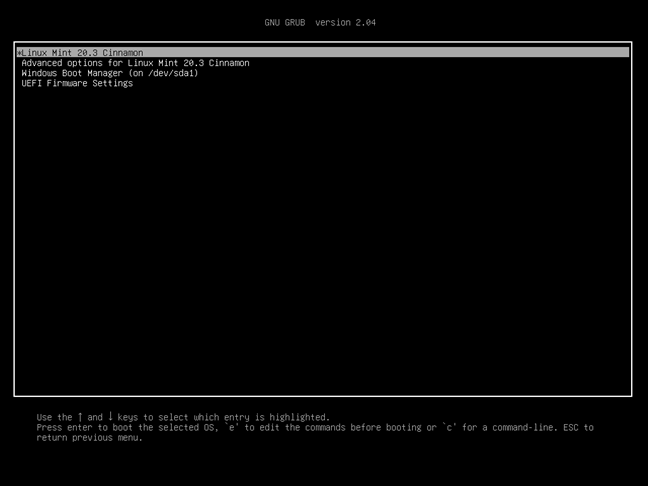
Linux Mint and Windows 11 in a dual-boot setup
First of all, remove the Windows 11 system partition(s). To do so, you need an app that can manage drives and partitions. The one found by default in Linux Mint is called Disks. Start by opening the Applications menu with a click/tap on its button from the bottom-left corner of the screen.
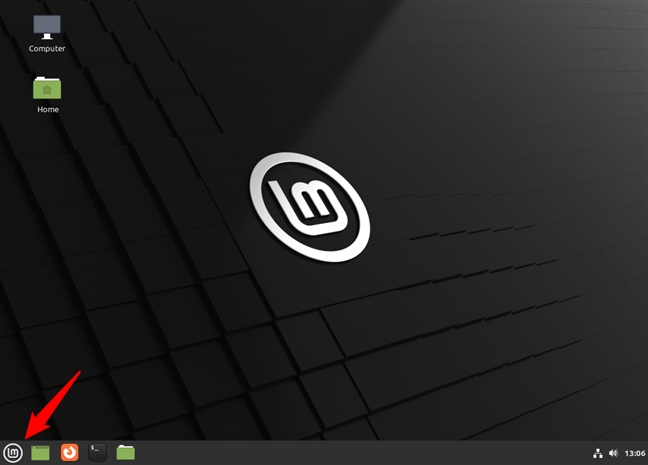
The applications menu from Linux Mint
On the Applications screen, type disks in the search field at the top. Then, in the list of search results, click or tap Disks.
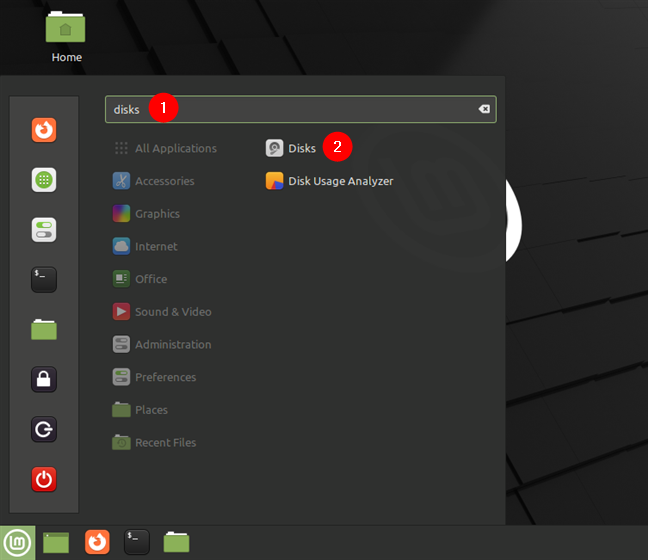
The Disks app from Linux Mint
Select the Windows partition that you want to remove in the Disks app. It should be easy to spot because it should be formatted using NTFS. After selecting it, click/tap the - (minus) button under the Volumes list.
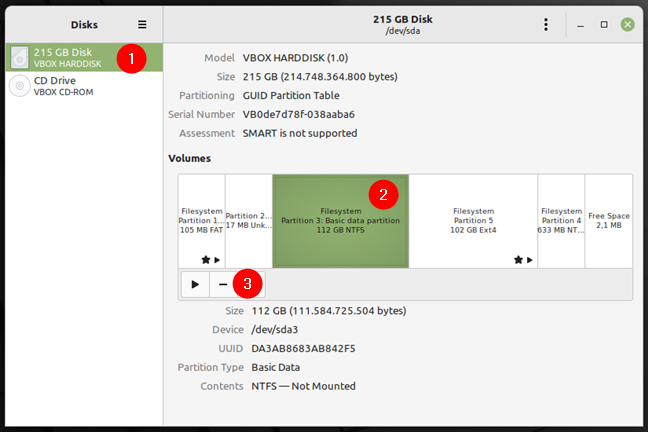
Deleting a Windows 11 partition using Disks in Linux Mint
Linux Mint asks if you “are sure you want to delete the partition.” Click Delete.
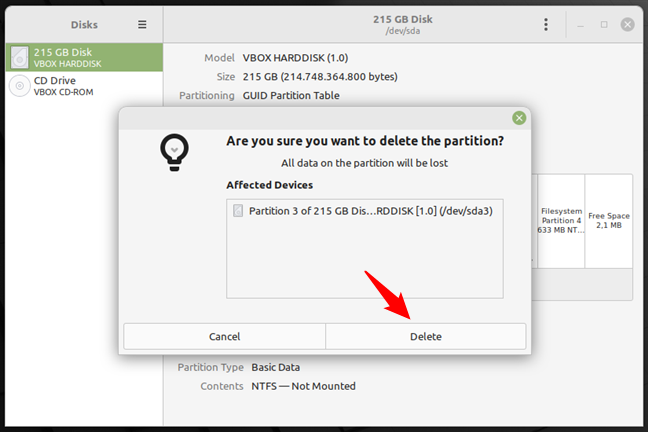
Confirming the removal of the Windows partition
Confirm the action by entering the administrator password, and then click/tap Authenticate.
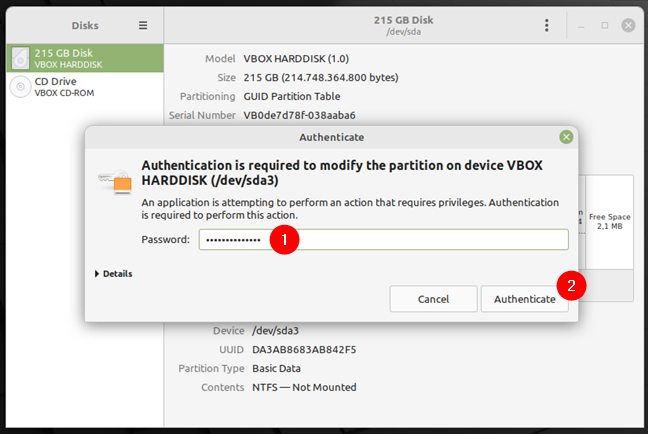
Authenticating as an administrator in Linux Mint
Now, the Windows partition should be no more. The next step is to reboot your computer.
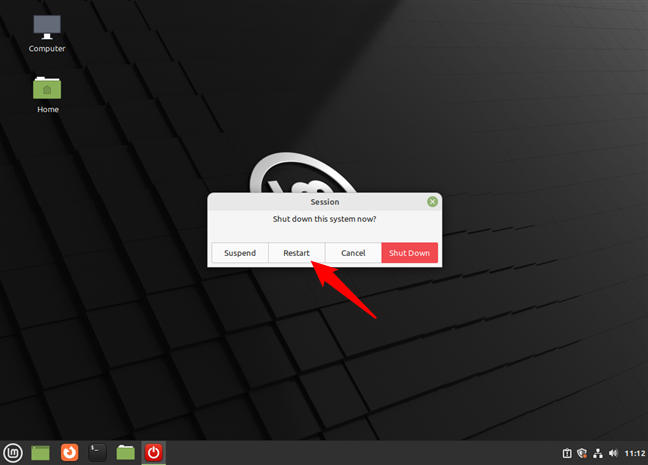
Rebooting the computer in Linux Mint
The GRUB loader might still show Windows 11 or Windows 10 as an available operating system to boot from when your computer starts. However, booting from it does not work because you deleted its partition(s). To completely forget that a Windows operating system was ever found on your computer, you must delete its entry from the GRUB boot menu. Fortunately, that’s easy: start Linux again and log in with your user account.
Open a Terminal window by simultaneously pressing the Ctrl + Alt + T keys on your keyboard. In the Terminal, run this command:
Press Enter, type the administrator account password, and press Enter once more.
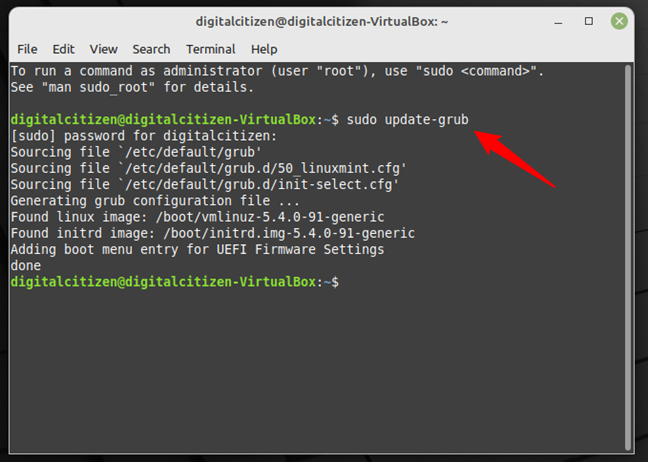
Running sudo update-grub to remove Windows from the boot menu
After a moment or two, Ubuntu updates the GRUB boot menu, removing the old Windows entries. From now on, you can enjoy a Windows-free Linux experience. 🙂
Why did you want to remove Windows?
As you have seen, uninstalling Windows 11 or Windows 10 is not as hard as it may seem. Anyone can do it with a bit of attention to the steps detailed above. If you are looking for guides on installing different versions of Windows, do not hesitate to read the recommendations below and, if you have something to add to our guide, write us a comment.


 21.02.2022