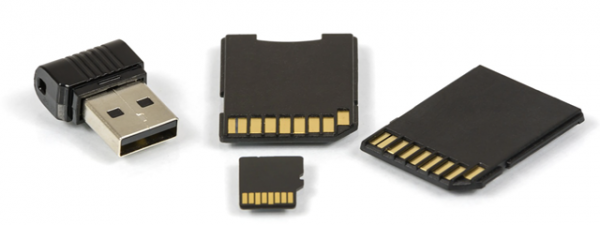
SD cards are more popular than ever as they’re used in various devices for storing data. To give you a few examples, we have them inside our smartphones to increase storage capacity, inside digital cameras, surveillance cameras, laptops, and even tablets. If you want to eliminate all the data on an SD card, it is a good idea to format it, and the same is true when you encounter issues with data corruption. Moreover, if you have a troublesome SD card, you may want to format it and check its health status in order to see if it needs replacing with a new one. Here’s how to check the health of an SD card and how to format it in Windows 10 and Windows 11:
How to plug the SD card into your Windows laptop or PC
Some Windows laptops have a built-in micro SD card reader. If you have a microSD card, simply plug it into your laptop’s card reader. It’s usually placed on the side of the laptop, and it looks similar to the one in the image below.

The micro SD card reader on a Samsung Galaxy Book laptop
If you don’t have a microSD card reader on your laptop or are using a desktop computer, you need an adapter like the Kingston MobileLite Duo 3C Reader. This card reader works with microSDHC and microSDXC cards. You plug your SD card into it, and then you can use its USB-Type C or USB-Type A ports to plug it into your computer. Then, Windows detects the SD card as if it were a USB flash drive.
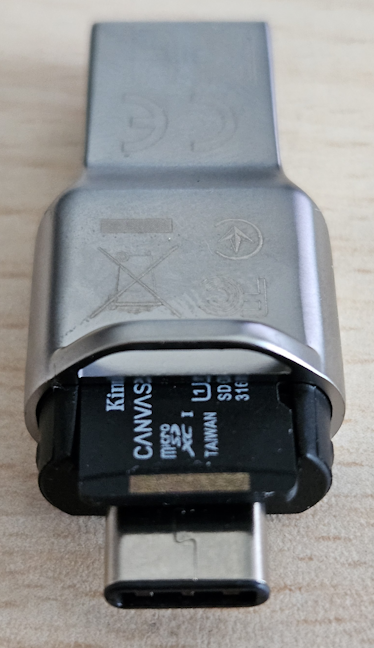
Kingston MobileLite Duo 3C Reader
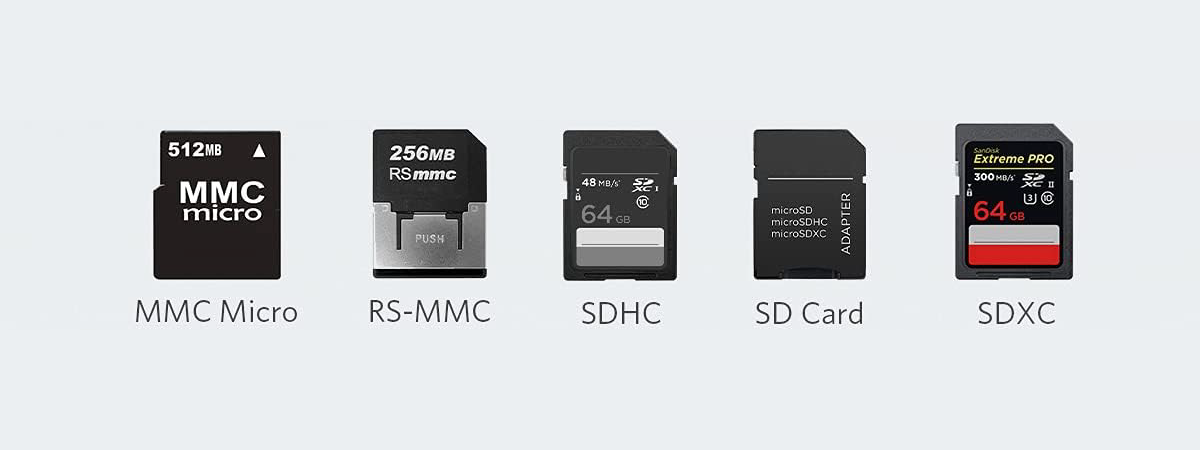
If you work with other formats of SD cards, like SDHC, SD, SDXC, MMC Micro, or RS-MMC, you’ll want a more advanced adapter, like the Anker USB-C SD 4.0 Card Reader. You plug the Anker card reader into your Windows computer’s USB Type C port and your SD card into the appropriate card reader slot. Then, Windows detects your SD card and allows you to read and manage the data stored on it, format it, or check its health.
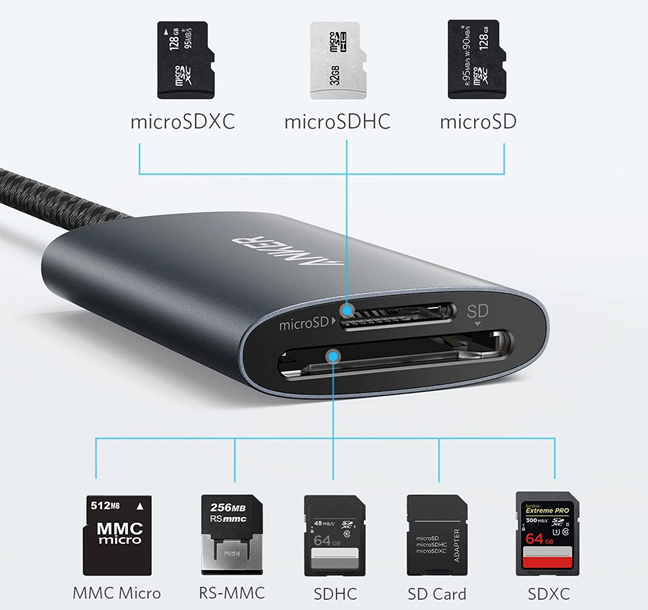
Anker USB-C SD 4.0 Card Reader
How to format an SD card from Windows
Formatting an SD card is similar to formatting any kind of storage drive in Windows. While the formatting window looks and works the same in Windows 10 and Windows 11, getting to it is slightly different based on the version of Windows you’re using. For completeness, first, let’s see how to access the formatting window in Windows 10 and then in Windows 11. After that, you’ll also learn how to use this wizard.
How to access the formatting window in Windows 10
On your Windows 10 computer, open File Explorer (Windows + E) and go to This PC. Find your SD card in the list of Devices and drives, and go to the Drive Tools tab on the ribbon. There, click or tap on the Format button from the Manage section.
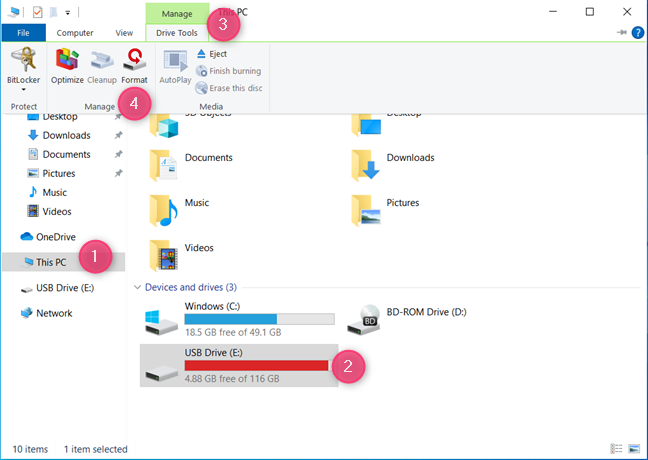
Look for Format in the Drive Tools tab
Alternatively, you can go to This PC and right-click or press-and-hold on the SD card. In the context menu, choose Format.
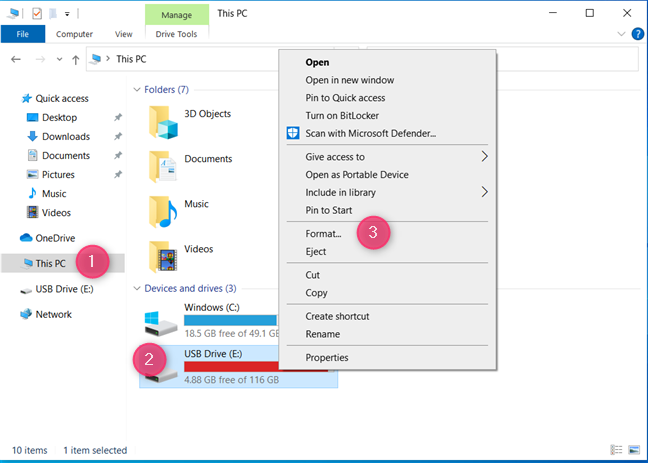
Right-click the SD card and choose Format
Now, skip to the section where I share how to use the formatting window.
How to access the formatting window in Windows 11
On your Windows 11 computer, start File Explorer (Windows + E) and go to This PC. Under Devices and drives, select the SD card that you want to format. Then, click or tap the three dots button (See more) on the toolbar on the top, and choose Format in the menu displayed.
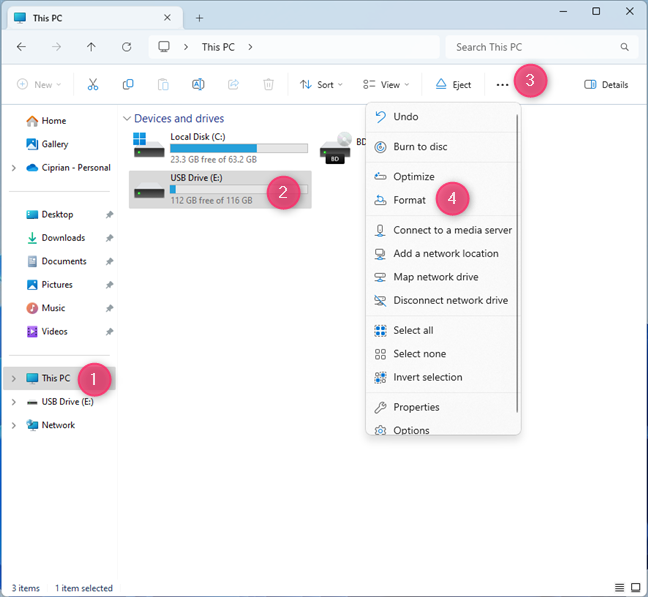
Find the Format option in the See More menu
Alternatively, go to This PC, right-click on the SD card, and choose Format.
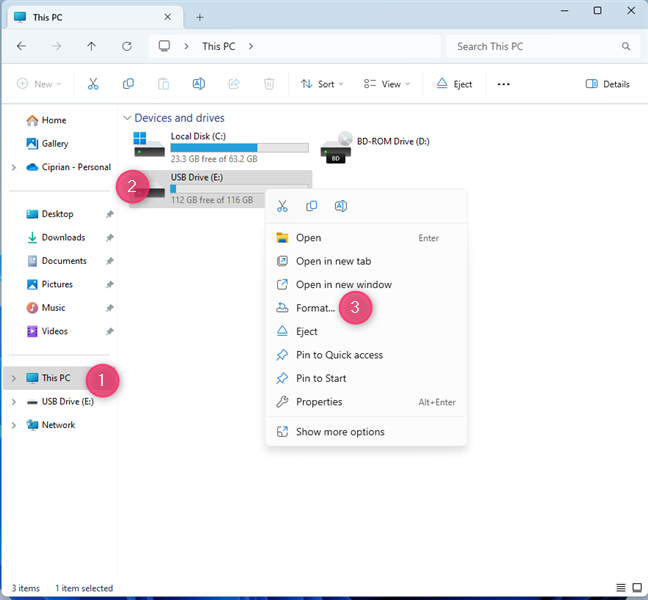
Right-click the SD card and choose Format
You now see the formatting window. Read on to see how to use it.
How to format an SD card
Let’s see how to use the formatting window. At the top of the window, you see Format, followed by the drive’s name and letter.
Then, you see the capacity of the SD card, its current file system, and allocation unit size. “What’s that?”, you may ask. Think of the allocation unit size as the smallest chunk of data on the SD card. For example, if you were to create an empty file on the SD card, it would have the size of this allocation unit size.
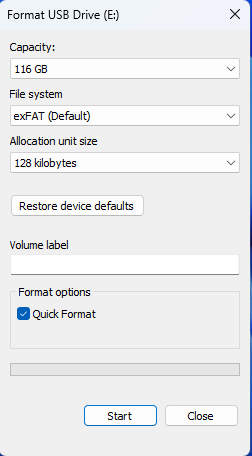
The formatting window
You can choose the file system used for the SD card by clicking or tapping on the File system drop-down list and choosing what you want. However, it is better to use the exFAT file system for SD cards that are used to store pictures and videos inside a digital camera or a smartphone. If you want to know which file system is the fastest, read this article: FAT32, exFAT, or NTFS?
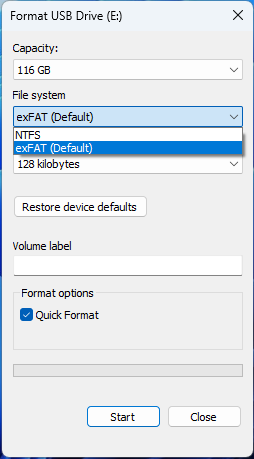
Choose the File System for the SD card
You can also change the Allocation unit size by clicking or tapping on this drop-down list and choosing the desired value. A higher value is better when you tend to copy larger files on the SD card, while a smaller value is best for smaller files.
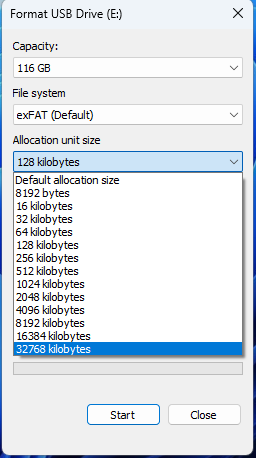
Choose the Allocation unite size
For optimal performance, it is best to press the Restore device defaults button to use the recommended settings set by the manufacturer of the SD card. Windows automatically applies them when you hit this button. Lastly, before formatting the SD card, you can type a name in the Volume label field, which will be used to identify the SD card.
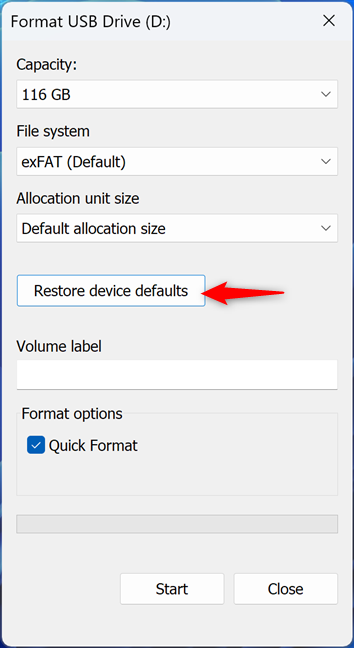
It is a good idea to Restore device defaults
The last question you might ask before hitting the Start button is: Do I want a quick or full format? If you choose a quick format, the process takes much less time, but your deleted data is easier to recover with specialized software like Recuva. On the other hand, if you have issues with data corruption on the SD card, it’s better to opt out of the quick format and wait longer for the full format. When you are done setting things up, click or tap Start, and you are shown a warning informing you that formatting will erase ALL data on this disk. To go ahead, click or tap OK.
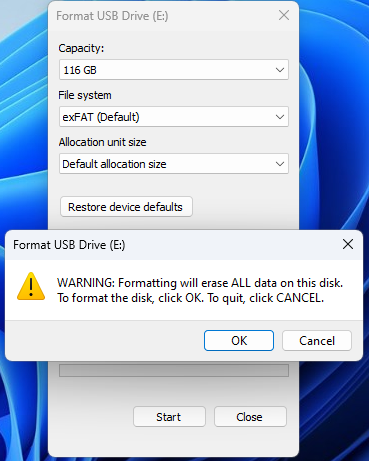
Formatting will erase ALL data on this disk
A progress bar is shown, and when it’s done, you see a Format Complete prompt. Click or tap OK; the SD card is now formatted and ready for use.
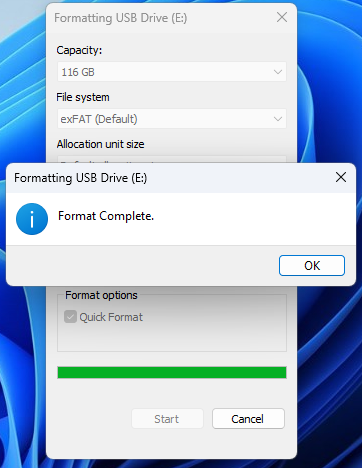
The formatting is complete
You can unplug the SD card and then use it inside the devices you want: smartphone, digital camera, surveillance camera, etc.
TIP: If you want to format your SD card using CMD, read the section dedicated to the format command from this guide: 20 best Command Prompt (CMD) commands you should know.
How to check an SD card’s health in Windows
If you want to check the health of the SD card, open Command Prompt or a Command Prompt tab in Windows Terminal. Then, type or copy and paste the following command and press Enter:
You then see a list of all your Windows computer’s drives and their status. The Caption field shares the name used by Windows to identify each drive and the Status field. My SD card was a “Generic- SD/MMC USB Device.” On other computers it might be an SDXC Card or something similar.
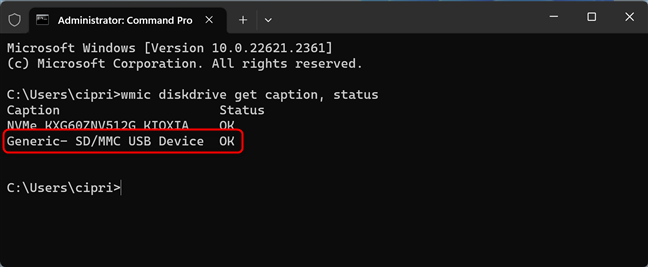
Check the health status of the SD card
If all is well with your SD card, Windows says its status is OK. If there’s a problem with it and it will likely stop working, you will see something like “Pred Fail” in the Status field for your SD card.
If you have problems with the SD card, check it for errors using the chkdsk command. Before you run it, check the drive letter of your SD card, and then type this command:
On my Windows 11 laptop, the SD card had the drive letter D, so I typed:
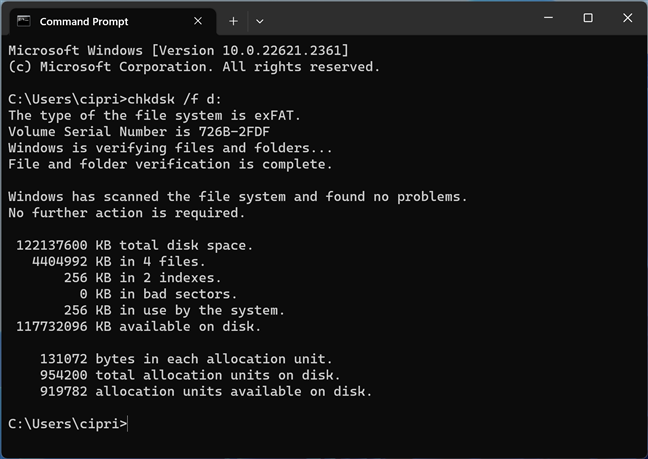
Run chkdsk to look for errors on the SD card
You should always use this command with the /f parameter because it automatically lets the tool fix any errors it finds on your SD card. As you can see above, the chkdsk command checks the total disk space available on the SD card and if any bad sectors or errors need to be fixed.
Why did you format your SD card?
Now you know how to format any SD card on a Windows 10 or Windows 11 computer, and also how to check its health and scan it for errors that may need to be fixed. Before closing this tutorial, let me know if the instructions in this guide provided the help you were looking for and your reason(s) for formatting your SD card. Was it to permanently remove the data on it, fix problems with data corruption, or something else? Comment using the options available below, and let me know.


