

Microsoft's support for Windows 10 will end on October 14th, 2025. After that date, you have to pay a lot of money to get security updates, and you can do so only for the first three years. Therefore, if you want to avoid paying for updates, your only solution is to upgrade from Windows 10 to Windows 11. And the easiest way to do it is via Microsoft’s Windows 11 Installation Assistant. This free tool handles the upgrade process, migrating your user accounts, user files, and apps from Windows 10 to Windows 11. Here’s how it works:
NOTE: This guide shows you how to upgrade from Windows 10 to Windows 11 using the Windows 11 Installation Assistant. If you’re looking for a guide on how to clean install Windows 11, read this instead: How to install Windows 11 from USB, DVD, or ISO.
 Downloading the Windows 11 Installation Assistant
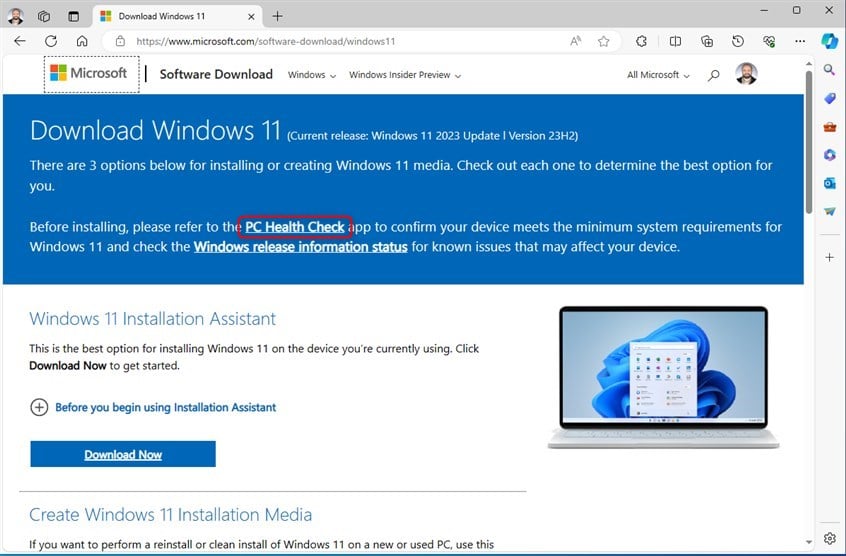
Next, in the Download Windows 11 section at the top, you see the current release of Windows 11, which you are upgrading to. There’s also a link to the PC Health Check highlighted below. Click or tap it to download this tool.
Downloading the Windows 11 Installation Assistant
Next, in the Download Windows 11 section at the top, you see the current release of Windows 11, which you are upgrading to. There’s also a link to the PC Health Check highlighted below. Click or tap it to download this tool.
 Click or tap PC Health Check
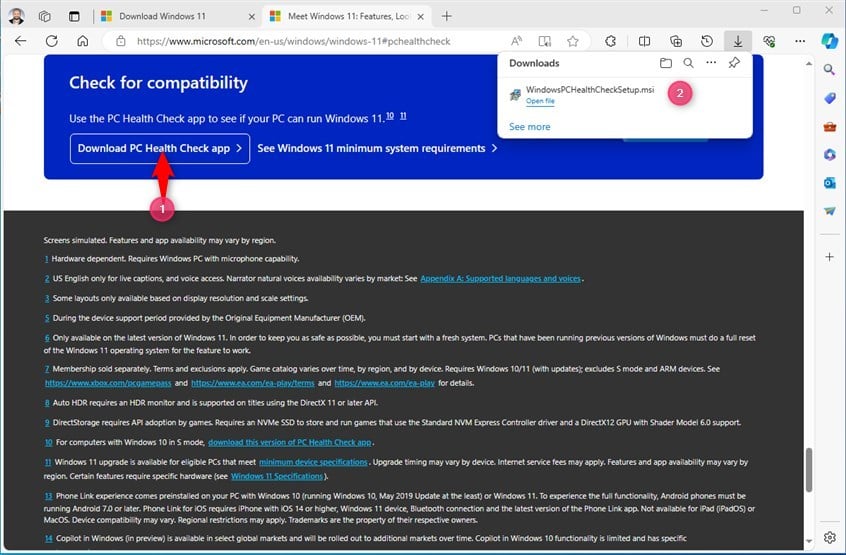
The next page presents several Windows 11 features promoted by Microsoft. At the bottom, there’s a section called Check for compatibility with a “Download PC Health Check app” button. Click or tap it. If you can’t find it, here’s a download link for the app.
Click or tap PC Health Check
The next page presents several Windows 11 features promoted by Microsoft. At the bottom, there’s a section called Check for compatibility with a “Download PC Health Check app” button. Click or tap it. If you can’t find it, here’s a download link for the app.
 Download PC Health Check
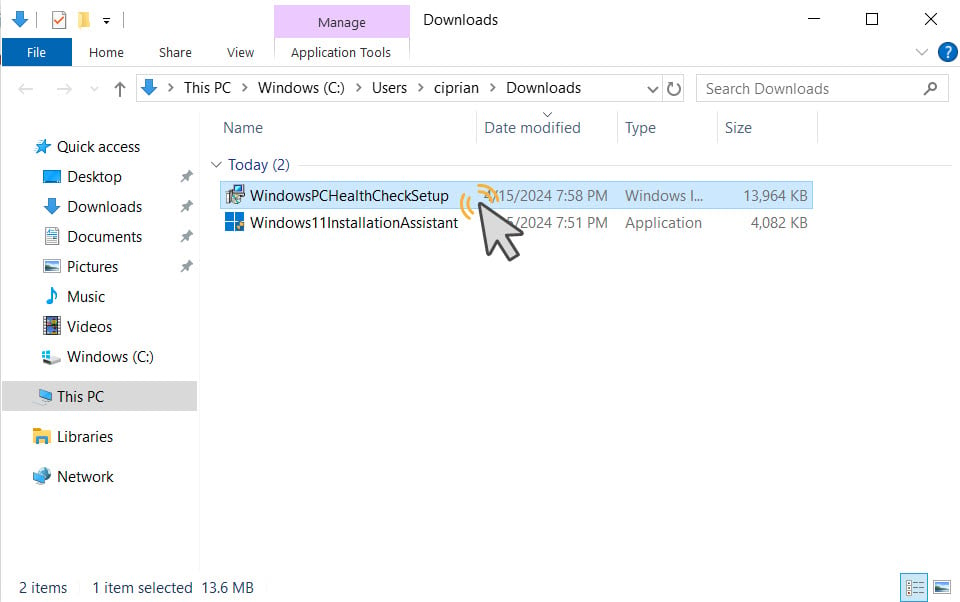
 Run WindowsPCHealthCheckSetup
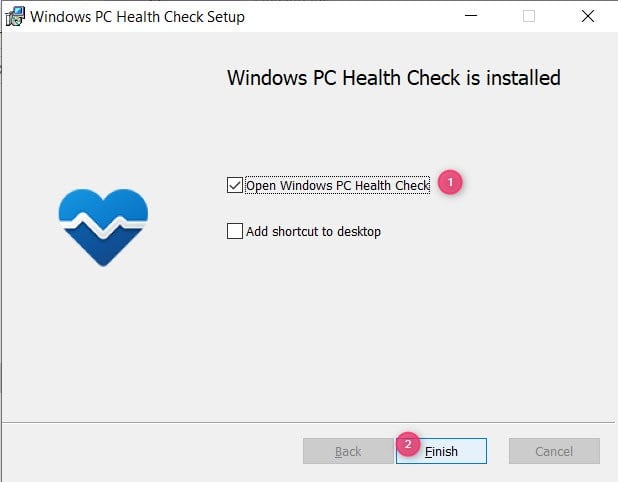
Accept the license terms of the app, and the PC Health Check app installs itself automatically and shows the progress of the whole process. When it’s done, you are informed that the app has been installed. Leave the “Open Windows PC Health Check” option checked, and click or tap Finish.
Run WindowsPCHealthCheckSetup
Accept the license terms of the app, and the PC Health Check app installs itself automatically and shows the progress of the whole process. When it’s done, you are informed that the app has been installed. Leave the “Open Windows PC Health Check” option checked, and click or tap Finish.
 Installing the PC Health Check app
The PC Health Check app opens. To see whether your Windows 10 computer meets the requirements for Windows 11, click or tap Check now.
Installing the PC Health Check app
The PC Health Check app opens. To see whether your Windows 10 computer meets the requirements for Windows 11, click or tap Check now.
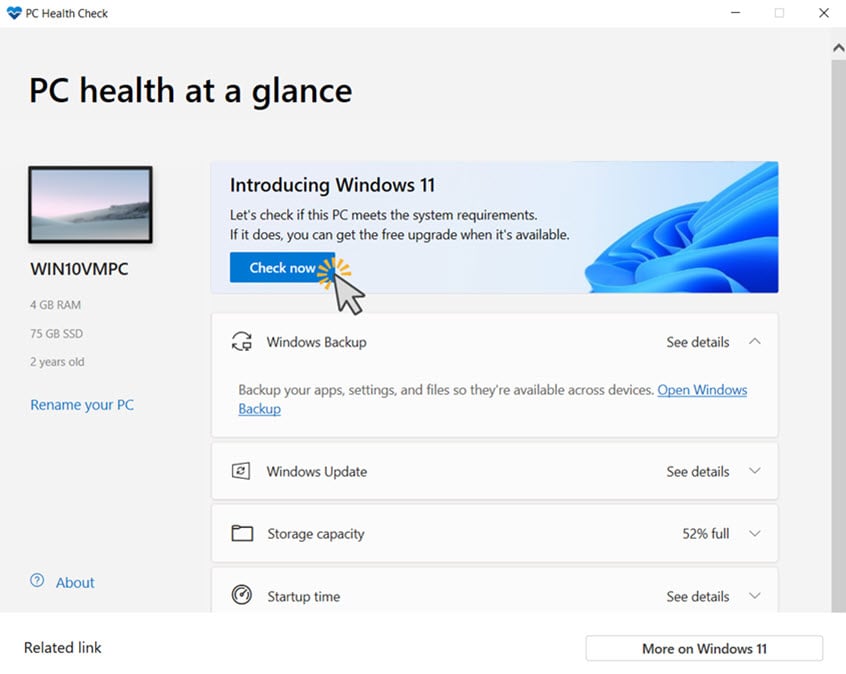
 Click or tap Check now
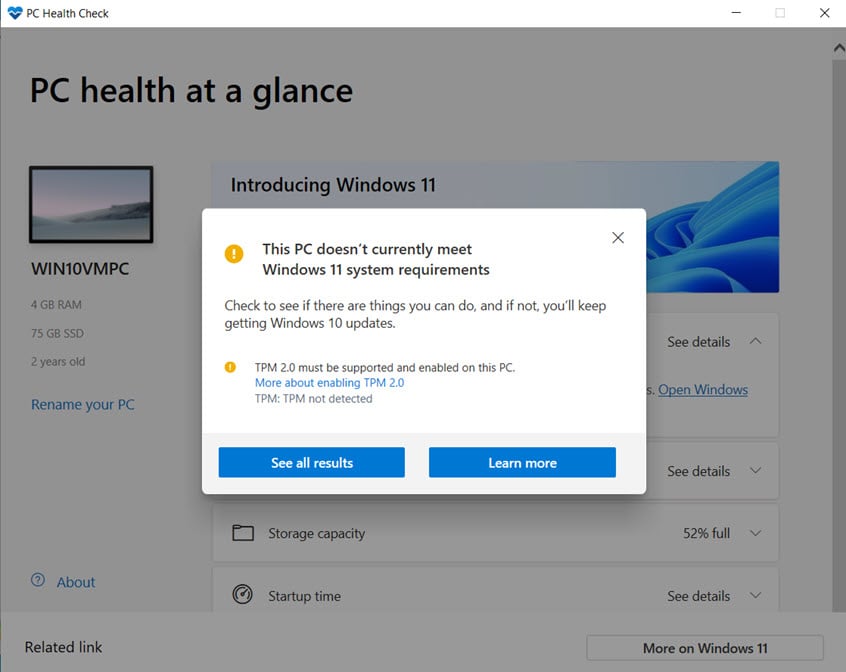
You then see the evaluation results. If it fails, you are shown what is wrong and what you must fix to use Windows 11.
For example, my computer didn’t have TPM 2.0 encryption enabled, and the TPM chip on my Windows 10 computer was disabled in the UEFI.
Click or tap Check now
You then see the evaluation results. If it fails, you are shown what is wrong and what you must fix to use Windows 11.
For example, my computer didn’t have TPM 2.0 encryption enabled, and the TPM chip on my Windows 10 computer was disabled in the UEFI.
 My Windows 10 computer is not compatible with Windows 11
After enabling the TPM chip and repeating the evaluation, the PC Health Check app informed me that This PC meets Windows 11 requirements. You can then close the app and go ahead with the upgrade process.
My Windows 10 computer is not compatible with Windows 11
After enabling the TPM chip and repeating the evaluation, the PC Health Check app informed me that This PC meets Windows 11 requirements. You can then close the app and go ahead with the upgrade process.
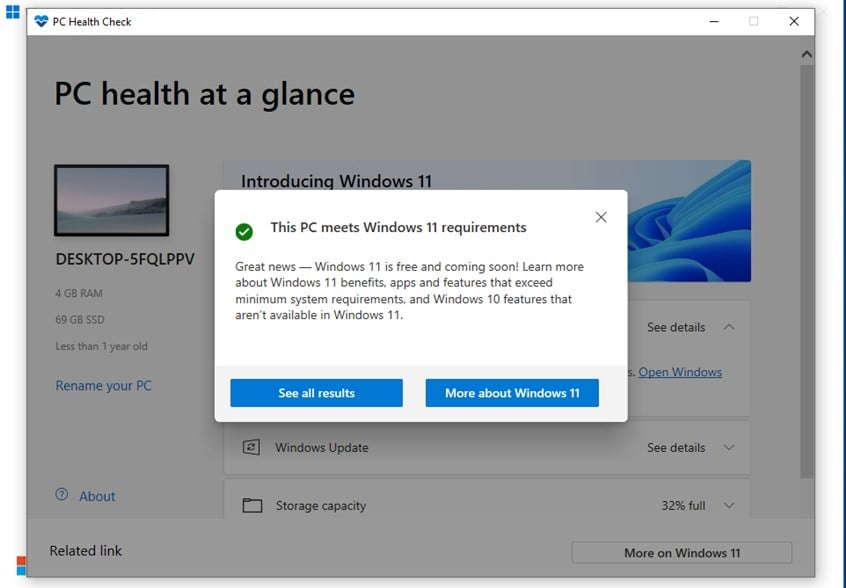
 This PC meets the Windows 11 requirements
IMPORTANT: If your computer doesn’t meet the Windows 11 system requirements and PC Health Check doesn’t share a positive result, you won’t be able to upgrade to Windows 11 using the Windows 11 Installation Assistant. However, there’s another method you can try, which is detailed in this guide: How to install Windows 11 on unsupported hardware.
This PC meets the Windows 11 requirements
IMPORTANT: If your computer doesn’t meet the Windows 11 system requirements and PC Health Check doesn’t share a positive result, you won’t be able to upgrade to Windows 11 using the Windows 11 Installation Assistant. However, there’s another method you can try, which is detailed in this guide: How to install Windows 11 on unsupported hardware.
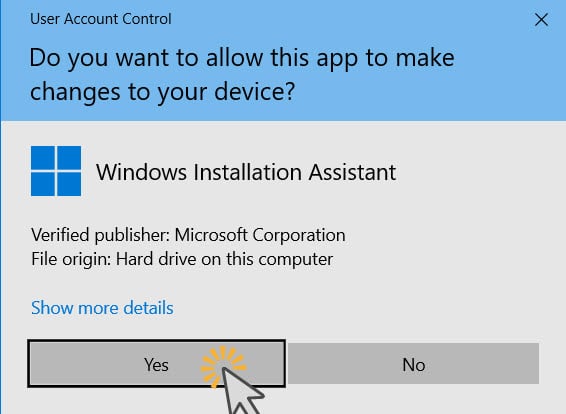
 Confirm that you want to run the Windows Installation Assistant
The Windows 11 Installation Assistant loads and might ask you to use the PC Health Check app to check compatibility. If you performed Step 2 in this guide successfully, simply press Refresh. If you didn’t, click or tap the “Get PC Health Check app” link and follow the instructions from Step 2. However, if the PC Health Check app has shown a positive result in its evaluation, this step is skipped for most users.
Confirm that you want to run the Windows Installation Assistant
The Windows 11 Installation Assistant loads and might ask you to use the PC Health Check app to check compatibility. If you performed Step 2 in this guide successfully, simply press Refresh. If you didn’t, click or tap the “Get PC Health Check app” link and follow the instructions from Step 2. However, if the PC Health Check app has shown a positive result in its evaluation, this step is skipped for most users.
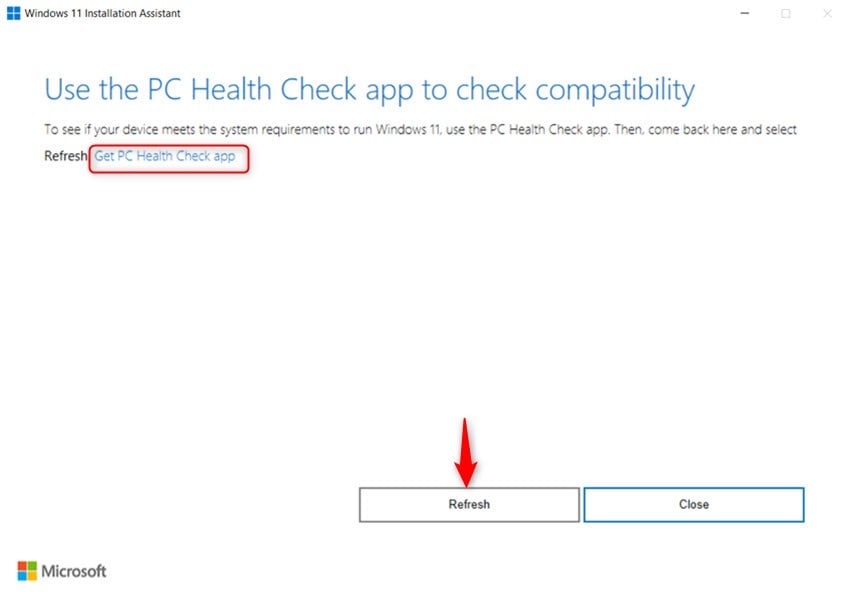
 Click or tap Refresh
If the PC doesn’t meet the requirements, you are stuck, and the only thing you can do is Close the Windows 11 Installation Assistant.
If your PC meets the Windows 11 system requirements, the wizard tells you to “Install Windows 11” and shows you the “Microsoft Software License Terms.” If you’re OK with them and want to continue upgrading Windows 10 to Windows 11, click or tap “Accept and install.”
Click or tap Refresh
If the PC doesn’t meet the requirements, you are stuck, and the only thing you can do is Close the Windows 11 Installation Assistant.
If your PC meets the Windows 11 system requirements, the wizard tells you to “Install Windows 11” and shows you the “Microsoft Software License Terms.” If you’re OK with them and want to continue upgrading Windows 10 to Windows 11, click or tap “Accept and install.”
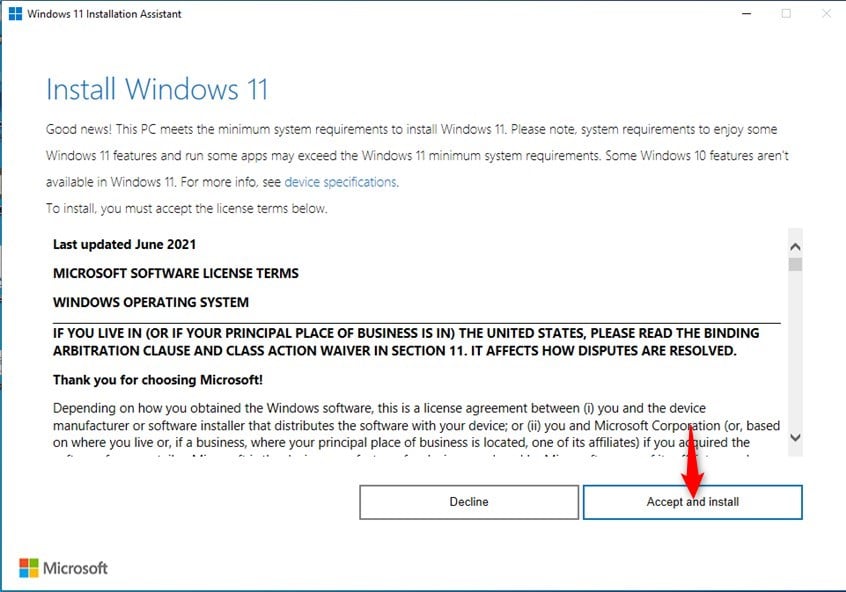 Click or tap Accept and install
Windows 11 Installation Assistant starts downloading the files required to install Windows 11. Depending on your internet connection speed, this step might take a while, so if you’re on a Windows 10 laptop or 2-in-1 device with a battery, make sure it’s plugged into a power socket. The wizard keeps you permanently informed about the download progress.
Click or tap Accept and install
Windows 11 Installation Assistant starts downloading the files required to install Windows 11. Depending on your internet connection speed, this step might take a while, so if you’re on a Windows 10 laptop or 2-in-1 device with a battery, make sure it’s plugged into a power socket. The wizard keeps you permanently informed about the download progress.
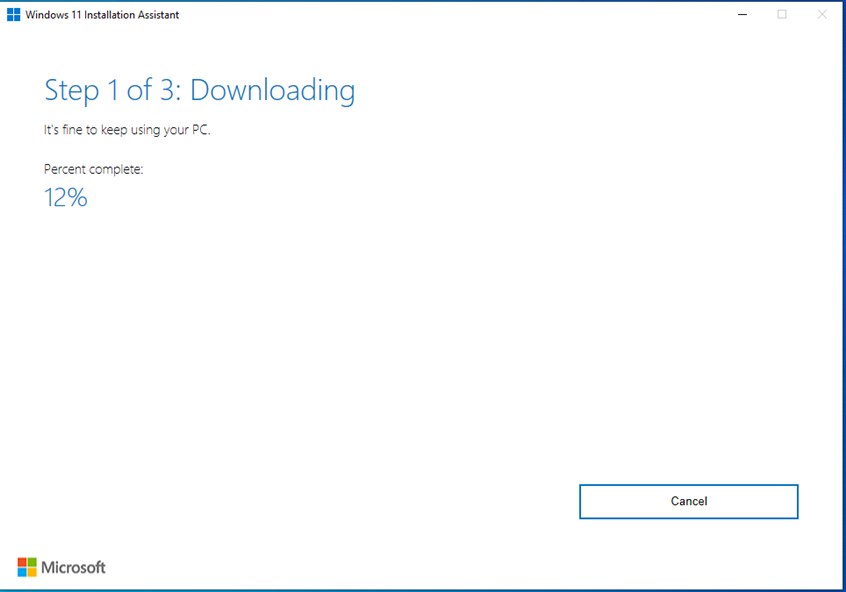 Windows 11 Installation Assistant is downloading the Windows 11 setup files
Once all the Windows 11 setup files are downloaded, the Windows 11 Installation Assistant checks their integrity before upgrading. Again, the progress is shown in percentages.
Windows 11 Installation Assistant is downloading the Windows 11 setup files
Once all the Windows 11 setup files are downloaded, the Windows 11 Installation Assistant checks their integrity before upgrading. Again, the progress is shown in percentages.
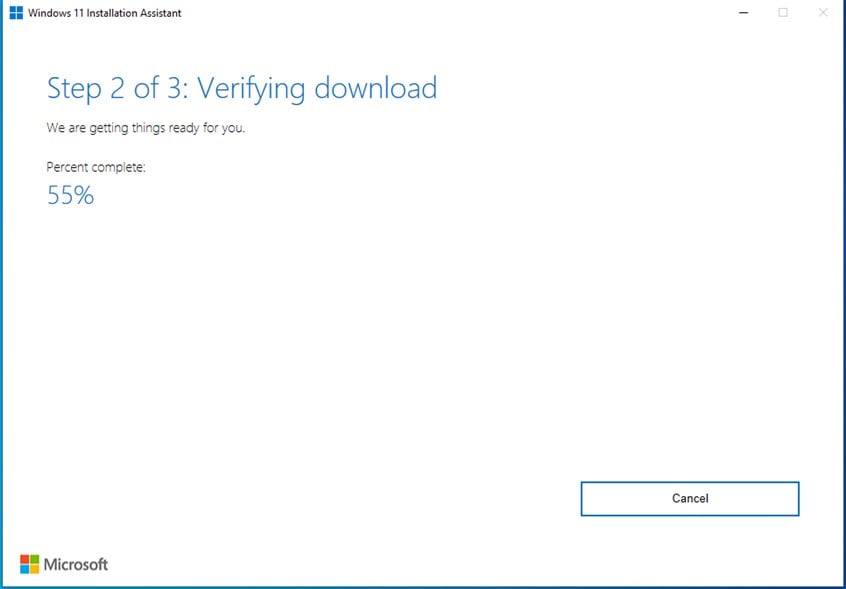
 Windows 11 Installation Assistant is verifying the download
The third step of the Windows 10 to Windows 11 upgrade is installing Windows 11. Keep in mind that the Windows 11 Installation Assistant is slow, especially during this step. The app installs Windows 11, makes a backup of Windows 10, and migrates all your apps and files from Windows 10 to Windows 11. This is bound to take some time, especially if you have been using Windows 10 for many years.
Windows 11 Installation Assistant is verifying the download
The third step of the Windows 10 to Windows 11 upgrade is installing Windows 11. Keep in mind that the Windows 11 Installation Assistant is slow, especially during this step. The app installs Windows 11, makes a backup of Windows 10, and migrates all your apps and files from Windows 10 to Windows 11. This is bound to take some time, especially if you have been using Windows 10 for many years.
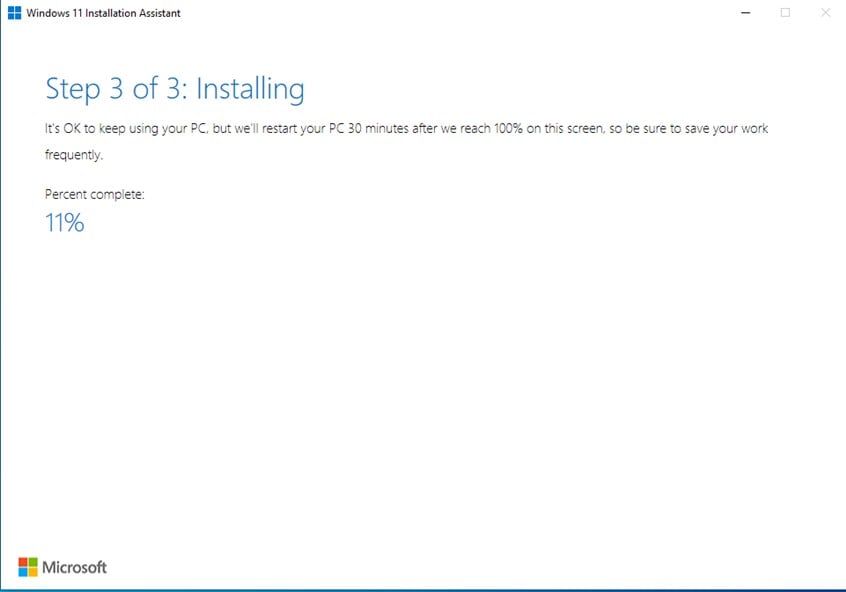 Windows 11 Installation Assistant is installing Windows 11
Another annoyance is that you can’t cancel this process and mustn’t close your PC or have it run out of power. The only thing you can do is minimize the Windows 11 Installation Assistant and use your computer normally. To restore the app, click the up arrow in the system tray (the bottom right corner of the taskbar) and the Windows icon.
Windows 11 Installation Assistant is installing Windows 11
Another annoyance is that you can’t cancel this process and mustn’t close your PC or have it run out of power. The only thing you can do is minimize the Windows 11 Installation Assistant and use your computer normally. To restore the app, click the up arrow in the system tray (the bottom right corner of the taskbar) and the Windows icon.
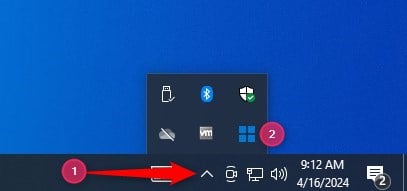
 How to restore Windows 11 Installation Assistant
When the third step ends, you are notified that “Your PC needs to restart to install Windows 11.” You can wait 30 minutes until your PC automatically reboots, or you can expedite the process by clicking or tapping Restart now. However, make sure that you close all your apps and files before doing that so you don’t lose anything.
How to restore Windows 11 Installation Assistant
When the third step ends, you are notified that “Your PC needs to restart to install Windows 11.” You can wait 30 minutes until your PC automatically reboots, or you can expedite the process by clicking or tapping Restart now. However, make sure that you close all your apps and files before doing that so you don’t lose anything.
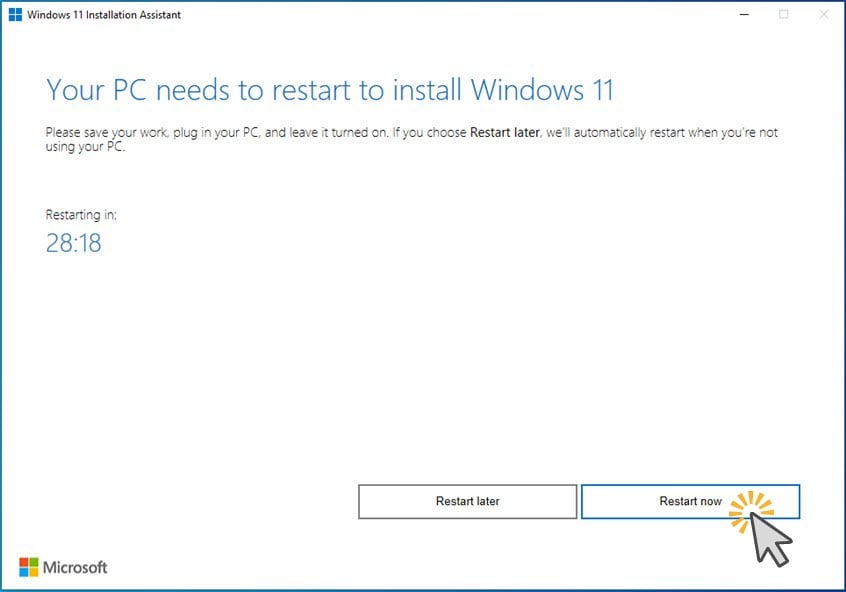 Choose Restart now
Windows 10 informs you that “You’re about to be signed out. Windows 11 Installation Assistant will reboot your device to complete the install.” Wait or press Close: it doesn’t matter because, after a minute or so, Windows 10 restarts your PC for the last time.
Choose Restart now
Windows 10 informs you that “You’re about to be signed out. Windows 11 Installation Assistant will reboot your device to complete the install.” Wait or press Close: it doesn’t matter because, after a minute or so, Windows 10 restarts your PC for the last time.
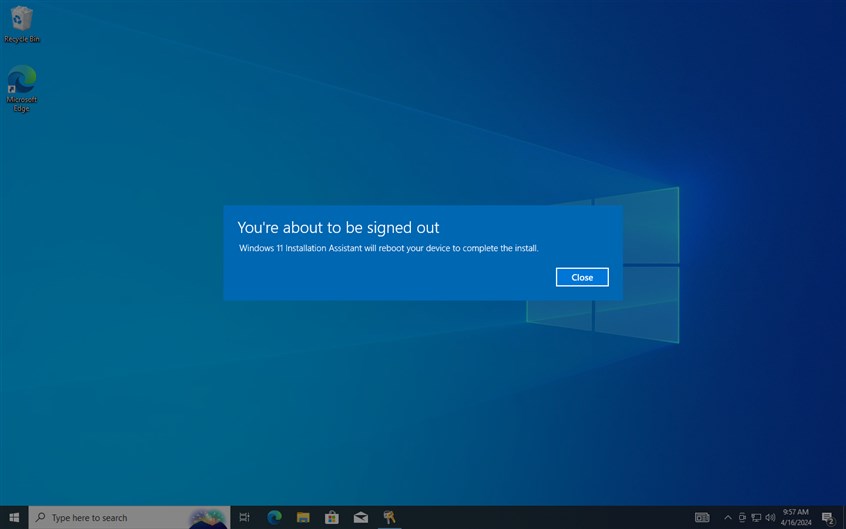
 You’re about to be signed out
After the reboot, the process of upgrading from Windows 10 to Windows 11 continues, and your PC might restart a couple more times. Wait for it to do its thing, and don’t power off your computer.
You’re about to be signed out
After the reboot, the process of upgrading from Windows 10 to Windows 11 continues, and your PC might restart a couple more times. Wait for it to do its thing, and don’t power off your computer.
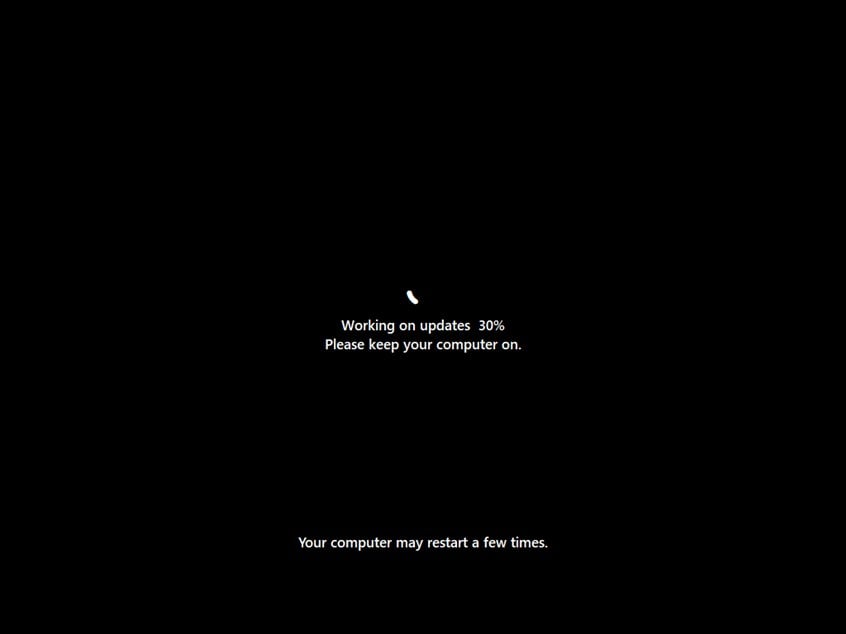
 Wait for the updates to be performed
After it’s done, you will see the Windows 11 Lock screen. Click or tap to see your sign-in options.
Wait for the updates to be performed
After it’s done, you will see the Windows 11 Lock screen. Click or tap to see your sign-in options.
 Welcome to the Windows 11 Lock screen
TIP: If you’re a multilingual user, here’s how to change the language on Windows’ lock screen.
Choose the user account you want to sign in with and enter the login information. As you can see, your user accounts have been migrated over from Windows 10 to Windows 11. Therefore, you can sign in to Windows 11 with the same accounts and passwords.
Welcome to the Windows 11 Lock screen
TIP: If you’re a multilingual user, here’s how to change the language on Windows’ lock screen.
Choose the user account you want to sign in with and enter the login information. As you can see, your user accounts have been migrated over from Windows 10 to Windows 11. Therefore, you can sign in to Windows 11 with the same accounts and passwords.
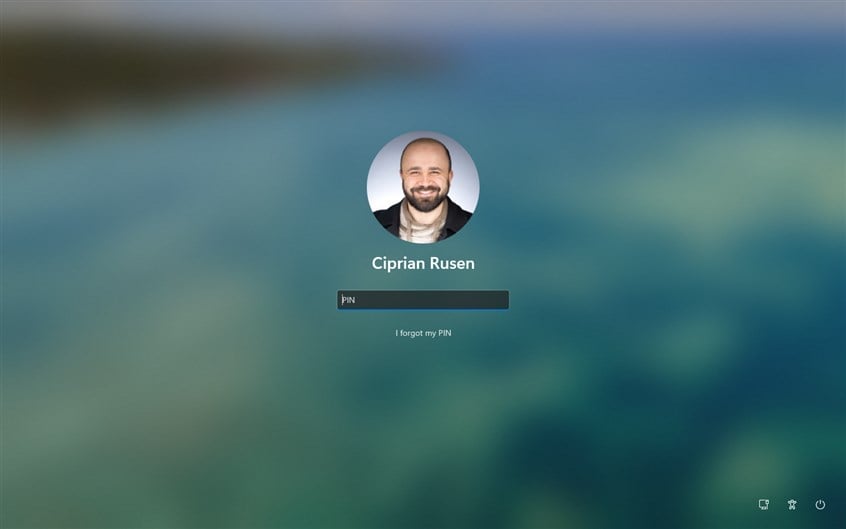 Sign in to Windows 11
Then, wait a few more minutes until Windows 11 makes its final updates.
Sign in to Windows 11
Then, wait a few more minutes until Windows 11 makes its final updates.
 Wait a few more minutes
Once everything’s set up, Windows 11 is up and running, and you see the desktop and the Start Menu. If you look carefully, you see a folder named Your Windows 10 Apps in the Start Menu. Inside, you’ll find the Windows 10 apps migrated to Windows 11.
Wait a few more minutes
Once everything’s set up, Windows 11 is up and running, and you see the desktop and the Start Menu. If you look carefully, you see a folder named Your Windows 10 Apps in the Start Menu. Inside, you’ll find the Windows 10 apps migrated to Windows 11.
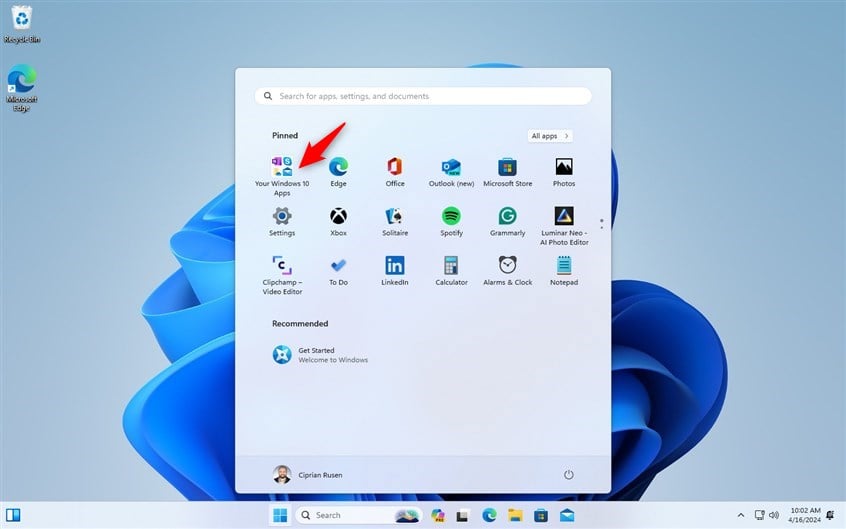 The Windows 11 Start Menu has a folder with Your Windows 10 Apps
If you open File Explorer and go to the C: drive, you’ll find a large folder called Windows.old. Here’s where your old Windows 10 is kept. Keep this folder if you haven’t decided whether to keep Windows 11. It will be used if you later choose to downgrade Windows 11 and roll it back to Windows 10.
The Windows 11 Start Menu has a folder with Your Windows 10 Apps
If you open File Explorer and go to the C: drive, you’ll find a large folder called Windows.old. Here’s where your old Windows 10 is kept. Keep this folder if you haven’t decided whether to keep Windows 11. It will be used if you later choose to downgrade Windows 11 and roll it back to Windows 10.
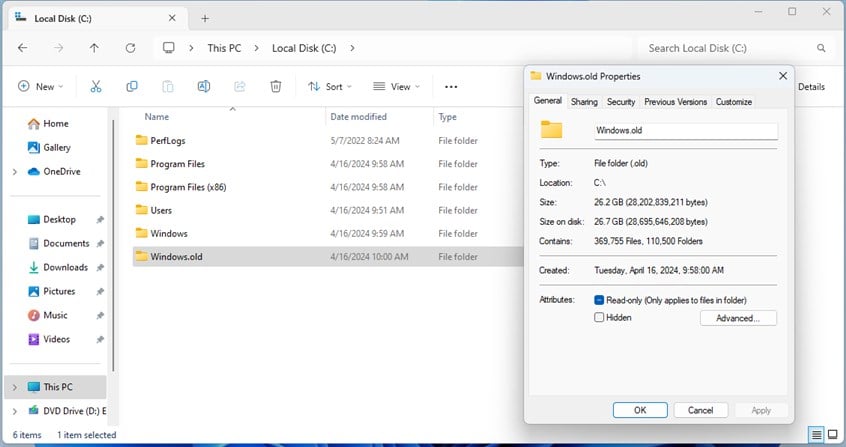
 Windows.old is where Windows 10 is kept
The upgrade process is complete; you can start using Windows 11. If you prefer the old-school interface setup, here’s how to move the Windows 11 Start Menu to the left.
Windows.old is where Windows 10 is kept
The upgrade process is complete; you can start using Windows 11. If you prefer the old-school interface setup, here’s how to move the Windows 11 Start Menu to the left.
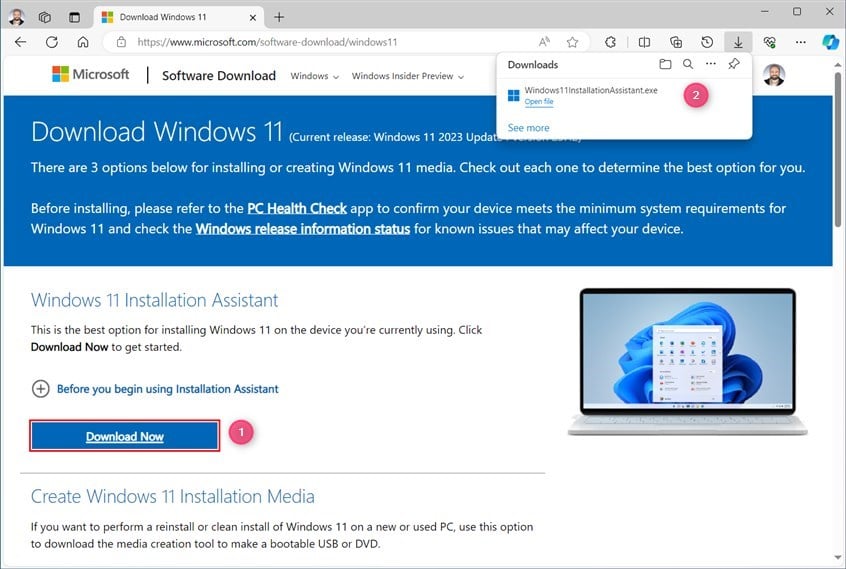
Step 1. Download the Windows 11 Installation Assistant and PC Health Check
Few people know that the Windows 11 Installation Assistant requires the PC Health Check app installed on your Windows 10 computer. The PC Health Check app is a free tool that verifies whether your computer meets the system requirements for Windows 11. Furthermore, to make the upgrade from Windows 10 to Windows 11, you need a Windows 10 license (product key), and you must use Windows 10 version 2004 or newer (May 2020 Update) to be able to run the Windows 11 Installation Assistant. If you don’t know which Windows 10 version you have, here’s how to check. Last but not least, you need at least 9 GB of free storage space on the C: drive of your Windows 10 computer so that the tool can download Windows 11 and upgrade to it. 🙂 To download both tools, open your favorite web browser and go to Download Windows 11. Find the “Windows 11 Installation Assistant” section and click or tap on the Download Now button. This action triggers the download of a tiny 3.98 MB executable file called Windows11InstallationAssistant.exe. Save it anywhere you want on your Windows 10 computer or device.Step 2. Run PC Health Check
Before running Windows11InstallationAssistant.exe, you should first run the WindowsPCHealthCheckSetup.msi file so that the PC Health Check app can verify whether your Windows 10 computer is compatible with Windows 11. If you don’t do this now, the Windows 11 Installation Assistant will force you to do it later. Therefore, open File Explorer, go to the Downloads folder and run WindowsPCHealthCheckSetup.msi.Step 3. Upgrade from Windows 10 to Windows 11 with the Installation Assistant
Now, you can finally proceed with the upgrade process. Run the Windows11InstallationAssistant.exe file, and when you see a UAC prompt, click or tap Yes.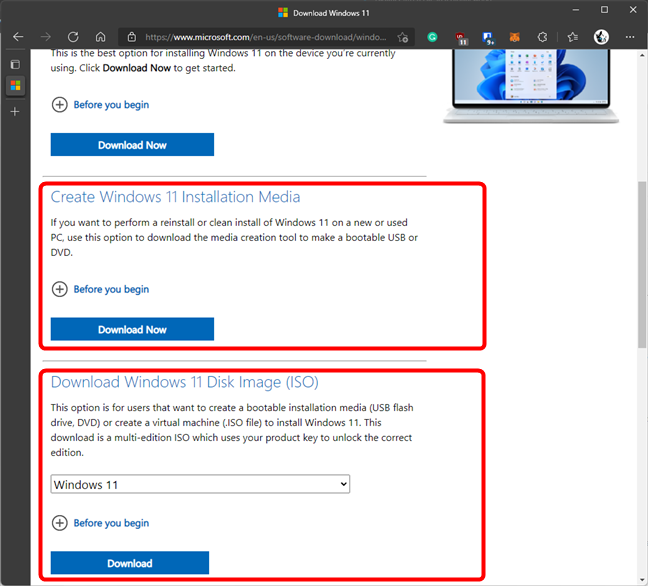


Discussion (1)
I upgraded from Windows 10 to Windows 11 (the production version, not an early release). I downloaded an ISO file of the installer and ran that. It installed smoothly and my machine was activated with a digital licence. All very good. I then did another download and created a bootable USB key with the installer. I booted from this USB key and then formatted the Windows partition and installed Windows 11 as a cold install. It installed in about 5 minutes (I have a fast machine) and then about 10 minutes of silly questions and we were good to go.
Like many people I have my favourite programs and apps. So I set about installing these and then my troubles began. I installed my Office 13 which I have had for many years and has worked very well. It installed and activated but Word 2013 did not look like it did on Win 10. I then found out that Office 2013 is no longer supported. I’m still working out what I’ll do about that. Then the real fun begins. I have a favourite program for showing images (Irfanview) so I set about installing it. I set it up and then told it what file extensions that it could use by default. I then looked at a JPG file and it opened with MS Photos. I thought that I can fix that, but no, there is no capability for setting a default for JPG, JPEG, and PNG files. I then thought that I would install my favourite browser, Chrome. I found a similar problem. It could be done but making it a default was very tedious.
My conclusion is that Windows 11 is great if you wish to use the Microsoft provided programs and apps but not if you are more independent. Microsoft must be getting very close to behaving like a monopoly here. This could be a target for the EU regulators. I retreated and I am now firmly back in the Windows 10 camp and I’ll stay there until Windows 11 becomes more friendly to people such as me.
For those people who might wonder that this approach of mine is a lot of work it is not. My machine is dual booted. It originally had two partitions of Windows 10 Pro. It now has one of Windows 10 Pro and one of Windows 11 Pro. I have not given up completely on Windows 11. I will boot it up occasionally and apply updates and see if it behaves better. Of course, all of these problems could be due to early development and rough edges. We shall see but, for now, I am very productive on Windows 10.