


The best way to test a new operating system without putting your computers at risk is to install and try it on a virtual machine. That’s also true about Windows 11, Microsoft’s brand-new operating system, which, although nice and shiny, comes with plenty of changes and has its share of bugs. Unfortunately, as you already know, it also has some steep system requirements, like Secure Boot and the need for a TPM 2.0 chip installed, which is something that older versions of free virtual machine players could not handle until recently. However, the latest version of VMware Workstation 17 Player, as well as the latest Oracle VirtualBox 7, now supports Windows 11 virtual machines by default. Here’s how to install Windows 11 on a virtual machine:
 Install VMware Workstation Player 17 Free
Fire up VMware Workstation Player Free on your computer. In its window, click or tap on “Create a New Virtual Machine.”
Install VMware Workstation Player 17 Free
Fire up VMware Workstation Player Free on your computer. In its window, click or tap on “Create a New Virtual Machine.”

 Create a new virtual machine in VMware Workstation Player Free
Choose “Installer disc image file (iso)” in the “New Virtual Machine Wizard” window, and then click or tap Browse. Next, navigate to the location of the Windows 11 ISO file you downloaded earlier and select it.
Create a new virtual machine in VMware Workstation Player Free
Choose “Installer disc image file (iso)” in the “New Virtual Machine Wizard” window, and then click or tap Browse. Next, navigate to the location of the Windows 11 ISO file you downloaded earlier and select it.
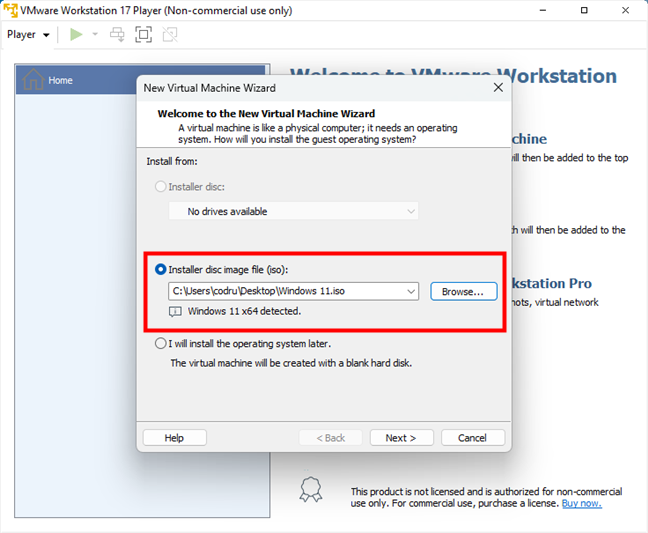 Select the installer disc image file (iso)
Enter a name for the Windows 11 virtual machine and choose the folder location where you want to save its files on your computer. Then, press Next.
Select the installer disc image file (iso)
Enter a name for the Windows 11 virtual machine and choose the folder location where you want to save its files on your computer. Then, press Next.
 Enter a name and a location for the virtual machine
Next, VMware Workstation Player detects that you want to install Windows 11 on the virtual machine. As a consequence, because this operating system has special requirements, you’re notified that “This Guest OS requires an encrypted Trusted Platform Module to operate.” This requires the virtual machine to be encrypted, which means you’ll need to configure a password for it. Furthermore, you’ll have to choose how to encrypt the virtual machine: “All the files” or “Only the files needed to support a TPM are encrypted.” Select the option you prefer and enter a password you’ll remember. While you can set VMware Workstation Player to “Remember the password on this machine in Credential Manager,” if you’ll move the virtual machine to another computer and forget the password you set, you won’t be able to access it anymore. When you’re done, press Next.
Enter a name and a location for the virtual machine
Next, VMware Workstation Player detects that you want to install Windows 11 on the virtual machine. As a consequence, because this operating system has special requirements, you’re notified that “This Guest OS requires an encrypted Trusted Platform Module to operate.” This requires the virtual machine to be encrypted, which means you’ll need to configure a password for it. Furthermore, you’ll have to choose how to encrypt the virtual machine: “All the files” or “Only the files needed to support a TPM are encrypted.” Select the option you prefer and enter a password you’ll remember. While you can set VMware Workstation Player to “Remember the password on this machine in Credential Manager,” if you’ll move the virtual machine to another computer and forget the password you set, you won’t be able to access it anymore. When you’re done, press Next.
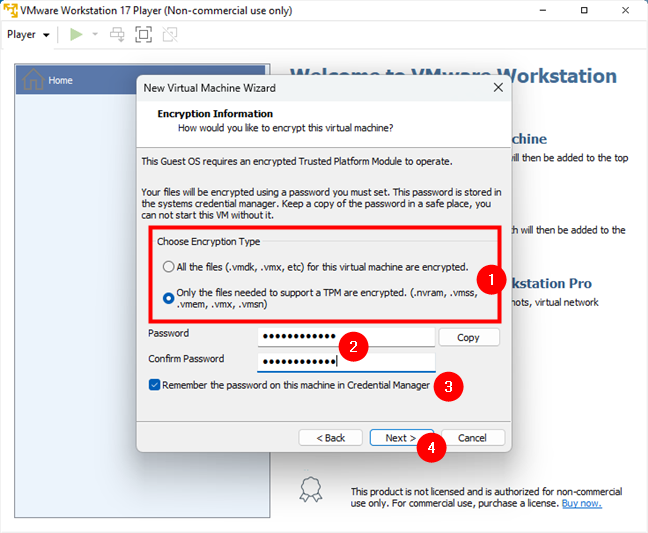 Choose the encryption type
VMware Workstation Player Free now asks you to Specify Disk Capacity for the Windows 11 virtual machine. Enter 64 GB or more, but not less, as this is the minimum free disk space required by Microsoft for Windows 11. Then, choose whether to “Store virtual disk as a single file” or “Split virtual disk into multiple files,” and press Next.
Choose the encryption type
VMware Workstation Player Free now asks you to Specify Disk Capacity for the Windows 11 virtual machine. Enter 64 GB or more, but not less, as this is the minimum free disk space required by Microsoft for Windows 11. Then, choose whether to “Store virtual disk as a single file” or “Split virtual disk into multiple files,” and press Next.
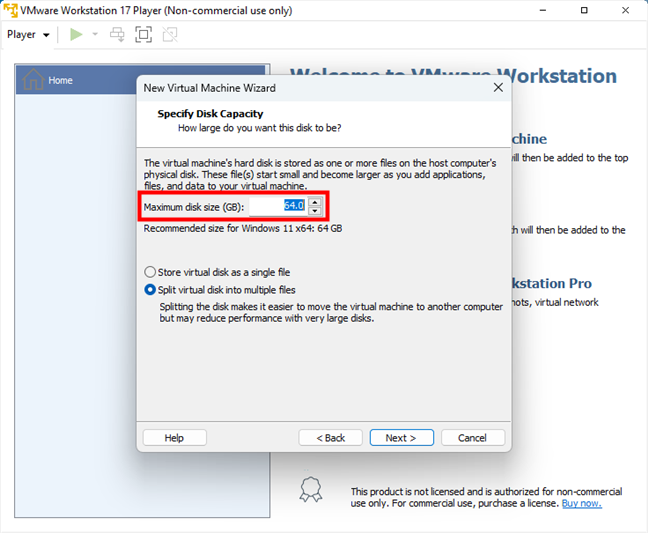 Set the size of the virtual machine drive to at least 64GB
On the next step of the Windows 11 virtual machine configuration wizard, you might be tempted to press Finish thinking you’re done. But don’t do that yet, as you still need to adjust a few settings:
When VMware Workstation Player Free says that it’s “Ready to Create Virtual Machine,” click or tap on Customize Hardware, not on Finish.
Set the size of the virtual machine drive to at least 64GB
On the next step of the Windows 11 virtual machine configuration wizard, you might be tempted to press Finish thinking you’re done. But don’t do that yet, as you still need to adjust a few settings:
When VMware Workstation Player Free says that it’s “Ready to Create Virtual Machine,” click or tap on Customize Hardware, not on Finish.
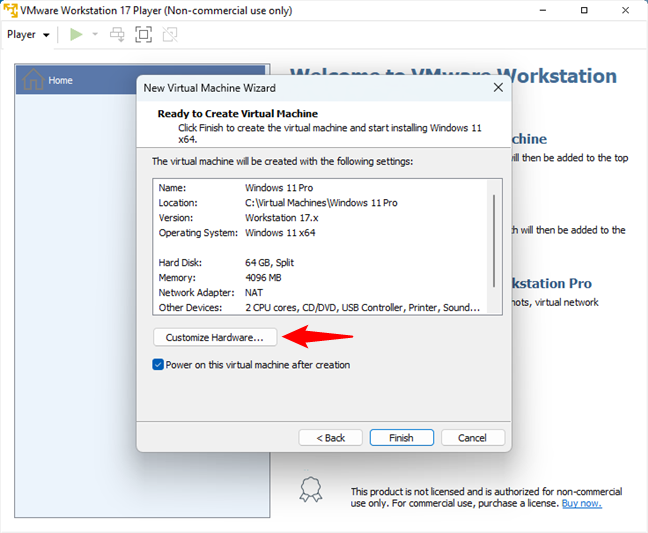 Click or tap on Customize Hardware
This opens VMware Workstation Player’s Hardware window. In it, select Memory on the left and increase the amount of RAM allocated to the Windows 11 virtual machine to at least 4 GB (4096 MB).
Click or tap on Customize Hardware
This opens VMware Workstation Player’s Hardware window. In it, select Memory on the left and increase the amount of RAM allocated to the Windows 11 virtual machine to at least 4 GB (4096 MB).
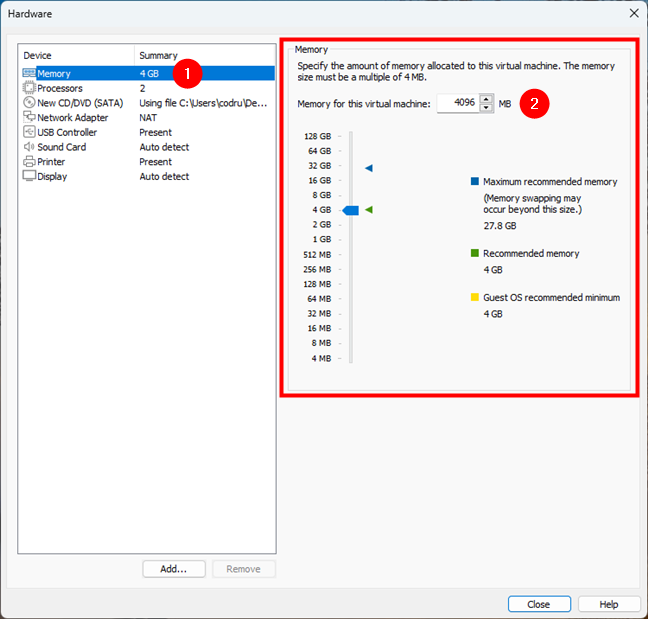
 Allocate at least 4 GB of RAM for the virtual machine
If you have a powerful processor, you might also want to increase the number of CPU cores allocated to the Windows 11 virtual machine. However, that’s not mandatory, as VMware Workstation Player Free gives it two cores by default, which is the minimum required by Windows 11.
Allocate at least 4 GB of RAM for the virtual machine
If you have a powerful processor, you might also want to increase the number of CPU cores allocated to the Windows 11 virtual machine. However, that’s not mandatory, as VMware Workstation Player Free gives it two cores by default, which is the minimum required by Windows 11.
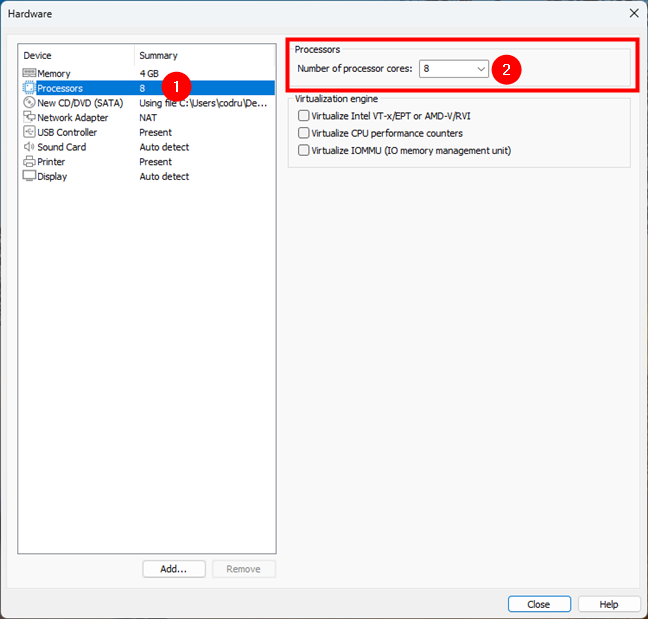 Set the number of CPU cores available to the virtual machine (at least 2)
You can leave the other settings as they are or customize them to your liking. Once you’re done, click or tap the Close button at the bottom-right corner of the Hardware window and then the Finish button in the “Ready to Create Virtual Machine” window.
Set the number of CPU cores available to the virtual machine (at least 2)
You can leave the other settings as they are or customize them to your liking. Once you’re done, click or tap the Close button at the bottom-right corner of the Hardware window and then the Finish button in the “Ready to Create Virtual Machine” window.
 Click or tap the Finish button
Wait for VMware Workstation Player to create the disk for your Windows 11 virtual machine.
Click or tap the Finish button
Wait for VMware Workstation Player to create the disk for your Windows 11 virtual machine.
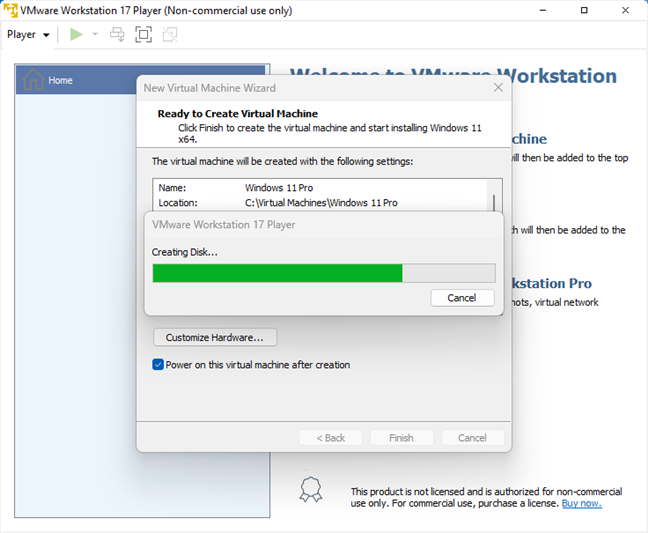 Wait for the Windows 11 virtual machine disk to be created
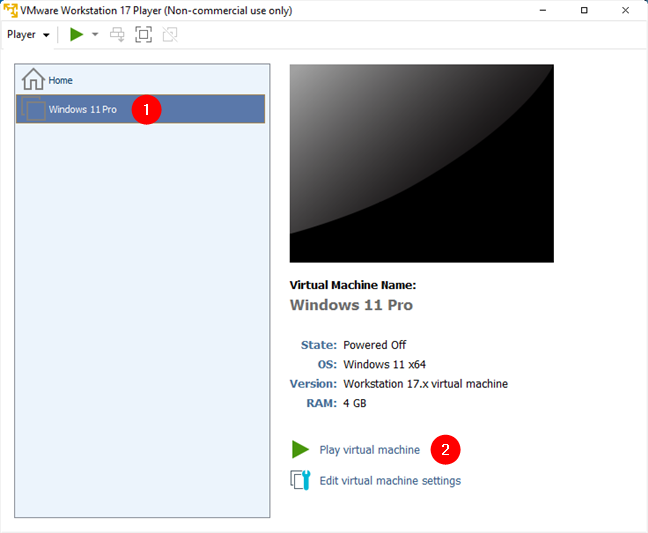
Once that’s done, you return to the VMware Workstation Player Free dashboard, where the Windows 11 virtual machine is created and listed on the left side of the window. To start it, double-click on its name on the left, or select it first and then click/tap “Play virtual machine” on the right.
Wait for the Windows 11 virtual machine disk to be created
Once that’s done, you return to the VMware Workstation Player Free dashboard, where the Windows 11 virtual machine is created and listed on the left side of the window. To start it, double-click on its name on the left, or select it first and then click/tap “Play virtual machine” on the right.
 Start the virtual machine in VMware Workstation Player
Then, the virtual machine starts from the ISO file and loads the Windows 11 installation wizard. All there’s left for you to do right now is install Windows 11 like you normally would on any PC.
Start the virtual machine in VMware Workstation Player
Then, the virtual machine starts from the ISO file and loads the Windows 11 installation wizard. All there’s left for you to do right now is install Windows 11 like you normally would on any PC.
 Install Oracle VirtualBox 7
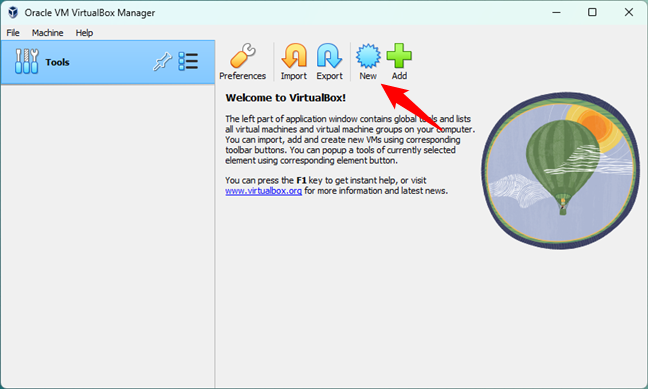
Once you’ve installed it, launch VirtualBox and, in its window, click or tap the New button from the right-hand panel.
Install Oracle VirtualBox 7
Once you’ve installed it, launch VirtualBox and, in its window, click or tap the New button from the right-hand panel.
 Create a new virtual machine in Oracle VirtualBox
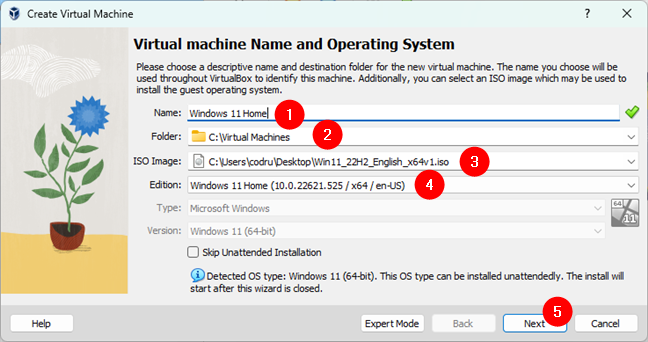
This loads a new window called “Virtual machine Name and Operating System,” where you should do the following:
Create a new virtual machine in Oracle VirtualBox
This loads a new window called “Virtual machine Name and Operating System,” where you should do the following:
 Configure the virtual machine and Windows 11
If you went through with the unattended installation of Windows 11, on the next step, enter all the details presented earlier.
Configure the virtual machine and Windows 11
If you went through with the unattended installation of Windows 11, on the next step, enter all the details presented earlier.
 Continue to configure the operating system
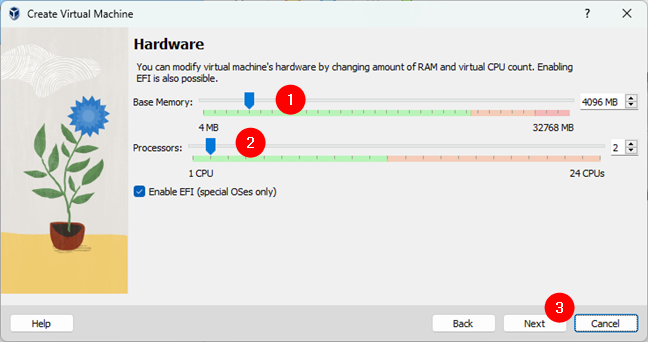
Next, VirtualBox shows you how much memory and how many processor cores are allocated to the virtual machine. By default, it gets the minimum system requirements: 4 GB of RAM and 2 processor cores. However, if you want, you can allocate more memory and more cores, depending on your computer’s hardware.
Continue to configure the operating system
Next, VirtualBox shows you how much memory and how many processor cores are allocated to the virtual machine. By default, it gets the minimum system requirements: 4 GB of RAM and 2 processor cores. However, if you want, you can allocate more memory and more cores, depending on your computer’s hardware.
 Adjust memory and processor cores used by the VM
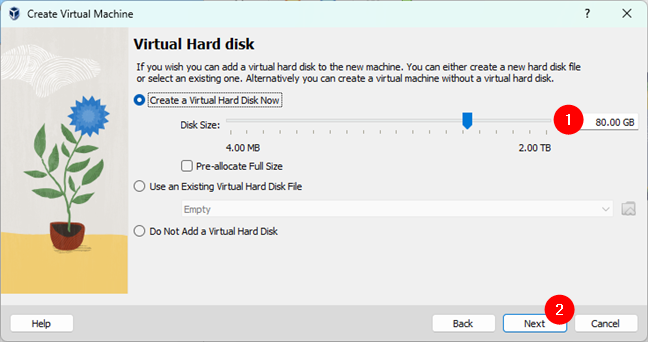
You’ll also have to specify the size of the virtual machine’s hard disk drive. VirtualBox sets a standard size of 80 GB, which is more than the minimum Windows 11 requirement of 64 GB. If you want, you can either decrease this value or increase it to expand the virtual machine’s drive capacity.
Adjust memory and processor cores used by the VM
You’ll also have to specify the size of the virtual machine’s hard disk drive. VirtualBox sets a standard size of 80 GB, which is more than the minimum Windows 11 requirement of 64 GB. If you want, you can either decrease this value or increase it to expand the virtual machine’s drive capacity.
 Create a virtual disk drive for the virtual machine
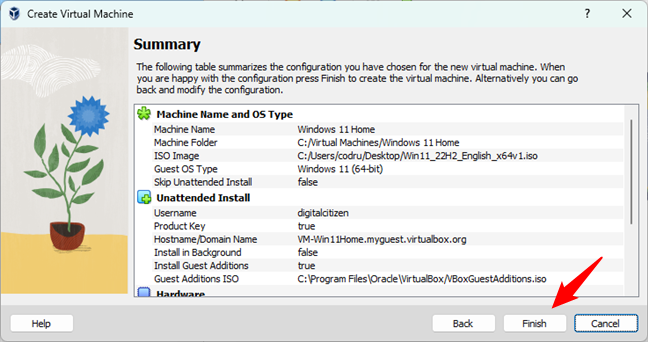
In the end, VirtualBox shows a summary of all the settings you’ve made for your new Windows 11 virtual machine. Check them, and if you want to change anything, press the Back button to return to the previous steps of the wizard. Otherwise, click or tap the Finish button.
Create a virtual disk drive for the virtual machine
In the end, VirtualBox shows a summary of all the settings you’ve made for your new Windows 11 virtual machine. Check them, and if you want to change anything, press the Back button to return to the previous steps of the wizard. Otherwise, click or tap the Finish button.
 Press the Finish button
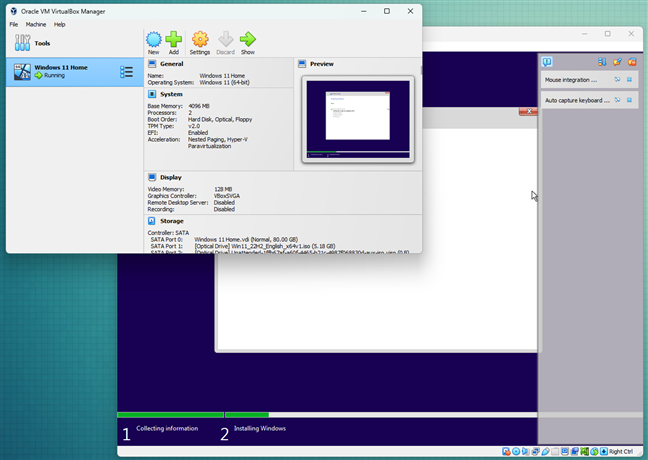
As soon as you’ve clicked on Finish, VirtualBox creates and starts the Windows 11 virtual machine. Next, you can watch Windows 11 getting installed on the virtual machine.
Press the Finish button
As soon as you’ve clicked on Finish, VirtualBox creates and starts the Windows 11 virtual machine. Next, you can watch Windows 11 getting installed on the virtual machine.
 Start the virtual machine and install Windows 11
That’s it!
Start the virtual machine and install Windows 11
That’s it!
 Download a free virtual machine from Microsoft
Regardless of what virtual machine you choose to download, when the web browser prompts you, save it somewhere on your computer.
Download a free virtual machine from Microsoft
Regardless of what virtual machine you choose to download, when the web browser prompts you, save it somewhere on your computer.

 Save the virtual machine file on your PC
Once the download is complete, open the location where you saved the virtual machine. There, you’ll find a ZIP archive bearing the name of that virtual machine. Extract its contents to the folder where you want to keep the virtual machine on your computer.
Save the virtual machine file on your PC
Once the download is complete, open the location where you saved the virtual machine. There, you’ll find a ZIP archive bearing the name of that virtual machine. Extract its contents to the folder where you want to keep the virtual machine on your computer.
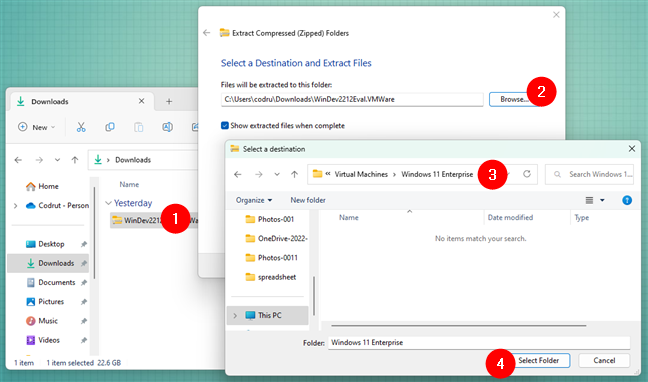
 Extract the contents of the ZIP file
Next, use File Explorer to get to the location where you extracted the virtual machine and double-click or double-tap on its main file. It’s easy to identify because it should be the only one with a custom icon. For example, if you downloaded a virtual machine for VMware Workstation Player, open the WinDev[xxxx]Eval.ovf file. If you got the VirtualBox virtual machine, launch the WinDev[xxxx]Eval.ova file.
Extract the contents of the ZIP file
Next, use File Explorer to get to the location where you extracted the virtual machine and double-click or double-tap on its main file. It’s easy to identify because it should be the only one with a custom icon. For example, if you downloaded a virtual machine for VMware Workstation Player, open the WinDev[xxxx]Eval.ovf file. If you got the VirtualBox virtual machine, launch the WinDev[xxxx]Eval.ova file.
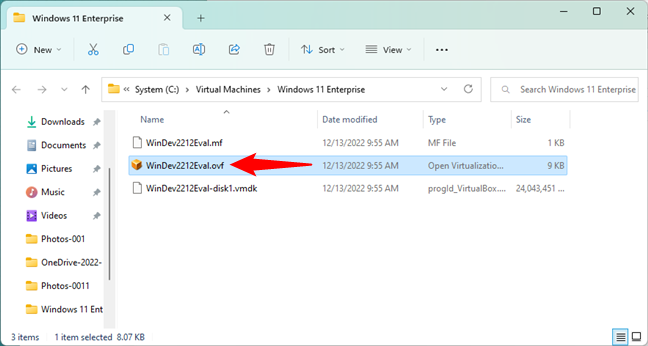
 Open the main file of the virtual machine
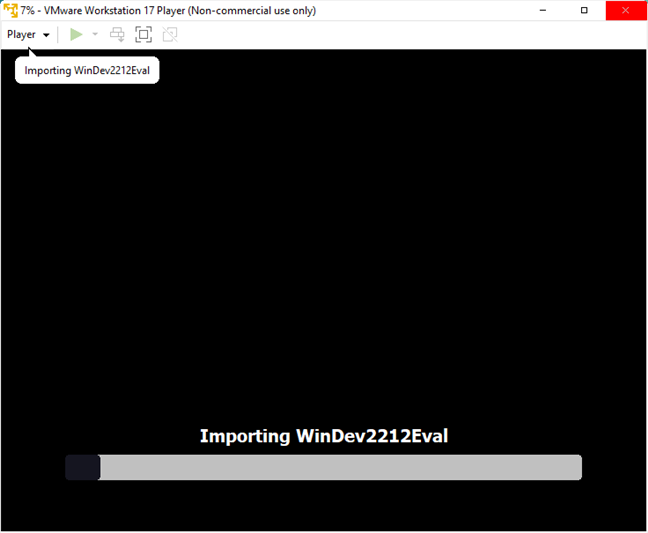
As soon as you do that, your VM software will trigger the import wizard. Follow its steps if you want to customize the hardware settings of the virtual machine, or simply press Import/Finish to immediately begin importing the free Windows 11 virtual machine in your favorite VM software.
Open the main file of the virtual machine
As soon as you do that, your VM software will trigger the import wizard. Follow its steps if you want to customize the hardware settings of the virtual machine, or simply press Import/Finish to immediately begin importing the free Windows 11 virtual machine in your favorite VM software.
 Wait for your VM software to import the virtual machine
When the import is over, you can start using your new Windows 11 virtual machine. It’s as simple as that.
Wait for your VM software to import the virtual machine
When the import is over, you can start using your new Windows 11 virtual machine. It’s as simple as that.
How to install Windows 11 on a virtual machine
The first step for installing Windows 11 on a virtual machine is to get the right tools. Use your web browser to download Windows 11. Then, you’ll need a good VM application. For now, the best VM apps for Windows 11 are VMware Workstation Player and VirtualBox, both free for personal use.How to install Windows 11 in a virtual machine with VMware Workstation 17 Player (Free)
First, use your web browser to download VMware Workstation Player. Then, install it on your computer. Make sure it’s version 17 or newer, not older. Otherwise, the steps described in this guide won’t work.How to install Windows 11 in a virtual machine using Oracle’s VirtualBox 7 (Free)
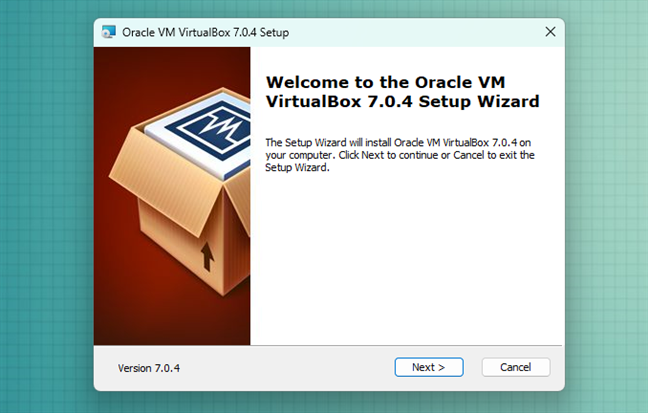
If you prefer Oracle’s VirtualBox 7 as your virtual machine application, first download and install it on your PC. Just like with VMware, make sure you’re installing version 7 or newer, not older.- In the Name field, enter a name for your virtual machine;
- Use the Folder field to choose a folder on your computer where you’d like to store the VM files;
- Click or tap on the ISO image field, select Other and browse through your computer to specify the location of the Windows 11 ISO image file you’ll be using;
- In the Edition field, choose the edition of Windows 11 you want to install.
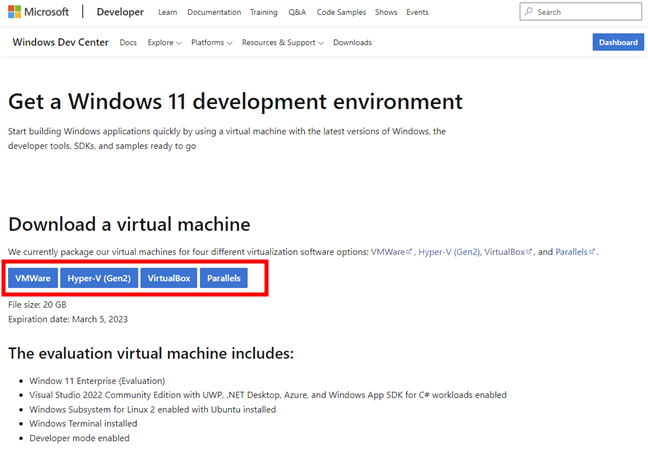
How to download and install a free Windows 11 virtual machine from Microsoft
There’s a different and maybe easier way to install Windows 11 on a virtual machine: download and use a free Windows 11 virtual machine directly from Microsoft. The company creates and regularly updates such virtual machines with Windows 11 with the intention of providing them to developers. However, regular users can use them too. These free virtual machines from Microsoft use Windows 11 Enterprise (Evaluation) and are preconfigured with a couple of additional software for developers, such as Visual Studio 2022 Community Edition, Windows Subsystem for Linux 2 with Ubuntu, Windows Terminal, and Developer Mode. The virtual machines can be used for free until March 5, 2023, after which they will need to be activated if you still want to use them. However, there’s nothing stopping you from deleting your old virtual machines, downloading the new ones on Microsoft’s website, and reinstalling them to get another period of free use. If you want to get a free Windows 11 virtual machine from Microsoft, head to this webpage: Get a Windows 11 development environment and, in the Download a virtual machine section, click/tap the link corresponding to the type of virtual machine you want (VMware, Hyper-V Gen 2, VirtualBox, or Parallels).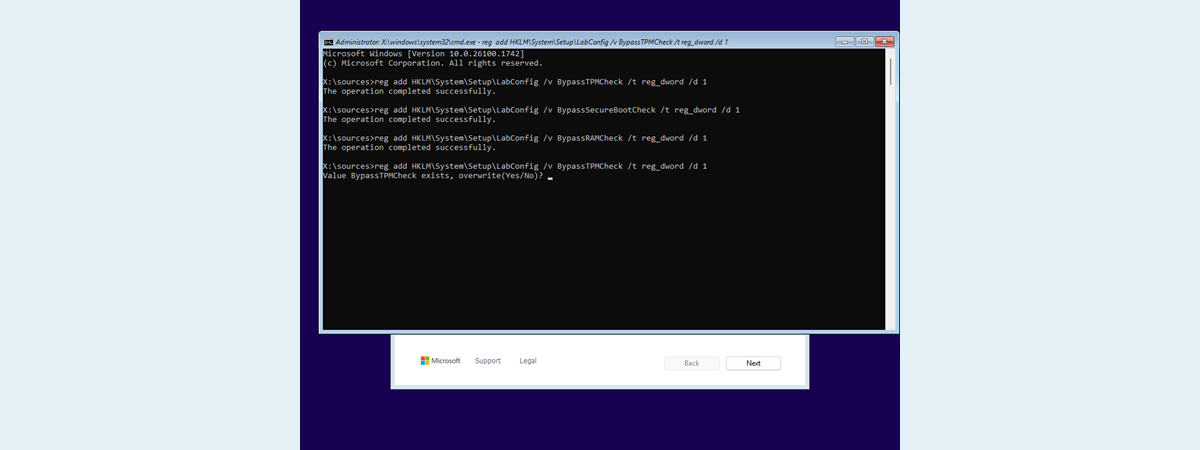
Discussion (7)
Created win 11 with vmware 17 player using your easy tutorial. –> Thanks!
Happy to have helped.
Complicated, complex. Commands in the VM must be written manually, cannot be copied and pasted.
Use “rufus-3.21.exe” to create a boot flash. Create a folder “ISO_Files” in the local drive “C”, copy the contents of the flash into it. Download the file “oscdimg.exe” and put it in system32.
Open CMD as Administrator and enter this command there:
oscdimg -m -o -u2 -udfver102 -bootdata:2#p0,e,b”c:\ISO_Files\boot\etfsboot.com”#pEF,e,b”c:\ISO_Files\efi\microsoft\boot\efisys .bin” “c:\ISO_Files” “c:\Win11.iso”
In “C” you will have a modified ISO that can be installed on any PC or Notebook!
The steps to create a Windows 11 VM on VMWare Player Workstation worked perfectly.
Thank you for that!
We’re glad to help. If you want to keep in touch with our latest content, don’t hesitate to subscribe to our newsletter: https://www.digitalcitizen.life/newsletter/
What about the processor generation requirement?
Hi, you should be able to bypass the CPU check using this command:
REG ADD "HKLM\SYSTEM\Setup\LabConfig" /v "BypassCPUCheck" /t REG_DWORD /d 1 /f