

The latest update for Windows 11, version 24H2, is now available for download and installation. This update introduces numerous features and improvements, including a new setup wizard. Consequently, the procedure for installing Windows 11 has changed, offering different options for partitioning your computer and a new personalization wizard. If you need assistance downloading and installing Windows 11, whether from a USB drive, DVD, or ISO file, read this guide:
 Windows 10 Update tells you whether you can upgrade to Windows 11
If you want to make a clean Windows 11 installation, continue reading this guide and all the instructions shared below.
If you’re installing Windows 11 on a computer with no operating system installed or an operating system other than Windows 10, read all the minimum Windows 11 system requirements. You can also use the PC Health Check app to check whether your computer is compatible with Windows 11. If your computer doesn’t meet the system requirements, read this guide: How to install Windows 11 on unsupported hardware.
If your computer or device works with Windows 11, you can download the latest Windows 11 setup file directly from Microsoft, or you can use any of the sources presented in this guide: How to download Windows 11 for free.
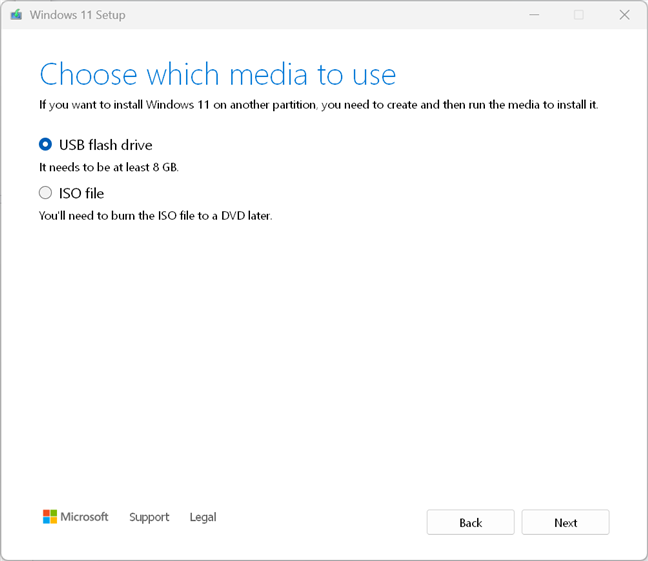
Once you have a Windows 11 ISO file, use a tool like Rufus to create a bootable USB memory stick with the necessary installation files. You can also use Microsoft’s Media Creation Tool to create a USB stick with the Windows 11 setup files.
Windows 10 Update tells you whether you can upgrade to Windows 11
If you want to make a clean Windows 11 installation, continue reading this guide and all the instructions shared below.
If you’re installing Windows 11 on a computer with no operating system installed or an operating system other than Windows 10, read all the minimum Windows 11 system requirements. You can also use the PC Health Check app to check whether your computer is compatible with Windows 11. If your computer doesn’t meet the system requirements, read this guide: How to install Windows 11 on unsupported hardware.
If your computer or device works with Windows 11, you can download the latest Windows 11 setup file directly from Microsoft, or you can use any of the sources presented in this guide: How to download Windows 11 for free.
Once you have a Windows 11 ISO file, use a tool like Rufus to create a bootable USB memory stick with the necessary installation files. You can also use Microsoft’s Media Creation Tool to create a USB stick with the Windows 11 setup files.
 Create a bootable USB drive with the Windows 11 setup from Media Creation Tool
If you’re using an ISO file with the Windows 11 installation, and want to install the operating system in a virtual machine, follow this guide instead: How to install Windows 11 on a virtual machine, which provides specific step-by-step instructions.
Before you start, you should also have your Windows 10 or Windows 11 product key ready. You need it to activate the operating system during the installation process or afterwards. If you need help recovering your product key, read this guide: How to find your Windows product key.
If you just want to try it for a while, you can install Windows 11 for free, before deciding whether to stick to it and buy a genuine product key. Windows 11 doesn't require a product key to install, and you can skip the step of providing a product key. I have more details in the installation guide below.
If you’re installing Windows 11 on a PC that previously had an activated copy of Windows 10 or Windows 11, you can skip providing a product key. When Windows 11 finishes installing, the operating system should detect your previous Windows 10 or Windows 11 license and automatically activate Windows 11 for free. So, if the question on your mind was “Can I install Windows 11 for free?”, yes, you can!
Create a bootable USB drive with the Windows 11 setup from Media Creation Tool
If you’re using an ISO file with the Windows 11 installation, and want to install the operating system in a virtual machine, follow this guide instead: How to install Windows 11 on a virtual machine, which provides specific step-by-step instructions.
Before you start, you should also have your Windows 10 or Windows 11 product key ready. You need it to activate the operating system during the installation process or afterwards. If you need help recovering your product key, read this guide: How to find your Windows product key.
If you just want to try it for a while, you can install Windows 11 for free, before deciding whether to stick to it and buy a genuine product key. Windows 11 doesn't require a product key to install, and you can skip the step of providing a product key. I have more details in the installation guide below.
If you’re installing Windows 11 on a PC that previously had an activated copy of Windows 10 or Windows 11, you can skip providing a product key. When Windows 11 finishes installing, the operating system should detect your previous Windows 10 or Windows 11 license and automatically activate Windows 11 for free. So, if the question on your mind was “Can I install Windows 11 for free?”, yes, you can!

 Press any key to boot from your USB drive or DVD
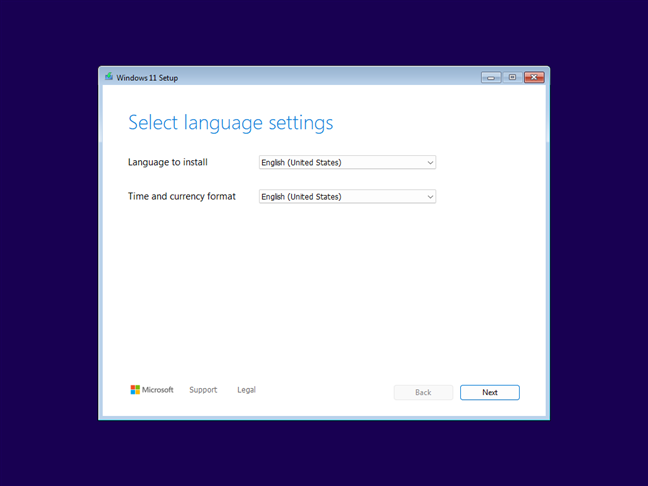
The Windows 11 Setup wizard starts and asks you to select the language you want to install. Click on the appropriate drop-down list and select the language you want. Then, choose the Time and currency format, and press Next.
Press any key to boot from your USB drive or DVD
The Windows 11 Setup wizard starts and asks you to select the language you want to install. Click on the appropriate drop-down list and select the language you want. Then, choose the Time and currency format, and press Next.
 Choose the language and the time and currency format you want to use
Then, you’re asked to select the keyboard language you want to use. Choose it from the Keyboard or input method drop-down list, and click or tap Next.
Choose the language and the time and currency format you want to use
Then, you’re asked to select the keyboard language you want to use. Choose it from the Keyboard or input method drop-down list, and click or tap Next.
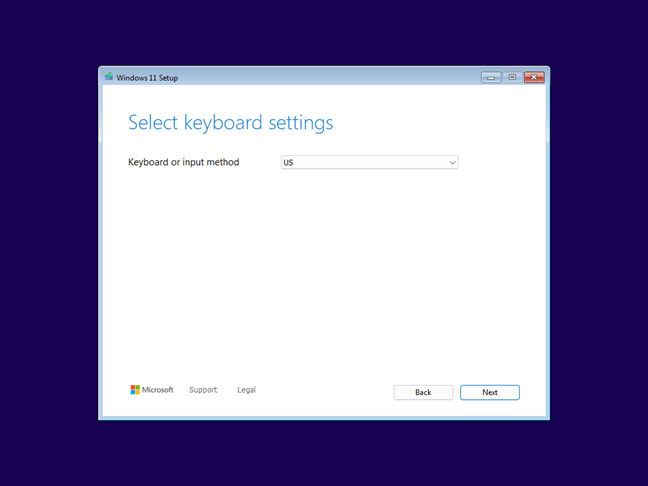 Select the keyboard you want to use
You are asked what you want to do:
Select the keyboard you want to use
You are asked what you want to do:
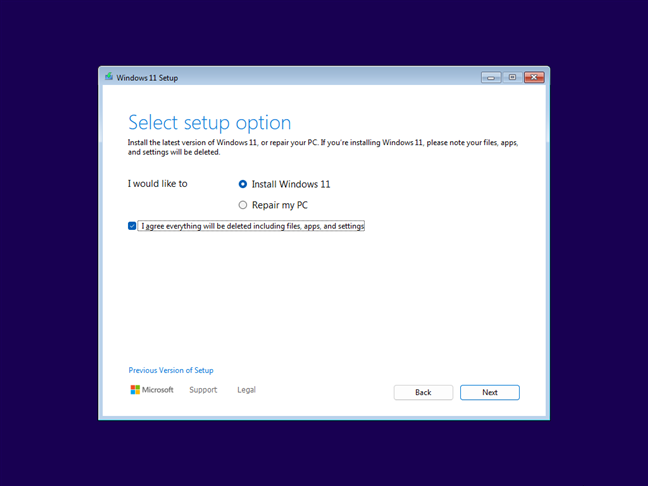 Choose what you would like to do
The Windows 11 Setup asks you to enter a product key. If you’re reinstalling Windows 11 or previously had a Windows 10 copy installed on this PC, click or tap “I don't have a product key.” Your Windows 11 will automatically activate after you finish installing it. Do the same if you want to try Windows 11 for free, without buying it right now. If you have a product key, type it carefully, and then click or tap Next.
Choose what you would like to do
The Windows 11 Setup asks you to enter a product key. If you’re reinstalling Windows 11 or previously had a Windows 10 copy installed on this PC, click or tap “I don't have a product key.” Your Windows 11 will automatically activate after you finish installing it. Do the same if you want to try Windows 11 for free, without buying it right now. If you have a product key, type it carefully, and then click or tap Next.
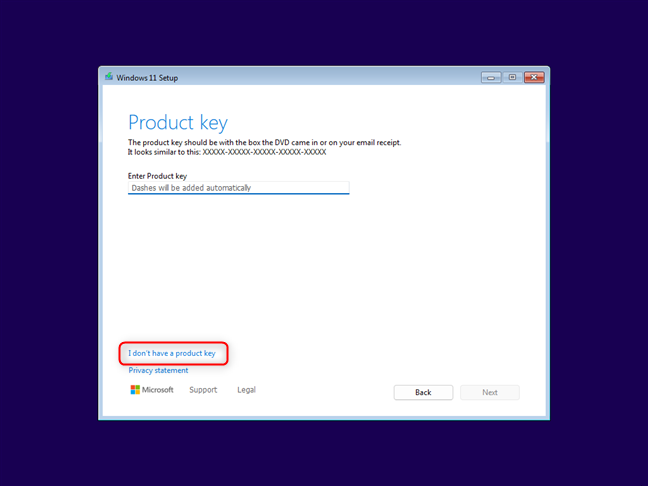 Provide the product key or select that you don't have one
After a couple seconds spent getting a few things ready, you are asked to select which edition of Windows 11 you’d like to install. Ensure you choose the edition for which you have a product key. The product key for Windows 11 Home won’t work on Windows 11 Pro, and the other way around. Keep in mind that Windows 11 Education or Windows 11 Enterprise are suitable for organizations, not home users.
Provide the product key or select that you don't have one
After a couple seconds spent getting a few things ready, you are asked to select which edition of Windows 11 you’d like to install. Ensure you choose the edition for which you have a product key. The product key for Windows 11 Home won’t work on Windows 11 Pro, and the other way around. Keep in mind that Windows 11 Education or Windows 11 Enterprise are suitable for organizations, not home users.
 Choose the Windows 11 edition you want to install
Microsoft presents you with the “Applicable notices and license terms” for Windows 11. Read what the company has to say, and if you want to continue installing Windows 11, click or tap Accept. Note that you can’t install Windows 11 without accepting these terms.
Choose the Windows 11 edition you want to install
Microsoft presents you with the “Applicable notices and license terms” for Windows 11. Read what the company has to say, and if you want to continue installing Windows 11, click or tap Accept. Note that you can’t install Windows 11 without accepting these terms.
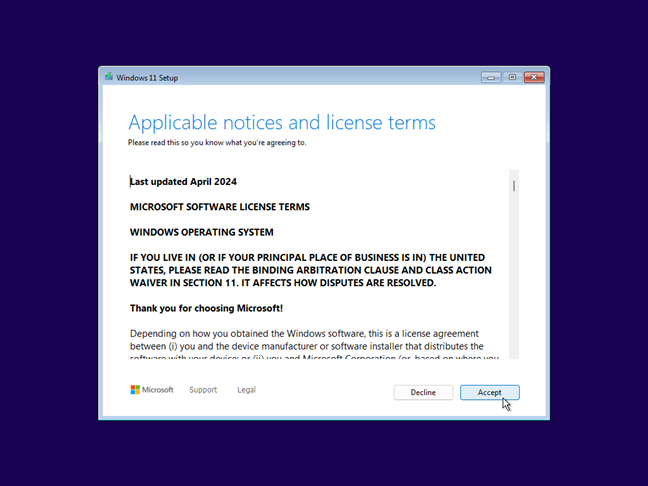 Accept the license terms to go ahead with the Windows 11 installation
After a few seconds, you choose where to install Windows 11. Select the drive or partition for it, and then press Next. If you’re using a new computer and its storage is not yet formatted, you’ll see an entry named Disk 0 Unallocated Space. In this situation, click or tap Create Partition, set its size, and press Apply. If you need or want to configure partitions in a specific way, you can delete partitions, format them, extend them, etc. When you’re done setting things up and selecting where you want to install Windows 11, press Next.
Accept the license terms to go ahead with the Windows 11 installation
After a few seconds, you choose where to install Windows 11. Select the drive or partition for it, and then press Next. If you’re using a new computer and its storage is not yet formatted, you’ll see an entry named Disk 0 Unallocated Space. In this situation, click or tap Create Partition, set its size, and press Apply. If you need or want to configure partitions in a specific way, you can delete partitions, format them, extend them, etc. When you’re done setting things up and selecting where you want to install Windows 11, press Next.
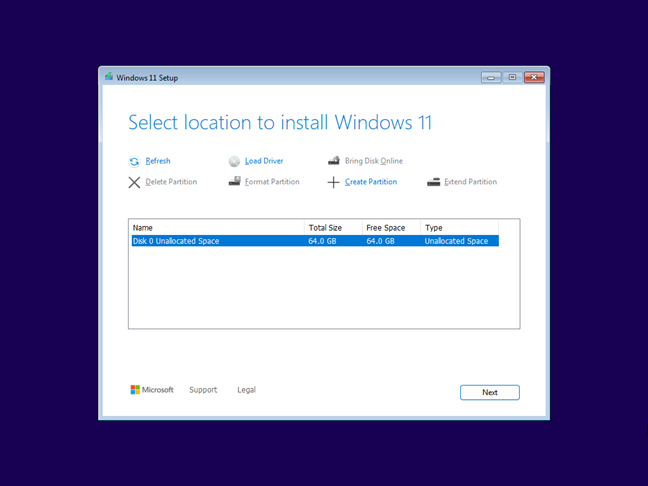 Select the partition on which you want to install Windows 11
You’re getting close to starting the actual installation process. But before it starts, you’re shown a summary of your settings. As you can see, I’ve chosen to Install Windows 11 Pro, decided to Keep nothing, and have all the existing data removed. Make your choices, then click or tap Install.
Select the partition on which you want to install Windows 11
You’re getting close to starting the actual installation process. But before it starts, you’re shown a summary of your settings. As you can see, I’ve chosen to Install Windows 11 Pro, decided to Keep nothing, and have all the existing data removed. Make your choices, then click or tap Install.
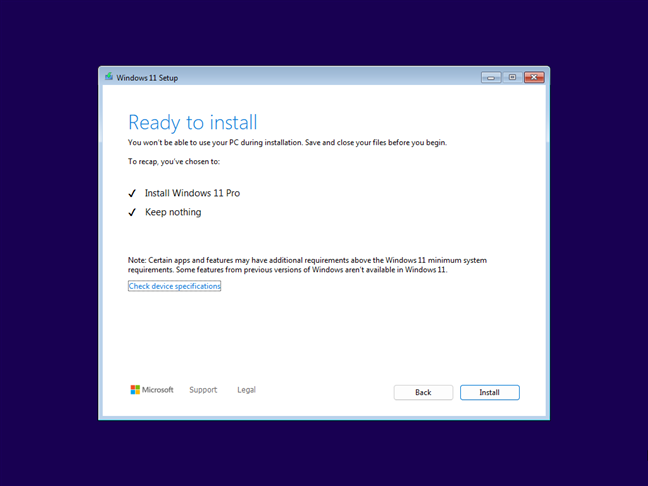 Click or tap Install to go ahead with the process
The actual Windows 11 installation process begins, and you see its progress in percentages, like the one in the screenshot below.
Click or tap Install to go ahead with the process
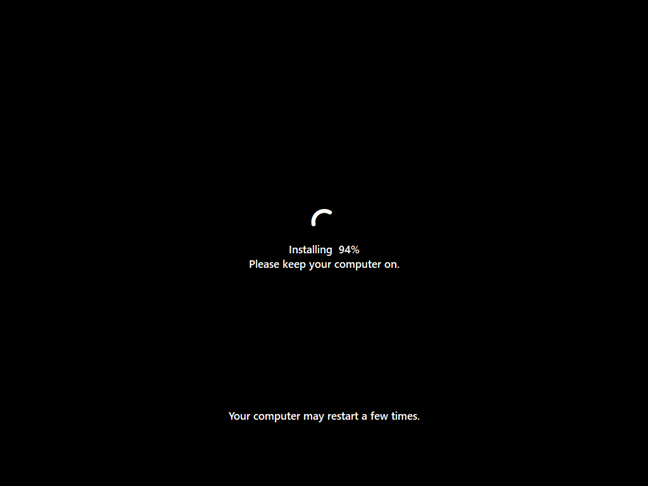
The actual Windows 11 installation process begins, and you see its progress in percentages, like the one in the screenshot below.
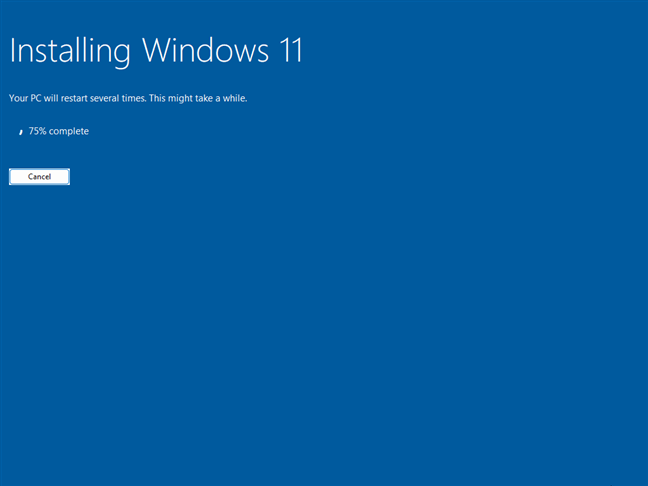 Windows 11 is finally installing
The installation process involves two or more reboots. After each one, you should see the progress displayed, similar to the screenshot below.
Windows 11 is finally installing
The installation process involves two or more reboots. After each one, you should see the progress displayed, similar to the screenshot below.
 The progress of your Windows 11 installation
When you no longer see black screens sharing the progress of the installation process, you’re done with Windows 11 installing its files, and the customization process begins.
The progress of your Windows 11 installation
When you no longer see black screens sharing the progress of the installation process, you’re done with Windows 11 installing its files, and the customization process begins.
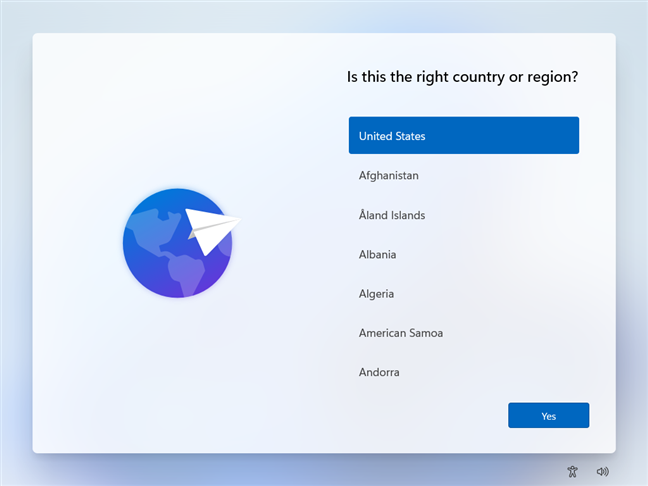 Select the country or region you're in
The setup wizard proposes a keyboard layout at the top of the list, based on the region you chose earlier. Select the keyboard layout you prefer to use and press Yes.
Select the country or region you're in
The setup wizard proposes a keyboard layout at the top of the list, based on the region you chose earlier. Select the keyboard layout you prefer to use and press Yes.
 Select the keyboard you want to use
You can add a second keyboard layout. If you don’t want to do that, click or tap Skip. Note that you can install new keyboard layouts after installing Windows 11, so it’s not mandatory to do this right now.
Select the keyboard you want to use
You can add a second keyboard layout. If you don’t want to do that, click or tap Skip. Note that you can install new keyboard layouts after installing Windows 11, so it’s not mandatory to do this right now.
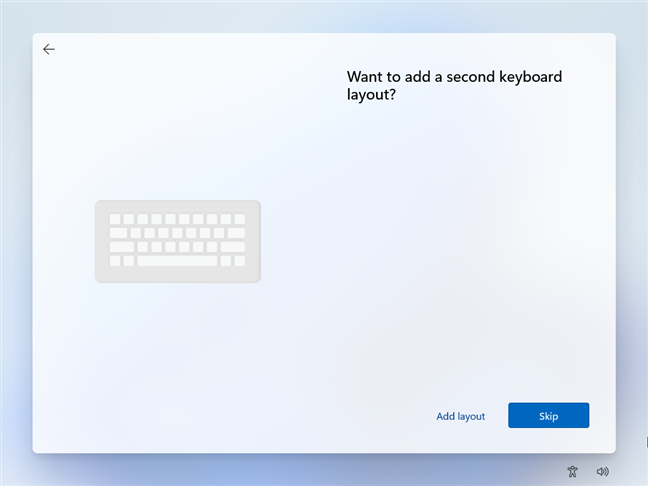 Do you want to add a second keyboard layout?
If your computer or device is connected to the internet, Windows 11 checks for and installs any available updates. If it isn’t, it asks you to connect to a network. On a laptop, the setup wizard shares the Wi-Fi networks found in your area and asks you to select one, type its password, and connect to it. Then, wait for the setup wizard to check for updates. This process may take a while. When it’s over, your computer reboots one more time.
Do you want to add a second keyboard layout?
If your computer or device is connected to the internet, Windows 11 checks for and installs any available updates. If it isn’t, it asks you to connect to a network. On a laptop, the setup wizard shares the Wi-Fi networks found in your area and asks you to select one, type its password, and connect to it. Then, wait for the setup wizard to check for updates. This process may take a while. When it’s over, your computer reboots one more time.
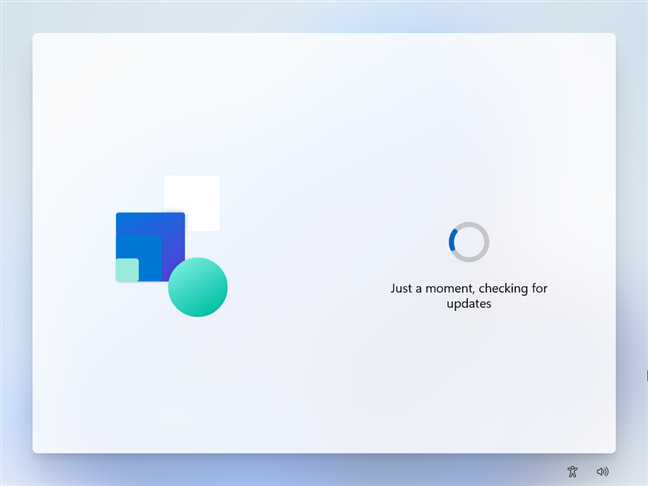 The setup is checking for updates
After the reboot, the Windows 11 Setup wizard asks if you’d like to name your device. Type the name you want and press Next. If you don’t care and are OK with a name chosen by Microsoft, you can choose to Skip for now.
The setup is checking for updates
After the reboot, the Windows 11 Setup wizard asks if you’d like to name your device. Type the name you want and press Next. If you don’t care and are OK with a name chosen by Microsoft, you can choose to Skip for now.
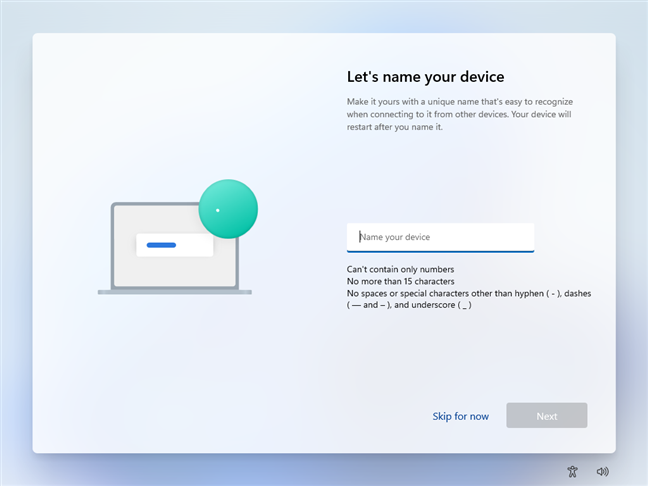 Name your computer or device
Another reboot takes place, in which your computer or device is renamed. Then, the setup wizard continues by asking how you’d like to set up your device: “Set up for personal use” or “Set up for work or school.” As you’re probably a home user, choose “Set up for personal use” and press Next. However, if your computer belongs to an organization like a company or school, select “Set up for work or school” and use your business account to sign in.
Name your computer or device
Another reboot takes place, in which your computer or device is renamed. Then, the setup wizard continues by asking how you’d like to set up your device: “Set up for personal use” or “Set up for work or school.” As you’re probably a home user, choose “Set up for personal use” and press Next. However, if your computer belongs to an organization like a company or school, select “Set up for work or school” and use your business account to sign in.
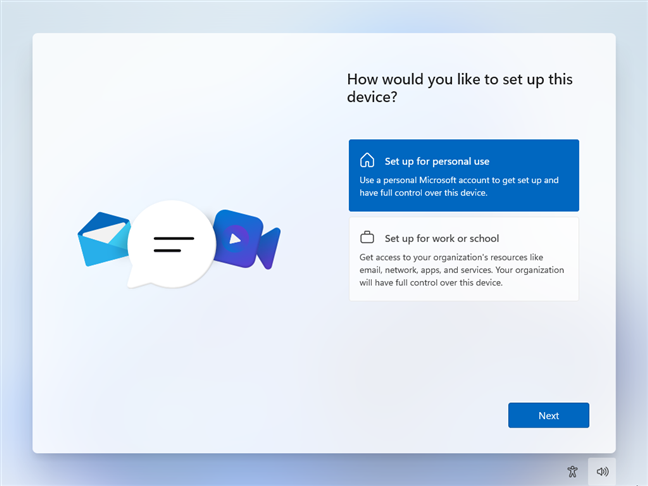 Choose Set up for personal use
TIP: The previous step is not shown if you’re installing a Home edition of Windows 11, because you can only use personal accounts on it.
The setup wizard checks for updates one more time, and then starts downloading and installing them on your computer. This step takes place only if you’re connected to the internet, and it may take a long time, depending on how many updates are available for download and on the speed of your internet connection. Arm yourself with patience and wait for this stage to complete. During this time, you see the progress at the bottom of the window, and the setup wizard browses through different tips teaching you how to use Windows 11.
Choose Set up for personal use
TIP: The previous step is not shown if you’re installing a Home edition of Windows 11, because you can only use personal accounts on it.
The setup wizard checks for updates one more time, and then starts downloading and installing them on your computer. This step takes place only if you’re connected to the internet, and it may take a long time, depending on how many updates are available for download and on the speed of your internet connection. Arm yourself with patience and wait for this stage to complete. During this time, you see the progress at the bottom of the window, and the setup wizard browses through different tips teaching you how to use Windows 11.
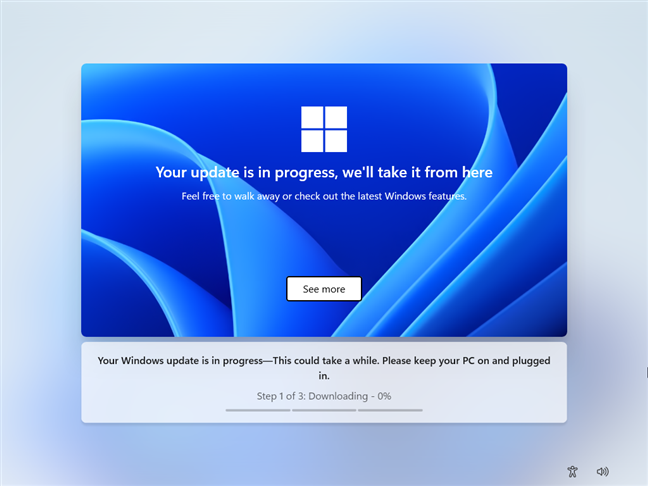 Updates are downloaded and installed
When you get to the part where updates are installed on your computer, another restart is performed, and you’re shown the progress of this operation. In some situations, two restarts may be performed, not just one.
After all the updates are installed, you get to the part of the Windows 11 installation process, in which you add or create a Microsoft account. Go to the next page of this article to continue reading our step-by-step guide.
Updates are downloaded and installed
When you get to the part where updates are installed on your computer, another restart is performed, and you’re shown the progress of this operation. In some situations, two restarts may be performed, not just one.
After all the updates are installed, you get to the part of the Windows 11 installation process, in which you add or create a Microsoft account. Go to the next page of this article to continue reading our step-by-step guide.
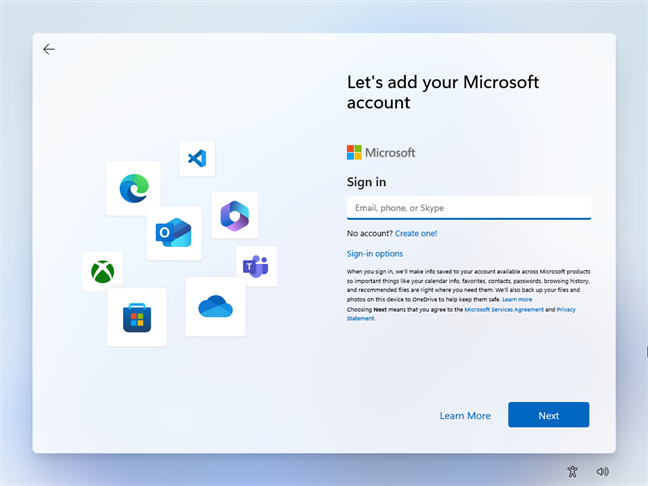
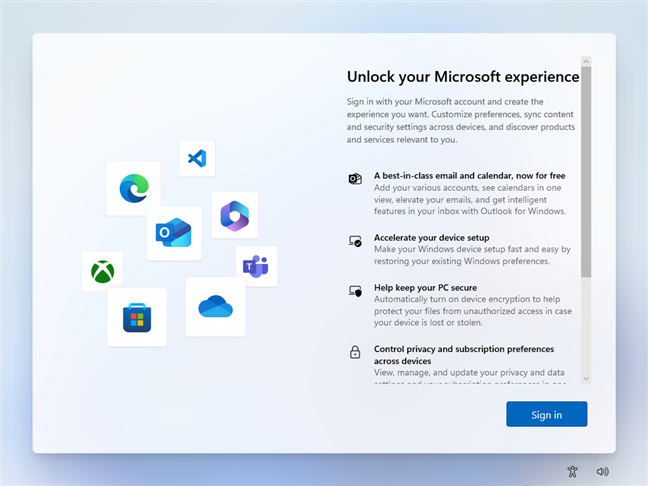 Windows 11 recommends using a Microsoft account
When asked to Sign in, type the email, phone number or Skype ID associated with your Microsoft account, and click or tap Next.
Windows 11 recommends using a Microsoft account
When asked to Sign in, type the email, phone number or Skype ID associated with your Microsoft account, and click or tap Next.
 Type your Microsoft account email, phone or Skype ID
If you’re using two-step verification for your Microsoft account, you might have to confirm that you are the one who tries to sign in by entering a code received on your smartphone or an alternative email account. Otherwise, you are just asked to type the password of your Microsoft account. Once you do, press Sign in.
Type your Microsoft account email, phone or Skype ID
If you’re using two-step verification for your Microsoft account, you might have to confirm that you are the one who tries to sign in by entering a code received on your smartphone or an alternative email account. Otherwise, you are just asked to type the password of your Microsoft account. Once you do, press Sign in.
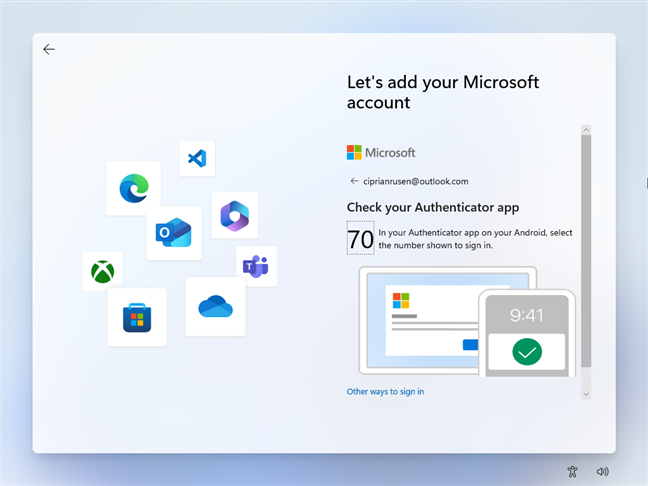 Approve your sign in
You are asked to create a PIN so that you can sign in quickly to your Windows 11 computer or device. Click or tap Create PIN.
Approve your sign in
You are asked to create a PIN so that you can sign in quickly to your Windows 11 computer or device. Click or tap Create PIN.
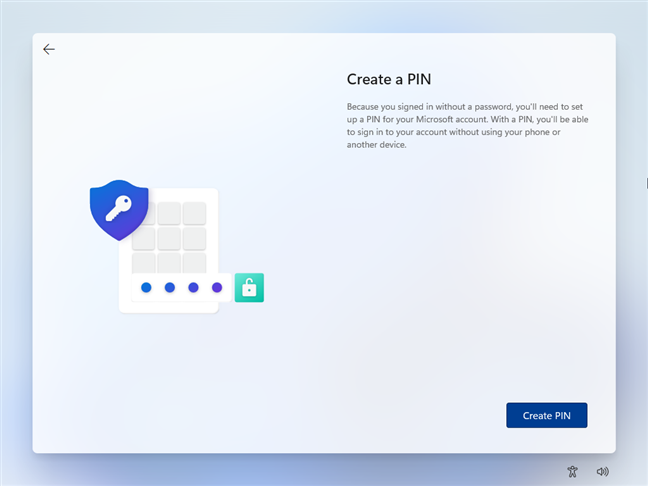 Click or tap Create PIN
Type the new pin and confirm it. Then, click or tap OK.
Click or tap Create PIN
Type the new pin and confirm it. Then, click or tap OK.
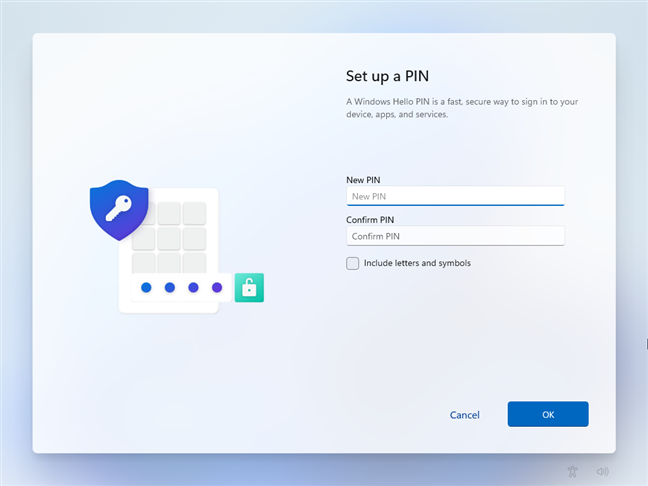 Set up your PIN
The PIN is created and associated with your Microsoft account. Next, you’re asked to choose the privacy settings for your device. Scroll down this list, enable the switches for the types of tracking you want, and disable the ones for those you don’t want. When you’re done, click or tap Next.
Set up your PIN
The PIN is created and associated with your Microsoft account. Next, you’re asked to choose the privacy settings for your device. Scroll down this list, enable the switches for the types of tracking you want, and disable the ones for those you don’t want. When you’re done, click or tap Next.
 Choose your privacy settings
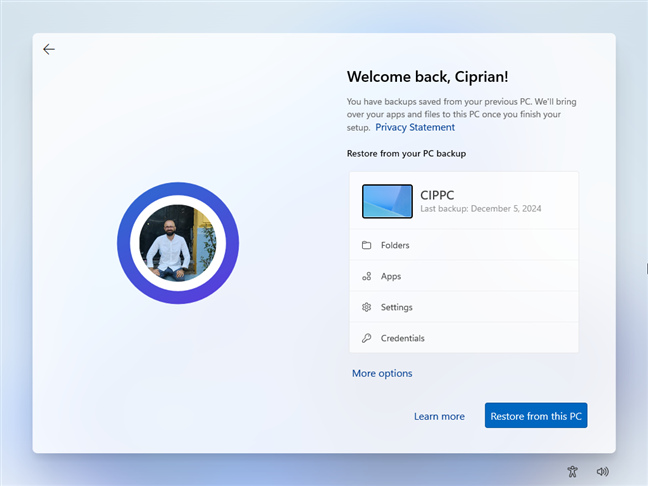
If you have previously used Windows 10 or Windows 11 with the same Microsoft account, you’ll see a Welcome back! message similar to the one below.
You are also asked whether you want to restore your folders, apps, settings, and credentials from another computer, which is suggested by Microsoft as the best choice. If you want that, click or tap the Restore from this PC button. Otherwise, if you want to use another Windows Backup or if you don’t want to restore anything, click or tap More options.
Choose your privacy settings
If you have previously used Windows 10 or Windows 11 with the same Microsoft account, you’ll see a Welcome back! message similar to the one below.
You are also asked whether you want to restore your folders, apps, settings, and credentials from another computer, which is suggested by Microsoft as the best choice. If you want that, click or tap the Restore from this PC button. Otherwise, if you want to use another Windows Backup or if you don’t want to restore anything, click or tap More options.
 Do you want to restore your PC from a backup?
If you’ve clicked (tapped) More options, you can either choose a different Windows Backup to restore, or you can click or tap Set up as a new PC if you don’t want to restore anything.
Do you want to restore your PC from a backup?
If you’ve clicked (tapped) More options, you can either choose a different Windows Backup to restore, or you can click or tap Set up as a new PC if you don’t want to restore anything.
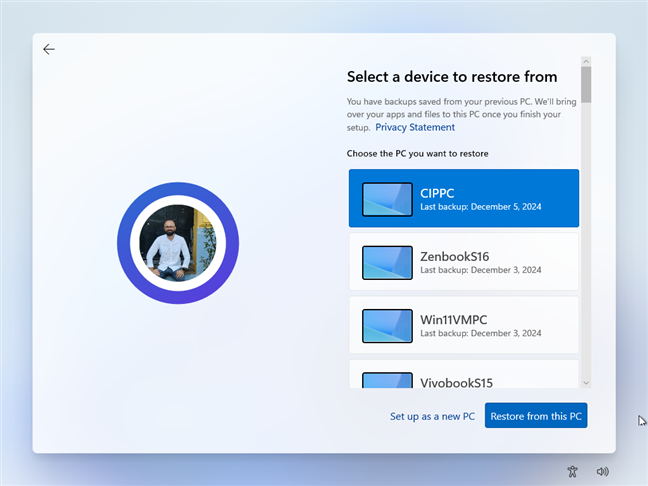 Choose the PC you want to restore or Set up as a new PC
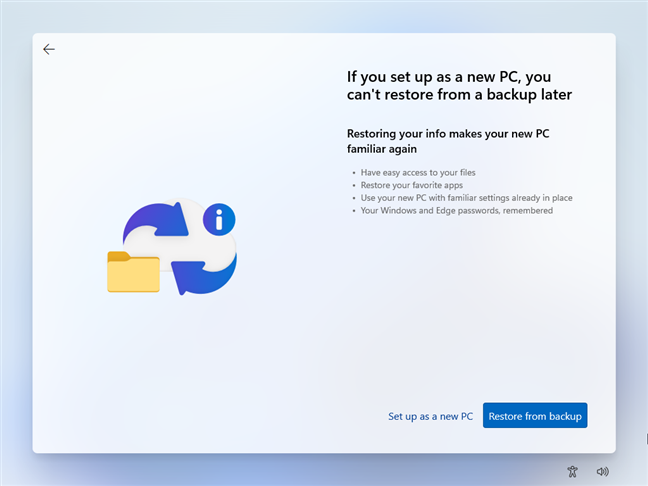
If you choose Set up as a new PC, you’re informed you won’t be able to restore from a backup later. If you’re okay with this choice, click or tap Set up as a new PC one more time.
Choose the PC you want to restore or Set up as a new PC
If you choose Set up as a new PC, you’re informed you won’t be able to restore from a backup later. If you’re okay with this choice, click or tap Set up as a new PC one more time.
 Click or tap Set up as a new PC
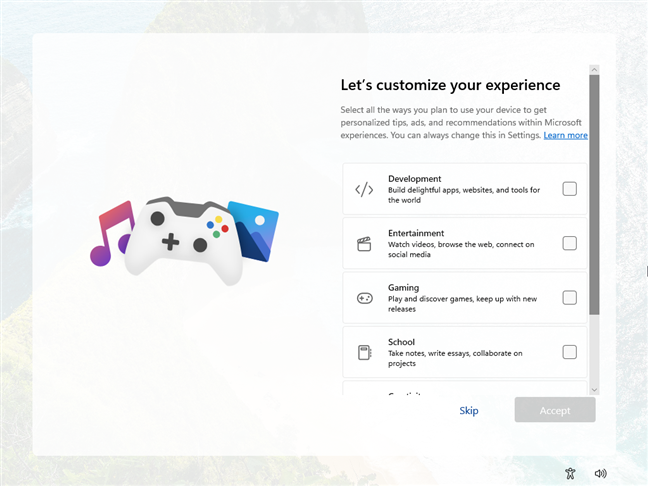
Now, Windows 11 asks you how you intend to use your PC. For example, will you use it mainly for Development, Entertainment, Gaming, School, Creativity, Business, or Family? Windows 11 will deliver personalized tips, ads, and recommendations depending on your choice. It may also adjust the list of preinstalled apps or Windows 11 bloatware.
Note that you can also select nothing and Skip this step altogether! If you selected any of the options in the list, press Accept when you’re done.
Click or tap Set up as a new PC
Now, Windows 11 asks you how you intend to use your PC. For example, will you use it mainly for Development, Entertainment, Gaming, School, Creativity, Business, or Family? Windows 11 will deliver personalized tips, ads, and recommendations depending on your choice. It may also adjust the list of preinstalled apps or Windows 11 bloatware.
Note that you can also select nothing and Skip this step altogether! If you selected any of the options in the list, press Accept when you’re done.
 It's best that you press Skip
Windows 11 recommends using your Android phone or iPhone from your PC. If you want to use the Phone Link app on your PC, follow the instructions on the screen and scan the QR code with your smartphone. However, you can do this later, regardless of whether you’re using an Android smartphone or an iPhone. If you want to finish the installation faster, it’s better to click or tap Skip.
It's best that you press Skip
Windows 11 recommends using your Android phone or iPhone from your PC. If you want to use the Phone Link app on your PC, follow the instructions on the screen and scan the QR code with your smartphone. However, you can do this later, regardless of whether you’re using an Android smartphone or an iPhone. If you want to finish the installation faster, it’s better to click or tap Skip.
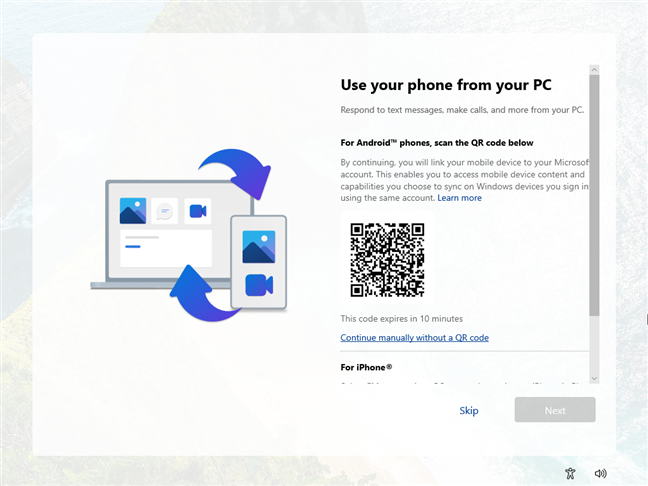 Pressing Skip helps you finish faster
Microsoft recommends you back up your phone’s photos to keep them safe, using their OneDrive app. To finish the Windows 11 installation faster, click or tap Skip.
Pressing Skip helps you finish faster
Microsoft recommends you back up your phone’s photos to keep them safe, using their OneDrive app. To finish the Windows 11 installation faster, click or tap Skip.
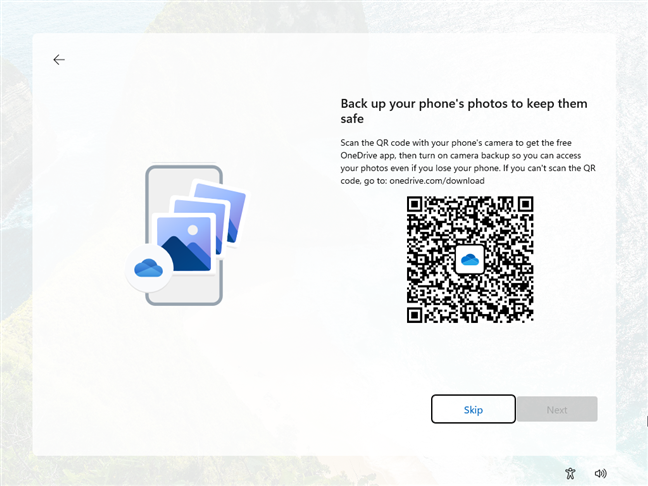 Skip this too
Next, Microsoft asks whether you want to always have access to your recent browsing data. If you Accept this, Microsoft Edge will regularly import your browsing data from other browsers, like Google Chrome, Opera, or anything else you may be using.
If you consider this behavior annoying, like I do, click or tap Not now to skip this step.
Skip this too
Next, Microsoft asks whether you want to always have access to your recent browsing data. If you Accept this, Microsoft Edge will regularly import your browsing data from other browsers, like Google Chrome, Opera, or anything else you may be using.
If you consider this behavior annoying, like I do, click or tap Not now to skip this step.
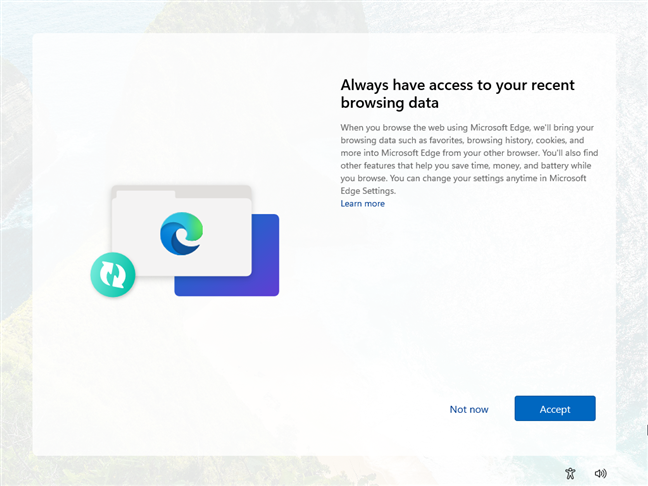 Not now is the better choice
After this step, Microsoft promotes one of its services. In my case, the company invited me to join its PC Game Pass subscription. You can Skip for now to move ahead with the installation.
Not now is the better choice
After this step, Microsoft promotes one of its services. In my case, the company invited me to join its PC Game Pass subscription. You can Skip for now to move ahead with the installation.
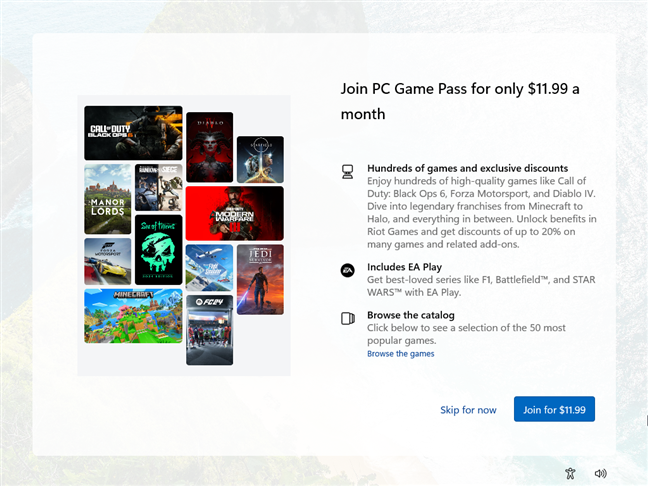 Skip all offers shown by Microsoft
If you receive other offers, keep choosing Skip for now.
When the personalization wizard is finished, Windows 11 automatically logs you in and displays the desktop.
Skip all offers shown by Microsoft
If you receive other offers, keep choosing Skip for now.
When the personalization wizard is finished, Windows 11 automatically logs you in and displays the desktop.
 You finally see the Windows 11 desktop
If you want to check the version of Windows 11 you’ve installed, open the Settings app (Windows + I) and head to System > About. There, your Windows 11 version is displayed under Windows Specifications. For example, in the following screenshot, you can see that after taking all the earlier steps, I installed Windows 11 24H2 on my computer.
You finally see the Windows 11 desktop
If you want to check the version of Windows 11 you’ve installed, open the Settings app (Windows + I) and head to System > About. There, your Windows 11 version is displayed under Windows Specifications. For example, in the following screenshot, you can see that after taking all the earlier steps, I installed Windows 11 24H2 on my computer.
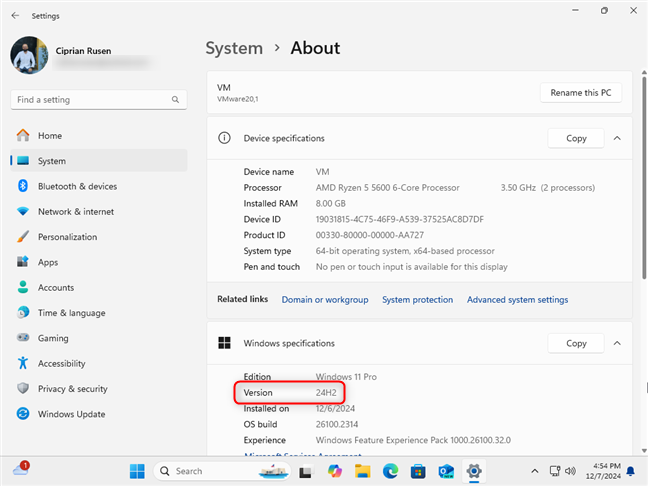 Checking the Windows 11 version you've installed
What you need to install Windows 11
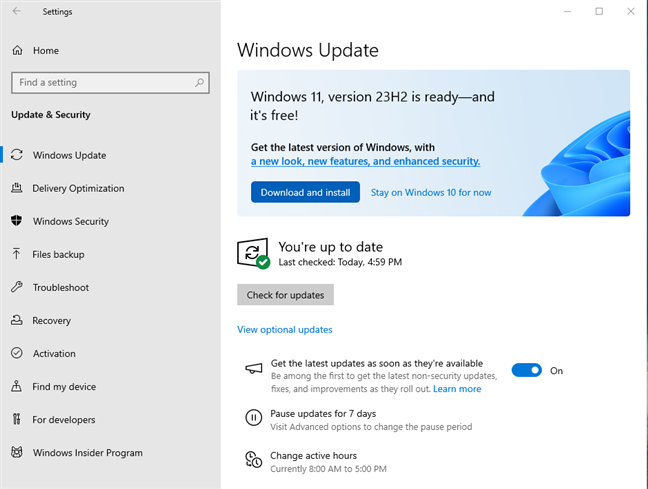
If you’re using Windows 10 and want to check whether your computer is compatible with Windows 11, open Settings and go to Update & Security > Windows Update. If you see a banner recommending you get the latest version of Windows, like the one in the screenshot below, your computer is compatible with Windows 11. If you don’t want to make a clean installation of Windows 11, simply click or tap Download and install, and then follow the instructions in the personalization wizard.How to clean install Windows 11 using a USB drive, a DVD, or an ISO file
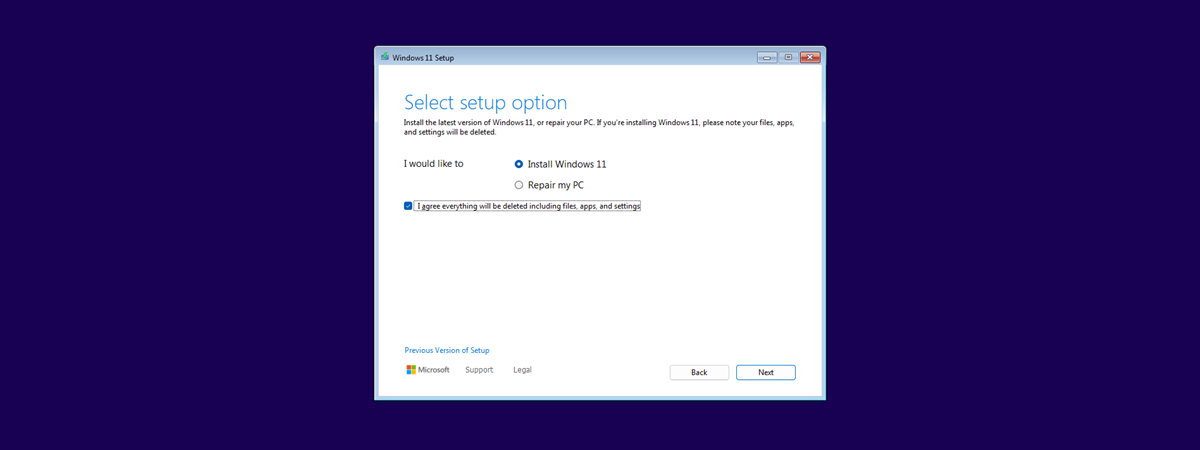
If you have created a USB memory stick (or DVD) with the Windows 11 installation, you first need to boot your PC from this drive. The steps involve accessing the UEFI (BIOS) and setting the USB drive as the boot device. After you boot from the USB drive (or DVD), wait for a few seconds, and your computer or device should briefly display a message asking you to “Press any key to boot from CD or DVD.” Do as instructed to load the Windows 11 Setup wizard.- Install Windows 11 - this is the option you should choose when you want a clean installation of the operating system.
- Repair my PC - this option is useful for troubleshooting a computer on which Windows 11 is already installed. Therefore, for the purposes of this tutorial, I won’t select this option.
How to customize your Windows 11 installation
As the installation is almost over, now comes the time to customize Windows 11. The setup wizard first asks you to select the country or region you live in. Choose it from the list, and then click or tap Yes.How to configure Windows 11 with a Microsoft account
Whether you’re using the Home or Pro editions, Windows 11 asks you to sign in with your Microsoft account, and presents you with the benefits of using such an account.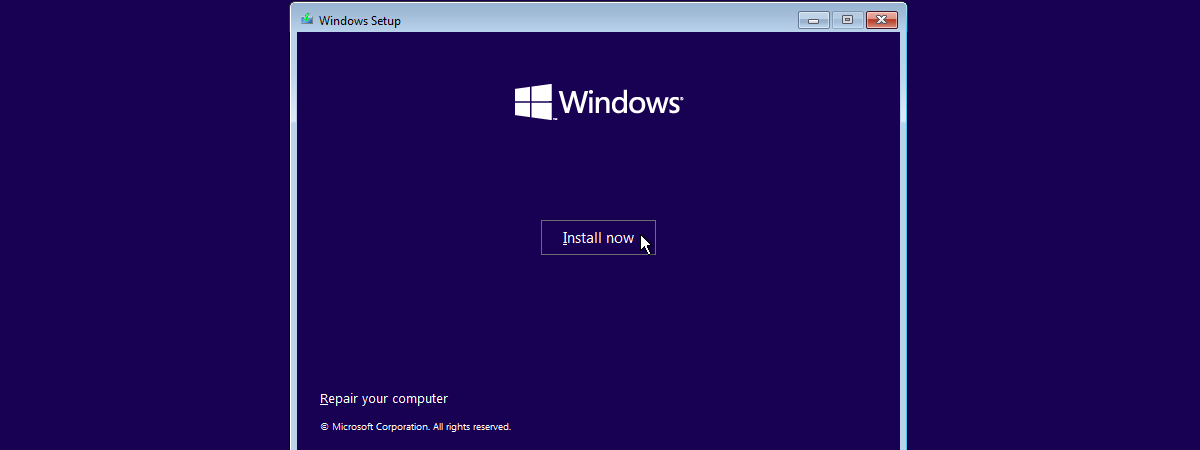
Discussion (0)
Be the first to comment.