


There are plenty of situations where you might need to boot your computer from a USB drive. Maybe you’re installing a fresh version of Windows. Maybe you’re troubleshooting a stubborn problem or just experimenting with Linux. Whatever the case, learning how to boot from USB is one of those things every PC user should do. So if you’ve ever wondered how to boot from a USB drive on Windows 11 or Windows 10 or how to boot from USB in BIOS, this guide covers it all. Here are four different ways to do it, depending on whether your system is working normally, partially, or not at all:
NOTE: If you want to boot from USB in order to install an operating system, you first need to create the installation drive. For guidance on that, read this tutorial: How to use Rufus to create a bootable USB drive with Windows, Linux, or FreeDOS.
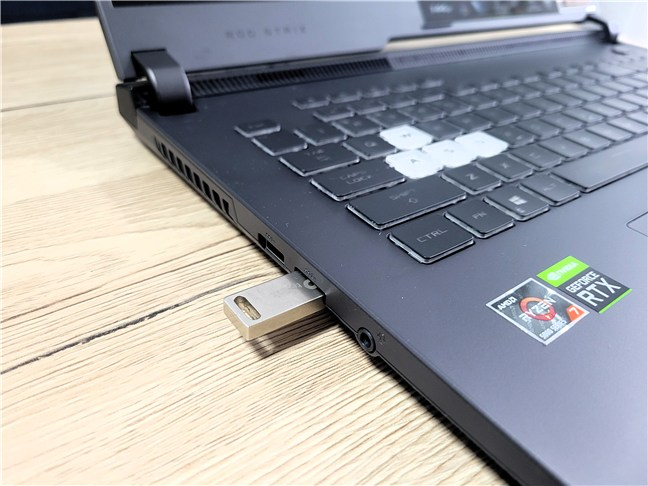
 Plug your bootable drive into a USB port
Then, turn on your computer (or restart it) and immediately press the key that opens the Boot Menu. It’s usually F4, F8, F10, F11, or F12, but some systems might use Esc or Del instead. If your computer displays a message like “Boot from UEFI USB” or “Press F12 to select boot device” during startup, that’s the key you want to press. If nothing shows up, try all the keys I mentioned. And if none of them work, check your laptop’s manual or your motherboard’s user guide; the Boot Menu access key(s) should be mentioned somewhere.
Plug your bootable drive into a USB port
Then, turn on your computer (or restart it) and immediately press the key that opens the Boot Menu. It’s usually F4, F8, F10, F11, or F12, but some systems might use Esc or Del instead. If your computer displays a message like “Boot from UEFI USB” or “Press F12 to select boot device” during startup, that’s the key you want to press. If nothing shows up, try all the keys I mentioned. And if none of them work, check your laptop’s manual or your motherboard’s user guide; the Boot Menu access key(s) should be mentioned somewhere.
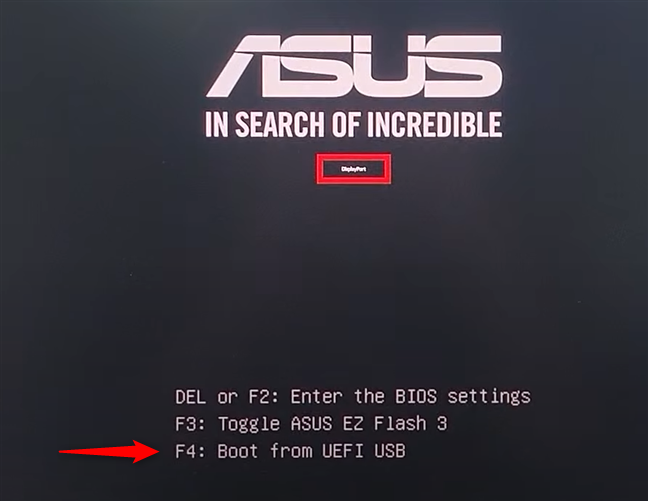
 Press the key that enables the Boot Menu
Once the Boot Menu appears on the screen, choose your USB drive. It might be listed as USB HDD, Removable Device, or by the brand name of the drive. Select it and hit Enter.
Press the key that enables the Boot Menu
Once the Boot Menu appears on the screen, choose your USB drive. It might be listed as USB HDD, Removable Device, or by the brand name of the drive. Select it and hit Enter.
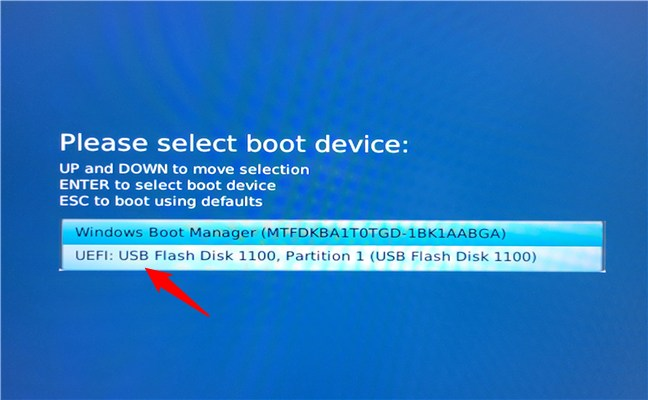
 Choose to boot from a USB flash drive in the Boot Menu
Once you’ve pressed Enter, your PC should boot from USB.
Choose to boot from a USB flash drive in the Boot Menu
Once you’ve pressed Enter, your PC should boot from USB.
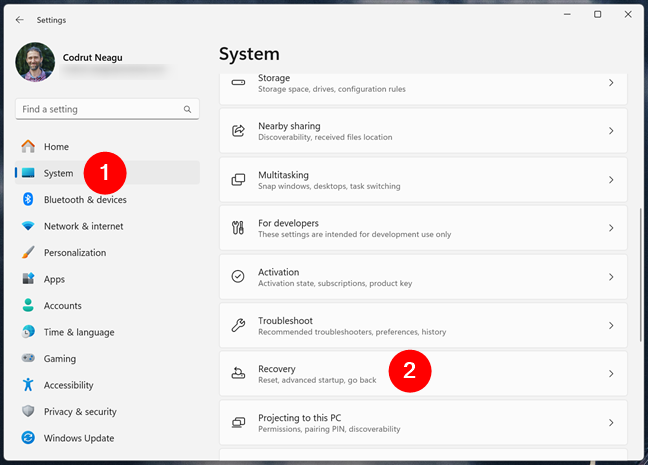
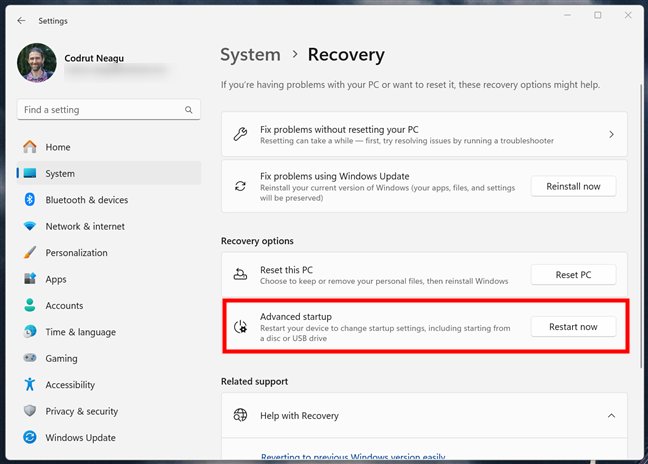
 Access the Recovery settings in Windows 11
Next, on the right side of the window, locate the Advanced startup option. It briefly explains that you can “Restart your device to change startup settings, including starting from a disc or USB drive.” Press the Restart now button on the right.
Access the Recovery settings in Windows 11
Next, on the right side of the window, locate the Advanced startup option. It briefly explains that you can “Restart your device to change startup settings, including starting from a disc or USB drive.” Press the Restart now button on the right.
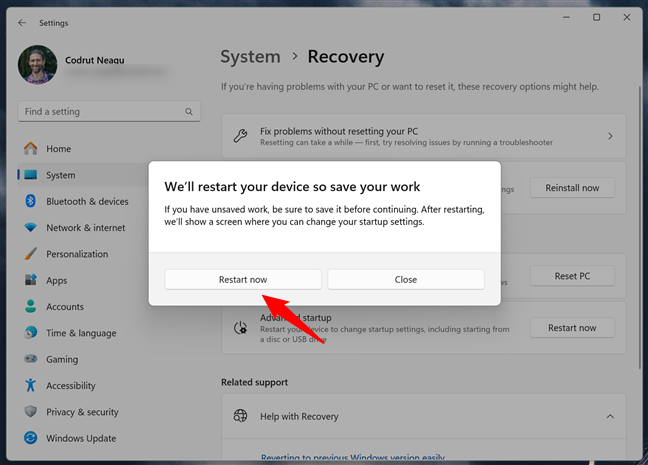
 Advanced startup in Windows 11
Finally, Windows 11 lets you know that it will restart your device, so you’d better save your work before that. After doing so, click or tap the Restart now button from the dialog.
Advanced startup in Windows 11
Finally, Windows 11 lets you know that it will restart your device, so you’d better save your work before that. After doing so, click or tap the Restart now button from the dialog.
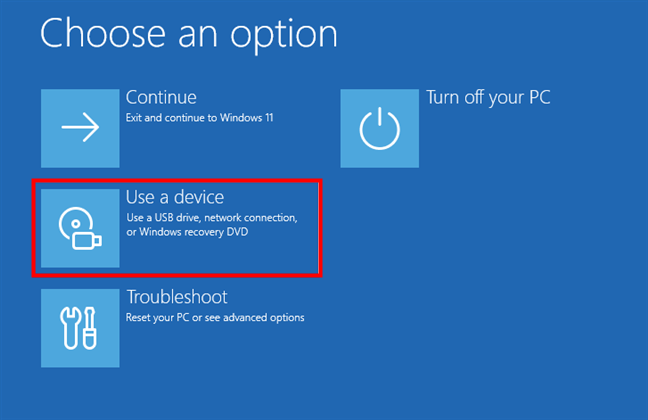
 Windows 11 notifies you that it will restart your device
Your PC will then reboot, and Windows 11 will load its recovery environment. In it, select the Use a device option.
Windows 11 notifies you that it will restart your device
Your PC will then reboot, and Windows 11 will load its recovery environment. In it, select the Use a device option.
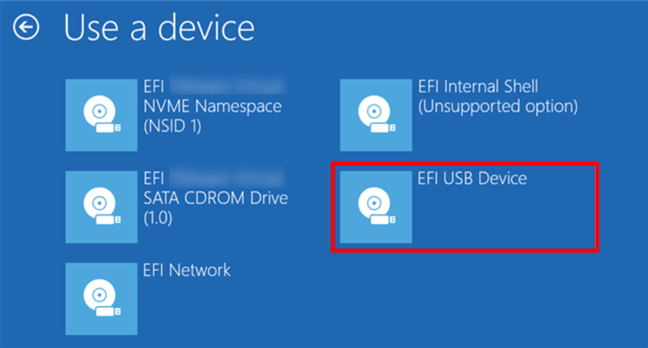
 The Use a device option in Windows 11's recovery environment
Next, you see the list of bootable devices your computer can use. That includes the USB drive you’ve plugged in, so click or tap it.
The Use a device option in Windows 11's recovery environment
Next, you see the list of bootable devices your computer can use. That includes the USB drive you’ve plugged in, so click or tap it.
 Select the USB drive option from the list
Your PC will restart again and boot straight from the USB. This is a great option if you need to boot from USB in Windows 11 without accessing the UEFI/BIOS settings.
Select the USB drive option from the list
Your PC will restart again and boot straight from the USB. This is a great option if you need to boot from USB in Windows 11 without accessing the UEFI/BIOS settings.
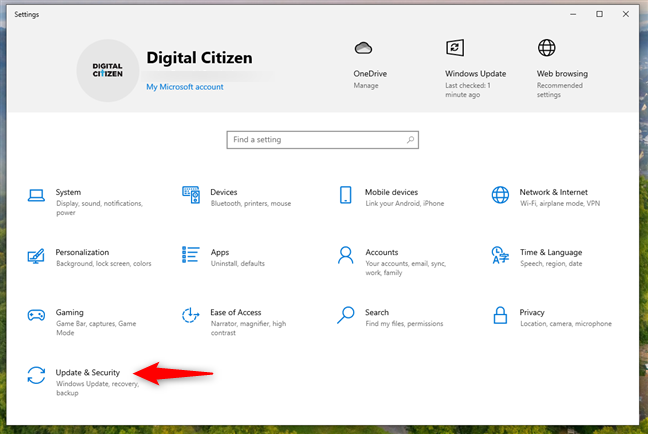
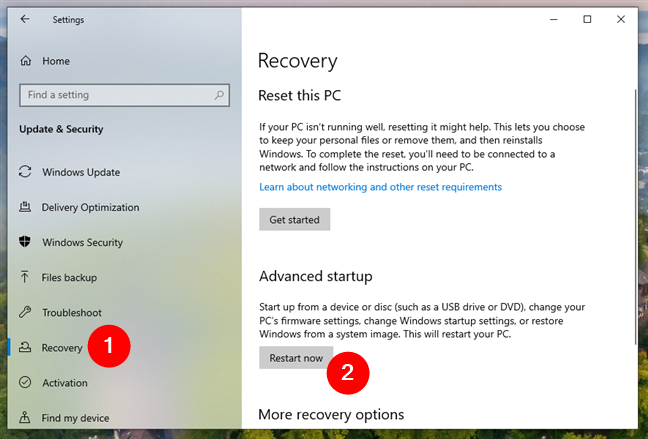
 Update & Security settings in Windows 10
Select Recovery on the left, then scroll on the right side of the window until you find the Advanced startup section. Click or tap the Restart now button.
Update & Security settings in Windows 10
Select Recovery on the left, then scroll on the right side of the window until you find the Advanced startup section. Click or tap the Restart now button.
 Advanced startup recovery options in Windows 10
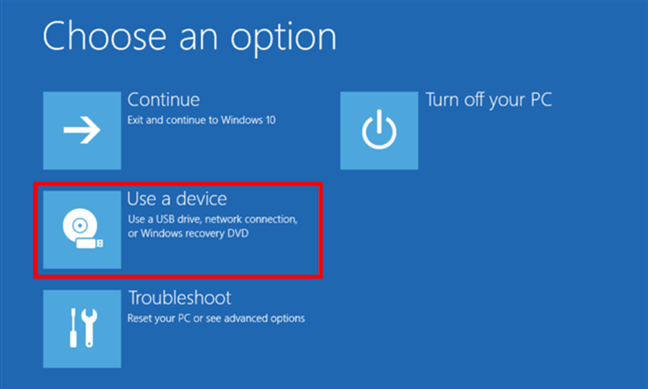
Windows 10 restarts and then shows a screen where you can Choose an option. Click or tap Use a device.
Advanced startup recovery options in Windows 10
Windows 10 restarts and then shows a screen where you can Choose an option. Click or tap Use a device.
 Choosing to use a device to start the PC
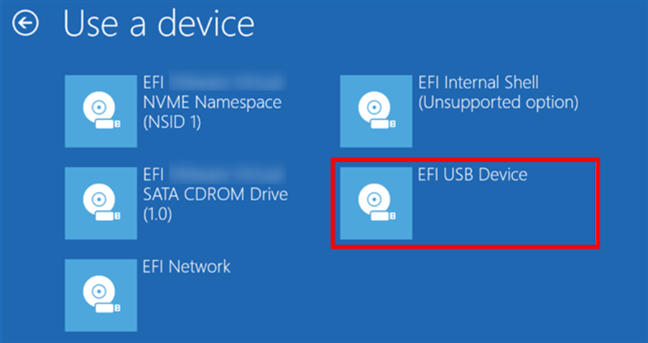
Next, you should see a list of devices your computer can boot from, including the USB flash drive that you plugged in. Click or tap it.
Choosing to use a device to start the PC
Next, you should see a list of devices your computer can boot from, including the USB flash drive that you plugged in. Click or tap it.
 Selecting the USB flash drive from which the PC should boot
Your computer then restarts and boots from the USB flash drive you chose.
TIP: If you want a faster way of accessing the Windows recovery environment, where you can boot from a USB drive, creating a shortcut or knowing the command for that might come in handy. Here’s a guide that explains everything: Shortcuts for the UEFI BIOS & Windows Recovery Environment.
Selecting the USB flash drive from which the PC should boot
Your computer then restarts and boots from the USB flash drive you chose.
TIP: If you want a faster way of accessing the Windows recovery environment, where you can boot from a USB drive, creating a shortcut or knowing the command for that might come in handy. Here’s a guide that explains everything: Shortcuts for the UEFI BIOS & Windows Recovery Environment.
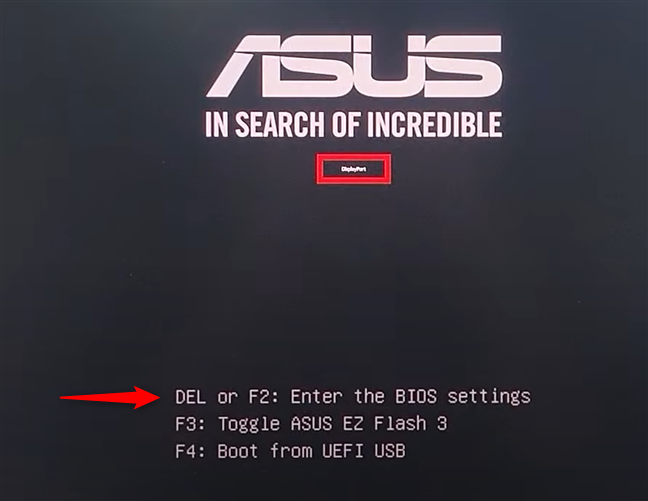 Press the BIOS/UEFI access key repeatedly
TIP: On modern computers that use UEFI instead of the traditional BIOS, the system might start up so quickly that it’s hard to press the required key in time. If that happens, the solution is to access the firmware settings from within Windows. If you’re using Windows 10, follow the instructions in this step-by-step tutorial on how to enter the BIOS from Windows 10. For Windows 11, check out this guide that explains 7 ways to access the UEFI/BIOS from Windows 11.
Once you’ve entered the BIOS/UEFI, browse through its configuration options until you find a page called Boot or similar. There, you should see the boot order your computer uses. In this list, you must choose the USB flash drive as the first device used for booting. Remember that the USB option can be named differently on your PC, so check for Removable Devices, USB-HDD, or similar names. Selecting the USB flash drive as the first boot option is usually done using the arrow keys. However, on some systems, you might need to use the +, -, F5, or F6 keys instead. Your BIOS/UEFI should display some helpful information about this topic.
Press the BIOS/UEFI access key repeatedly
TIP: On modern computers that use UEFI instead of the traditional BIOS, the system might start up so quickly that it’s hard to press the required key in time. If that happens, the solution is to access the firmware settings from within Windows. If you’re using Windows 10, follow the instructions in this step-by-step tutorial on how to enter the BIOS from Windows 10. For Windows 11, check out this guide that explains 7 ways to access the UEFI/BIOS from Windows 11.
Once you’ve entered the BIOS/UEFI, browse through its configuration options until you find a page called Boot or similar. There, you should see the boot order your computer uses. In this list, you must choose the USB flash drive as the first device used for booting. Remember that the USB option can be named differently on your PC, so check for Removable Devices, USB-HDD, or similar names. Selecting the USB flash drive as the first boot option is usually done using the arrow keys. However, on some systems, you might need to use the +, -, F5, or F6 keys instead. Your BIOS/UEFI should display some helpful information about this topic.
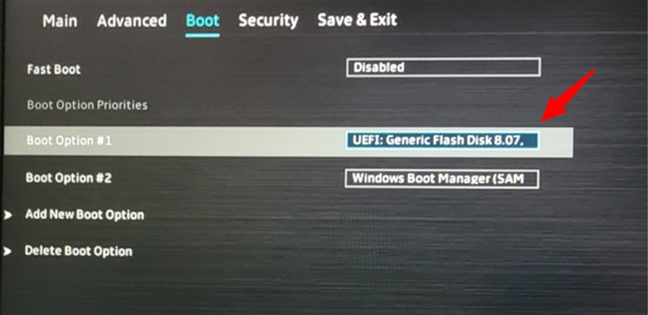
 Moving the USB flash drive to the top of the boot order list
After you’ve selected the USB flash drive as the first boot option, save your settings (usually done by pressing F10 on your keyboard) and exit the BIOS/UEFI environment. Your computer will restart and then automatically boot from the USB flash drive.
Moving the USB flash drive to the top of the boot order list
After you’ve selected the USB flash drive as the first boot option, save your settings (usually done by pressing F10 on your keyboard) and exit the BIOS/UEFI environment. Your computer will restart and then automatically boot from the USB flash drive.
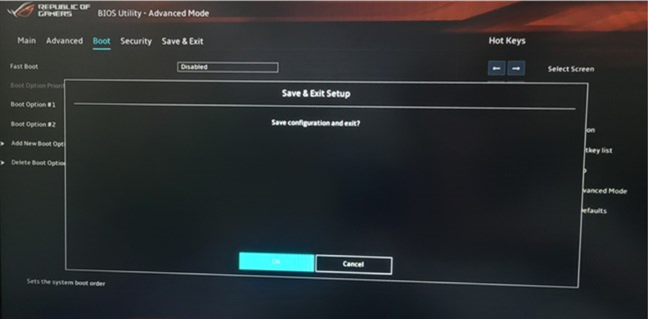
 Saving the settings in BIOS/UEFI
IMPORTANT: If your computer uses UEFI, you might not be able to make the previous settings. In that case, you must first disable (temporarily) the Secure Boot option. This option can also have different names depending on what the manufacturer wanted: Legacy Boot or Legacy Support, CSM or Launch CSM, and so on. Choose to enable the options that start with Legacy or that have CSM in their names.
Saving the settings in BIOS/UEFI
IMPORTANT: If your computer uses UEFI, you might not be able to make the previous settings. In that case, you must first disable (temporarily) the Secure Boot option. This option can also have different names depending on what the manufacturer wanted: Legacy Boot or Legacy Support, CSM or Launch CSM, and so on. Choose to enable the options that start with Legacy or that have CSM in their names.
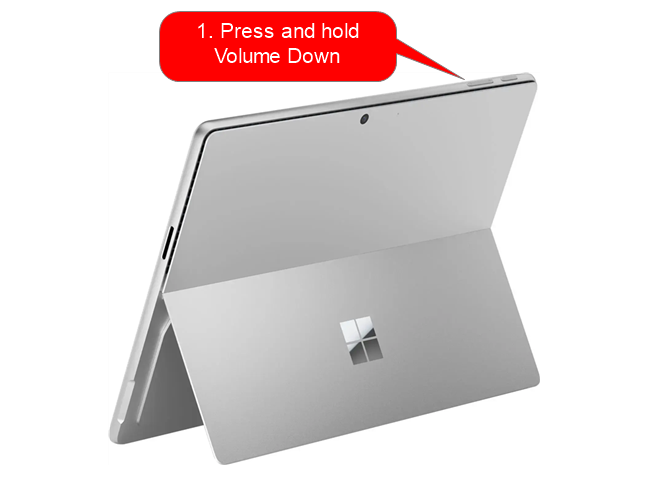
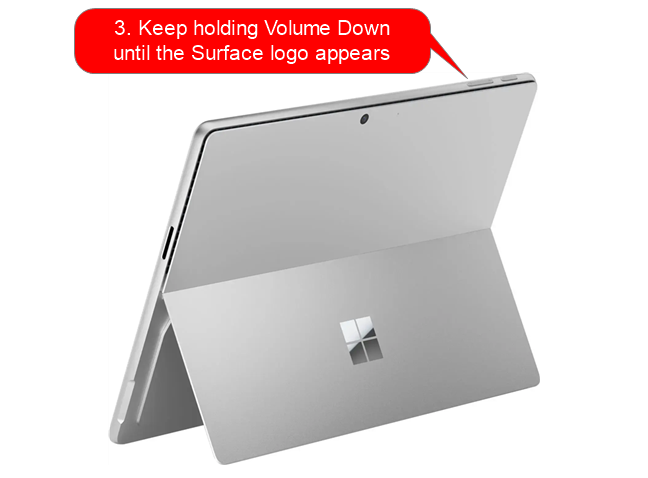
 Press and hold Volume Down
While still holding Volume Down, tap the Power button.
Press and hold Volume Down
While still holding Volume Down, tap the Power button.
 Tap the Power button
Keep holding Volume Down until the Surface logo appears.
Tap the Power button
Keep holding Volume Down until the Surface logo appears.
 Hold the Volume Down
The device should now boot from the USB drive, assuming one is connected and bootable.
Hold the Volume Down
The device should now boot from the USB drive, assuming one is connected and bootable.
1. Boot from USB using the Boot Menu (F4, F8, F10, F11, etc.)
One of the easiest ways to boot your computer from a USB drive is by using the boot menu. This works on almost any PC, no matter what operating system is installed. Make sure that your USB flash drive is bootable, and then plug it into any USB port on your laptop or desktop computer.2. Boot from a USB drive using Windows Settings (without BIOS/UEFI access)
If you want a method that doesn’t require going into BIOS or UEFI, you can force Windows to boot from USB. Start by plugging in the bootable USB flash drive to a USB port on your computer. Then, it depends on whether you’re using Windows 11 or Windows 10:2.1. Boot from USB using Settings in Windows 11
After connecting the bootable USB flash drive to a USB port on your Windows 11 computer, open Settings (Windows + I), ensure that System is selected on the left sidebar, and click or tap Recovery in the right panel.2.2. Boot from USB using Settings in Windows 10
If your computer is running Windows 10, open the Settings app and head to Update & Security.3. Boot from USB by changing the BIOS/UEFI boot order
If you want your PC to boot from a USB drive by default (for example, on every restart), you need to change the boot sequence in BIOS/UEFI. Here’s how to do that: To begin, plug your USB drive into a USB port on your computer. Then, restart your PC. As soon as it powers on, repeatedly press the BIOS access key. Although the manufacturer of your PC or motherboard can assign any key for this action, commonly used keys include Delete, F1, F2, F10, and F12. If none of these work, you can find the right key to press in the manual of your PC or motherboard.4. Boot from USB on Microsoft Surface and similar tablets
If you’re using a Surface device or another Windows tablet without a keyboard, here’s how to boot from USB in Windows 11 or Windows 10 using physical buttons: Shut down the device completely. Then, press and hold the Volume Down button.
Discussion (9)
First option did not work, there was no option to select where to boot from.
Did you try the other options and found another that works for on your computer?
I’m stumped.
Have Win11 on this computer,
and Win10 on the disk removed from previous computer.
Win10 disk is connected via USB to my Win11 computer.
Using your procedure in sample 2,
booting from USB without BIOS or UEFI,
the last window with “Use a device” does not show,
and so I can’t choose “EFI USB Device”.
Please help.
Just hold Shift key while selecting restart. That will put you straight to the screen in settings for selecting option for next boot.
I need a script that will do that. Must be something we can do to get windows to select the USB for booting 1 time. Don’t like my computer to be set to always boot from USB, as can be done in UEFI.
This is exactly what I was looking for.
Such a very great info. And I’m glad to come across this website.
Thanks a lot.
Don’t hesitate to subscribe to our newsletter, for more useful guides and tutorials.
Couldn’t boot my laptop after Lenovo logo circle comes and after that grey screen only nothing to do . Lenovo ideapad 330
I tried boot from a USB flash… but during installation I get an error message “we couldn’t find any drives, am kinda frustrated… it seems the hard-drive cannot be detected.
I was able to boot using bios/boot menu, however once I select in grub what I want , it boots off that with a blank cursor, then restarts into windows 10.