

Can we dual-boot Windows 10 and Windows 11? Yes, we can! And dual-booting Windows 10 and Windows 11 can be quite helpful if you need to work with both operating systems. It’s also a good choice if you want to see what Windows 11 is all about, but you don’t want to let go of your old Windows 10 setup. Whatever your reasons are, in this article, we’re going to guide you through the steps of installing Windows 10 and Windows 11 in a dual-boot configuration. So, if you want to know all the details on how to dual boot Windows 11 with Windows 10 on the same computer, read on:
NOTE: For the purpose of this tutorial, we’re going to show you how to dual boot Windows 10 and Windows 11 when you first install Windows 10, and afterward, you install Windows 11. However, keep in mind that the other way around is also possible (install Windows 11 first and Windows 10 second), and the steps are exactly the same.
 Installing Windows 10
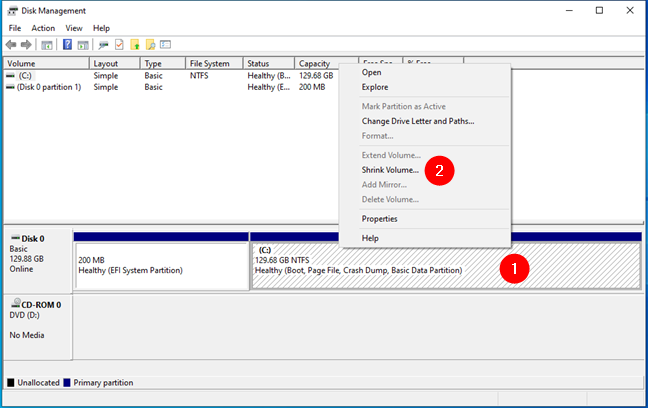
 Shrink volume reduces the size of the Windows 10 partition
In the Shrink C: dialog box, enter the number of megabytes you want to shrink the Windows 10 partition by. Make sure that you choose a value that’s large enough for Windows 11, which requires at least 64GB (65,536MB) of free space. Once done, press the Shrink button.
Shrink volume reduces the size of the Windows 10 partition
In the Shrink C: dialog box, enter the number of megabytes you want to shrink the Windows 10 partition by. Make sure that you choose a value that’s large enough for Windows 11, which requires at least 64GB (65,536MB) of free space. Once done, press the Shrink button.
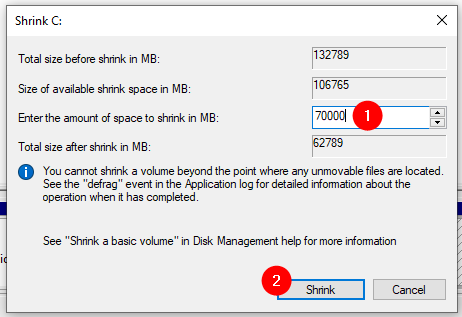
 Specifying the size to shrink the Windows 10 partition
After the shrinking is done, it’s time to create a new partition for Windows 11. Right-click on the Unallocated space on your drive and select New Simple Volume from the context menu.
Specifying the size to shrink the Windows 10 partition
After the shrinking is done, it’s time to create a new partition for Windows 11. Right-click on the Unallocated space on your drive and select New Simple Volume from the context menu.
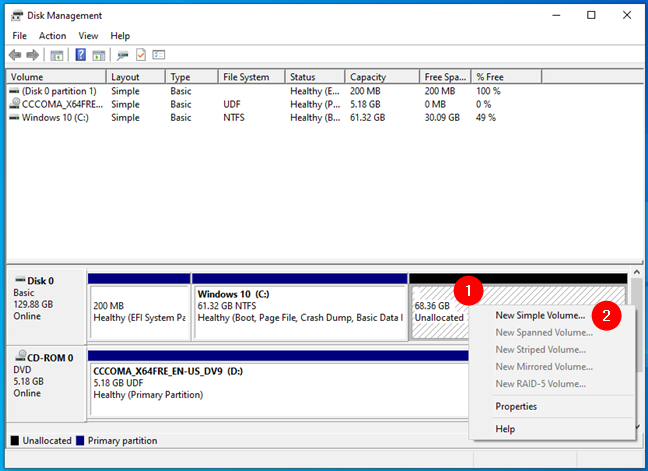
 Creating a new partition for Windows 11
Follow the wizard's steps and, when you get to the Format Partition settings, make sure you choose NTFS.
Creating a new partition for Windows 11
Follow the wizard's steps and, when you get to the Format Partition settings, make sure you choose NTFS.
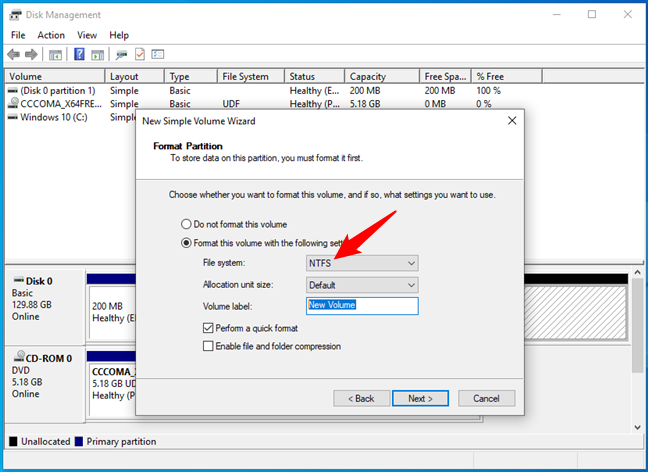
 Format the Windows 11 partition using NTFS
TIP: For more help, read this guide: 2 ways to create a partition in Windows (all versions).
Once you’ve created the partition for Windows 11, follow the instructions from the third chapter of this guide.
Format the Windows 11 partition using NTFS
TIP: For more help, read this guide: 2 ways to create a partition in Windows (all versions).
Once you’ve created the partition for Windows 11, follow the instructions from the third chapter of this guide.
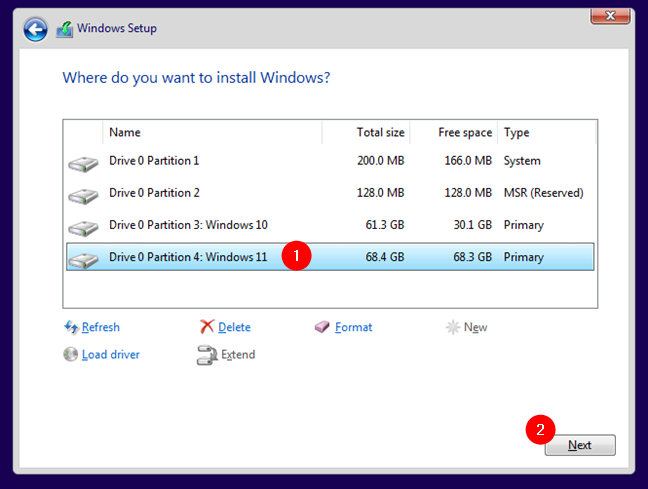
 Selecting the Windows 11 partition
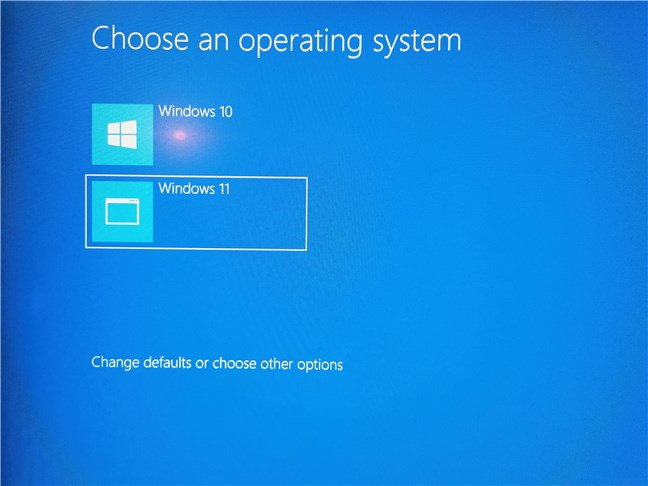
 The boot loader allows you to dual boot Windows 10 and Windows 11
Congratulations! You’re now dual-booting Windows 10 and Windows 11! 🙂
The boot loader allows you to dual boot Windows 10 and Windows 11
Congratulations! You’re now dual-booting Windows 10 and Windows 11! 🙂
 Opening System Configuration
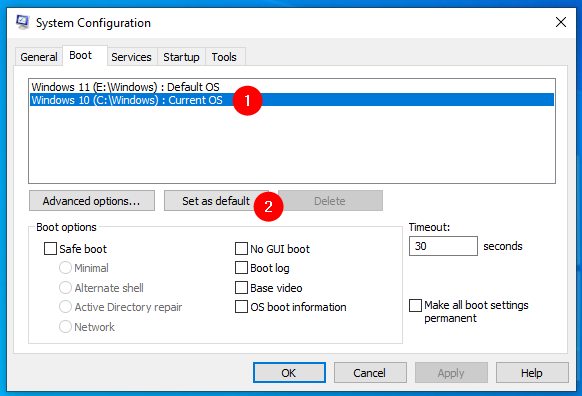
In the System Configuration window, select the Boot tab, and you should see Windows 10 and Windows 11 listed as dual-boot options. Click or tap the one you want as default and, if it’s not already the default choice, press the Set as default button.
Opening System Configuration
In the System Configuration window, select the Boot tab, and you should see Windows 10 and Windows 11 listed as dual-boot options. Click or tap the one you want as default and, if it’s not already the default choice, press the Set as default button.
 Set the default operating system
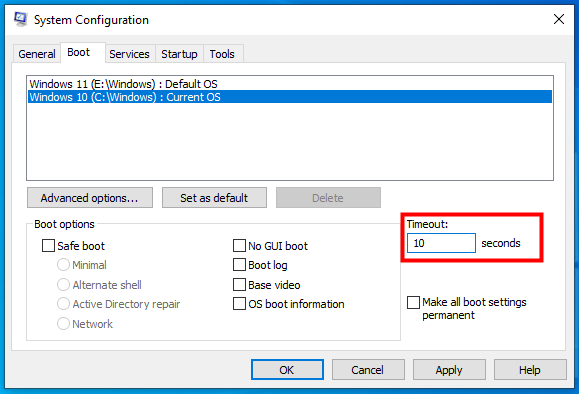
If you want to increase or decrease the display time of the boot loader, enter the number of seconds you prefer in the Timeout field on the right.
Set the default operating system
If you want to increase or decrease the display time of the boot loader, enter the number of seconds you prefer in the Timeout field on the right.
 Choose the timeout for the boot loader
Press OK to save your changes and close System Configuration. Then, reboot your computer to see how you like them.
Choose the timeout for the boot loader
Press OK to save your changes and close System Configuration. Then, reboot your computer to see how you like them.
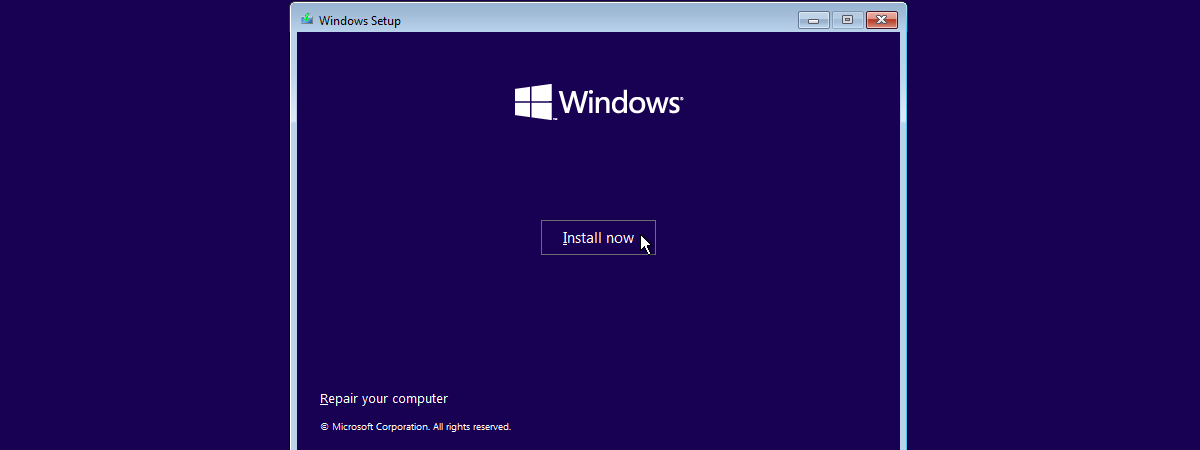
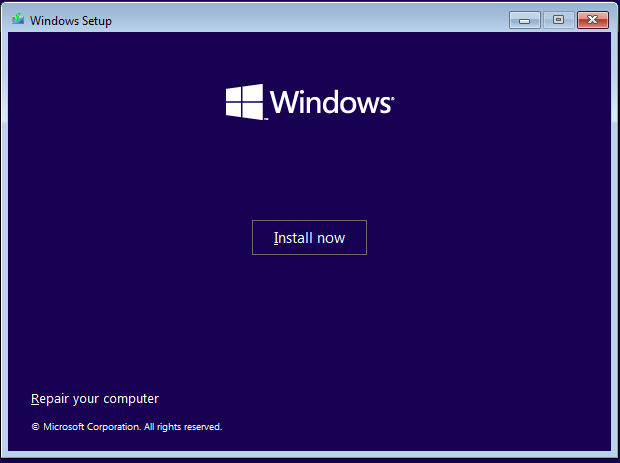
1. Install Windows 10
The first step to dual-boot Windows 10 and Windows 11 is to have Windows 10 installed on your PC. If you’re already running Windows 10, skip to the next step of this guide. Otherwise, if you have a new computer with no operating system on it or you simply want to start from zero for a completely clean experience, first install Windows 10. We’ve covered all the necessary steps in detail in this separate tutorial: How to install Windows 10 from DVD, ISO, or USB. In short, what you need to do is create a Windows 10 installation USB memory stick or DVD, boot from it, and follow the instructions of the Windows 10 setup wizard.2. Prepare a partition for Windows 11
When you have Windows 10 up and running on your computer, the next step you must take to dual boot with Windows 11 is to prepare a partition for the latter. There are two ways to do that:- Shrink your Windows 10 partition, if the drive containing it is large enough to hold both operating systems
- Ensure that you have another partition or drive with enough free space on it, available to install Windows 11 on it
2.1. Shrink your Windows 10 partition
If you want to use the same partition on which Windows 10 is installed, you need to shrink it in order to have enough space to create a new partition for Windows 11. In case you don’t know how to do that, this tutorial explains everything in detail: 2 ways to resize a partition in Windows (all versions). However, if time is of the essence, here’s the condensed explanation of the steps you should take: Open Disk Management - right-click on the Start button and select Disk Management from the WinX menu. Then, right-click on your Windows 10 partition and choose Shrink Volume from the contextual menu.2.2. Choose another empty drive or partition on your PC
You may want to install Windows 10 and Windows 11 in dual-boot on different drives, or you already have a partition on your PC that you want to use for Windows 11. In this case, make sure that you don’t have any data on it. If you do, move the files you want to keep to another storage unit before installing Windows 11 or you risk losing them. Then, move on to the next step:3. Install Windows 11
Now comes one of the essential steps of dual-booting Windows 10 with Windows 11: actually installing Windows 11. If you don’t already have a Windows 11 installation media, create one now, and use it to boot your Windows 10 computer. For instructions on how to do that, follow the steps from this guide: How to install Windows 11 from USB, DVD, or ISO. After you boot your PC using the Windows 11 installation media, follow the wizard’s steps like you normally would, right until you get to the “Where do you want to install Windows?” question. When you get there, be very careful to select the partition you’ve prepared for Windows 11, as explained in the second step of this guide. Then, press Next and continue installing Windows 11 and configuring it as you like.4. Dual boot Windows 10 and Windows 11
Once you finish installing Windows 11, your computer is ready to dual-boot. Whenever you start or restart your PC, you’ll be asked what operating system you want to boot into: Windows 10 or Windows 11.Additional configuration: How to set the default operating system for dual boot (Windows 10 or Windows 11)
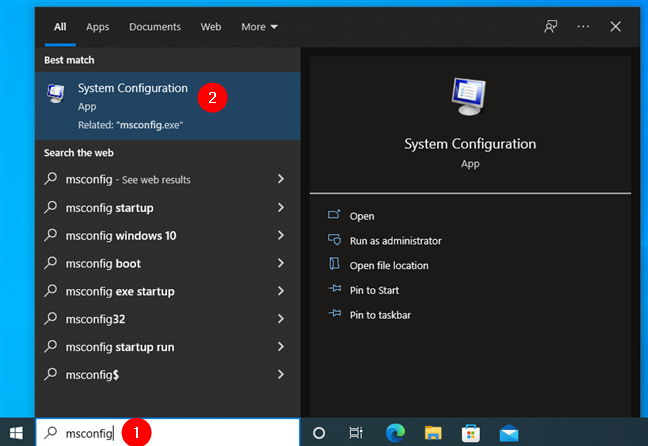
Finally, there’s one more thing you might want to do for your dual-boot configuration: choose the default operating system and, maybe, the timeout of the “Choose an operating system” boot loader screen. That is because, after the standard 30 seconds, the boot loader automatically starts the default operating system. To set these as you want, open the System Configuration tool: search for msconfig and press the System Configuration result.

Discussion (5)
I dual boot because windows 11 is my gaming OS and windows 10 is for my internet radio software. I decided to seperate them to avoid issues while I am on air.
You can also change the boot options from the ‘Choose an Op System’ page. The text ‘Change Defaults or choose other options’ (bottom) are clickable and let you change the defaults (delay in seconds, default system, etc) or do something else (ie shutdown).
I’m not sure whether Windows 11 upgrade is a smart thing to do since I see many people complaining about AMD processors dropping performances and also people saying it has a lot of bugs. It’ll be a hassle for me to reconfigure everything as I use 2 profiles. I just learnt how to partition my drive and was wondering if it’s possible to try windows 11 because I know you can boot from a separate drive. I might try this.
Windows 11 has a built-in X server thats should perform a lot better that third party options. I am exploring the possibilities of docker with regards to running Windows GUI applications from inside (linux) containers in order to replace my current (more resource intensive) VM solutions.
I need to be testing things in Windows 11 but it’s not stable enough to be ready for everyone to be using it yet. I’m yet to find anything business related that Windows 11 will do that Windows 10 won’t do better.