


If you have some free space on one of your drives and the partitions on it are too small, you may want to resize them to make them larger. Or maybe you want to resize one of the partitions on your drive to make it smaller and create a new partition in the space left unoccupied. Although you might think you need third-party tools to do these tasks, the good news is that you do not need any. Windows 11 and Windows 10 already have everything you need. Here are some ways to resize a partition (for free) in Windows using only built-in tools such as Disk Management, Command Prompt, or PowerShell:
NOTE: The steps illustrated in the following partition resizing methods are the same in both Windows 11 and Windows 10. In case you’re wondering if it’s safe to resize partitions, the answer is yes, in general. However, it doesn’t hurt, and I’d recommend you have a backup of your data before making any changes to your partitions, as there is always a risk of data loss or corruption when handling drives like this.

 How to open Disk Management in Windows 11
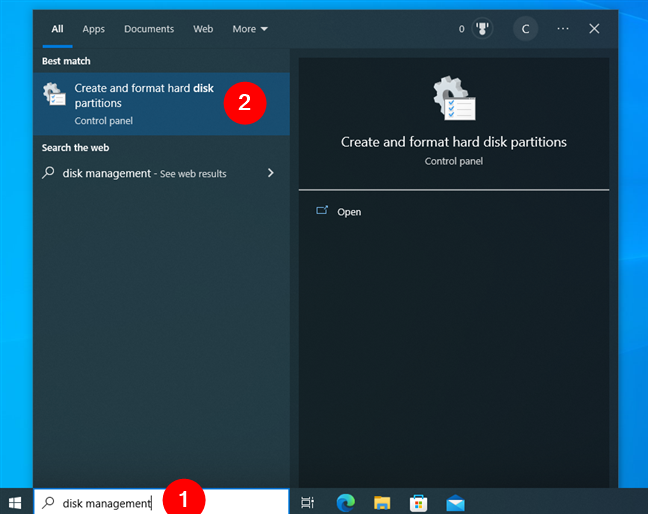
In Windows 10, enter the same “disk management” words in the search field on the taskbar, and click or tap “Create and format hard disk partitions” in the list of results.
How to open Disk Management in Windows 11
In Windows 10, enter the same “disk management” words in the search field on the taskbar, and click or tap “Create and format hard disk partitions” in the list of results.
 How to open Disk Management in Windows 10
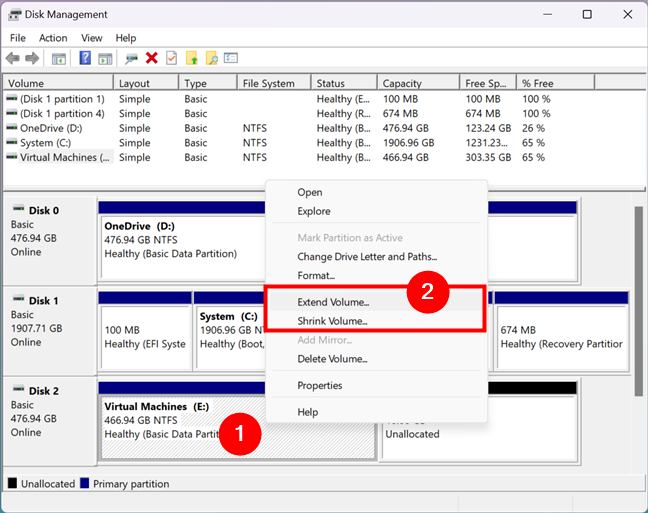
Regardless of your operating system, the Disk Management window should now open. In it, locate the partition to resize and right-click or press and hold on it. Note that you can do this both in the list of volumes from the top area or on the graphical representation of the disks and partitions from the bottom.
To resize the partition that you selected, in the contextual menu that opens:
How to open Disk Management in Windows 10
Regardless of your operating system, the Disk Management window should now open. In it, locate the partition to resize and right-click or press and hold on it. Note that you can do this both in the list of volumes from the top area or on the graphical representation of the disks and partitions from the bottom.
To resize the partition that you selected, in the contextual menu that opens:
 Partition resize options
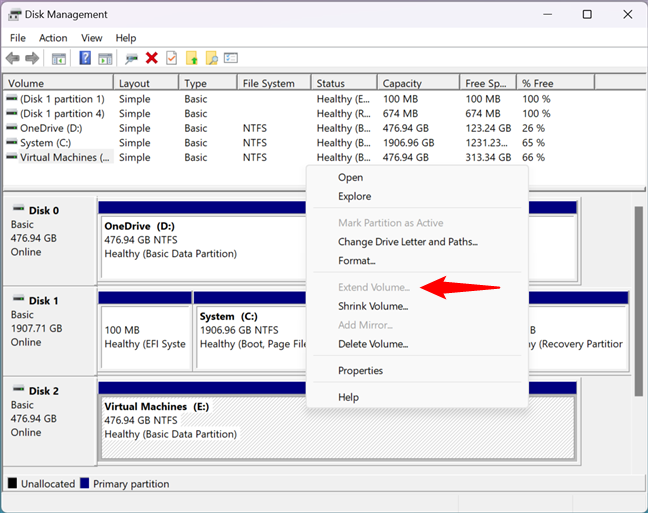
Note that if there is no free unallocated space near the partition, you cannot enlarge it. In this case, the “Extend Volume” option is grayed out. Similarly, if the partition you want to shrink is full of data, you cannot make it smaller as there is no space left on it to take away. In this case, the “Shrink Volume” option is grayed out.
Partition resize options
Note that if there is no free unallocated space near the partition, you cannot enlarge it. In this case, the “Extend Volume” option is grayed out. Similarly, if the partition you want to shrink is full of data, you cannot make it smaller as there is no space left on it to take away. In this case, the “Shrink Volume” option is grayed out.
 Extend Volume and Shrink Volume are not always available
 Starting the Extend Volume Wizard
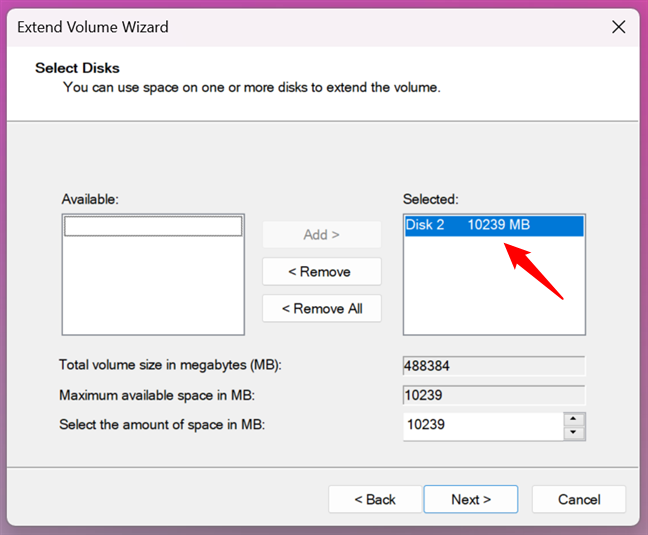
Next, you can see how much space you can add to the partition. The amount you can add depends on how much free space is available near the partition. By default, the wizard selects all the free space it can use, which you can see in the Selected list.
Starting the Extend Volume Wizard
Next, you can see how much space you can add to the partition. The amount you can add depends on how much free space is available near the partition. By default, the wizard selects all the free space it can use, which you can see in the Selected list.
 The partition can be resized by this much
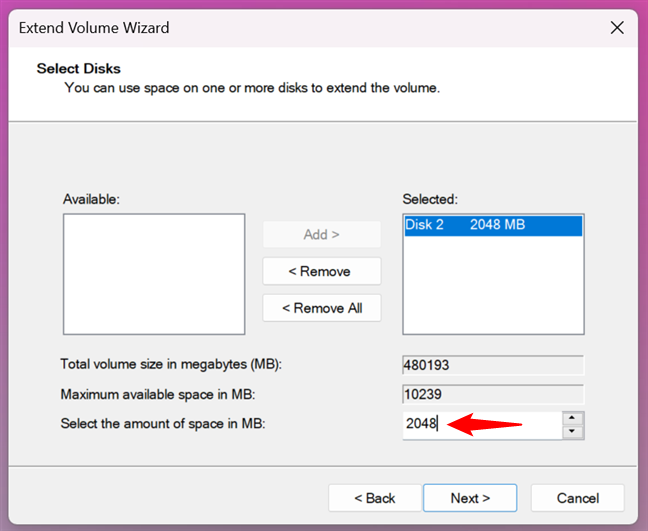
If you want to add less space to the partition, you can specify it in the “Select the amount of space in MB” field at the bottom of the window. Once you have made a decision, click or tap on Next to continue.
The partition can be resized by this much
If you want to add less space to the partition, you can specify it in the “Select the amount of space in MB” field at the bottom of the window. Once you have made a decision, click or tap on Next to continue.
 The amount of space to add to the partition
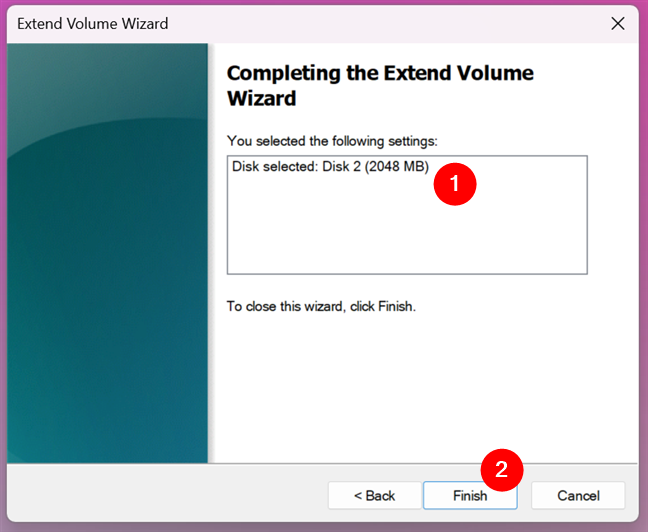
Finally, the “Extend Volume Wizard” shows a summary of the settings you made. If you are satisfied with them and want to continue, click or tap the Finish button.
The amount of space to add to the partition
Finally, the “Extend Volume Wizard” shows a summary of the settings you made. If you are satisfied with them and want to continue, click or tap the Finish button.
 Finish extending the partition
The wizard closes, and you can see that the partition is extended back into the Disk Management window. Depending on your drive’s speed, this process could take a second or a few minutes.
Finish extending the partition
The wizard closes, and you can see that the partition is extended back into the Disk Management window. Depending on your drive’s speed, this process could take a second or a few minutes.
 Choosing to shrink a partition
That action triggers the opening of a dialog window called “Shrink X:” where X is the letter of that partition. In the first two fields from this dialog window, the Disk Management tool tells you the size of the partition right now and how much space you can take from it. This value is displayed in the “Size of available shrink space in MB,” and it is calculated by Windows based on how much free space there is on the partition and the location of any unmovable files found on that partition.
Choosing to shrink a partition
That action triggers the opening of a dialog window called “Shrink X:” where X is the letter of that partition. In the first two fields from this dialog window, the Disk Management tool tells you the size of the partition right now and how much space you can take from it. This value is displayed in the “Size of available shrink space in MB,” and it is calculated by Windows based on how much free space there is on the partition and the location of any unmovable files found on that partition.
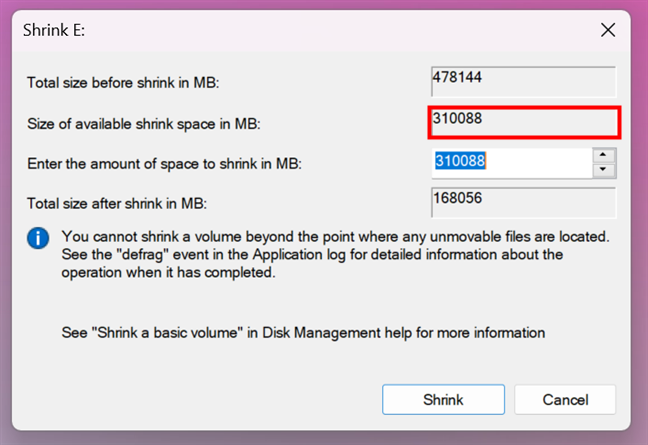
 Size of available shrink space in MB
The only field that is editable is called “Enter the amount of space to shrink in MB,” and this is where you must type the space that you want to take from the partition. The value you enter cannot be larger than the one specified in the “Size of available shrink space in MB.” In the fourth field, the last one, Disk Management automatically calculates the size of the partition after you shrink it.
Size of available shrink space in MB
The only field that is editable is called “Enter the amount of space to shrink in MB,” and this is where you must type the space that you want to take from the partition. The value you enter cannot be larger than the one specified in the “Size of available shrink space in MB.” In the fourth field, the last one, Disk Management automatically calculates the size of the partition after you shrink it.
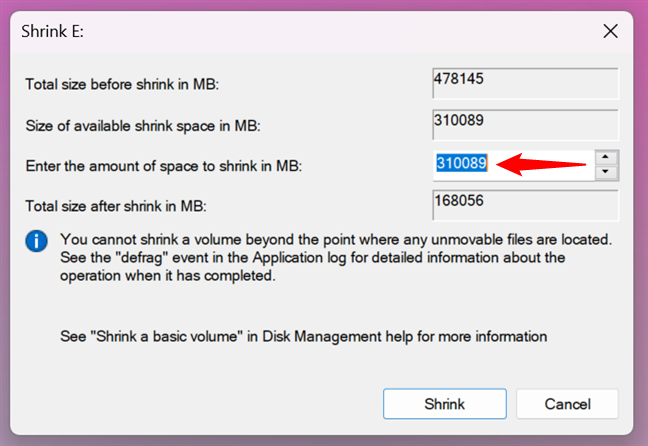
 The partition is resized by this much
Once you have made up your mind and decided the amount of space you want to take from the partition, click or tap on the Shrink button.
The partition is resized by this much
Once you have made up your mind and decided the amount of space you want to take from the partition, click or tap on the Shrink button.
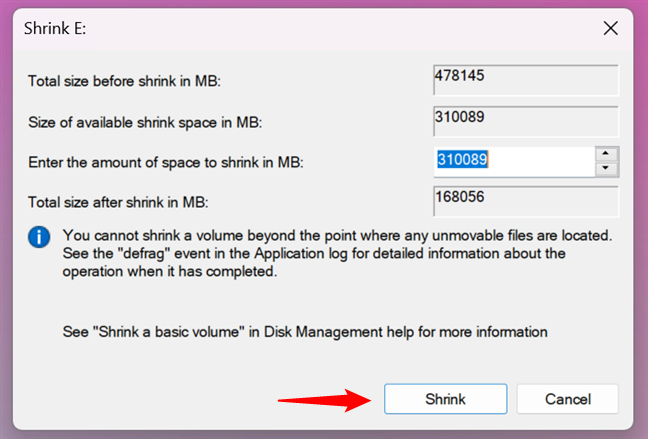
 Shrink a partition in Windows
Wait for a few moments for the partition to be shrunk by Windows. Then, you can see its new size in the Disk Management tool.
Shrink a partition in Windows
Wait for a few moments for the partition to be shrunk by Windows. Then, you can see its new size in the Disk Management tool.
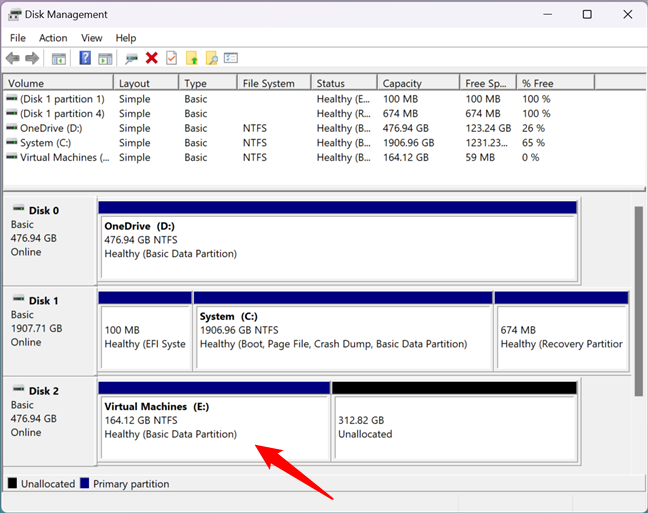 The partition was resized
The space you took from the partition should now be available next to it, marked as unallocated. If you want, you can use this space to create new partitions or to increase the size of another partition placed next to the unallocated space.
The partition was resized
The space you took from the partition should now be available next to it, marked as unallocated. If you want, you can use this space to create new partitions or to increase the size of another partition placed next to the unallocated space.
 Starting diskpart in Command Prompt
Next, list the volumes (partitions) on your Windows computer with this command:
Starting diskpart in Command Prompt
Next, list the volumes (partitions) on your Windows computer with this command:
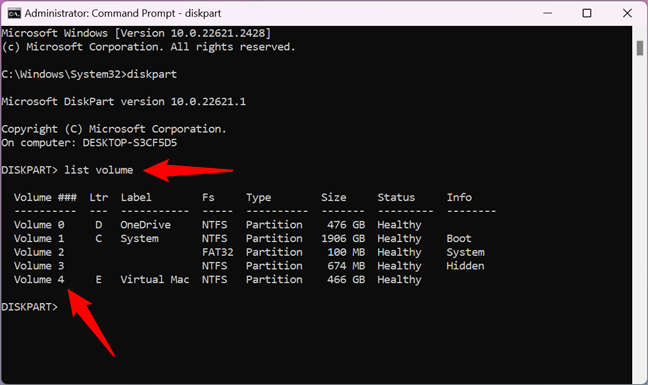 List the volumes on the computer
Once you find the partition to resize, run this command to select it:
List the volumes on the computer
Once you find the partition to resize, run this command to select it:
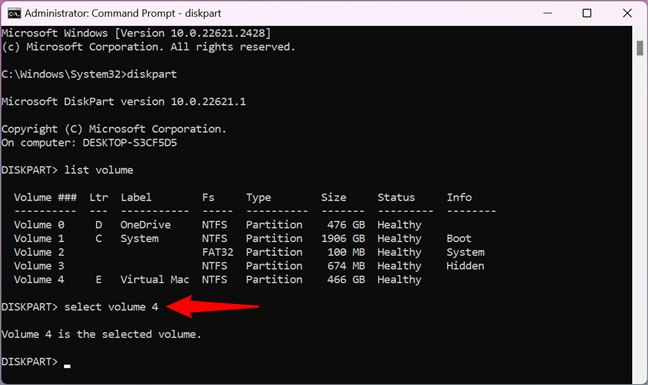 Selecting the volume to resize
The next command differs depending on how you want to resize the partition. If you want to extend the partition, run the following command with the customsize value specified in MB (megabytes):
Selecting the volume to resize
The next command differs depending on how you want to resize the partition. If you want to extend the partition, run the following command with the customsize value specified in MB (megabytes):
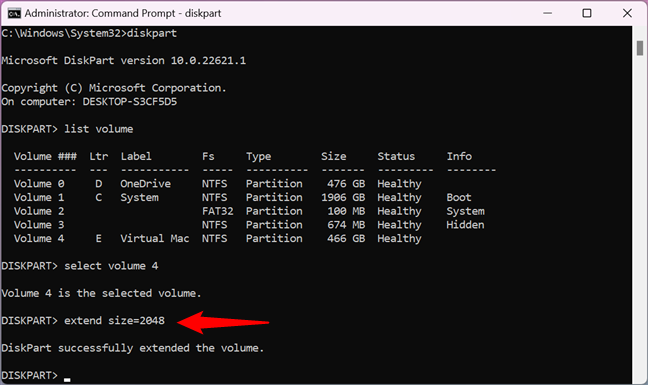 Resize a partition by extending it
If you want to shrink the partition (make it smaller), run the next command with the customsize value specified in MB (megabytes):
Resize a partition by extending it
If you want to shrink the partition (make it smaller), run the next command with the customsize value specified in MB (megabytes):
 Resize a partition by shrinking it
Unfortunately, the DiskPart tool is trickier to use than the Disk Management. That is because DiskPart does not tell you the amount of available space that you can add or remove from a partition. You have to know that beforehand, or you might have to do some trial and error.
When you are done with resizing the partition, you can close the Command Prompt or PowerShell, depending on which one you used. If you want to know more about the diskpart command-line tool and how to use it in Windows to manage partitions and disks, read this tutorial: How to use diskpart, chkdsk, defrag, and other disk-related commands.
Resize a partition by shrinking it
Unfortunately, the DiskPart tool is trickier to use than the Disk Management. That is because DiskPart does not tell you the amount of available space that you can add or remove from a partition. You have to know that beforehand, or you might have to do some trial and error.
When you are done with resizing the partition, you can close the Command Prompt or PowerShell, depending on which one you used. If you want to know more about the diskpart command-line tool and how to use it in Windows to manage partitions and disks, read this tutorial: How to use diskpart, chkdsk, defrag, and other disk-related commands.
 Importing the Storage module in PowerShell
Next, to see the (physical) drives installed on your system, run this cmdlet:
Importing the Storage module in PowerShell
Next, to see the (physical) drives installed on your system, run this cmdlet:
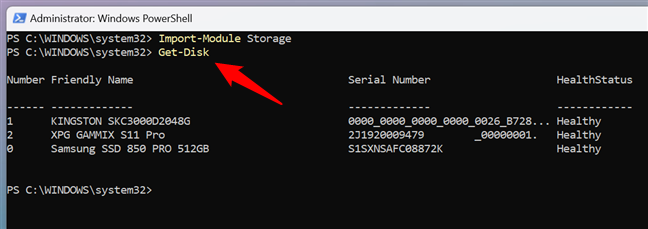
 Get information about the drives
To see the partitions found on a certain drive, use the following cmdlet, replacing [Number] with the number of the drive shown by the previous command:
Get information about the drives
To see the partitions found on a certain drive, use the following cmdlet, replacing [Number] with the number of the drive shown by the previous command:
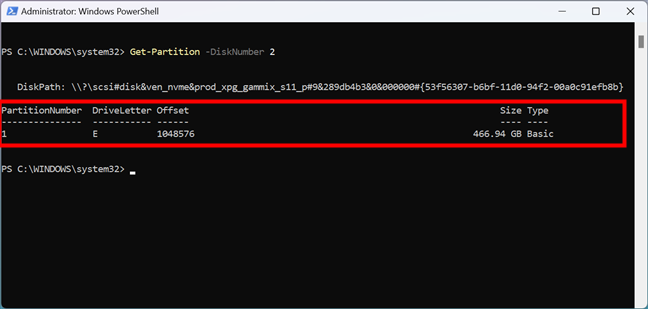
 Get information about the partitions on a drive
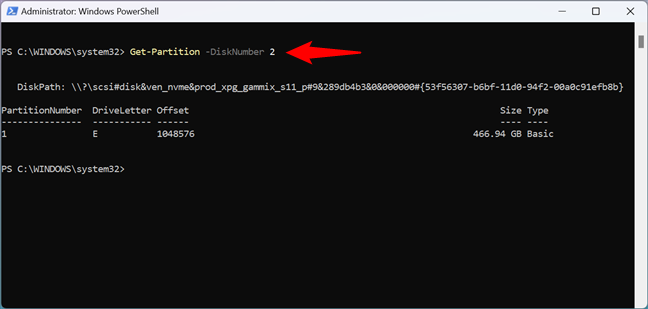
This command outputs details such as the partition number, drive letter, size, and type of each partition found on the selected drive.
Get information about the partitions on a drive
This command outputs details such as the partition number, drive letter, size, and type of each partition found on the selected drive.
 Details about the partitions on the drive
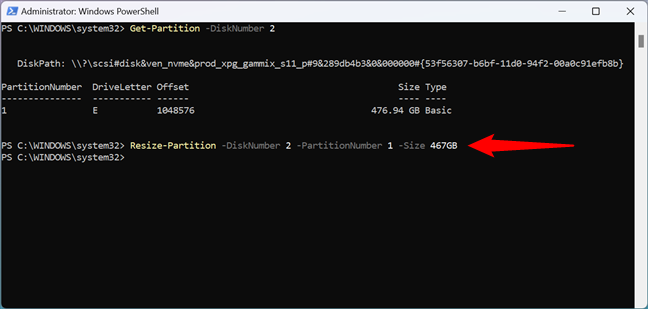
To resize a partition, you can execute the Resize-Partition cmdlet in PowerShell, specifying the disk number, the partition number, and the new size in bytes. The syntax is this:
Details about the partitions on the drive
To resize a partition, you can execute the Resize-Partition cmdlet in PowerShell, specifying the disk number, the partition number, and the new size in bytes. The syntax is this:
 Using PowerShell's Resize-Partition to shrink a partition
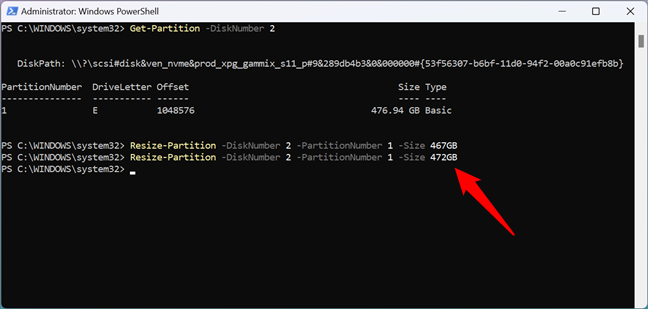
You can use the same command with a larger size value to extend the partition. The only condition is having enough free space on the drive. For instance, if I wanted to increase the size of my E: partition by 5 GB, I could run PowerShell’s Resize-Partition cmdlet like this:
Using PowerShell's Resize-Partition to shrink a partition
You can use the same command with a larger size value to extend the partition. The only condition is having enough free space on the drive. For instance, if I wanted to increase the size of my E: partition by 5 GB, I could run PowerShell’s Resize-Partition cmdlet like this:
 Using PowerShell's Resize-Partition to extend a partition
The resizing happens all in the background, and depending on your hardware, it may take a while to complete.
Using PowerShell's Resize-Partition to extend a partition
The resizing happens all in the background, and depending on your hardware, it may take a while to complete.
1. How to resize a partition in Windows using Disk Management
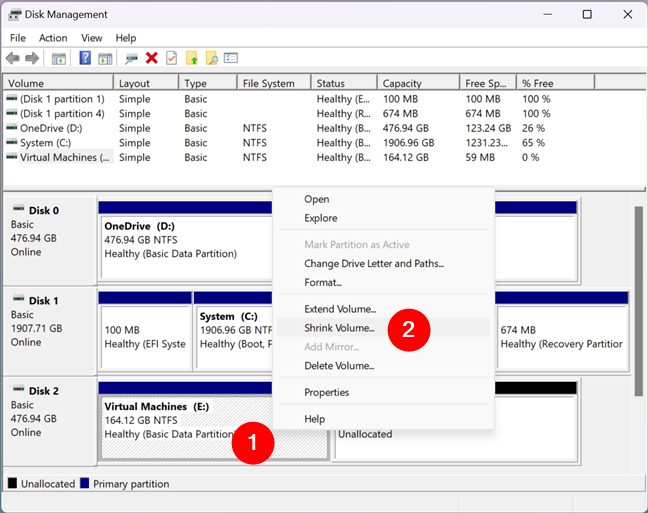
The first thing you must do is open the Disk Management tool, and a fast method is to use the search. If you’re using Windows 11, click or tap the search box on the taskbar, type “disk management,” and choose the “Create and format hard disk partitions” result.- Click or tap on “Extend Volume” if you want to increase the partition size or
- Click or tap on “Shrink Volume” if you want to make the partition smaller.
How to increase the size of a Windows partition
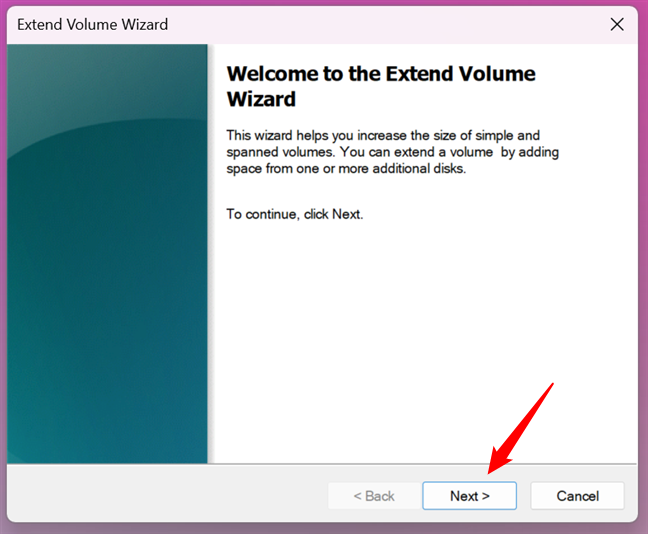
If you want to make the partition bigger and there is free space for it to take, after you click/tap on the “Extend Volume” option, Disk Management opens the “Extend Volume Wizard.” In it, click or tap Next.How to decrease the size of a Windows partition
What if you want to make the partition smaller than it currently is? In this case, in the right-click menu, choose “Shrink Volume.”2. How to resize a partition with DiskPart in Command Prompt or PowerShell
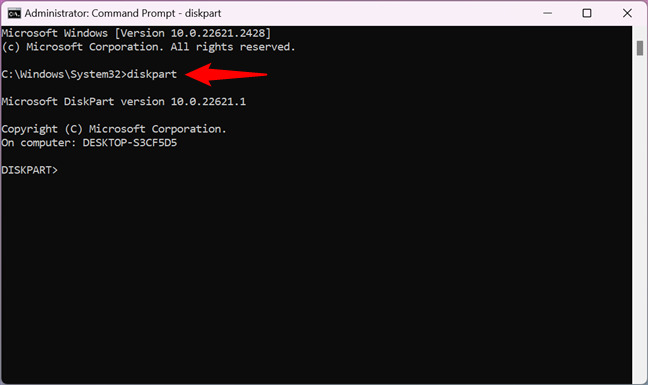
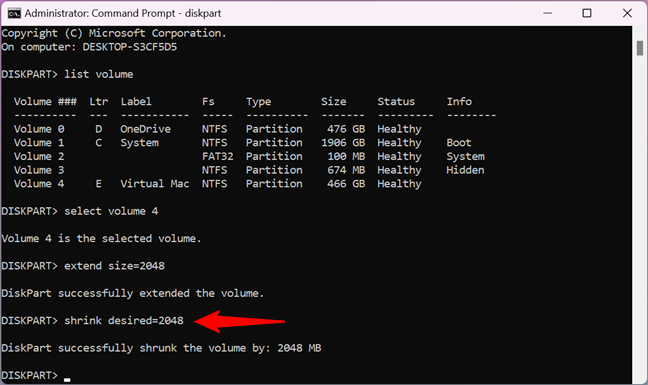
If you love using the command line, you might prefer the Command Prompt or the PowerShell to resize your partitions. Start CMD or PowerShell as an administrator, or launch the one you prefer in a Windows Terminal tab. That matters less; what counts are the next steps and commands. First, type this command to start the DiskPart partitioning tool:diskpart
list volume
In the list, identify the volume number of the partition that you want to resize. Look for it in the Volume ### column.
select volume #
Replace # with the actual number of the partition you want to resize. In my case, for example, I typed “select volume 4" because I wanted to resize the partition with the letter E and the volume number 4.
extend size=customsize
shrink desired=customsize
3. How to change a partition’s size with Resize-Partition in PowerShell
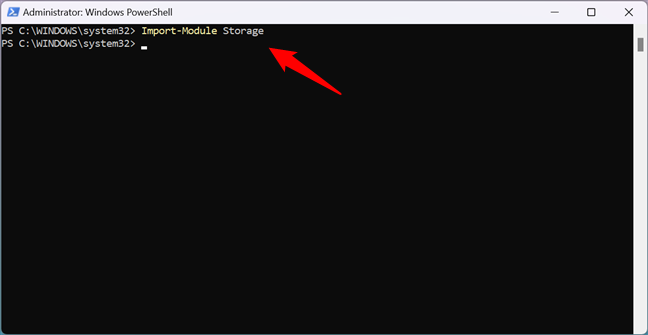
If you want to change the size of a certain partition on your Windows 11 or Windows 10 computer, you can also use the Resize-Partition cmdlet in PowerShell. This command allows you to decrease or increase a partition without losing data. But before you can actually run it, you need to open PowerShell as an administrator and run the following command to make sure that you can use the required storage commands:Import-Module Storage
Get-Disk
Get-Partition -DiskNumber [Number]
For example, I wanted to see the partitions on my XPG Gammix S11 Pro solid-state drive. Its number is 2, so I ran the cmdlet like this:
Get-Partition -DiskNumber 2
Resize-Partition -DiskNumber [Number] -PartitionNumber [Number] -Size Size [Size specified in Bytes, KB, MB, GB, or TB]
For example, to shrink my E: drive by approximately 10 GB, I need to run the command:
Resize-Partition -DiskNumber 2 -PartitionNumber 1 -Size 467GB
Resize-Partition -DiskNumber 2 -PartitionNumber 1 -Size 472GB
Discussion (0)
Be the first to comment.