

If you work with Windows computers and devices that have multiple partitions and drives, you may need to hide a particular partition. For instance, many computer manufacturers create hidden recovery partitions on their devices. However, in certain situations, the recovery partitions might start showing up in File Explorer and elsewhere on your device. While helpful in restoring your PC, you might not always want to see it and prefer to hide the recovery partition from view. Similarly, when you need simple access to a hidden partition, you will want to unhide that partition. Whatever your reasons, here’s how to hide a partition in Windows and how to unhide one:
NOTE: The instructions in this guide apply to both Windows 10 and Windows 11. Because everything looks almost identical in the two operating systems, for simplicity, we use screenshots taken only in Windows 11.
 Open the WinX menu in Windows
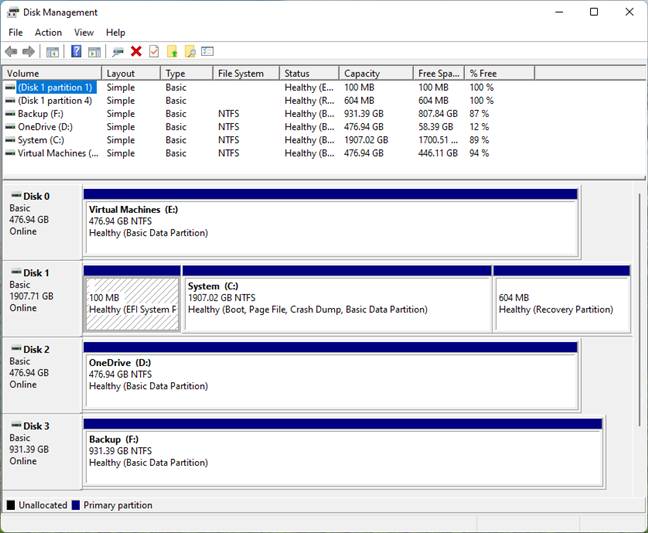
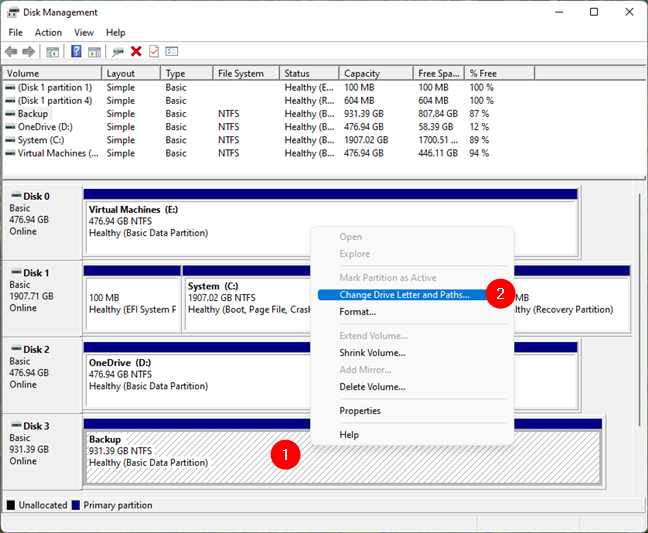
In the Disk Management window, identify the partition you want to hide. You can find it in the volumes list at the top and in the graphical representation at the bottom of the window.
Open the WinX menu in Windows
In the Disk Management window, identify the partition you want to hide. You can find it in the volumes list at the top and in the graphical representation at the bottom of the window.
 The Disk Management tool from Windows
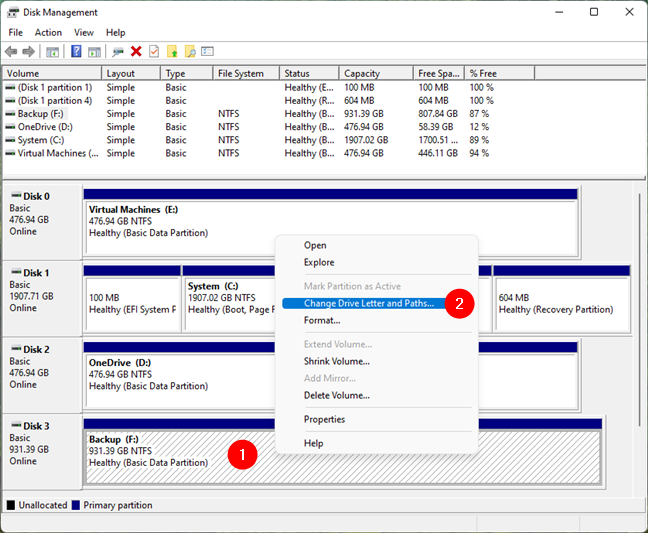
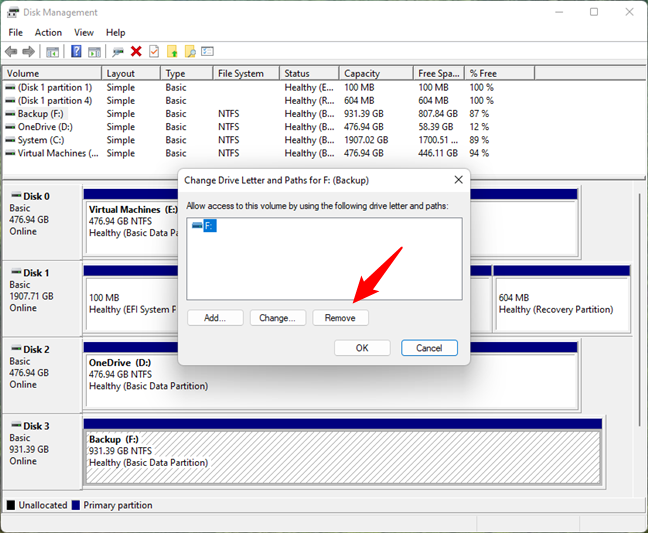
Right-click or press and hold the partition you want to hide (or dismount, if you prefer). Then, in the right-click menu, choose “Change Drive Letter and Paths.”
The Disk Management tool from Windows
Right-click or press and hold the partition you want to hide (or dismount, if you prefer). Then, in the right-click menu, choose “Change Drive Letter and Paths.”
 Change drive letter and paths for a drive
Click or tap the Remove button in the “Change Drive Letter and Paths” window.
Change drive letter and paths for a drive
Click or tap the Remove button in the “Change Drive Letter and Paths” window.
 Remove the drive letter of a partition
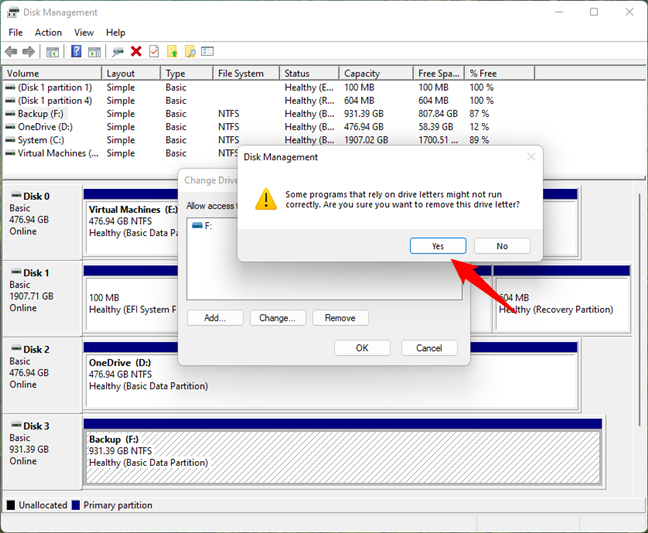
You are asked to confirm that you want to remove the drive letter. Press Yes.
Remove the drive letter of a partition
You are asked to confirm that you want to remove the drive letter. Press Yes.
 Close any open files and apps to continue
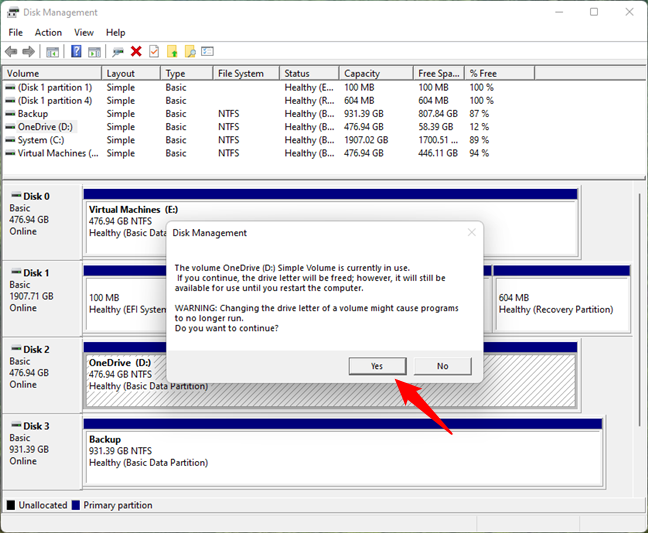
You might get a warning that the drive is currently in use, in which case you should close any open apps and files, especially those stored on the drive you’re trying to hide. Then, press Yes in the Disk Management dialog.
Close any open files and apps to continue
You might get a warning that the drive is currently in use, in which case you should close any open apps and files, especially those stored on the drive you’re trying to hide. Then, press Yes in the Disk Management dialog.
 Hide a partition in Windows
Now the partition is hidden (or dismounted) and no longer easily accessible from File Explorer. On every login from now on, Windows will remember the setting you just made. Thus, the partition will no longer be available to apps and users unless you choose to unhide (or mount) it. You can close Disk Management and resume your work.
Hide a partition in Windows
Now the partition is hidden (or dismounted) and no longer easily accessible from File Explorer. On every login from now on, Windows will remember the setting you just made. Thus, the partition will no longer be available to apps and users unless you choose to unhide (or mount) it. You can close Disk Management and resume your work.
 Change drive letter and paths for a partition
In the “Change Drive Letter and Paths” window, press the Add button.
Change drive letter and paths for a partition
In the “Change Drive Letter and Paths” window, press the Add button.
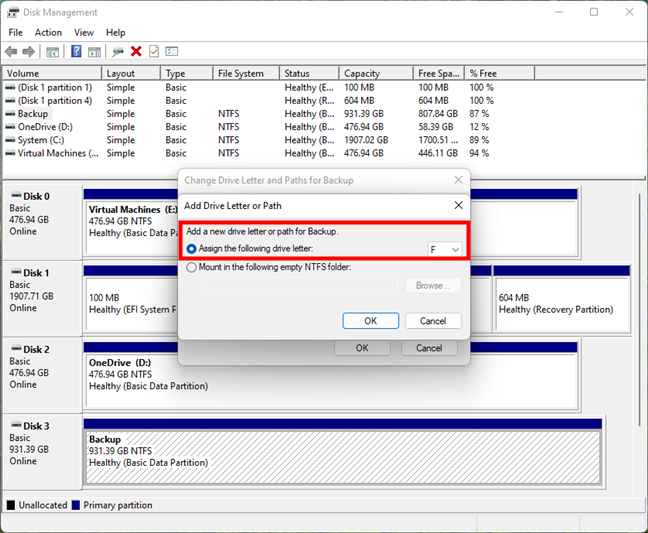
 Add a drive letter to a hidden partition
The “Add Drive Letter or Path” window opens. Here, choose the drive letter you want to assign in the dropdown list on the right. Then, click or tap OK.
Add a drive letter to a hidden partition
The “Add Drive Letter or Path” window opens. Here, choose the drive letter you want to assign in the dropdown list on the right. Then, click or tap OK.
 Select the letter to use for the hidden partition
You successfully unhid the partition. It’s now mounted and visible to all users and apps on your Windows computer.
Select the letter to use for the hidden partition
You successfully unhid the partition. It’s now mounted and visible to all users and apps on your Windows computer.
 Use CMD to hide a partition in Windows
TIP: If you’d like to know more about the mountvol command and how it works, read this documentation from Microsoft: mountvol.
Use CMD to hide a partition in Windows
TIP: If you’d like to know more about the mountvol command and how it works, read this documentation from Microsoft: mountvol.
 Run the mountvol command to see the hidden partitions
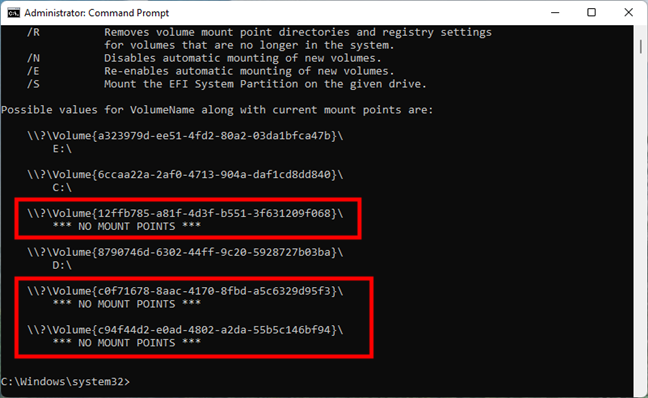
Scroll down until you see the list of possible values for the VolumeName parameter, along with the current mount points. The entries that say *** NO MOUNT POINTS *** represent hidden partitions, which can be mounted (unhid).
Run the mountvol command to see the hidden partitions
Scroll down until you see the list of possible values for the VolumeName parameter, along with the current mount points. The entries that say *** NO MOUNT POINTS *** represent hidden partitions, which can be mounted (unhid).
 The volume names of the hidden partitions
To mount a partition, run the command:
The volume names of the hidden partitions
To mount a partition, run the command:
 How to unhide a partition from CMD
You won’t receive any messages, but as soon as the partition is mounted, Windows will open it in File Explorer. The partition is now unhidden and accessible to all apps and users.
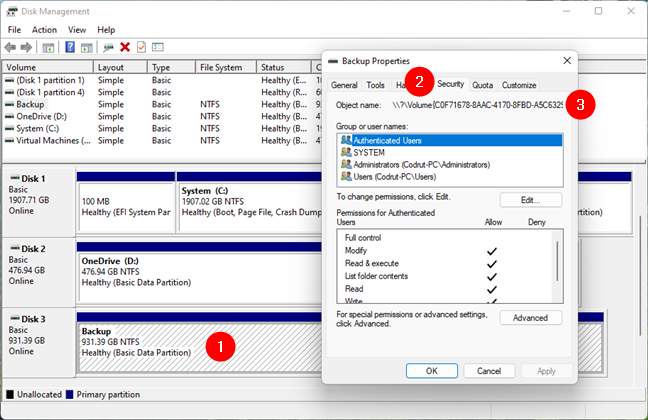
NOTE: One tricky part about this method is that, when working on a Windows computer with many hidden partitions, you don’t know the Volume ID of the partition that you want to mount for use. To check the ID of the hidden partition that you want to unhide, you need to open Disk Management, access the properties of that hidden partition, and go to the Security tab. There, you’ll see the ID next to Object name.
How to unhide a partition from CMD
You won’t receive any messages, but as soon as the partition is mounted, Windows will open it in File Explorer. The partition is now unhidden and accessible to all apps and users.
NOTE: One tricky part about this method is that, when working on a Windows computer with many hidden partitions, you don’t know the Volume ID of the partition that you want to mount for use. To check the ID of the hidden partition that you want to unhide, you need to open Disk Management, access the properties of that hidden partition, and go to the Security tab. There, you’ll see the ID next to Object name.
 Find the volume name of a hidden drive
That’s it!
Find the volume name of a hidden drive
That’s it!
How to hide a partition in Windows using Disk Management
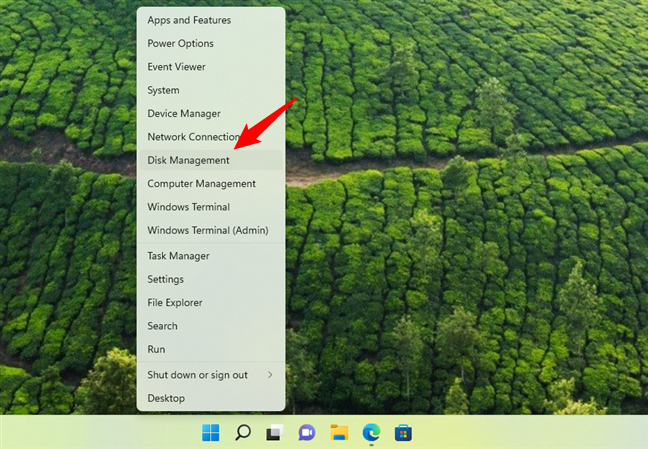
First, you need to open Disk Management. A fast way to do it, which works the same in Windows 10 and Windows 11, is to use the WinX menu. Right-click or press and hold the Start button, and select Disk Management from the menu.How to unhide a partition in Windows using Disk Management
When you want the partition available again, you need to unhide it or mount it. To do that, open the Disk Management tool again. In the list of volumes at the top or in that of disks at the bottom of the window, find the hidden partition and right-click on it. In the context menu, select “Change Drive Letter and Paths.”How to hide a partition in Windows using the Command Prompt
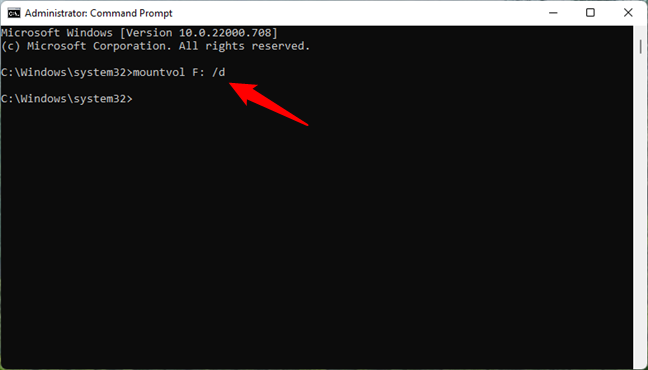
You can also hide a drive in Windows using Command Prompt. Open CMD as an administrator and run this command:mountvol [driveletter]: /d
Replace [driveletter] with the actual drive letter of the partition that you want to hide or dismount. For example, to hide the F: drive, you should run the command:
mountvol F: /d
How to unhide a partition in Windows using the Command Prompt
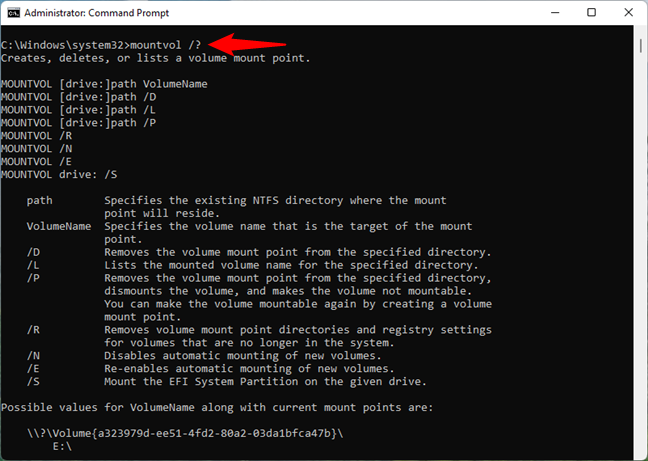
When you want the partition available again for daily use, you need to unhide it or mount it again. To do that, open the Command Prompt as administrator, and run the command:mountvol /?
It displays all the documentation about the mountvol command and its parameters.
mountvol [driveletter]: [volumename]
Replace [driveletter]: with the letter you want to use for the partition, but make sure it’s free and not taken by other drives. In our example, we choose to use the drive letter F.
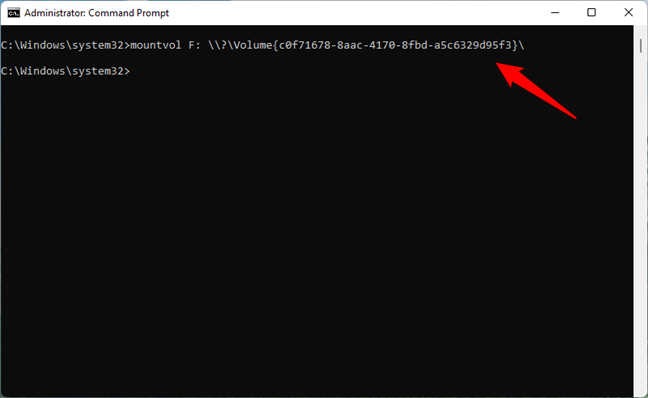
Also, replace [volumename] with the exact name of the drive you want to mount, as shown by the previous command. It starts with \\?\Volume{. In our case, the partition we want to mount is named \\?\Volume{c0f71678-8aac-4170-8fbd-a5c6329d95f3}\.
So, our command looks like this:
mountvol F: \\?\Volume{c0f71678-8aac-4170-8fbd-a5c6329d95f3}\
Discussion (12)
I have a better method. I use Boot Manager from TerabyteUnlimited. Allows me to select boot partition that are in totally isolated form and lets me hide / display any volume or partition that I wish.
Hello, quick question. If I un-mount the secondary partition in windows 10 via partition manager. Can I still use it for dual-boot at startup? (I have two OS on my laptop and I want to hide the partition with the second OS, but still be able to boot to it from the dual-boot screen) Thanks!
To remove the partitions, the given post can be very useful for the user as they can do the removing of the partition or hiding of the partitions. Some times some partition has to be removed, so for that the update is necessary and it can be done by windows modules installer worker high cpu
If I try to unmount the partition I get access denied (Zugriff verweigert).
What should i do if i get the message :the system cannot find the drive specified in CPRMT
Your article helped protecting my backups on an online external drive against false intruders or malware (p.e. cryptoware). Thank you so much for your most detailed article !!!
Happy to help!
thanks a lot so easy and just what i needed
This is NOT usefull if you do it on an external hard drive: when you conect it to another computer your “hidden” partition will be there for everyone to acces.
Any ideeas ?
This doesn’t work if the Windows does not recognize the partition(s) you’re trying to hide. On laptop I have Windows XP and Ubuntu Linux on Reiser file system. XP’s disk management shows the Linux partition(s) but has no drive letters assgned to them and changing/assigning drive letters is not an available option, YET you’re still given the option of DELETING or FORMATTING the Linux partions!!! I need a better method!
Really simple and effective. Thanks for the info.
I was using the XOSL bootmanager (Extended Operating System Loader) for the machines with more than one OS on board. It also does allow to create a profiles in which certain partitions will be hidden automatically at boot time. This should work for all Windows based version (XP, Vista, probably 7 as well). On my machine I have only XP + recovery partition made from WinPE. XOSL is on extended dedicated partition (8MB) and it allows me to select either OS or recovery. I did not try to use it with Linux, but it is written that Linux (with LILO) is supported. Maybe it is worth to try it. 🙂