

Hiding important files or folders on your Windows PC can be useful if you want to keep them relatively safe. However, there comes a point when you’ll probably want to unhide those files and/or folders. Fortunately, you can do it just as easily as hiding them. Whatever your reasons are, in this tutorial, I’m going to show you how to unhide files and folders in Windows 11 and Windows 10 using File Explorer, as well as with commands in PowerShell and Command Prompt. Let’s start:
NOTE: If you’ve come to this guide while searching how to hide files or folders, not unhide them, read this tutorial instead: How to hide files and folders in Windows. Also, note that because the instructions and steps are identical in both Windows 11 and Windows 10, I’m using screenshots only from Windows 11.
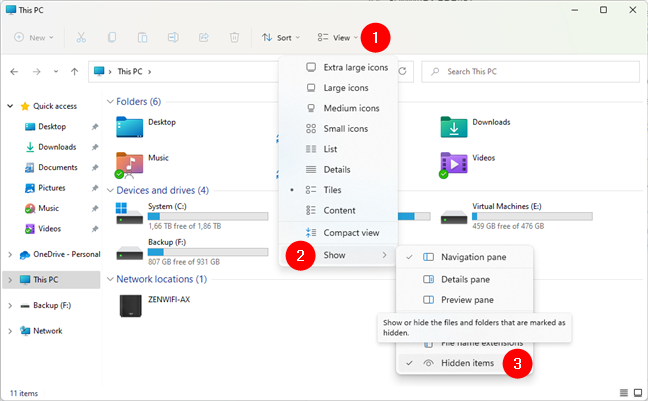
 Show hidden items in Windows 11's File Explorer
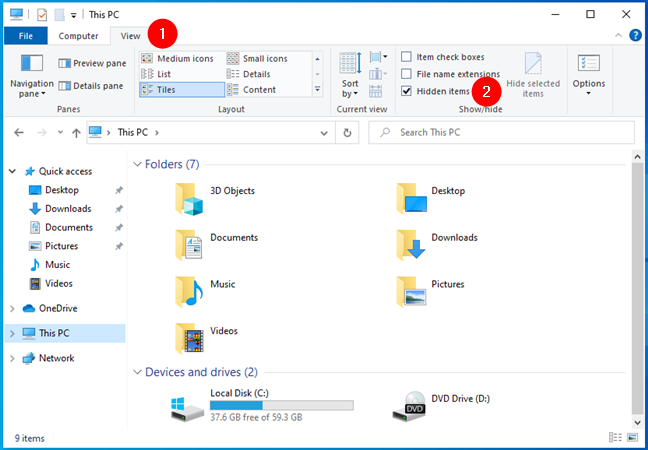
In Windows 10, open the View menu from the top of File Explorer, and then select the Hidden items setting.
Show hidden items in Windows 11's File Explorer
In Windows 10, open the View menu from the top of File Explorer, and then select the Hidden items setting.
 Show hidden items in Windows 10's File Explorer
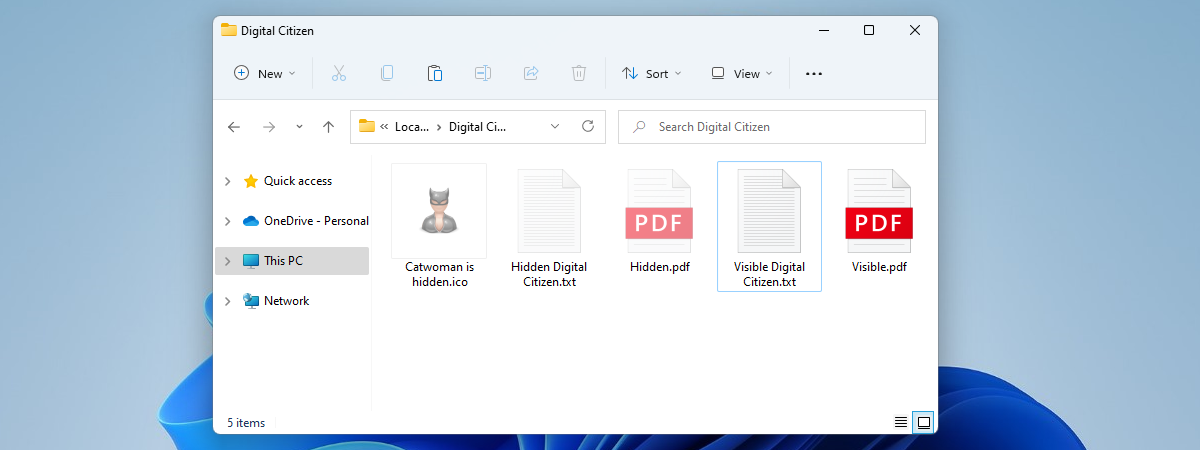
Then, regardless of whether you have Windows 11 or Windows 10, use File Explorer to go to the file or folder you want to unhide.
Show hidden items in Windows 10's File Explorer
Then, regardless of whether you have Windows 11 or Windows 10, use File Explorer to go to the file or folder you want to unhide.
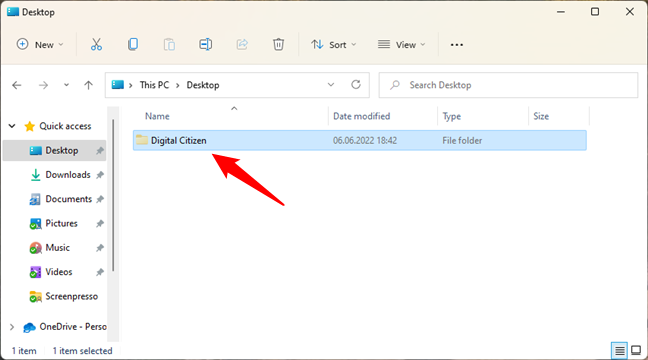
 Navigate to the file or folder you want to unhide
Right-click or press and hold on the hidden file or folder and, in the context menu, select Properties. You can also select the file/folder and press ALT + Enter on your keyboard to achieve the same result.
Navigate to the file or folder you want to unhide
Right-click or press and hold on the hidden file or folder and, in the context menu, select Properties. You can also select the file/folder and press ALT + Enter on your keyboard to achieve the same result.
 Open the Properties of the hidden file or folder
In the hidden file or folder Properties window, select the General tab. Then, uncheck the Hidden box and click or tap on OK.
Open the Properties of the hidden file or folder
In the hidden file or folder Properties window, select the General tab. Then, uncheck the Hidden box and click or tap on OK.
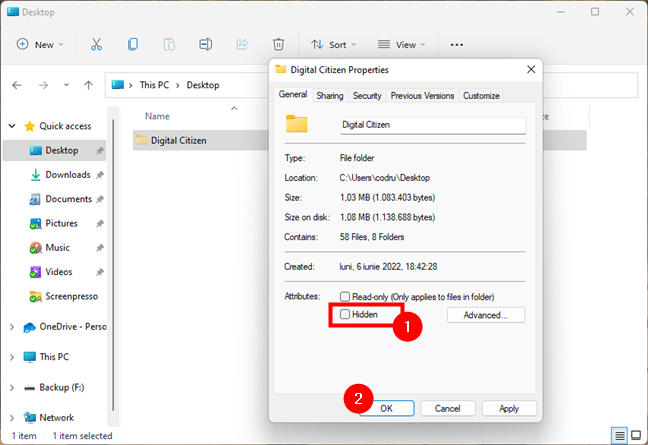
 Uncheck the Hidden option and apply the setting
If you’ve set a file as not hidden, the change is applied immediately. However, if you followed the steps on a hidden folder, Windows will ask you to “Confirm [the] Attribute Changes.” Choose whether you want to unhide only the folder or its subfolders and files too. In most situations, you’ll probably prefer the second option: “Apply changes to this folder, subfolders[,] and files.” Mark the option you prefer and press OK twice.
Uncheck the Hidden option and apply the setting
If you’ve set a file as not hidden, the change is applied immediately. However, if you followed the steps on a hidden folder, Windows will ask you to “Confirm [the] Attribute Changes.” Choose whether you want to unhide only the folder or its subfolders and files too. In most situations, you’ll probably prefer the second option: “Apply changes to this folder, subfolders[,] and files.” Mark the option you prefer and press OK twice.
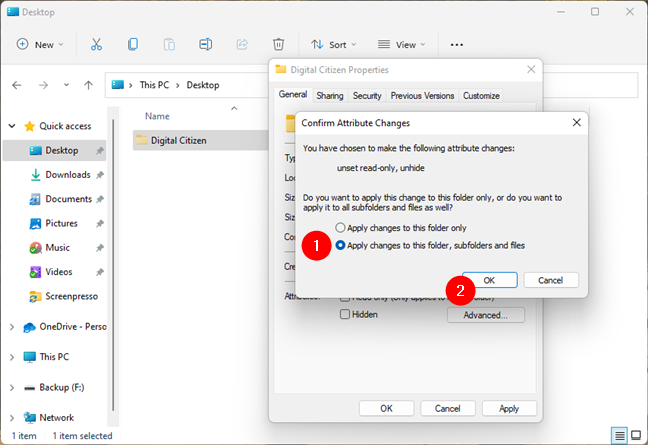 Confirm Attribute Changes
The file or folder is then unhidden and visible in File Explorer’s default view again.
TIP: If you’d like to protect your files and folders using a password, these two guides can help: 8 tools to password-protect your folders in Windows and 2 ways to create a password-protected ZIP file in Windows.
Confirm Attribute Changes
The file or folder is then unhidden and visible in File Explorer’s default view again.
TIP: If you’d like to protect your files and folders using a password, these two guides can help: 8 tools to password-protect your folders in Windows and 2 ways to create a password-protected ZIP file in Windows.
 Unhide a file or folder in Windows with Command Prompt
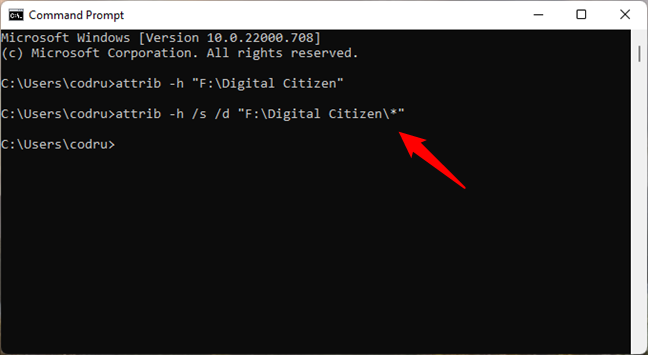
If you want to unhide all the contents of a folder, including files and subfolders, run the previous command first, and then run this one too:
Unhide a file or folder in Windows with Command Prompt
If you want to unhide all the contents of a folder, including files and subfolders, run the previous command first, and then run this one too:
 How to unhide all files and subfolders in a folder using CMD
Next, let’s see how to do the same from PowerShell:
How to unhide all files and subfolders in a folder using CMD
Next, let’s see how to do the same from PowerShell:
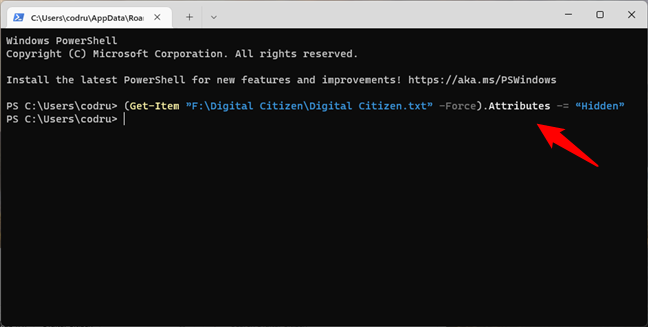
 Set a file as unhidden from PowerShell
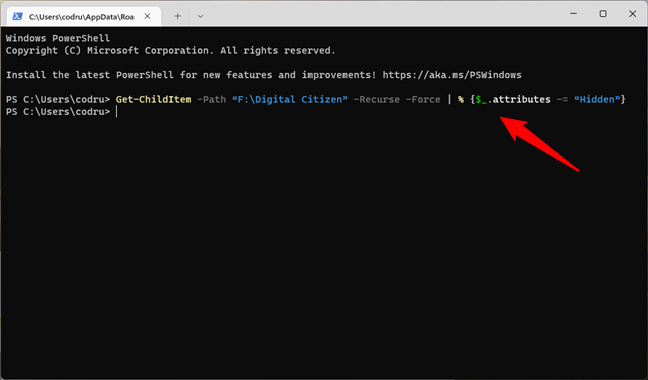
If you want to remove the Hidden attribute to all the files and subfolders inside a folder, run this command:
Set a file as unhidden from PowerShell
If you want to remove the Hidden attribute to all the files and subfolders inside a folder, run this command:
 Set a folder's subfolders and files as unhidden
That’s it!
TIP: If you want to unhide more than just files and folders, here’s how to hide (or unhide) any partition in Windows.
Set a folder's subfolders and files as unhidden
That’s it!
TIP: If you want to unhide more than just files and folders, here’s how to hide (or unhide) any partition in Windows.
How to unhide files and folders using File Explorer
If you want to use File Explorer to unhide files or folders, you first have to actually see them in order to select them. If Windows is not showing them, here’s what you should do to make hidden items visible: How to view all hidden files and folders in Windows. The short way, if you’re using Windows 11, is to open the View menu from File Explorer, go to Show, and select Hidden items.How to unhide files and folders using Command Prompt
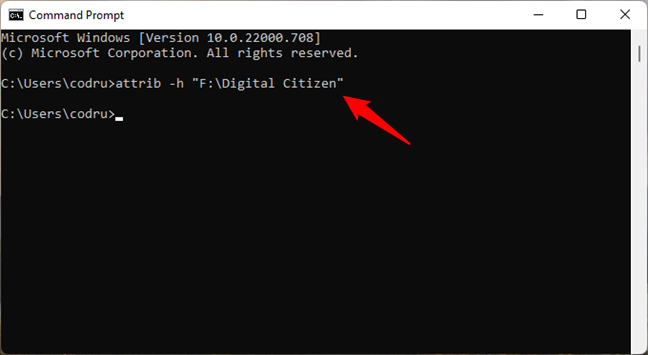
Open Command Prompt as administrator and then run this command:attrib -h “file or folder path”
Replace “path to file or folder” with the real path towards the file or folder you want to unhide. For example, I wanted to unhide a folder called Digital Citizen found on the root of my F: drive. The command I had to run to unhide it is:
attrib -h “F:\Digital Citizen”
attrib -h /s /d “folderpath\*”
For example, in my case, as I wanted to unhide everything in my Digital Citizen folder, this was the command I had to execute:
attrib -h /s /d “F:\Digital Citizen\*”
How to unhide a file or folder using PowerShell
You can open PowerShell as administrator or a PowerShell tab in a Windows Terminal window and set a file as unhidden, using the following command:(Get-Item “path to file or folder” -Force).Attributes -= “Hidden”
Replace “path to file or folder” with the actual path to the file or folder you want to unhide. If it’s a file, also make sure to type its extension. For example, here’s what the command looks like in my case, if I want to unhide a file called Digital Citizen.txt found in my Digital Citizen folder:
(Get-Item ”F:\Digital Citizen\Digital Citizen.txt” -Force).Attributes -= “Hidden”
Get-ChildItem -Path “path to folder” -Recurse -Force | % {$_.attributes -= “Hidden”}
In my example, this is the command I have to run for the Digital Citizen folder:
Get-ChildItem -Path “F:\Digital Citizen” -Recurse -Force | % {$_.attributes -= “Hidden”}
Discussion (1)
I’m still using windows 7/8 and can’t find file explorer in it anywhere. I don’t think I can download it either unless there’s a non microsoft program out there. Prefer free and can be used offline. I have a switch box that disconnects my modem. Thanks