Modern versions of Windows come with a handy disk management utility that allows you to create, resize and delete drive partitions on the fly, without having to boot into a particular disk utility or purchase additional software. The Windows built-in tool we are talking about is called Disk Management, and it is quite easy to use. If you want to make some changes related to your disks and partitions, read on:
NOTE: This article covers Windows 10, Windows 7 and Windows 8.1. Before reading it, you should know that we start from the assumption that you know how to start Disk Management. If you do not know how, read 9 ways to open the Disk Management tool in Windows (all versions).
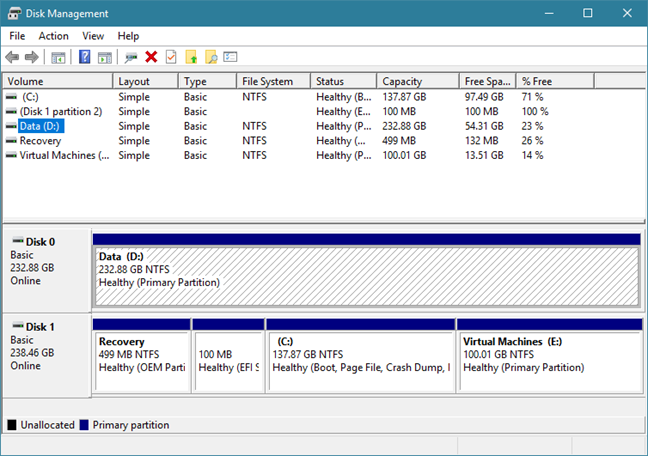
1. See information about your drives and partitions
Open the Disk Management tool and, on its top area, you can see information about your drives. It shows you the name, size, and type of each partition created on the drives found on your system. It displays the partitions that are formatted but also those that are not, as well as any hidden drives or unallocated space found on your drives.
Disk Management
Keep in mind though, that the Disk Management utility can only manage file systems compatible with Windows operating systems, such as NTFS, exFAT, or FAT32. While it can see other types of partitions, such as the ones created and formatted by Linux, it can only delete them, not manage them.
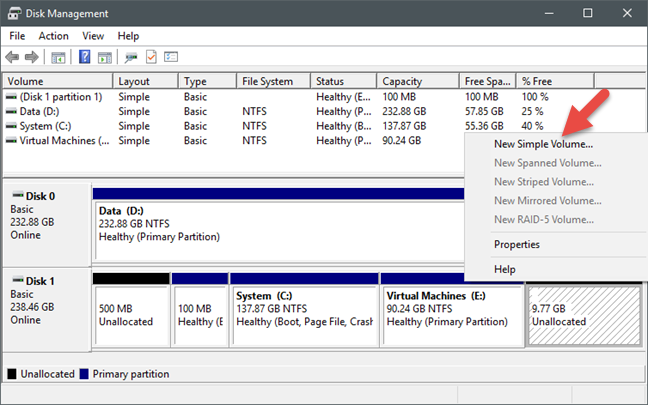
2. Create partitions on your drives
If you have free space on your hard drive, you can use it to create one or more new partitions. The unpartitioned space is highlighted and labeled as Unallocated or "Free space." The fastest and easiest way to create a partition using all or only some of the free space available is to right-click or tap and hold on that unallocated space and click/tap on "New Simple Volume." Then, follow the steps of the "New Simple Volume Wizard."
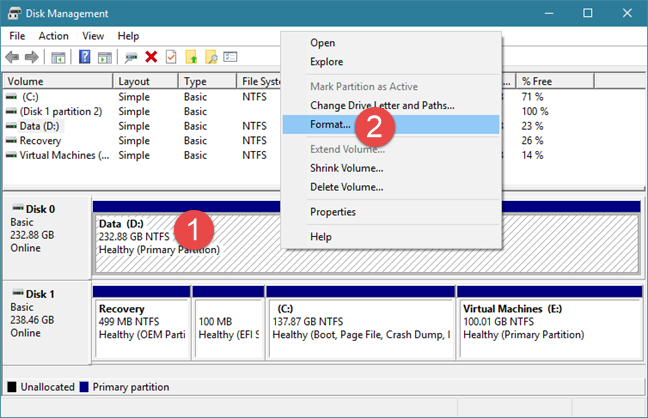
If you have just created a partition on one of your drives, the partition wizard has already offered you the option to format it. However, you can also format a partition that is already created and present on a drive. If this is what you want, you should keep in mind that formatting a partition means that all the data on it is removed, so make sure you backup any critical files on it before you go ahead.
To format an existing partition, right-click or tap and hold on it, in the Disk Management window, and then click or tap on Format. Set the label, file system type, and allocation unit size. Note that for the latter keeping the default unit size should be the right choice for most users.
Disk Management
Then, Windows should start formatting the partition. This process should only take a few seconds, but that depends on the size of the partition and the speed of your drive. If you want more details on how to format drives, fixed or portable, you might be interested in this tutorial: 2 ways to format an SD Card, a USB memory stick or a hard drive partition, in Windows.
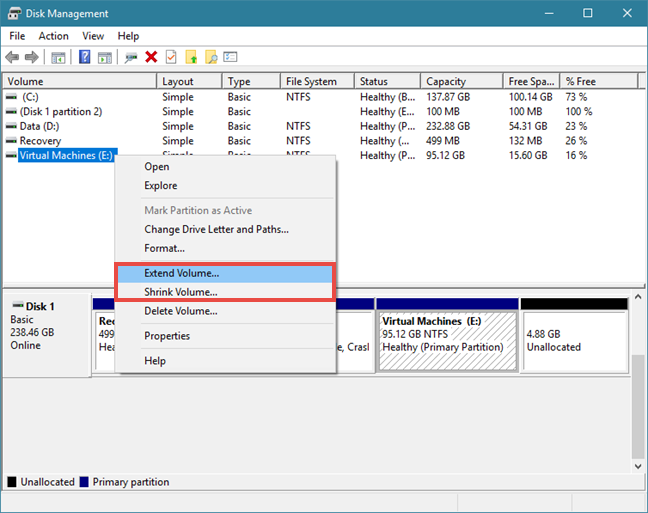
4. Resize the partitions found on your drives
You can also shrink or expand partitions on your drives, as long as there is some free (unpartitioned) space available immediately before or after the partition that you are trying to modify. Neither expanding nor shrinking a partition requires formatting.
To make a partition larger or smaller, right-click or tap and hold on that partition and click or tap on "Extend Volume" or on "Shrink Volume," depending on what you want. Then, follow the steps of the "Extend Volume Wizard" if you chose to make it bigger, or choose how small you want to make it in the "Shrink" dialog window.
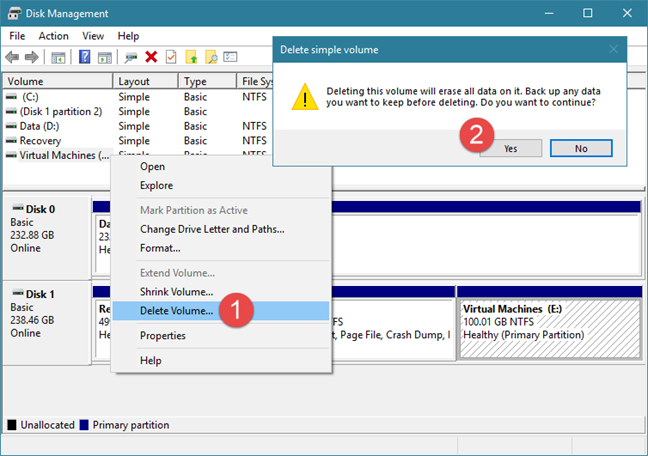
If there are any partitions that you no longer need and you want to free the drive space that they occupy, you can delete them using the same Disk Management tool. Take note though, that before you delete a partition, you should always make sure that there are no important files on it, as everything on it is going away too.
To delete a partition with Disk Management, right-click or tap and hold on it, and then click or tap on "Delete Volume." In the "Delete simple volume" prompt that is shown, confirm that you really want to do this and then the partition is erased.
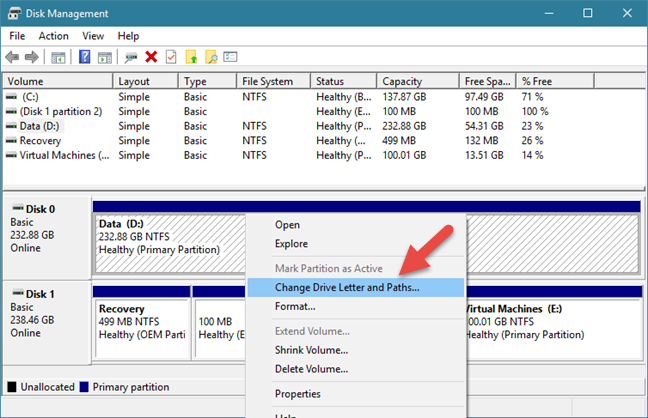
Disk Management also offers you the option to change the drive letters. They are those letters that everyone sees displayed on their drives in File Explorer or Windows Explorer. The most common drive letter in Windows is "C" because it is the default letter used by the operating system to mark the Windows installation drive. That is also the reason why you cannot change the drive letter for the C drive, at least not using conventional methods. 🙂
To change the drive letter associated with a partition, right-click or tap and hold on that partition and click or tap "Change Drive Letter and Paths."
Disk Management
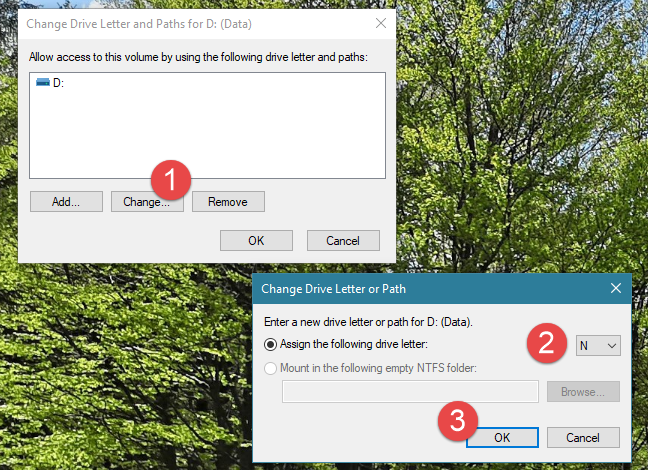
A new window should pop up, listing the drive letter of the partition. Click or tap Change and, in the next window, select the new drive letter you wish to assign to it. Then, click or tap OK.
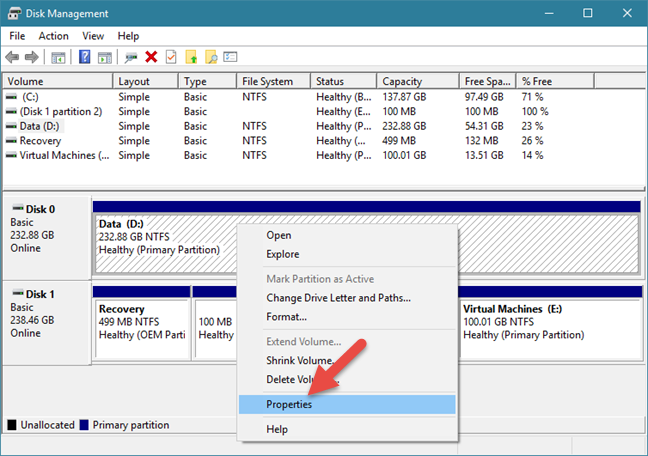
Similarly to changing drive letters, you can use the Disk Management tool to change their labels too. The volume label of a partition shows up next to the drive letter when viewing the partitions in File Explorer or Windows Explorer, and it is also required if you plan on sharing the partitions with other operating systems. To change the label of a partition, right-click or tap and hold on the partition and select Properties in the contextual menu.
Disk Management
In the General tab of the partition's Properties window, type in the new label name next to the disk icon.
Disk Management
Click or tap on OK, and the partition's label will be changed immediately. In case you want to learn more ways to set labels for your partitions, check this guide too: 4 ways to label and rename any drive in Windows.
Do you use the Disk Management tool?
Or do you prefer other software from third-parties like MiniTool Partition Wizard Free, EaseUS Partition Master Free Edition, Paragon Partition Manager Free, or AOMEI Partition Assistant SE? We found the Disk Management utility to be easy to use for managing partitions, but some might feel otherwise. Do you have any tips on partitioning or do you want to make some recommendations with some good partition setups? If you do, or if you have questions, feel free to leave a comment below.
Extremely helpful… very detailed and clear, thank you very much!
pissed ·
procedure does not work to delete win 10 partitions. please review and advise. thanks.
Linda McKoryk ·
I have two disks. On Disk 0 in order from the left of the screen I have 300 MB EFI System Partition; then 900 MB Recovery Partition; then OS (C:) with 185.96 GB NTFS where I only have 13 GB free space and that I need to add more GB to; then 350 MB Recovery partition; then DATA (D:) with 63 GB NTFS all of which is free. On Disk 1 in order from the left of the screen I have Data1 (E:) with 37 GB NTFS all of which is free; then 193 GB Unallocated; then Data2 (F:) with 37 GB all of which is free. My problem is that I cannot figure out how to get the unallocated amounts alongside the OS (C:) so I can expand the OS (C:). Can you help with this?
misty ·
I forgot my password for my computer and never set up a recovery. will the disc utility cd allow me to get into it?
Aslam ·
Superb, Very Very usefull and indepth.
Z ·
How to Delete a Disk Partition with Disk Mangement – should be Management
Ciprian Adrian Rusen ·
Problem fixed. Thanks for the feedback.
Ritu Ranjan Shrivastwa ·
Hi,
I have a question..
If I extend a drive, will anything happen to the drive being extended (apart from getting extended). I mean like the previous data will be safe or not? (I think they should be)
Shaiswa ·
Your all data will be safe….
Venkatesh Macha ·
Very Good tutorial, very good explanation with screenshots. i found everything i needed.
Thank you for sharing such a useful Tutorial.
Mike Briggs ·
Great tutorial. I have 378GB unallocated. How do I transfer it to my C drive which only has 1.39GB left? Also I have 379 GB on D drive, some of which I would also like to transfer to my C drive. Can you help please?
MANISH ·
I LOST MY DRIVE , PLZ HELP ME TO RECOVER IT
Mirwais Khawrin ·
If I shrink any drive in windows7 for example drive D, could be safe the data of drive D ?
Silhoutte James ·
Follow the instructions to access Disk Utility in Windows 7:
1.Launch the Start button, and then select Control Panel
2.Click on the System and Security icon (In case you don’t find the option in Control Panel, skip to Administrative Tools icon and right away move to step 4)
3.In the System and Security window, click on the Administrative Tools located at the bottom of the window
4.In the Administrative Tools window, double-click on the Computer Management icon
5.Click on Disk Management on the left side of the window soon after the Computer Management opens
6.Your computer might take few minutes fn loading, soon after which Disk Management should appear on the right side of the Computer Management window
sri jnana ·
does it work for windows 7 home basic version?
I mean i am using windows 7 home basic version & when i am using to do partition my c drive(in which win 7 is installed) i am getting error at last step i.e; drive cannot be converted to dynamic drive. it is not supported by current server configuration…
so does the partition works in windows 7 home basic???
thanks in advance!!
sri jnana
Al ·
All well and good if your drive has only ever been partitioned and formatted with windows formats. If the drive has any other formatting on it, this Disk Manager cannot do a thing. Cannot delete partition, cannot reformat, cannot work with it at all. Not really a Disk Manager, more a ‘Windows formatting adjuster’.
Henry Wong ·
I have c: drive, D: drive and E: drive and some unallocated space. How can I increase the C: drive?
Ciprian Adrian Rusen ·
Read this guide, section: How to Resize a Partition – Extending & Shrinking.
jasray ·
Yes, a lot of work–well-done. I would like to see the same type of tutorial using GParted.
Doug ·
Hey! Great tutorial! This has helped me get over the jitters of disk management almost completely. The problem I have was created when attempting a dual boot install of Linux Mint 14 along side Windows 7.
At one point during the Mint install I was promted if I wanted to import files from Windows to Mint. I clicked yes. This worked until the system froze and would not continue the install. Thinking I could simply begin a fresh install, I rebooted the install disk and inadvertantly created two new volumes/disks which is not what I wanted because the total of volumes/disks were now four! With c having 149GiB and the others having 70 or so GiB.
I want to simply delete the other volumes/disks and have what I started with. C having 296 or so GiB in one partition so that I can re-reinstall Mint once again and end up sharing equally the entire hard drive in just two partitions.
Also, I cannot seem to expand C either with or without a free space partition to the right of C because the expand button is grayed. What say you of the computer savvy? I have Windows 7 Ultimate to work with.
Thanks tons in advance!
Rocky ·
You could try using gParted under Linux to manage partitions but you do need to be very careful as it is very easy to delete partitions and create a mess. I believe one of the problems with the Windows partitioner manager is that it does not recognise the Linux partition / file systems whereas Linux will be able to see the Windows partitions.
It feels scary at first but tread carefully, double check as you go and be prepared to read up on partitions etc
AVLien Media ·
Conversely, you should be careful managing Windows partitions with a Linux partition manager. gParted is a great tool IF you know what you are doing with it. It can (I have done it) completely trash a Windows install without meaning to. I always attributed it to the NTFS, which is completely proprietary. Linux file systems have their little quirks, that’s why you will have problems managing them with a Windows-based partition manager.
25 years “in the trenches” doing IT has made me realize that using tools made by the OS’s creators (/maintainers) is generally the best course of action. Make a partition with gParted BEFORE you install Windows on it, that is safe. Otherwise you are treading on thin ice. Everything may work fine once you reboot, but gParted can also mess up the Windows boot partition (especially important to some OEM installs, since it contains the Win license key file).
Most problems I have seen arise from gParted/Windows cock-ups are just boot partition “damage”, but they can be really hard for an inexperienced user to deal with, since they stop any kind of automated diagnostics (or even low-level error messages) from running.
XD ·
hello my brother accidentally changed the drive letter and path of local D to G it done so many problems how i gonna fix this
Narayan Mukku ·
HI,
Currently my Desktop OS is XP & i want to upgrade to Windows 7 however when i try to install Win7 its gets an error saying that hard disk is not compitable… the disk mgmt supports upto XP version… can you suggest how to manage the disk to install Win7.
Thanks In Advance,
Narayan
micke ·
hello i have 133 MB healthy(EISA congifuration )d drive of 10 gb ntfs healthy (primary partition)and c drive of 275.56 gb ,9.99 gb is unallocted and there is 2.05 gb healthy(primary partition)
2 drives c,d is shown on my pc and i want to make one more drive but there error comes that u have alredy 4 partition nw tell me how i add this 2.05 gb and 9.99 gb to make a new partition ??
vicky ·
Thanks for your great clear tutorial guide. My sincere thanks for all of your hard work and the quality info you provide. I like the way and the style of layout you written. Short and clear to the point directly.
Thanks
Vicky
Anand ·
I appreciate your tutorial. Though I am still in WinXp, I know that your tutorial is going to help me when I will need one.
I read many tutorial and blogs and have to say, yours is clear and to the point. Sincerely thanks and hope you will keep it up.
Anand
Rich ·
I have to second Brian rec’s. I recently bought a WIN7 laptop and your tutorials have been a godsend for me in learning the new WIN7 OS. My sincere thanks for all of your hard work and the quality info you provide. Keep up the great work guys!
Rich
Brian ·
7tutorials,
Thanks for the great tutorial covering disk management!
I especially like the depth that you include in this tutorial.
Your tutorials are excellent because of the:
1. Detail covered
2. Clearity of instructions
3. Great screenshots
4. Excellent choice of what topics to cover.
Keep up the good work.
Thanks for making the great tutorials.
BRIAN
Ciprian ·
Thanks for sharing. We’re always happy to see that our work helps people.


Discussion (30)
Extremely helpful… very detailed and clear, thank you very much!
procedure does not work to delete win 10 partitions. please review and advise. thanks.
I have two disks. On Disk 0 in order from the left of the screen I have 300 MB EFI System Partition; then 900 MB Recovery Partition; then OS (C:) with 185.96 GB NTFS where I only have 13 GB free space and that I need to add more GB to; then 350 MB Recovery partition; then DATA (D:) with 63 GB NTFS all of which is free. On Disk 1 in order from the left of the screen I have Data1 (E:) with 37 GB NTFS all of which is free; then 193 GB Unallocated; then Data2 (F:) with 37 GB all of which is free. My problem is that I cannot figure out how to get the unallocated amounts alongside the OS (C:) so I can expand the OS (C:). Can you help with this?
I forgot my password for my computer and never set up a recovery. will the disc utility cd allow me to get into it?
Superb, Very Very usefull and indepth.
How to Delete a Disk Partition with Disk Mangement – should be Management
Problem fixed. Thanks for the feedback.
Hi,
I have a question..
If I extend a drive, will anything happen to the drive being extended (apart from getting extended). I mean like the previous data will be safe or not? (I think they should be)
Your all data will be safe….
Very Good tutorial, very good explanation with screenshots. i found everything i needed.
Thank you for sharing such a useful Tutorial.
Great tutorial. I have 378GB unallocated. How do I transfer it to my C drive which only has 1.39GB left? Also I have 379 GB on D drive, some of which I would also like to transfer to my C drive. Can you help please?
I LOST MY DRIVE , PLZ HELP ME TO RECOVER IT
If I shrink any drive in windows7 for example drive D, could be safe the data of drive D ?
Follow the instructions to access Disk Utility in Windows 7:
1.Launch the Start button, and then select Control Panel
2.Click on the System and Security icon (In case you don’t find the option in Control Panel, skip to Administrative Tools icon and right away move to step 4)
3.In the System and Security window, click on the Administrative Tools located at the bottom of the window
4.In the Administrative Tools window, double-click on the Computer Management icon
5.Click on Disk Management on the left side of the window soon after the Computer Management opens
6.Your computer might take few minutes fn loading, soon after which Disk Management should appear on the right side of the Computer Management window
does it work for windows 7 home basic version?
I mean i am using windows 7 home basic version & when i am using to do partition my c drive(in which win 7 is installed) i am getting error at last step i.e; drive cannot be converted to dynamic drive. it is not supported by current server configuration…
so does the partition works in windows 7 home basic???
thanks in advance!!
sri jnana
All well and good if your drive has only ever been partitioned and formatted with windows formats. If the drive has any other formatting on it, this Disk Manager cannot do a thing. Cannot delete partition, cannot reformat, cannot work with it at all. Not really a Disk Manager, more a ‘Windows formatting adjuster’.
I have c: drive, D: drive and E: drive and some unallocated space. How can I increase the C: drive?
Read this guide, section: How to Resize a Partition – Extending & Shrinking.
Yes, a lot of work–well-done. I would like to see the same type of tutorial using GParted.
Hey! Great tutorial! This has helped me get over the jitters of disk management almost completely. The problem I have was created when attempting a dual boot install of Linux Mint 14 along side Windows 7.
At one point during the Mint install I was promted if I wanted to import files from Windows to Mint. I clicked yes. This worked until the system froze and would not continue the install. Thinking I could simply begin a fresh install, I rebooted the install disk and inadvertantly created two new volumes/disks which is not what I wanted because the total of volumes/disks were now four! With c having 149GiB and the others having 70 or so GiB.
I want to simply delete the other volumes/disks and have what I started with. C having 296 or so GiB in one partition so that I can re-reinstall Mint once again and end up sharing equally the entire hard drive in just two partitions.
Also, I cannot seem to expand C either with or without a free space partition to the right of C because the expand button is grayed. What say you of the computer savvy? I have Windows 7 Ultimate to work with.
Thanks tons in advance!
You could try using gParted under Linux to manage partitions but you do need to be very careful as it is very easy to delete partitions and create a mess. I believe one of the problems with the Windows partitioner manager is that it does not recognise the Linux partition / file systems whereas Linux will be able to see the Windows partitions.
It feels scary at first but tread carefully, double check as you go and be prepared to read up on partitions etc
Conversely, you should be careful managing Windows partitions with a Linux partition manager. gParted is a great tool IF you know what you are doing with it. It can (I have done it) completely trash a Windows install without meaning to. I always attributed it to the NTFS, which is completely proprietary. Linux file systems have their little quirks, that’s why you will have problems managing them with a Windows-based partition manager.
25 years “in the trenches” doing IT has made me realize that using tools made by the OS’s creators (/maintainers) is generally the best course of action. Make a partition with gParted BEFORE you install Windows on it, that is safe. Otherwise you are treading on thin ice. Everything may work fine once you reboot, but gParted can also mess up the Windows boot partition (especially important to some OEM installs, since it contains the Win license key file).
Most problems I have seen arise from gParted/Windows cock-ups are just boot partition “damage”, but they can be really hard for an inexperienced user to deal with, since they stop any kind of automated diagnostics (or even low-level error messages) from running.
hello my brother accidentally changed the drive letter and path of local D to G it done so many problems how i gonna fix this
HI,
Currently my Desktop OS is XP & i want to upgrade to Windows 7 however when i try to install Win7 its gets an error saying that hard disk is not compitable… the disk mgmt supports upto XP version… can you suggest how to manage the disk to install Win7.
Thanks In Advance,
Narayan
hello i have 133 MB healthy(EISA congifuration )d drive of 10 gb ntfs healthy (primary partition)and c drive of 275.56 gb ,9.99 gb is unallocted and there is 2.05 gb healthy(primary partition)
2 drives c,d is shown on my pc and i want to make one more drive but there error comes that u have alredy 4 partition nw tell me how i add this 2.05 gb and 9.99 gb to make a new partition ??
Thanks for your great clear tutorial guide. My sincere thanks for all of your hard work and the quality info you provide. I like the way and the style of layout you written. Short and clear to the point directly.
Thanks
Vicky
I appreciate your tutorial. Though I am still in WinXp, I know that your tutorial is going to help me when I will need one.
I read many tutorial and blogs and have to say, yours is clear and to the point. Sincerely thanks and hope you will keep it up.
Anand
I have to second Brian rec’s. I recently bought a WIN7 laptop and your tutorials have been a godsend for me in learning the new WIN7 OS. My sincere thanks for all of your hard work and the quality info you provide. Keep up the great work guys!
Rich
7tutorials,
Thanks for the great tutorial covering disk management!
I especially like the depth that you include in this tutorial.
Your tutorials are excellent because of the:
1. Detail covered
2. Clearity of instructions
3. Great screenshots
4. Excellent choice of what topics to cover.
Keep up the good work.
Thanks for making the great tutorials.
BRIAN
Thanks for sharing. We’re always happy to see that our work helps people.