



File History makes automated backups of your data, and it works with storage devices like external hard drives, network storage, and so on. If you want to use File History to back up your user data from Windows 10, read this tutorial. We show you how to turn on File History, how to change the way it works, how to stop it when you no longer need it, and how to change File History storage devices. Read on to learn more:
How to turn File History on, in Windows 10
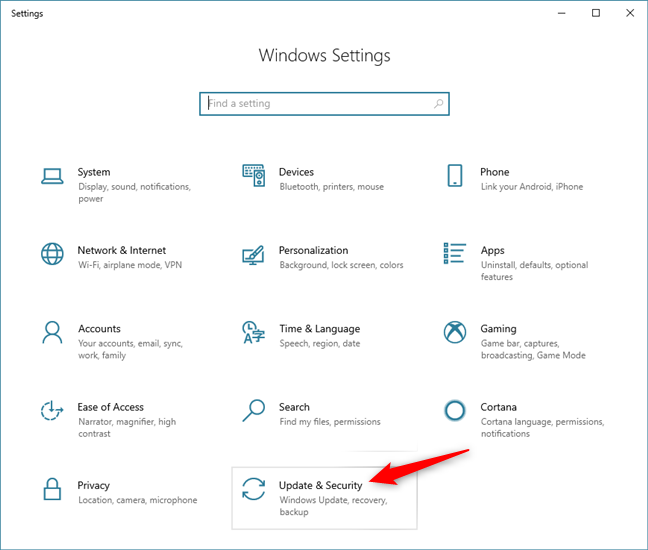
Before turning File History on, make sure that you connect an external hard drive to your Windows 10 computer or device. You may also map a network drive so that you can use it to backup your data with File History. After you connect the storage device that you want to use, open the Settings app (a quick way is to press the Windows + I keys at the same time). In the Settings app, go to Update & Security.
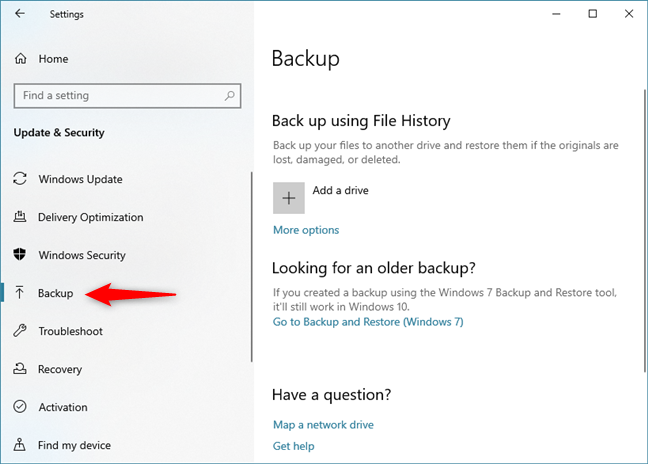
Choose Backup on the left column: this is where Windows 10 displays File History options and controls. By default, File History should be disabled.
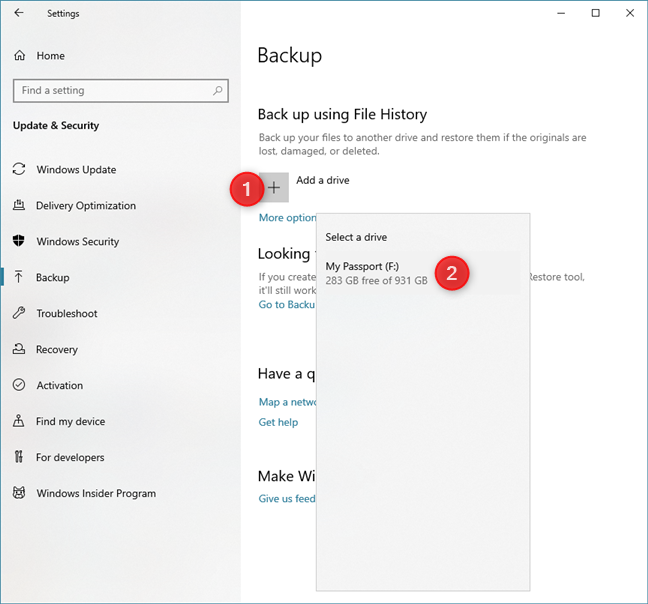
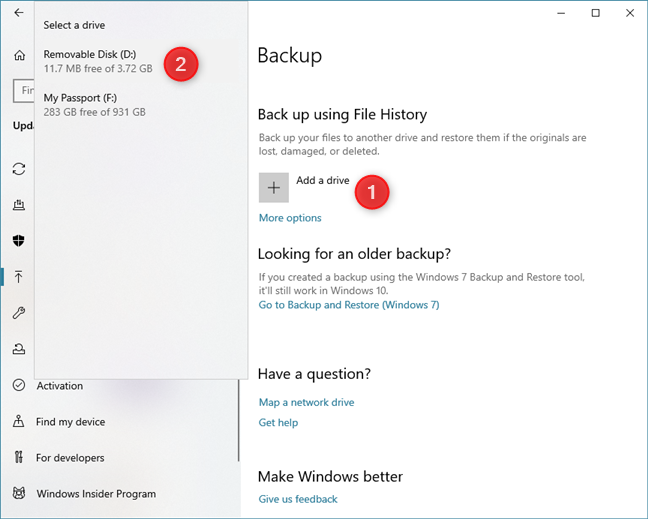
To turn File History on, click or tap on "+ Add a drive" in the "Back up using File History" area from the right side of the window, and then select the drive that you want to use for storing backups of your data.
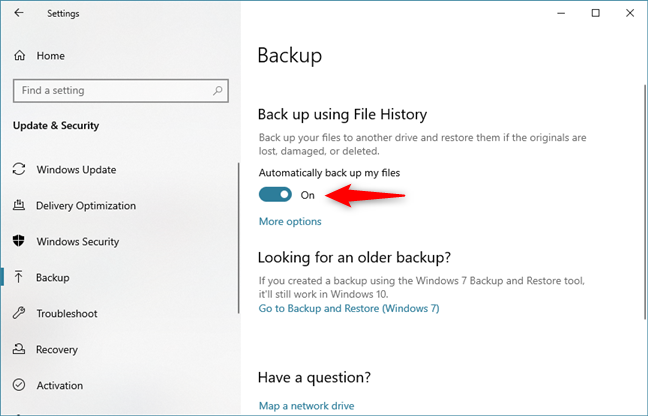
After a few seconds, File History is turned on, and you see a switch appear, named "Automatically back up my files." The switch is set On, signaling that File History is activated and doing its job in the background.
NOTE: Although configuring File History from the Settings app is a better experience, you should know that you can also work with it from the old Control Panel.
What data does File History back up and how long does it take to perform a backup?
If you do not change its default configuration, File History automatically backs up all your user libraries (both default libraries and custom libraries that you created), the Desktop, your Contacts, Microsoft Edge favorites and, finally, OneDrive. File History is a background process with low priority and, the first time it runs, it takes hours to back up your data. If you need to back up more than 100 GB of data, the first complete run might take up to 24 hours. The backup speed depends on the following factors:
- How you use your Windows 10 computer or device. If you run resource intensive apps and tasks, File History has a lower priority (it runs in the background) and takes longer to back up your data.
- The speed of the storage drive that you are using for File History. If you use a USB 2.0 port instead of USB 3 port, the transfer speed is much lower. It also matters whether the storage drive is an SSD or hard-disk drive. The slower the drive, the longer the backup process. Network storage tends to be even slower than local storage.
After the first complete run, File History is a lot faster because it backs up only new and changed files. A typical run, after the first backup, takes no more than a few minutes to finish.
Where to configure File History
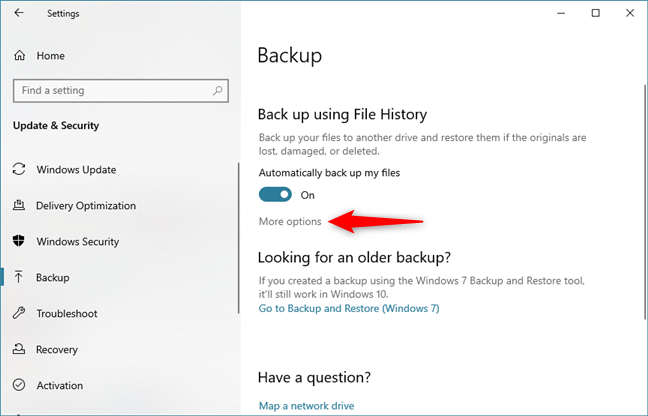
There are many things that you can change about the way File History works. To access the available configuration options, click or tap the "More options" link, beneath the "Automatically back up my files" switch.
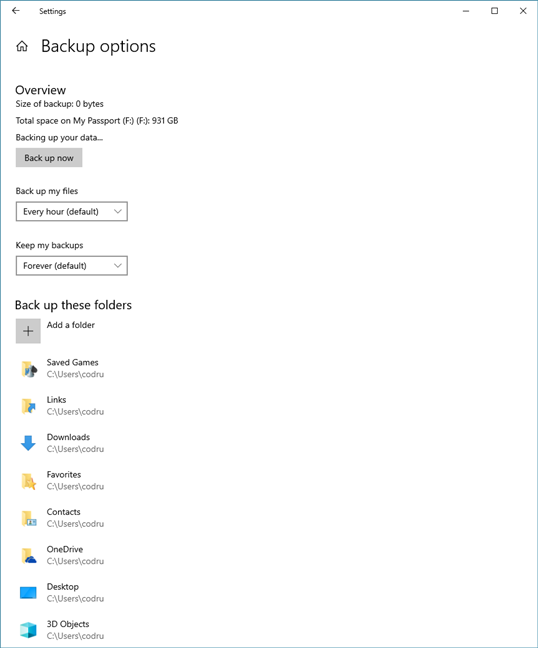
First, you see an overview that shows the size of the existing backup (until the first run is finished, the size is likely to be zero), the total space available on the storage device used by File History, and the status of your backup. Beneath the overview, there are options to change how often Windows' File History scans for file and folder changes, how long it keeps your files and the list of folders that it backs up. Let's take these options one by one, see what they do and how to change them.
How to change the default schedule of File History to save files
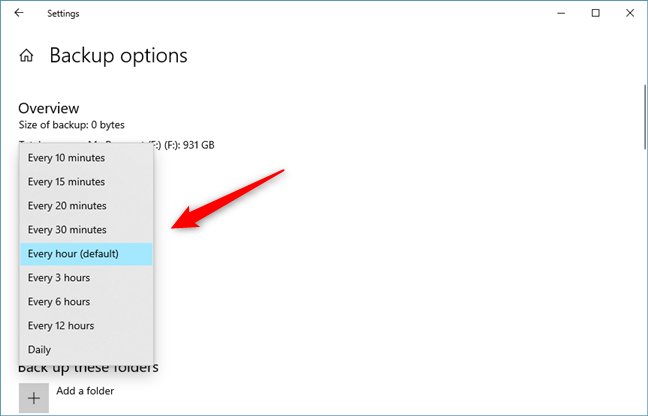
To change how often File History runs, click or tap on the "Back up my files" drop-down list. You can choose to run File History every ten minutes, every fifteen minutes, and so on, up to once a day. The default schedule of File History to save files is once every hour. However, you can choose any of the available schedule times that you prefer.
How to change File History's default time to keep backups
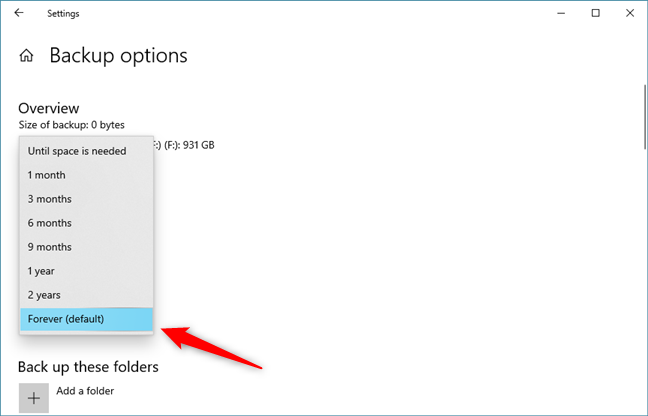
By default, File History keeps your files forever. This is a sure way to quickly run out of space on the storage device used by File History. You might prefer File History to keep your deleted files only for a limited time. To do so, click or tap on the "Keep my backups" drop-down list. You can then choose to keep deleted files or older versions of your files for at least a month, and increase the duration up to two years or… forever.
How to choose which folders are backed up by File History
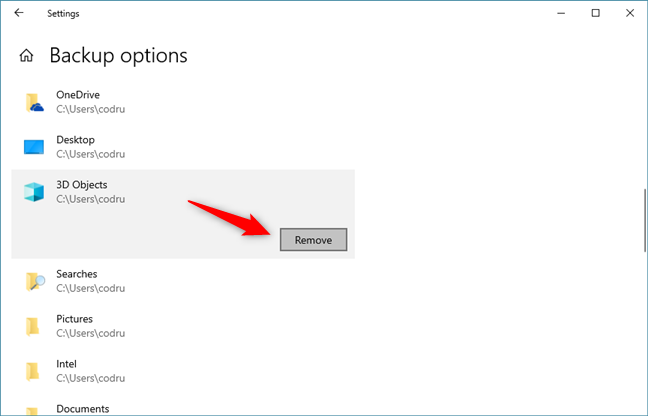
Also, you might not want File History to back up all your user libraries and folders. To remove some of them, scroll down to the list of folders and click or tap the first folder that you want to be skipped from the backup process. Then, click or tap the Remove button near that folder's name. Repeat the process for all the folders that you do not want to be backed up by File History.
You can also add new folders to the list of backed up data. To do so, click or tap on "+ Add a folder," browse to the folder that you want to include, select it, and then press "Choose this folder."
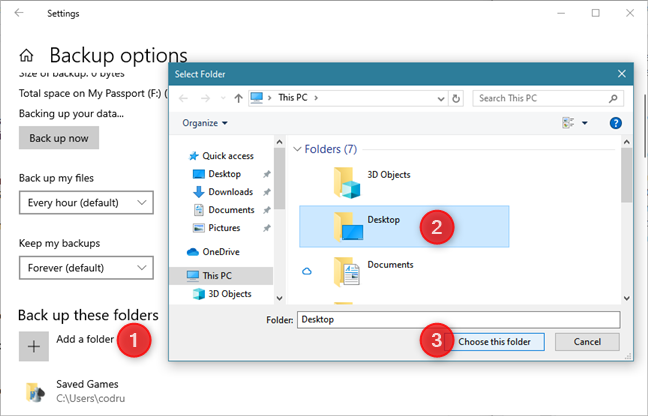
The selected folder is now included in the list of folders that are backed up by File History. Repeat the process to add all the folders you wish.
How to manually run File History backups
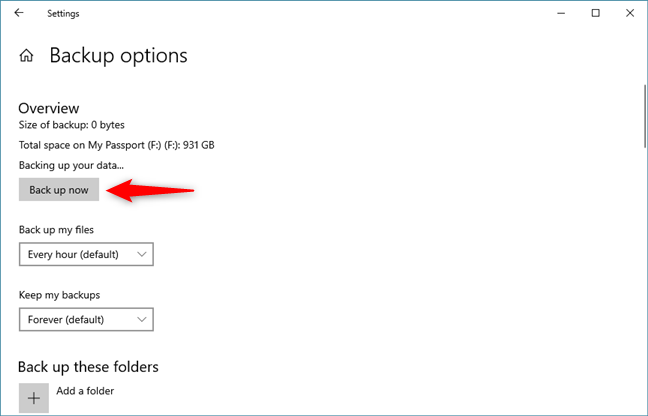
If you want to manually start a File History backup, outside of its regular schedule, you can do so. Go back to the Backup Options window: in the Settings app, open Update & Security, select Backup, and then click or tap on "More options." In the Overview section, press the "Back up now" button, and File History starts a manual run, right now.
How to stop File History in Windows 10
If you want to stop File History from running, do the following: open the Settings app, go to Update & Security, choose Backup, and turn Off the "Automatically back up my files" switch.
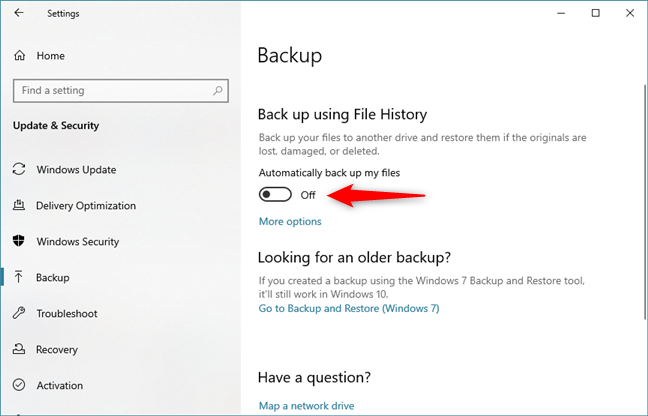
As long as you do not set this switch back On, File History is disabled and does not back up your data.
How to change the storage drive used by File History for backups
At some point, you may need to stop using a storage drive for File History, so that you can change it with another. To do so, go to the Backup Options window: open the Settings app, go to Update & Security, choose Backup, and click or tap on "More options." Scroll down the list of options until you see the "Backup to a different drive" section. Here, press the "Stop using drive" button.
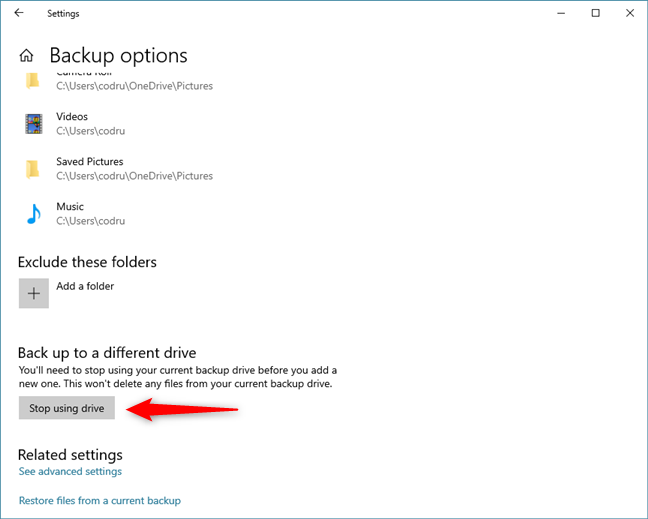
File History now temporarily stops backing your data up. Click or tap on the Back arrow, and plug in the new storage drive that you want to use for File History. Then, click or tap on "+ Add a drive" and select the new drive that you want to use for storing the backup data.
The trouble is that now File History reverts to its default settings. You need to configure it again and run the backup, once more following our instructions from the previous sections of this tutorial.
Do you like the File History from Windows 10?
In Windows 10 File History offers more personalization options than it did in previous Windows operating systems. We use it to back up our data, alongside cloud storage services, for redundancy. This way, we never lose the files and documents that are important to us. Now that you have finished reading this tutorial, try File History and let us know how well it works for you. Are you satisfied with File History? Do you find it easy to use? Does it deliver the results you wanted? Comment below and let's discuss.
Discussion (35)
File History works fine for documents, images, etc. I do wish Outlook backed up automatically but it doesn’t. I periodically manually export an Outlook file to a Documents folder to ensure i have a backup. It may be weeks old but that’s better than losing everything. And yes i know the manual Outlook backup in File History works.
While I like File History, the drawback is that it doesn’t support multiple devices. I like to keep a storage device connected for normal backup and then at least yearly I’ll backup to a different device which I’ll store in a fire proof safe. This results in new, full backups when switching devices.
Excellent article but like other explanations I have read: How on earth do I know if File History has not run for whatever reason without regularly deep diving into Settings? Mine has failed on several occasions but I have never had a notification! Anyone help?
I can’t turn it on.
I get an error: “The service cannot be started, either because it is disabled or because it has no enabled devices associated with it”
No one seems to know how to fix it.
The File History Service might be disabled. Read this guide: What are Windows services, what do they do and how do you manage them?. Access Services, find that service and set it to start Automatically.
It seems FileHistory only makes backup when you change a file.
This still does not work for me into turning the file history drive. It starts to run like it should then it shuts off and I get a notice that your File History Drive is not working
Reading the comments made in 2015 I don’t see why you take the time to write articles as good as this one is. It’s an “Outstanding” article and has helped me tremendously. Thank You!!!!!! Here it is 2017 and it’s still going strong helping others.
Also, the frequency keeps resetting to the default of one hour. This whole thing was cobbled together by distracted monkeys.
If you want to do a clean file history prior to installing a new OS. File history is lacking an progress indicator for the user to know how long it is going to take to save the file and when it is completed. This would be useful during normal operation as well.
Yes. I have used it. But, I don’t see how this will prevent a ransomware attack from infecting your backup.
File History doesn’t offer ransomware protection.
Although the backup schedule is set for daily this does not necessarily occur. It appears to happen at random times, often missing several days. Is there a fix for this? Also does Outlook have to be closed for the history to pick up pst files?
As of fall 2016 Win10 File History slows down my home network dramatically. Streaming media files from my NAS becomes erratic to totally non functional. Very slow file transfers as well. Turn off File History and speeds return to normal.
Also File History is not saving every hour (my setting) so I have to monitor it and hit the Back up Now button if I am creating important files. It seems to only backup at somewhere around 6 hour frequency – if that.
You can use Long Path Tool, it really helps me.
File history is great for recovering an accidentally deleted document, or getting back a prior version. What it’s not great for is a general backup of your system because it has no recovery feature. If my hard drive crashes and I have to re-install Windows, how to I re-load all my user files? One by one?
Another problem is that you can’t limit the number of times a file is backed up. For example, I use the Thunderbird email client. It keeps saved emails in a file, that can get large over time. One of my files is 1.5 GB in size. File history has 753 copies of this file. I can limit the length of time that File History keeps files, but if I cut the time down, then older files won’t be backed up at all.
Thank you for the very informative article.
How do you restore files from the previous hard drive after starting a second hard drive?
Upgraded to Windows 10 and lost ability to have operating system recognize external hard drive. Found that File History is easy to use following instructions above. However, my hard drive no longer logs backups so no way to verify that data is actually backed up. Default is to trust that File History has actually performed intended operation.
I believe that you are saying that you can not check the saved File History on your external HD for accuracy. If so, I just go into the saved File History by clicking on it until I see Documents and look there for files that I have changed. If they are there and accurate, all’s well.
I understood that once you had made a backup, when you came back for regular backups, the system would only add what was new, not repeat the process of backing up your while system again? Is that correct?
If not, is there a way to configure the system so that it will do this. This would greatly reduce the time spent backing up the system. I use a removable external drive to do this.
Thanks
Great article! Thank you so much!
🙂
I have a Win 10 machine and at first file history was working just fine. Then it stopped saving updates even though set for 1 hour. Couldn’t get it to save changes so decided to delet the history and start again. After awhile, it saved everything under C except users which is where all the data is so again deleted the useless save and ever since have been trying to get it to work. It does set up the file history folders in my backup drive but, no data at all now. Did find the error messages and quite a few reparse points were identified so deleted those finally after finding a shareware that found and deleted them so those error messages are gone but, a few remain regarding files not related to my backup that it won’t try to backup again unless they are modified which is fine but, no backup??? Really need help as cannot figure out how to make it run. Thanks in advance, Dave
File history is simply not saving documents and despite looking at several sites, I have no idea why. I never had problems before, even on Windows 8. I could not say if the problem is with Win 10 or with File History – but I can, definitively, say that it is not working.
The article title is File History, why and when does this become ‘backup’? I just wanted to ‘save’ copies of certain files!, not backup the whole of my Photo’s/Music/Documents (as I have another program for that). It also seems to ‘add’ other connected drives to the ‘backup’ and I haven’t found away to stop this other than ‘exclude’ these folders (every folder on every drive) ?????
It does not seem to do what it was intended for.
And we’re back to the annoying “Your backup drive is disconnected” issue. No, it’s not. My backup drive is never disconnected. I just double-checked. This happens every time I’m away from my computer for more than a few hours (like, you know, sleep?) Annoying, ridiculous, and no I won’t use One Drive.
I have come to the conclusion MS just wants everyone to sighup to One Drive. I can recommend EaseUS as a local backup solution.
I set up network folder as a backup destination.
File History Backup constantly adds the folders I removed to the backup list (including OneDrive folders) and also won’t let me exclude any folders (I add exclusions but the list is blank). I only wanted to backup my User folders (Documents, Pictures, etc.) but it keeps adding my OneDrive folders as well :/ (I have removed any shortcuts to other folders from the specified backup folders list but it didn’t help. For some reason it always go back to the default folders list… crap
I also have the problems mentioned above….It keeps backing up folders i’ve previously removed and it seems to create new copies of photos that haven’t changed since the last back up. It also manages to selectively back up folders so some with changes are missed??
Very very flakey. I am going to find a 3rd party program as I do not like what it’s doing. Any recommendations please?
Bring back “my briefcase” I say. For simple home back ups that’s all I need.
Nerobackitup is a decent program for backing up to an external drive and 5 free gigs of cloud too if you want it.
File history keeps adding folders I’ve previously removed in the settings. I want the whole of my E: backed up and selected folders on C:. I’ve set it up a couple of times now but still it keeps adding other folders.
I’m still not convinced it is actually backing up because only a few folders show on my network backup drive, despite file history still saying that the first time backup is running.
File History work but using the default settings my backup disc is full within 24 hours and I have to delete old copies of files manually to create space on the HD. The process seems very crude to me and needs refining.
I am finding that despite following each step of this tutorial File History still will not backup unless I manually hit “Back Up Now”. Does anyone else have this issue? The backup works fine, but it must be done manually.
Same exact symptoms here, after Windows 10 upgrade from 8.1. Any solutions?
I am having a challenge with file history. I clicked “Stop using Drive” button. And then when I went to “Add Drive,” the previous drive that I stopped using is no longer in the drop down menu. The drive still exists, but is no longer an option to select. I went to advanced options as well. Do you know the solution to this?