

Nearby sharing is a feature that allows you to share documents, photos, links, and more with other devices that are close by, over Bluetooth and Wi-Fi. Instead of cumbersome sharing methods like email attachments, cloud storage, or USB memory sticks, you can use Nearby sharing to quickly and easily send or receive content. Oh, and it works with both Windows 10 and Windows 11 computers or devices. Without further ado, here’s how to enable and use Nearby sharing on Windows PCs:
 Nearby sharing works with Windows 11 and Windows 10 PCs
When transferring content, the Nearby sharing feature on the sending computer uses Wi-Fi if and only if the receiving Windows 10 or Windows 11 PC is connected to the same private Wi-Fi network. Otherwise, the sharing will be done over Bluetooth.
Nearby sharing is available by default in Windows 11, but Windows 10 computers must be updated to version 1803 or newer to have this feature. If you don’t know what Windows 10 version is installed on your PC, check this guide: What is the latest version of Windows 10? Check the version you have.
Last but not least, it’s also important to note that although its purpose is similar, Windows’s Nearby sharing is not the same as Android’s Nearby Share feature. If you’re looking for information on how to share files from Android to Windows, check this guide instead: How to use Android Nearby Share with Windows PCs.
Nearby sharing works with Windows 11 and Windows 10 PCs
When transferring content, the Nearby sharing feature on the sending computer uses Wi-Fi if and only if the receiving Windows 10 or Windows 11 PC is connected to the same private Wi-Fi network. Otherwise, the sharing will be done over Bluetooth.
Nearby sharing is available by default in Windows 11, but Windows 10 computers must be updated to version 1803 or newer to have this feature. If you don’t know what Windows 10 version is installed on your PC, check this guide: What is the latest version of Windows 10? Check the version you have.
Last but not least, it’s also important to note that although its purpose is similar, Windows’s Nearby sharing is not the same as Android’s Nearby Share feature. If you’re looking for information on how to share files from Android to Windows, check this guide instead: How to use Android Nearby Share with Windows PCs.
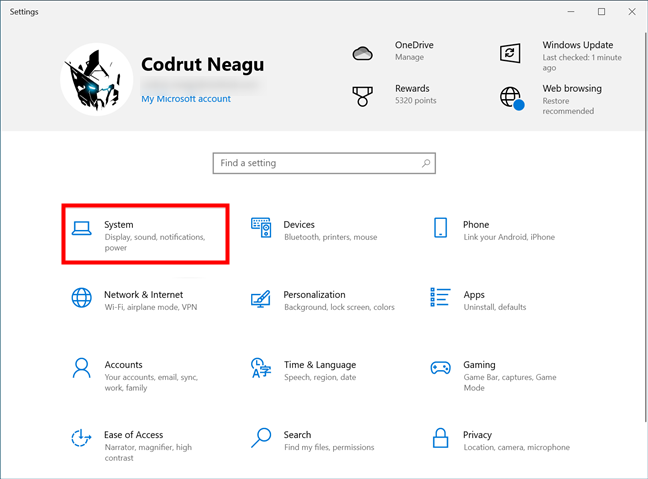
 Open Settings and go to System
In the System settings, select Shared experiences on the left, and turn on the “Share content with a nearby device by using Bluetooth and Wi-Fi” switch on the right, under Nearby sharing.
Open Settings and go to System
In the System settings, select Shared experiences on the left, and turn on the “Share content with a nearby device by using Bluetooth and Wi-Fi” switch on the right, under Nearby sharing.
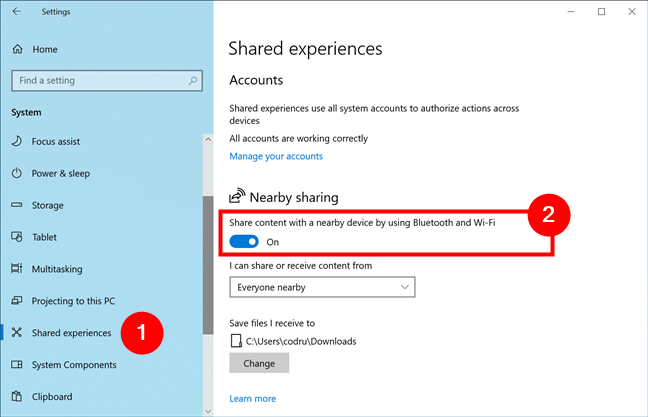
 Enable the Nearby sharing switch in Shared experiences
Next, choose whether you want the Nearby sharing feature to work with all the devices and people near your Windows 10 computer, or only with those devices where you’re signed in with the same Microsoft account.
Enable the Nearby sharing switch in Shared experiences
Next, choose whether you want the Nearby sharing feature to work with all the devices and people near your Windows 10 computer, or only with those devices where you’re signed in with the same Microsoft account.
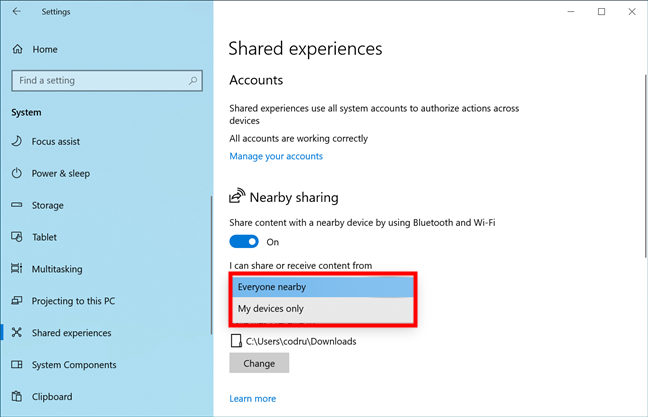 Choose to share with Everyone nearby or My devices only
You can also choose where to save the files you may receive via Nearby sharing. By default, they’re saved in your Downloads folder, but you can click or tap the Change button under “Save files I receive to” to select another location on your Windows 10 computer.
Choose to share with Everyone nearby or My devices only
You can also choose where to save the files you may receive via Nearby sharing. By default, they’re saved in your Downloads folder, but you can click or tap the Change button under “Save files I receive to” to select another location on your Windows 10 computer.
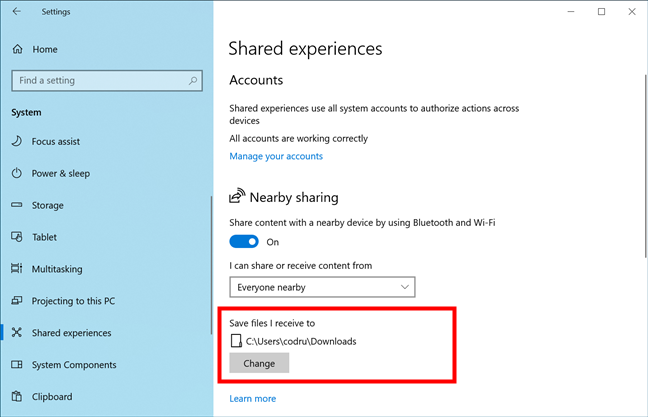 Save files I receive to
Once you’ve configured Nearby sharing’s options on your Windows 10 computer, you can enable or disable it much faster by pressing the Nearby sharing button in the quick actions panel (Win + A).
Save files I receive to
Once you’ve configured Nearby sharing’s options on your Windows 10 computer, you can enable or disable it much faster by pressing the Nearby sharing button in the quick actions panel (Win + A).
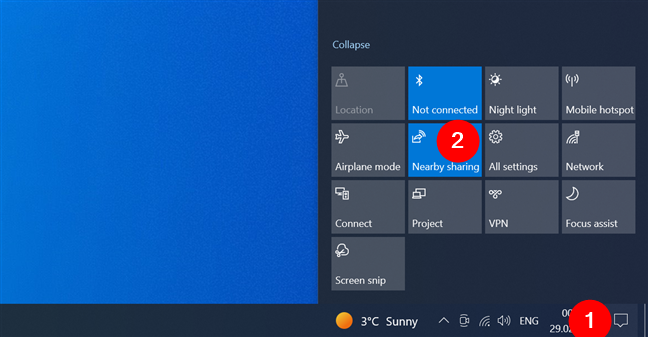
 The Nearby sharing quick action in Windows 10
Now that Nearby sharing is on let’s see…
The Nearby sharing quick action in Windows 10
Now that Nearby sharing is on let’s see…
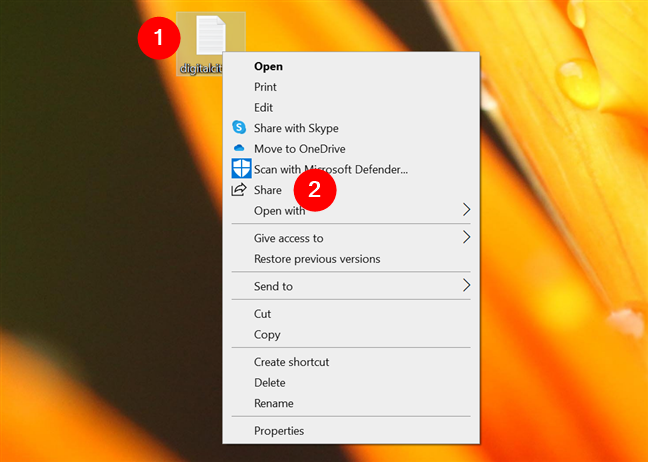
 Right-click a file and choose Share
Alternatively, you can also open File Explorer (Win + E), select the file to send, access the Share tab in the ribbon, and click or tap the Share button on the left.
Right-click a file and choose Share
Alternatively, you can also open File Explorer (Win + E), select the file to send, access the Share tab in the ribbon, and click or tap the Share button on the left.

 Select the file and click Share in File Explorer's toolbar
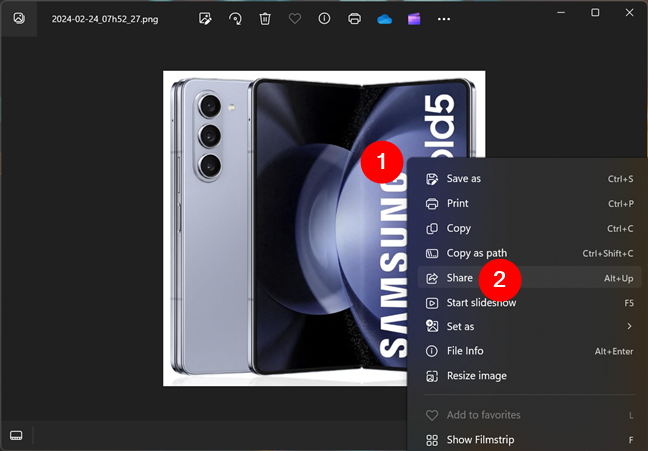
It’s a similar process for photos, too. Open the picture(s) you want to send in the Photos app, right-click (press and hold), and choose Share in the context menu.
Select the file and click Share in File Explorer's toolbar
It’s a similar process for photos, too. Open the picture(s) you want to send in the Photos app, right-click (press and hold), and choose Share in the context menu.
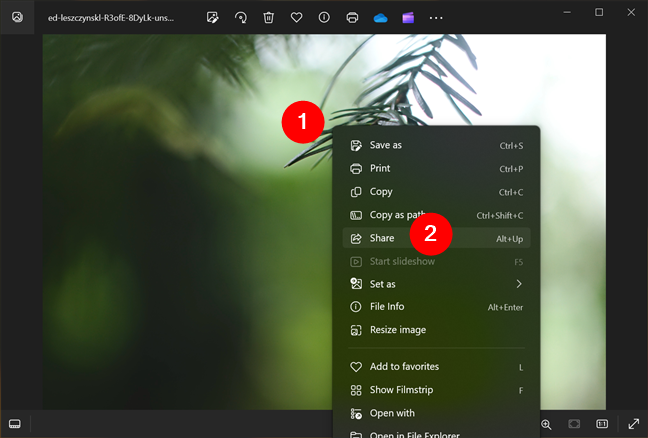
 Right-click the photo and choose Share
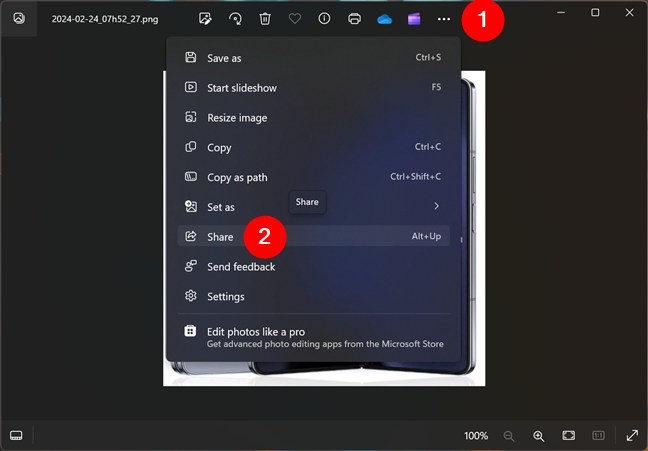
Or open the Photos app’s menu (marked by three dots) and click or tap the Share option from the list.
Right-click the photo and choose Share
Or open the Photos app’s menu (marked by three dots) and click or tap the Share option from the list.
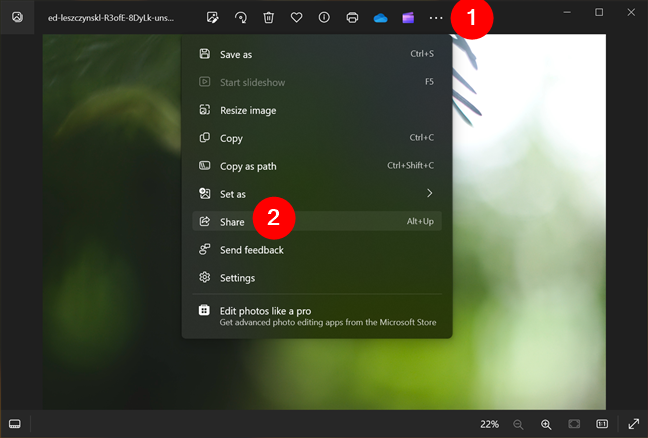 Open the Photos app's menu and choose Share
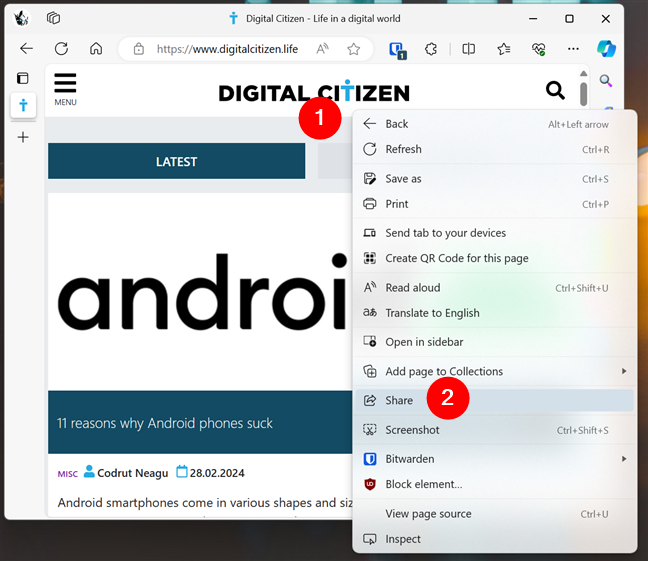
You can even share websites with Windows 10’s Microsoft Edge browser. Just like for files or photos, first open the site to share. Then, right-click or press and hold an empty spot on that website, and choose Share in the context menu.
Open the Photos app's menu and choose Share
You can even share websites with Windows 10’s Microsoft Edge browser. Just like for files or photos, first open the site to share. Then, right-click or press and hold an empty spot on that website, and choose Share in the context menu.
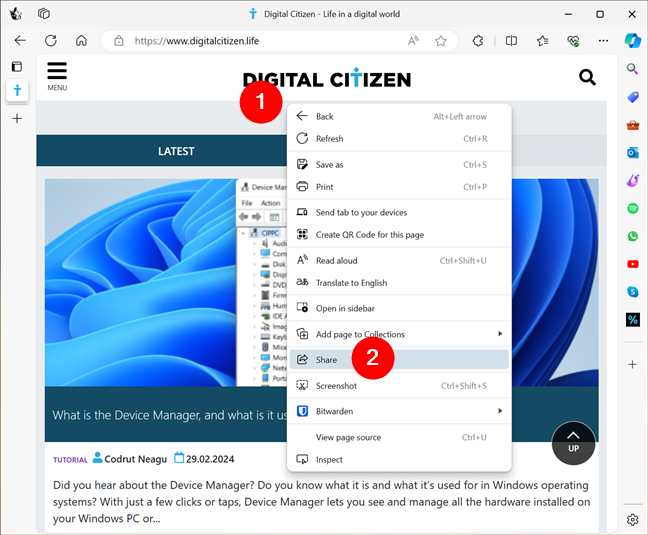
 Right-click and select Share
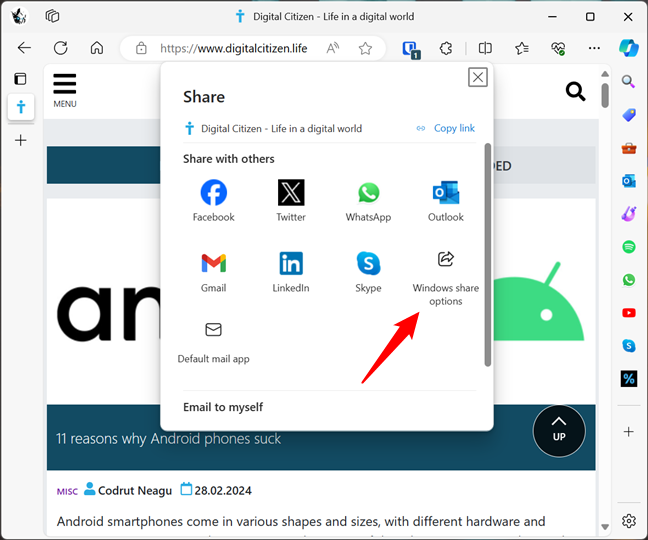
Then, in the Share dialog, click or tap the Windows share options button.
Right-click and select Share
Then, in the Share dialog, click or tap the Windows share options button.
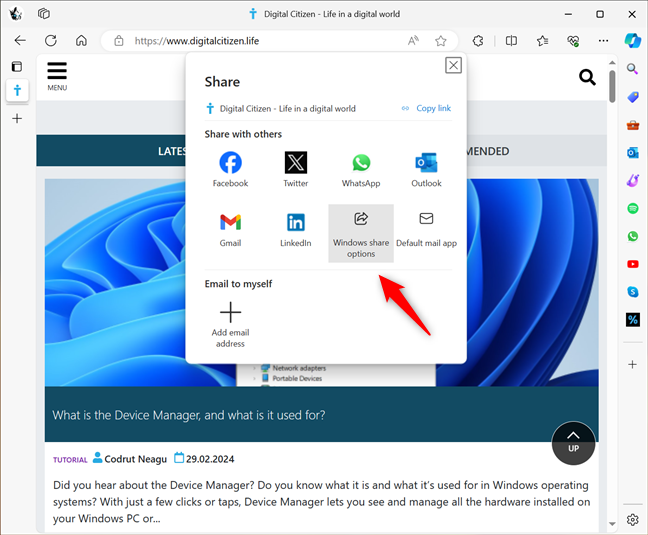 Click Windows share option in Edge
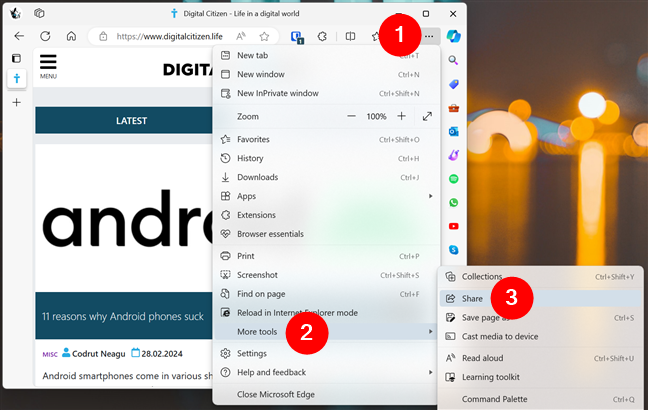
As an alternative, you could access the Settings and more (Alt + F) menu from Edge, go to More tools, and select Share. However, this is a lengthier way to initiate the sharing process.
Click Windows share option in Edge
As an alternative, you could access the Settings and more (Alt + F) menu from Edge, go to More tools, and select Share. However, this is a lengthier way to initiate the sharing process.
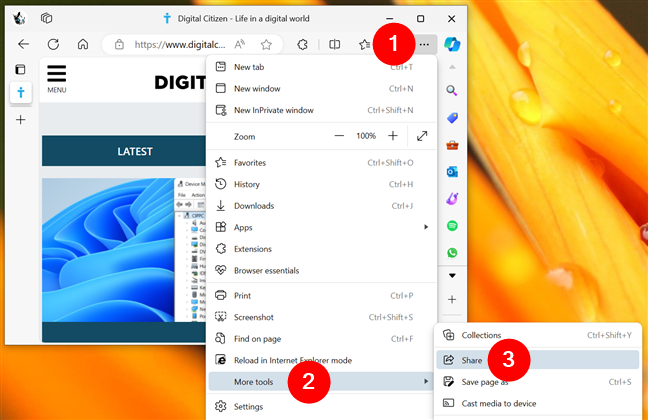
 Open the Edge menu, go to More tools, and click Share
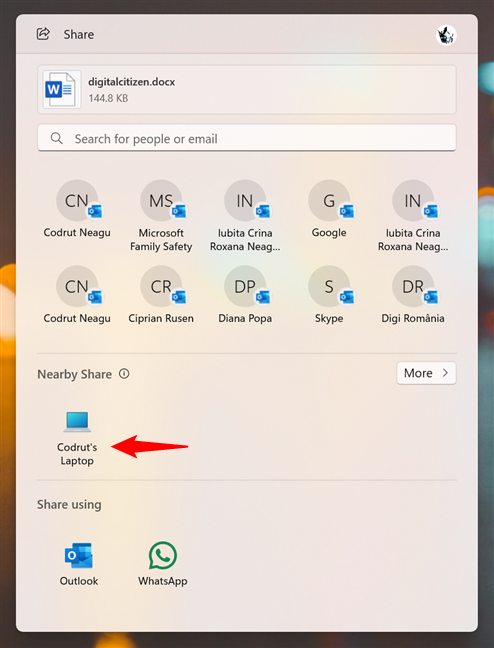
Either way, and regardless of what you chose to share with Windows 10’s Nearby sharing feature, you’ll now see the Share window in the middle of the screen. In it, look for a section that displays any computers or devices nearby. While Windows 10 doesn’t explicitly mark this section with a Nearby sharing title, it should be easy to identify the computer where you want to send your file(s), photo(s), or website(s). For instance, in the screenshot below, I’m trying to send a document to my laptop. Choose the device to send the content to, and click or tap its name.
Open the Edge menu, go to More tools, and click Share
Either way, and regardless of what you chose to share with Windows 10’s Nearby sharing feature, you’ll now see the Share window in the middle of the screen. In it, look for a section that displays any computers or devices nearby. While Windows 10 doesn’t explicitly mark this section with a Nearby sharing title, it should be easy to identify the computer where you want to send your file(s), photo(s), or website(s). For instance, in the screenshot below, I’m trying to send a document to my laptop. Choose the device to send the content to, and click or tap its name.
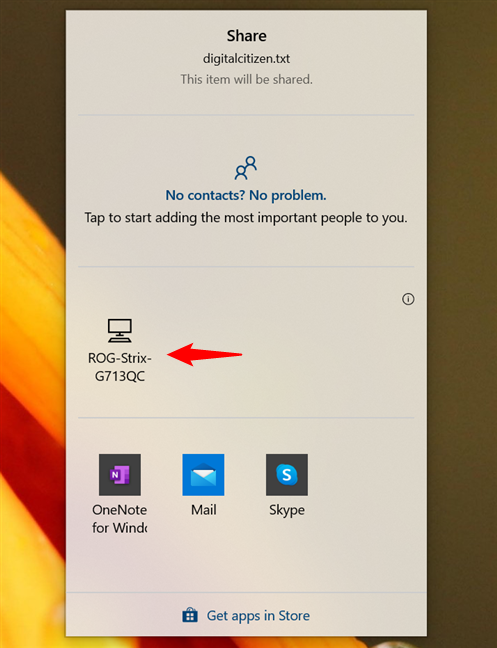
 Select the recipient device
TIP: If you can’t see the device you want to share with, make sure you’ve turned on Nearby sharing on it, that it has Bluetooth and/or Wi-Fi enabled, and that it’s within range.
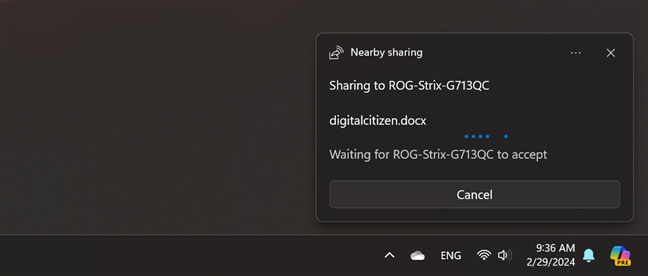
After you’ve clicked or tapped the device you want to share with, you must wait for it to accept the request. During this time, you’ll see a message saying “Waiting for (device name) to accept” on the bottom-right area of your screen.
Select the recipient device
TIP: If you can’t see the device you want to share with, make sure you’ve turned on Nearby sharing on it, that it has Bluetooth and/or Wi-Fi enabled, and that it’s within range.
After you’ve clicked or tapped the device you want to share with, you must wait for it to accept the request. During this time, you’ll see a message saying “Waiting for (device name) to accept” on the bottom-right area of your screen.
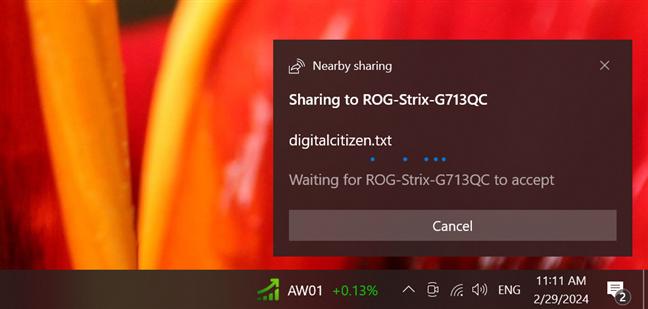
 Waiting for the recipient to accept the share
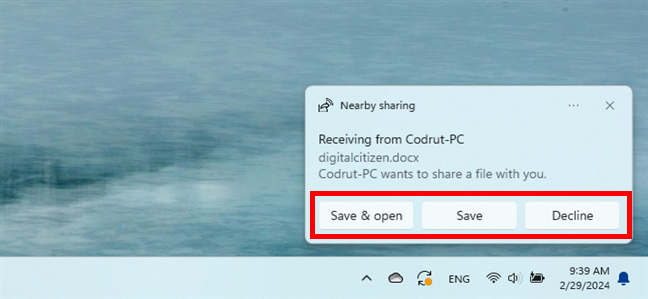
When you initiate a share, the other computer receives a notification asking them to accept or decline your request. Depending on the type of content shared, on the receiving computer, you can get options/buttons to Save & open or just Save in the case of files, or Open for links to websites.
Waiting for the recipient to accept the share
When you initiate a share, the other computer receives a notification asking them to accept or decline your request. Depending on the type of content shared, on the receiving computer, you can get options/buttons to Save & open or just Save in the case of files, or Open for links to websites.
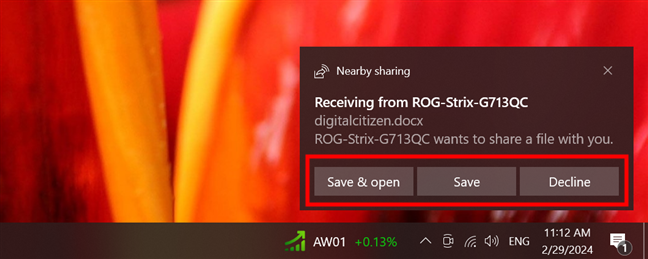
 Share notification on the receiving device
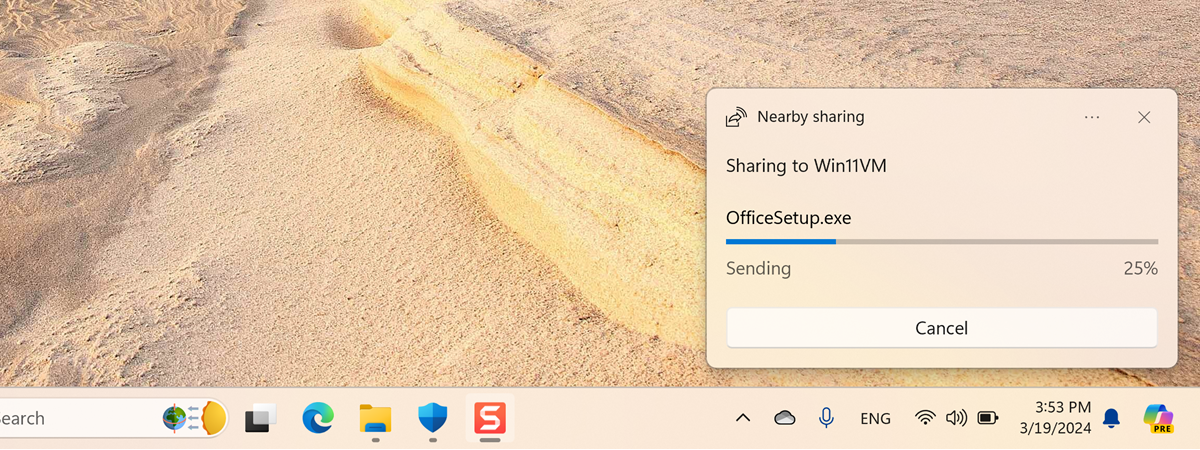
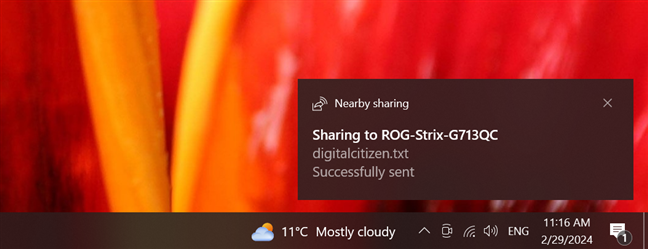
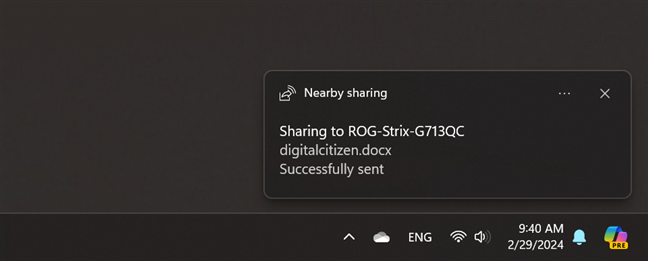
If they accept, the sharing process begins. When completed, you should see a “Successfully sent” message.
Share notification on the receiving device
If they accept, the sharing process begins. When completed, you should see a “Successfully sent” message.
 The file has been sent via Nearby sharing
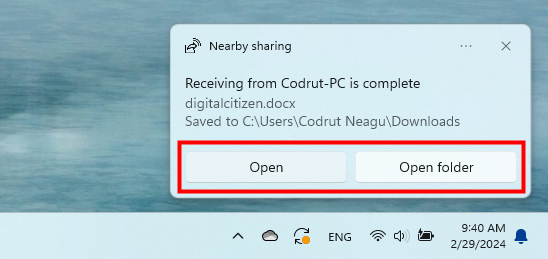
The other device will also see a message saying “Receiving from (computer name) is complete” in the notification area. Depending on what type of content you’ve shared, they will also be able to click or tap some buttons in the message to open the file, photo, or link received, or go to the location where the content has been saved on their computer.
The file has been sent via Nearby sharing
The other device will also see a message saying “Receiving from (computer name) is complete” in the notification area. Depending on what type of content you’ve shared, they will also be able to click or tap some buttons in the message to open the file, photo, or link received, or go to the location where the content has been saved on their computer.

 The file has been received via Nearby sharing
That’s it! Quite a neat way of sending and receiving content, don’t you think?
The file has been received via Nearby sharing
That’s it! Quite a neat way of sending and receiving content, don’t you think?
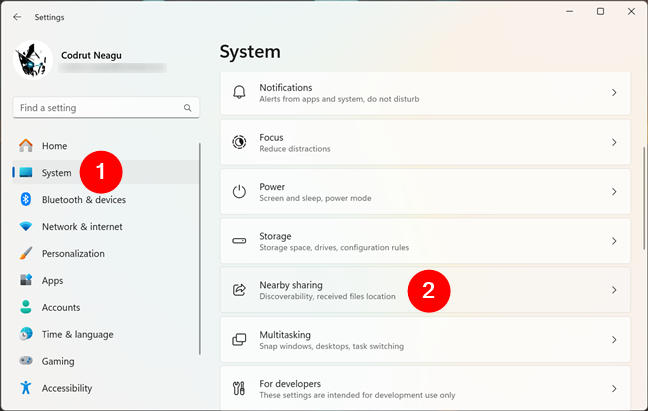
 Open Settings, go to System, and click Nearby sharing
Then, instead of having the Nearby sharing feature turned Off, enable one of these options: My devices only or Everyone nearby. If you want to be able to send and receive content from any computer near you, select the Everyone nearby option. If you prefer Nearby sharing to work only with the devices near you and connected to the same Microsoft account, choose My devices only.
Open Settings, go to System, and click Nearby sharing
Then, instead of having the Nearby sharing feature turned Off, enable one of these options: My devices only or Everyone nearby. If you want to be able to send and receive content from any computer near you, select the Everyone nearby option. If you prefer Nearby sharing to work only with the devices near you and connected to the same Microsoft account, choose My devices only.
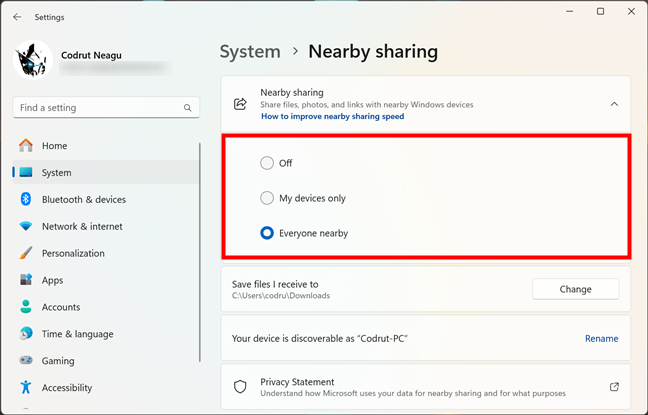
 Choose My devices only or Everyone nearby
Next, you can alter the location where the files received via Nearby sharing are saved. The default folder location is your Downloads folder, but you can press the Change button next to “Save files I receive to” to choose another place on your Windows 11 computer.
Choose My devices only or Everyone nearby
Next, you can alter the location where the files received via Nearby sharing are saved. The default folder location is your Downloads folder, but you can press the Change button next to “Save files I receive to” to choose another place on your Windows 11 computer.
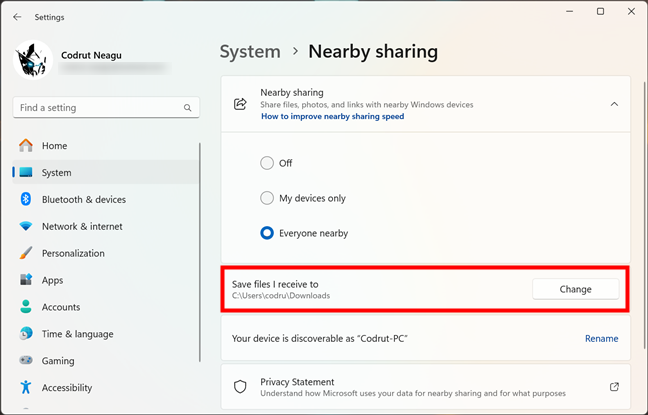 The location where files received via Nearby sharing are saved
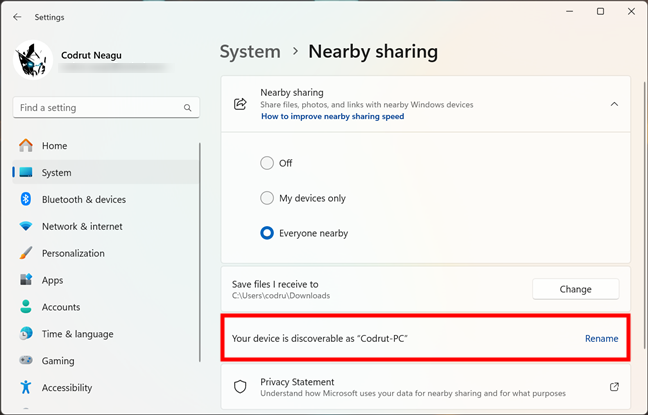
The last setting you have on the Nearby sharing is related to your Windows 11 computer name. “Your device is discoverable as” tells you how the other computers near you will display your Windows 11 PC. Clicking or tapping the Rename link next to this entry takes you to the System > About page in the Settings app, where you can rename your computer. If that’s something you want, here are detailed instructions about the whole process: How to change your PC name in Windows (4 ways).
The location where files received via Nearby sharing are saved
The last setting you have on the Nearby sharing is related to your Windows 11 computer name. “Your device is discoverable as” tells you how the other computers near you will display your Windows 11 PC. Clicking or tapping the Rename link next to this entry takes you to the System > About page in the Settings app, where you can rename your computer. If that’s something you want, here are detailed instructions about the whole process: How to change your PC name in Windows (4 ways).
 Your computer's name
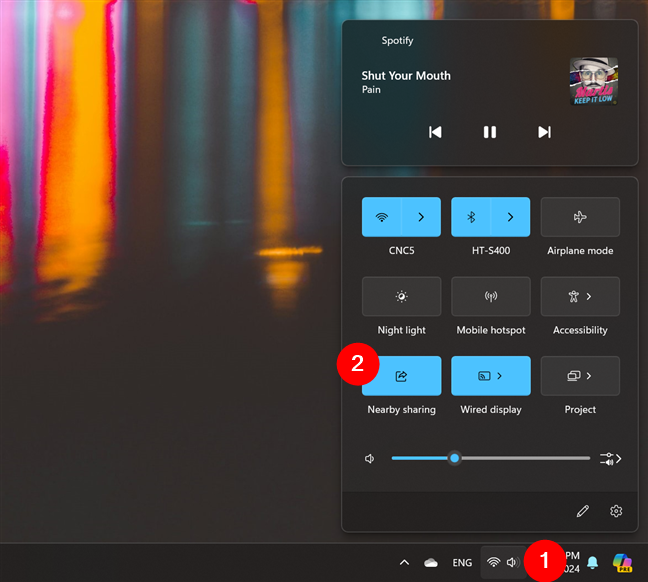
You’ve now finished configuring Nearby sharing on your Windows 11 computer. It’s worth noting that, from here on, a faster way to enable or disable it is to click or tap the Nearby sharing button available in the quick settings panel (Win + A).
Your computer's name
You’ve now finished configuring Nearby sharing on your Windows 11 computer. It’s worth noting that, from here on, a faster way to enable or disable it is to click or tap the Nearby sharing button available in the quick settings panel (Win + A).
 The Nearby sharing quick setting in Windows 11
Having that covered, let’s move on to see…
The Nearby sharing quick setting in Windows 11
Having that covered, let’s move on to see…
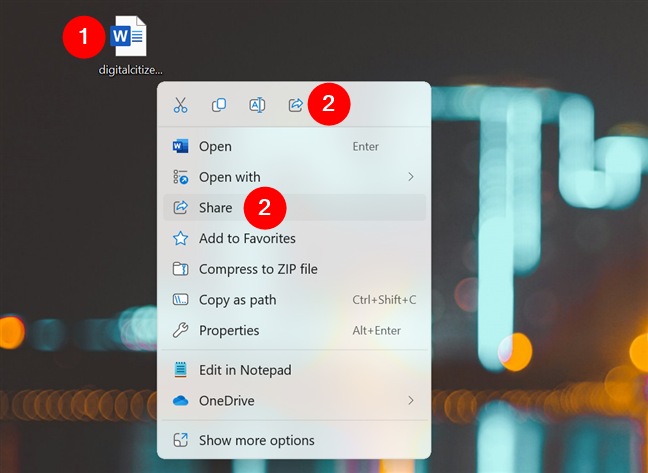
 Right-click the file and select Share
Alternatively, open File Explorer (Win + E), choose the file and click or tap the Share button in the toolbar.
Right-click the file and select Share
Alternatively, open File Explorer (Win + E), choose the file and click or tap the Share button in the toolbar.
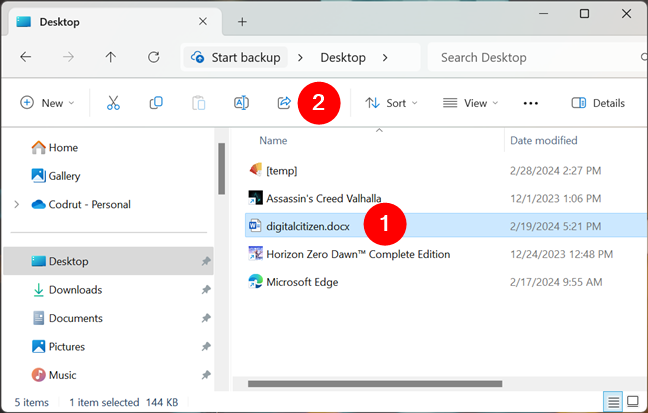
 Select the file and click Share in File Explorer's toolbar
For sharing pictures, you can open the Photos app, right-click (press and hold) the image, and select Share from the context menu.
Select the file and click Share in File Explorer's toolbar
For sharing pictures, you can open the Photos app, right-click (press and hold) the image, and select Share from the context menu.
 Right-click the image and choose Share
Alternatively, access the menu in the Photos app (three dots) and click or tap Share.
Right-click the image and choose Share
Alternatively, access the menu in the Photos app (three dots) and click or tap Share.
 Open or select the photo, access Photos' menu and choose Share
To share a website using Microsoft Edge, open the site, right-click (or press and hold) on an empty spot, and choose Share from the context menu.
Open or select the photo, access Photos' menu and choose Share
To share a website using Microsoft Edge, open the site, right-click (or press and hold) on an empty spot, and choose Share from the context menu.
 Right-click on a website and click Share
In the Share box, click or tap the Windows share options button.
Right-click on a website and click Share
In the Share box, click or tap the Windows share options button.
 Click or tap Windows share options
Although it takes more time and steps, you should know that you can also achieve the same result by accessing the Settings and more (Alt + F) menu in Edge, going to More tools, and clicking or tapping Share.
Click or tap Windows share options
Although it takes more time and steps, you should know that you can also achieve the same result by accessing the Settings and more (Alt + F) menu in Edge, going to More tools, and clicking or tapping Share.
 Access More tools in Edge's menu and choose Share
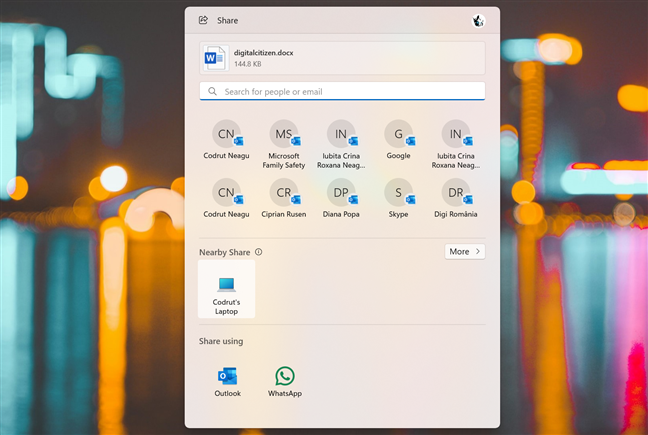
Next, regardless of the content you decided to share and the app where you initiated the action, you will see a Share window like the one below. Inside it, locate the Nearby Share section: it will list all the nearby computers or devices that can receive your file(s), photo(s), or link(s). Identify the target device, and click or tap its name. For example, I’m attempting to send a document from my Windows 11 computer to my laptop.
Access More tools in Edge's menu and choose Share
Next, regardless of the content you decided to share and the app where you initiated the action, you will see a Share window like the one below. Inside it, locate the Nearby Share section: it will list all the nearby computers or devices that can receive your file(s), photo(s), or link(s). Identify the target device, and click or tap its name. For example, I’m attempting to send a document from my Windows 11 computer to my laptop.
 Click or tap the recipient device
TIP: If the desired device is not visible in the list, ensure Nearby sharing is enabled on it, Bluetooth and/or Wi-Fi are activated, and it’s within range.
Once you’ve selected the target device, wait for the recipient to accept the request. While that happens, Windows 11 will let you know that it’s “Waiting for (device name) to accept”.
Click or tap the recipient device
TIP: If the desired device is not visible in the list, ensure Nearby sharing is enabled on it, Bluetooth and/or Wi-Fi are activated, and it’s within range.
Once you’ve selected the target device, wait for the recipient to accept the request. While that happens, Windows 11 will let you know that it’s “Waiting for (device name) to accept”.
 Initiating a share via Nearby sharing
The recipient will receive a notification to accept or decline the Nearby sharing request. Depending on the content you’ve shared, the receiving computer will show options/buttons to Save & open or Save in the case of files and photos, or Open in the case of links to webpages.
Initiating a share via Nearby sharing
The recipient will receive a notification to accept or decline the Nearby sharing request. Depending on the content you’ve shared, the receiving computer will show options/buttons to Save & open or Save in the case of files and photos, or Open in the case of links to webpages.
 Notification about the share on the recipient PC
If accepted, the sharing process goes on, and upon completion, a “Successfully sent” message confirms a favorable outcome.
Notification about the share on the recipient PC
If accepted, the sharing process goes on, and upon completion, a “Successfully sent” message confirms a favorable outcome.
 The file has been successfully sent
The receiving device will also see a notification stating “Receiving from (computer name) is complete.” Depending on the shared content, they can click or tap buttons in the message to access the file, photo, or link received.
The file has been successfully sent
The receiving device will also see a notification stating “Receiving from (computer name) is complete.” Depending on the shared content, they can click or tap buttons in the message to access the file, photo, or link received.
 Receiving is complete
And with that, the process of sending and receiving content with Windows 11’s Nearby sharing feature is over. It’s quite easy, isn’t it?
Receiving is complete
And with that, the process of sending and receiving content with Windows 11’s Nearby sharing feature is over. It’s quite easy, isn’t it?
Essential aspects about Nearby sharing on Windows
Windows’ Nearby sharing feature enables the sharing of content such as files, documents, photos, or website links among nearby devices, using Bluetooth or Wi-Fi. Nearby sharing works between PCs running either Windows 10 or Windows 11. Any scenario involving the two operating systems is valid: you can send and receive content from a Windows 10 PC to a Windows 11 device, from a Windows 11 PC to a Windows 10 computer, from a Windows 10 to a Windows 10 device, and from a Windows 11 to a Windows 11 computer.How to use Nearby sharing in Windows 10
If you want to use Nearby sharing on your Windows 10 computer, here’s how to enable and then send or receive files with its help:How to enable Nearby sharing in Windows 10
To use Nearby sharing in Windows 10, you must first enable it. To do that, open the Settings app and click or tap System.How to share files, photos, or links with Nearby sharing in Windows 10
When you want to send something with Nearby sharing from your Windows 10 computer, open the app that has the content you want to share. That can be any app that supports sharing, such as File Explorer, Photos, or Microsoft Edge. Next, I’m going to use a couple of examples to help you understand how the entire process of sharing works: Say you want to send a file to another computer nearby. In this case, the easiest way is to right-click (or press and hold) that file and click or tap the Share button in the context menu.How to use Nearby sharing in Windows 11
If you want to make use of Nearby sharing on your Windows 11 PC, here’s how to enable it and then send or receive files with its help:How to enable Nearby sharing in Windows 11
If you want to send or receive files, photos, or links using Nearby sharing in Windows 11, you must first make sure that this feature is enabled on your computer. Here are the steps to do that: Open the Settings app, select System in the left sidebar, and click or tap the Nearby sharing entry in the right panel.How to share files, photos, or links with Nearby sharing in Windows 11
In order to use Nearby sharing to send content from your Windows 11 computer, open the application that has the file(s), photo(s), or link that you want to share. This can be any program that offers support for sharing, like File Explorer, Photos, or Microsoft Edge. To make sure that the entire process is as clear as possible, in the next paragraphs, I’ll show you some examples: For instance, if you want to share a file, right-click (or press and hold) it and select any of the two available Share buttons in its context menu.
Discussion (0)
Be the first to comment.