File Explorer is one of the most powerful tools in Windows, and one reason for that is the fact that it offers many different options to share files and folders with others. It has tools for sharing items with your local network but also with other people, using email, various apps or other means of communication. Here are seven ways in which you can use File Explorer to share files and folders, in Windows 10 and Windows 8.1:
How to access the sharing options from File Explorer
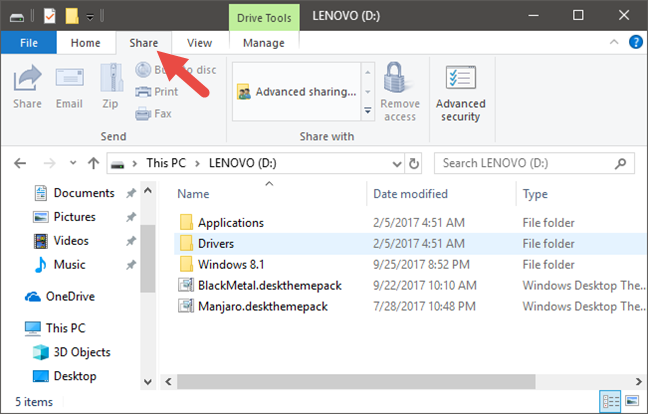
Before you can start exploring how you can share files and folders from File Explorer, you must first know how to access its sharing tools. The easiest way to find all of them is to open the Share tab. Start by opening File Explorer. A quick way to do it is to click or tap on its shortcut from the taskbar, or simultaneously press the Windows logo + E keys on your keyboard. Once you have launched File Explorer, open a drive, library or folder and click or tap the Share tab in the ribbon menu, to view the tools that are covered in this article.
File Explorer, Windows, share
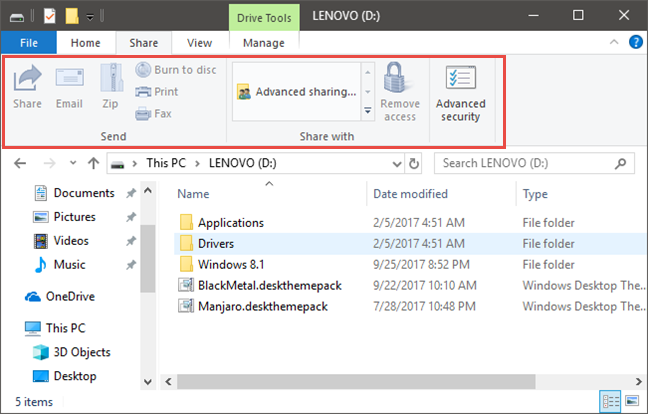
You will find that the sharing tools are separated into three sections:
Send - Tools that help you send a file by various methods.
Share with - Tools to change network sharing settings for a file or folder.
Advanced Security - Provides access to advanced file and folder security settings.
File Explorer, Windows, share
Note that, regardless of whether you are using Windows 10 or Windows 8.1, the sharing options become active, clickable buttons only when you select the appropriate type of content in File Explorer. If nothing is selected, they are greyed out and unusable. Now let's see how you can share files and folders, step by step and one way after another:
1. Share files and folders using the apps found on your Windows 10 PC or device
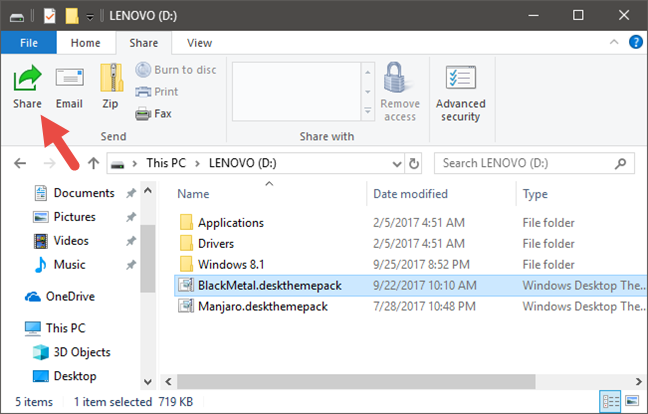
In Windows 10, the first tool available in the Share tab is called Share.
File Explorer, Windows, share
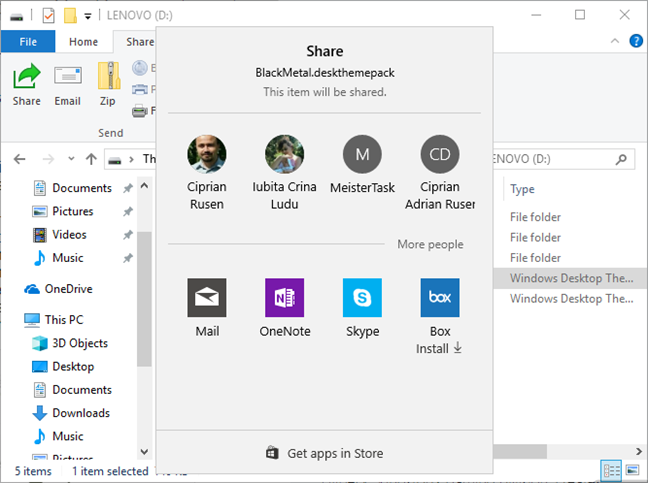
If you click or tap on it, Windows 10 offers you the option to share the selected file via any compatible app you have installed on your computer. For example, if you choose to share a file via Skype, that file will be sent in a message to the person you want. Or, if you choose to share a file using the Mail app, that file will be added as an attachment to an email message that is sent to whomever you want.
File Explorer, Windows, share
If you would like to know more about how this sharing process, read this guide: How to share files from File Explorer to apps like Mail, Skype, Dropbox, or OneDrive, in two steps.
Note that the Share button is not available in Windows 8.1, but the operating system offers a similar feature in its Share charm. This is also the only sharing tool that is exclusive to Windows 10. All the others that you will read about in this article are found both in Windows 10 and Windows 8.1.
2. Share files and folders by sending them via email
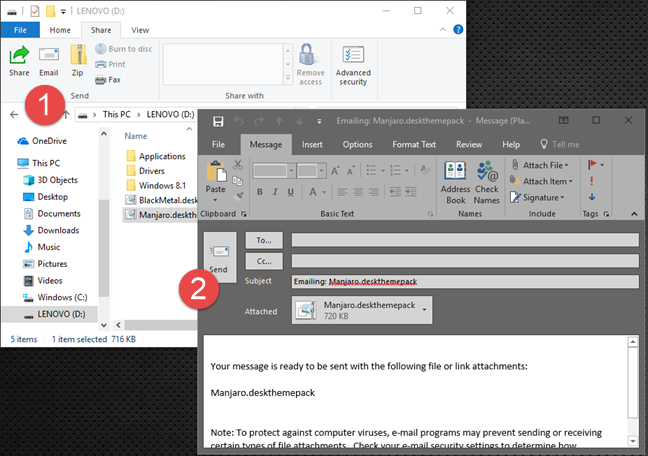
The Email sharing option opens your default email client with the selected file or files attached. All you have to do is complete the message, the sender, the subject, and click or tap Send.
File Explorer, Windows, share
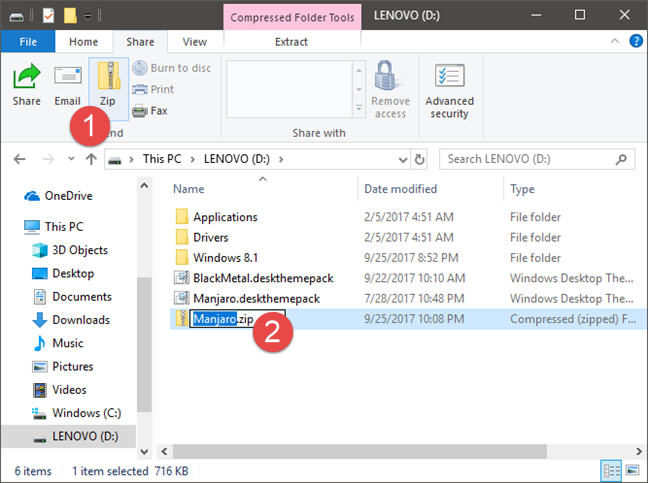
If your file is a bit too large to email, you can try compressing it using the Zip button. This automatically creates a ".ZIP" archive that compresses the file for easier sending.
File Explorer, Windows, share
3. Share files and folders by burning them to a CD or DVD
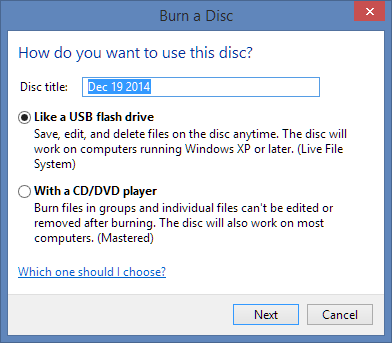
Another option is to share your files and folders using optical media like a CD or DVD. Click or tap "Burn to disc" in the Share menu to use this option. The Burn a Disc dialog that opens gives you two choices for how you want to burn the file, depending on how you intend to use it.
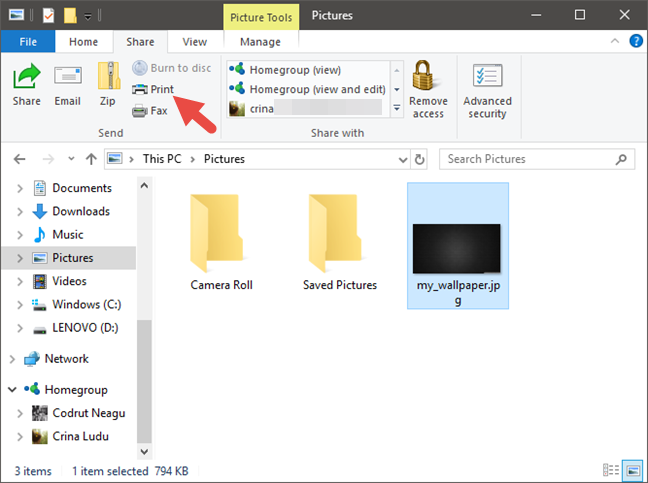
If you would rather create a physical copy of a file you selected, you can click or tap the Print button. Documents are sent directly to your printer, without any confirmation required while pictures open a dialog from which you can select printing options such as the image size and quality.
File Explorer, Windows, share
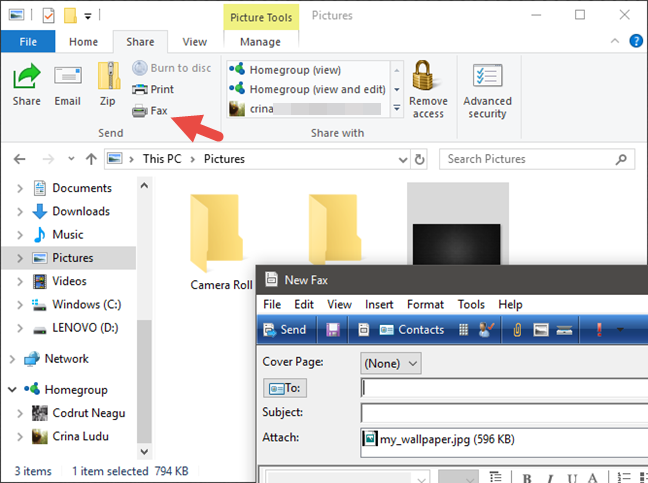
5. Share files and folders by sending them via a fax machine
If you have the hardware required, you can also fax a file to someone by clicking or tapping the Fax button. Windows opens a fax editor from which you can enter a phone number, a subject, and a brief message. This works only if you have a fax device installed and connected to your Windows computer. Otherwise, it will only start a guide for setting up a fax modem.
File Explorer, Windows, share
Click or tap Send to fax the file using your connected fax machine.
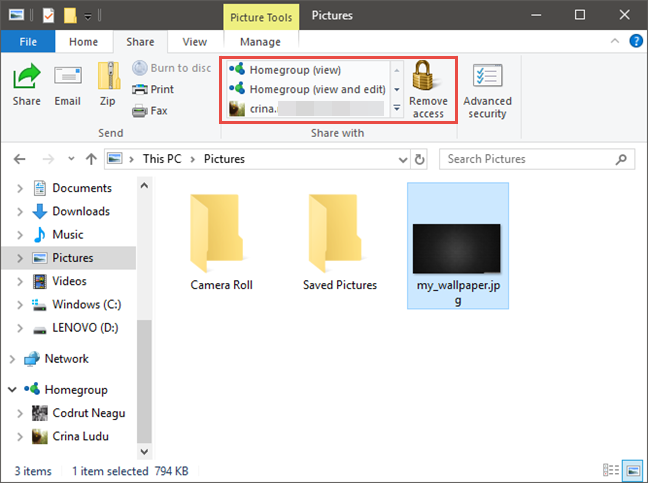
6. Share files and folders by allowing access to them for your homegroup or specific people from your local network
The second section of the Share tab offers tools to share your files and folders over your local area network. There are only two tools in this section. One to add permissions, and one to take them away.
File Explorer, Windows, share
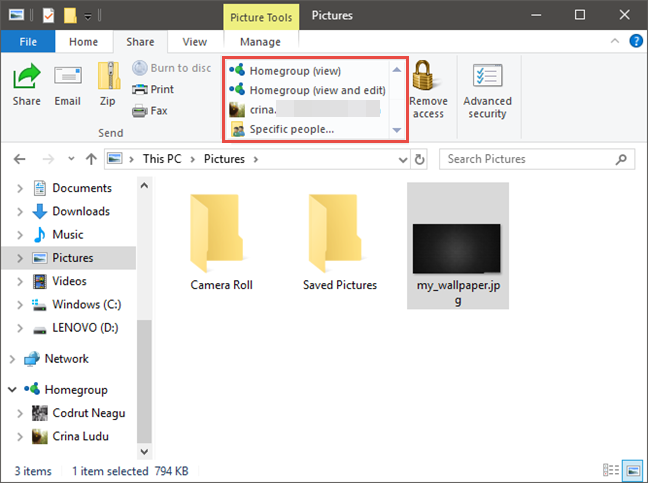
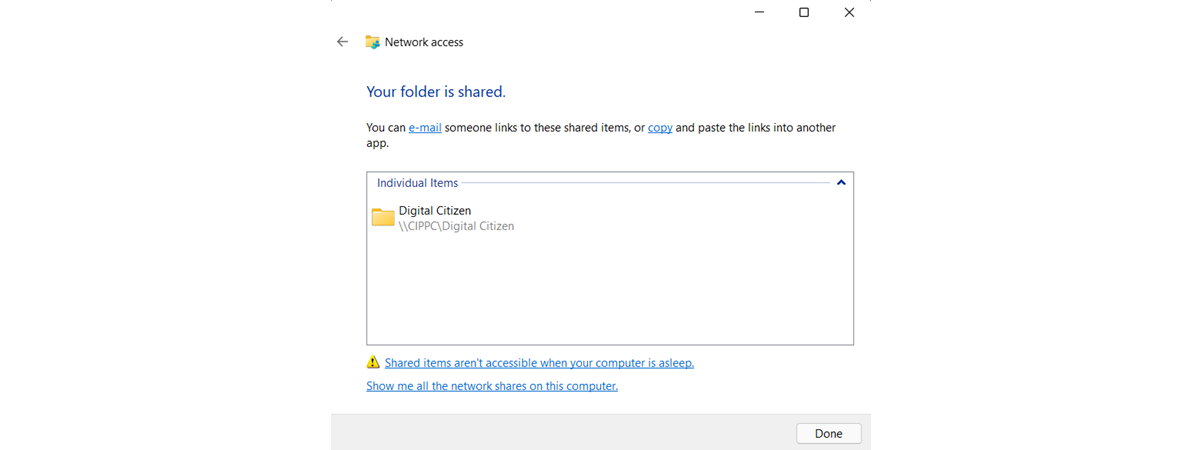
To share with other users on your computer or network, select a folder or file and then select a name from the list in the "Share with" section of the Share tab. If the person you want to share with does not appear, click or tap "Specific people…" and enter the person manually.
7. Use advanced sharing options to allow access to your files and folders to other devices and people from your local area network
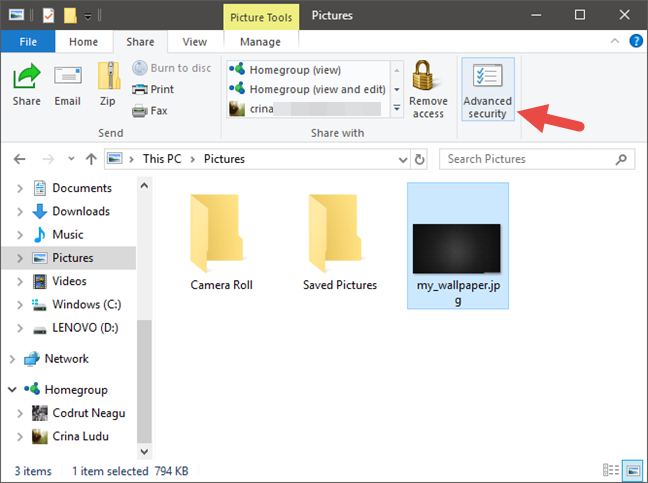
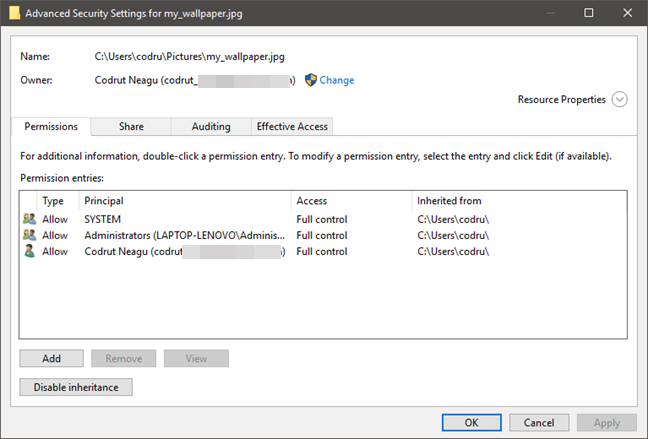
The Share tab from File Explorer also includes a button that provides easy access to the Advanced Security Settings for a file or folder. Click or tap Advanced Security to access that dialog.
File Explorer, Windows, share
From this dialog, you can adjust permissions for all users who have access to the file or folder, share the file with networked users or groups, view or edit auditing properties and test individual accounts to see what access they are given to your file or folder.
File Explorer, Windows, share
This is a one-stop shop for choosing who on your computer or network can view and edit your files. If you want some guidance on how this process works, read this tutorial: How to share folders using Advanced Sharing in Windows.
Conclusion
As you have seen, both Windows 10 and Windows 8.1 offer quite a few different tools that you can use to share files and folders with others. Most of the options are easy to use and to understand. With just a few clicks or taps, you can send any file or folder to anyone you like. Before closing this article, do not hesitate to use the comments form below for any questions or problems you might have.
Doesn’t show the most basic, to extract where a mounted disc is pointing.
Charles Hoes ·
As far as I can determine, Explorer in Windows 10 is broken. It allows the first computer on that network that boots up to “see” the shared files on the other computers, but all the rest do not have this ability. It can be changed by rebooting in a different order, then another computer gets to select. Clearly the network and the sharing are set up correctly because any of the computers can have this ability, just not at the same time. This started to happen immediately following the last automatic updates from Microsoft.
L. David Roper ·
There is no share button in the ribbon of my file explorer in Win 10.
Ciprian Adrian Rusen ·
Which edition of Windows 10 do you have? Can you share a screenshot?









Discussion (4)
Doesn’t show the most basic, to extract where a mounted disc is pointing.
As far as I can determine, Explorer in Windows 10 is broken. It allows the first computer on that network that boots up to “see” the shared files on the other computers, but all the rest do not have this ability. It can be changed by rebooting in a different order, then another computer gets to select. Clearly the network and the sharing are set up correctly because any of the computers can have this ability, just not at the same time. This started to happen immediately following the last automatic updates from Microsoft.
There is no share button in the ribbon of my file explorer in Win 10.
Which edition of Windows 10 do you have? Can you share a screenshot?