A lot of people have several computers in their homes and workplaces. If you're one of them, then you may need to share folders, files, and libraries with other users and computers on the same network. Unfortunately, many don't know how to share something on their network, and use other, clunkier methods for sharing, like e-mail. Here is how to use Windows' sharing wizard to share any folder, file, or library over the network:
NOTE: This guide covers Windows 10 with May 2020 Update and Windows 7. Most things work the same in both operating systems, although Windows 7 has a few additional sharing options that are no longer available in Windows 10. Read the first part of this tutorial to learn how to use the sharing wizard, and the last section to see what are the additional options you get in the sharing wizard from Windows 7. If you do not know the version of Windows that you have, read: What version of Windows do I have installed?.
How to share folders, files, and libraries with the network, using the Windows sharing wizard
Before you can share things with other people or computers on your local network, there are a couple of things you must configure:
First, make sure that both the PC from which you're sharing and the ones from which you want to access the shared files, folders, or libraries are on the same Workgroup. If you don't know how to check that or how to change your Workgroup, this guide is going to help you: What is the Workgroup & How to Change it in Windows?.
Secondly, all the computers and devices that share files, folders, or libraries between them should use a Private network profile.
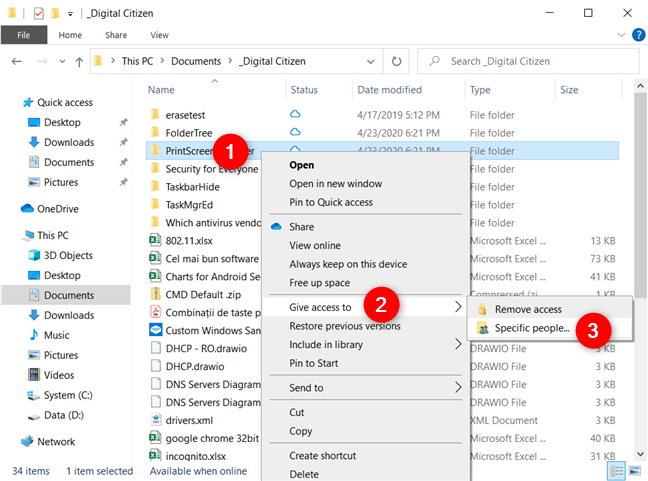
Once the above prerequisites are met, open File Explorer (or Windows Explorer, in Windows 7) and browse to the item or items that you want to share. Then, select the file(s), folder(s), or library(ies) that you want to share and right-click. In the contextual menu, go to "Give access to" (or Share with, in Windows 7) and click or tap on Specific people.
Give access to... Specific people
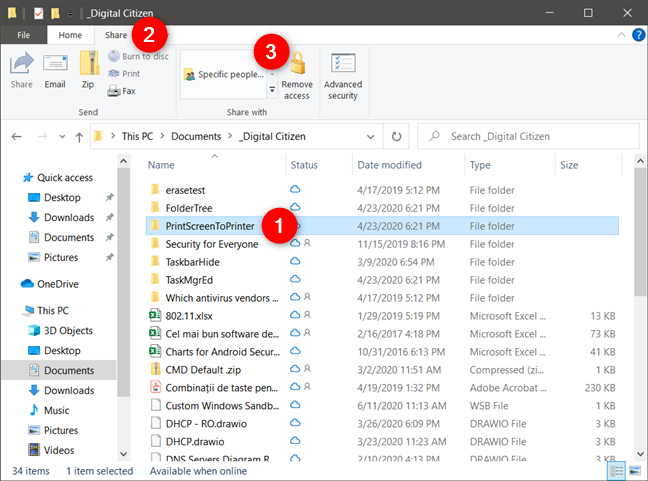
An alternative way to launch the Windows 10 sharing wizard is to select the items you want to share and then click or tap the Specific people button on the Share tab from File Explorer's ribbon.
Share with Specific people, in File Explorer
NOTE: The Specific people option is the only one available in Windows 10, and it allows you to share the selected item with one or more users, or even groups of users, as well as set individual sharing permissions for each.
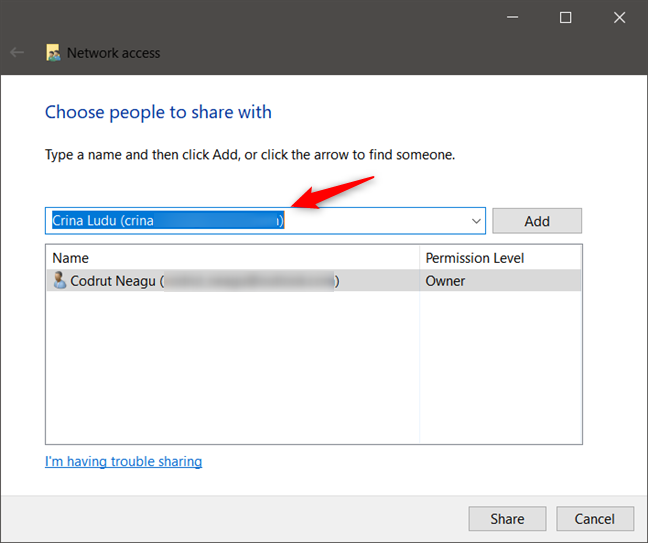
The previous action opens the sharing wizard, which Windows 10 calls Network access. In it, you must now "choose people to share with." Type the name of the user account or group of users with whom you want to share the items you selected.
Typing the name of the user with whom to share the selected items
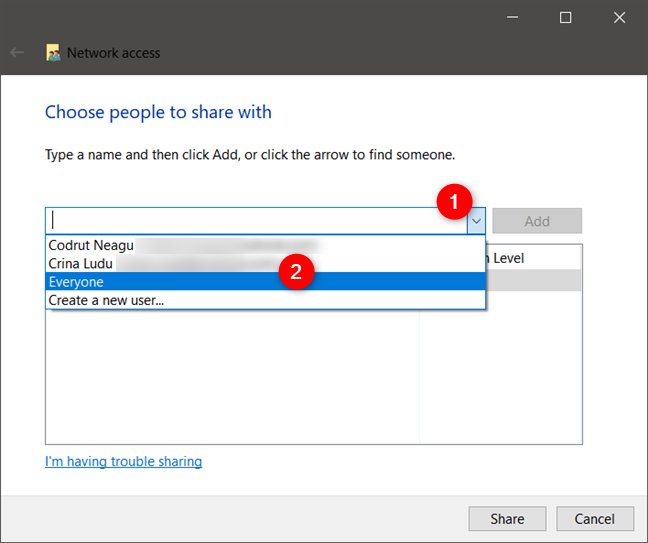
Alternatively, you can click or tap on the arrow next to the text field to select the user(s) with whom you want to share the folders, files, or libraries that you've chosen earlier. An interesting option is that you can share the items with Everyone, meaning that any computer and user account from your network gets access to those items.
Selecting the name of the user with whom to share the selected items
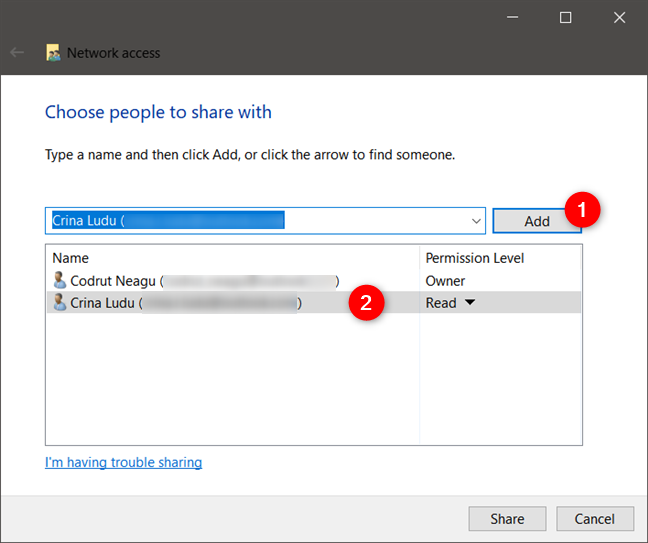
Once you're done typing or selecting the people with whom you want to share your folders, files, or libraries, click or tap the Add button. The user(s) that you've typed or selected are then listed in the section below.
Adding the selected users to share items with
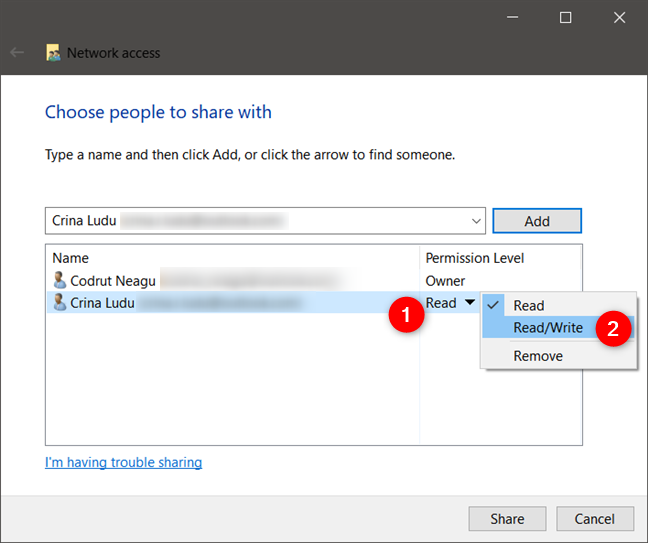
For every user(s) that you've added, you can also set their sharing permissions. On the right side of each user or group of users, click or tap on the Permission Level, and choose the type of sharing permissions that you want to give him or her:
Read - the user or the group can only view and read the shared item(s). He, she, or them can't change or delete the item(s).
Read/Write - the user or the group can view, read, change, or delete the shared item(s).
Remove - the user or the group no longer has access to the shared item.
Choosing the sharing permissions
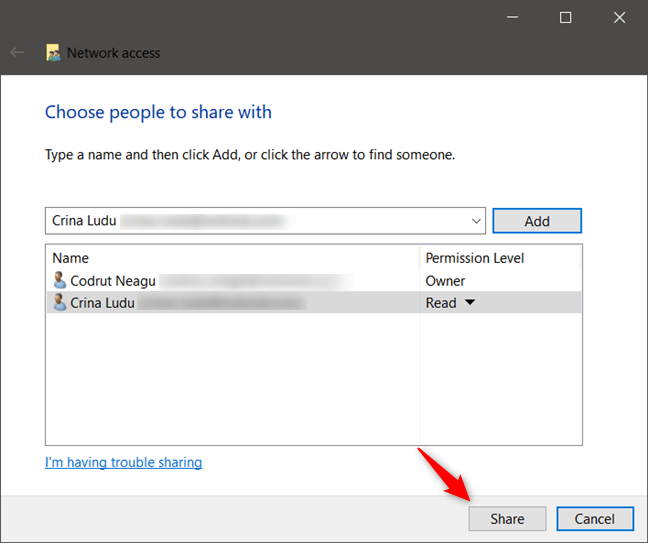
After you've finished adding all the users or groups of users that you wanted, click or tap on the Share button from the bottom-right corner of the Windows 10 sharing wizard.
Sharing the selected files, folder, or libraries
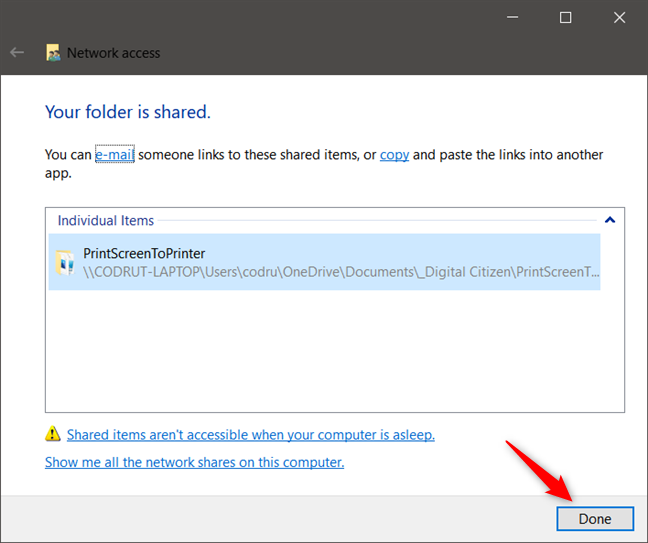
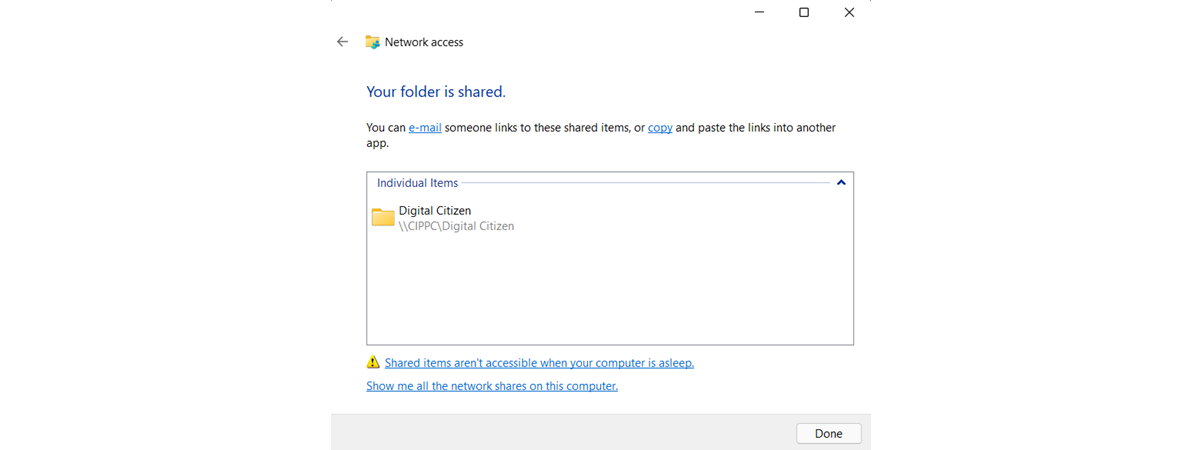
The final step of the Windows 10 sharing wizard tells you that everything's done, and that "You can e-mail someone links to these shared items, or copy and paste the links into another app." If you want, you can click or tap on the e-mail link to send a message with the path of the shared items to the people you want. You can also click or tap the copy link to get the path in your clipboard and send it to the people you want using other means. Either way, the files, folders, or libraries you've shared are now available in your network, for all the users that you've chosen. Click or tap on Done to close the sharing wizard.
The items are now shared
How to stop sharing folders, files, or libraries in Windows
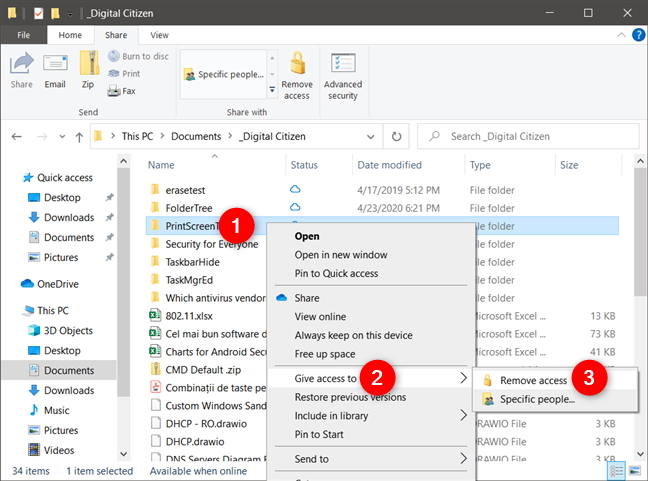
To stop sharing a folder, file, or library, right-click or press-and-hold on it, then select "Give access to" (or Share with, in Windows 7) and click or tap on Remove access (or Stop sharing, in Windows 7).
Using the sharing wizard to Remove access to shared items
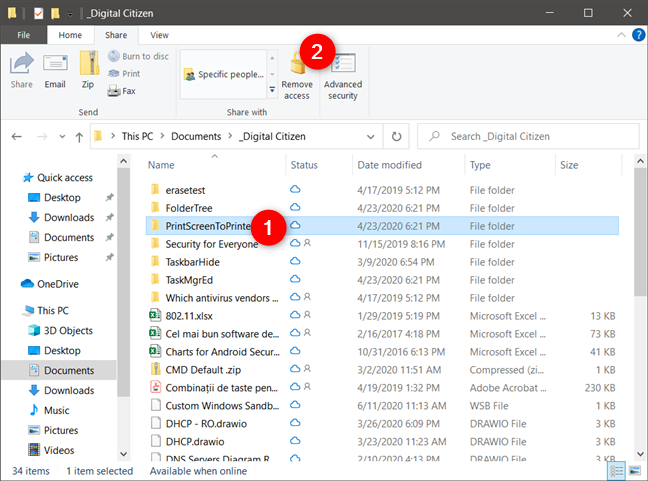
Alternatively, you can also use the ribbon from File Explorer. Select the item that you want to stop sharing, then click or tap the Share tab on the ribbon and press Remove access.
Using File Explorer to stop sharing items
The selected item is no longer shared with anyone.
NOTE: If you're curious to see what and how many folders you're sharing on your local network, here are three different ways to do it.
What if you don't see the sharing wizard?
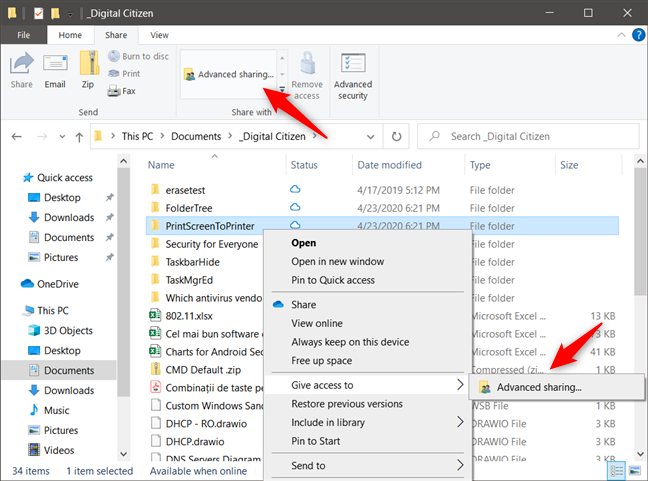
If you do not see the sharing options presented in this tutorial, and all you get are references to Advanced sharing, then it means that the Sharing Wizard is disabled.
Opening the Advanced sharing options
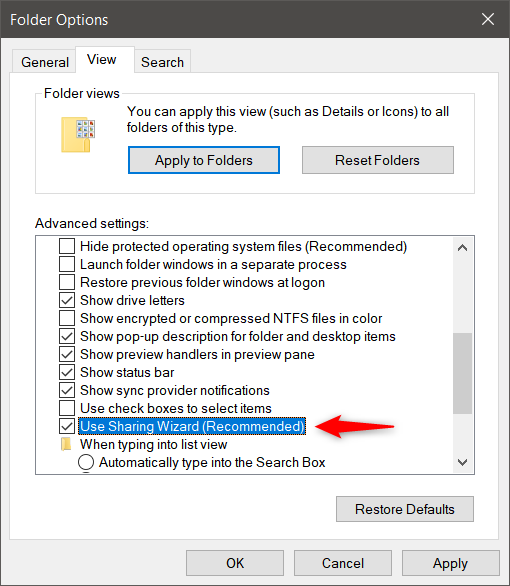
To enable it, open Folder Options, go to the View tab, and, in the list of advanced settings, check the "Use Sharing Wizard" option. Then click or tap OK to apply your setting.
What other sharing options do you get in Windows 7?
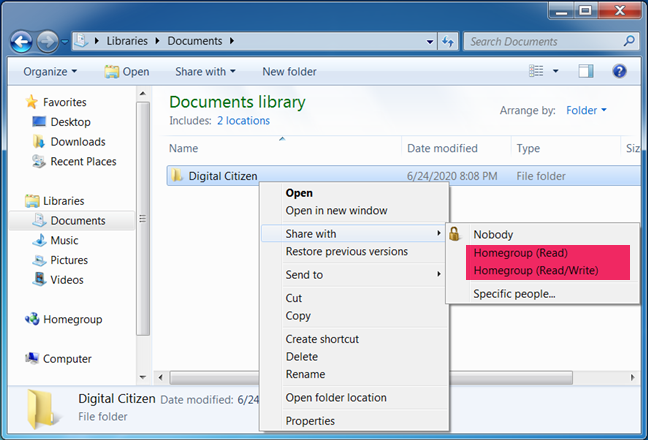
Windows 7's sharing wizard works the same way as the one in Windows 10. However, when you start it, you have a few additional options that are not available in Windows 10. These are sharing options that only work for Homegroups, a feature that Microsoft, unfortunately, chose to remove from Windows 10. When you right-click on a folder, file, or library in Windows 7, the Share with section of the contextual menu also lets you choose to share those items with the:
Homegroup (Read) - shares the selected item with other computers and devices on the Homegroup, allowing them to view it and read it without being able to modify it, delete it or change it in any way. If you disconnect from the Homegroup, the item is no longer shared.
Homegroup (Read/Write) - the selected item is shared with other computers and devices that are part of the Homegroup and allows them to view, read, change, or delete its contents. The item is no longer shared when you disconnect from the Homegroup.
Names of other user accounts - if other user accounts exist on your Windows computer, you may see them listed as sharing options. If you see and choose another user account, that user can view the item you are sharing. That user may exist on more than one computer or device. The selected item is shared with that user account no matter what computer he or she is using.
Additional options to share with Homegroup that are available in Windows 7
Did you use the sharing wizard successfully?
As you could see in this guide, sharing folders with others on the network is not that difficult. All it takes is a few clicks or taps. Before closing this tutorial, let us know whether this guide was helpful or not. Did you encounter problems? If you did, comment below and let's discuss.
Is was a great . The only thing, I have a HP computer running windows 10. I have a Dell laptop running windows 10. I want my laptop to talk to the HP. What is the setup for this?
Rusty ·
Please add a paragraph describing how to let a machine running XP access shares on newer OS versions like 7, 8 & 10. Home groups seem to block access and setting the network type to ‘work’ doesn’t seem to help.
MikeH ·
Hi, I’m using Win 10 trying to share files between a desktop and laptop. Choosing ‘give access to/ specific people/’ the dropdown on the Network access page only lists people with accounts on that device, and not the people with accounts on the other device (even though the other devices have been discovered in explorer. I’ve tried entering \MIKE-DESKTOPMIKE (and variations on this) but the error is user not found. I have to give access to everyone to get the file or folder seen on the other computer, which is not really desirable.
Any suggestions would be welcome!
thanks for you help
Mike
kristofjs ·
I’m working on a network of 4 computers, 3 with W7 and one with W10. I’m trying to connect to the W10 computer, but so far I can only do that by sharing its folders with everyone. When I access it via the network from another computer, I’d like to see the window I see on a W7 computer which invites me to log in. How do I get that to happen?
Chavo del 8 ·
Ciprian, I know this is an old tutorial, but it is a good one. However, what can we do when the Sharing icons in Explorer (on Win 8.1) are greyed out for a shared USB drive connected to the network router (Netgear) via USB cable? Is there a work around for that?
Guy ·
Hello – how can I remove someone from the list of possible people in the “Share with” (right click) menu? For example, in the screengrab you show above, the [email protected] address, below “Homegroup (View and edit)” in the menu list.
I’ve got an email address in there from what must be an old account (on a Win 8 PC), but I can’t for the life of me work out how to get rid of it. Thanks.
Ciprian Adrian Rusen ·
That’s a good question. We will run some experiments and see if we can come up with an answer. If we do, we will publish an article.
jonaldinho ·
what about sharing with workgroup?
my linux on asus eeepc isnt seen when i go to folder>sharewith>specific ppl> my ubuntu doesnt appear in this list but is visible in explorer>network
just putting it out there ill figure it out come back npost how idid it since this is such an old thread but i love these forums theyre a real help.much appreciated
Tim ·
I’ve gone through all this dozens of times, still cannot view anything on my Windows 7 machine from my XP Laptop, or visa versa.
Anonymous ·
Thanks very much this helped me through my first networking experience.
Very straight forward and informative, great job.








Discussion (10)
Is was a great . The only thing, I have a HP computer running windows 10. I have a Dell laptop running windows 10. I want my laptop to talk to the HP. What is the setup for this?
Please add a paragraph describing how to let a machine running XP access shares on newer OS versions like 7, 8 & 10. Home groups seem to block access and setting the network type to ‘work’ doesn’t seem to help.
Hi, I’m using Win 10 trying to share files between a desktop and laptop. Choosing ‘give access to/ specific people/’ the dropdown on the Network access page only lists people with accounts on that device, and not the people with accounts on the other device (even though the other devices have been discovered in explorer. I’ve tried entering \MIKE-DESKTOPMIKE (and variations on this) but the error is user not found. I have to give access to everyone to get the file or folder seen on the other computer, which is not really desirable.
Any suggestions would be welcome!
thanks for you help
Mike
I’m working on a network of 4 computers, 3 with W7 and one with W10. I’m trying to connect to the W10 computer, but so far I can only do that by sharing its folders with everyone. When I access it via the network from another computer, I’d like to see the window I see on a W7 computer which invites me to log in. How do I get that to happen?
Ciprian, I know this is an old tutorial, but it is a good one. However, what can we do when the Sharing icons in Explorer (on Win 8.1) are greyed out for a shared USB drive connected to the network router (Netgear) via USB cable? Is there a work around for that?
Hello – how can I remove someone from the list of possible people in the “Share with” (right click) menu? For example, in the screengrab you show above, the [email protected] address, below “Homegroup (View and edit)” in the menu list.
I’ve got an email address in there from what must be an old account (on a Win 8 PC), but I can’t for the life of me work out how to get rid of it. Thanks.
That’s a good question. We will run some experiments and see if we can come up with an answer. If we do, we will publish an article.
what about sharing with workgroup?
my linux on asus eeepc isnt seen when i go to folder>sharewith>specific ppl> my ubuntu doesnt appear in this list but is visible in explorer>network
just putting it out there ill figure it out come back npost how idid it since this is such an old thread but i love these forums theyre a real help.much appreciated
I’ve gone through all this dozens of times, still cannot view anything on my Windows 7 machine from my XP Laptop, or visa versa.
Thanks very much this helped me through my first networking experience.
Very straight forward and informative, great job.
Cheers
Eager