

When you connect to a new and unknown network in Windows 10 or Windows 11, the operating system sets it as Public which means it doesn’t consider it trustworthy. When the network profile is set to Public, your computer or device is not discoverable on the network, and you cannot share stuff with others. However, you may want to set the network as Private because you’re on a network you trust and want to share content or hardware. Here’s how to change the network profile to Private:
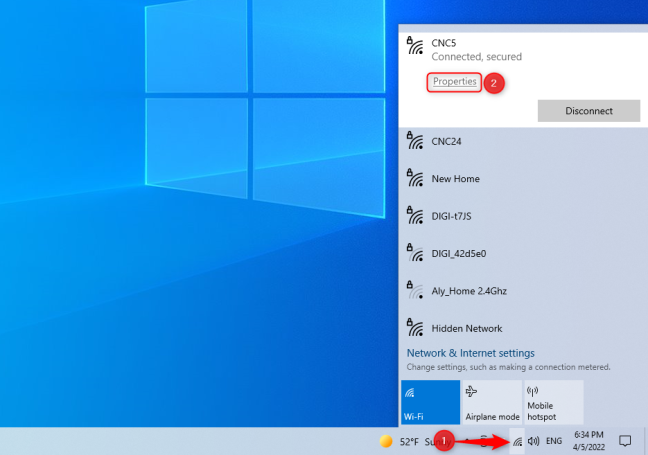
 Open the list of Wi-Fi networks and choose Properties
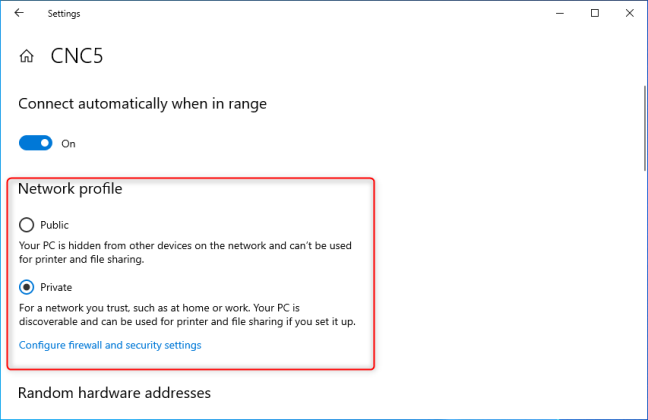
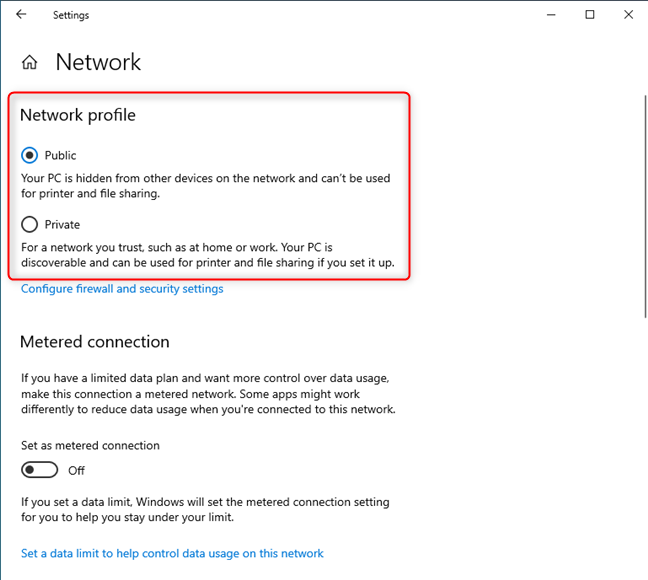
This takes you to a Settings page, where you see details about the wireless network you’re using. In the Network profile section, choose between Public or Private, depending on what you want.
Open the list of Wi-Fi networks and choose Properties
This takes you to a Settings page, where you see details about the wireless network you’re using. In the Network profile section, choose between Public or Private, depending on what you want.
 Set the network profile in Windows 10
Your setting is applied immediately. You don’t need to press a Save button or restart your device.
Another way to get to the same place is to open Settings and go to Network -> Internet. On the left, choose WiFi, and on the right, click or tap on your network’s name.
Set the network profile in Windows 10
Your setting is applied immediately. You don’t need to press a Save button or restart your device.
Another way to get to the same place is to open Settings and go to Network -> Internet. On the left, choose WiFi, and on the right, click or tap on your network’s name.

 Access the properties of your Wi-Fi connection
In the Network profile section, choose between Public or Private, as shown earlier.
Access the properties of your Wi-Fi connection
In the Network profile section, choose between Public or Private, as shown earlier.
 Access the properties of your Ethernet connection
You see the properties of your Ethernet connection. Then, in the Network profile section, choose Private or Public, depending on what you want.
Access the properties of your Ethernet connection
You see the properties of your Ethernet connection. Then, in the Network profile section, choose Private or Public, depending on what you want.
 Set the network profile in Windows 10
Your setting is instantly applied.
Set the network profile in Windows 10
Your setting is instantly applied.
 Access the properties of your Wi-Fi connection
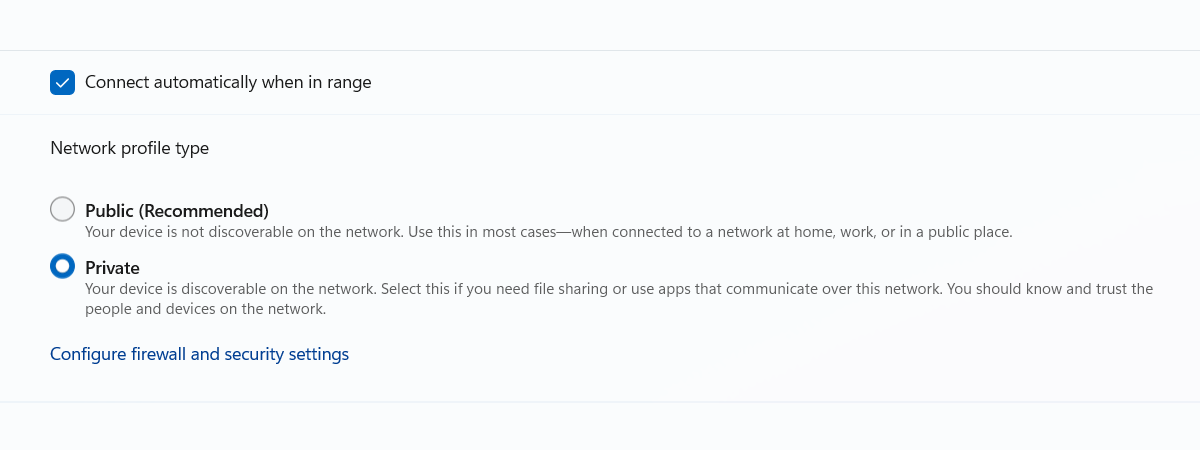
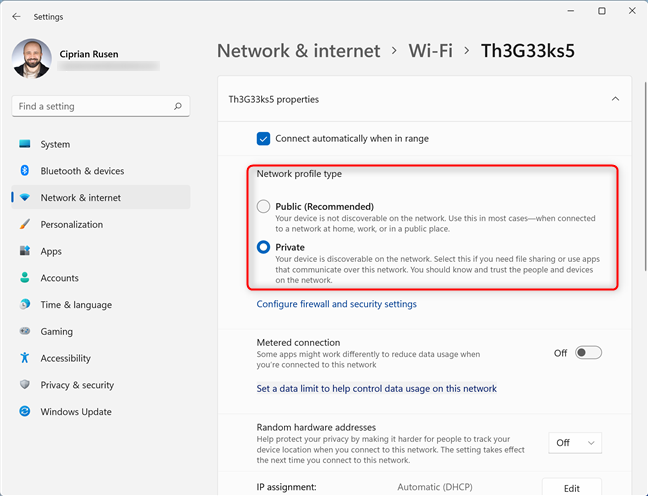
This action takes you to the Properties window for your Wi-Fi network. In the “Network profile type” section, choose Private instead of Public (Recommended). Your setting is applied immediately.
Access the properties of your Wi-Fi connection
This action takes you to the Properties window for your Wi-Fi network. In the “Network profile type” section, choose Private instead of Public (Recommended). Your setting is applied immediately.
 Change the Network profile type
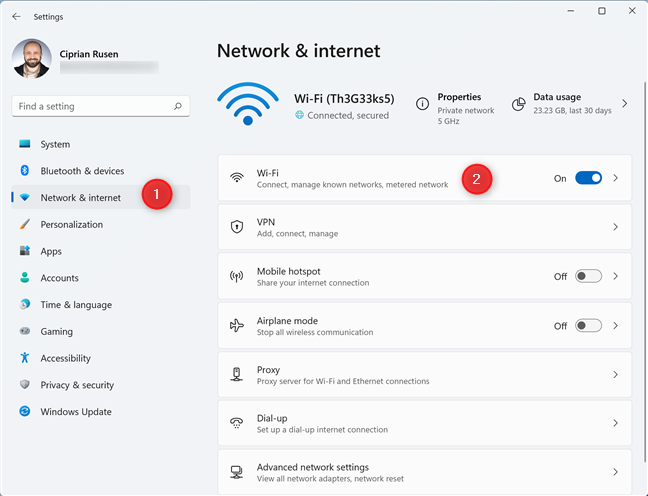
An alternative is to open Settings and go to Network & internet. Then, on the right, click or tap on the Wi-Fi section. Don’t press the switch for Wi-Fi, as it enables or disables wireless connectivity. Instead, click or tap ONLY on the name of the section.
Change the Network profile type
An alternative is to open Settings and go to Network & internet. Then, on the right, click or tap on the Wi-Fi section. Don’t press the switch for Wi-Fi, as it enables or disables wireless connectivity. Instead, click or tap ONLY on the name of the section.
 Choose Wi-Fi in the Network & internet settings
You then see all the Wi-Fi settings that can be configured in Windows 11. Click or tap on your network’s name followed by the word properties, shown below the Wi-Fi switch.
Choose Wi-Fi in the Network & internet settings
You then see all the Wi-Fi settings that can be configured in Windows 11. Click or tap on your network’s name followed by the word properties, shown below the Wi-Fi switch.
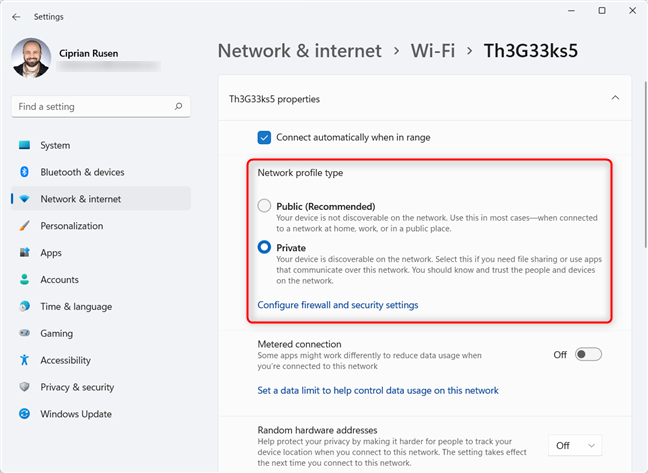
 Access the properties of your Wi-Fi connection
Then, choose between Private or Public for the Network profile type.
Access the properties of your Wi-Fi connection
Then, choose between Private or Public for the Network profile type.
 Change the Network profile type
Your Wi-Fi network is now set as you wish.
Change the Network profile type
Your Wi-Fi network is now set as you wish.
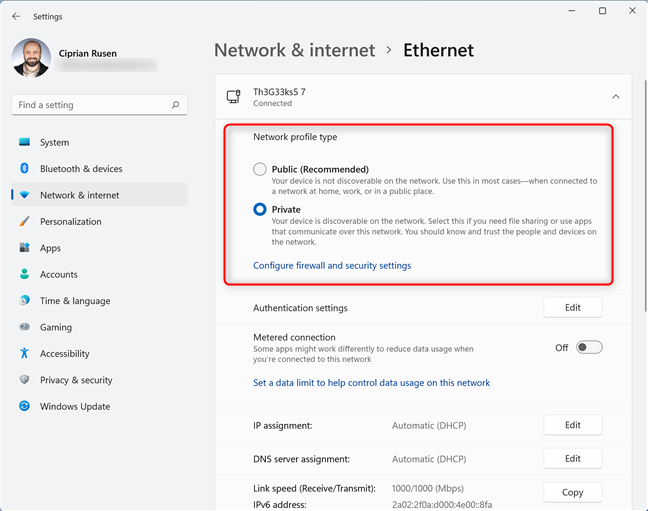
 Access the properties of your Ethernet connection
You see all the properties of your Ethernet connection. In the “Network profile type” section, choose Private instead of Public (Recommended).
Access the properties of your Ethernet connection
You see all the properties of your Ethernet connection. In the “Network profile type” section, choose Private instead of Public (Recommended).
 Change the Network profile type
NOTE: You should choose Public when you don’t want your PC to be discoverable on the network.
Change the Network profile type
NOTE: You should choose Public when you don’t want your PC to be discoverable on the network.
 See the Name and NetworkCategory fields
Remember the network's name exactly as you see it listed by the command you’ve just run. Then, type this command and press Enter:
See the Name and NetworkCategory fields
Remember the network's name exactly as you see it listed by the command you’ve just run. Then, type this command and press Enter:
 Change the network profile
The network name is changed immediately, but you don't get any confirmation message.
If you want to change the network profile from Private to Public, write this command instead:
Change the network profile
The network name is changed immediately, but you don't get any confirmation message.
If you want to change the network profile from Private to Public, write this command instead:

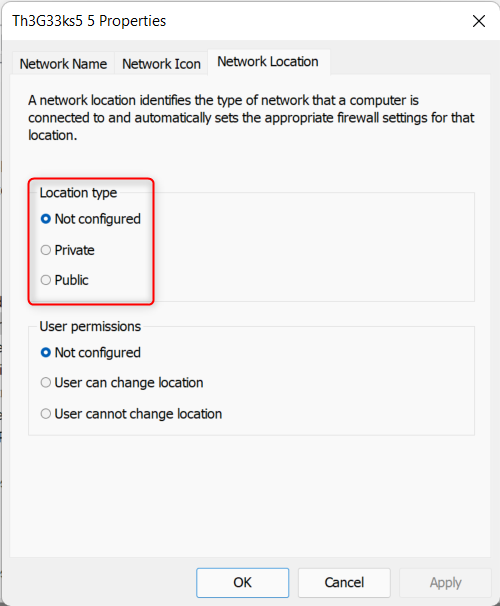
 Access the properties of your network connection
You see the properties of your network connection. Go to the Network Location tab, choose the Location type you want (Private or Public), and click OK.
Access the properties of your network connection
You see the properties of your network connection. Go to the Network Location tab, choose the Location type you want (Private or Public), and click OK.
 Change the Location type
Your setting is applied, and all you have to do is close the Local Group Policy Editor.
TIP: Did you know there are eight ways to close apps in Windows?
Change the Location type
Your setting is applied, and all you have to do is close the Local Group Policy Editor.
TIP: Did you know there are eight ways to close apps in Windows?
Why should you change the network profile in Windows?
Both Windows 10 and Windows 11 treat your existing network connection based on the profile set for it. When you connect to a new network, Windows automatically sets it as Public, meaning it might not be a safe network. This network profile is a great choice when you’re connected to networks that you do not know, like those found in public places, airports, hotels, restaurants, libraries, or companies you do not work for. The only networks you should set as Private are the ones you know and trust, like those in your home or workplace. When you set a network as Private, Windows allows your computer or device to be discoverable on the network, to share files, folders, and devices, including printers. For example, you cannot install a wireless or network printer at home unless the network profile is set as Private.How to change the Windows 10 network profile from Public to Private or the other way around
At the time this article is written, most people are still using Windows 10, so I’ll start with this operating system. Also, I’ll first cover laptop and tablet users with Wi-Fi connections and then desktop users with Ethernet connections.How to change the network profile to Private (or Public) when connected to WiFi
To change the network profile for your Wi-Fi connection, click or tap the Wi-Fi icon found in the bottom-right corner of the desktop and then the Properties link under the network you’re connected to.How to change the network profile to Private (or Public) when using an Ethernet connection
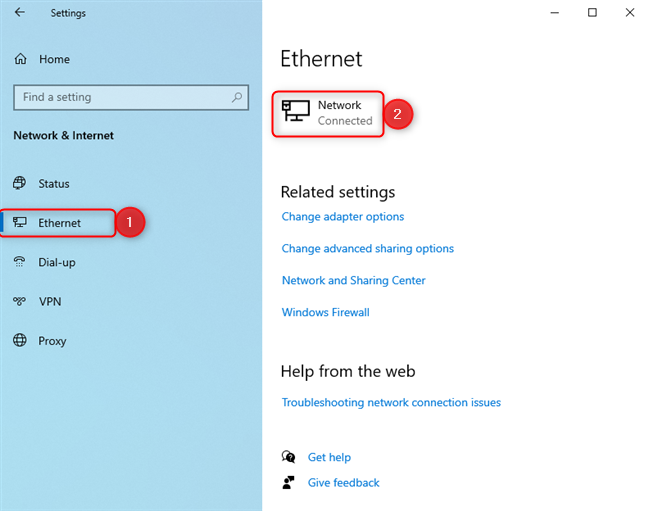
If you’re on a desktop computer, open Settings (Windows + I). Then, go to the Network & Internet section. In the column on the left, choose Ethernet, and on the right, click on the network’s name.How to change the Windows 11 network profile from Public to Private or the other way around
First, let’s see how to change the network location for Wi-Fi connections in Windows 11 and then for Ethernet connections. Each type of network connection has its separate section below.How to change the network profile to Private (or Public) when connected to WiFi
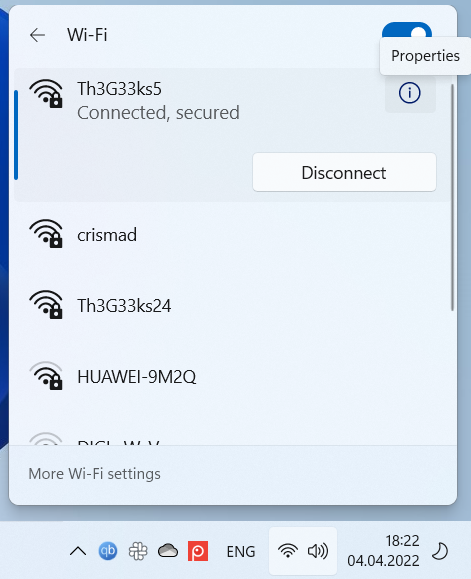
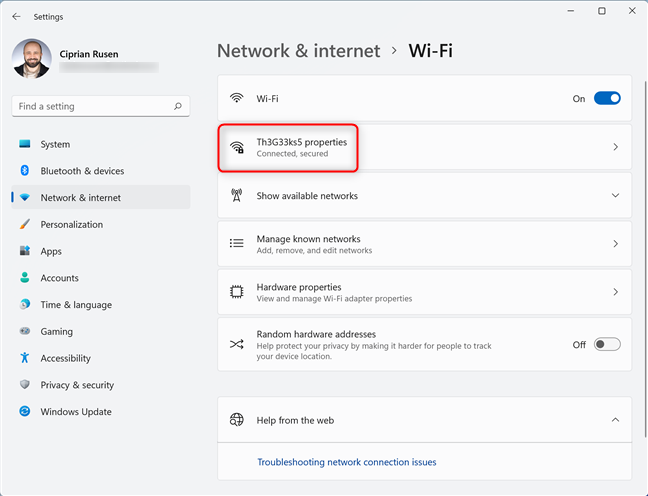
Let’s assume that you’ve just connected to a new wireless network on your Windows 11 laptop or tablet. As soon as you’re connected, the network’s name is shown at the top of the list of Wi-Fi networks, together with its status: “Connected, secured.” Click or tap the i (Properties) button next to your network.How to change the network profile to Private (or Public) when using an Ethernet connection
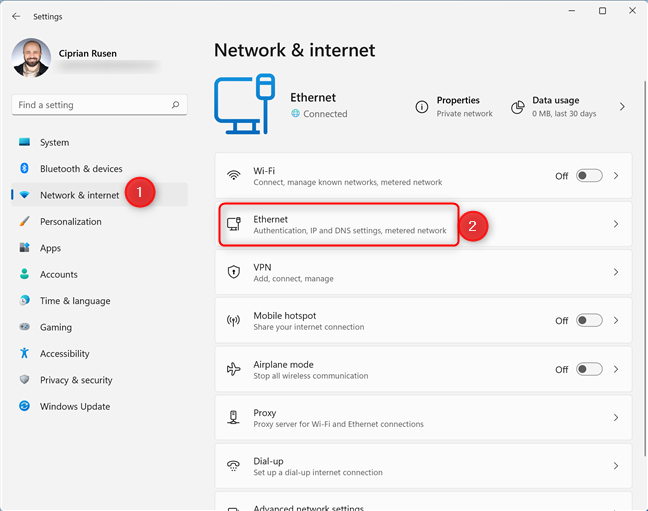
You may be using a desktop PC connected to the network through a cable instead of Wi-Fi. If that’s the case for you, open Settings (Windows + I). Then, click Network & internet on the left, and then, on the right, go to Ethernet.How to change the network profile using CMD, PowerShell, or Windows Terminal
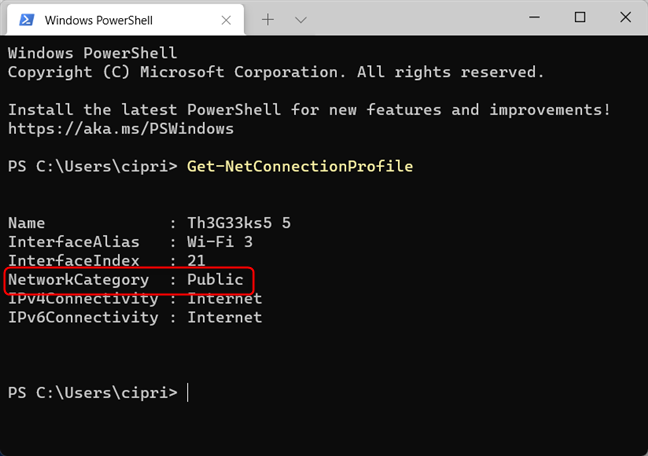
If you prefer command-line environments, open the Command Prompt, PowerShell, or Windows Terminal as administrator, depending on which you like most. I prefer to open Windows Terminal because it looks better than the other two. First, you need to know the network's name as it is stored by Windows. To do that, run the following command and press Enter:Get-NetConnectionProfile
You see the name of the existing network connection (it doesn’t matter if it's wireless or wired) and its current profile in the NetworkCategory field highlighted below.
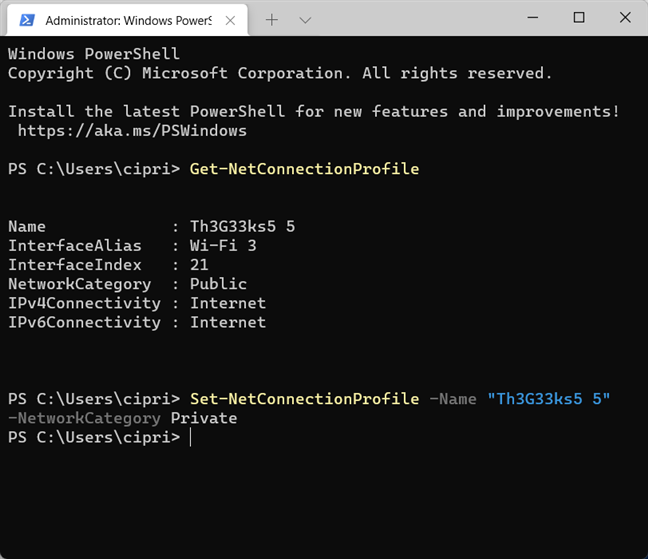
Set-NetConnectionProfile -Name "NetworkName" -NetworkCategory Private
Don’t forget to replace NetworkName with the value of the Name field shared by the previous command.
Set-NetConnectionProfile -Name "NetworkName" -NetworkCategory Public
Again, don’t forget to replace NetworkName with the Name field value returned by the first command you’ve run.
TIP: To double-check that the network location was changed, rerun the first command and see the results. The NetworkCategory field should have a different value.
How to change the network profile using Local Group Policy Editor
If you’re using the Pro or Enterprise editions of Windows 10 and Windows 11, you can also change the network profile using Local Group Policy Editor. First, use any of the methods described in this guide to open the Local Group Policy Editor. Then, on the left side of the window, navigate to “Computer Configuration > Windows Settings > Security Settings > Network List Manager Policies.” On the right, double-click on your network’s name.

Discussion (32)
Im seeing the same as ‘horses0987’; using windows 10 systems, 1809, 1909. WHen you click on netwk taskbar icon, then click on the connected network, Setting appears, click on the connected Network again, and the first thing appearing on the window is ‘Metered Connection:’. There is no ‘Network Profile’ as your example shows (also appearing below Metered conn. is ‘Properties’.
Does this mean there is a GPO or reg setting that controls what is displayed on this window? Or is your example from an older version of windows 10 (or newer) where the Profile is no longer settable from this particular setting window?
Metered connections cannot be set as public or private. If you disable the “metered” network setting, then you should be able to see the switch. This guide should help: https://www.digitalcitizen.life/what-are-metered-connections-windows-10-how-enable-them-and-why/
following your directions to set ethernet cable network from public to private. the directions show a public/private switch in settings. THAT SETTING SWITCH IS NOT THERE!!!! so how the hell do i set it to private so i can use my wifi shared over ethernet. it just says metered connection on or off. im using win10 pro j
Are you using a work laptop managed by your company? Also, did you read the whole guide, including the part about setting this using PowerShell?
Unlike Windows Vista and Windows 7, Microsoft has dropped the GUI to manage (rename, delete and merge) network profiles on Windows 8, Windows 8.1 and Windows 10 (Why??)
Unused network profiles accumulate in the registry. I was able to see computers with regular access to public hot spots, containing more than 100 network profiles in the system for no purpose.
So I made this piece of software to manage (rename and delete) network profiles on windows.
The program is very simple but you can read the text file in the 7zip.
Hope it helps: https://www.mediafire.com/file/ulm9jwzyg5q7mol/NetProf10.7z/file
Ilanio Castro
set-NetConnectionProfile -Name “ATT3SL9q6I_2.4” -NetworkCategory Private
didn’t work. It still says public
‘Get-NetConnectionProfile’ is not recognized as an internal or external command, operable program or batch file.
What now?
I reset the network to ‘Private’ it reverts to ‘Public’. This means I can’t properly connect wirelessly to other devices on my home network. There’s clearly a different function that’s affecting this; I have no idea how to find it.
Thanks for any advice!
Digital Citizen instructions always seem to work for me…!
We’re glad that they do. Do not hesitate to subscribe to our email newsletter, for more useful tutorials.
could you include a screenshot of where the Network Profile option is in the Settings app? I could not find it there
However, working from the Powershell in admin mode did allow me to change the Network Profile to Private
This article was GREAT! I had been trying to figure why some of the PC on the network did not see each other. Had everyone in the same work group but still could not see them. Step by step instructions for wireless or Ethernet.
couldn’t change to private. Would not accept check to private
Thank you very much. Instructions were soooo easy to follow and the screen shots were as per, – even for this 73 year old. Book marking this site is a must.
Had to remotely connect to an employee laptop but Powershell worked for me.
Hopefully when they reboot, it will remember that it’s settings.
Powershell did it for me – thanks.
Hi,
worked fine with PowerShell commands except for the “Unidentified network” kind that resets to Public @reboot.
The GUI menus don’t exist in Windows 10 1607 LTSB
In fact, in secpol.msc Network List Manager Policies there’s a group “Unidentified Networks” (note the ‘s’) and here that kind of network can be forced to Public or Private
The box to select Public or Private never showed up so nothing worked.
Used the Powershell Command successfully , but upon restart it goes back to Public
win 10 v.1803 i have nothing on there that says
network profile
Would be great, if it worked like that. Maybe some day it will. It currently does not. There’s no ‘Network Profile’ to change and no ‘Make this PC discoverable’. Not sure what version you have, or where it came from, but out here in the real world these settings don’t exist. Running April Creators update on Pro version.
Are you on a business network, with a business PC?
Why the fxxx did Microsoft tinker with this. In earlier versions of Windows, I could change it in 15 secs or less, now 2 hours later, I still can’t figure out how to do it in Windows 10.
I totally understand your frustration. That’s why we wrote this guide, to help you with this issue.
I did this and under Wi-Fi it doesnt have Make this private.
I want to make a HomeGroup on my computer so other laptops can share, but I cant find how to change the bloody Wi-Fi to private!
“Make this PC discoverable” does not exist.
There is no “Make this PC discoverable” switch.
Nothing you have said works and I have tried everything to make it work!!
With all due respect, I already knew how to do that. My problem is why my all my photos keep popping up the windows app screen in photos.
I guess I’ll just have to figure it out myself again.
Even so, I really like your presentation. 🙂
Same here, no option to find devices and content, just disconnect.
I don’t get a screen to ‘find devices and content’ , I only get button to disconnect.