

Windows’ Backup and Restore is a feature that allows you to create backups of your personal files, such as documents, photos, music, and videos. Moreover, you can also use it to back up a system image of your computer, which includes the operating system, programs, drivers, and settings. And once you’ve created a backup, Windows’ Backup and Restore can help you restore your files, as well as recover your system in case of a hardware failure, malware infection, or accidental deletion. Some may know about this backup program from the old days of Windows 7, but some may only hear about it now. While the tool itself didn’t change in the last decade or so, it still works in modern Windows operating systems. Yes, Backup and Restore is available in both Windows 10 and Windows 11, although it’s quite hidden from view. Without further ado, here’s where to find Windows’ Backup and Restore, how to use it to back up a computer, and how to create a system image:
 Windows Backup and Restore
Furthermore, Windows Backup offers the ability to create a system image, which is a clone of the drives your computer requires to start. A system image includes the operating system and all your system settings, programs, and files found on the C: drive. You can use it to restore the content on your computer if your hard disk or solid-state drive crashes. When you repair your computer from a system image, you must know it is a complete restoration process. You can’t choose individual items, programs, or system settings. Basically, the drive is overwritten with the files from the system image. If you want to create a system image of your computer, read the last section of this guide.
Windows Backup and Restore
Furthermore, Windows Backup offers the ability to create a system image, which is a clone of the drives your computer requires to start. A system image includes the operating system and all your system settings, programs, and files found on the C: drive. You can use it to restore the content on your computer if your hard disk or solid-state drive crashes. When you repair your computer from a system image, you must know it is a complete restoration process. You can’t choose individual items, programs, or system settings. Basically, the drive is overwritten with the files from the system image. If you want to create a system image of your computer, read the last section of this guide.
 Creating a system image with Backup and Restore
Before we go ahead and see how Backup and Restore works, there’s one more thing you should know. This tool is an old program that was quite popular in the Windows 7 era. Since then, the app didn’t receive any updates, but it’s still available in Windows 11 and Windows 10. It works the same in both operating systems, and in my experience, it does its job perfectly. However, everything about it looks old, and it lacks integration with the modern apps and features of Windows 11 or Windows 10. In the future, this might all change, as rumor has it that Microsoft is preparing a new Windows Backup app that will be part of the next Windows 11 2023 Update (version 23H2) and, presumably, will also be available for Windows 10. Until then, let’s see what the current Backup and Restore tool can do and how to use it:
Creating a system image with Backup and Restore
Before we go ahead and see how Backup and Restore works, there’s one more thing you should know. This tool is an old program that was quite popular in the Windows 7 era. Since then, the app didn’t receive any updates, but it’s still available in Windows 11 and Windows 10. It works the same in both operating systems, and in my experience, it does its job perfectly. However, everything about it looks old, and it lacks integration with the modern apps and features of Windows 11 or Windows 10. In the future, this might all change, as rumor has it that Microsoft is preparing a new Windows Backup app that will be part of the next Windows 11 2023 Update (version 23H2) and, presumably, will also be available for Windows 10. Until then, let’s see what the current Backup and Restore tool can do and how to use it:
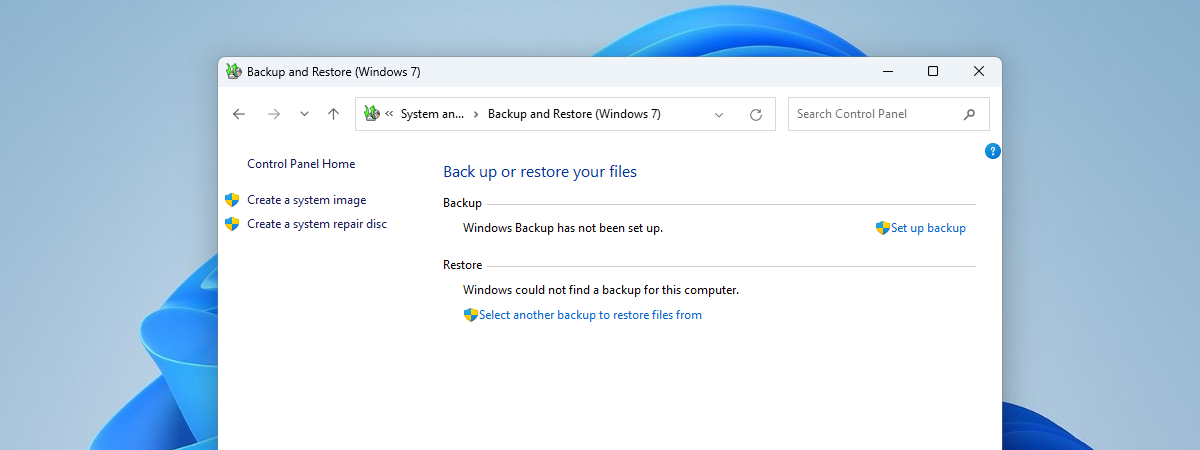
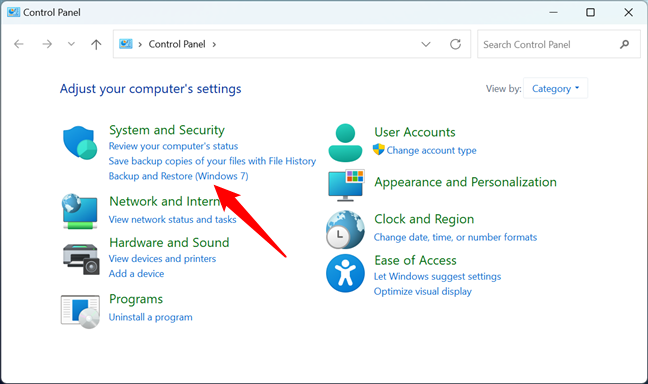
 Open the Control Panel
Then, to open Windows Backup, click or tap the “Backup and Restore (Windows 7)” link under System and Security. Alternatively, go to System and Security > Backup and Restore (Windows 7).
Open the Control Panel
Then, to open Windows Backup, click or tap the “Backup and Restore (Windows 7)” link under System and Security. Alternatively, go to System and Security > Backup and Restore (Windows 7).
 Click or tap the Backup and Restore (Windows 7) link
Note that although the link’s name ends in Windows 7, the Windows Backup tool still works as it should in both Windows 11 and Windows 10.
Click or tap the Backup and Restore (Windows 7) link
Note that although the link’s name ends in Windows 7, the Windows Backup tool still works as it should in both Windows 11 and Windows 10.
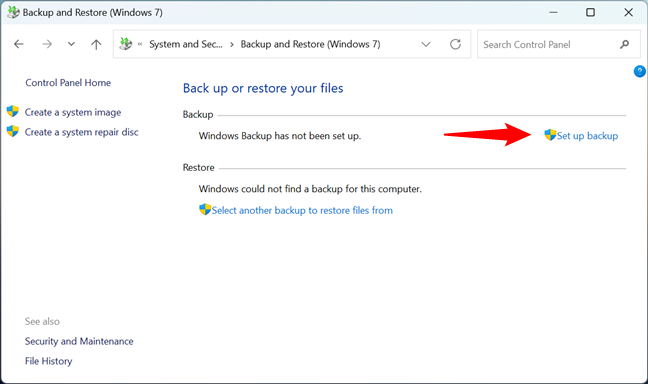 Click on Set up backup
This triggers the launch of a new window where you can see the list of drives available for saving your backups. Select the one you prefer to use for this task and click or tap Next.
Click on Set up backup
This triggers the launch of a new window where you can see the list of drives available for saving your backups. Select the one you prefer to use for this task and click or tap Next.
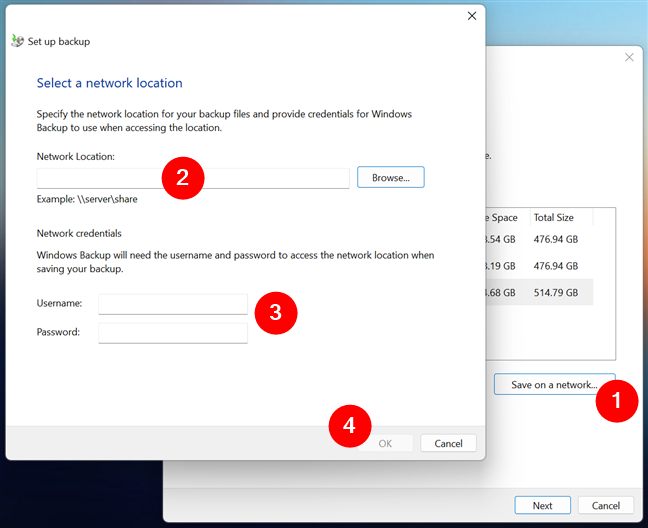
 Select where you want to save your backup
NOTE: The “Set up backup” window also allows you to save the backups in a network location. If that’s what you want, click or tap the “Save on a network button,” and a new window shows up. In it, you have to enter the Network Location, as well as the Username and Password required to access that location.
Select where you want to save your backup
NOTE: The “Set up backup” window also allows you to save the backups in a network location. If that’s what you want, click or tap the “Save on a network button,” and a new window shows up. In it, you have to enter the Network Location, as well as the Username and Password required to access that location.
 Select a network location for the backup
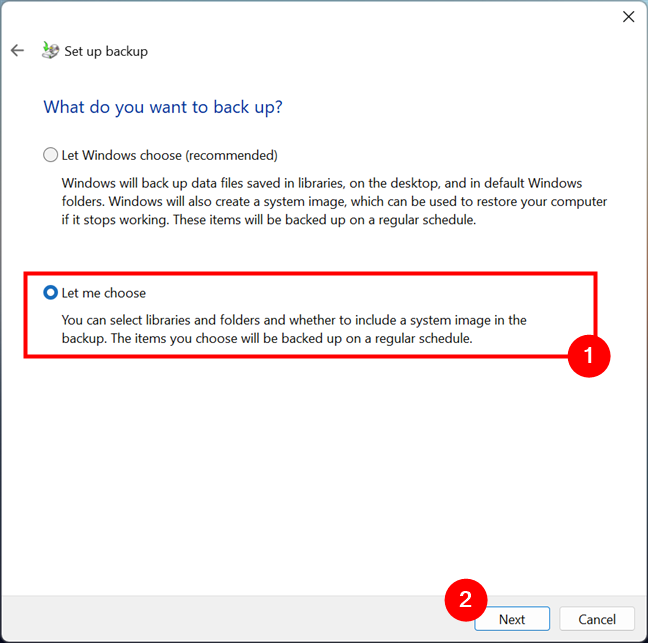
Next, after you’ve chosen where to save your backup, the “Set up backup” wizard asks “What do you want to back up?”. There are two options available for the content of the backups:
Select a network location for the backup
Next, after you’ve chosen where to save your backup, the “Set up backup” wizard asks “What do you want to back up?”. There are two options available for the content of the backups:
 Choose to customize the backup
If you opted to “Let Windows choose,” this next step is skipped, as the operating system handles all the data about to be backed up. However, if you’ve chosen the second option (“Let me choose”), the wizard allows you to select the backup contents. Select the files, folders, or drives you want to back up (you can have Windows Backup save everything if that’s what you want). If you want to make a copy of your operating system drives as well, make sure to also check the “Include a system image of drives” box at the bottom of the window. Note that you can also perform this action independently by following the instructions in the next chapter of this guide: How to use Windows Backup to create a system image. To get back to the matter at hand, after deciding what you want to back up, click or tap the Next button.
Choose to customize the backup
If you opted to “Let Windows choose,” this next step is skipped, as the operating system handles all the data about to be backed up. However, if you’ve chosen the second option (“Let me choose”), the wizard allows you to select the backup contents. Select the files, folders, or drives you want to back up (you can have Windows Backup save everything if that’s what you want). If you want to make a copy of your operating system drives as well, make sure to also check the “Include a system image of drives” box at the bottom of the window. Note that you can also perform this action independently by following the instructions in the next chapter of this guide: How to use Windows Backup to create a system image. To get back to the matter at hand, after deciding what you want to back up, click or tap the Next button.
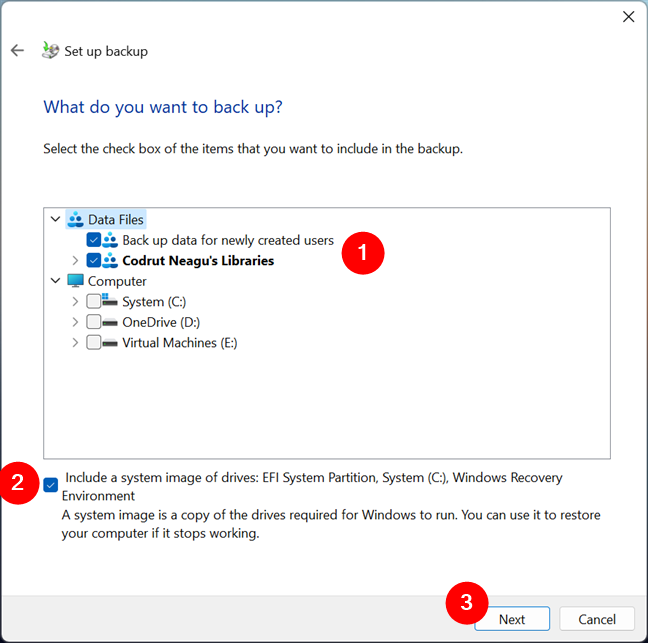 Select the files, folders, and drives to back up
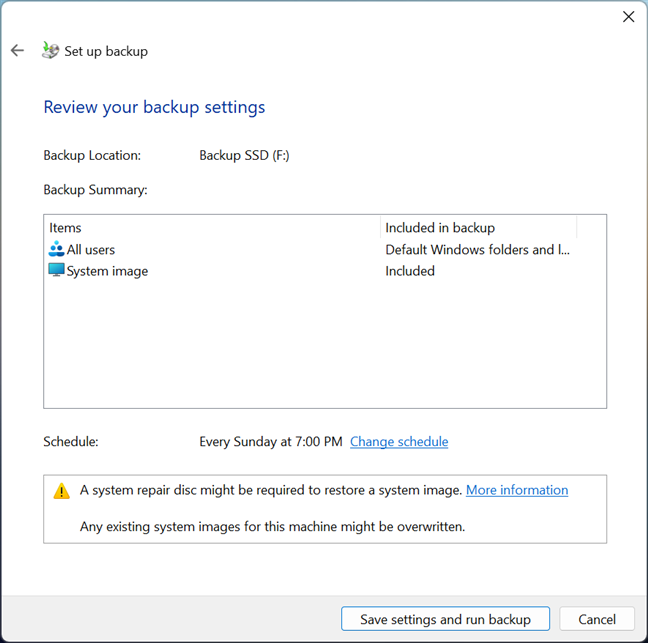
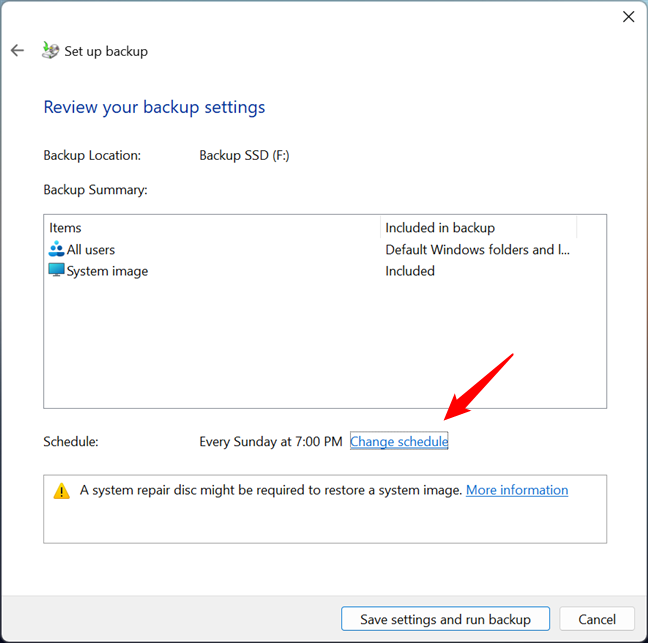
Then comes the “Review your backup settings” step of the wizard. You can now inspect the settings for the backup job. Double-check to make sure that you’ve selected the backup location you really want, and see if you’ve included all the drives, folders, and files you need.
Afterward, check the Schedule at the bottom of the window. By default, Windows sets the backup to run “Every Sunday at 7:00 PM.” If you want to modify or disable the schedule, click or tap the Change schedule link next to it.
Select the files, folders, and drives to back up
Then comes the “Review your backup settings” step of the wizard. You can now inspect the settings for the backup job. Double-check to make sure that you’ve selected the backup location you really want, and see if you’ve included all the drives, folders, and files you need.
Afterward, check the Schedule at the bottom of the window. By default, Windows sets the backup to run “Every Sunday at 7:00 PM.” If you want to modify or disable the schedule, click or tap the Change schedule link next to it.
 Change the schedule of the backup
This opens a new window where Windows asks you: “How often do you want to back up?”. If you don’t want Windows to perform automatic backups, uncheck the first option: “Run backup on a schedule (recommended).” If, on the other hand, you want to update your backup regularly, leave the box checked and then select How often, on What day, and at What time you’d like Windows to perform this task. It would be best to choose a time when your computer or device is up and running to ensure that the backup can be performed. When you’re done with the schedule configuration, press OK.
Change the schedule of the backup
This opens a new window where Windows asks you: “How often do you want to back up?”. If you don’t want Windows to perform automatic backups, uncheck the first option: “Run backup on a schedule (recommended).” If, on the other hand, you want to update your backup regularly, leave the box checked and then select How often, on What day, and at What time you’d like Windows to perform this task. It would be best to choose a time when your computer or device is up and running to ensure that the backup can be performed. When you’re done with the schedule configuration, press OK.
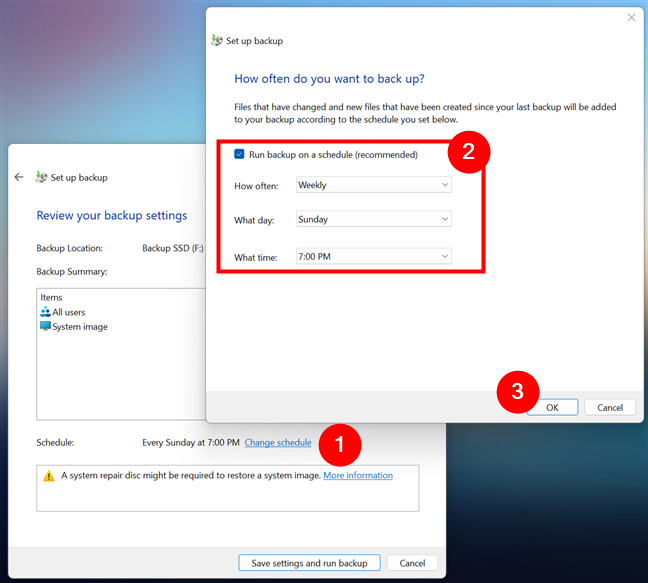
 Schedule options for the backup
Now you’ve finished configuring Windows Backup. To apply the settings, create the backup task, and run it for the first time, click or tap the “Save setting and run backup” button.
Schedule options for the backup
Now you’ve finished configuring Windows Backup. To apply the settings, create the backup task, and run it for the first time, click or tap the “Save setting and run backup” button.
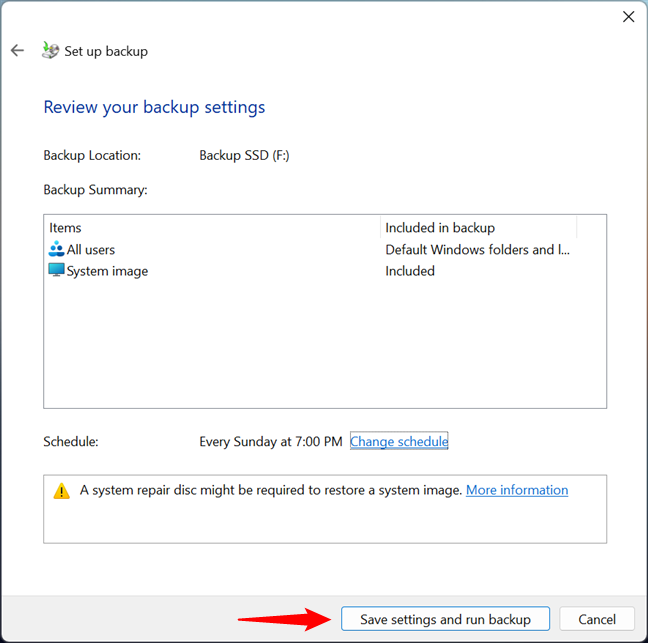 Review your backup settings
The “Set up backup” wizard closes, and you’re brought back to the Backup and Restore (Windows 7) page in the Control Panel. The backup begins, and you can monitor its progress.
Review your backup settings
The “Set up backup” wizard closes, and you’re brought back to the Backup and Restore (Windows 7) page in the Control Panel. The backup begins, and you can monitor its progress.
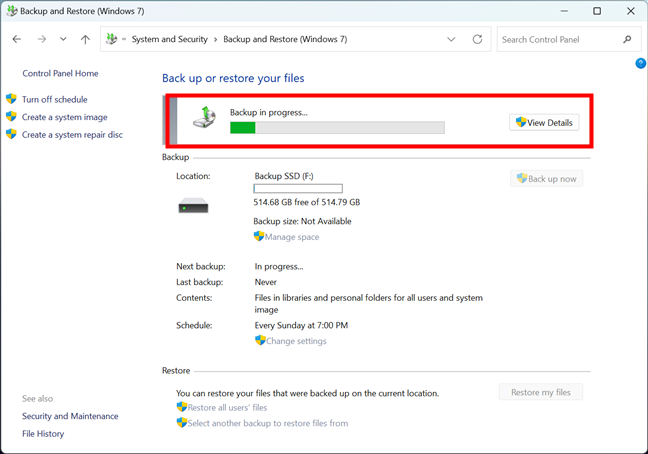
 The backup task is in progress
Moreover, Control Panel’s Backup and Restore (Windows 7) page also shows you other useful information about the backup task. You can check how much disk space is used on the drive where the backup is located, when the next backup will be performed, when the last backup happened, the contents of the backup, and its schedule. Note that this information is available at any time, not only during backup tasks.
The backup task is in progress
Moreover, Control Panel’s Backup and Restore (Windows 7) page also shows you other useful information about the backup task. You can check how much disk space is used on the drive where the backup is located, when the next backup will be performed, when the last backup happened, the contents of the backup, and its schedule. Note that this information is available at any time, not only during backup tasks.
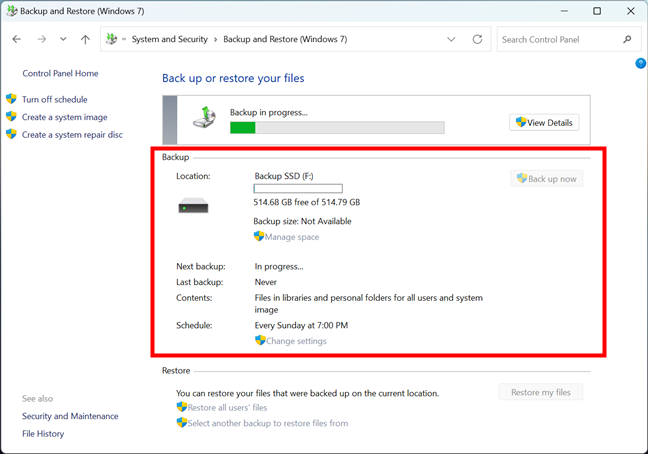 Information about the backup configuration
That’s it! Now you get some peace of mind that your important files and your Windows operating system are backed up. If something bad happens with your PC, you’ll at least have a backup that you can use to restore your data. If you need guidance for that, read this tutorial: How to recover data from a Windows backup image.
Information about the backup configuration
That’s it! Now you get some peace of mind that your important files and your Windows operating system are backed up. If something bad happens with your PC, you’ll at least have a backup that you can use to restore your data. If you need guidance for that, read this tutorial: How to recover data from a Windows backup image.
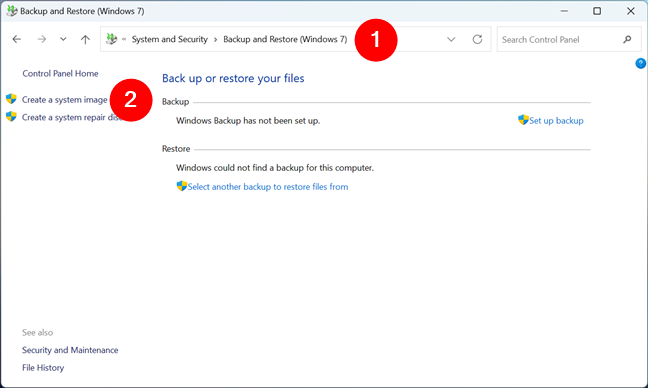
 Create a system image
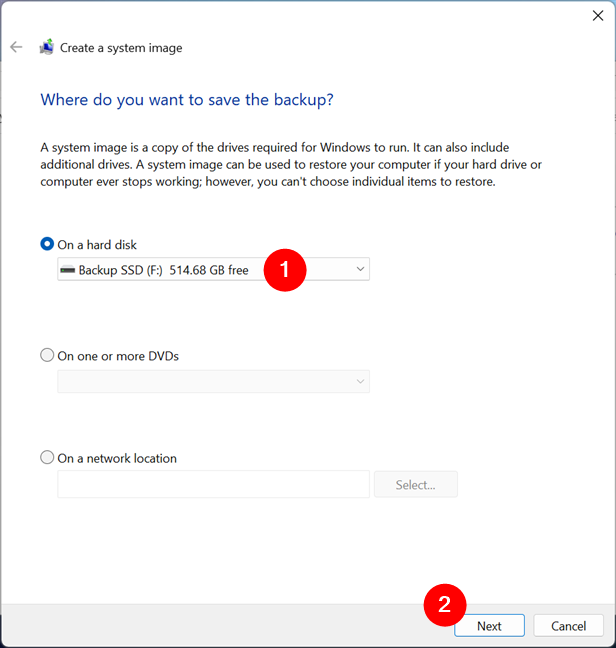
This opens the “Create a system image” wizard, which starts by asking you where you want to save the backup. Additionally, Windows Backup also clearly explains that “A system image is a copy of the drives required by Windows to run [...]” and “[...] can be used to restore your computer if your hard drive or computer ever stops working.” Choose the location of the backup. There are three options available:
Create a system image
This opens the “Create a system image” wizard, which starts by asking you where you want to save the backup. Additionally, Windows Backup also clearly explains that “A system image is a copy of the drives required by Windows to run [...]” and “[...] can be used to restore your computer if your hard drive or computer ever stops working.” Choose the location of the backup. There are three options available:
 Choose where to save the system image
Next, Windows Backup shows you the list of drives available on your computer. The drives that are required for Windows 11 or Windows 10 to start are automatically selected and can’t be unchecked. The others, which aren’t needed for your computer to boot, are deselected by default, but you can check their boxes if you want them included in the system image too. Once you’ve made up your mind, click or tap the Next button.
Choose where to save the system image
Next, Windows Backup shows you the list of drives available on your computer. The drives that are required for Windows 11 or Windows 10 to start are automatically selected and can’t be unchecked. The others, which aren’t needed for your computer to boot, are deselected by default, but you can check their boxes if you want them included in the system image too. Once you’ve made up your mind, click or tap the Next button.
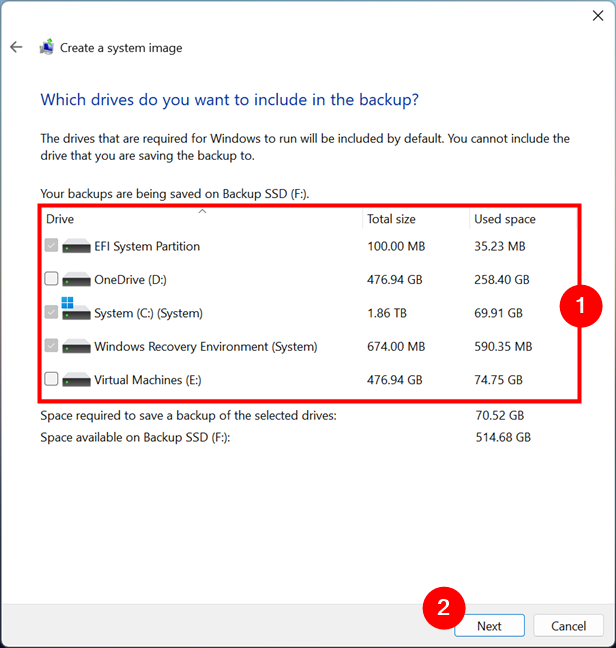 Select what drives to add to the system image
Lastly, you must “Confirm your backup settings.” The “Create a system image” wizard gives you a summary of the backup location and its size, and it also lists the drives that will be included in the system image. If everything looks right, click or tap the Start backup button to begin the backup process.
Select what drives to add to the system image
Lastly, you must “Confirm your backup settings.” The “Create a system image” wizard gives you a summary of the backup location and its size, and it also lists the drives that will be included in the system image. If everything looks right, click or tap the Start backup button to begin the backup process.
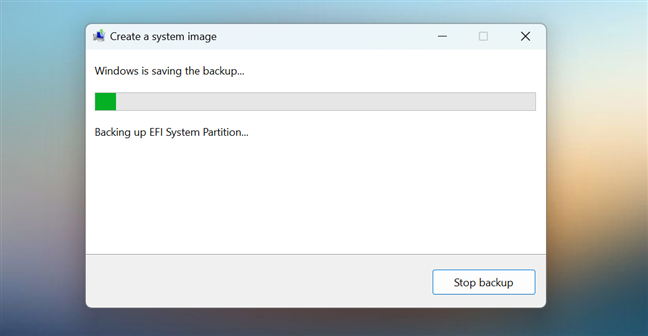
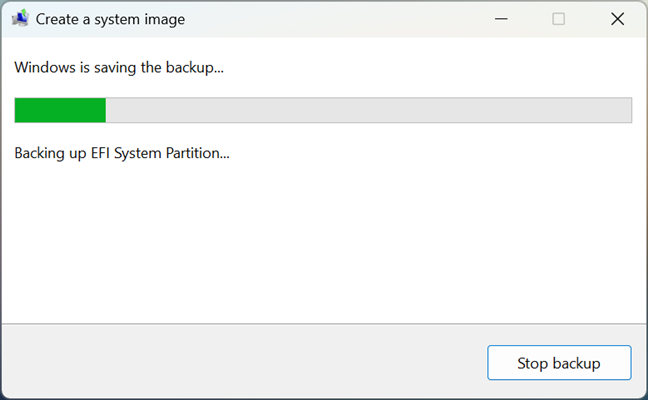
 Start the backup
Windows Backup now loads a new window showing you the progress of the backup. Wait until it’s done, or click/tap the Stop backup button if you somehow decide that you no longer need the system image.
Start the backup
Windows Backup now loads a new window showing you the progress of the backup. Wait until it’s done, or click/tap the Stop backup button if you somehow decide that you no longer need the system image.
 Windows is creating the system image
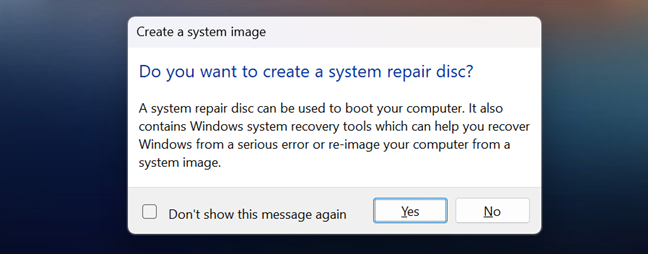
When the backup is over and the system image is created, Windows Backup asks you if you’d like to create a system repair disc too. A system repair disc is a bootable CD or DVD that you can use to boot, troubleshoot, and repair malfunctioning Windows computers that refuse to start. If you don’t already have a system repair disc, it doesn’t hurt to create one right now. However, you can make a system repair disk anytime you want; we’ve covered the entire process here: How to create a System Repair disc in Windows 10 and Windows 11.
Windows is creating the system image
When the backup is over and the system image is created, Windows Backup asks you if you’d like to create a system repair disc too. A system repair disc is a bootable CD or DVD that you can use to boot, troubleshoot, and repair malfunctioning Windows computers that refuse to start. If you don’t already have a system repair disc, it doesn’t hurt to create one right now. However, you can make a system repair disk anytime you want; we’ve covered the entire process here: How to create a System Repair disc in Windows 10 and Windows 11.
 Option to create a system repair disc
If you choose to create a system repair disc, a new wizard launches, guiding you through the process. If you choose No, the dialog simply closes. Either way, the final step of creating a system image with Windows Backup is to click or tap the Close button.
Option to create a system repair disc
If you choose to create a system repair disc, a new wizard launches, guiding you through the process. If you choose No, the dialog simply closes. Either way, the final step of creating a system image with Windows Backup is to click or tap the Close button.
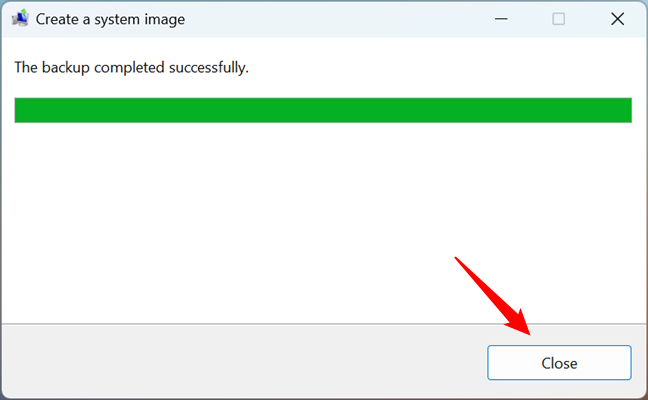 The system image was created
And that’s it! The system image is now saved in the location you selected during the process, and you can use it anytime you need to restore your Windows computer.
The system image was created
And that’s it! The system image is now saved in the location you selected during the process, and you can use it anytime you need to restore your Windows computer.
What is Windows Backup, aka Backup and Restore?
As the name says, Backup and Restore is a tool that allows you to back up your operating system, settings, and data. You can let Windows choose what to back up or select the individual folders, libraries, and disk drives you want to back up. By default, your backups are created on an automatic schedule, but you can manually create a backup at any time. Once you set up Windows Backup, it keeps track of the files and folders that are new or modified and adds them to your backup. If this is what you want, read the “How to back up a computer with Windows Backup” chapter in this tutorial.Where do you find Windows Backup? How to open it in Windows 11 or Windows 10
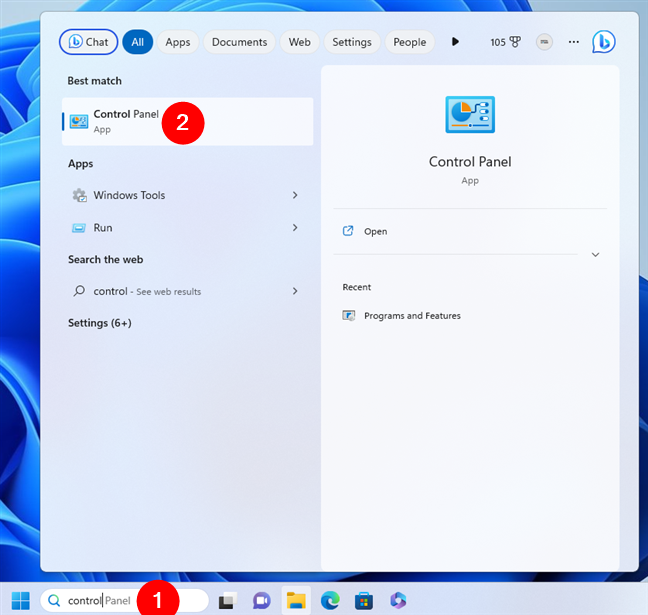
As far as I know, in the latest versions of Windows 11 and Windows 10, there’s only one method to open Windows Backup that still works consistently. Regardless of your operating system, launch the Control Panel. A fast way of opening it is to look for it using the search box on your taskbar; when the results are shown, click or tap on Control Panel.How to back up a computer with Windows Backup
By default, the Windows Backup feature is turned off. To start using it, you have to configure it first. Follow the next steps to configure and decide what type of backup - automatic or manual - fits your needs best: After clicking or tapping the “Backup and Restore (Windows 7)” link, the Control Panel loads a page called “Back up or restore your files.” On it, click or tap the “Set up backup” link in the Backup section.- Let Windows choose (recommended) - Windows Backup creates two backup types in a single operation: a system image you can use for disaster recovery and a backup of data files found in your user folders (and libraries), the Windows desktop, and the default Windows folders.
- Let me choose - Windows Backup allows you to back up individual folders, drives, or libraries.
How to use Windows Backup to create a system image
Probably the most interesting and useful feature offered by Windows Backup is its ability to create an image clone of your operating system. In other words, the Backup and Restore tool can create an identical copy of all the drives required for Windows to run. Furthermore, if you need to, you can also choose to include other drives to the system image on top of the ones required to boot your Windows 11 or Windows 10 computer. Here’s how it all goes: The first step is to open the Backup and Restore page from the Control Panel, as shown in this tutorial’s second chapter. Then, click or tap the “Create a system image” link on the left side of the window.- “On a hard disk” lets you select the hard disk, solid-state drive, or USB memory stick where you want to back up the system image.
- “On one or more DVDs” allows you to use your DVD writer to write the system image on DVDs. For both Windows 11 and Windows 10, this means you’ll need more than just a couple of discs, as both operating systems are quite large.
- “On a network location” is the option you should choose if you want to save the system image on a different computer or drive from your local network.

Discussion (7)
i will try
I find this a very good description of not only how to create a system image, but the importance of creating one. I have often wondered why the “size” is so small and this explains that it is only the changes that are added to the base system.
This is very understandable and helped a lot. Thank you.
This was helpful, but one thing confused me. While setting up the backup, you said to include the default option to make a system image. I did. – But then in the second half of the tute, you explained how to make a system image as a separate routine. That makes it sound like I need to make two images, but that doesn’t make sense — ? So, do I need to have the backup routine make an image, and then make yet another image as your tute implies?
Is it possible to get a backup program that just adds any new items not repeating everything in the backup. Say monthly, only adding new items?
Try File History. It is built into Windows 10 and Windows 8.1.
As I understand it, this is exactly what happens