

Did you create a backup image of your Windows 11 or Windows 10 computer using the built-in Backup and Restore (Windows 7) tool? If your PC broke down, you may have difficulties accessing your files and folders because data loss or corruption occurred. So now, you may wonder how to recover files and folders from that backup image you made a while ago. In this tutorial, I’ll show you how to do that. Without further ado, let’s start:
 Creating a backup with Backup and Restore (Windows 7)
If something breaks or simply doesn’t work as it should, you can use your backups to restore your PC to a previous state. If that’s what you need, follow the steps in this article: How to recover Windows from a backup with System Image Recovery.
Creating a backup with Backup and Restore (Windows 7)
If something breaks or simply doesn’t work as it should, you can use your backups to restore your PC to a previous state. If that’s what you need, follow the steps in this article: How to recover Windows from a backup with System Image Recovery.
 Restore a Windows PC with Image System Recovery
Some other times though, you may only need to recover some specific files or folders from the backup without restoring the whole system. For example, if you accidentally deleted some important documents or photos. In this case, you can use the Backup and Restore (Windows 7) tool to recover only your lost files and folders by following the instructions below:
Restore a Windows PC with Image System Recovery
Some other times though, you may only need to recover some specific files or folders from the backup without restoring the whole system. For example, if you accidentally deleted some important documents or photos. In this case, you can use the Backup and Restore (Windows 7) tool to recover only your lost files and folders by following the instructions below:
 Connect the drive with the backup
 How to open Backup and Restore in Windows
This opens the Backup and Restore (Windows 7) page from the Control Panel. Here, you can access not only backup tools but also a series of file recovery options.
How to open Backup and Restore in Windows
This opens the Backup and Restore (Windows 7) page from the Control Panel. Here, you can access not only backup tools but also a series of file recovery options.
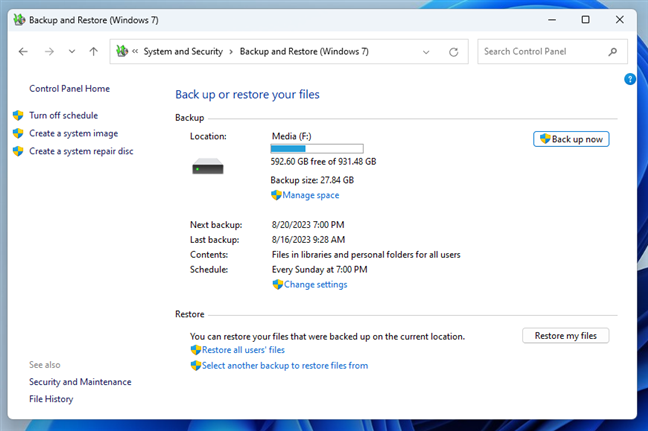
 The Backup and Restore (Windows 7) tool
Next, let’s see how to use Windows’ Backup and Restore to recover files and folders that you've previously backed up.
The Backup and Restore (Windows 7) tool
Next, let’s see how to use Windows’ Backup and Restore to recover files and folders that you've previously backed up.
 Recovery options in Windows' Backup and Restore
After you’ve chosen one of the options above, a new window called Restore Files opens. In it, you can decide what items to restore. To select the files and folders, you have three options:
Recovery options in Windows' Backup and Restore
After you’ve chosen one of the options above, a new window called Restore Files opens. In it, you can decide what items to restore. To select the files and folders, you have three options:
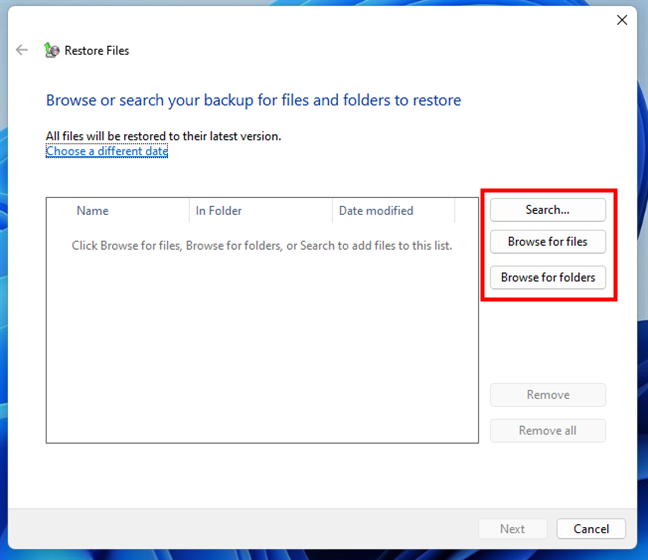
 Browse or search the backup for files and folders to restore
If you choose Search, you can look for the files or folders you want to restore. Once you find them, select them and click on OK.
Browse or search the backup for files and folders to restore
If you choose Search, you can look for the files or folders you want to restore. Once you find them, select them and click on OK.
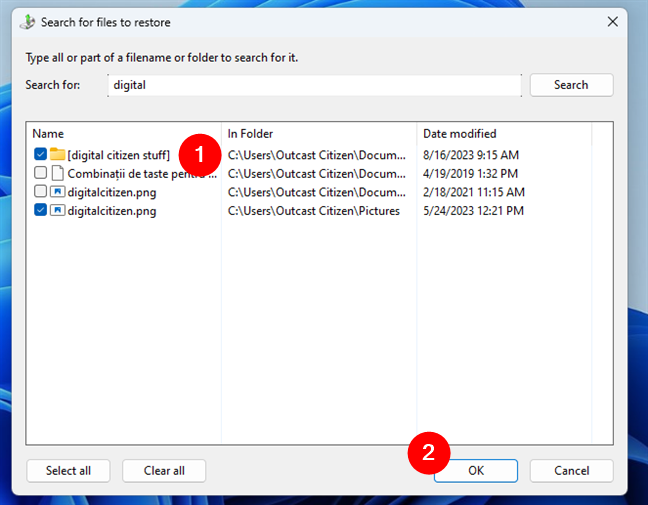
 Search for files to restore
If you click or tap the “Browse for files” button, the Backup and Restore tool launches a new window where you can navigate the backup and select the files that will be restored. After you find them, click or tap the Add file button.
Search for files to restore
If you click or tap the “Browse for files” button, the Backup and Restore tool launches a new window where you can navigate the backup and select the files that will be restored. After you find them, click or tap the Add file button.

 Browse the backup for files
TIP: You can use the Shift key to select multiple files at once.
The third option you can use to select the data to recover is “Browse for folders.” If you click or tap on it, Backup and Restore allows you to navigate the backup image and choose the folders you want to restore. After marking a folder, click or tap the Add folder button to add it to the list.
Browse the backup for files
TIP: You can use the Shift key to select multiple files at once.
The third option you can use to select the data to recover is “Browse for folders.” If you click or tap on it, Backup and Restore allows you to navigate the backup image and choose the folders you want to restore. After marking a folder, click or tap the Add folder button to add it to the list.
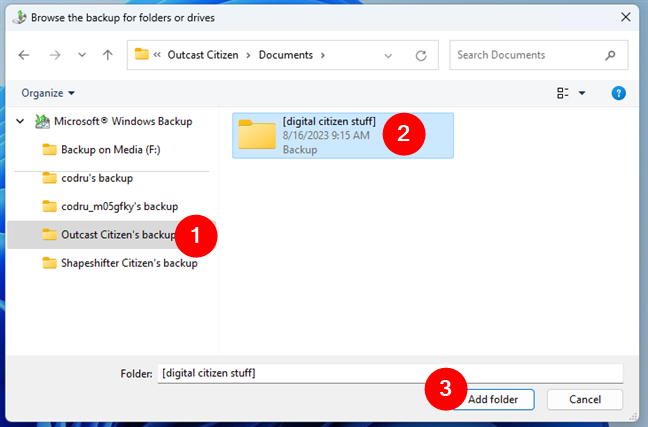 Browse the backup for folders or drives
You can repeat any of the operations above until you add all the files and folders you want to the recovery list. When done, press the Next button.
Browse the backup for folders or drives
You can repeat any of the operations above until you add all the files and folders you want to the recovery list. When done, press the Next button.
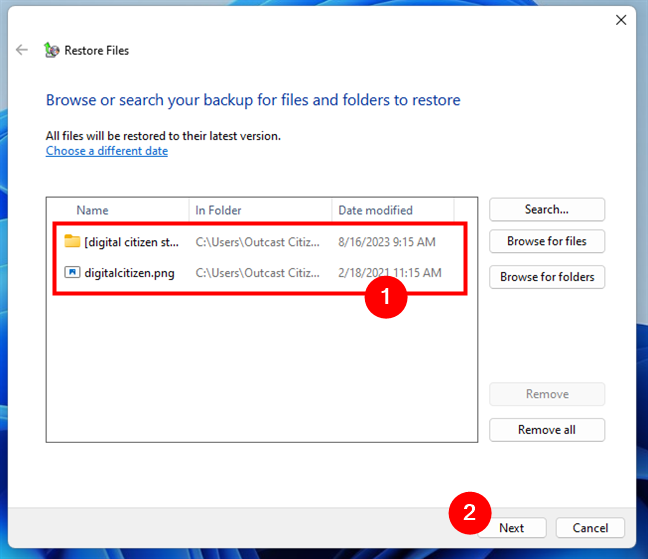
 Files and folders to be recovered
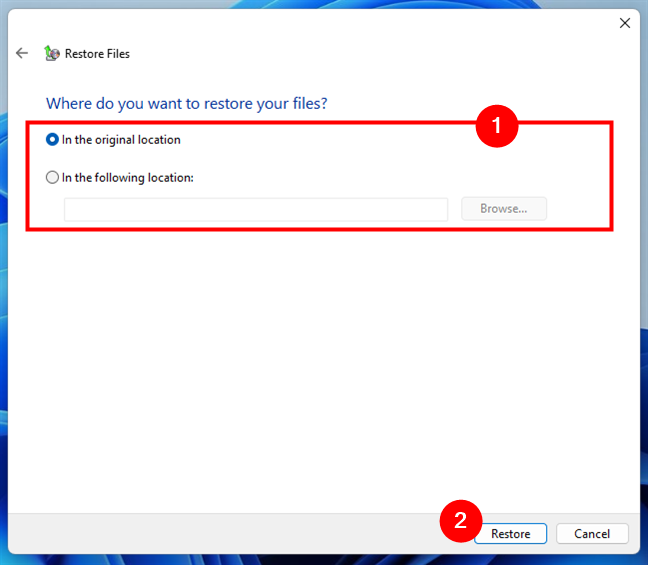
 The next step of the restoring process is to specify where you want to recover the files and folders. You can choose to restore them to their original location (this is the default option) or to a different location. If you restore them to their original location, existing files with the same name are overwritten. Select the option you prefer and click or tap the Restore button.
 The location where the files are restored
 Recovering files with Windows' Backup and Restore
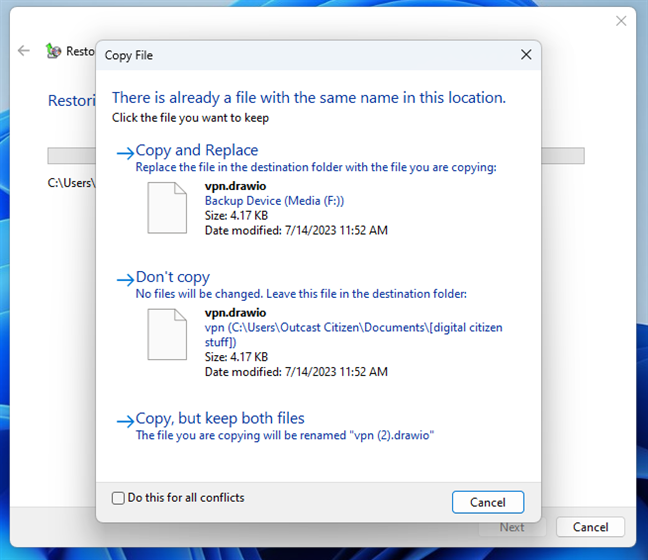
During the restoration process, if there are existing copies of the files and folders in the location you selected, Windows’ Backup and Restore may ask you to choose one of the following options:
Recovering files with Windows' Backup and Restore
During the restoration process, if there are existing copies of the files and folders in the location you selected, Windows’ Backup and Restore may ask you to choose one of the following options:
 Options for when files with the same name exist
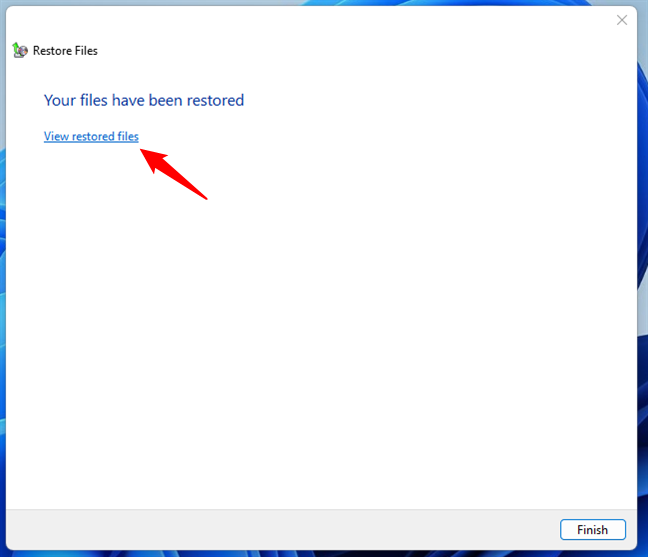
When the backup recovery is over, you should get a message telling you that “Your files have been restored.” You can either close the window and access your restored files manually, or you can click/tap the “View restored files” to have File Explorer open the location where the files and folders recovered are saved.
Options for when files with the same name exist
When the backup recovery is over, you should get a message telling you that “Your files have been restored.” You can either close the window and access your restored files manually, or you can click/tap the “View restored files” to have File Explorer open the location where the files and folders recovered are saved.
 View restored files
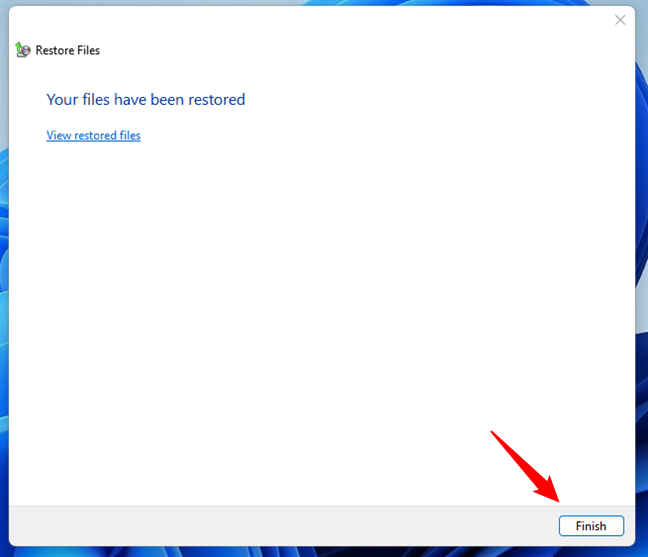
Either way, you can press the Finish button now in order to close the Restore Files wizard launched by Windows’ Backup and Restore.
View restored files
Either way, you can press the Finish button now in order to close the Restore Files wizard launched by Windows’ Backup and Restore.
 Your files have been restored
That’s it!
Your files have been restored
That’s it!
What you should know about restoring backup files
If you’re reading this guide, you are already aware that a backup image made with the Backup and Restore (Windows 7) tool can include your entire system. Depending on how you’ve configured Windows Backup, the backup can cover your Windows 11 or Windows 10 operating system, applications, settings, and personal files and folders.How to restore files and folders with Backup and Restore on a Windows 11 or Windows 10 computer
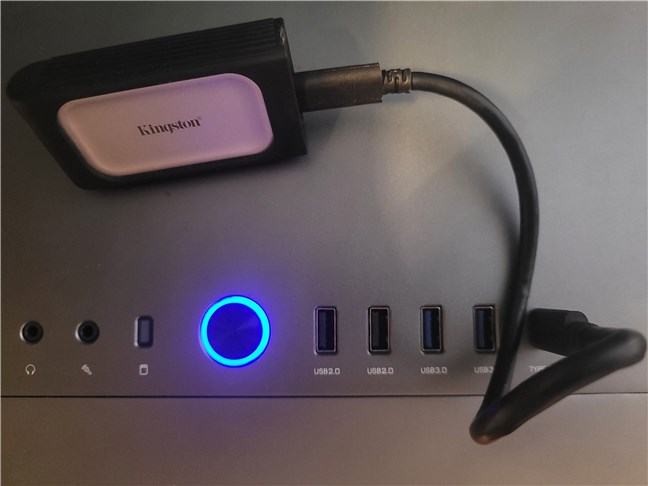
Step 1. Connect the drive or network location with the Windows backup image
The first step you need to take in order to restore files and folders is to ensure that the location where the backup is saved is available on your Windows computer. Depending on how created the backup and where you saved it, you need to:- Connect the hard disk drive or solid-state drive that contains the backup data.
- Insert the first DVD with the backup image in your Windows computer.
- Make sure that the network location where the backup files are saved is available on your PC.
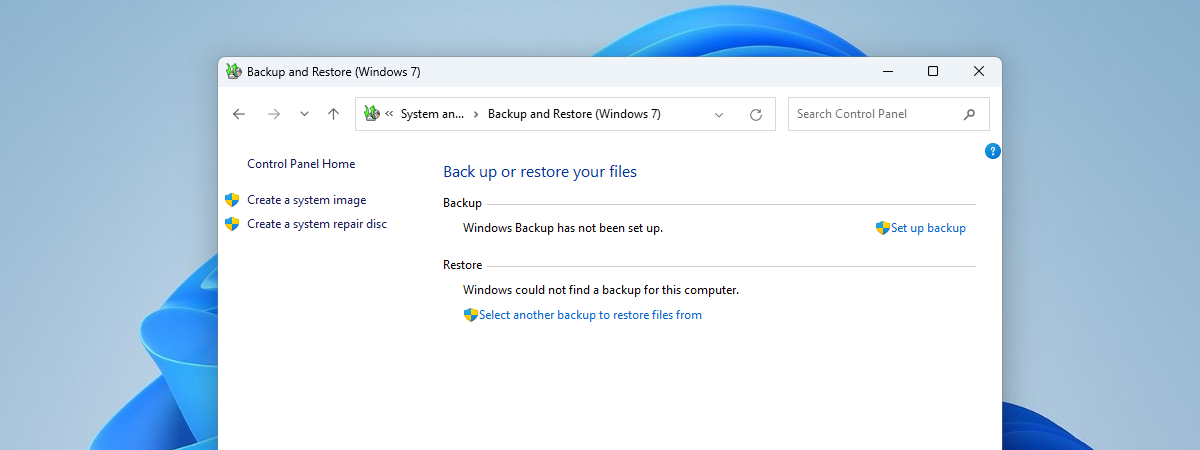
Step 2. Access Backup and Restore (Windows 7)
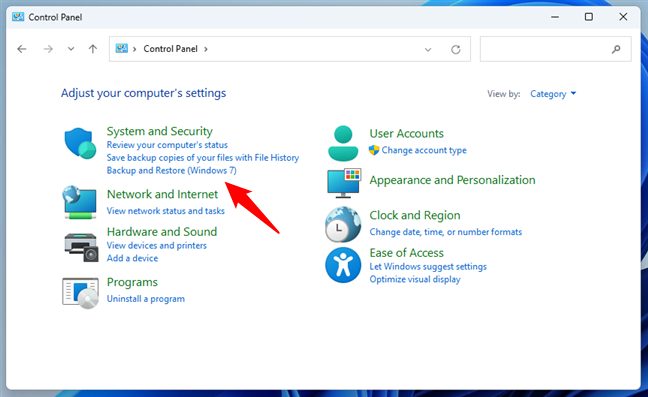
Then, open the Control Panel and click or tap on Backup and Restore (Windows 7) under System and Security. Alternatively, you can go to System and Security > Backup and Restore (Windows 7).Step 3. Choose the files and folders to restore from the Windows backup
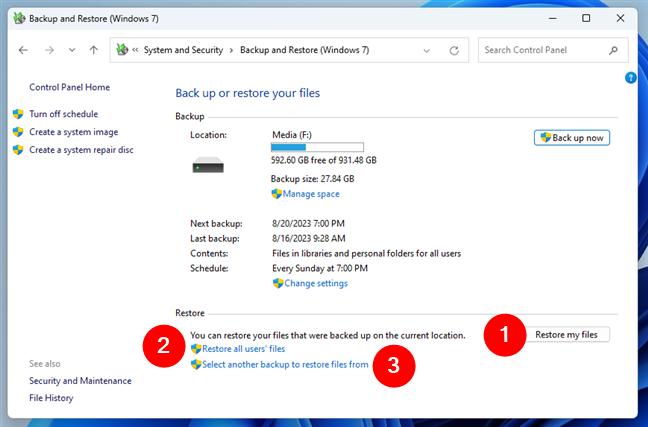
At the bottom of the Backup and Restore window, there’s an area designed for recovery called Restore. It has three options:- Restore my files - allows you to restore your files and folders (marked with 1 in the next screenshot);
- Restore all users’ files - enables you to restore the files of all the users defined on the computer (noted with 2 in the screenshot below);
- Select another backup to restore files from - allows you to restore files from a backup created on another computer or saved in a different location (marked 3 in the following screenshot).
- Search - lets you search the contents of the backup;
- Browse for files - allows you to navigate through the backup in order to select the files that you want to restore;
- Browse for folders - enables you to browse and select the folders you need to recover; this option doesn’t show individual files in a folder.
Step 4. Restore your files and folders from the Windows backup
Finally, Windows starts restoring all the files and folders you’ve selected. All you have to do now is wait for the process to complete. Depending on how many and how large the files and folders are, it may take a while.- Copy and Replace - choose this if you want to replace the existing files with the ones from the backup;
- Don’t copy - lets you keep the existing file and ignore its backup copy;
- Copy, but keep both files - if you’re not sure which version of the file you want, you can use this option to save both the current and the backup file; the one restored from the backup gets a different name.


Discussion (0)
Be the first to comment.