


So, you have Windows 11 installed on your computer, but apps misbehave, and system features are constantly acting up, causing you headaches? If that’s the case, you’re probably looking for a way to troubleshoot and fix your system. Lucky for you, Windows 11 comes with a neat tool called Safe Mode that can help with the whole troubleshooting process. Now, you might be wondering, “How do I start Windows 11 in Safe Mode?” Well, I’ve got you covered! There are actually eight different ways to do it, and I’ve gathered them all for you in this guide:
NOTE: This tutorial is about booting into Safe Mode in Windows 11. If you got here looking for instructions on how to start Safe Mode on a Windows 10 computer, check this article instead: How to boot Windows 10 in Safe Mode.

 Windows 11 Safe Mode
Unfortunately, old tricks for getting into Safe Mode, like pressing F8 or Shift + F8, don’t work anymore because Windows 11 requires UEFI BIOS. It’s also impossible to make Windows 11 enter Safe Mode from BIOS or boot Windows 11 in Safe Mode from a power-off state. Fear not, though! There are still plenty of ways to get there - eight to my count - and I’m about to walk you through all of them.
In the first part of this guide, sections 1 through 4, I’ll show you how to boot into Safe Mode in Windows 11 when you’re locked out of your system. And if you can actually log in, you may prefer the later methods, from 5 to 8. Having said that, let’s get into it!
Windows 11 Safe Mode
Unfortunately, old tricks for getting into Safe Mode, like pressing F8 or Shift + F8, don’t work anymore because Windows 11 requires UEFI BIOS. It’s also impossible to make Windows 11 enter Safe Mode from BIOS or boot Windows 11 in Safe Mode from a power-off state. Fear not, though! There are still plenty of ways to get there - eight to my count - and I’m about to walk you through all of them.
In the first part of this guide, sections 1 through 4, I’ll show you how to boot into Safe Mode in Windows 11 when you’re locked out of your system. And if you can actually log in, you may prefer the later methods, from 5 to 8. Having said that, let’s get into it!
 How to start Windows 11 in Safe Mode using automatic repair
Wait for a few moments until Windows 11 diagnoses your PC.
How to start Windows 11 in Safe Mode using automatic repair
Wait for a few moments until Windows 11 diagnoses your PC.
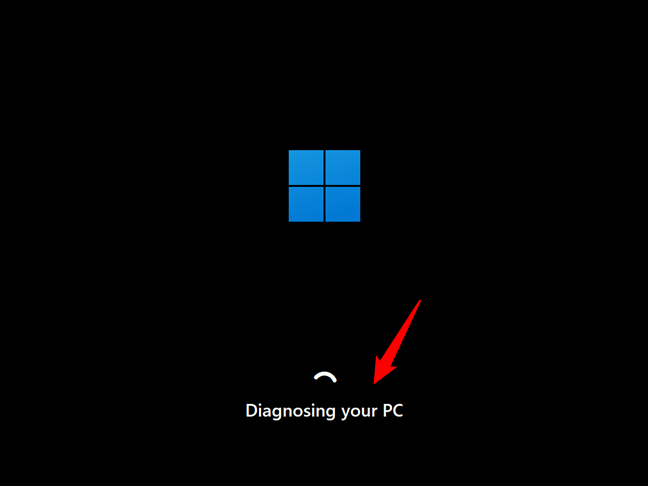 Windows 11 is diagnosing your PC
Then, it loads the Automatic Repair screen. On it, press the Advanced options button.
Windows 11 is diagnosing your PC
Then, it loads the Automatic Repair screen. On it, press the Advanced options button.
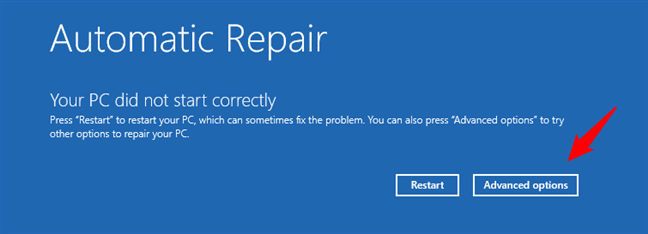
 Click or tap Advanced options
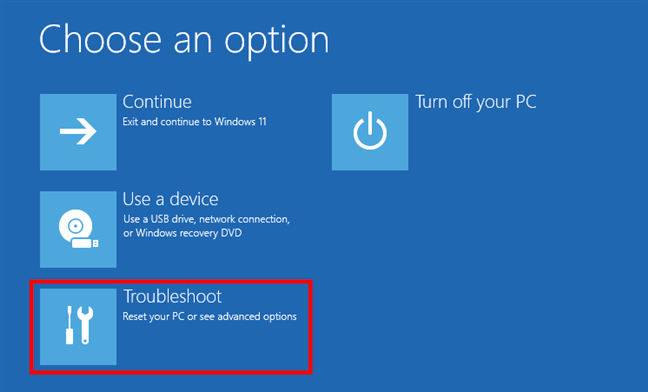
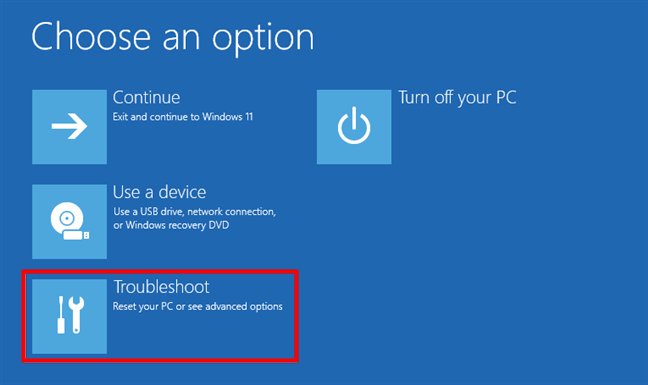
On the “Choose an option” screen, select Troubleshoot.
Click or tap Advanced options
On the “Choose an option” screen, select Troubleshoot.

 Troubleshoot Windows 11
On the Troubleshoot screen, click or tap on Advanced options.
Troubleshoot Windows 11
On the Troubleshoot screen, click or tap on Advanced options.

 Accessing the advanced troubleshooting options
Next, the Advanced options screen loads. On it, select Startup Settings. If you don’t have this option on the screen, use the “See more recovery options” link at the bottom to get to it. Then, click or tap on Startup Settings.
Accessing the advanced troubleshooting options
Next, the Advanced options screen loads. On it, select Startup Settings. If you don’t have this option on the screen, use the “See more recovery options” link at the bottom to get to it. Then, click or tap on Startup Settings.
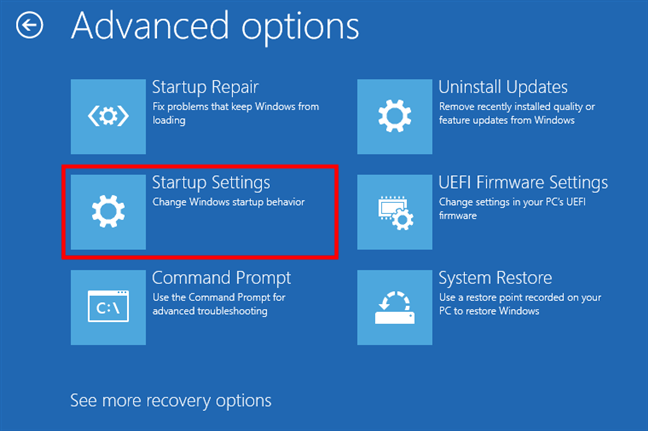
 Choose Startup Settings
Windows 11 then loads another screen called Startup Settings. It informs you that after restarting your PC, you can change Windows options. One of them is that you can Enable Safe Mode. Click or tap on the Restart button.
Choose Startup Settings
Windows 11 then loads another screen called Startup Settings. It informs you that after restarting your PC, you can change Windows options. One of them is that you can Enable Safe Mode. Click or tap on the Restart button.
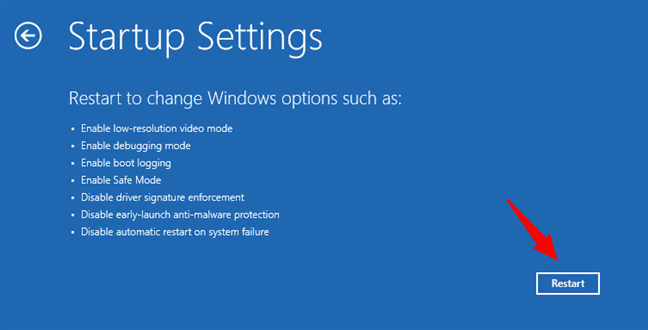
 Startup Settings: Choose Restart for Windows 11 Safe Mode options
Once Windows 11 restarts, you can select the Startup Settings you want to enable. To enter Windows 11’s Safe Mode, there are three options you can choose from:
Startup Settings: Choose Restart for Windows 11 Safe Mode options
Once Windows 11 restarts, you can select the Startup Settings you want to enable. To enter Windows 11’s Safe Mode, there are three options you can choose from:

 Choose one of the three Safe Mode options for Windows 11
Then, Windows 11 starts in its Safe Mode, and you can log into it using an admin account and start troubleshooting.
Choose one of the three Safe Mode options for Windows 11
Then, Windows 11 starts in its Safe Mode, and you can log into it using an admin account and start troubleshooting.

 How to start Windows 11 in Safe Mode from the Sign In screen
Windows 11 immediately reboots. Then, when it asks you to Choose an option, select Troubleshoot.
How to start Windows 11 in Safe Mode from the Sign In screen
Windows 11 immediately reboots. Then, when it asks you to Choose an option, select Troubleshoot.
 Choose Troubleshoot
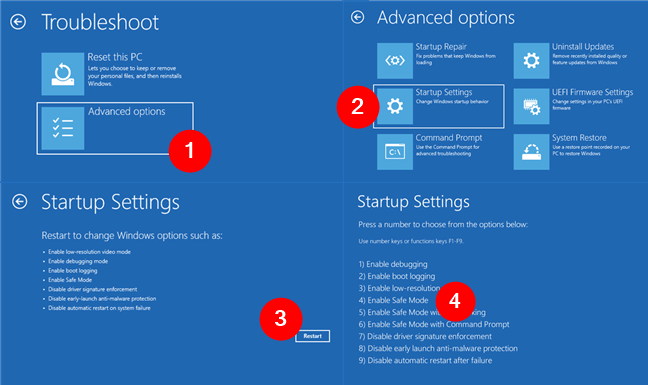
From here on, follow the same steps as I’ve shown in the first method of this guide. Go to “Advanced options > Startup Settings > Restart” and press 4 or F4 on your keyboard to boot into minimal Safe Mode, 5 or F5 to activate Windows 11’s “Safe Mode with Networking,” and 6 or F6 to enter “Safe Mode with Command Prompt.”
Choose Troubleshoot
From here on, follow the same steps as I’ve shown in the first method of this guide. Go to “Advanced options > Startup Settings > Restart” and press 4 or F4 on your keyboard to boot into minimal Safe Mode, 5 or F5 to activate Windows 11’s “Safe Mode with Networking,” and 6 or F6 to enter “Safe Mode with Command Prompt.”
 Go to Advanced options > Startup Settings > Restart > Enable Safe Mode
TIP: When you’re done troubleshooting Windows 11, here’s how to exit Safe Mode and boot your PC normally.
Go to Advanced options > Startup Settings > Restart > Enable Safe Mode
TIP: When you’re done troubleshooting Windows 11, here’s how to exit Safe Mode and boot your PC normally.
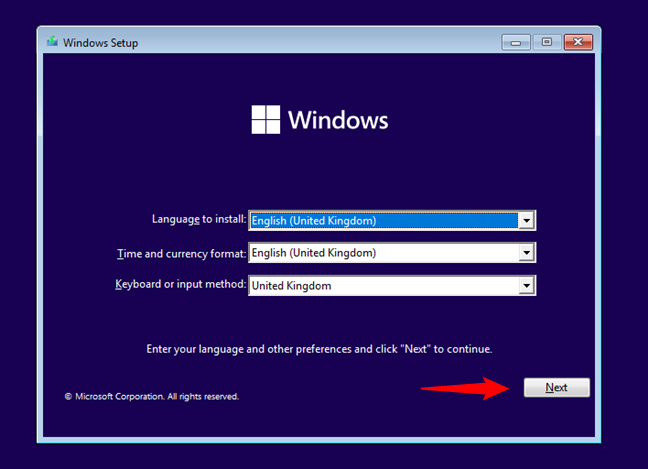
 In the Windows 11 Setup, press Next
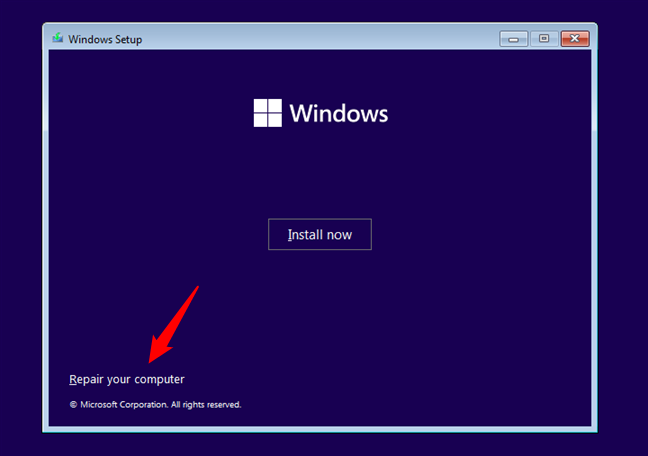
Next, click or tap the “Repair your computer” link from the bottom-left corner of the Windows Setup window.
In the Windows 11 Setup, press Next
Next, click or tap the “Repair your computer” link from the bottom-left corner of the Windows Setup window.
 Click or tap Repair your computer
On the “Choose an option” screen, select Troubleshoot.
Click or tap Repair your computer
On the “Choose an option” screen, select Troubleshoot.
 To get to Windows 11 Safe Mode, select Troubleshoot
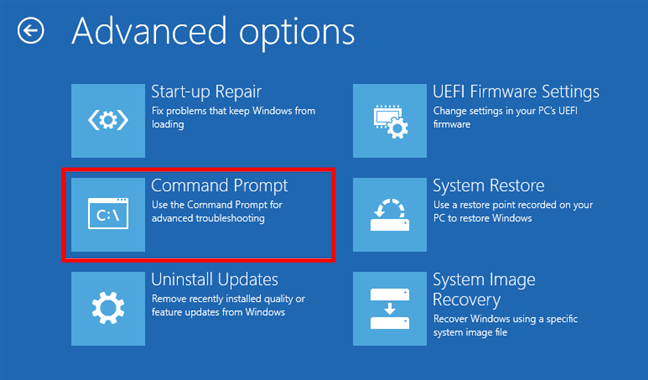
On the “Advanced options” screen, choose “Command Prompt (Use the Command Prompt for advanced troubleshooting).”
To get to Windows 11 Safe Mode, select Troubleshoot
On the “Advanced options” screen, choose “Command Prompt (Use the Command Prompt for advanced troubleshooting).”
 Starting the Command Prompt
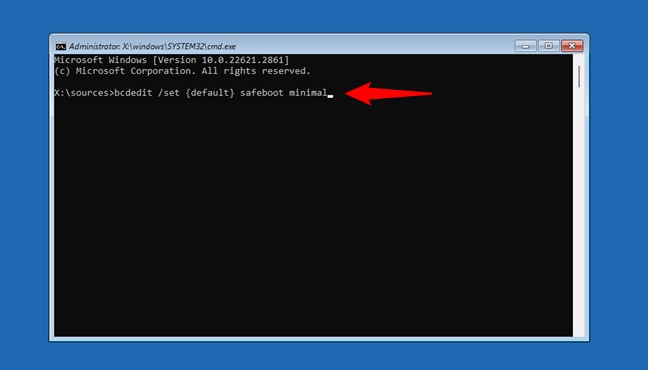
Now comes the most important part: in Command Prompt, run the command:
Starting the Command Prompt
Now comes the most important part: in Command Prompt, run the command:
 How to boot Windows 11 in Safe Mode from the Command Prompt
Close the Command Prompt and click or tap the Continue button on the next screen.
How to boot Windows 11 in Safe Mode from the Command Prompt
Close the Command Prompt and click or tap the Continue button on the next screen.
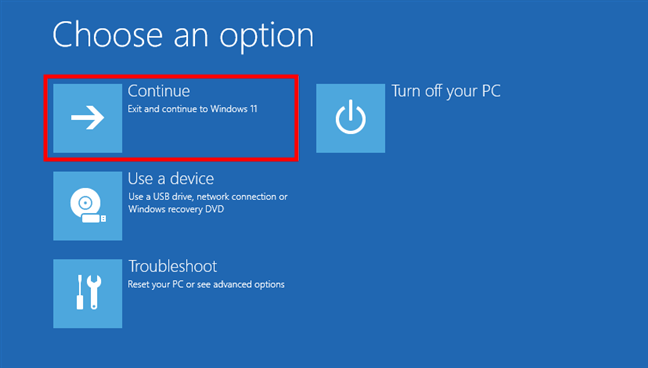
 Choose Continue to start Windows 11 in Safe Mode
Wait for your computer or device to restart and watch Windows 11 enter Safe Mode.
IMPORTANT: If you use this method, Windows 11 will go into Safe Mode each and every time it starts. If you want it to start normally again, you must disable this setting by running this command:
Choose Continue to start Windows 11 in Safe Mode
Wait for your computer or device to restart and watch Windows 11 enter Safe Mode.
IMPORTANT: If you use this method, Windows 11 will go into Safe Mode each and every time it starts. If you want it to start normally again, you must disable this setting by running this command:
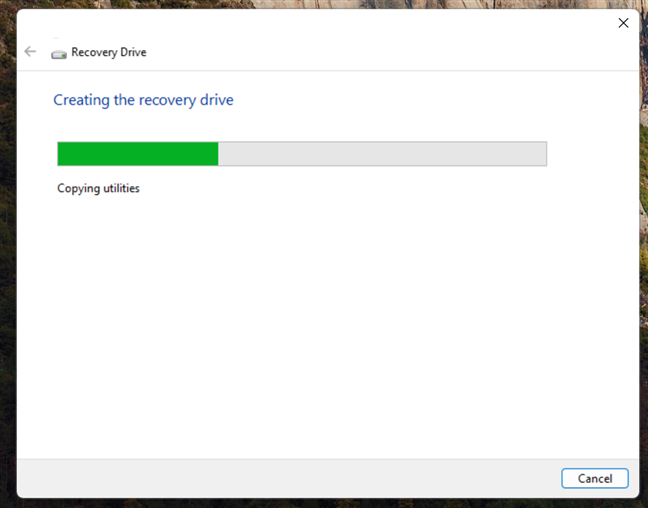
 Creating a Windows 11 Recovery Drive
Boot your Windows 11 PC from the USB recovery drive and select the layout for your keyboard.
Creating a Windows 11 Recovery Drive
Boot your Windows 11 PC from the USB recovery drive and select the layout for your keyboard.

 Choosing the keyboard layout for the recovery drive
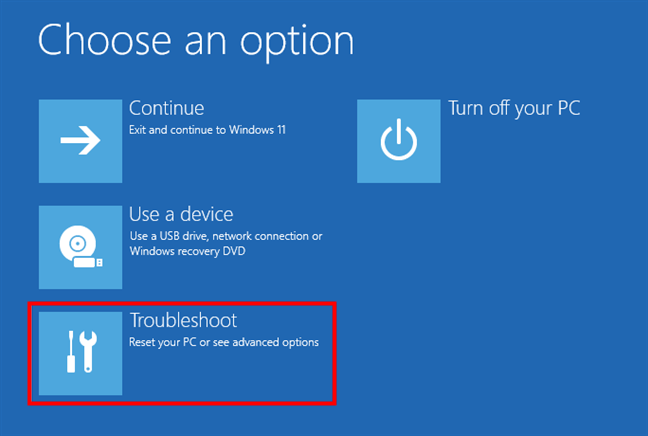
Then, the already familiar “Choose an option” screen loads. On it, click or tap Troubleshoot.
Choosing the keyboard layout for the recovery drive
Then, the already familiar “Choose an option” screen loads. On it, click or tap Troubleshoot.
 Choose Troubleshoot to get to the Windows 11 Safe Mode options
The next steps are the same ones I presented in the first method from this guide. In short, you have to go to “Advanced options > Startup Settings > Restart” and then press the 4 (F4) key to boot into minimal Safe Mode, 5 (F5) to access “Safe Mode with Networking,” or 6 (F6) to activate Windows 11’s “Safe Mode with Command Prompt.”
Choose Troubleshoot to get to the Windows 11 Safe Mode options
The next steps are the same ones I presented in the first method from this guide. In short, you have to go to “Advanced options > Startup Settings > Restart” and then press the 4 (F4) key to boot into minimal Safe Mode, 5 (F5) to access “Safe Mode with Networking,” or 6 (F6) to activate Windows 11’s “Safe Mode with Command Prompt.”
 Go to Advanced options > Startup Settings > Restart > Enable Safe Mode
 How to start Windows 11 in Safe Mode from the Start Menu
Windows 11 restarts and loads the “Choose an option” screen. Select Troubleshoot.
How to start Windows 11 in Safe Mode from the Start Menu
Windows 11 restarts and loads the “Choose an option” screen. Select Troubleshoot.
 Click or tap on Troubleshoot to get to the Safe Mode settings
Next, take the same steps shown in this guide’s first method. Go to “Advanced options -> Startup Settings -> Restart,” and press 4/F4 on your keyboard to start in Safe Mode, 5/F5 to boot into “Safe Mode with Networking,” or 6/F6 to go into “Safe Mode with Command Prompt.”
Click or tap on Troubleshoot to get to the Safe Mode settings
Next, take the same steps shown in this guide’s first method. Go to “Advanced options -> Startup Settings -> Restart,” and press 4/F4 on your keyboard to start in Safe Mode, 5/F5 to boot into “Safe Mode with Networking,” or 6/F6 to go into “Safe Mode with Command Prompt.”
 Go to Advanced options > Startup Settings > Restart > Enable Safe Mode
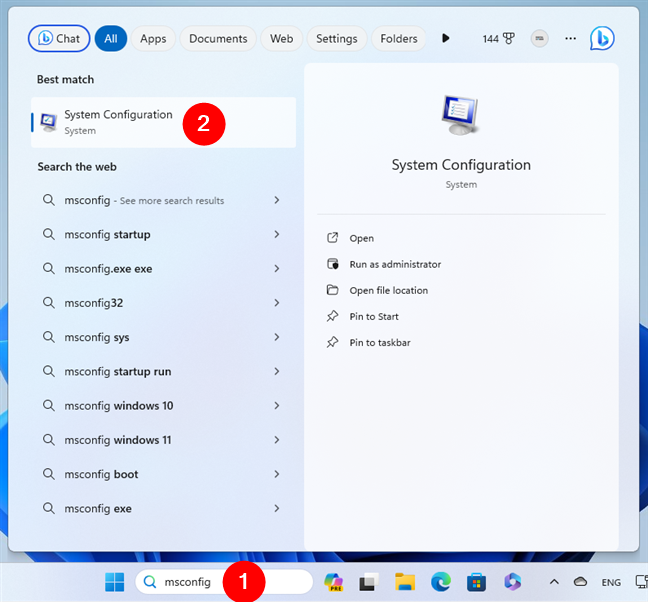
 Searching for System Configuration (msconfig)
In System Configuration, switch to the Boot tab and select “Safe boot” in the Boot options section. Then, press OK.
Searching for System Configuration (msconfig)
In System Configuration, switch to the Boot tab and select “Safe boot” in the Boot options section. Then, press OK.

 Start in Safe Mode using System Configuration (msconfig)
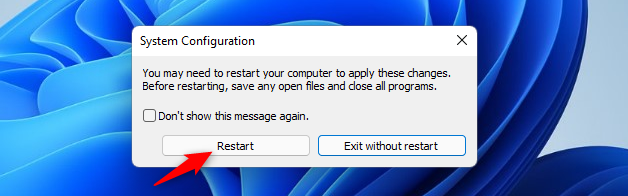
Windows 11 lets you know you must restart your PC to apply the change. Choose “Exit without restart” if you still have things to do, or Restart if you want to enter Windows 11’s Safe Mode immediately.
Start in Safe Mode using System Configuration (msconfig)
Windows 11 lets you know you must restart your PC to apply the change. Choose “Exit without restart” if you still have things to do, or Restart if you want to enter Windows 11’s Safe Mode immediately.
 Restart Windows 11 in Safe Mode
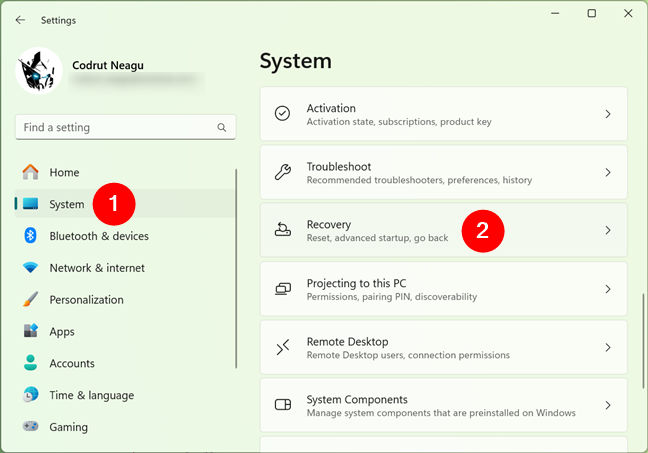
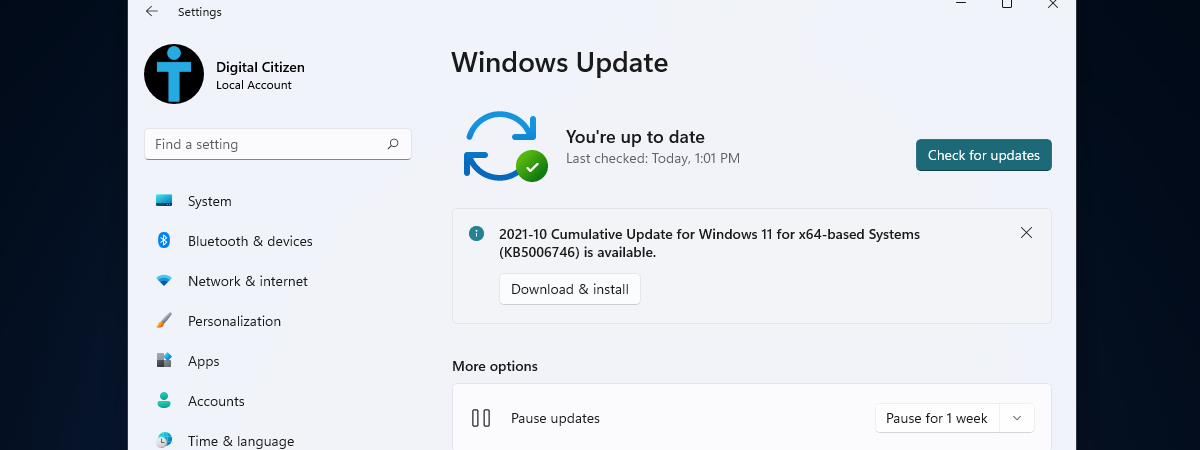
 Go to System and then to Recovery
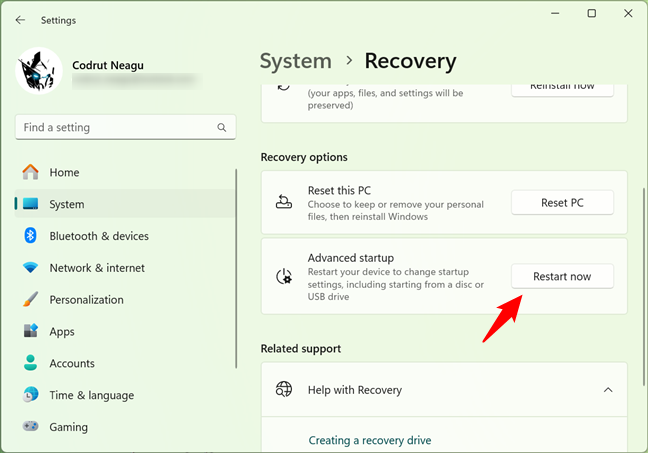
On the Recovery page, in the Recovery options section, click or tap the Restart now button next to Advanced startup.
Go to System and then to Recovery
On the Recovery page, in the Recovery options section, click or tap the Restart now button next to Advanced startup.
 Windows 11 Recovery options
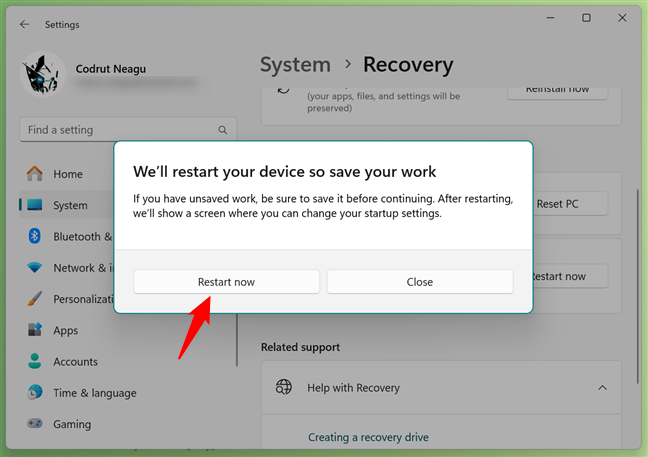
Then, Windows 11 tells you that it needs to restart your device. Save your work and click or tap on Restart now when you’re done.
Windows 11 Recovery options
Then, Windows 11 tells you that it needs to restart your device. Save your work and click or tap on Restart now when you’re done.
 Windows 11 wants to restart your PC
After Windows 11 reboots, select Troubleshoot on the “Choose an option” screen.
Windows 11 wants to restart your PC
After Windows 11 reboots, select Troubleshoot on the “Choose an option” screen.
 Troubleshoot Windows 11: Reset your PC or see advanced options
Next, follow the same steps from the first method in this guide. In short, navigate to “Advanced options > Startup Settings > Restart” and press 4 or F4 on your keyboard to activate Windows 11’s Safe Mode, 5 or F5 to boot into “Safe Mode with Networking,” or 6 or F6 to go into “Safe Mode with Command Prompt.”
Troubleshoot Windows 11: Reset your PC or see advanced options
Next, follow the same steps from the first method in this guide. In short, navigate to “Advanced options > Startup Settings > Restart” and press 4 or F4 on your keyboard to activate Windows 11’s Safe Mode, 5 or F5 to boot into “Safe Mode with Networking,” or 6 or F6 to go into “Safe Mode with Command Prompt.”
 Go to Advanced options > Startup Settings > Restart > Enable Safe Mode
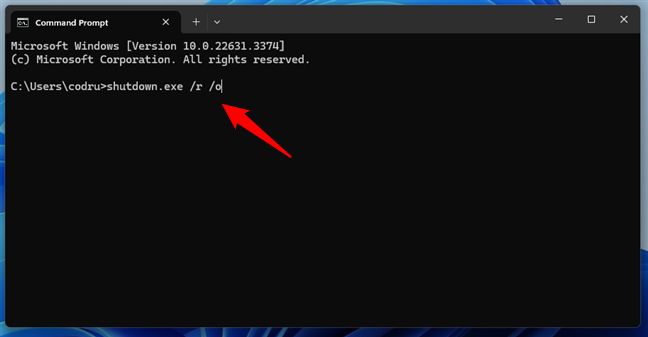
 Get to Windows 11's Safe Mode using the shutdown command
This command makes Windows 11 reboot and loads its recovery environment. After you run it, Windows 11 tells you that it will shut down in less than a minute.
Get to Windows 11's Safe Mode using the shutdown command
This command makes Windows 11 reboot and loads its recovery environment. After you run it, Windows 11 tells you that it will shut down in less than a minute.
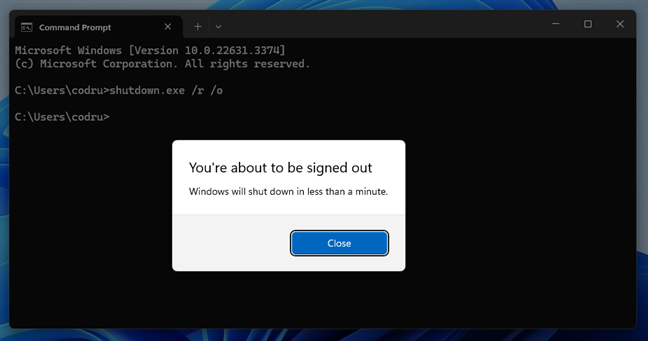
 You're about to be signed out
Once your computer restarts, Windows 11 loads the same “Choose an option” screen that we’ve also seen in the previous methods. Choose Troubleshoot and follow the steps illustrated in the first method of this guide. Go to “Advanced options > Startup Settings > Restart” and press 4/F4 on your keyboard to start Windows 11 in Safe Mode, 5/F5 to boot into “Safe Mode with Networking,” or 6/F6 to go into “Safe Mode with Command Prompt.”
You're about to be signed out
Once your computer restarts, Windows 11 loads the same “Choose an option” screen that we’ve also seen in the previous methods. Choose Troubleshoot and follow the steps illustrated in the first method of this guide. Go to “Advanced options > Startup Settings > Restart” and press 4/F4 on your keyboard to start Windows 11 in Safe Mode, 5/F5 to boot into “Safe Mode with Networking,” or 6/F6 to go into “Safe Mode with Command Prompt.”
 Go to Advanced options > Startup Settings > Restart > Enable Safe Mode
What you get when you start Windows 11 in Safe Mode
Is this your first time hearing about Safe Mode in Windows 11? In that case, you must first understand what it is and what it does; I’ve covered this subject in detail here: What is Safe Mode on a Windows computer? The key takeaway is that Safe Mode is like a stripped-down version of the Windows 11 system that only loads the essentials, leaving out all the extra stuff that could be causing trouble. So, if your computer’s acting up, Safe Mode can be a lifesaver for troubleshooting.How to boot into Safe Mode when you can’t sign in to Windows 11
If you want to start your computer into Safe Mode but can’t log in to Windows 11, here are the ways and steps you should take:1. How to enter Windows 11’s Safe Mode by stopping the PC from booting normally
Windows 11 has a built-in failsafe switch that triggers when it fails to start normally. The fourth time it tries to boot after three failed attempts, Windows 11 automatically loads its Automatic Repair mode. So, all you have to do is interrupt Windows 11’s normal boot process three consecutive times. Press the physical Restart or Power button on your Windows 11 computer or device to stop it during its startup process. Note that if you press the Power button, you must hold it down for about 4 seconds to enforce the power off. If you succeed in doing it, Windows 11 loads its Automatic Repair mode.- Safe Mode - press 4 or F4 on your keyboard to start Windows 11 in the standard Safe Mode.
- Safe Mode with Networking - press 5 or F5 to enter Safe Mode and load networking drivers and services.
- Safe Mode with Command Prompt - press 6 or F6 to get into Safe Mode and automatically load Command Prompt.
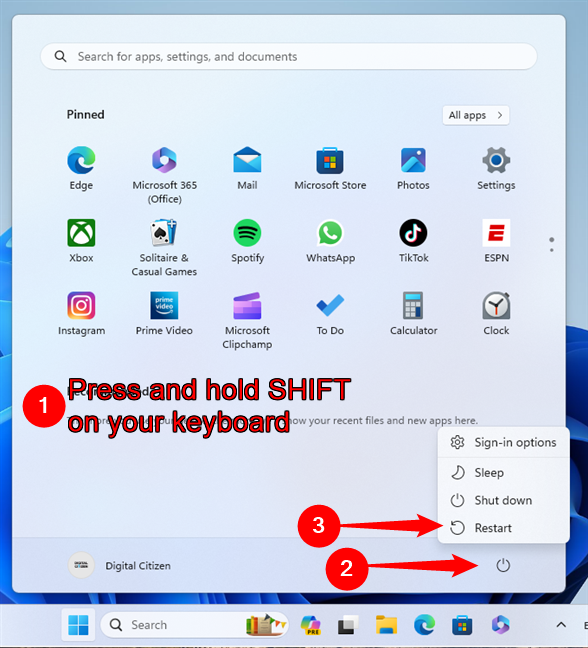
2. How to start Safe Mode in Windows 11 by pressing “Shift + Restart” on the sign-in screen
If you can’t log into Windows 11 but your computer or device can reach the sign-in screen, press and hold Shift on your keyboard. While holding down the Shift key, click or tap on the Power button and select Restart in the menu.3. How to start Windows 11 in Safe Mode using a DVD or USB installation drive and Command Prompt
Another way to enter Safe Mode in Windows 11 is by using a USB stick or DVD with the Windows 11 setup. Use the one you already have, or make one now if you can, on another computer. Then, use it to boot your PC, select the language and keyboard layout you prefer, and click or tap Next.bcdedit /set {default} safeboot minimal
Press Enter on the keyboard and wait to see the message that “The operation completed successfully.”
bcdedit /deletevalue {default} safeboot
You can execute it from Windows 11’s Safe Mode, or you can run it following the same steps from this chapter.
4. How to start Windows 11 in Safe Mode from a recovery drive
You can also enter Windows 11’s Safe Mode from a system recovery USB drive. Either use one that you already made or create a USB recovery drive on another Windows 11 PC.How to boot into Safe Mode when you can log in to Windows 11
Do you want to start your Windows 11 in Safe Mode and you’re already logged in with your user account? Just follow the simple steps in any of the next methods, and you’ll be on your way to troubleshooting your PC in no time:5. How to start Windows 11 in Safe Mode by pressing “Shift + Restart” on the Start Menu
One other way to enter Safe Mode in Windows 11 is available from the Start Menu. While pressing the Shift key on your keyboard, click the Start button, then Power, and then Restart.6. How to start Windows 11 in Safe Mode using System Configuration (msconfig.exe)
One of the easiest methods to start Windows 11 in Safe Mode is available via the System Configuration tool, also known as msconfig.exe. Open it: a fast way is to search for “system configuration.”7. How to enter Windows 11’s Safe Mode from the Settings app (Recovery > Advanced startup)
If you can sign in to Windows 11, you can boot into Safe Mode from the Settings app. Open Settings (Windows + I) and, on the System page, click or tap on Recovery.8. How to start Windows 11 in Safe Mode using the shutdown command in CMD
The Command Prompt also provides an alternative way of starting Windows 11 in Safe Mode. Open CMD and execute this command:shutdown.exe /r /o


Discussion (0)
Be the first to comment.