


If your Windows 11 system is having issues or failing to start, booting into Safe Mode can be a lifesaving step for troubleshooting. Safe Mode is a specialized startup mode that loads only essential components, allowing you to identify problems and potentially resolve them. More often than not, you also need internet connectivity for that, which makes Safe Mode with Networking indispensable. In this guide, I’m going to show you various methods to start Windows 11 in Safe Mode with Networking, including command-line and graphical user interface approaches. Without further ado, let’s start:
NOTE: This guide covers the ways in which you can boot Windows 11 into Safe Mode with Networking. If you’d like to know more about Safe Mode, what it is, and why it’s useful, you should read this article first: What is Safe Mode? Also, if you’re interested in starting your computer into standard Safe Mode without networking or internet access, read this tutorial instead: How to start Windows 11 in Safe Mode (8 ways).

 Safe Mode with Networking in Windows 11
However, note that Safe Mode with Networking works exclusively with wired Ethernet connections. Wireless functionality is not supported due to the more complex drivers required. Therefore, if you can’t connect your Windows 11 laptop or desktop PC to your networks using a cable, you can’t access the internet.
Having said that, let’s now see how to boot into Safe Mode with Networking in Windows 11. I’ll start with the methods that allow you to restart in Safe Mode with Networking when you can’t log in to Windows 11, and I’ll continue with the ones available when you can sign in with your user account.
Safe Mode with Networking in Windows 11
However, note that Safe Mode with Networking works exclusively with wired Ethernet connections. Wireless functionality is not supported due to the more complex drivers required. Therefore, if you can’t connect your Windows 11 laptop or desktop PC to your networks using a cable, you can’t access the internet.
Having said that, let’s now see how to boot into Safe Mode with Networking in Windows 11. I’ll start with the methods that allow you to restart in Safe Mode with Networking when you can’t log in to Windows 11, and I’ll continue with the ones available when you can sign in with your user account.

 How to start Windows 11 in Safe Mode with Networking from the Sign In screen
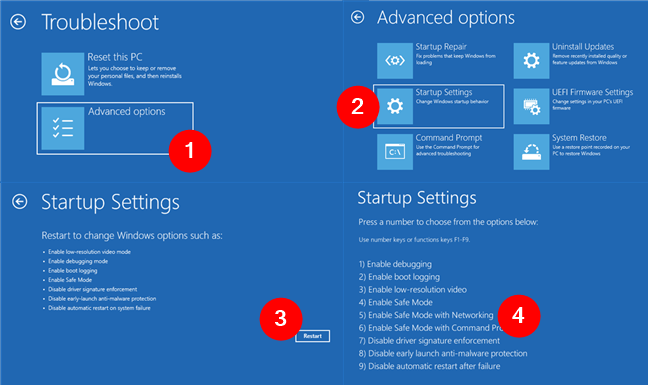
You will then see a blue screen with multiple choices. Select the option called Troubleshoot.
How to start Windows 11 in Safe Mode with Networking from the Sign In screen
You will then see a blue screen with multiple choices. Select the option called Troubleshoot.
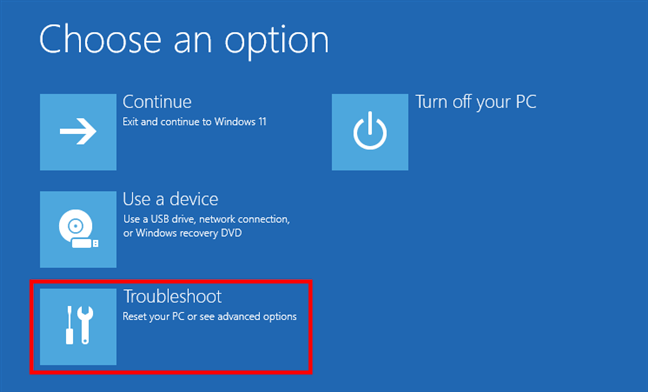
 Click Troubleshoot (Reset your PC or see advanced options)
This brings up the Troubleshoot screen. On it, click or tap Advanced options.
Click Troubleshoot (Reset your PC or see advanced options)
This brings up the Troubleshoot screen. On it, click or tap Advanced options.

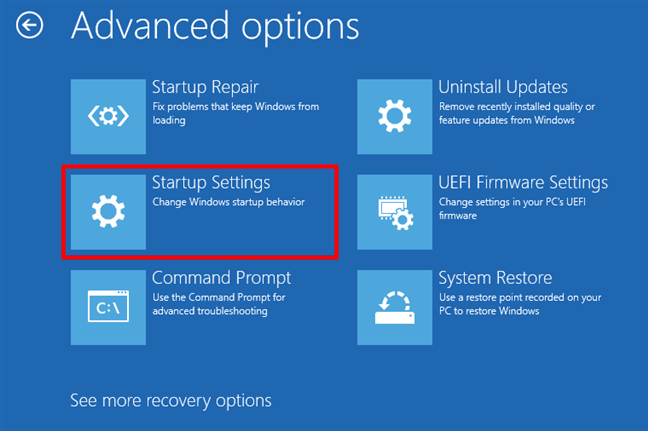
 Select Advanced options
On the next screen, choose Startup Settings.
Select Advanced options
On the next screen, choose Startup Settings.
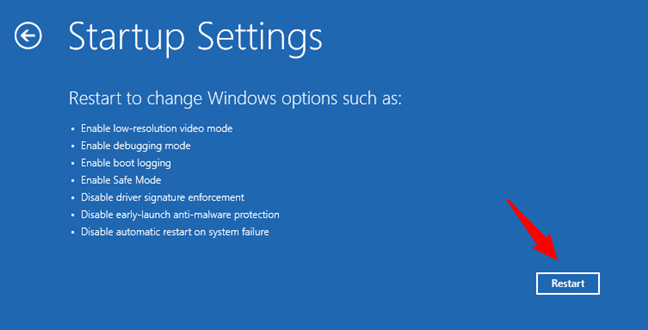
 Enter Startup Settings in Windows 11's recovery environment
Then, the Startup Settings screen loads, and you can see what options you’ll get if you reboot Windows 11. Click tap the Restart button.
Enter Startup Settings in Windows 11's recovery environment
Then, the Startup Settings screen loads, and you can see what options you’ll get if you reboot Windows 11. Click tap the Restart button.
 Choose to restart Windows 11
After Windows 11 restarts, it will show you a series of different boot options. To start Safe Mode with Networking, select the fifth option: “5) Enable Safe Mode with Networking.” You can do this by pressing 5 or F5 on your keyboard.
Choose to restart Windows 11
After Windows 11 restarts, it will show you a series of different boot options. To start Safe Mode with Networking, select the fifth option: “5) Enable Safe Mode with Networking.” You can do this by pressing 5 or F5 on your keyboard.
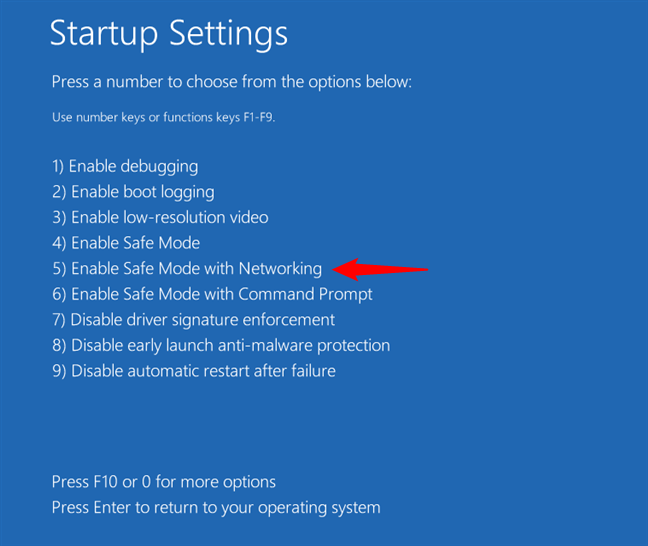
 Press 5 or F5 to restart Windows 11 in Safe Mode with Networking
Finally, Windows 11 will restart once more, but this time, your computer will boot directly to Safe Mode with Networking.
Press 5 or F5 to restart Windows 11 in Safe Mode with Networking
Finally, Windows 11 will restart once more, but this time, your computer will boot directly to Safe Mode with Networking.
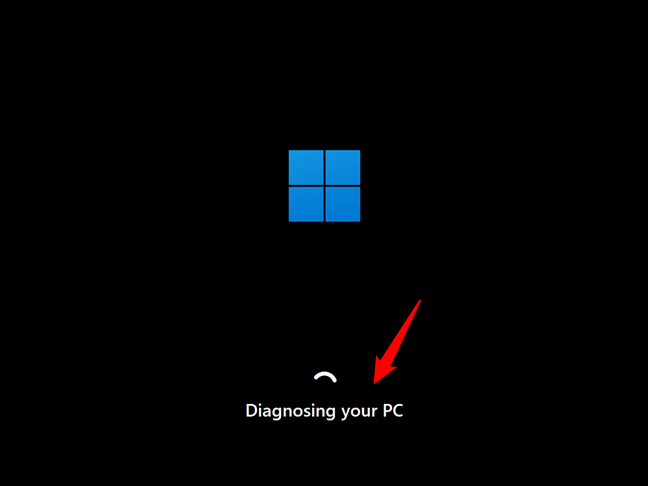
 How to boot into Safe Mode from a blank screen
Soon after that, the message changes to “Diagnosing your PC.” Wait for Windows 11 to do its thing.
How to boot into Safe Mode from a blank screen
Soon after that, the message changes to “Diagnosing your PC.” Wait for Windows 11 to do its thing.
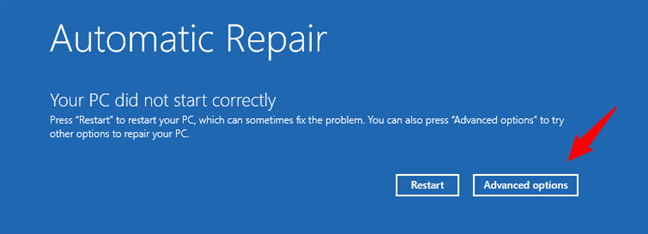
 Windows 11 is diagnosing your PC
Then, a new screen called Automatic Repair is shown. On it, click or tap the Advanced options button.
Windows 11 is diagnosing your PC
Then, a new screen called Automatic Repair is shown. On it, click or tap the Advanced options button.
 Advanced options on the Automatic repair screen
Then, select Troubleshoot on the Choose an option screen.
Advanced options on the Automatic repair screen
Then, select Troubleshoot on the Choose an option screen.

 Select Troubleshoot
Next, take the same steps I’ve shown you in the first method of this guide, which is to go to Advanced options > Startup Settings > Restart > Enable Safe Mode with Networking (press the 5 or the F5 key).
Select Troubleshoot
Next, take the same steps I’ve shown you in the first method of this guide, which is to go to Advanced options > Startup Settings > Restart > Enable Safe Mode with Networking (press the 5 or the F5 key).
 Go to Advanced options > Startup Settings > Restart > Enable Safe Mode with Networking
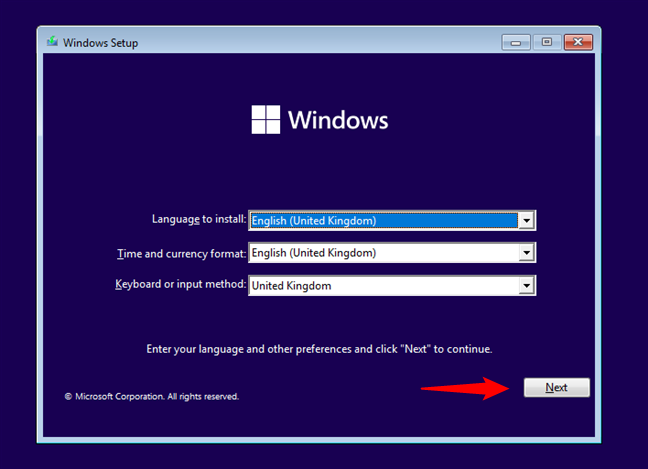
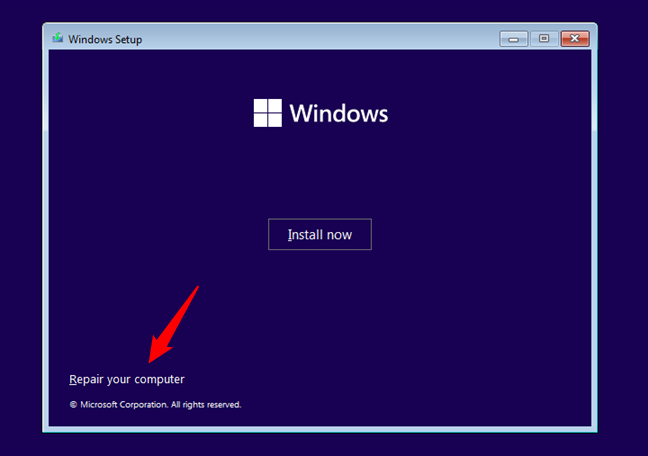
 The Windows 11 Setup first screen
On the Windows Setup screen, ignore the Install now button. Instead, click or tap Repair your computer in the bottom-left corner.
The Windows 11 Setup first screen
On the Windows Setup screen, ignore the Install now button. Instead, click or tap Repair your computer in the bottom-left corner.
 Click Repair your computer
This makes the Windows 11 setup wizard load the Choose an option screen. On it, click or tap Troubleshoot.
Click Repair your computer
This makes the Windows 11 setup wizard load the Choose an option screen. On it, click or tap Troubleshoot.

 Select Troubleshoot
The Troubleshoot screen loads. On it, click or tap Advanced options.
Select Troubleshoot
The Troubleshoot screen loads. On it, click or tap Advanced options.
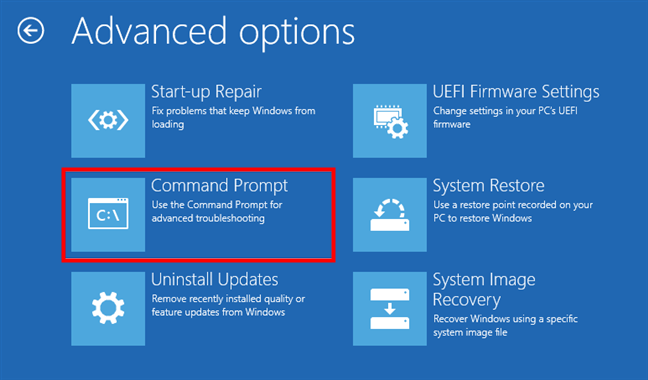
 Select Advanced options
Next, on the Advanced options screen, select “Command Prompt (Use the Command Prompt for advanced troubleshooting).”
Select Advanced options
Next, on the Advanced options screen, select “Command Prompt (Use the Command Prompt for advanced troubleshooting).”
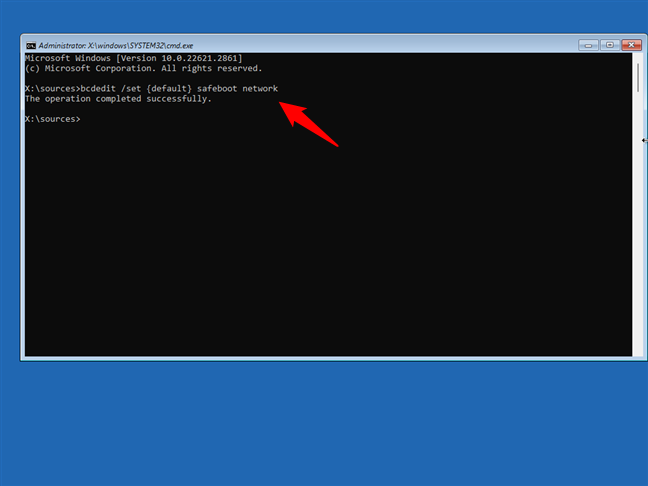
 Open Command Prompt
And now, to make Windows 11 boot to Safe Mode with Networking, run this command:
Open Command Prompt
And now, to make Windows 11 boot to Safe Mode with Networking, run this command:
 How to restart Windows 11 in Safe Mode with Networking from command line
Close the Command Prompt and then press the “Continue (Exit and continue to Windows 11)” button.
How to restart Windows 11 in Safe Mode with Networking from command line
Close the Command Prompt and then press the “Continue (Exit and continue to Windows 11)” button.
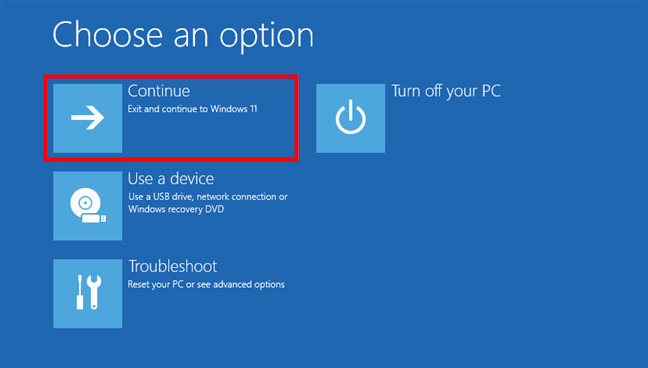
 Choose Continue to start Windows 11 in Safe Mode with Networking
Finally, your Windows 11 PC will reboot to Safe Mode with Networking.
IMPORTANT: To get back to normal boot after you’ve finished repairing what’s broken, follow the same steps, but run this command instead:
Choose Continue to start Windows 11 in Safe Mode with Networking
Finally, your Windows 11 PC will reboot to Safe Mode with Networking.
IMPORTANT: To get back to normal boot after you’ve finished repairing what’s broken, follow the same steps, but run this command instead:
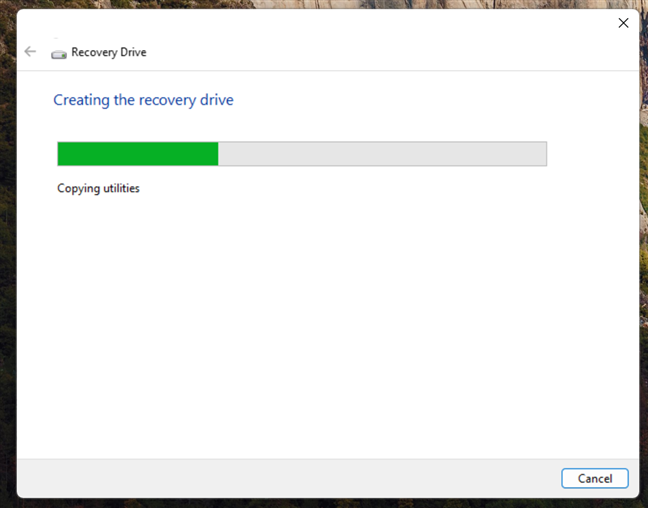
 Creating a recovery drive in Windows 11
To start your Windows 11 PC from the recovery drive, insert it and choose your preferred keyboard layout on the first screen. Click or tap on your selection.
Creating a recovery drive in Windows 11
To start your Windows 11 PC from the recovery drive, insert it and choose your preferred keyboard layout on the first screen. Click or tap on your selection.

 Choose your keyboard layout
Then, select Troubleshoot on the Choose an option screen.
Choose your keyboard layout
Then, select Troubleshoot on the Choose an option screen.
 Select Troubleshoot
Go to Advanced options > Startup Settings > Restart > Enable Safe Mode with Networking (press the 5 or the F5 key).
Select Troubleshoot
Go to Advanced options > Startup Settings > Restart > Enable Safe Mode with Networking (press the 5 or the F5 key).
 Go to Advanced options > Startup Settings > Restart > Enable Safe Mode with Networking
Then, your Windows 11 device will boot into Safe Mode with Networking.
Go to Advanced options > Startup Settings > Restart > Enable Safe Mode with Networking
Then, your Windows 11 device will boot into Safe Mode with Networking.
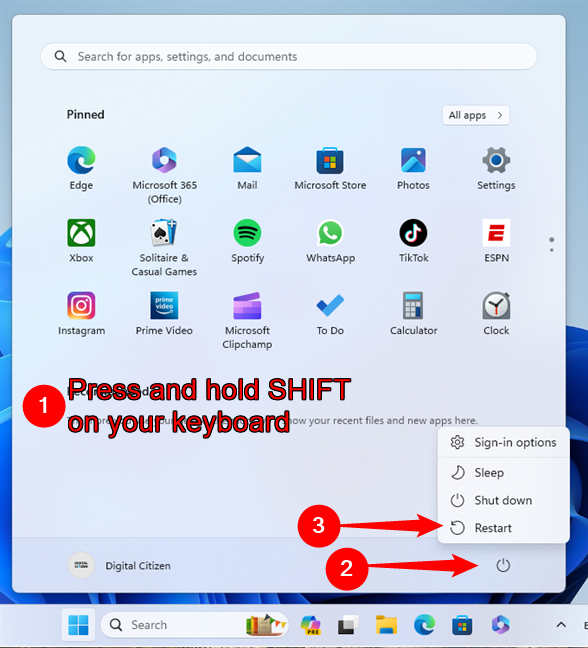
 Press Shift and select Restart to get to Windows 11's Safe Mode with Networking
After a short while, you should see a blue screen with four options: “Continue (Exit and continue to Windows 11),” “Use a device (Use a USB drive, network connection, or Windows recovery DVD), “Troubleshoot (Reset your PC or see advanced options),” and “Turn off your PC.” Click or tap on Troubleshoot.
Press Shift and select Restart to get to Windows 11's Safe Mode with Networking
After a short while, you should see a blue screen with four options: “Continue (Exit and continue to Windows 11),” “Use a device (Use a USB drive, network connection, or Windows recovery DVD), “Troubleshoot (Reset your PC or see advanced options),” and “Turn off your PC.” Click or tap on Troubleshoot.
 Select Troubleshoot
Then, take the same steps shown in the first method of this guide. In short, go to Advanced options > Startup Settings > Restart > Enable Safe Mode with Networking (press the 5 or the F5 key).
Select Troubleshoot
Then, take the same steps shown in the first method of this guide. In short, go to Advanced options > Startup Settings > Restart > Enable Safe Mode with Networking (press the 5 or the F5 key).
 Go to Advanced options > Startup Settings > Restart > Enable Safe Mode with Networking
Once you do that, Windows 11 will restart in Safe Mode with Networking.
Go to Advanced options > Startup Settings > Restart > Enable Safe Mode with Networking
Once you do that, Windows 11 will restart in Safe Mode with Networking.
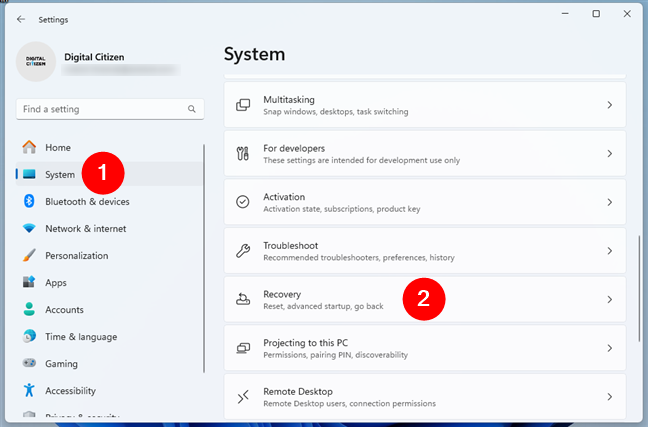
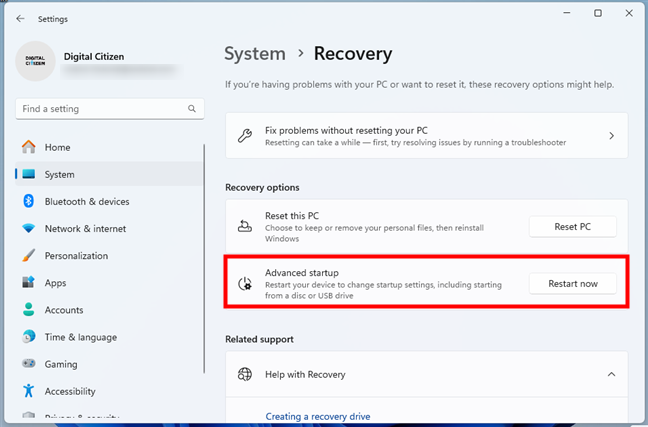
 Go to Settings > System > Recovery
Then, on the Recovery page, locate the Recovery options section and click or tap Restart now, next to Advanced startup.
Go to Settings > System > Recovery
Then, on the Recovery page, locate the Recovery options section and click or tap Restart now, next to Advanced startup.
 Restart now in Advanced startup
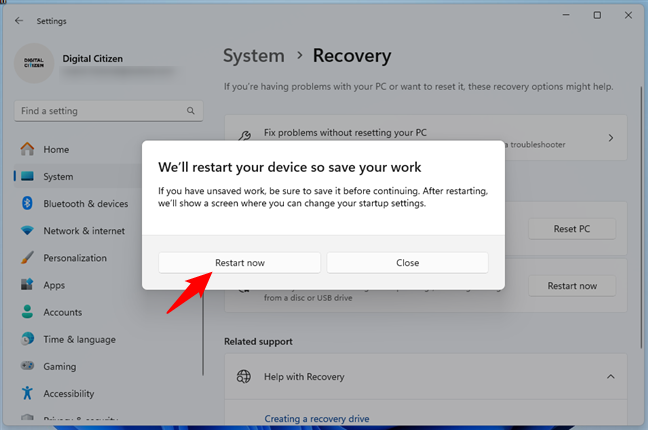
Confirm that you want to reboot your Windows 11 device by clicking or tapping the Restart now button.
Restart now in Advanced startup
Confirm that you want to reboot your Windows 11 device by clicking or tapping the Restart now button.
 Click/tap Restart now
After the Windows 11 reboot, you’ll see the Choose an option screen. On it, select Troubleshoot.
Click/tap Restart now
After the Windows 11 reboot, you’ll see the Choose an option screen. On it, select Troubleshoot.
 Select Troubleshoot
Next, go to Advanced options > Startup Settings > Restart > Enable Safe Mode with Networking (press the 5 or the F5 key).
Select Troubleshoot
Next, go to Advanced options > Startup Settings > Restart > Enable Safe Mode with Networking (press the 5 or the F5 key).
 Go to Advanced options > Startup Settings > Restart > Enable Safe Mode with Networking
Windows 11 will then start in Safe Mode with Networking.
Go to Advanced options > Startup Settings > Restart > Enable Safe Mode with Networking
Windows 11 will then start in Safe Mode with Networking.

 Opening msconfig (System Configuration) in Windows 11
In the System Configuration window, switch to the Boot tab. Then, check the Safe boot option and select Network under it.
Opening msconfig (System Configuration) in Windows 11
In the System Configuration window, switch to the Boot tab. Then, check the Safe boot option and select Network under it.
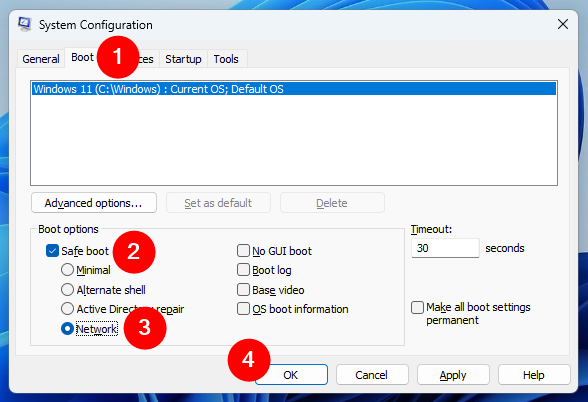
 Enable Safe Boot and select Network in msconfig
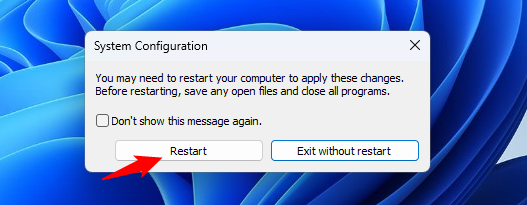
To apply the new settings and actually enter Safe Mode with Networking, you’ll need to reboot your computer. System Configuration will ask you about that, so you can do this now by clicking or tapping Restart. If you prefer, you can exit without restarting and reboot your Windows 11 PC in Safe Mode with Networking later.
Enable Safe Boot and select Network in msconfig
To apply the new settings and actually enter Safe Mode with Networking, you’ll need to reboot your computer. System Configuration will ask you about that, so you can do this now by clicking or tapping Restart. If you prefer, you can exit without restarting and reboot your Windows 11 PC in Safe Mode with Networking later.
 Restart Windows 11 in Safe Mode with Networking
After your Windows 11 device restarts, it will automatically enable Safe Mode with Networking. Moreover, it will also launch Microsoft Edge and load the Windows help & learning website.
Restart Windows 11 in Safe Mode with Networking
After your Windows 11 device restarts, it will automatically enable Safe Mode with Networking. Moreover, it will also launch Microsoft Edge and load the Windows help & learning website.
 Edge offers help in Windows 11 Safe Mode with Networking
If you need to access online help or tools required to fix your Windows 11 computer, you can now browse the web with Microsoft Edge. After you finish troubleshooting, you can exit Safe Mode with Networking by unchecking the Safe boot option in msconfig (System Configuration), following the same steps shown in this chapter’s previous paragraphs.
Edge offers help in Windows 11 Safe Mode with Networking
If you need to access online help or tools required to fix your Windows 11 computer, you can now browse the web with Microsoft Edge. After you finish troubleshooting, you can exit Safe Mode with Networking by unchecking the Safe boot option in msconfig (System Configuration), following the same steps shown in this chapter’s previous paragraphs.
 How to restart a Windows 11 computer in Safe Mode with Networking using CMD
This command initiates a restart of Windows 11 into its recovery mode. As soon as you run it, Windows 11 informs you that it will log you off.
How to restart a Windows 11 computer in Safe Mode with Networking using CMD
This command initiates a restart of Windows 11 into its recovery mode. As soon as you run it, Windows 11 informs you that it will log you off.
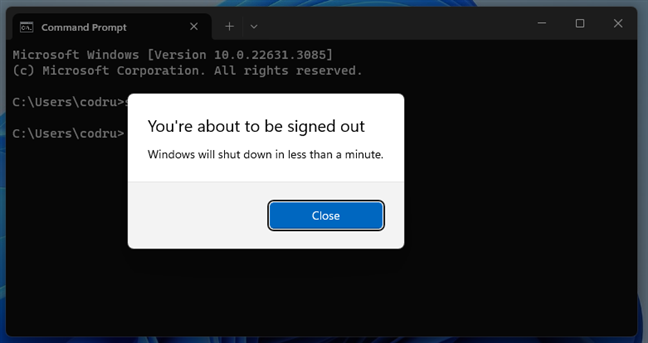
 You're about to be signed out
You will then see the Choose an option screen, just like in the previous sections of this guide. On it, select Troubleshoot.
You're about to be signed out
You will then see the Choose an option screen, just like in the previous sections of this guide. On it, select Troubleshoot.
 Select Troubleshoot
Next, take the same steps described in the first method of this guide: go to Advanced options > Startup Settings > Restart > Enable Safe Mode with Networking (press the 5 or the F5 key).
Select Troubleshoot
Next, take the same steps described in the first method of this guide: go to Advanced options > Startup Settings > Restart > Enable Safe Mode with Networking (press the 5 or the F5 key).
 Go to Advanced options > Startup Settings > Restart > Enable Safe Mode with Networking
That’s it!
Go to Advanced options > Startup Settings > Restart > Enable Safe Mode with Networking
That’s it!
Understanding Safe Mode with Networking. How is it different from standard Safe Mode in Windows 11?
Safe Mode is a special diagnostic mode of a Windows 11 operating system that allows you to troubleshoot problems and fix errors. However, there’s a big problem with it. While Safe Mode prioritizes minimal services and drivers to prevent issues, it lacks network and internet access. Safe Mode with Networking, on the other hand, maintains essential services and drivers while also loading critical networking components. This version of Safe Mode enables network connectivity, which means you can address issues using online help, documentation, and other resources.How to boot in Safe Mode with Networking when you’re unable to log in to Windows 11
If you need to boot your computer into Safe Mode with Networking but can’t log in to Windows 11, here are the methods and steps you should perform:1. How to reboot to Safe Mode with Networking using the Shift + Restart keyboard shortcut in Windows 11
Boot your Windows 11 PC as you would normally do. When you get to the Windows 11 sign-in screen, press and hold the Shift key while clicking the Power button, and then Restart.2. How to reboot into Safe Mode with Networking when Windows 11 shows only a black screen
This method is especially useful when your Windows 11 device stops showing anything on its screen. In such a situation, when the display is blank, you can’t really click on anything. But you can force restart to Safe Mode with Networking by interrupting the normal boot process. You can do this by using the Reset or the Power button on your Windows 11 computer while it is trying to load the operating system. Note, however, that you’ll need to do this three times over. Once this condition is met, Windows 11 automatically enters Automatic Repair, from where you can access the Safe Mode with Networking. You’ll know you’ve force restarted Windows 11 enough times when the boot screen shows the “Preparing Automatic Repair” message.3. How to reboot to Safe Mode with Networking using CMD and a Windows 11 installation disc or USB drive
To enter Safe Mode with Networking on a PC that won’t start Windows 11, you can also use another computer and a USB memory stick or DVD. First, go to the Windows 11 download page and make your own installation media. Put the DVD or USB stick with the Windows 11 setup in the malfunctioning PC and boot from it. When the Windows 11 setup wizard appears, select your language and keyboard layout. Click or tap Next to continue.bcdedit /set {default} safeboot network
Once you press the Enter key, the Command Prompt should tell you that “The operation completed successfully.”
bcdedit /deletevalue {default} safeboot
4. How to start Windows 11 in Safe Mode with Networking using a recovery drive
If your Windows 11 PC stops working properly, you can also use a recovery disk that you already have or create on another Windows computer to boot into Safe Mode with Networking.How to start Windows 11 in Safe Mode with Networking when you can log in
If you want to reboot your computer to Safe Mode with Networking, and you can still log into Windows 11 with your user account, here’s what you’ll need to do:5. How to reboot Windows 11 in Safe Mode with Networking using Shift + Restart
While logged in to Windows 11, open the Start Menu. Press and keep the Shift key down, click or tap the Power button, and choose Restart.6. How to reboot to Safe Mode with Networking using Windows 11’s Settings
You can also boot into Safe Mode with Networking using the Advanced startup settings from Windows 11. Open the Settings app, select System in the left sidebar, and click or tap Recovery in the right panel.7. How to make Windows 11 restart in Safe Mode with Networking using msconfig (System Configuration)
You can also access Safe Mode with Networking on a Windows 11 PC by using the System Configuration tool, also known as msconfig.exe. To open System Configuration, you can quickly type system configuration or msconfig in the taskbar search box and then select System Configuration.8. How to boot in Safe Mode with Networking using Command Prompt and the shutdown command
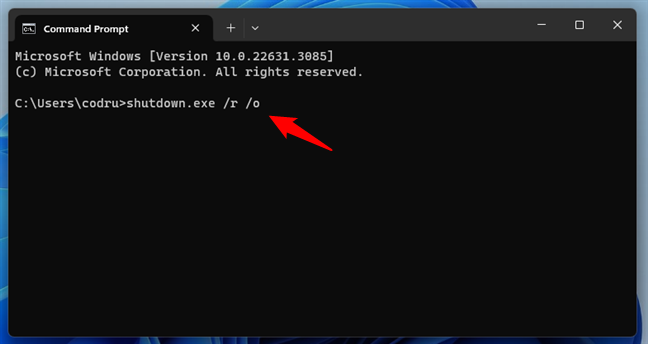
Last but not least, you can also reboot in Safe Mode with Networking from CMD using the shutdown command. To do so, open CMD and run this command:shutdown.exe /r /o


Discussion (0)
Be the first to comment.