

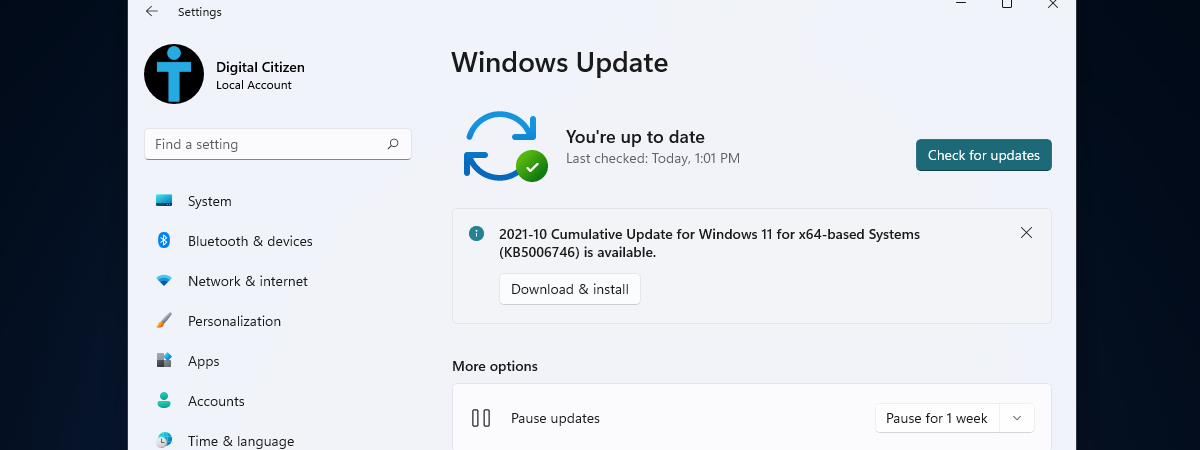
Even if Microsoft does test its updates, in recent years, there were many occurrences of buggy updates ruining system stability. Therefore, uninstalling Windows 11 updates can come in handy if your system doesn’t function properly after updating. This article shows you five methods to view and remove updates in Windows 11, including uninstalling them from Safe Mode if the system fails to boot normally. Without further ado, let’s begin:

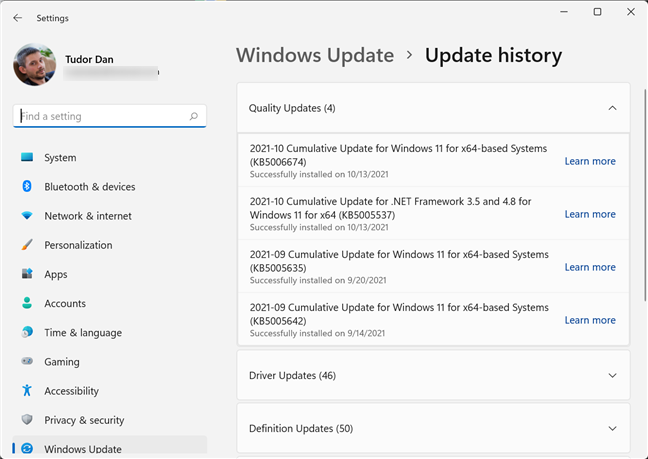
 Go to Update history in the Windows Update section of the Settings app
Here, you can see all installed updates, along with details and the date they were installed. The list is split into the following categories:
Go to Update history in the Windows Update section of the Settings app
Here, you can see all installed updates, along with details and the date they were installed. The list is split into the following categories:
 The types of Windows 11 updates that get installed
Identify the update that is causing problems and write down or memorize the update number (the one that starts with KB). Next, scroll down and select Uninstall updates. This actually opens the Installed Updates section in the Control Panel.
The types of Windows 11 updates that get installed
Identify the update that is causing problems and write down or memorize the update number (the one that starts with KB). Next, scroll down and select Uninstall updates. This actually opens the Installed Updates section in the Control Panel.
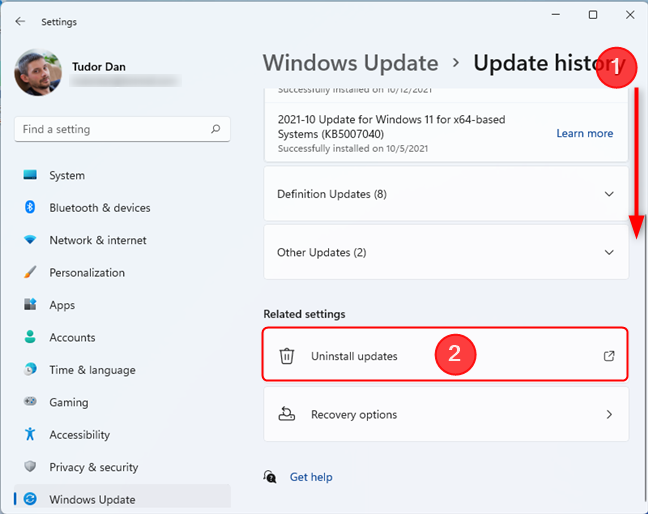
 Scroll down and select Uninstall updates
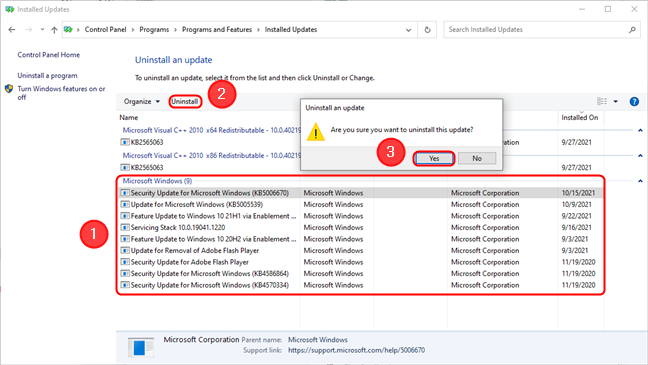
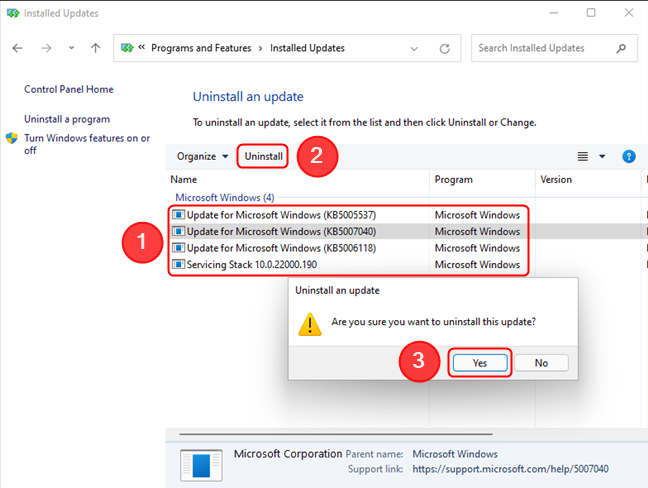
The Installed Updates window shows updates for Windows 11, as well as for other software installed on your PC. Find the Microsoft Windows section and locate the update you want to remove. Now, click on the update you want to remove and then click Uninstall. Alternatively, you can double-click the update. Confirm the action by selecting Yes in the dialog box.
Scroll down and select Uninstall updates
The Installed Updates window shows updates for Windows 11, as well as for other software installed on your PC. Find the Microsoft Windows section and locate the update you want to remove. Now, click on the update you want to remove and then click Uninstall. Alternatively, you can double-click the update. Confirm the action by selecting Yes in the dialog box.
 Uninstalling updates in Windows 11
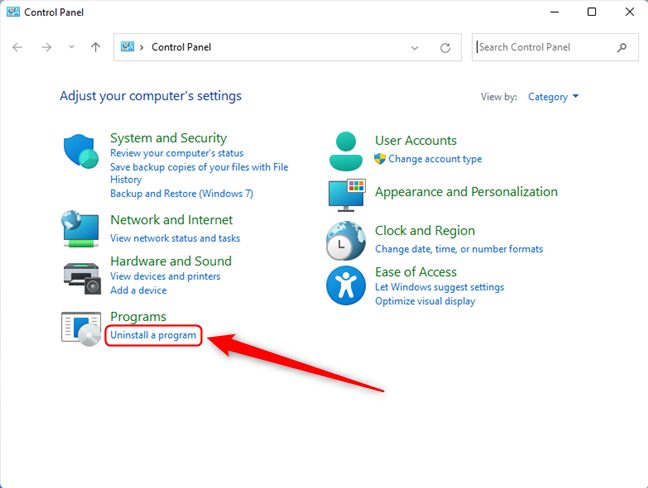
 Press on Uninstall a program to see a list of apps and programs on the device
On the next screen, click “View installed updates" in the upper-left corner.
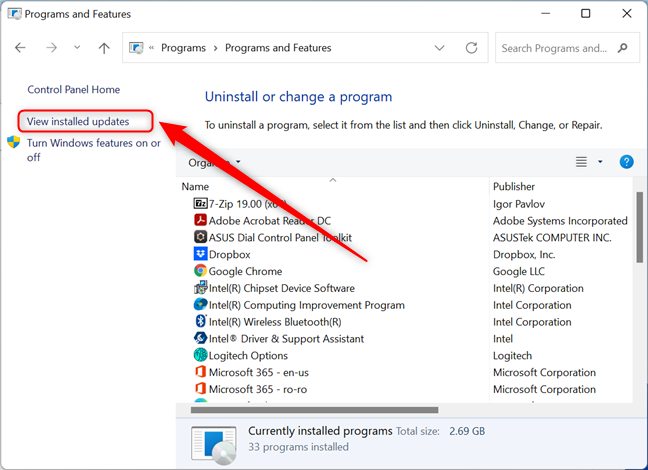
Press on Uninstall a program to see a list of apps and programs on the device
On the next screen, click “View installed updates" in the upper-left corner.
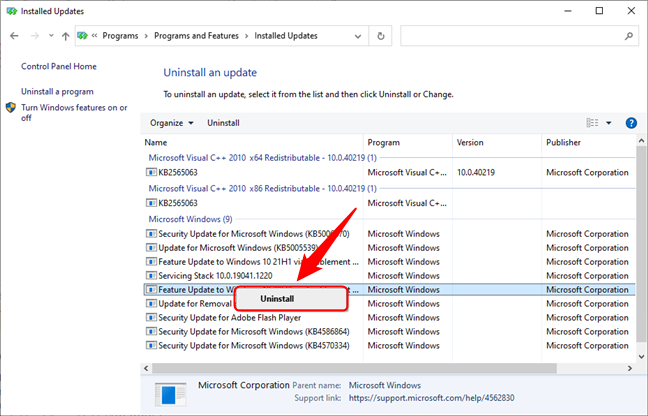
 Switch from programs to updates by pressing on View installed updates
Now, the procedure is identical to the previous method: select the update and click on Uninstall in the list header. Alternatively, you can right-click (or press and hold) on the update you want to remove and then click Uninstall.
Switch from programs to updates by pressing on View installed updates
Now, the procedure is identical to the previous method: select the update and click on Uninstall in the list header. Alternatively, you can right-click (or press and hold) on the update you want to remove and then click Uninstall.
 You can right-click an update and then click Uninstall
Confirm the action by selecting Yes in the dialog box.
You can right-click an update and then click Uninstall
Confirm the action by selecting Yes in the dialog box.
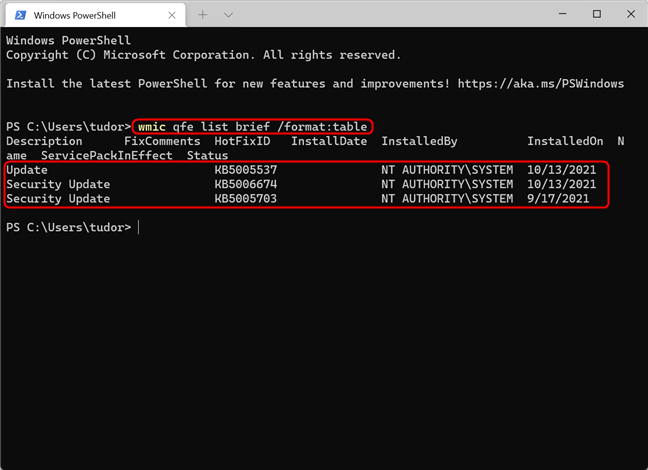 This command lists the installed updates
To uninstall an update, just type the following command (or copy and paste it in the Terminal window):
This command lists the installed updates
To uninstall an update, just type the following command (or copy and paste it in the Terminal window):
 Uninstall an update using Windows Terminal in Windows 11
NOTE: if you want to uninstall an update using Command Prompt or remove it using PowerShell, the commands listed above can be used for both command-line shells.
Uninstall an update using Windows Terminal in Windows 11
NOTE: if you want to uninstall an update using Command Prompt or remove it using PowerShell, the commands listed above can be used for both command-line shells.
 Select Restart while holding Shift to access Windows RE
Once the Windows Recovery Environment loads, select Troubleshoot, then Advanced Options.
Select Restart while holding Shift to access Windows RE
Once the Windows Recovery Environment loads, select Troubleshoot, then Advanced Options.
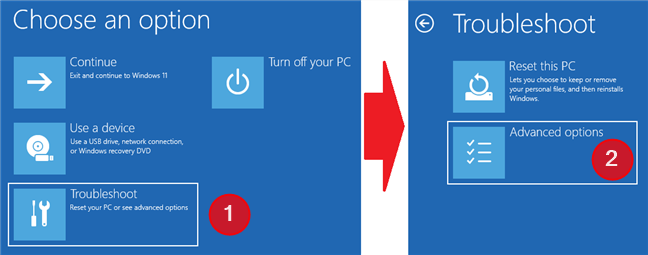
 Click or tap on Troubleshoot, then on Advanced options
Now, click or tap on Uninstall updates. You can only uninstall the latest quality or feature update, but usually it’s the latest update that is causing problems.
Click or tap on Troubleshoot, then on Advanced options
Now, click or tap on Uninstall updates. You can only uninstall the latest quality or feature update, but usually it’s the latest update that is causing problems.
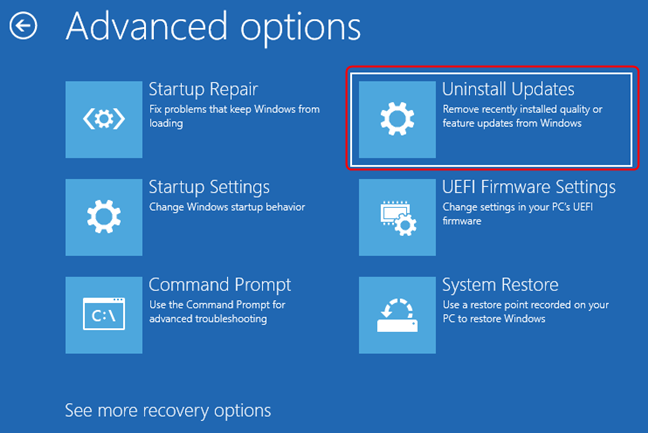
 Press on Uninstall updates
As described before, feature updates are significant updates that include new features, updated integrations, and sometimes new graphical user interface elements. Quality updates refer to security, drives, telemetry updates, etc. Select the type of update to uninstall based on your objective or based on the symptoms of the device.
Press on Uninstall updates
As described before, feature updates are significant updates that include new features, updated integrations, and sometimes new graphical user interface elements. Quality updates refer to security, drives, telemetry updates, etc. Select the type of update to uninstall based on your objective or based on the symptoms of the device.
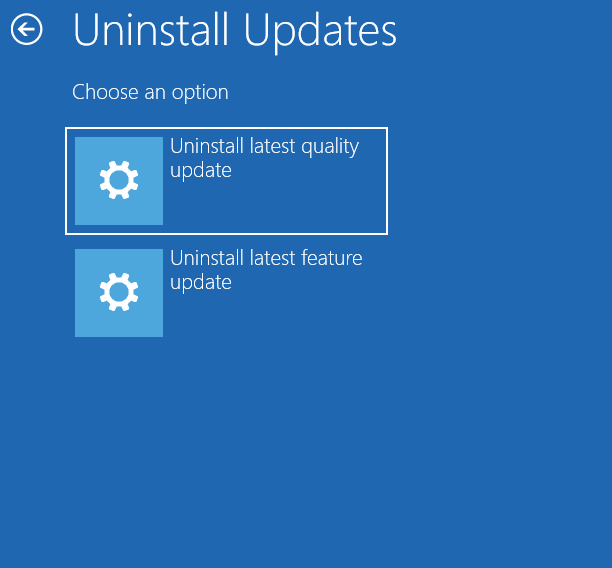
 Uninstall the latest quality update or the latest feature update
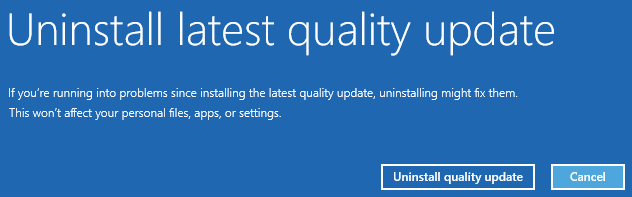
After choosing one of the two options (we went with “Uninstall the latest quality update”), Windows asks you to confirm the action. Confirm it by pressing “Uninstall quality update.”
Uninstall the latest quality update or the latest feature update
After choosing one of the two options (we went with “Uninstall the latest quality update”), Windows asks you to confirm the action. Confirm it by pressing “Uninstall quality update.”
 Confirm your command to continue
It might take a few minutes for the latest update to be uninstalled. When the process is finished, press Done. Then, press Continue to boot Windows normally. Hopefully, the problem will be gone.
Confirm your command to continue
It might take a few minutes for the latest update to be uninstalled. When the process is finished, press Done. Then, press Continue to boot Windows normally. Hopefully, the problem will be gone.
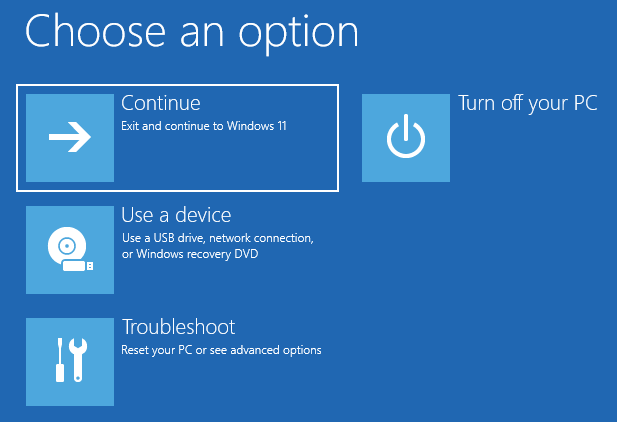
 Click or tap on Continue to load Windows

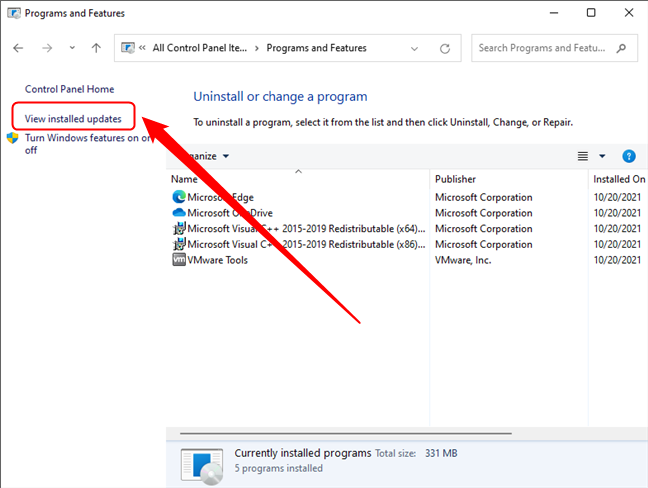
 Access Program and Features in the Control Panel
Click on “View installed updates” in the upper left corner of the window to browse through the list of Windows 11 updates.
Access Program and Features in the Control Panel
Click on “View installed updates” in the upper left corner of the window to browse through the list of Windows 11 updates.
 View installed updates in Safe mode
Now, just like in the first two methods, select the update you want to remove and then click on Uninstall in the list header. Alternatively, double-click on the update or right-click on it and then press Uninstall. Finally, confirm the action by pressing Yes in the dialog box.
View installed updates in Safe mode
Now, just like in the first two methods, select the update you want to remove and then click on Uninstall in the list header. Alternatively, double-click on the update or right-click on it and then press Uninstall. Finally, confirm the action by pressing Yes in the dialog box.
 Uninstall an update in Safe mode
After the update is removed, exit Safe Mode to see if the problem is solved.
Uninstall an update in Safe mode
After the update is removed, exit Safe Mode to see if the problem is solved.
1. Uninstall Windows 11 updates from the Settings app
Begin with opening the Settings app. You can do it by pressing Win + I on your keyboard. Click or tap on Windows Update in the left pane and then on Update history.- Feature Updates - major updates to Windows 11 that bring new features, and change important aspects of the operating system. These types of updates may cause instability on certain systems. If you encounter problems after a feature update is installed, you may want to uninstall it immediately.
- Quality Updates - these updates do not include new features or significant improvements. They are maintenance updates meant to fix bugs, errors, patch security vulnerabilities, and improve reliability. Sometimes though, they can impact your system’s stability.
- Driver Updates - updates for the hardware components found inside your computer: the network card, the mouse and keyboard, the graphics card, etc. Drivers delivered through Windows Update are usually tested and signed by Microsoft and, in most cases, they should not lead to system instability.
- Definition Updates - updates to the database used by the Microsoft Defender Antivirus to protect you from malware and other threats. Such updates should not cause system instability, so you can usually ignore them.
- Other Updates - updates to apps and tools included in Windows 11, like the Windows Defender Antivirus platform, .NET Framework updates, etc. Such updates should not cause system instability, so you can usually ignore them.
2. Use Control Panel to uninstall Windows 11 updates
If you want, you can stick to the good ol’ Control Panel. One way to open it is by pressing Win + R on your keyboard, typing control, and pressing Enter. Then, click or tap on the “Uninstall a program” link under Programs.3. Uninstall Windows 11 updates from the Windows Terminal
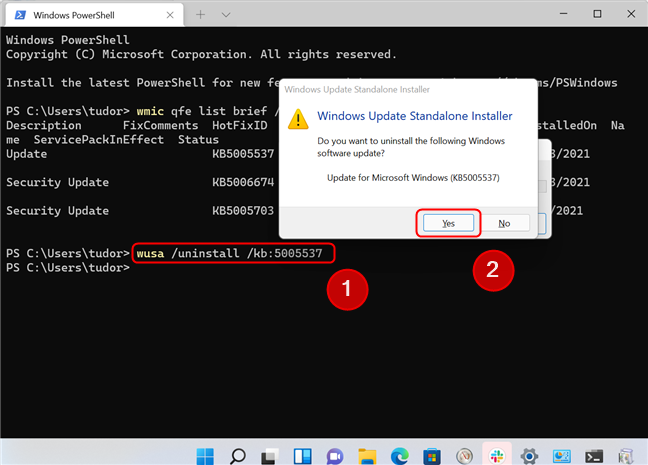
You can also uninstall updates using Windows Terminal if the methods above don’t work or if you prefer the command-line interface. First, run Windows Terminal as administrator. Next, enter the following command:wmic qfe list brief /format:table
Press Enter. This command lists all installed updates, like in the screenshot below.
wusa /uninstall /kb:HotFixID
where HotFixID is the identification number of that update. As an example, let’s say that we want to uninstall the update KB5005537. To do that, we must type: wusa /uninstall /kb:5005537. Press Enter after typing the command to execute it. Now, confirm the action by pressing Yes in the dialog.
4. Uninstall the latest update from Windows Recovery Environment
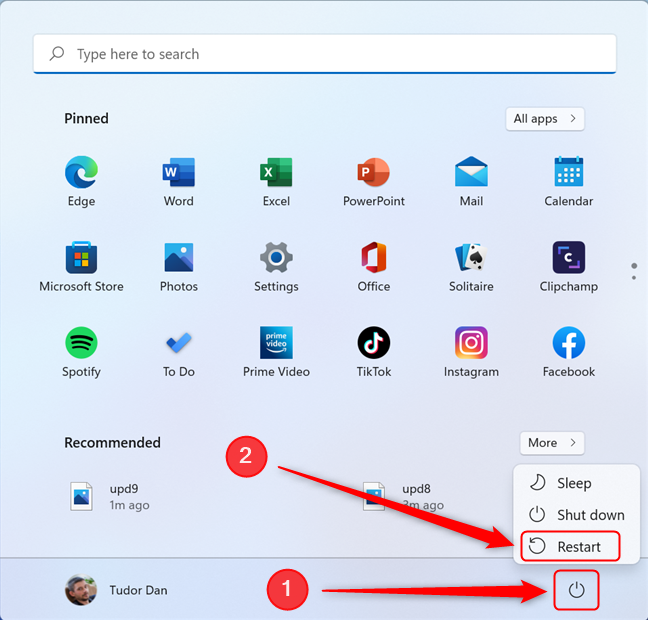
Sometimes, Microsoft challenges our technical know-how by releasing a Windows update that renders the operating system unable to boot correctly or makes the system lock up. If this happens, there are ways to uninstall the buggy update. First, let Windows fail to boot three times in a row. This will activate Windows Recovery Environment. Alternatively, if you want to enter the Windows Recovery Environment manually when Windows is running, open the Start Menu, click or tap the Power button in the lower right corner and then, while pressing Shift on your keyboard, click on Restart.5. Uninstall updates from Safe Mode
If your system still fails to boot or if you want to remove a stubborn update, you can also try uninstalling updates from Safe Mode. First, enter Safe Mode by using a method described in this article: How to start Windows 11 in Safe Mode (8 ways). Once Windows is loaded, open the Control Panel by pressing Win + R on your keyboard, typing control, and pressing Enter. Next, click on Programs and Features.
Discussion (0)
Be the first to comment.