

Many modern devices with Windows 10 or Windows 11 include a webcam, and to use it, you need an app that helps you take pictures, record videos, or stream video while video chatting. For this purpose, Microsoft has built an app called Camera, which is available by default in both Windows 10 and Windows 11. This guide shows you everything you need to know on how to test and use your webcam with the Camera app. Here’s how to start the Camera, how to take pictures and record videos, how to set the brightness and other parameters, and how to configure the way your webcam works:
IMPORTANT: If this is the first time you’re using the Camera app on your Windows 10 or Windows 11 device, please ensure that you have a driver installed for your webcam. Because the Camera app is identical in Windows 11 and Windows 10, we used screenshots taken mainly from Windows 11 to create this guide.

 How to open Camera in Windows 11 fast
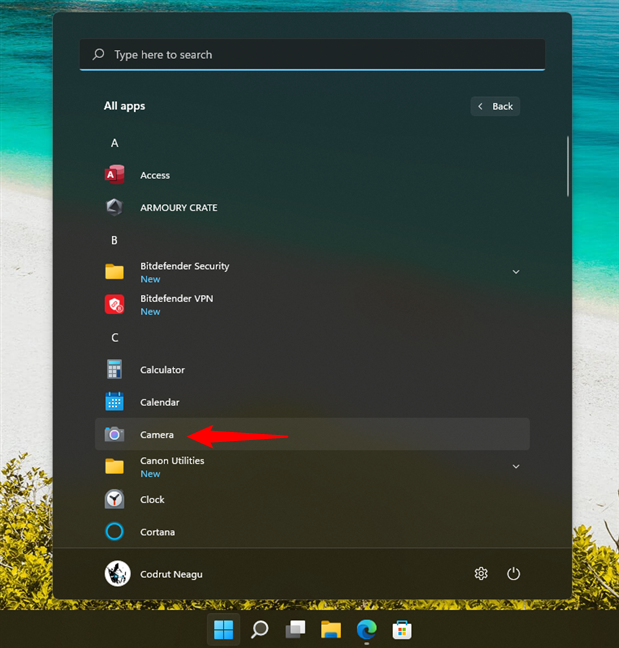
Another way to open the Camera app is offered by the Start Menu. In Windows 11, click or tap the Start button, go to the All apps list, and click or tap on the Camera shortcut.
How to open Camera in Windows 11 fast
Another way to open the Camera app is offered by the Start Menu. In Windows 11, click or tap the Start button, go to the All apps list, and click or tap on the Camera shortcut.
 The Camera shortcut from Windows 11's Start Menu
If you have Windows 10, open the Start Menu and scroll down the app list until you get to the Camera. Once you’ve found it, click or tap on it.
The Camera shortcut from Windows 11's Start Menu
If you have Windows 10, open the Start Menu and scroll down the app list until you get to the Camera. Once you’ve found it, click or tap on it.

 The Camera app in the Start Menu
Now that you know how to open the Camera app, let’s see how you can test and use it for capturing photos and filming videos, as well as how to set it up just the way you like it:
The Camera app in the Start Menu
Now that you know how to open the Camera app, let’s see how you can test and use it for capturing photos and filming videos, as well as how to set it up just the way you like it:
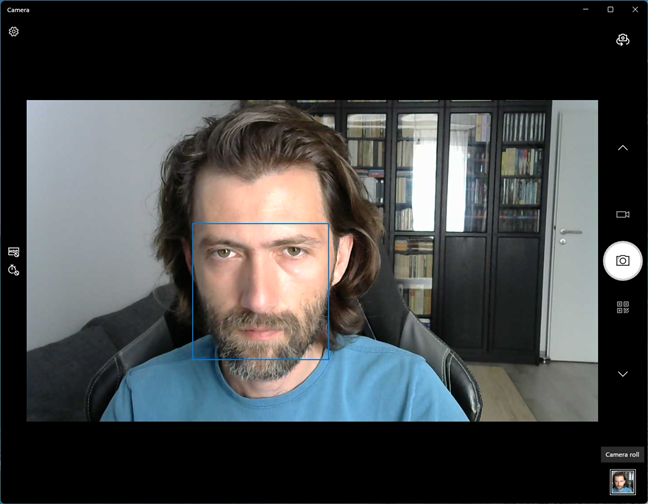
 Testing the webcam with the Camera app in Windows 11
That’s all there is to it if you want to test a webcam in Windows 11!
Testing the webcam with the Camera app in Windows 11
That’s all there is to it if you want to test a webcam in Windows 11!
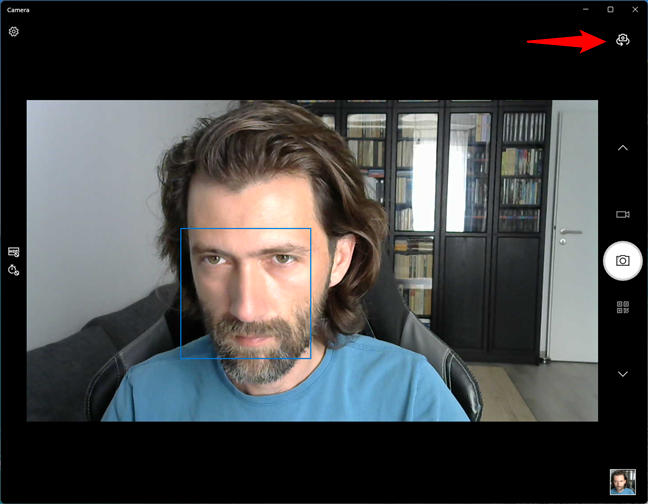 Changing the webcam used by the Camera app from Windows 11
 The photo and video modes available in the Camera app from Windows 11
Note that if the Camera app were in “Take Video” or in another mode, you would have to click twice on the “Take Photo” button: once to switch to the Photo mode and once to take the picture.
The photo and video modes available in the Camera app from Windows 11
Note that if the Camera app were in “Take Video” or in another mode, you would have to click twice on the “Take Photo” button: once to switch to the Photo mode and once to take the picture.
 The Take Video button from the Camera app
Then, click or tap the “Take Video” button once more.
The Take Video button from the Camera app
Then, click or tap the “Take Video” button once more.
 Start recording a video with the Camera app
When you start recording a video, the Camera app displays a stopwatch at the bottom, keeping track of the time that has passed since you started recording.
Start recording a video with the Camera app
When you start recording a video, the Camera app displays a stopwatch at the bottom, keeping track of the time that has passed since you started recording.
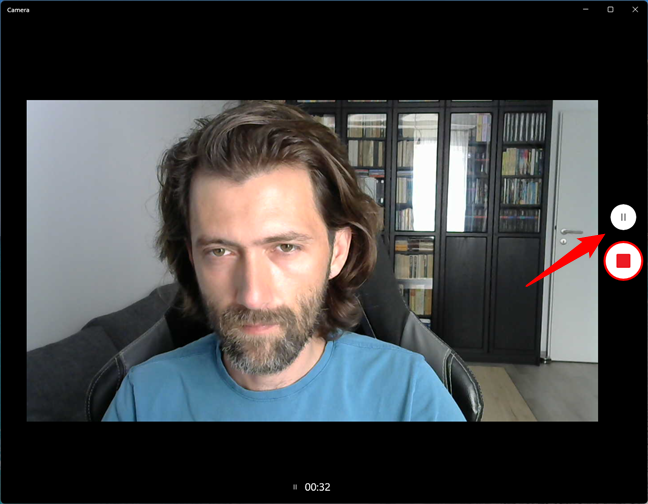
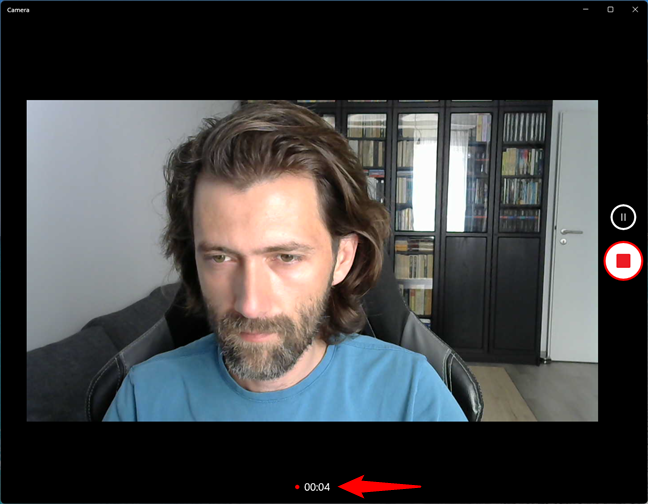 Recording video with your webcam using the Camera app
If you want to pause the video recording, click/tap on the Pause button found on the right side. When a video is paused, you see the message Paused displayed on the right side of the window, as well as the pause symbol to the left of the time elapsed from the beginning of the recording. To resume video recording, click or tap Pause again.
Recording video with your webcam using the Camera app
If you want to pause the video recording, click/tap on the Pause button found on the right side. When a video is paused, you see the message Paused displayed on the right side of the window, as well as the pause symbol to the left of the time elapsed from the beginning of the recording. To resume video recording, click or tap Pause again.
 Pausing and resuming video recording in the Camera app
Then, when you want to finalize your video, click or tap the Stop button, also found on the right side.
Pausing and resuming video recording in the Camera app
Then, when you want to finalize your video, click or tap the Stop button, also found on the right side.
 Stopping the video recording in the Camera app
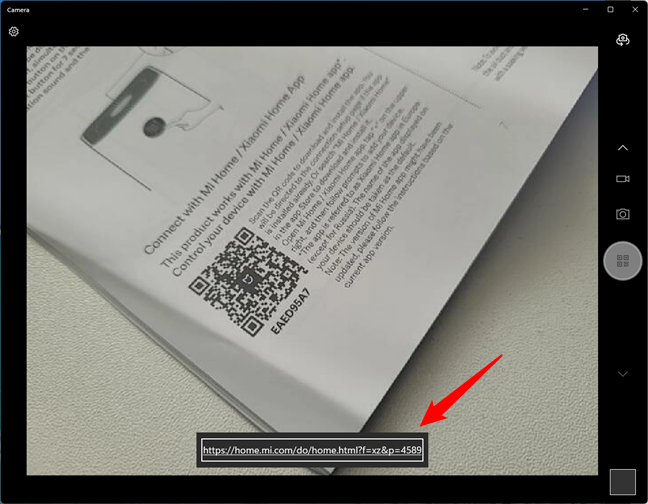
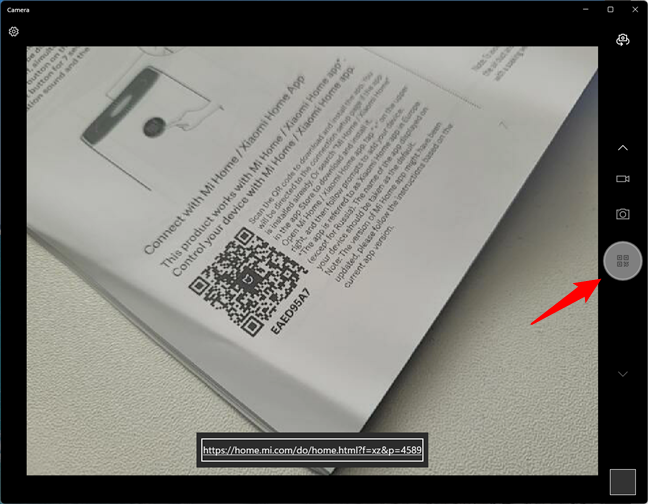 Using the Windows Camera app to scan a QR code
Just like in the screenshot above, the barcode or QR code, if recognized, is immediately translated into something that’s human-readable. That decoded content is shown at the bottom of the window.
Using the Windows Camera app to scan a QR code
Just like in the screenshot above, the barcode or QR code, if recognized, is immediately translated into something that’s human-readable. That decoded content is shown at the bottom of the window.
 Scanning a barcode with the Windows Camera app
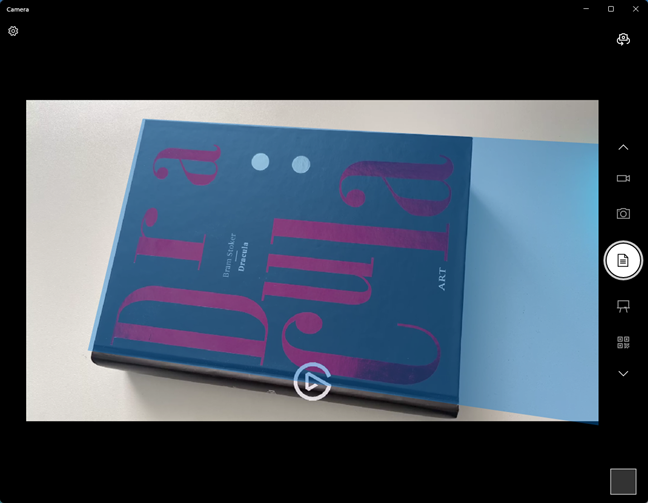
 Taking a document photo with a webcam and the Camera app
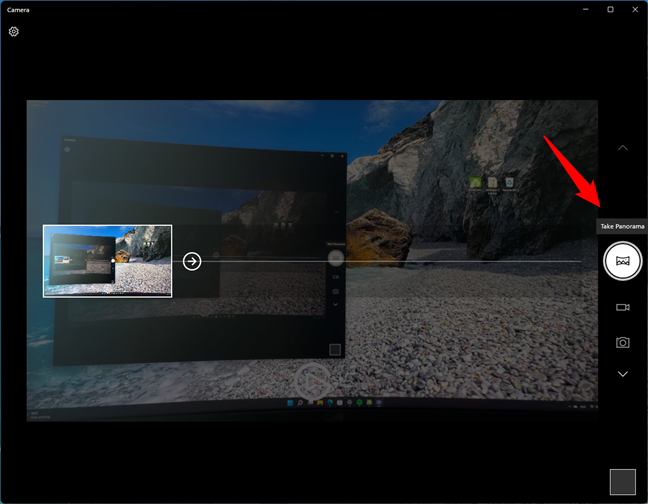
To shoot a panorama photo with the Windows Camera app, select the “Take Panorama” mode and slowly move your device from left to right.
Taking a document photo with a webcam and the Camera app
To shoot a panorama photo with the Windows Camera app, select the “Take Panorama” mode and slowly move your device from left to right.
 Shooting a panorama photo with the webcam and Windows Camera app
However, note that this photo mode only works as it should if you’re using a Windows tablet or 2-in-1 device with built-in positioning sensors, such as an accelerometer and a geomagnetic field sensor. Otherwise, the Camera doesn’t detect that you are moving your device. In other words, this photo mode doesn’t work with wireless webcams, nor with an Android smartphone or an iPhone turned into a wireless webcam.
Shooting a panorama photo with the webcam and Windows Camera app
However, note that this photo mode only works as it should if you’re using a Windows tablet or 2-in-1 device with built-in positioning sensors, such as an accelerometer and a geomagnetic field sensor. Otherwise, the Camera doesn’t detect that you are moving your device. In other words, this photo mode doesn’t work with wireless webcams, nor with an Android smartphone or an iPhone turned into a wireless webcam.
 Using the Photo timer in the Camera app
If you change your mind and no longer want to use a timer, press the same stopwatch button until the Camera app is set to “No timer.”
Using the Photo timer in the Camera app
If you change your mind and no longer want to use a timer, press the same stopwatch button until the Camera app is set to “No timer.”
 Switching between different flash modes
Similarly, when you’re in “Take video” mode, you can turn “Video light on” or “Video light off,” depending on what you prefer.
Switching between different flash modes
Similarly, when you’re in “Take video” mode, you can turn “Video light on” or “Video light off,” depending on what you prefer.
 Turning HDR on or off in the Camera app
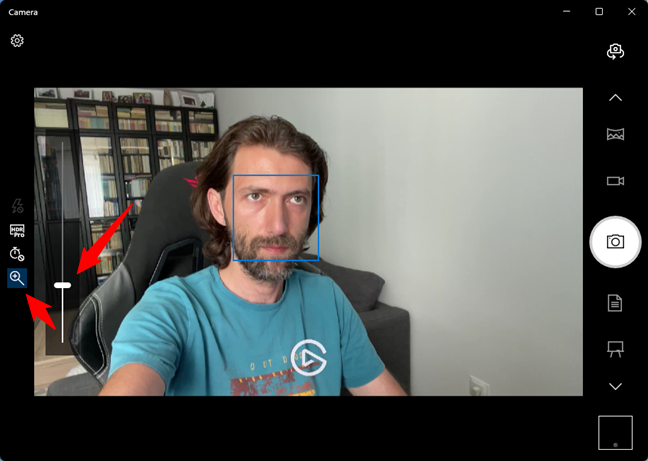 Zooming the webcam in or out with the Windows Camera app
Read the next page of this tutorial to find out how to view the photos and videos you captured with the Camera app and also how to adjust the more advanced settings it offers.
Zooming the webcam in or out with the Windows Camera app
Read the next page of this tutorial to find out how to view the photos and videos you captured with the Camera app and also how to adjust the more advanced settings it offers.
 The Settings button from the Windows Camera app
The Camera app displays a series of settings you can change as you see fit. Note that some of these settings might differ for you, depending on the make and model of your webcam and the options supported by its driver. Here’s a list of the settings that you should be able to change for most webcams:
The Settings button from the Windows Camera app
The Camera app displays a series of settings you can change as you see fit. Note that some of these settings might differ for you, depending on the make and model of your webcam and the options supported by its driver. Here’s a list of the settings that you should be able to change for most webcams:
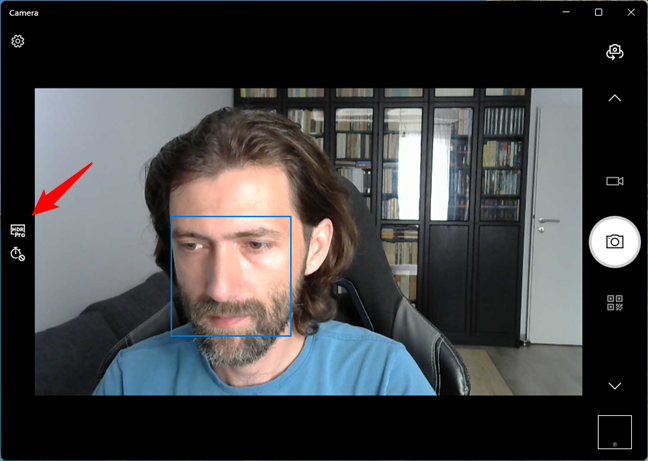
 The Pro mode switch from the Camera app
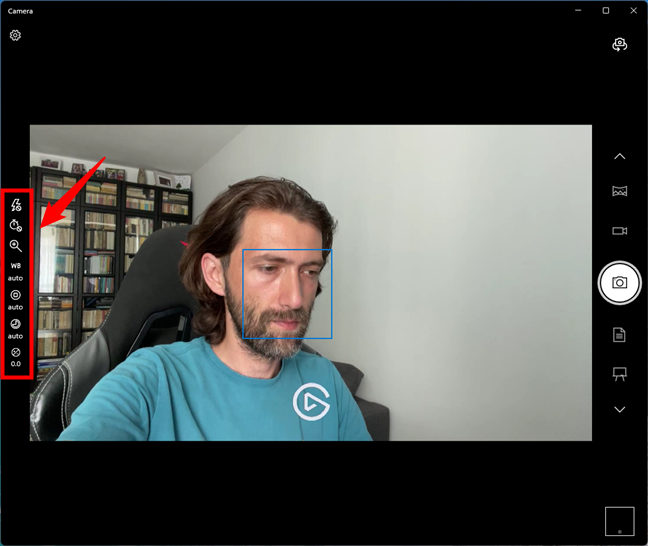
Go back to the main view of the Camera app, and, on the left side of the window, you can see new options available, both in the “Take Photo” and “Take Video” modes. To adjust the White balance, Manual focus, Shutter speed, or Brightness, first click or tap on the setting you want to change.
The Pro mode switch from the Camera app
Go back to the main view of the Camera app, and, on the left side of the window, you can see new options available, both in the “Take Photo” and “Take Video” modes. To adjust the White balance, Manual focus, Shutter speed, or Brightness, first click or tap on the setting you want to change.
 The various advanced settings available in the Pro mode
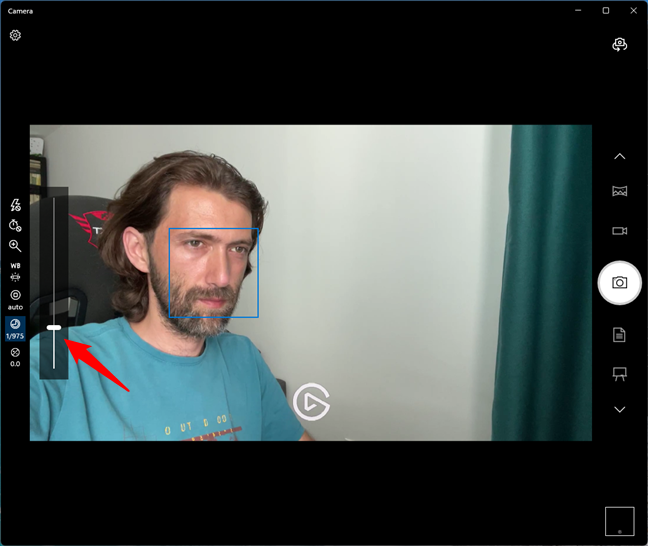
Then, the Camera app displays a manual slider which you can use to adjust the setting. For example, if you want to change the brightness, use the mouse or your finger to move the slider upwards to brighten your photos and videos or downwards to darken them.
The various advanced settings available in the Pro mode
Then, the Camera app displays a manual slider which you can use to adjust the setting. For example, if you want to change the brightness, use the mouse or your finger to move the slider upwards to brighten your photos and videos or downwards to darken them.
 Setting the shutter speed in the Camera app
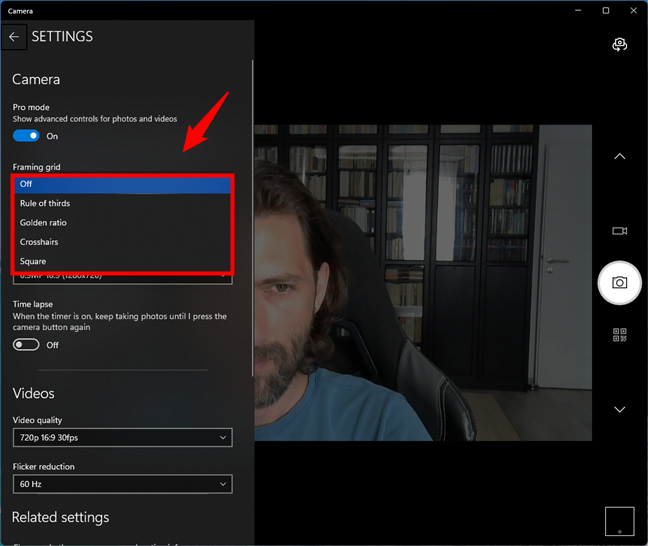 Choosing to display a framing grid in the Camera app
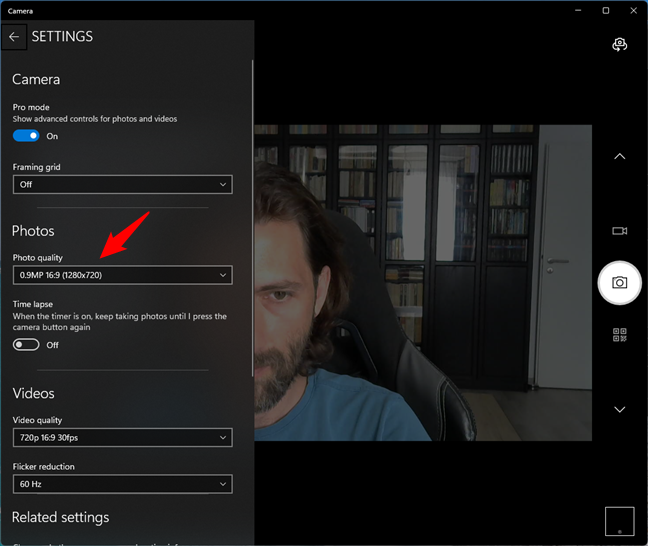 Available photo quality settings depend on the webcam you’re using
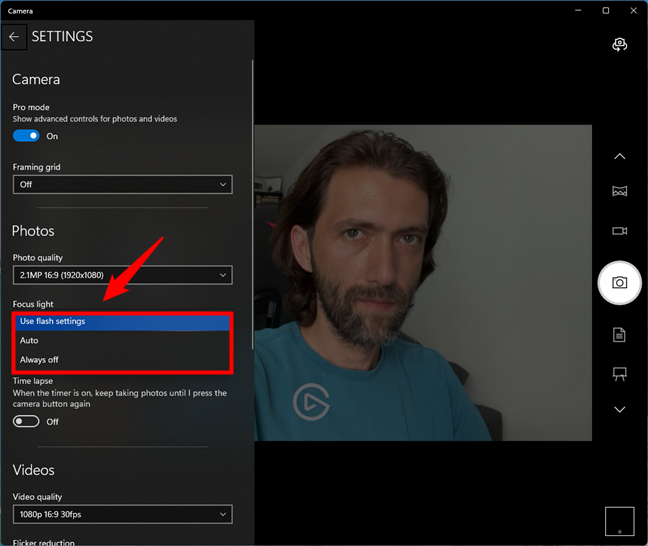 Setting the Focus light in the Camera app
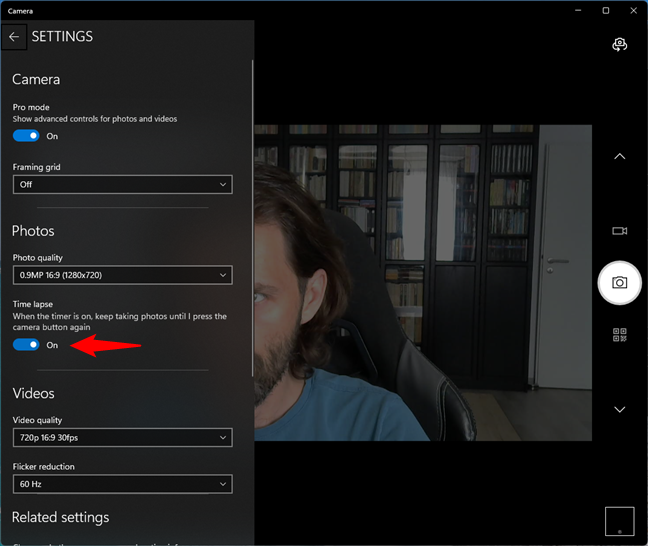 Enabling the Time lapse feature
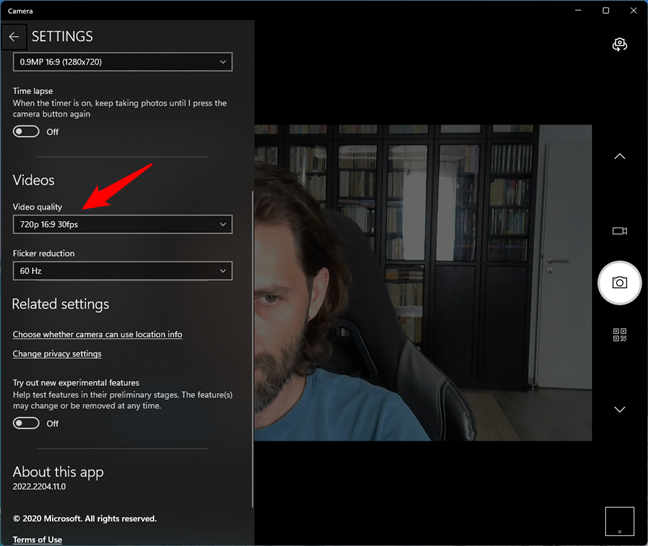 Adjusting the video quality in the Windows Camera app
You can also adjust the “Flicker reduction,” which is a setting that can reduce the video flicker by syncing the webcam and Camera app with the AC (Alternative Current) frequency of your power mains.
TIP: If you live in North America, you should set this to 60 Hz, while if you reside in the European Union, India, or other parts of the world, you should set it to 50 Hz.
Adjusting the video quality in the Windows Camera app
You can also adjust the “Flicker reduction,” which is a setting that can reduce the video flicker by syncing the webcam and Camera app with the AC (Alternative Current) frequency of your power mains.
TIP: If you live in North America, you should set this to 60 Hz, while if you reside in the European Union, India, or other parts of the world, you should set it to 50 Hz.
 Setting the flicker reduction mode in the Camera app
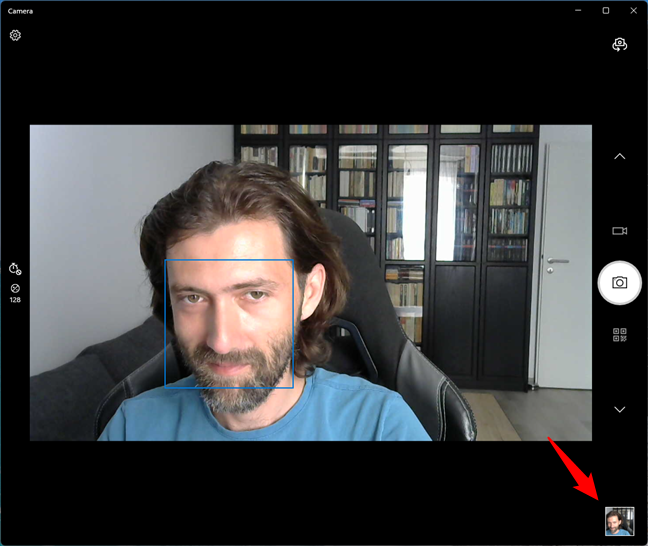 How to access your photos and videos in the Camera app
Once you click or tap this button, Windows loads the last photo you took or the last video you recorded with the Camera app. Then, you can use the controls offered by the Photos app to navigate backward and forward.
How to access your photos and videos in the Camera app
Once you click or tap this button, Windows loads the last photo you took or the last video you recorded with the Camera app. Then, you can use the controls offered by the Photos app to navigate backward and forward.
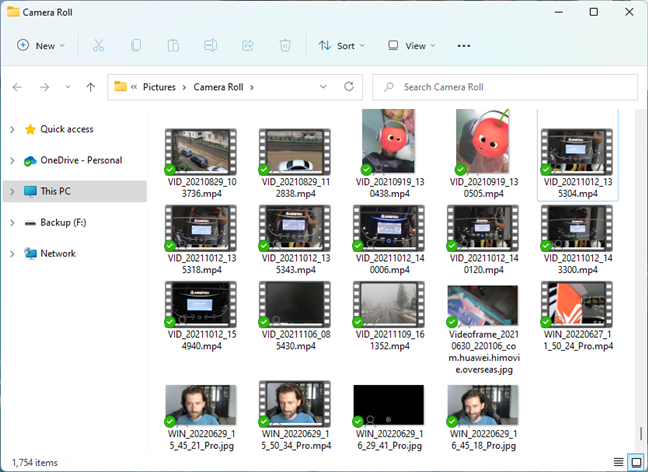
 Browsing photos and videos with the Camera app
If you prefer not to use the Photos app to view your photos, you can use any other app, including File Explorer, by navigating to the Camera roll folder from your Pictures library.
The full path is:
Browsing photos and videos with the Camera app
If you prefer not to use the Photos app to view your photos, you can use any other app, including File Explorer, by navigating to the Camera roll folder from your Pictures library.
The full path is:
 The Camera Roll folder
TIP: %userprofile% is an environment variable. To learn more about what they are, how they work, and why they’re useful, read: What are environment variables in Windows?
The Camera Roll folder
TIP: %userprofile% is an environment variable. To learn more about what they are, how they work, and why they’re useful, read: What are environment variables in Windows?
 Choose whether Camera can use location info
On the Location page, you can turn the location services on or off on your Windows device. If all you want is to turn off the location for the Camera app, locate the Camera entry and disable its switch. In Windows 11, you’ll find it in the section called “Let apps access your location,” while in Windows 10, it’s found in the “Choose which apps can access your precise location.”
Choose whether Camera can use location info
On the Location page, you can turn the location services on or off on your Windows device. If all you want is to turn off the location for the Camera app, locate the Camera entry and disable its switch. In Windows 11, you’ll find it in the section called “Let apps access your location,” while in Windows 10, it’s found in the “Choose which apps can access your precise location.”
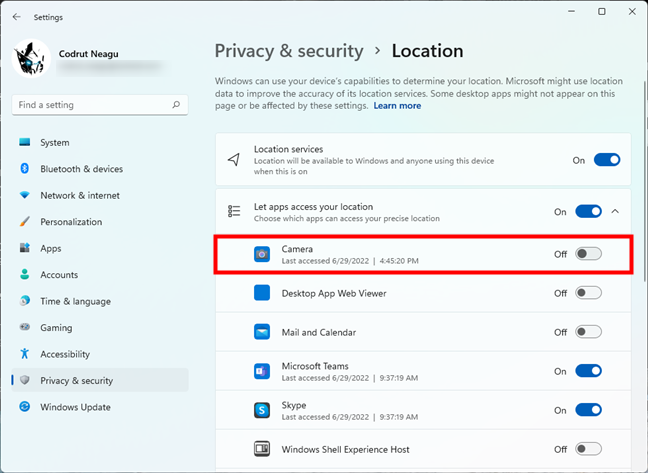
 Disable location access for the Camera app in Windows 11
TIP: For more information about working with Location services, read: How to set and configure Location Services in Windows 11.
Disable location access for the Camera app in Windows 11
TIP: For more information about working with Location services, read: How to set and configure Location Services in Windows 11.
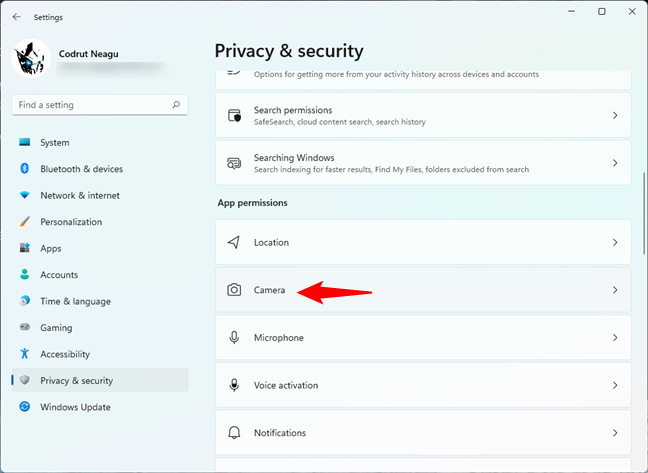 Access the Camera privacy settings
In the Camera privacy settings, you can allow anyone on your device to access the webcam and configure which apps can use it.
Access the Camera privacy settings
In the Camera privacy settings, you can allow anyone on your device to access the webcam and configure which apps can use it.
 Camera privacy settings in Windows 11
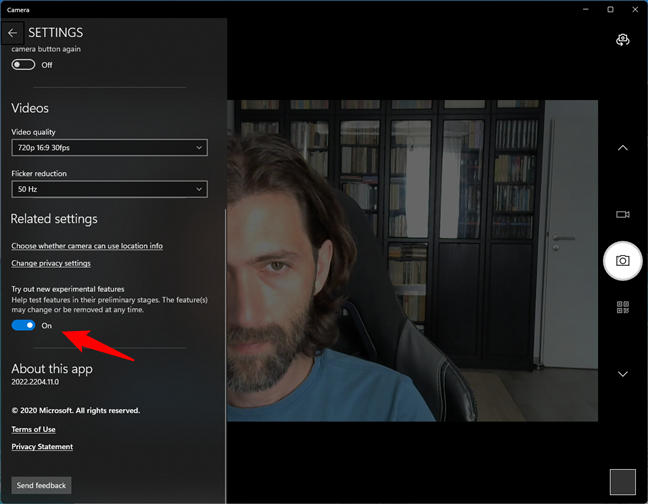 Try out new experimental features
Note that there’s no need for you to be a Windows Insider in order to try out experimental features in the Windows Camera app. So have at it if you enjoy being a pioneer when it comes to new Camera options!
Try out new experimental features
Note that there’s no need for you to be a Windows Insider in order to try out experimental features in the Windows Camera app. So have at it if you enjoy being a pioneer when it comes to new Camera options!
How to start the Camera app in Windows
You can launch the Camera app in multiple ways. One of the fastest methods to start the Camera app, regardless of whether you have Windows 11 or Windows 10, is to use search. Click or tap on the search button (or box) from the taskbar and type in the word camera. Then, click/tap on the Camera app or select it from the results and press Open on the right side of the panel.How to test your webcam in Windows using the Camera app
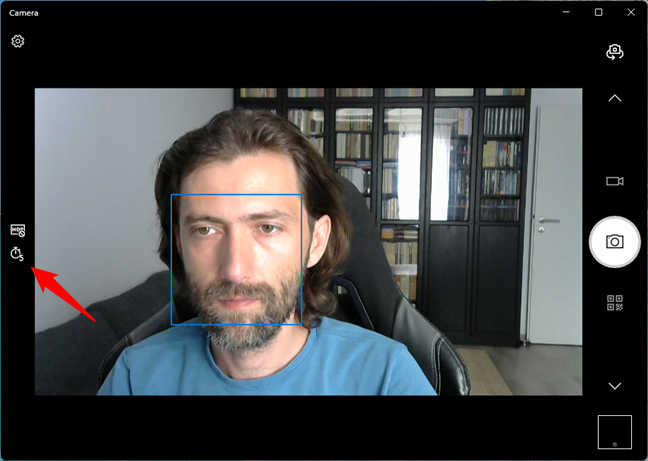
Testing whether your webcam works in Windows 11 or Windows 10 is straightforward. You launch the Camera app and check whether you see any video from the webcam. If this is your first time launching the Camera app, the application may ask you to allow it to use your webcam, microphone, and location. We recommend that you enable it to access all these devices and features. Or, at least, let it use your webcam to test it. If you can see an image of what’s in front of the webcam, which is probably you, your camera works. 🙂How to choose the webcam used by the Camera app
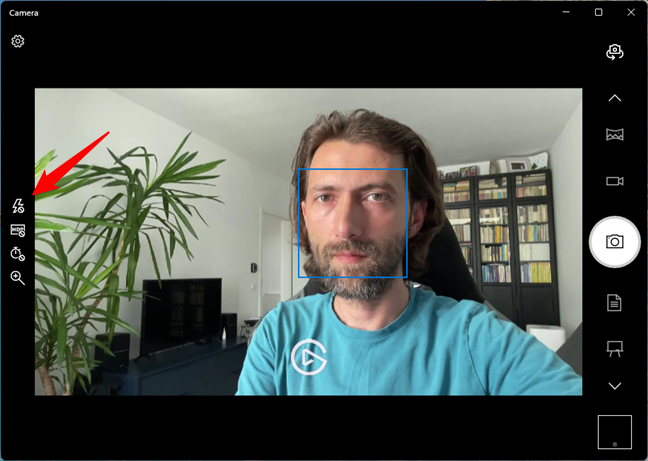
If you have more than one webcam connected to your Windows 10 or Windows 11 PC or device, you can choose the one you prefer. To switch to your device’s secondary webcam or cycle through all your connected webcams (if you have three or more cameras plugged in), open the Camera app and click or tap the “Change camera” button in the top-right corner of the window.How to use your webcam to take photos in Windows using the Camera app
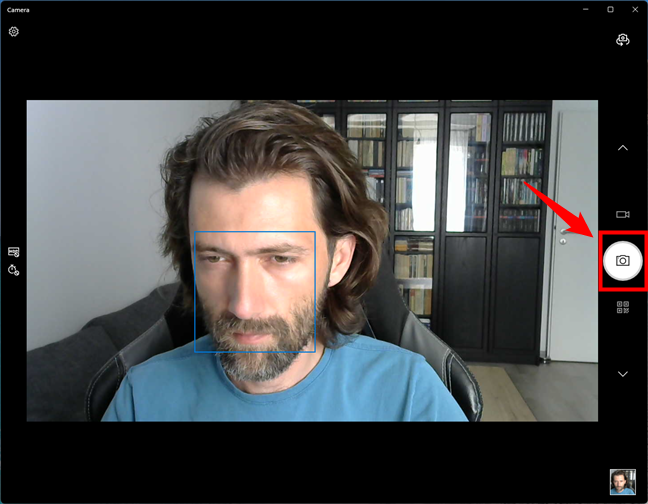
On the right side of the Camera app, there are a couple of buttons available, each of them granting you access to different camera modes that you can use. By default, the selected mode is the one called “Take Photo.” Notice that the selected mode has a larger button than the others and a white background to make it stand out. All you have to do to take a picture is to click or tap the “Take Photo” button.How to use your webcam to record videos in Windows with the Camera app
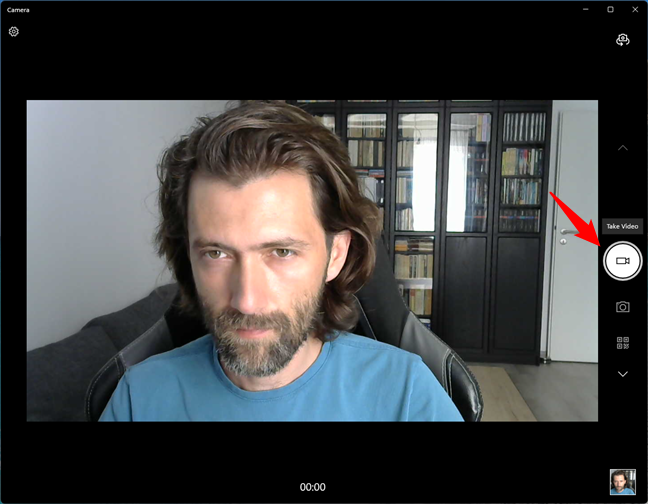
To record videos with the Camera app from Windows 11 or Windows 10, switch to the “Take Video” mode. Click or tap the “Take Video” button from the right side of the app’s window.How to use the webcam on your Windows device to scan barcodes or QR codes
On the right side of the Camera app, you can also choose to shoot a special kind of photo: Scan Barcode. And it works for QR codes too. To scan a barcode, point your webcam towards the barcode and click or tap on the Scan Barcode button from the Camera app.How to use the webcam on your Windows device to take photos of documents, whiteboards, or panoramas
Depending on your webcam or if you own a device designed for mobility, like a tablet or a 2-in-1 hybrid device, there are a couple of photo modes that you might find useful. On the right side of the Camera app, you can choose to shoot special photos: panoramas, documents, and whiteboards. These photo modes can be quite helpful at times if you can physically move your Windows 11 or Windows 10 device, if you have a wireless webcam, or if you’ve transformed your Android smartphone or iPhone into a webcam to use on your Windows PC. To scan a document with your webcam, point it towards the document and press the “Take Document” button. Similarly, to take a photo of a whiteboard, point your webcam towards it and push the “Take Whiteboard” button.How to set a timer for taking photos with the Camera app from Windows
The Camera app also allows you to set up a “Photo timer” for taking pictures automatically, a couple of seconds after you hit the “Take Photo” button. You can use this setting to take pictures with a delay of 2, 5, or 10 seconds. To select the delay, press the stopwatch icon repeatedly. The number of seconds delayed is discreetly shown next to the stopwatch icon.How to use the flash on your webcam in Windows
The Camera app also lets you change how the flash works on your webcam. When it comes to photos, you can click or tap on the Flash button from the left side of the app to cycle between “Flash on,” “Flash off,” and “Flash auto.” However, these options work only if your webcam has a flash on it. 🙂How to enable or disable HDR in the photos shot with your webcam
When in photo mode, the Camera app also lets you use HDR (High Dynamic Range). To enable it, click or tap on the HDR button from the left side of the window. Still, if your webcam doesn’t support HDR, this setting has no effect.How to zoom your webcam in the Windows Camera app
Both in photo and video mode, the Camera app lets you zoom your webcam in or out. To do that, click or tap on the Zoom button and use the slider that shows up to adjust the zoom level of the webcam.How to change the settings of the Camera app in Windows
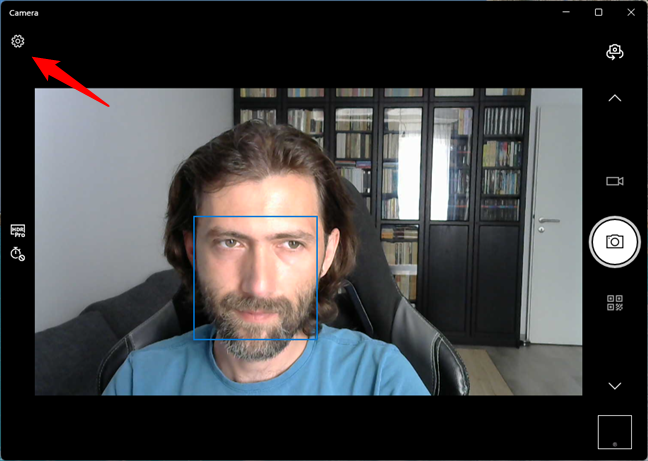
The Camera app has a few more advanced settings available for you to change. To access them, click or tap on the cogwheel button from the top left corner of the app.How to adjust the webcam’s brightness, white balance, shutter speed, and manual focus
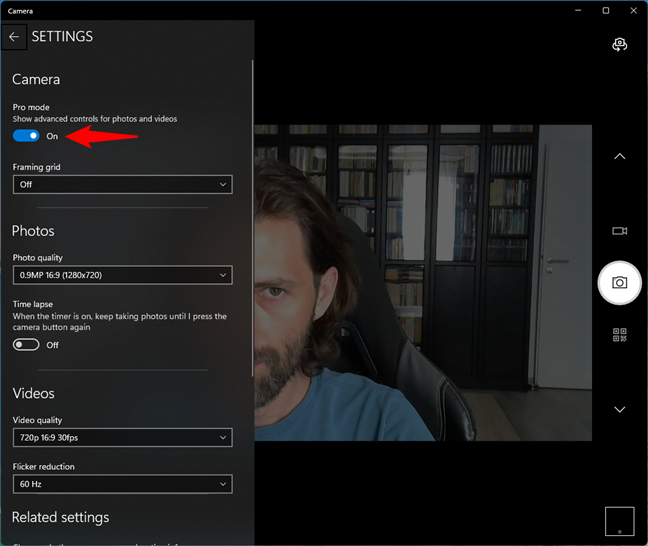
The Windows Camera app allows you to configure more advanced settings, such as the White balance, Manual focus, Shutter speed, and Brightness (or exposure) of the photos and videos you take with it. To get access to all of that, on the Settings panel, turn on the “Pro mode” switch.How to make the Windows Camera app display a framing grid
The “Framing grid” shows a series of horizontal and vertical lines that divide the image according to various photo composition guidelines. In Camera’s Settings, click or tap on “Framing grid,” which is Off by default, and choose between using the Rule of thirds, the Golden ratio, Crosshairs, or Square, depending on which you prefer.How to change the webcam photo resolution in the Windows Camera app
Depending on your webcam’s features and specs, the Camera app allows you to control the “Photo quality.” The options you get here vary depending on your webcam’s make and model and can include various sizes in megapixels, as well as different aspect ratio settings, such as 16:9 or the traditional 4:3.How to set the webcam to use focus light when shooting a photo
When you use your webcam to shoot a photo or a video, if it has a flash, the Camera app can use it to quickly spread light before taking the actual photo or video. It can then use that light to adjust the webcam’s focus better. In the Camera app, this setting is called “Focus light,” and, by default, it should match the settings of the flash. However, you can also choose to set it to Auto or “Always off.”How to configure the webcam to shoot time-lapses
Some people, us included, like time-lapse videos. The good news is that the Camera app lets you record such videos by changing only one setting. Turn the “Time lapse” switch on, and the Camera app will take photos every 2, 5, or 10 seconds after you press the “Take Photo” button. The time interval for taking photos is set by the “Photo timer” setting that we discussed earlier in this tutorial. The time-lapse ends when you press the photo button again.How to adjust the webcam video quality in the Windows Camera app
The “Video quality” setting from the Camera app allows you to set the resolution and the number of frames per second at which videos are recorded. The options available vary wildly between webcams depending on their specs, features, and drivers.How to view the photos and videos shot with your webcam and the Camera app
The fastest way to see the photos and videos you took with the Camera is to click or tap the small button in the bottom-right corner of the app. This button shows a preview of the last photo or video you took with the Camera app.C:\Users\Your user name\Pictures\Camera Roll
If you do not know your username, you can copy and paste this relative path in File Explorer’s address bar:
%userprofile%\Pictures\Camera Roll
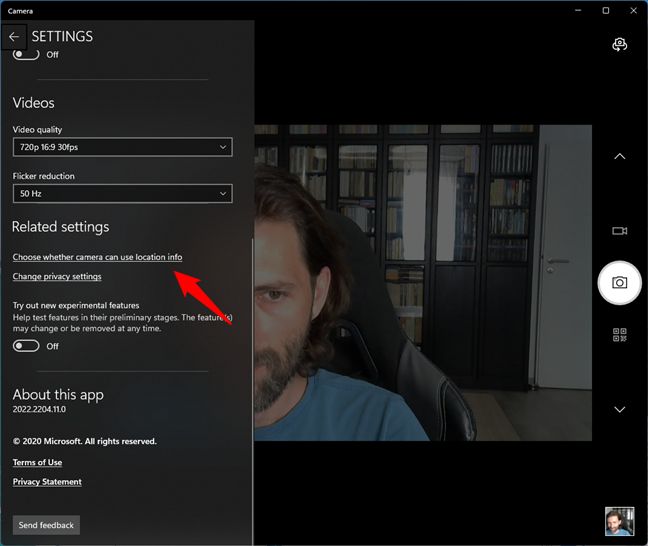
How to configure the Windows Camera Related settings
The Camera app offers a few Related settings that let you “Choose whether camera can use location info,” “Change privacy settings,” and “Try out new experimental features.” Let’s see what they do:How to enable or disable the location data stored in your photos and video
By default, Windows and the Camera app want to save your location details in the properties of the photos and videos you shoot. However, you might not want that metadata there. Here’s what to do in this situation: Click or tap on the “Choose whether camera can use location info” link. Then, Windows launches the Settings app and takes you to the Location page from the Privacy section in Windows 10 or the Privacy & security section in Windows 11.How to change the privacy settings for the Camera app
The other Related setting from the Camera app is a link called “Change privacy settings,” which takes you to the Privacy & security section of the Settings app in Windows 11 and the Privacy section of the same app in Windows 10. Scroll down to App permissions and click or tap on Camera.How to test experimental features in the Windows Camera app
The third and last “related setting” from the Windows Camera app is actually a switch called “Try out new experimental features.” By default, it’s disabled. However, if you want to be one of the first to try new features and options added by Microsoft to the Camera app, you can enable it.
Discussion (71)
I was given a new webcam for Zoom etc. meetings but then needed to make a brief video for other reasons. Didn’t know that Windows 10 had a camera app that could do this for me, until I found your tutorial. It’s exceptionally clear and easy to follow and solved what had been a problem for this 75 year old. Thank you very much.
Mike, I’m super happy that our tutorial was useful to you. Thank you for the kind message. It encourages us to keep doing what we do. All the best! Ciprian
To: Codrut Neagu
I have turned on Pro mode but none of the new controls show up. I am running Windows 10. Is there some other action I need to take to access brightness?
What webcam do you have? Its drivers may not allow you to change settings such as the brightness.
This article ‘How to test and use your webcam in Windows with the Camera app’ is really amazing.
I would like to thank you for your best article about using the Camera with WIN 10 & WIN 11
I only have question and I wish I can ask you directly to the publisher.
Is there barcode scan feature available on WIN 11 please?
I spent three days on searching how to enable scan mode on WIN 10 with no success.
Hi! Yes, the Camera app from both Windows 11 and Windows 10 has the barcode scan option. If you can’t find it, make sure you update the app. And by the way, you don’t have to enable anything – the barcode scan button shows up under the camera button on the right.
Greetings:
I have Pro Mode turned on but no additional controls showed up. The only controls are Timer and Brightness. My Win10 is fully updated. I’m using a Logitech webcam.
The controls that show up vary based on your webcam too. Maybe download and install the Logitech drivers for your specific webcam?
my app does not show anywhere that I can change the file location as shown on the article, any ideas?
In the camera roll example there is a random picture of a monkey wearing a Rasta hat. Why? Haven’t we gone past this sort of thing now? I’d like to share this article with my colleagues but there’s no way I’d be comfortable with it whilst that image remained. Is it possible to change it? Thanks.
It is a tiny joke, some people actually laughed. Can we be a bit more relaxed, please?
Picture removed.
I get no additional settings with Pro Mode turned on. Why is this? I’m on a new Acer Asipre 5 laptop.
Your specific camera on your specific laptop doesn’t offer such options in its drivers.
It all looks very clear, but on my laptop windows 10 camera I don’t get all the buttons you have. On the left, I only get brightness and a timer. No zooming in/out symbol. The laptop is an HP Envy, bought new in November 2019, and I always allow updates so I don’t know why I don’t have the buttons you have.
The settings and buttons you get depend on the webcam you have. Not all webcams have the same specs, so not all of them can do the same things.
“The settings and buttons you get depend on the webcam you have. Not all webcams have the same specs, so not all of them can do the same things.”
May I ask what webcam did you use when you did this excellent tutorial? I’m trying hard to make the ZOOM feature work in my own Camera app…
I can record a video using the camera app on windows 10 but I don’t know how to save the video. Can someone help me please.
I can’t get the option to come up for how to zoom in on windows 10
any luck on how to zoom in?
Absolutely hate this app, it’s so limited. Also hate the Photos app and am currently looking to find more robust, more professional, more sophisticated software – does Microsoft really think these are high caliber, robust programs? I sure hope not. I’m assuming they are so basic because they assume people will install their preferred quality software. This software are missed golden moments for MS in my opinion.
I have no button for zoom. How to have it?
Excellent instructions! Clear and specific–does not require the reader to ‘fill in the blanks’ between high level, ambiguous directions, as is too common on the web.
An excellent article on Windows10 Camera App. I just bought a new Dell XPS 15 laptop with Windows10 installed. I have virtually none of the options described in the article. The only choices I have are Photo, Video, Brightness and Timer. I don’t have a clue on how to add the other functions. What should I do?
You cannot add the other functions. They also depend on your webcam and its drivers.
I bought this Microsoft Software Application because it alleges to now support multiple web cams.
However, I cannot make it work as I planned.
It appears I can only record from one PC camera at a time!
I wanted to simultaneously record video and audio from two web cams and then take the two A/V files into an editor like Resolve to “produce” my final multi-angled web video.
Please help me to get unstuck!
I hope I am wrong as I was hoping this package would cheaply record as many video files simultaneously as I had web cams.
Without this functionality, I see little to no value in this Microsoft Multi-Camera app.
Windows 10 Camera App: Does not save full webcam video
Today I tried to record about 3 minutes of video using a webcam and the Windows 10 Camera app. The app appeared to work correctly, but it actually only saved the first 30 seconds of footage recorded. There was no error message, and the app didn’t crash. It just didn’t save the entire recording.
I recorded a one hour video and it looked like it was recording, but after I hit stop it had only recorded the first thirty seconds. This has not happened previously. Is there a limit of how many videos you can make? My storage seems to be adequate so I’m not sure why it didn’t record the second video.
So what do you do if you open the Webcam App and the camera activates and you get no picture? All scans and checks show everything operating correctly and set up right but no picture. Can get on group chats and team meetings and see shared screens and other participants but they can not see me.
In the conferencing apps that you use, select the correct webcam, and people should see you.
I want to record for an extended period of time – appx 3-4 hours – how is the video stored prior to saving it – is there a max amount of data/time that video can be performed? I can’t find this kind of information anywhere
Very helpful – thanks.
Very detailed tutorial. Thanks very much for putting it together. For some reason though, when I try to record a video, nothing happens. The counter stays at zero. it simply will not record. Very frustrating.
“Then, when you want to finalize your video, click or tap the Stop button, which is found on the same right side of the app.”
Now that it’s finalized, how you save it and to where is your video saved?
A lot of helpful information for the windows 10 apps camera the camera video is cheap the one on the computer i use (dell) low quality video and pic only good for home made videos . thanks , for the info . how to use the windows 10 apps for camera .
sincerely,
Jerome Moses
Does the “share” feature work in the camera app?
Thank you for camera setting advisory- Win 10 was turned off and your page enabled me to adjust settings for Skype
I want to use my camera to take pictures but can only do selfies. How do I change the camera to take pictures facing the other way?
I also have this problem, nobody seems able to tell me so far.
Do you have a laptop? If you do, then you need to move your laptop the other way. There is no camera on the back. 🙂
How do I send this large file.
Thank you for posting this! By the way, your family is beautiful! Your daughter and significant other are absolutely adorable 🙂 Your love for one another shines through the screen! <3
Thank you! 🙂
All I get when I open Camera is the message ‘We can’t find your camera’. As if it thinks I want to use it with an external camera instead of the webcam. I just wanted to do a video diary. There aren’t any buttons or anything, just a blank black screen and the message.
Why do I keep losing my voice? I record the video, I go to watch it, it freezes, I hit play again and my voice is gone. I can use Skype, and facebook chat with no problems with my audio.
Thanks for the very helpful article. Is there an article that describes how to use the video editing features in the app?
Is it possible to use the Windows camera app with my logitech HD USB webcam? I like the Windows recording pause feature, so would like to use it. Thank you.
It is possible to use the Camera app with any webcam that is connected to your PC, as long as it is installed properly and the drivers work.
Great tutorial!
I was able to shoot my first video within 5 minutes of reading your tutorial.
Many thanks ?!
What a clear and concise explanation. One of the best I have seen. Many thanks for going to all that trouble.
Thank you so much for this excellent tutorial!
Thanks so much for this little tutorial. A friend has asked me to help her make a few YouTube videos to promote her new book, but being a Linux user, I had no idea where to start with Windows 10. Cool pics, by the way =)
Is there a way to get smooth recording in video mode? All of my videos are herky-jerky and hand movements leave trails, I have tried to adjust the few available settings and nothing changes
If you ratchet down from 16:9 and also the bitrate then you should end up with something equally as good but much smaller in size.
I am using a Dell Inspiron 11series 3000 2 in1 computer with Windows 10. It would appear to me that the only pictures that’s can be taken are “selfiies”. There doesn’t seem to be any way to point the camera, see what you are focused on and shoot. It would appear that there was little thought put into the use of the camera.
Thanks a bunch for this helpful piece! Did quite a few searches and tried a number of things before finding your piece and it saved the day!
Happy we could help. Don’t hesitate to subscribe to our content and receive more tutorials and how-to content from us.
The tutorial is straight forward, well explanatory and the app is very easy to use, its highly recommended
Hi, is it possible to record my screen (i.e. presenting a PPT or similar) while recording video footage at the same time so both show in the recording footage? I used to be able to do this with Skype — record my video full-screen, and then toggle to a PPT presentation while still showing the camera video in a smaller window within the recorded screen. This no longer works with the Windows 10 update.
Basically I need my recording to show PPT slides AND my face. Any ideas or suggestions for other products (I’m currently testing Camtasia, but it’s pricey) that I could use for this?
Much appreciated. Thanks!
Kelly
This app was not made for what you need. It’s just a simple Camera app that uses your webcam to take pictures or record videos.
I recommend OBS for anyone looking for this kind of versatility and more features. It can do Picture-in-Picture and you can organize the display from multiple inputs.
This is adorable. And also exactly what I needed to read. Thank you!
Thank you too! Glad to be of service 🙂
My laptop has an inbuilt camera and it works in video chats and all but, when I tried opened it alone, I can´t locate it. It´s supposed to be in Imaging Devices in the Control Panel but it’s not. I tried on the Windows Store to download it but says it´s already install, how can that be? I can´t trace it, don´t know if I´m looking in the wrong place or something is wrong with my laptop. Help, please
This is helpful but my problem is that the audio is barely audible. How do I adjust the settings for the audio as well as the video? I cannot find anything for the microphone input volume in the app.
Thanks.
When I click on “Change where photos and videos are saved”, I am being directed to STORAGE settings for Windows 10 apps. Then “Change where new contents is saved” page, and there the preset default location is This PC (C:), which is fixed/unchangeable. How can I change the saved file location to a designated folder?
The camera app won’t switch to my usb webcam, what can I do to make it work?
I searched everywhere and realized this tutorial is one of the best I could find in the whole WWW.!
Thanks to the author
Thanks.
Totally worked.
You are welcome. Don’t hesitate to subscribe to our website.
This is a good explanation of how to use Win 10 camera ap. The program itself, like all Win 10 programs, is completely non explanatory. Screen icons are shown, but there is no explanation of what these icons do. Before Iread your article, I had no idea that I had to press the OK icon, the check mark, in order to use the timer