Are you having problems with your webcam while using Skype? You can hear the people to whom you speak, but they can't see you? Or maybe the only thing they can see are blurred lines or gray images? Whether you use an external webcam that's connected to a USB port on your computer, or you rely on the built-in webcam from your notebook, there are more than a few things you can do so that Skype correctly uses correctly the webcam you want for video chat. Here is what you can do to troubleshoot issues with your webcam on Skype:
1. Check that everything is configured correctly in Skype's video settings
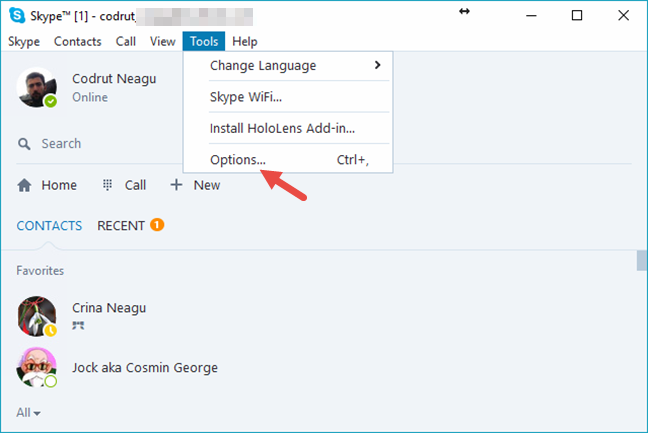
Most issues related to webcams in Skype can be resolved from the Video settings. In Skype, open the Tools menu and then click or tap Options… A faster way to open Skype's settings is to press the "Windows + ," keys simultaneously.
Skype, video, settings, webcam
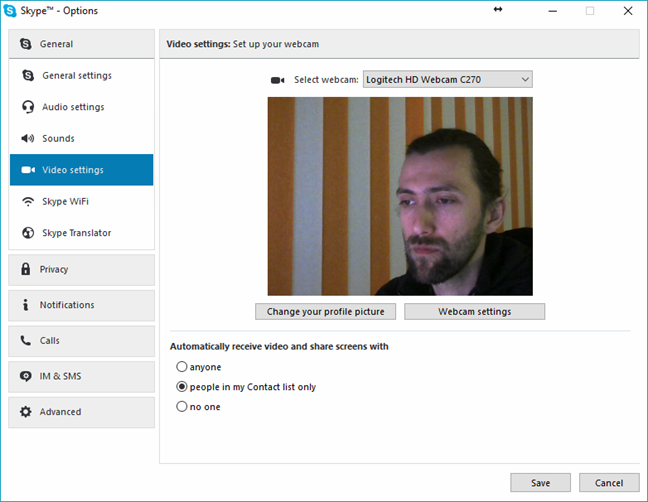
Once Skype's Options open, click or tap Video settings in the General tab from the left side of the window. On the right side of the window, you should see a video feed from your webcam, like in the screenshot below.
Skype, video, settings, webcam
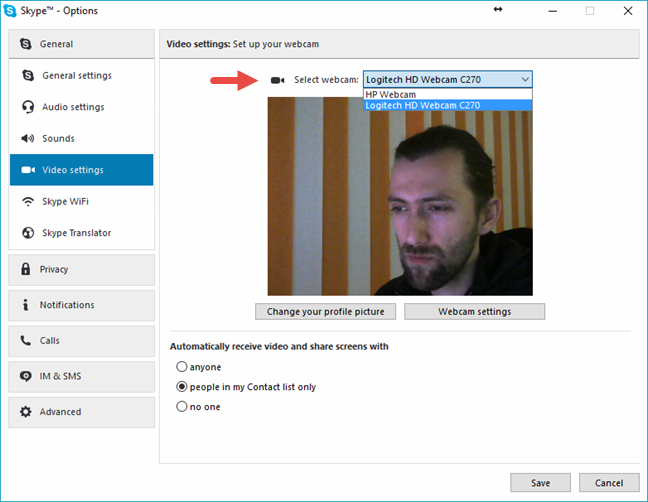
If you don't see any image and your computer has a video capture device, or if there are any other other video devices connected to your PC, it may happen that Skype thinks that they are also webcams. In some cases, Skype can set a wrong device as a default webcam. To make sure that it's using your webcam, check if you have a drop-down list called Select webcam at the top of the Video settings window. If you do, open the list and select the correct webcam. After a few seconds, you should see a video feed from your webcam being displayed.
Skype, video, settings, webcam
Also, if your webcam has a driver that allows more detailed configuration, Skype should display a button called Webcam settings. Clicking/tapping on it will open your webcam's driver settings and allow you to change things like the brightness, contrast, hue, saturation and other similar settings. Make sure that all these settings are set correctly.
Then, follow the instructions from the next section of this article.
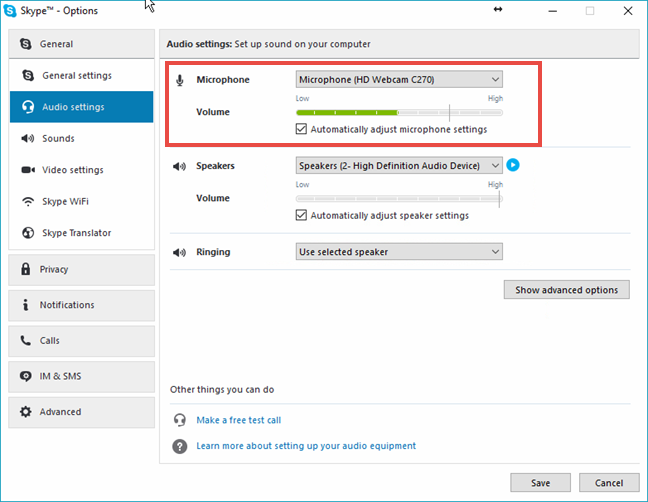
2. Check that the audio settings are set correctly
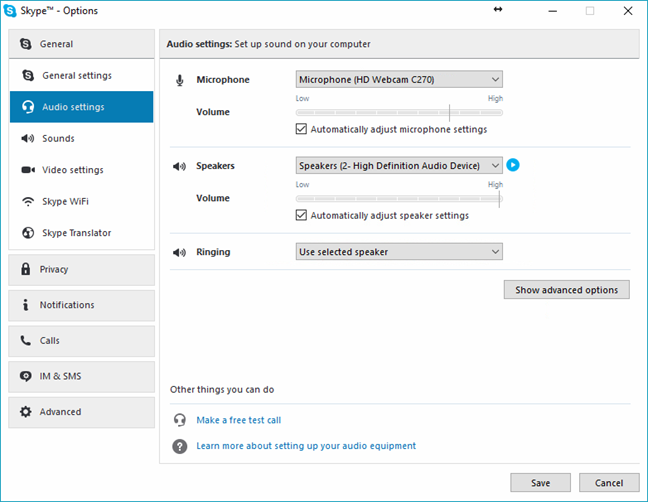
Most webcams also have built-in microphones and although you might have video in Skype, there are times you have sound issues. To check that everything's alright in this area too, in Skype's Options window, head to the General tab and open the Audio settings. On the right side of the window, you should see what microphone and what speakers Skype is configured to use.
Skype, video, settings, webcam
Make sure that the correct microphone is selected. For instance, if you want to use the microphone that's built into your webcam, it should bear the same name as the webcam. If you want to use the microphone on your headphones, or if you want to use an external microphone, it should bear a name like Microphone (Your sound card's model name). Select the right one and say something aloud - when you do that, the microphone's volume slider should turn partially green to let you know that sound has been detected. If it doesn't turn green at all, the microphone you've selected most probably doesn't work.
Skype, video, settings, webcam
Although it's not related to the webcam, it doesn't hurt to also check that the right speakers or headphones are also set. Right beneath the Microphone section, you should be able to select the ones you want to use.
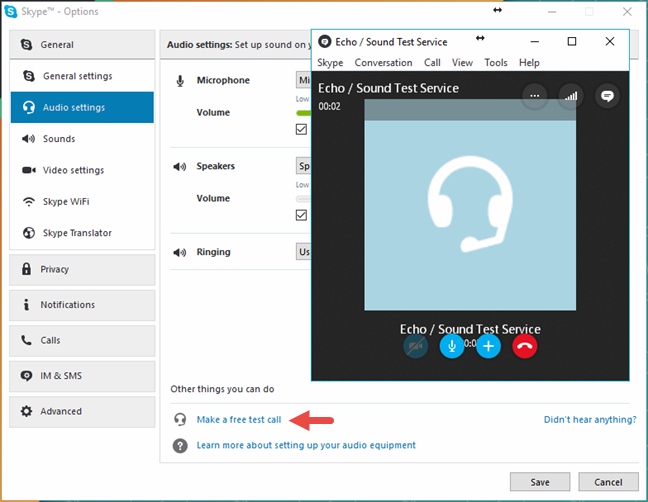
3. Make a free test call to make sure that your webcam's microphone works correctly
Once you've made the configurations you want, at the bottom part of the Audio settings panel, you will see a link that says "Make a free test call". Although it's not mandatory, if you click/tap on it, Skype will initiate a call that will let you say something, record what you say using your microphone, and then play it back to you. If you can hear yourself, then it means that the webcam's microphone is set correctly.
Skype, video, settings, webcam
Once everything's set as you want, press Save to apply your changes.
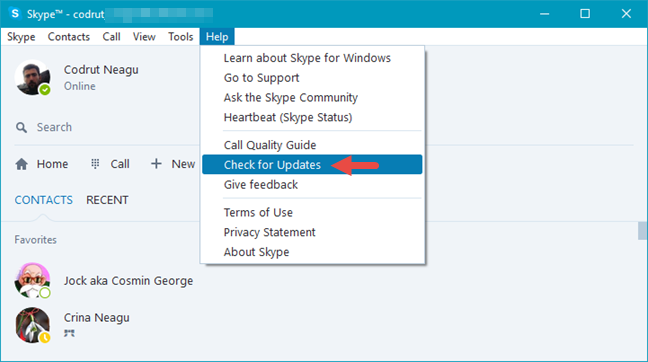
4. Make sure that you use the latest version of Skype
It may seem pretty obvious, but making sure that you use the most recent version available of Skype is crucial. This platform is evolving rapidly and, if you use a very old version of Skype, things won't work smoothly anymore. Microsoft delivers new updates for Skype on a regular and rather fast pace. Outdated versions of Skype may have annoying bugs, certain features become deprecated and the Skype infrastructure changes rapidly, requiring users to stay up-to-date with their apps. On the desktop version of Skype, go to "Help -> Check for Updates" and Skype will tell you whether you have the latest version or not.
Skype, video, settings, webcam
You can always download the latest version of Skype from its official website: Download Skype.
Skype, video, settings, webcam
As you will see, Skype is available for all kinds of devices, starting with computers with Windows or Linux, to smartphones of all kinds, tablets, Xbox consoles, wearables and ending with smart TV's.
5. Close other apps that could interfere with the webcam
Webcams are not usually able to provide video feeds to more than one app requesting video. This means that, if you use Skype for a video call, it should be able to use your webcam exclusively. Sometimes, Skype can stumble upon barriers: if your webcam is already being used by another app that doesn't grant the control over to Skype, then Skype can't use the webcam. To avoid this situation, make sure that there are no other apps open on your Windows computer that use your webcam. For example, you should avoid using other chat apps that are capable of performing video calls.
6. Make sure that the webcam is on and that it's facing you
Don't laugh, as there are times when this can happen, like after a very long night with your buddies at the local pub. 🙂 You should check that the webcam is facing you and also make sure that it's on. When you're in a Skype call, check that its video button is enabled.
Skype, video, settings, webcam
Read the next page of this article, to see more things which you can do to troubleshoot the issues you have with your webcam in Skype. Some of the other possible causes are poor USB connections, poor internet connections, or bad drivers.
7. Try to connect the webcam to another USB port
If you're using an external webcam that's connected to a USB port on your Windows computer or device, try to connect it to another port. Sometimes, disconnecting and reconnecting USB devices restarts them and so the issues you encounter can disappear, at least for a while. This is also true for USB webcams.
8. Check your internet connection
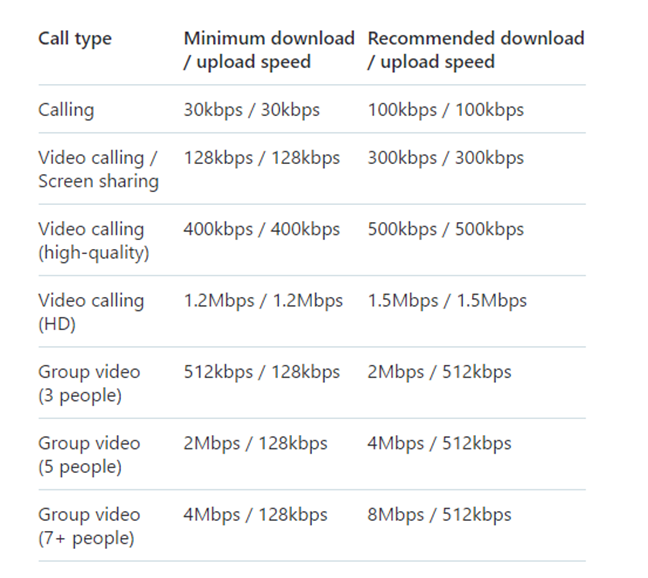
If your webcam seems to work but not as it should, like when the video is blurry, fuzzy, pixelated, or when it freezes, the problem might not be the webcam or the Skype app that you're using. First, you should check whether your internet connection is working well. When your internet connection's speed is low, Skype tries to reduce the video quality, which includes both the video feed from the people you are calling and that from your webcam. This way, it transfers less data, putting less strain on your internet connection.
When you encounter such issues, check your internet speed with a service like speedtest.net. Run a few speed tests and see if the results you get are stable. In addition to the reliability of the internet connection you have, also check that it's fast enough for the type of Skype call you're making. Here's the official recommendation for download and upload speeds and all the types of Skype calls:
Skype, video, settings, webcam
9. Make sure that your webcam has the right drivers installed
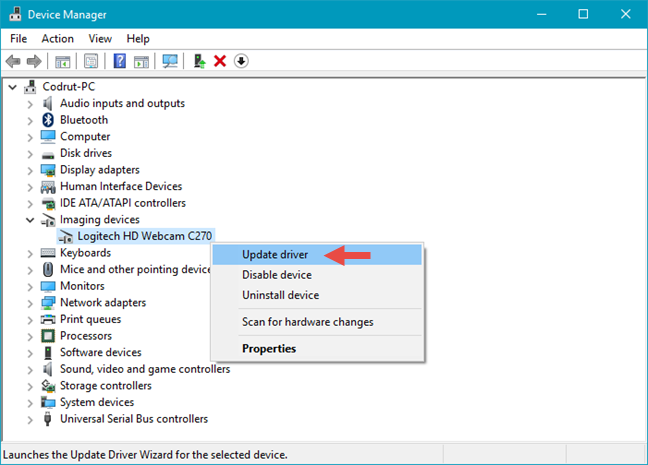
If nothing else seems to work, you might have to dig deeper and see if the webcam's drivers are the ones that have issues. On your Windows computer or device, open the Device Manager and try to update your webcam's drivers.
In Device Manager, you'll find your webcam listed in the Imaging devices section. There, right-click (or tap and hold if you have a touchscreen) and then click on the Update drivers option.
Skype, video, settings, webcam
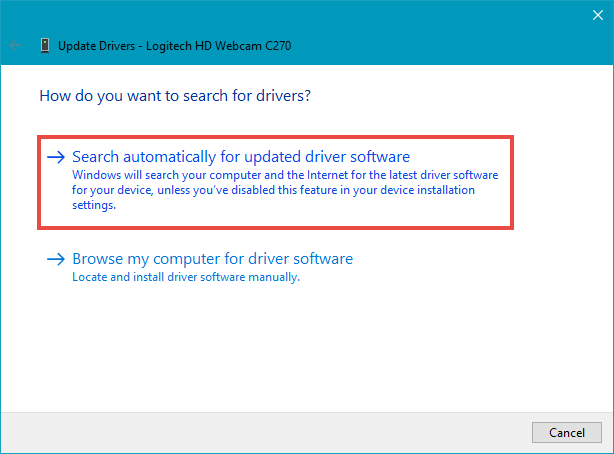
In the drivers update wizard that launches, choose to "Search automatically for updated driver software."
Skype, video, settings, webcam
If newer drivers are found for your webcam, go ahead and install them. If not, also try looking for newer drivers on the manufacturer's website. Then, try making a video call on Skype again. It might just work now! 🙂
10. Try to use the generic "USB Video Device" drivers for your webcam
If updating the webcam drivers to newer ones didn't work, here's another option: use generic drivers for it. This method might seem a bit unorthodox, but there are many kinds of webcams on the market and some of them don't have good drivers. If you have an older webcam, its drivers might be so outdated that neither Windows or Skype know how to use them properly. In short, this is a good thing to do especially if your webcam is old or if it's produced by a less reputable manufacturer.
Open Device Manager, expand the Imaging devices section, right-click (or tap and hold) on your webcam, and then click or tap on Update driver.
Skype, video, settings, webcam
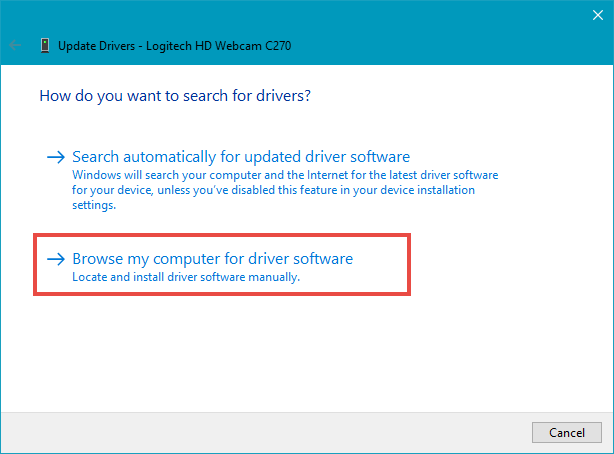
In the installation wizard that opens up, click/tap on "Browse my computer for driver software."
Skype, video, settings, webcam
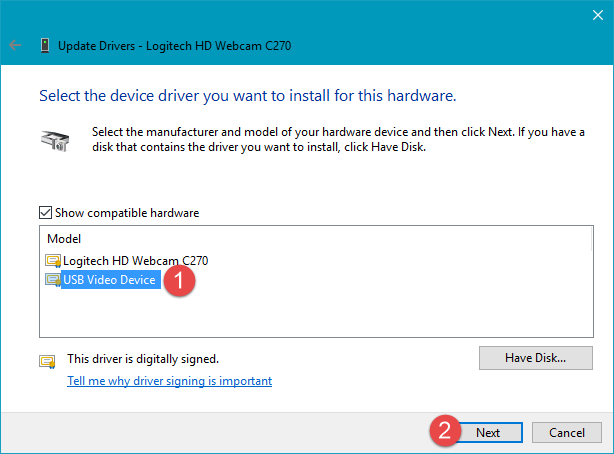
Next, click or tap on "Let me pick from a list of available drivers on my computer".
Skype, video, settings, webcam
Finally, select the option "USB Video Device" from the list of compatible hardware, and then click or tap on Next.
Skype, video, settings, webcam
Wait for the drivers to be installed, click/tap Close and then restart your PC.
Skype, video, settings, webcam
After your Windows PC reboots, try making a new video call in Skype. You could be in a surprise right now: it might work this time! 🙂
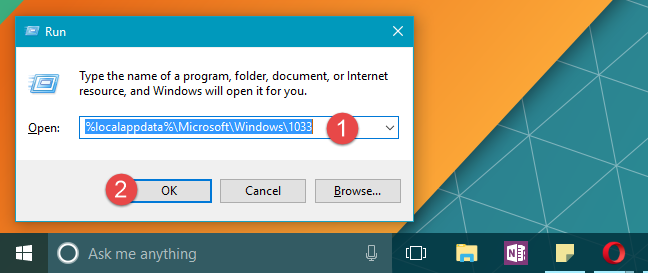
11. If you've upgraded from Windows 8 to Windows 10, try this hack
If you've just upgraded from Windows 8 to Windows 10, and you're using the Skype Preview app, apparently there's a bug that can stop your webcam from working correctly. Fortunately, if you can say that, Microsoft has a "hack" that can help in this situation. Open the Run window - a quick way to do it is to press Windows + R on your keyboard. Then type "%localappdata%MicrosoftWindows1033" without the quotes, and click or tap on OK.
Skype, video, settings, webcam
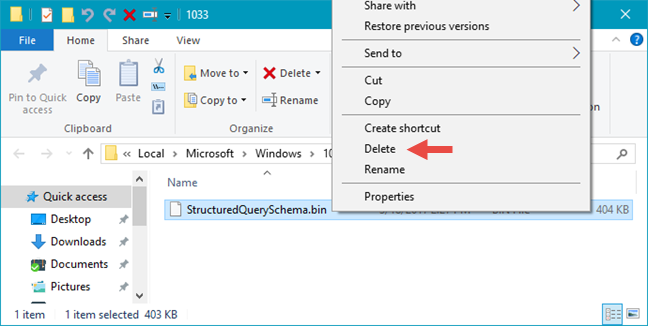
Windows 10 will open File Explorer and take you to a folder called 1033. Inside, you will see a file called StructuredQuerySchema.bin. Delete it and then restart your computer.
Skype, video, settings, webcam
After you reboot, the webcam should work in the Skype Preview app from Windows 10.
Conclusion
These are the main steps you can take to troubleshoot issues with your webcam on Skype. We hope that they will prove helpful to you. However, if you go through all of them but you still have issues with the camera on Skype, it's entirely possible that you will have to replace your webcam with a new one. Before you do that though, try using the old webcam on another Windows computer and see if it works.
The new version of Skype for Windows desktop has caused a slew of webcam problems. The new settings for webcam, well, there no longer are settings for webcam! I have two webcam drivers, but no longer can choose between the two. Now Skype opens the driver software AND causes the image to reverse. And after a week with the new Skype version, suddenly the webcam stays on after quitting Skype! No problem just as I closed the webcam ap duirng Skype (to fix the image reversal) after closing Skype I can end the webcam’s process. But I shouldn’t have to do this…
Zeel ·
Useful post, not only webcam but skype has many issues.
Try ZORO.IM, it has good video quality and also works in low bandwidth.


Discussion (2)
The new version of Skype for Windows desktop has caused a slew of webcam problems. The new settings for webcam, well, there no longer are settings for webcam! I have two webcam drivers, but no longer can choose between the two. Now Skype opens the driver software AND causes the image to reverse. And after a week with the new Skype version, suddenly the webcam stays on after quitting Skype! No problem just as I closed the webcam ap duirng Skype (to fix the image reversal) after closing Skype I can end the webcam’s process. But I shouldn’t have to do this…
Useful post, not only webcam but skype has many issues.
Try ZORO.IM, it has good video quality and also works in low bandwidth.