Do you need to know the exact version of the firmware (BIOS or UEFI) installed on your computer's motherboard? Traditionally, this means that you have to restart your computer, manually enter the BIOS and check the version information displayed there. It is one way of doing it, but it's not the fastest, nor the easiest. Without further ado, here's how to find your BIOS version in eight different ways:
NOTE: If you use a computer regularly, you probably heard about the term BIOS or UEFI BIOS. If you want to know more about them, read this article: What is BIOS? What does BIOS mean?. Also, if what you intend to do is update your BIOS, this tutorial can help you do it safely: How to update the BIOS of your motherboard.
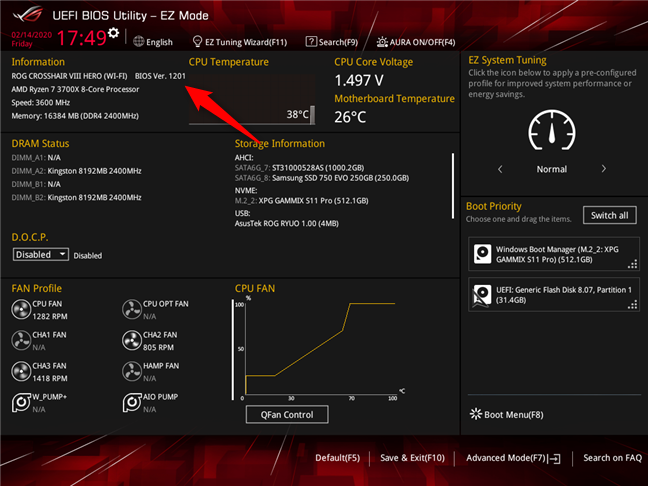
1. How to check the BIOS version by restarting your computer and accessing the BIOS
Some devices show the version of the BIOS during the POST process that takes place as soon as you start your computer or device, while for others, you need to enter the BIOS to see it. Unfortunately, the POST process is fast, and you might not have the time to see anything, so you still need to enter the BIOS.
To access it, you have to press a key (or a combination of keys) on your keyboard while starting the computer. The manufacturer of your motherboard can choose whatever key it wants you to press, but commonly used keys include Delete, F1, F2, F10, and F12. You can find the right key to push in the manual of your motherboard, computer, or notebook.
Once inside the BIOS or UEFI BIOS, look for an information page. There, you find the version of the BIOS used by your computer's motherboard.
Checking the BIOS version on an ASUS ROG motherboard
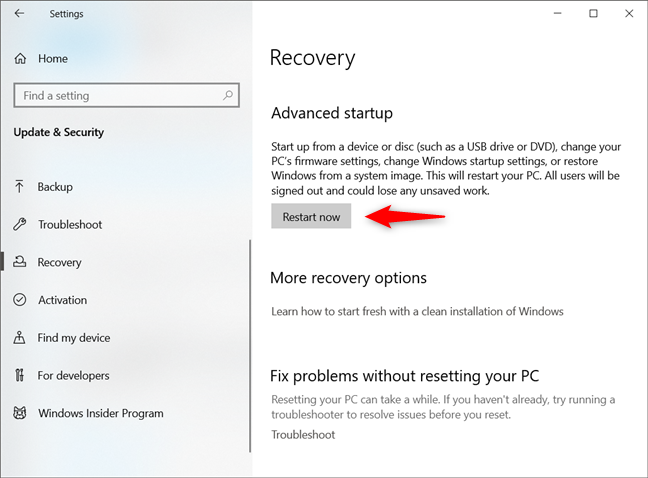
2. How to check the BIOS version using Windows 10's Advanced startup options
The firmware on motherboards has evolved from the early days of BIOS to a new version called UEFI. UEFI BIOS is faster, it allows more security, it offers better visual user interfaces and handles a mouse. It can also load operating systems from large drives (3 terabytes or more). One effect of making it faster is that it might not wait for any keyboard input, so it can be nearly impossible to catch a UEFI setup screen during boot by pressing a key on the keyboard.
Advanced startup settings in Windows 10
If you need additional help to learn how to boot into UEFI BIOS, check this guide: How to enter BIOS in Windows 10. Once inside the UEFI BIOS, look for the information page. There, you should find the BIOS version your computer or device is using.
3. How to find the BIOS version from Windows' System Information app
You can also easily find what BIOS version is used by your computer or device from Windows' System Information tool. In the System Information app, select System Summary on the left panel. Then, on the right side of the window, look for an item called BIOS Version/Date. Its value shows the BIOS version and its release date.
Check BIOS version and date in System Information
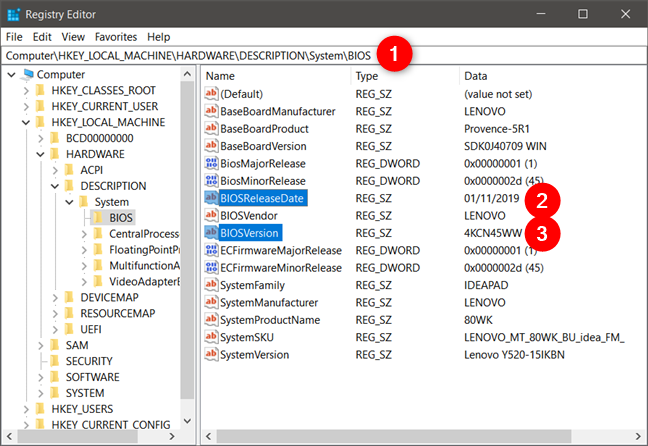
4. How to check the BIOS version from Windows' Registry Editor
Windows's Registry Editor offers another way of finding information about your BIOS. Open the Registry Editor and use it to navigate to this location:
Computer\HKEY_LOCAL_MACHINE\HARDWARE\DESCRIPTION\SystemBIOS. On the right panel, there are two registry keys called BIOSVersion and BIOSReleaseDate. The values assigned to these entries tell you what BIOS version you have and when it was launched.
Check BIOS version and date in Registry Editor
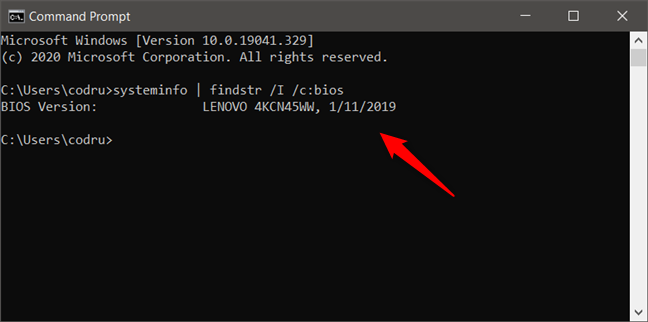
5. How to find the BIOS version using Command Prompt
You can also use the Command Prompt to check your BIOS version. To see the BIOS version and release date, run this command: systeminfo | findstr /I /c:bios. Note that we are using the capital letter I and not the lowercase letter L. Press Enter and the BIOS information is displayed.
Find BIOS version and date using systeminfo
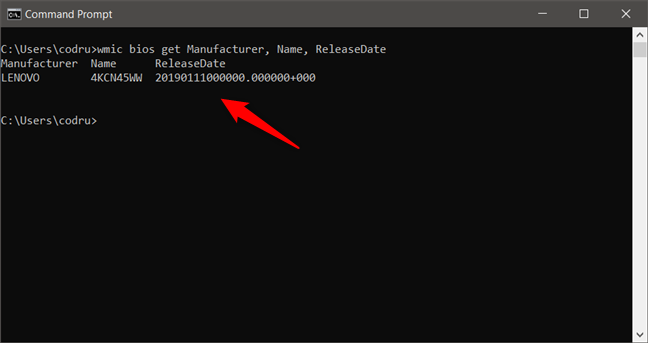
You can also run the following command: wmic bios get Manufacturer, Name, ReleaseDate. The data displayed should look similar to the screenshot below.
Check BIOS version and date from Command Prompt using wmic
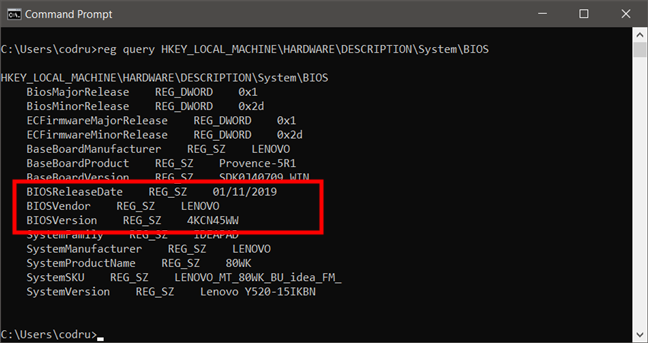
If you prefer, you can also read the Windows Registry from the Command Prompt, using the following command: reg query HKEY_LOCAL_MACHINE\HARDWARE\DESCRIPTION\SystemBIOS.
Running this command extracts all the BIOS information stored inside the Windows Registry and displays it in the Command Prompt window. Then, all you have to do is locate the BIOSVersion and BIOSReleaseDate entries.
Find BIOS version and date using reg query
6. How to check the BIOS version using PowerShell
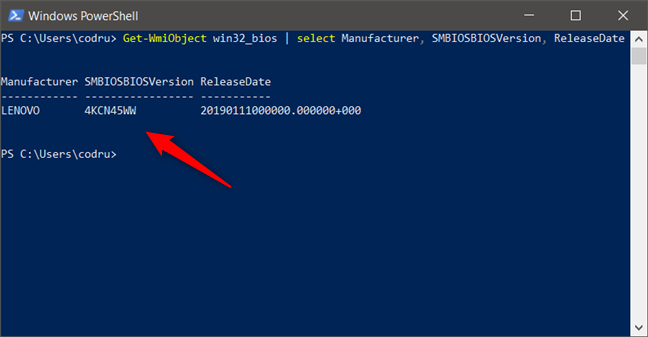
If you prefer to use Powershell to find your BIOS version, open it and run the following command: Get-WmiObject win32_bios | select Manufacturer, SMBIOSBIOSVersion, ReleaseDate.
How to check BIOS version and date from PowerShell
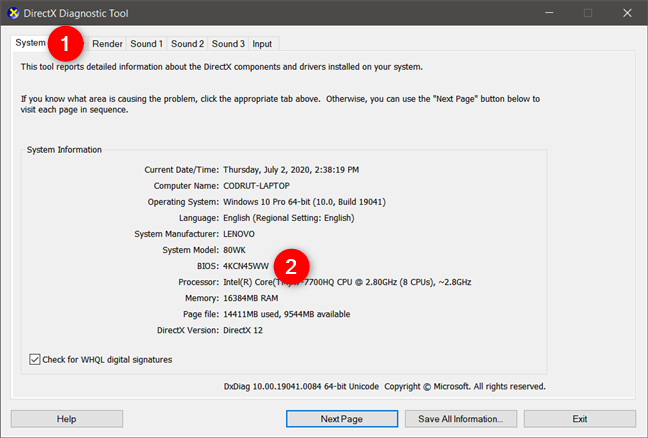
7. How to find the BIOS version using the DirectX Diagnostic Tool
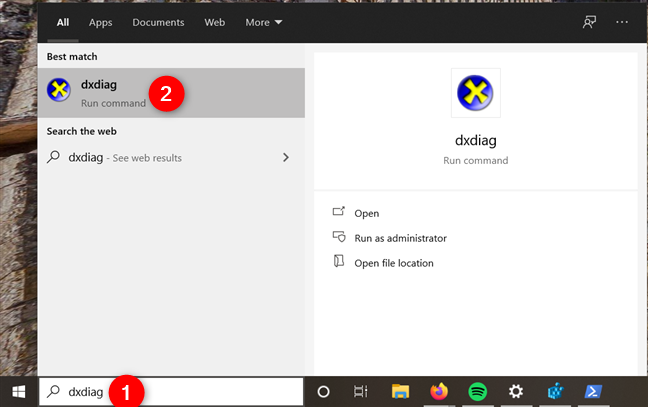
DirectX Diagnostic Tool or DXDiag.exe is a tool used to collect info about devices to help troubleshoot problems with DirectX sound, video, and input devices. Use the search term "dxdiag" in Windows and click or tap the dxdiag search result.
Search dxdiag and open DirectX Diagnostic Tool in Windows 10
You can find the BIOS version of your computer or device on the System tab.
Check BIOS version in Windows 10 using DirectX Diagnostic Tool
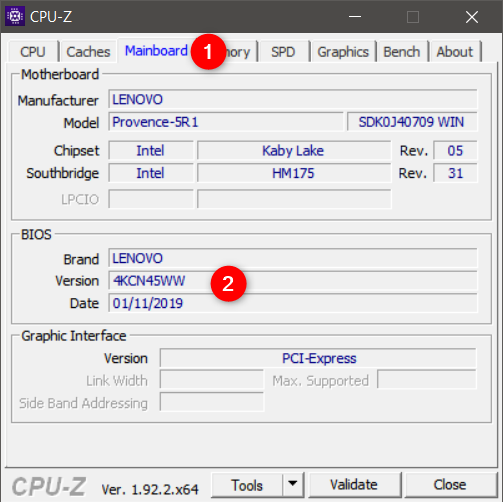
8. How to check your BIOS version using third-party apps
If none of the above methods suit you, you might prefer to use third-party applications that display this information. A good example is CPU-Z, a freeware app that gathers information about the main components of your system. In the Mainboard tab of this application, you can see the BIOS version of your computer's motherboard.
Check BIOS version with CPU-Z
Many similar applications can share this information. Other apps that we like are Speccy and Belarc Advisor.
Do you know other methods to check the BIOS version?
As you can see from this guide, there are many ways in which you can see the BIOS version of your computer or device. We generally prefer tools that easily share this information, like System Information, but we do not hesitate to use the Command Prompt or PowerShell when needed. Give our methods a try and, before closing this article, do share which way you like the most.


Discussion (2)
thank you very for these great knowledge .
I wish you all the progress and prosperity.
u can also type “dxdiag” and check in the directx tool. am i right? 🙂