


The clipboard on your Windows 10 computer can not only store copied items but also sync them across all your devices. This means that you can easily copy text, images, and other content on one computer and access it on another, thus significantly boosting your productivity when working on multiple computers. However, you might prefer the simplicity of the traditional clipboard that only stores the most recent item you copied and has nothing to do with cloud storage. In this tutorial, I’ll show you how to enable clipboard history as well as how to disable it and how to stop your Windows 10 clipboard from syncing with other computers and devices. If these are things you’d like to know, read on:
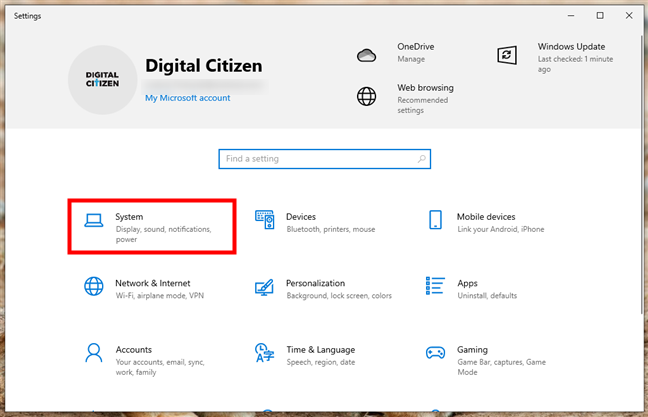
 Access the System settings
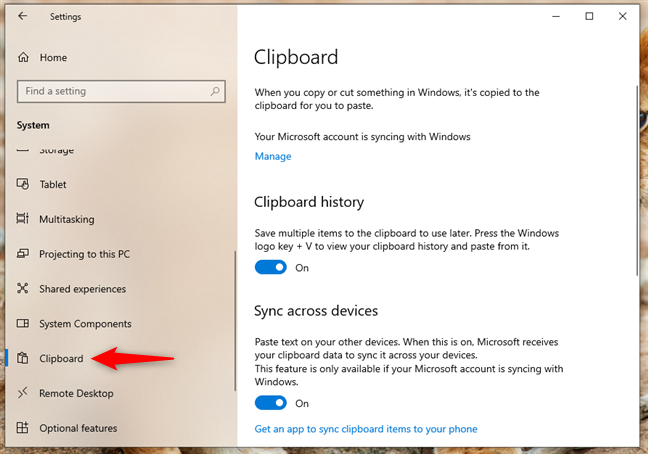
On the left side of the Settings window, select Clipboard.
Access the System settings
On the left side of the Settings window, select Clipboard.
 Select Clipboard in the left sidebar
Then, to enable clipboard history on your Windows 10 computer, make sure the Clipboard history switch on the right side of the app is turned On.
Select Clipboard in the left sidebar
Then, to enable clipboard history on your Windows 10 computer, make sure the Clipboard history switch on the right side of the app is turned On.
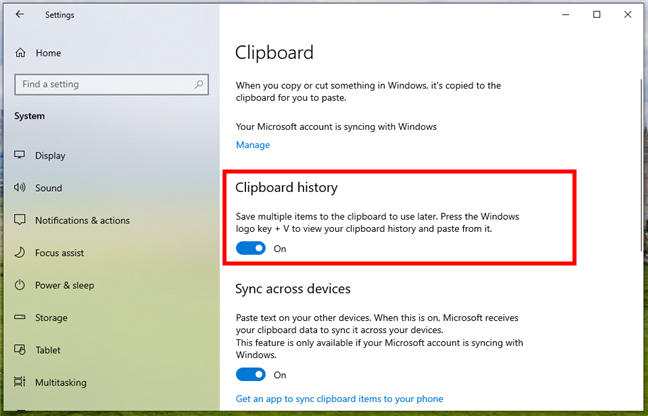
 How to turn on clipboard history in Windows 10
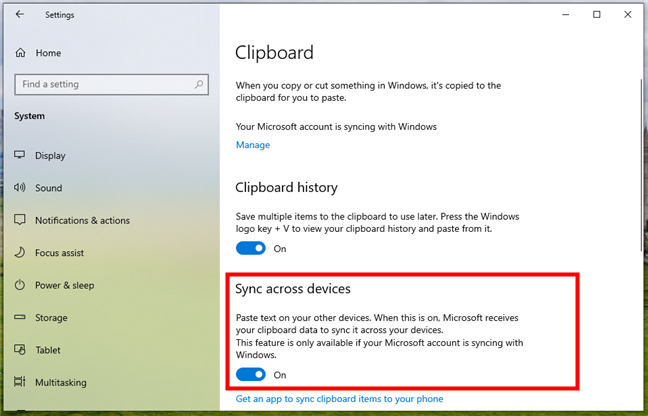 How to turn on clipboard syncing in Windows 10
And if you want more details on how clipboard sync works on Windows 10, read our dedicated tutorial: How to sync the Windows 10 clipboard with other PCs and Android phones.
How to turn on clipboard syncing in Windows 10
And if you want more details on how clipboard sync works on Windows 10, read our dedicated tutorial: How to sync the Windows 10 clipboard with other PCs and Android phones.
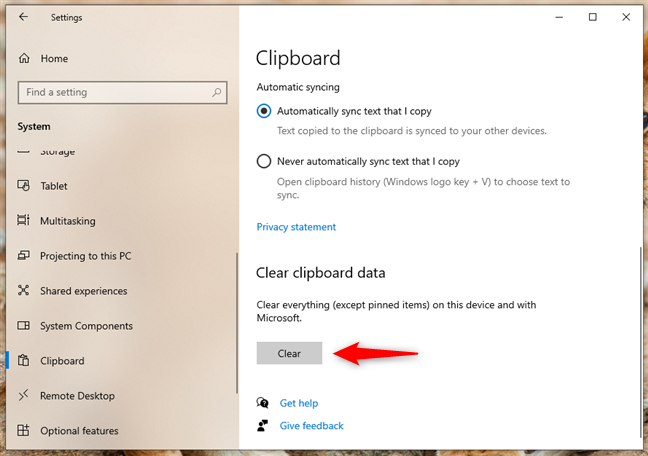
 Clear clipboard data
TIP: Are you unclear on what the clipboard is and how it works? Here’s a guide that explains everything: What is the clipboard from Windows?.
Clear clipboard data
TIP: Are you unclear on what the clipboard is and how it works? Here’s a guide that explains everything: What is the clipboard from Windows?.
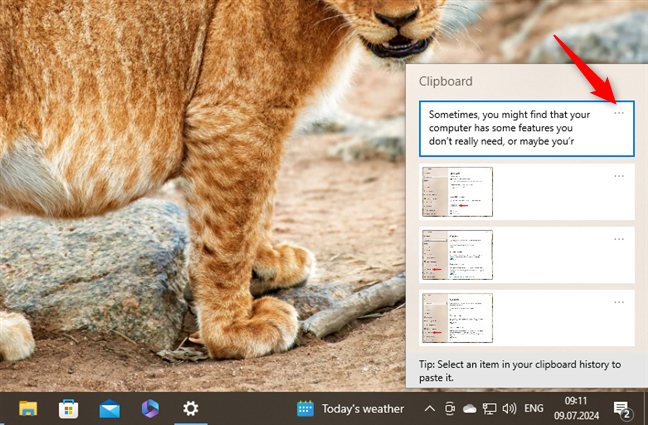
 How to see your clipboard history
Then, in the Clipboard popup, click or tap the ellipsis button in the top-right corner of any clipboard item.
How to see your clipboard history
Then, in the Clipboard popup, click or tap the ellipsis button in the top-right corner of any clipboard item.
 Click or tap the ellipsis button of a clipboard item
To delete an item from your clipboard history, choose Delete in the menu, and the item is removed from your clipboard history.
Click or tap the ellipsis button of a clipboard item
To delete an item from your clipboard history, choose Delete in the menu, and the item is removed from your clipboard history.
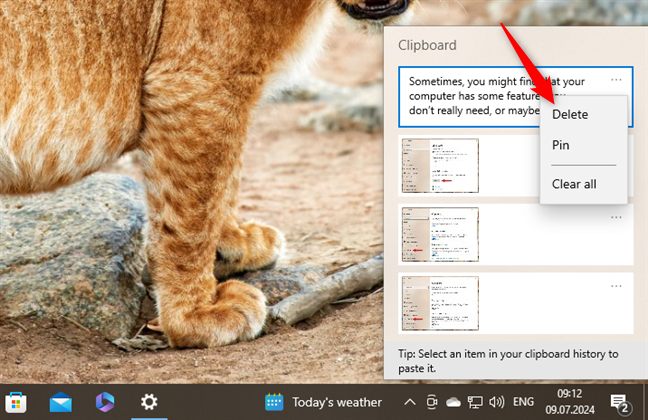
 Choose Delete to remove that clipboard element
You can also empty the clipboard history using this method. Click or tap the ellipsis button of any item in the Clipboard window, and choose Clear all to delete all the elements in your clipboard history.
Choose Delete to remove that clipboard element
You can also empty the clipboard history using this method. Click or tap the ellipsis button of any item in the Clipboard window, and choose Clear all to delete all the elements in your clipboard history.
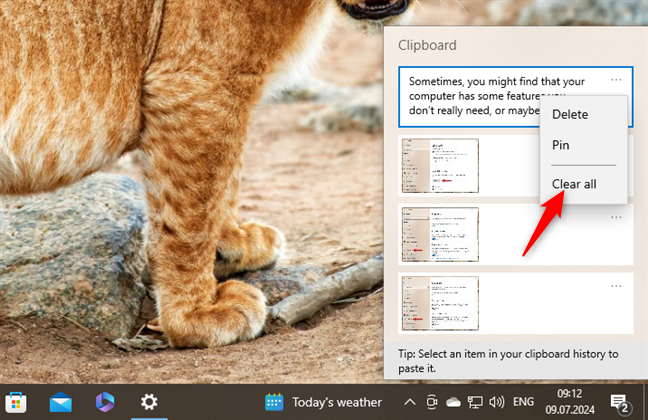 Click or tap Clear all to delete all clipboard items
The only items in your clipboard that aren’t removed when you do this are the pinned ones. Those clipboard elements can only be deleted manually. This means you must take them one by one, click or tap their small ellipsis buttons, and select Delete for each of the pinned clipboard items.
Click or tap Clear all to delete all clipboard items
The only items in your clipboard that aren’t removed when you do this are the pinned ones. Those clipboard elements can only be deleted manually. This means you must take them one by one, click or tap their small ellipsis buttons, and select Delete for each of the pinned clipboard items.
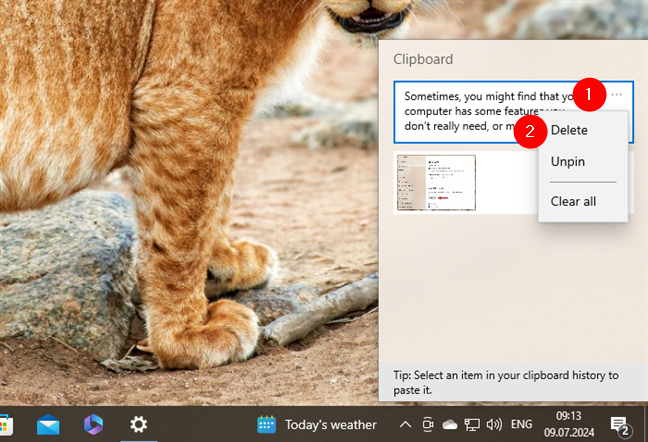
 Deleting pinned items from the clipboard
TIP: Would you like to learn more about how to enable, access, and use the clipboard? Check this tutorial: the Windows 10 clipboard.
Deleting pinned items from the clipboard
TIP: Would you like to learn more about how to enable, access, and use the clipboard? Check this tutorial: the Windows 10 clipboard.
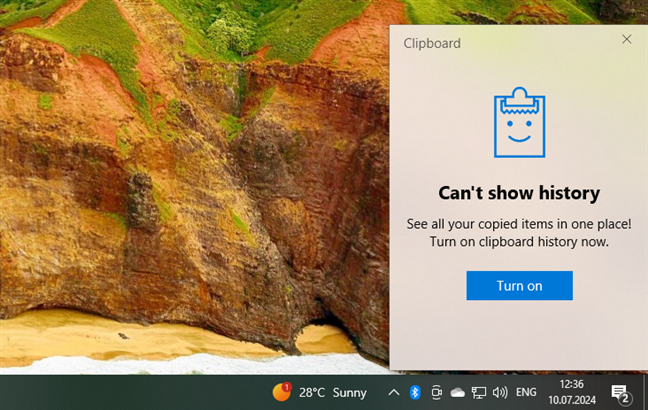
 The clipboard in Windows 10 when history is disabled

 Disabling the clipboard history (and thus also clearing everything stored in it)
As mentioned earlier, this stops your Windows 10 computer from saving multiple items in your clipboard. Only the last item you’ve copied is available in it.
Disabling the clipboard history (and thus also clearing everything stored in it)
As mentioned earlier, this stops your Windows 10 computer from saving multiple items in your clipboard. Only the last item you’ve copied is available in it.
 How to turn off clipboard sync in Windows 10
Your Windows 10 computer will no longer send clipboard data to Microsoft. It won’t be synced, and it won’t be available on your other devices.
How to turn off clipboard sync in Windows 10
Your Windows 10 computer will no longer send clipboard data to Microsoft. It won’t be synced, and it won’t be available on your other devices.
How to enable clipboard history in Windows 10
To turn on clipboard history in Windows 10, you need the Settings app. So, start by opening the Settings app: quick ways are pressing Win + I on your keyboard or clicking/tapping the Settings button in the Start Menu. Then, in the Settings app, go to the System category.BONUS: How to turn on clipboard sync in Windows 10
Under the Clipboard history section, toggle the Sync across devices switch On if you also want your clipboard history to be synchronized and its contents to be available on all your devices.How to clear your clipboard history in Windows 10
If you want to clear the clipboard history and all the data that has been synced by it across your Windows 10 devices, there are a few ways to do it:How to remove everything in your clipboard history on Windows 10
If you want to remove all the items in your Windows 10 clipboard, follow the same steps I’ve shown earlier, in the previous chapter of this guide. Open the Settings app (Win + I) and go to System > Clipboard. Then, on the right side of the Settings window, scroll until you find the Clear clipboard data section. It tells you that you can “Clear everything (except pinned items) on this device and with Microsoft.” If you want to delete the contents of your clipboard, press the Clear button under this text.How to delete items from Windows 10’s clipboard history
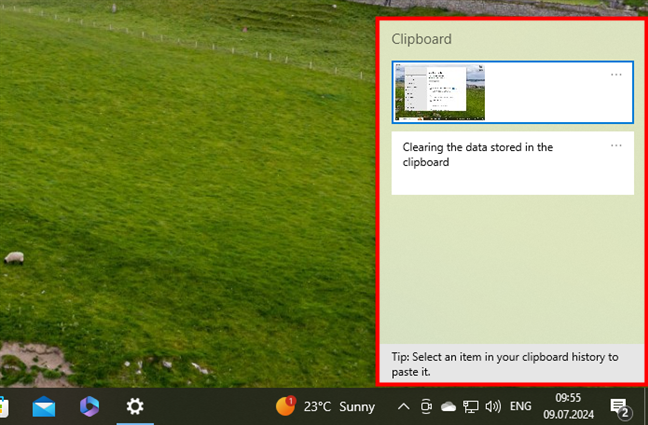
An alternative way of clearing your clipboard history in Windows 10 is available in the Clipboard window. No matter what you’re doing or where you are in Windows 10, press Windows + V on your keyboard to view your clipboard history.How to turn off clipboard history in Windows 10
If you don’t want to use any of the clipboard history and data syncing features offered by Windows 10, you can choose to disable the clipboard history. First, let’s see what happens when you do that. Then, I’ll walk you through the simple steps required to turn off clipboard history and disable clipboard sync in Windows 10:What happens if you disable the clipboard history?
If you choose to turn off Windows 10’s clipboard history, five things happen:- The operating system stops saving multiple items in your clipboard
- You cannot pin items to your clipboard because there’s no history
- No data from your clipboard history is synced to your other Windows devices
- All the data already saved in the clipboard history, as well as the data synced get deleted
- Your clipboard continues to work just like it did in the past, but only the last item you copy to your clipboard is available to paste
How to disable the clipboard history in Windows 10
To turn off the clipboard history, open the Settings app and go to System > Clipboard. Then, turn Off the Clipboard history switch.How to turn off clipboard sync in Windows 10
Besides disabling clipboard history in Windows 10, you can also turn off clipboard syncing. To do that, go to the same System > Clipboard location in Settings and look for the “Sync across devices” section. Then, set the switch under it to the Off position.

Discussion (3)
Codrut
Thanks for the vary detailed and complete subject in this tutorial.
You have a skill to explain things that many others can only try to do; everyone can understand and implement any desired action.
I am sure it alerted many to the possible hazard of posting complex passwords that they thought were safe, and then realizing how easily it is to having them retrieve by others if they have access to their PC!!
Thanks for sharing you expertise with the group.
I am grateful to your article for atleast confirming that the ‘clipboard’ can not be used without turning on the ‘history’ feature, even if I don’t like the answer.
I think MS need to rethink their decision to design the ‘clipboard’ as an ‘all or nothing’ operation…. you either keep lots of stuff you’ve copied (which as your article points out), not everyone wants / needs, or nothing at all, which is unhelpful.
It ought to be usable (as in the past with older MS systems), to copy one item to the clipboard, which then gets automatically deleted when the next item is copied and (better still) first flags up a warning to point out that the previous item has not been saved elsewhere yet.
I am left with one question though. As my history is turned off, where does Win 10 store an item copied using the ‘take a screen shot’ feature, for me to paste else where when I press ‘CTRL V’?
“It ought to be usable”
It is, what you want is how it works—try it.