


Microsoft Edge has become one of the best web browsers available today. Among its many features, one that stands out as especially useful to users who work on multiple computers and devices is its ability to Sync your data across devices. This functionality can simplify your life significantly, allowing you to quickly transition between a Windows computer and browsing the web on an Android smartphone or iPhone. I, for one, have to admit I’d be much slower in doing my work. For this reason, I want to show you how to sync Microsoft Edge on computers and smartphones, how to configure what Edge syncs, and how to stop Edge from syncing:
 Syncing options in Microsoft Edge
However, there’s a requirement to being able to use Microsoft Edge’s synchronization feature: having a Microsoft account to sign in to Edge on all the computers, smartphones, and other devices on which you use the browser.
Syncing options in Microsoft Edge
However, there’s a requirement to being able to use Microsoft Edge’s synchronization feature: having a Microsoft account to sign in to Edge on all the computers, smartphones, and other devices on which you use the browser.
 Opening the Edge menu
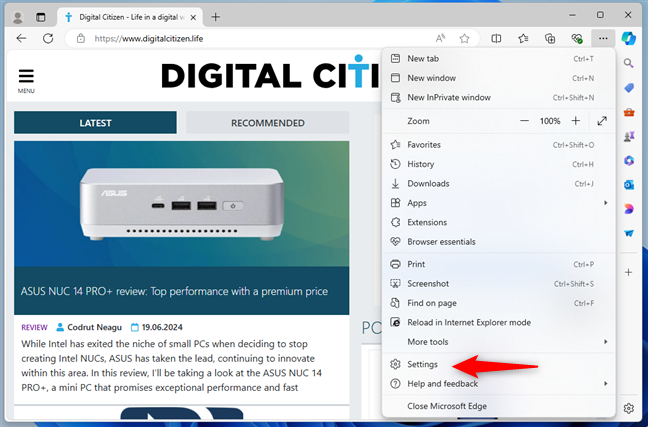
In the browser’s menu, look for the Settings option and click or tap on it.
Opening the Edge menu
In the browser’s menu, look for the Settings option and click or tap on it.
 The Settings entry from Edge's menu
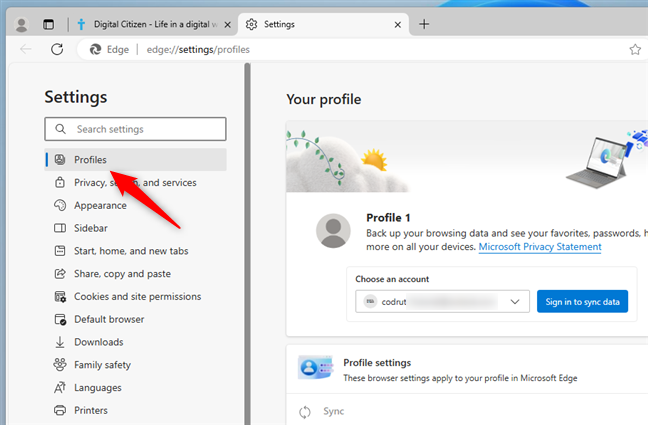
The previous action opens a new tab where Edge gives you access to all its settings. In it, make sure the Profiles entry is selected in the left sidebar.
The Settings entry from Edge's menu
The previous action opens a new tab where Edge gives you access to all its settings. In it, make sure the Profiles entry is selected in the left sidebar.
 Make sure Profiles is selected in the sidebar
Then, if you haven’t already signed in with your Microsoft account in Edge, select it from the Choose an account drop-down list and click or tap the Sign in to sync data button next to it.
Make sure Profiles is selected in the sidebar
Then, if you haven’t already signed in with your Microsoft account in Edge, select it from the Choose an account drop-down list and click or tap the Sign in to sync data button next to it.
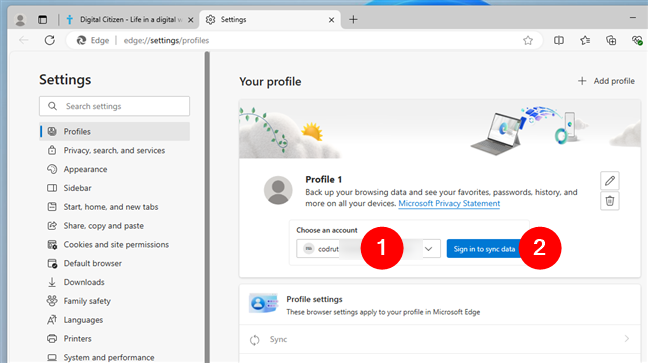
 Select your Microsoft account and click Sign in to sync data
NOTE: If you don’t see your Microsoft account in the list, you can choose Add new account. Then, once you press the Sign in to sync data button, you’ll be offered the option to authenticate with any Microsoft account you may have. Moreover, if you don’t have one at all, you’ll be able to create one.
Select your Microsoft account and click Sign in to sync data
NOTE: If you don’t see your Microsoft account in the list, you can choose Add new account. Then, once you press the Sign in to sync data button, you’ll be offered the option to authenticate with any Microsoft account you may have. Moreover, if you don’t have one at all, you’ll be able to create one.
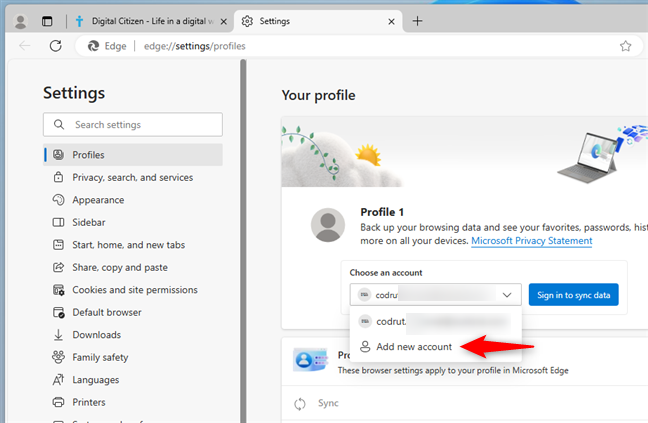
 If you don't have a Microsoft account, choose Add new account
Then, you are signed in with your user account. Once authenticated, you’ll see that Microsoft Edge is “Setting up sync.” This shouldn’t take long.
If you don't have a Microsoft account, choose Add new account
Then, you are signed in with your user account. Once authenticated, you’ll see that Microsoft Edge is “Setting up sync.” This shouldn’t take long.

 Microsoft Edge is Setting up sync
Once the sync is configured, Microsoft Edge will tell you that “Sync is on,” like in the next screenshot.
Microsoft Edge is Setting up sync
Once the sync is configured, Microsoft Edge will tell you that “Sync is on,” like in the next screenshot.
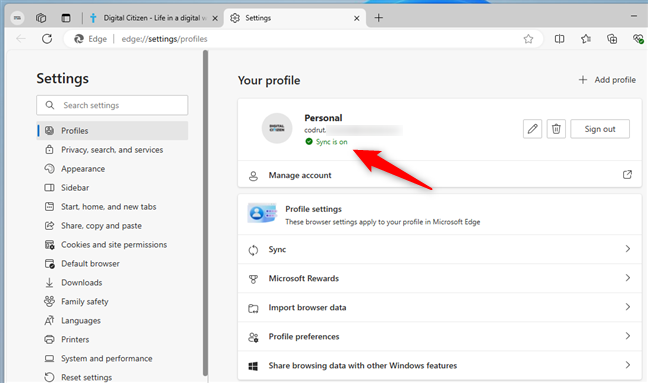
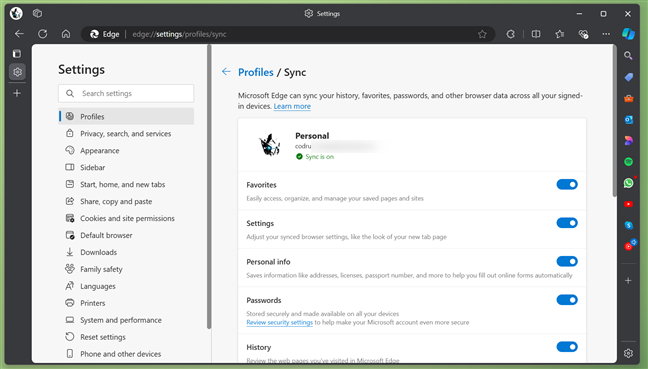
 Sync is on in Microsoft Edge
Next, you may want to see more details about what Microsoft Edge is syncing, as well as adjust the syncing options available. To do that, click or tap the Sync entry under Profile settings.
Sync is on in Microsoft Edge
Next, you may want to see more details about what Microsoft Edge is syncing, as well as adjust the syncing options available. To do that, click or tap the Sync entry under Profile settings.

 Click or tap Sync
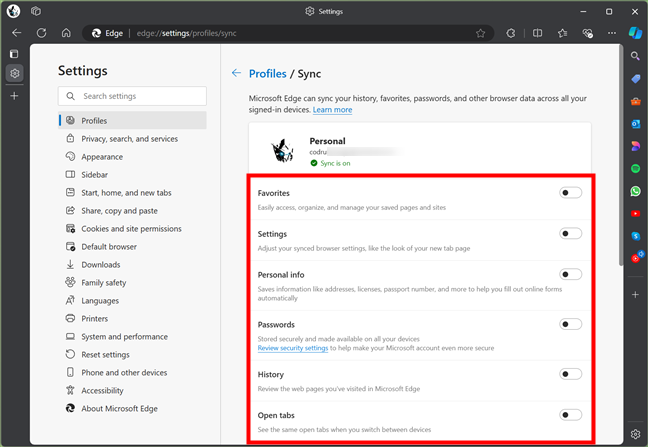
Then, the web browser will show you the list of features and data types that are synced and available to use across all the devices where you use the same Microsoft account in Edge:
Click or tap Sync
Then, the web browser will show you the list of features and data types that are synced and available to use across all the devices where you use the same Microsoft account in Edge:
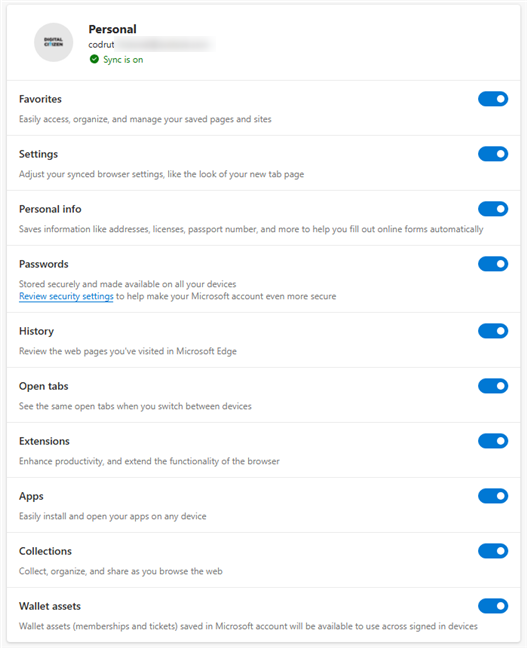
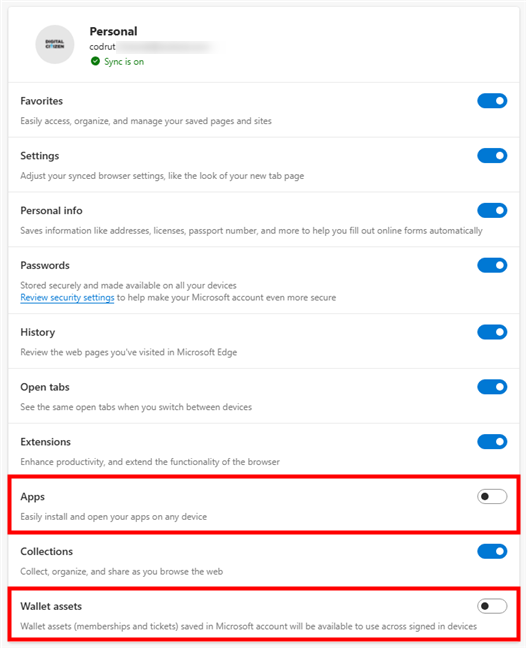
 The features and data types Microsoft Edge can sync
For each type of data, you can instruct Microsoft Edge whether to sync or not to sync by enabling or disabling its corresponding switch on the right. For example, in the next screenshot, you can see that I chose to sync everything except for my Apps and Wallet assets.
The features and data types Microsoft Edge can sync
For each type of data, you can instruct Microsoft Edge whether to sync or not to sync by enabling or disabling its corresponding switch on the right. For example, in the next screenshot, you can see that I chose to sync everything except for my Apps and Wallet assets.
 Choosing to not sync some features in Edge
And that’s it! From now on, Microsoft Edge synchronizes all the things you’ve chosen, so you can easily carry on browsing on all the other computers and devices where you use this web browser.
NOTE: I’ve wondered where Microsoft Edge sync data is stored, and I wish I could tell you about it. Unfortunately, although I’ve looked extensively for an answer, the best I could find is that all the synced data is saved and encrypted on Microsoft’s servers. This means that there’s no place where you can see it except in the Edge browser itself.
Choosing to not sync some features in Edge
And that’s it! From now on, Microsoft Edge synchronizes all the things you’ve chosen, so you can easily carry on browsing on all the other computers and devices where you use this web browser.
NOTE: I’ve wondered where Microsoft Edge sync data is stored, and I wish I could tell you about it. Unfortunately, although I’ve looked extensively for an answer, the best I could find is that all the synced data is saved and encrypted on Microsoft’s servers. This means that there’s no place where you can see it except in the Edge browser itself.
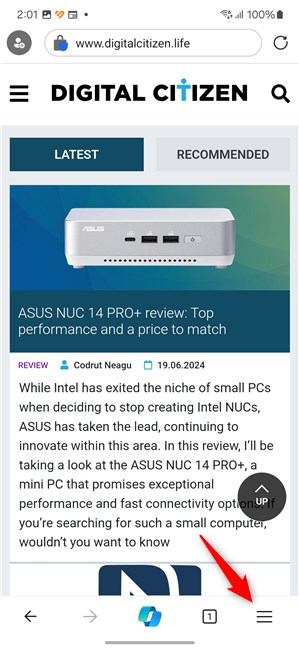
 Open the Edge menu on Android
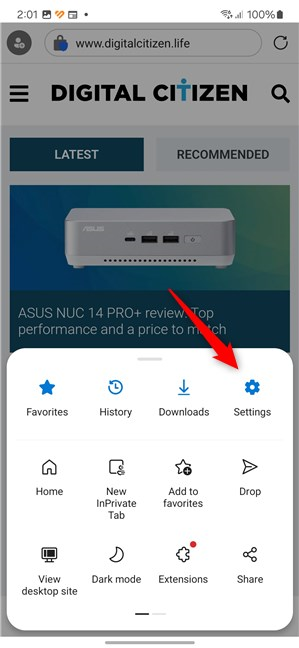
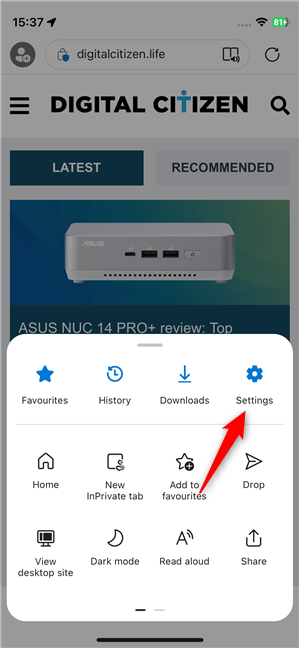
In the list of options Edge displays, tap Settings on the right.
Open the Edge menu on Android
In the list of options Edge displays, tap Settings on the right.
 Tap Settings
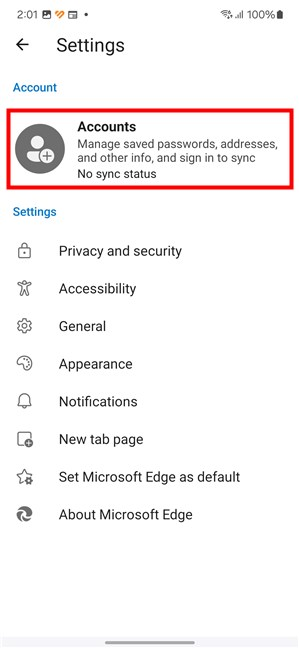
This makes Edge show its Settings screen. On it, tap the Accounts entry at the top.
Tap Settings
This makes Edge show its Settings screen. On it, tap the Accounts entry at the top.
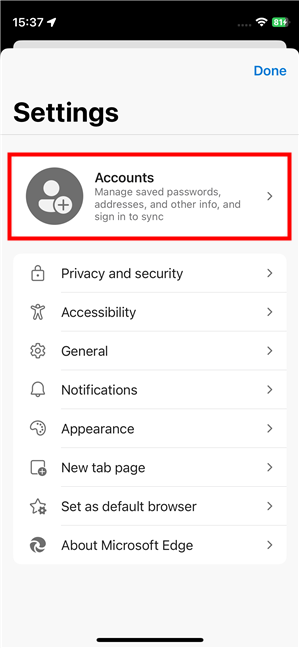
 Tap Accounts
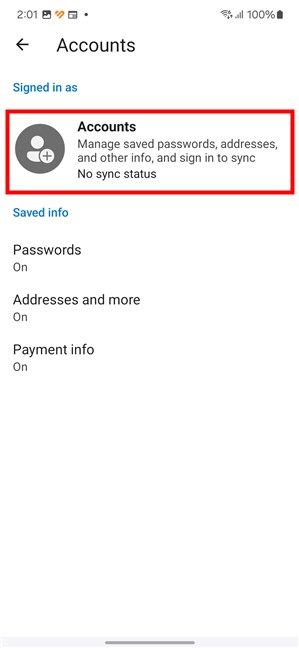
Edge loads the Accounts screen now. Unless you’re already connected to Edge with your Microsoft account, right under Signed in as, the browser will tell you that you can “Manage saved passwords, addresses, and other info, and sign in to sync.” Tap this Accounts entry.
Tap Accounts
Edge loads the Accounts screen now. Unless you’re already connected to Edge with your Microsoft account, right under Signed in as, the browser will tell you that you can “Manage saved passwords, addresses, and other info, and sign in to sync.” Tap this Accounts entry.
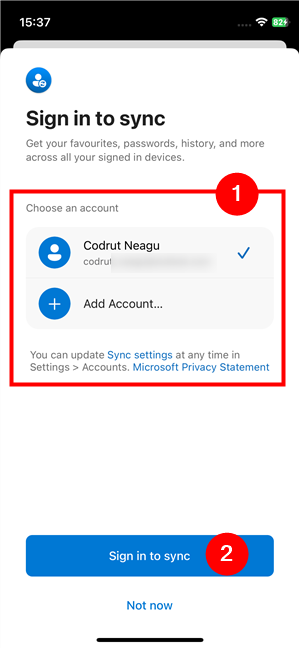
 Tap Accounts once more
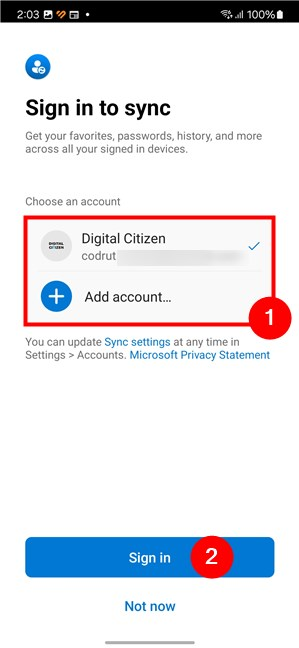
Then, Microsoft Edge loads the Sign in to sync screen. On it, you will see all the Microsoft accounts you’ve previously used on your smartphone, as well as an option called Add account…. Select the Microsoft account you want to connect to or tap the Add account… option to use a new one. Then, tap the Sign in button.
Tap Accounts once more
Then, Microsoft Edge loads the Sign in to sync screen. On it, you will see all the Microsoft accounts you’ve previously used on your smartphone, as well as an option called Add account…. Select the Microsoft account you want to connect to or tap the Add account… option to use a new one. Then, tap the Sign in button.
 Choose your Microsoft account or Add account and tap Sign in
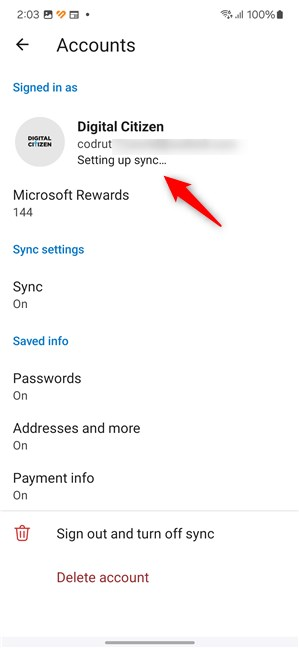
Sign in to your Microsoft account using your credentials (password, two-factor authentication, etc.), and you’ll immediately see that Microsoft Edge is Setting up sync… like in the next screenshot. This process shouldn’t take long.
Choose your Microsoft account or Add account and tap Sign in
Sign in to your Microsoft account using your credentials (password, two-factor authentication, etc.), and you’ll immediately see that Microsoft Edge is Setting up sync… like in the next screenshot. This process shouldn’t take long.
 Setting up sync in Edge for Android
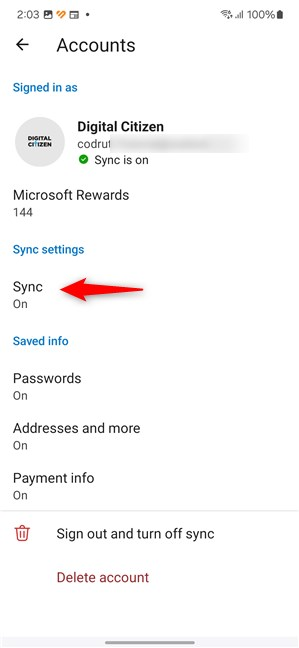
Once the syncing is on, you can tap the Sync entry on the Accounts screen to configure what features and data types are synchronized.
Setting up sync in Edge for Android
Once the syncing is on, you can tap the Sync entry on the Accounts screen to configure what features and data types are synchronized.
 Tap the Sync entry
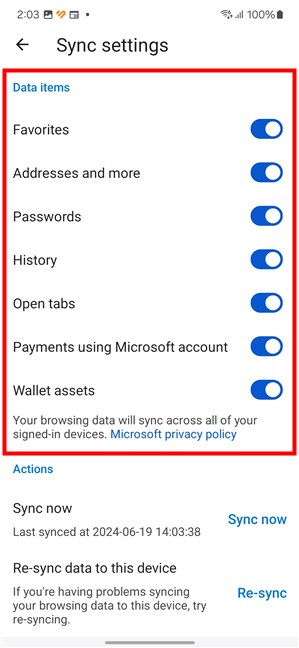
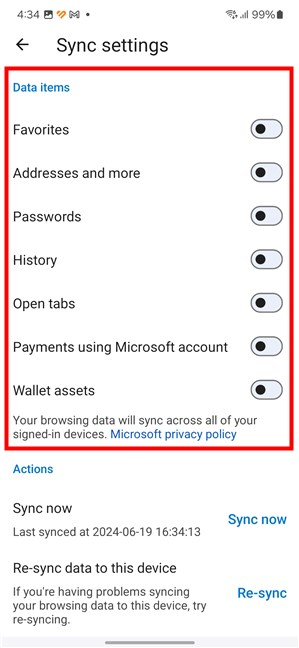
This brings you to the Sync settings screen. Here, you can see all the things that are synchronized by Microsoft Edge: Favorites, Addresses and more, Passwords, History, Open tabs, Payments using Microsoft account, and Wallet assets.
Tap the Sync entry
This brings you to the Sync settings screen. Here, you can see all the things that are synchronized by Microsoft Edge: Favorites, Addresses and more, Passwords, History, Open tabs, Payments using Microsoft account, and Wallet assets.
 The features synced by Edge on Android
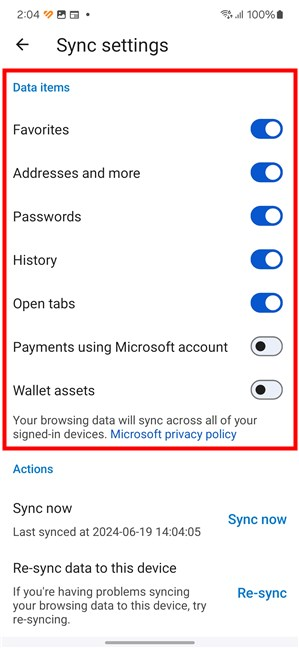
If you have some items that you don’t want to sync, simply turn their switches off. Just like I did with the Payments using Microsoft account and Wallet assets in the next screenshot.
The features synced by Edge on Android
If you have some items that you don’t want to sync, simply turn their switches off. Just like I did with the Payments using Microsoft account and Wallet assets in the next screenshot.
 Stop syncing some features in Edge for Android
If you suspect that your items didn’t sync properly on your Android, you can also tap the Sync now link to force a synchronization. Or the Re-synk link to make Edge Re-sync data to this device.
Stop syncing some features in Edge for Android
If you suspect that your items didn’t sync properly on your Android, you can also tap the Sync now link to force a synchronization. Or the Re-synk link to make Edge Re-sync data to this device.
 Edge for Android lets you Sync now or Re-sync data on this device
You can now exit the Settings of Edge for Android and start enjoying the browser’s syncing feature on all the devices and computers where you’ve turned it on.
Edge for Android lets you Sync now or Re-sync data on this device
You can now exit the Settings of Edge for Android and start enjoying the browser’s syncing feature on all the devices and computers where you’ve turned it on.
 The hamburger button from Edge for iOS (iPhone)
Tap the Settings button on the right side of the menu displayed.
The hamburger button from Edge for iOS (iPhone)
Tap the Settings button on the right side of the menu displayed.
 The Settings button from Edge for iPhone
This loads the Settings screen. Here, tap the Accounts entry at the top.
The Settings button from Edge for iPhone
This loads the Settings screen. Here, tap the Accounts entry at the top.
 Tap Accounts in Edge for iPhone
Now, Edge opens the Accounts screen. If you aren’t already connected to Edge with your Microsoft account, the Signed in as section will tell you that you can “Sign in to sync your browsing data across devices.” Tap this Accounts entry.
Tap Accounts in Edge for iPhone
Now, Edge opens the Accounts screen. If you aren’t already connected to Edge with your Microsoft account, the Signed in as section will tell you that you can “Sign in to sync your browsing data across devices.” Tap this Accounts entry.
 Tap Accounts once more
Next, Microsoft Edge will display the Sign in to sync screen. Here, you’ll find all the Microsoft accounts you’ve previously used on your iPhone, along with an option labeled Add Account…. Choose the Microsoft account you want to connect to, or tap Add account… to use a new one. Finally, tap the Sign in to sync button at the bottom.
Tap Accounts once more
Next, Microsoft Edge will display the Sign in to sync screen. Here, you’ll find all the Microsoft accounts you’ve previously used on your iPhone, along with an option labeled Add Account…. Choose the Microsoft account you want to connect to, or tap Add account… to use a new one. Finally, tap the Sign in to sync button at the bottom.
 Choose an account or add a new one
Sign in to your Microsoft account using your credentials (password, two-factor authentication, etc.). You will then be taken back to the Settings of Microsoft Edge, where you’ll see the Sync is on message under your Microsoft account, like in the screenshot. You can now exit Microsoft Edge’s Settings and go about your business, as everything that can be synced is synced. 🙂 However, you may want to customize the features and data types available across your Edge devices. To do so, tap your Microsoft account.
Choose an account or add a new one
Sign in to your Microsoft account using your credentials (password, two-factor authentication, etc.). You will then be taken back to the Settings of Microsoft Edge, where you’ll see the Sync is on message under your Microsoft account, like in the screenshot. You can now exit Microsoft Edge’s Settings and go about your business, as everything that can be synced is synced. 🙂 However, you may want to customize the features and data types available across your Edge devices. To do so, tap your Microsoft account.
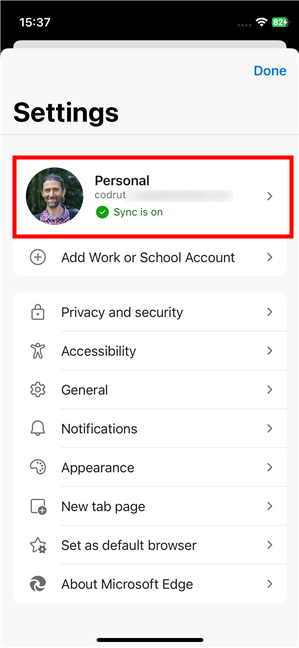 Sync is on: Tap your Microsoft account
Then, tap the Sync entry under Sync Settings.
Sync is on: Tap your Microsoft account
Then, tap the Sync entry under Sync Settings.
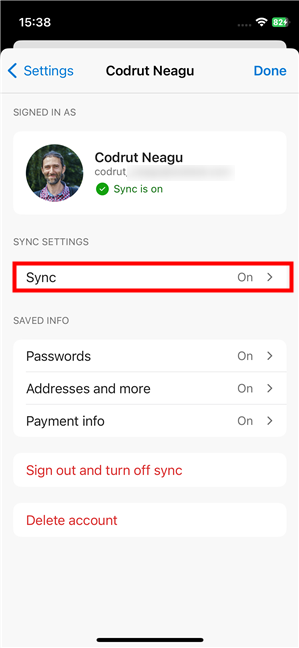 Tap the Sync entry
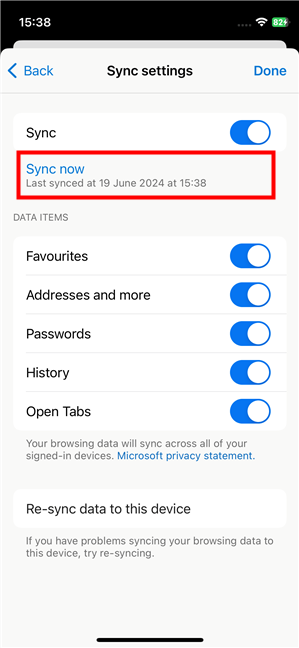
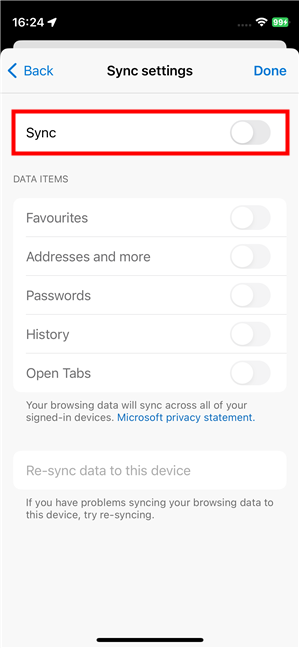
Now you can adjust the Sync settings used by Microsoft Edge for iPhone. First of all, you have the Sync switch at the top of the screen: if you disable it, syncing stops, so make sure it’s turned on. Then, in the Data Items section, turn on each thing you want to synchronize with Edge. You can choose to sync Favourites, Addresses and more, Passwords, History, and Open Tabs.
Tap the Sync entry
Now you can adjust the Sync settings used by Microsoft Edge for iPhone. First of all, you have the Sync switch at the top of the screen: if you disable it, syncing stops, so make sure it’s turned on. Then, in the Data Items section, turn on each thing you want to synchronize with Edge. You can choose to sync Favourites, Addresses and more, Passwords, History, and Open Tabs.
 The Sync switch is on, as are the Data Items
If you have a feeling that your items didn’t sync well on your iPhone, you can also tap the Sync now button to force a synchronization.
The Sync switch is on, as are the Data Items
If you have a feeling that your items didn’t sync well on your iPhone, you can also tap the Sync now button to force a synchronization.
 Tap Sync now to force a synchronization
You can now get out of Edge’s Settings and enjoy browsing the web seamlessly on all the iPhones, computers, and other devices where you’ve turned on Edge’s syncing feature.
Tap Sync now to force a synchronization
You can now get out of Edge’s Settings and enjoy browsing the web seamlessly on all the iPhones, computers, and other devices where you’ve turned on Edge’s syncing feature.
 Stop Edge from syncing on a computer
Another method would be to sign out of your Microsoft account in Microsoft Edge. It’s more radical, but you can do it if you prefer. In Edge’s Settings, click or tap the Sign out button from the Profiles page.
Stop Edge from syncing on a computer
Another method would be to sign out of your Microsoft account in Microsoft Edge. It’s more radical, but you can do it if you prefer. In Edge’s Settings, click or tap the Sign out button from the Profiles page.
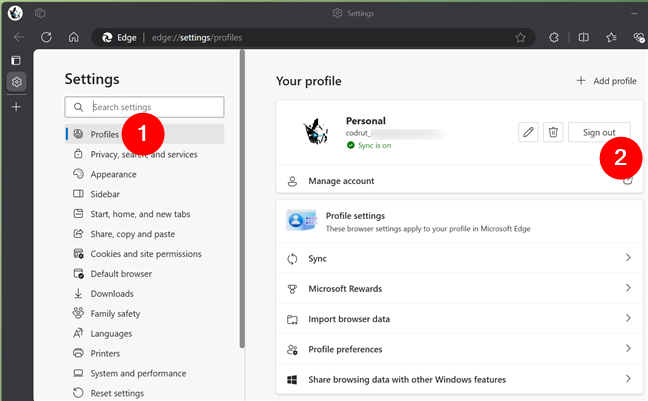
 Stop syncing by choosing to Sign out
If you choose to sign out of your account, Microsoft Edge warns you that nothing will be synced afterwards, and it requires you to confirm your intention. To continue, you’ll need to click or tap the Sign out button.
Stop syncing by choosing to Sign out
If you choose to sign out of your account, Microsoft Edge warns you that nothing will be synced afterwards, and it requires you to confirm your intention. To continue, you’ll need to click or tap the Sign out button.
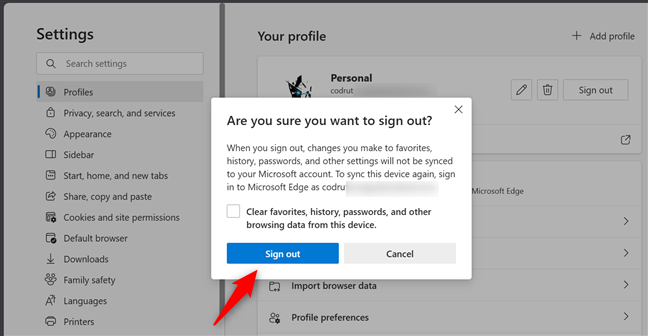
 Confirm that you want to sign out
Then, the syncing stops in the Edge browser on your computer. If you want to do the same on your other devices, repeat this process on your Windows PCs, or take the steps in the next chapters on your Android smartphones or iPhones.
Confirm that you want to sign out
Then, the syncing stops in the Edge browser on your computer. If you want to do the same on your other devices, repeat this process on your Windows PCs, or take the steps in the next chapters on your Android smartphones or iPhones.
 Disable all the Data items switches
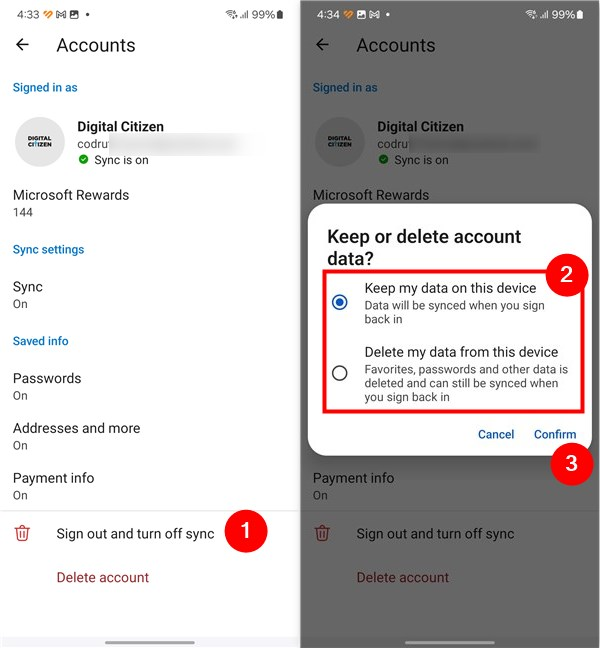
Another option is to sign out of your Microsoft account from Edge. This method is more drastic, but it’s available if you prefer. In Edge’s Settings, tap your Microsoft account, then tap the Sign out and turn off sync link at the bottom. If you choose to sign out, Microsoft Edge requires you to confirm your decision and choose whether to keep your current data or not. Choose the option you prefer, and tap the Confirm button.
Disable all the Data items switches
Another option is to sign out of your Microsoft account from Edge. This method is more drastic, but it’s available if you prefer. In Edge’s Settings, tap your Microsoft account, then tap the Sign out and turn off sync link at the bottom. If you choose to sign out, Microsoft Edge requires you to confirm your decision and choose whether to keep your current data or not. Choose the option you prefer, and tap the Confirm button.
 Sign out and turn off sync in Edge for Android
Once you sign out, syncing will stop in the Edge browser on your Android smartphone.
Sign out and turn off sync in Edge for Android
Once you sign out, syncing will stop in the Edge browser on your Android smartphone.
 Disable the Sync switch in Edge for iPhone
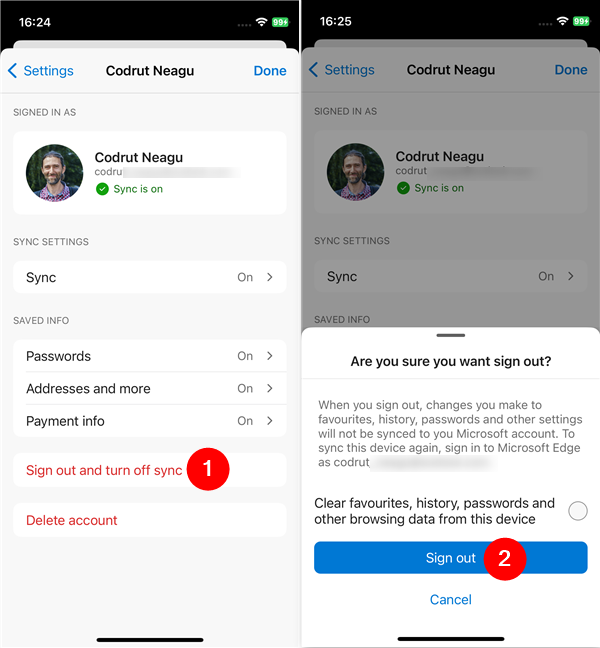
Alternatively, you can sign out of your Microsoft account in Edge. This method is more drastic, but you can use it if you prefer. In Edge’s Settings, tap the Sign out and turn off sync link. If you choose to do so, the browser will warn you that syncing will stop, and you will need to confirm your intention. To proceed, click or tap the Sign out button.
Disable the Sync switch in Edge for iPhone
Alternatively, you can sign out of your Microsoft account in Edge. This method is more drastic, but you can use it if you prefer. In Edge’s Settings, tap the Sign out and turn off sync link. If you choose to do so, the browser will warn you that syncing will stop, and you will need to confirm your intention. To proceed, click or tap the Sign out button.
 Sign out and turn off sync in Edge for iOS
Once you sign out, syncing will stop in the Edge browser on your iPhone.
Sign out and turn off sync in Edge for iOS
Once you sign out, syncing will stop in the Edge browser on your iPhone.
What is and why should you use Microsoft Edge’s Sync feature?
What is Microsoft Edge Sync? Well, it’s a feature in Microsoft Edge that allows users to synchronize browsing data across devices. It’s built right into the browser and allows you to sync your bookmarks, passwords, browsing history, personal data, and other things. So, if you want to be able to seamlessly access your Microsoft Edge data on every computer or device where you’re using this browser, you should enable the Sync feature.How to sync Microsoft Edge across devices
Having said all that, let’s see now how to sync Microsoft Edge and how to change the sync settings in Edge for computers, Android smartphones, and iPhones:How to sync Microsoft Edge on a Windows PC
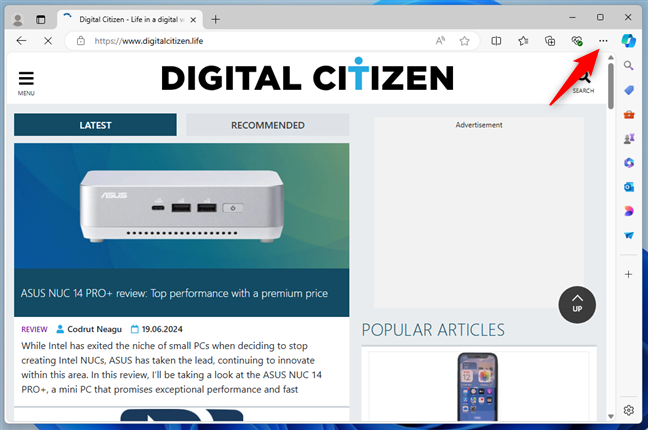
The first step is to start Microsoft Edge and access its settings. To do that, open the “Settings and More” menu by clicking or tapping on the three dots button found in the browser’s top-right corner.- Favorites - this includes all your bookmarks
- Settings - all the browser settings, including how you’ve personalized Edge to look like
- Personal info - your name, date of birth, address, and other personal data that can be used to autofill forms
- Passwords - all the passwords you save in Microsoft Edge
- History - the websites and web pages you’ve visited
- Open tabs - the tabs you have open in Edge
- Extensions - the add-ons and extensions you’ve installed
- Apps - apps you’ve created with Microsoft Edge, like Gmail, for example
- Collections - all the collections you’ve created in Microsoft Edge
- Wallet assets - the things you’ve saved in your Microsoft account, like memberships and tickets
How to sync Microsoft Edge on an Android phone
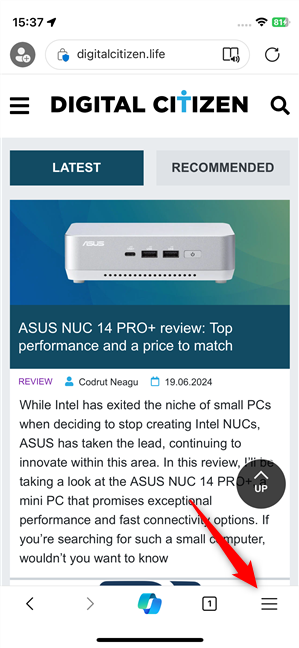
Just like on a computer, you can access and configure the synchronization feature of Microsoft Edge for Android from inside the app. In Edge for Android, tap the hamburger button in the bottom right corner of the screen.How to sync Microsoft Edge on an iPhone (iOS)
The syncing feature of Microsoft Edge for iPhones works similarly to the one on Android and computers. In Edge for iPhone, tap the hamburger button in the bottom right corner of the screen.How to stop Microsoft Edge from syncing
Now you know how to turn on Edge syncing and configure what you want to synchronize. But what about turning off the syncing feature? Stopping Microsoft Edge from syncing is easy but it does require a few manual actions:How to disable syncing in Microsoft Edge for Windows
Retrace the steps from the “How to sync Microsoft Edge on a Windows PC” chapter of this tutorial to go to Settings > Profiles > Sync. Then, turn off all the switches on this page.How to disable syncing in Microsoft Edge for Android
To disable syncing, follow the steps from the “How to sync Microsoft Edge on an Android phone” chapter of this tutorial to get to Settings > Account > Sync. Then, turn off all the switches on the Sync settings page.How to disable syncing in Microsoft Edge for iPhone (iOS)
Follow the steps in the “How to sync Microsoft Edge on an iPhone (iOS)” chapter of this tutorial to get to the Sync settings. In short, navigate to Settings > Personal (tap your Microsoft account) > Sync. Then, turn off the Sync switch at the top of the page. Unlike its Windows and Android versions, the Microsoft Edge for iPhone has a general switch for the syncing feature.
Discussion (6)
the only problems ive had with all this syncing, is when im asked if i want to save my password for future sign in, and i say yes, thinking it will be unnecessary to remember it. then i dont use that account for awhile, or for whatever other reason the password nazis deem logical, they say they gotta make sure its me because its sensitive info… (i dont think it is, but whatevadafk) and i go to my password manager- then microsoft says its not the correct password? what the hay? are microsoft and google at war, or some sht? they turned off sync cuz i dont use my account 24/7? i got a life outside my computer, unlike some…. how do i get into an account when i know the right password but it says all the time that something went wrong? wasting hours of time on this bs…the account has an old phone number& i cant get the special fkn code from it to change to the new phone number to get the code to get into my account so it will start to sync cuz i gotta prove its me, but something always goes wrong on your side? that is just stupid. im not a doctor. i hve no patients with this dis-ease!!!
I don’t sync my phones and PCs. I won’t login to Microsoft. They try every way to get you to log in so they can push adverts.
to synch just Edge, does each user have to use their Live account to log into Windows?
Yes, they do.
Too bad this setting is not in the menu for edge on my surface pro. Would be great if MS could get this working. It is turned on for my W10 phone but without the ability to sync from my surface pro, it is useless on the phone.
Make sure you have the latest version of Windows 10 installed on all your devices. I have also seen problems when people have multiple Microsoft accounts (like Azure and Outlook) and they authenticate with different ones on different devices. I can confirm that this works across Windows 10 on a desktop (HP) and a laptop (Asus) and a Windows 10 Mobile (Lumia).