


Connecting to hidden Wi-Fi networks in Windows 11 is not an easy task. In this tutorial, we explain when it is useful to use a hidden network, what information is required in order to access a hidden Wi-Fi, and how to connect to hidden networks on laptops, tablets, and other devices with Windows 11. Let’s start by answering a simple question: what’s a hidden Wi-Fi network?
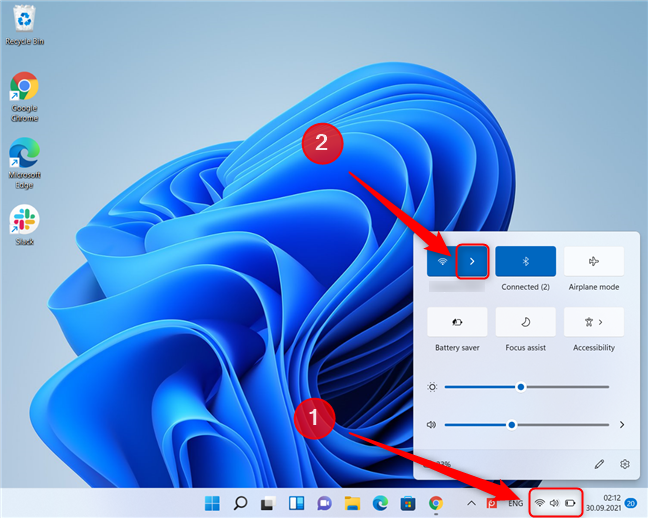
 Open the network list from Quick Settings
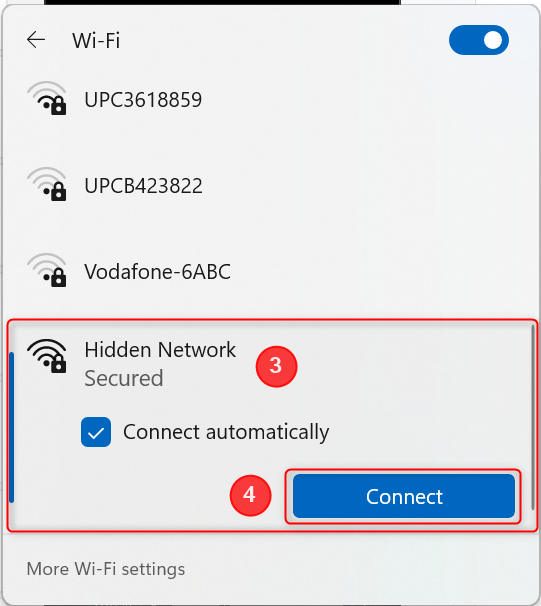
Windows 11 displays a list of all the Wi-Fi networks that are in range of your device. Look for an entry named Hidden network. It should be the last entry in the list. If the Hidden network entry is not present, jump to the next section of this article. If the entry is present, click on it to select it, then click on Connect. Also tick the “Connect automatically” checkbox if you plan to use this Wi-Fi network regularly and don’t want to connect manually each time.
Open the network list from Quick Settings
Windows 11 displays a list of all the Wi-Fi networks that are in range of your device. Look for an entry named Hidden network. It should be the last entry in the list. If the Hidden network entry is not present, jump to the next section of this article. If the entry is present, click on it to select it, then click on Connect. Also tick the “Connect automatically” checkbox if you plan to use this Wi-Fi network regularly and don’t want to connect manually each time.
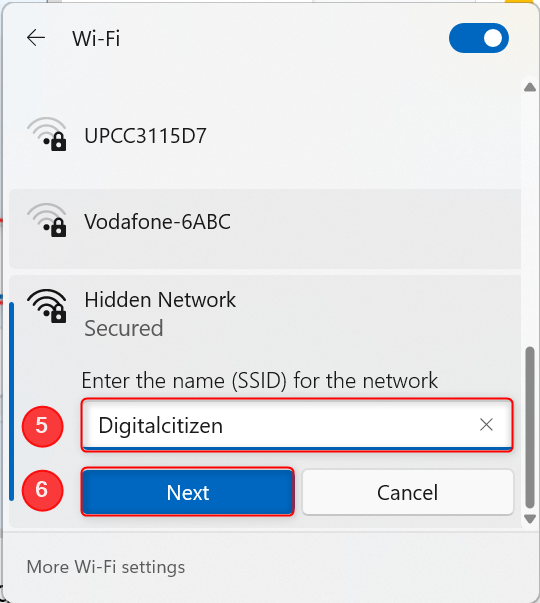
 Select Hidden Network in the list and click or tap on Connect
Type the network name and press Next.
Select Hidden Network in the list and click or tap on Connect
Type the network name and press Next.
 Enter the name of the hidden network and hit Next
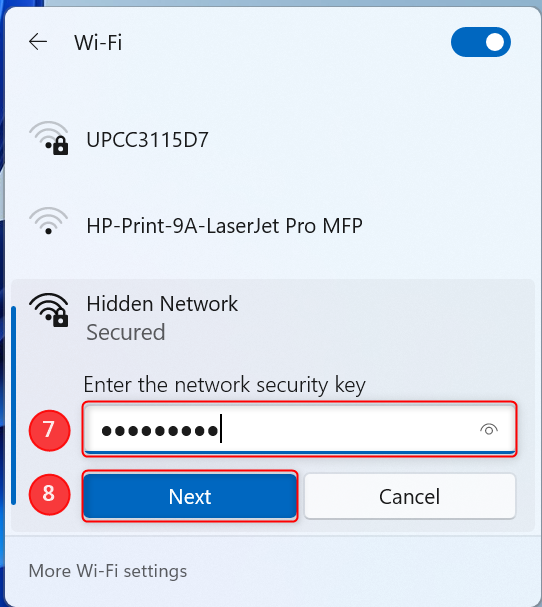
Now, enter the password (the security key) of the hidden Wi-Fi network and press Next.
Enter the name of the hidden network and hit Next
Now, enter the password (the security key) of the hidden Wi-Fi network and press Next.
 Enter the password of the hidden network and click or tap on Next
Your Windows 11 laptop or tablet will connect to the hidden network.
Enter the password of the hidden network and click or tap on Next
Your Windows 11 laptop or tablet will connect to the hidden network.

 Access the Settings app from the network list in Windows 11
This opens the Network & internet section of the Settings app. To get to the same place, you can also open Settings, and go to “Network & internet -> Wi-Fi.” Click or tap on “Manage known networks.”
Access the Settings app from the network list in Windows 11
This opens the Network & internet section of the Settings app. To get to the same place, you can also open Settings, and go to “Network & internet -> Wi-Fi.” Click or tap on “Manage known networks.”
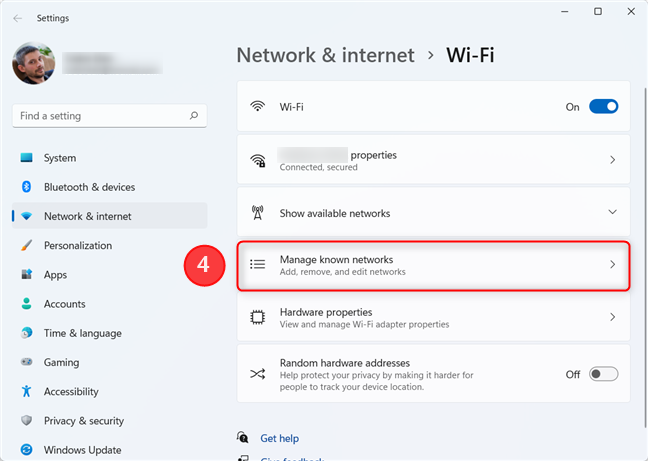
 Click on Manage known networks to see the networks list
Press on the Add network button, on the right side of the screen. You then need to enter the network name and choose the security type of the hidden network.
Click on Manage known networks to see the networks list
Press on the Add network button, on the right side of the screen. You then need to enter the network name and choose the security type of the hidden network.
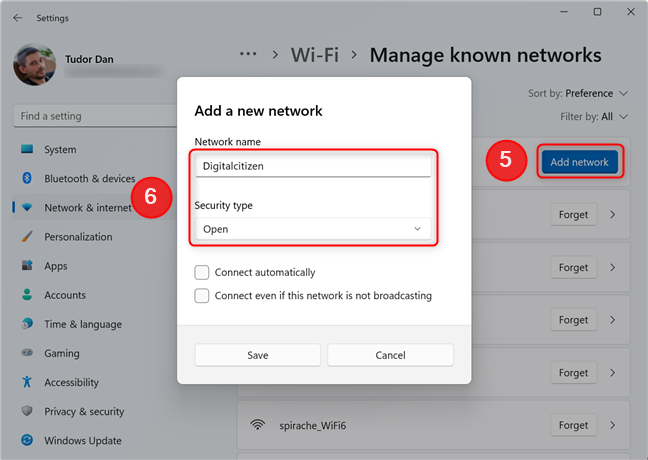
 Add a new Wi-Fi network in Settings
If the network has encryption, you now have to input the password. Tick the checkbox next to “Connect even if this network is not broadcasting.” Also tick the “Connect automatically” checkbox if you plan to use this Wi-Fi network regularly and don’t want to connect manually each time. Next, click on Save.
Add a new Wi-Fi network in Settings
If the network has encryption, you now have to input the password. Tick the checkbox next to “Connect even if this network is not broadcasting.” Also tick the “Connect automatically” checkbox if you plan to use this Wi-Fi network regularly and don’t want to connect manually each time. Next, click on Save.
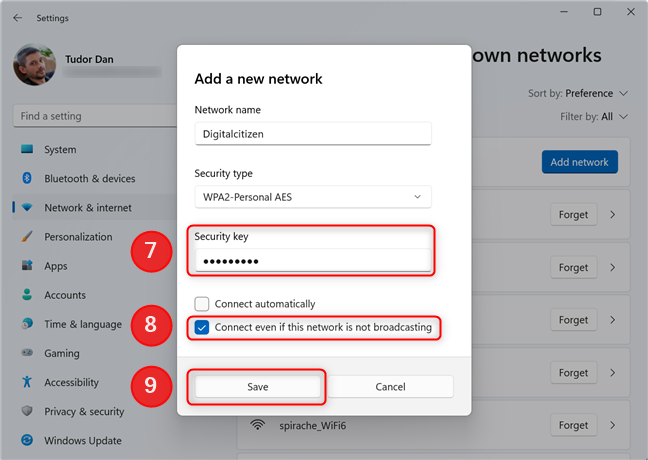 Enter the password and configure the new network
IMPORTANT: Checking the “Connect even if this network is not broadcasting” checkbox may put your privacy at risk, since your device will actively search for the hidden network even if it’s not in range. This broadcast can then be intercepted by skilled professionals. It also means that your device will use slightly more energy, so if it runs on batteries, take this into consideration.
The hidden network will now show up in the Quick settings Wi-Fi network list. If you are not connected to a network and you checked the Connect automatically checkbox, your device will connect to the hidden network.
Enter the password and configure the new network
IMPORTANT: Checking the “Connect even if this network is not broadcasting” checkbox may put your privacy at risk, since your device will actively search for the hidden network even if it’s not in range. This broadcast can then be intercepted by skilled professionals. It also means that your device will use slightly more energy, so if it runs on batteries, take this into consideration.
The hidden network will now show up in the Quick settings Wi-Fi network list. If you are not connected to a network and you checked the Connect automatically checkbox, your device will connect to the hidden network.
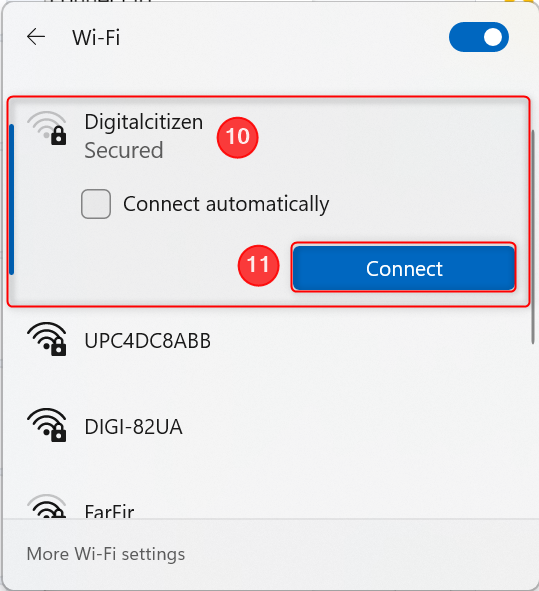
 Connect to the hidden network using Quick Settings
If you didn’t choose to connect automatically, you now have to connect to the hidden Wi-Fi network manually. Go ahead and close the Settings app, then go back to Quick Settings (Win+A). Click the arrow next to the Wi-Fi icon. In the list, select the newly created entry, then click or tap on Connect.
Connect to the hidden network using Quick Settings
If you didn’t choose to connect automatically, you now have to connect to the hidden Wi-Fi network manually. Go ahead and close the Settings app, then go back to Quick Settings (Win+A). Click the arrow next to the Wi-Fi icon. In the list, select the newly created entry, then click or tap on Connect.

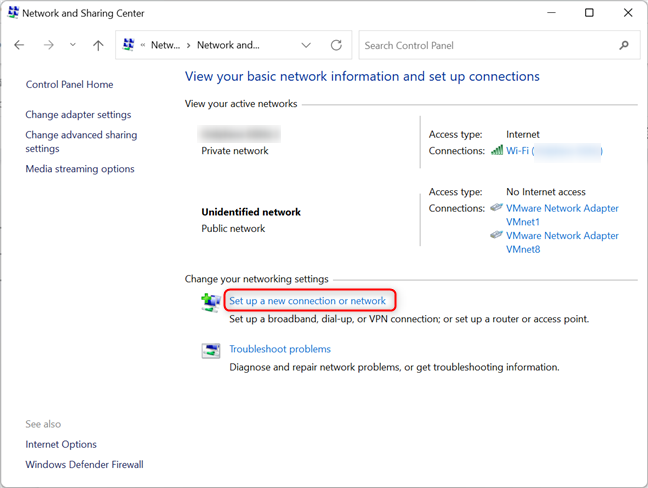
 Use Control Panel to connect to a hidden network in Windows 11
Now, click or tap on "Set up a new connection or network" in the lower part of the window.
Use Control Panel to connect to a hidden network in Windows 11
Now, click or tap on "Set up a new connection or network" in the lower part of the window.
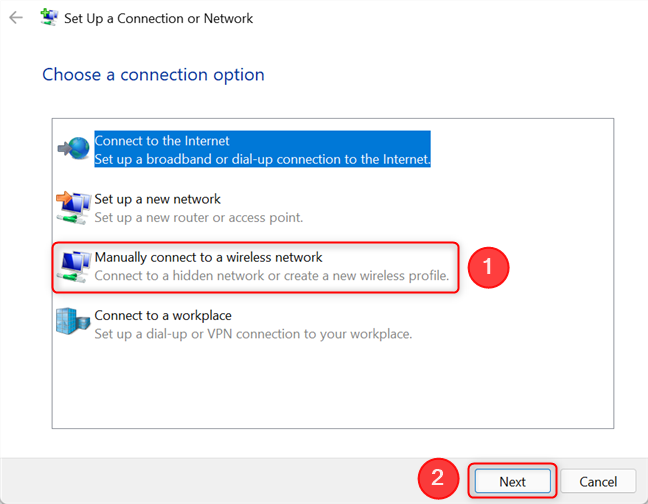
 Start the "Set Up a Connection or Network" wizard in Windows 11
This starts the "Set Up a Connection or Network" wizard. Choose "Manually connect to a wireless network" and click or tap Next.
Start the "Set Up a Connection or Network" wizard in Windows 11
This starts the "Set Up a Connection or Network" wizard. Choose "Manually connect to a wireless network" and click or tap Next.
 Click on Manually connect to a wireless network
Enter the security information for your WiFi network in the appropriate fields, as follows:
Click on Manually connect to a wireless network
Enter the security information for your WiFi network in the appropriate fields, as follows:
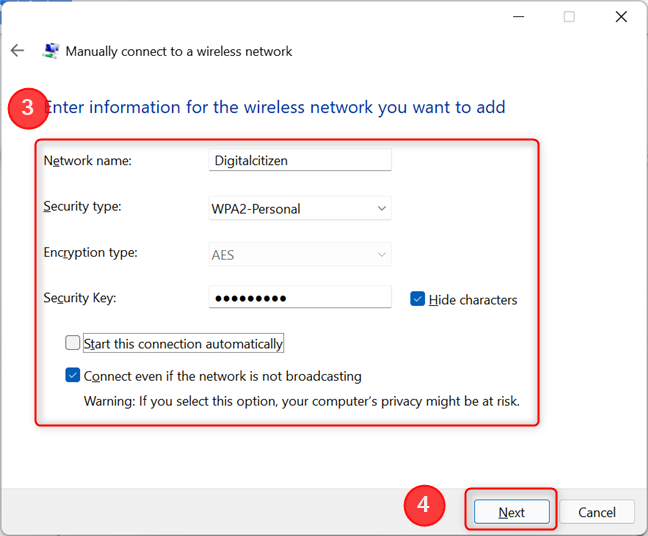
 Enter the details of the hidden network
If you are not currently connected to another network and you checked the box that says "Start this connection automatically," your device will automatically connect to the hidden network. Click Close and then close the Control Panel window.
Enter the details of the hidden network
If you are not currently connected to another network and you checked the box that says "Start this connection automatically," your device will automatically connect to the hidden network. Click Close and then close the Control Panel window.
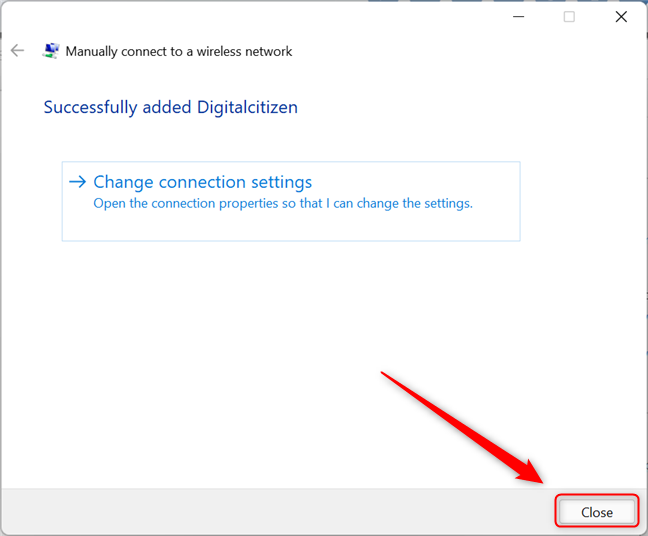 Close the "Set Up a Connection or Network" wizard
If you didn’t choose to connect automatically, you now have to connect to the hidden Wi-Fi network manually by going to Quick Settings (Win+A), clicking the arrow next to the Wi-Fi icon and selecting the network you just created. Finally, click or tap on Connect, and you’re done.
Close the "Set Up a Connection or Network" wizard
If you didn’t choose to connect automatically, you now have to connect to the hidden Wi-Fi network manually by going to Quick Settings (Win+A), clicking the arrow next to the Wi-Fi icon and selecting the network you just created. Finally, click or tap on Connect, and you’re done.
What’s a hidden Wi-Fi network? When is a hidden network useful?
Usually, Wi-Fi networks broadcast their name (also known as Service Set Identifier, or SSID) to all devices within range, making it easy for the users to select the network they want to connect to. When a network is configured as hidden, it does not broadcast its name. Instead, the client device must “make contact”, by broadcasting the correct name of the network it’s trying to connect to. Contrary to popular belief, hidden Wi-Fi networks are not more secure. They have the same encryption protocols, so the only thing that makes them special is the fact that they don’t broadcast their name. The main reason to hide a Wi-Fi network is to prevent unwanted users and casual attackers from trying to connect to it. A determined attacker can still find a hidden network though. To connect to a hidden Wi-Fi network, you need to know the following details:- The exact name of the network
- The security type (WEP, WPA2, etc.)
- The password (also known as the security key) used by the hidden network
1. How to connect to a hidden Wi-Fi network using Quick Settings
The most straightforward method of connecting your Windows 11 device to a hidden Wi-Fi network is by accessing Quick Settings. First, make sure your Wi-Fi adapter is turned on and you are in range of the hidden network you want to connect to. Then press Win + A on your keyboard to open Quick Settings. Alternatively, click or tap on any of the Wi-Fi, volume, or battery icons in the lower right corner of the screen. In the Quick Settings window, press the arrow next to the Wi-Fi symbol (“Manage Wi-Fi connections”).2. Connecting to a hidden Wi-Fi network using the Settings app
Sometimes the first method may fail because the Wi-Fi network you want to connect to doesn’t appear as Hidden network in the Wi-Fi network list. If this is the case, you need to click/tap on More Wi-Fi settings after opening the network list (see steps 1 and 2 from the previous section of this tutorial).3. Connecting to a hidden network using the Control Panel and the "Set Up a Connection or Network" wizard
This third method has been around since the days of Windows XP, and has remained largely unchanged. To connect to a hidden Wi-Fi network using the "Set Up a Connection or Network" wizard, first open the Control Panel. One way to do it is by opening the Start Menu, typing “control panel” and pressing Enter (or selecting Control Panel in the results list). Next, click or tap on “View network status and tasks,” below Network and Internet.- Enter the name of the network in the Network name field.
- In the Security type field, choose the type of security used by the hidden wireless network.
- In the Security key field, enter the password of the hidden WiFi network.
- If you do not want others to see the password you type, check the "Hide characters" checkbox.
- If you want your device to connect to this network automatically when in range, check the box that says "Start this connection automatically."
- Check the box that says "Connect even if the network is not broadcasting." This makes Windows 11 search for the hidden network periodically, even if your device is not in its coverage area.
Discussion (0)
Be the first to comment.