Windows 11 version 24H2 introduces a new feature that harnesses the power of Artificial Intelligence (AI) to transform your video and audio quality, making you look and sound your best in every online interaction. From improved portrait lighting to eye contact correction that makes you look engaged with your audience, Windows Studio Effects aims to improve remote communication in a way that wasn’t possible a few years ago. But, as always, there’s a catch: not all devices can tap into this feature. In this article, I show you what Windows Studio Effects can do, which devices support it, and how you can use it. Last but not least, I also show you how to turn off Windows Studio Effects if you don’t like how it works or if it causes technical problems. Let’s get started:
What is Windows Studio Effects?
Studio Effects is a new feature of Windows, introduced in Windows 11 version 24H2. It uses the Neural Processing Unit (NPU) on your computer or device to apply special effects to its webcam or built-in microphone. The effects are activated at a hardware level, and once turned on, they’re added by default on any app using your webcam or microphone, even if the app doesn’t know about the effect you’ve chosen to apply. If you have compatible hardware, you can enable these effects for the video footage recorded by your webcam:
- Portrait Light - applies a natural appearance to your figure by improving the quality of the lighting when you’re in a poorly lit environment and removing strong screen light reflection
- Portrait Blur - ads a light blur so that you’re always in focus
- Standard Blur - applies a heavy blur to obscure background objects
- Creative Filter: Illustrated - the video looks like an illustrated drawing
- Creative Filter: Animated - the video footage looks like an animated cartoon
- Creative Filter: Watercolor - makes the video look like a watercolor painting
- Eye Contact: Standard - simulates eye contact with the people you’re talking to even when you are looking at the screen instead of the webcam
- Eye Contact: Teleprompter - maintains eye contact even when you’re reading content from the screen
- Automatic framing - the webcam keeps you in the frame and in focus, zooming in and out as necessary
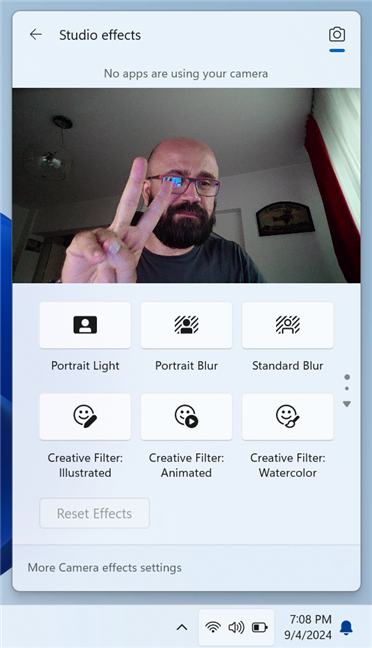
Studio Effects on a laptop with a Qualcomm Snapdragon X Elite processor
Windows Studio Effects also includes a Voice Focus effect for the integrated microphone, which filters out background noise and ensures your voice is heard clearly during video calls.
Which devices support Windows Studio Effects?
Unfortunately, Windows Studio Effects works only on a Copilot+ PC with an NPU boasting over 40 tera operations per second (TOPS), and it requires a compatible webcam and microphone. If your device has an NPU that can perform less than 40 trillion operations per second (TOPS), only the following effects are available:
- Background effect: Standard and Portrait - Standard applies a simple Gaussian blur effect, while Portrait enables a subtle bokeh-style blur effect or an in-depth-based blur, depending on your device's capabilities.
- Eye Contact: Standard - applies a subtle correction when you look down from the camera to the screen. Remember that it does not adjust the left or right movement of the eyes.
- Automatic framing - detects the person in the webcam’s field of view and crops and zooms to keep them framed.
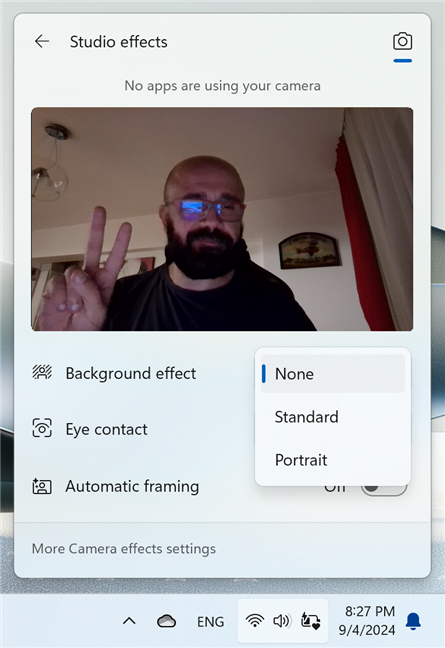
Studio Effects on a laptop with an AMD Ryzen AI processor
Voice Focus is also available, but only on devices with a compatible microphone.
Problems with Windows Studio Effects
In my early testing of Windows Studio Effects on two Copilot+ PC devices that meet the minimum requirements of this feature, I encountered the following problems:
- The full suite of effects is available (at the time of writing) only on Copilot+ PC devices powered by Qualcomm Snapdragon X Elite and X Plus processors.
- Even though many Copilot+ PCs exceed the minimum requirements, those powered by AMD's Ryzen AI 300 series can only access the basic effects. It looks like devices powered by Intel Core Ultra 200V series processors also have the same fate. Why is that? Only Microsoft knows. It seems unfair that the company prioritizes Qualcomm devices over its long-term partners, AMD and Intel.
Another issue you may encounter is that Windows Studio Effects may overlap with other apps that apply effects to your video footage. For example, if you enable a blur effect in Windows Studio Effects, it gets applied to all your webcam video footage and all apps using the webcam. However, some apps may have their effects that you can apply on top, overlapping with Windows Studio Effects. Therefore, you can end up in situations like these:
- You turn on a blur effect in Windows Studio Effects
- You run a video conferencing app like Zoom, which says its blur effect is turned off. However, you see it enabled, leading to confusion.
- You enable a blur effect in the app you’re using (in this case, Zoom), and now two blur effects are applied, wasting system resources and leading to poor results.
Therefore, when you’re using video effects, you should enable them only from Windows Studio Effects or the specific app that you want to use, not both.
How to enable and use Windows Studio Effects in Windows 11
Studio Effects can be enabled by using Quick Settings or the Settings app. I cover both situations.
How to turn on and personalize Windows Studio Effects from Quick Settings
If you have a Copilot+ PC device with a Qualcomm Snapdragon X Elite or X Plus processor, like the ASUS Vivobook S 15 I recently reviewed, you get the full suite of video effects. In order to access them, click or tap the Wi-Fi, Volume, or Battery icons in the bottom-right corner of the taskbar and then on Studio effects.
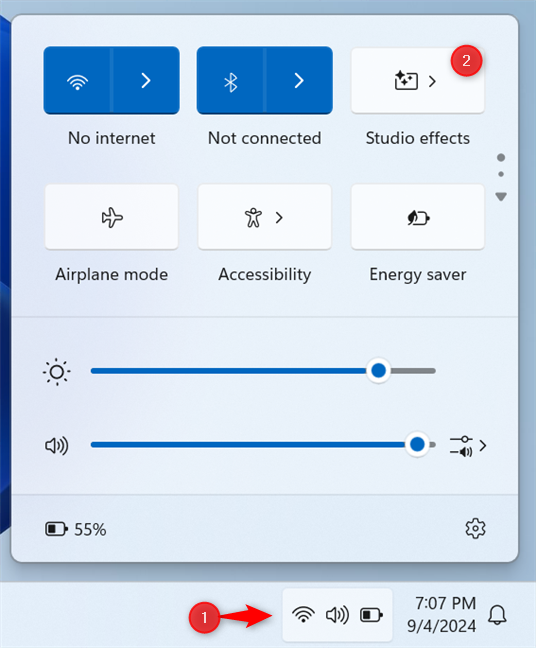
Enabling Studio Effects in Windows 11
TIP: Did you know that pressing Windows + A on your keyboard allows you to access Quick Settings?
Now, you see the list of Studio effects available on your specific device. This list varies depending on the capabilities of your system. At the top, you have the Camera icon, which informs you that you are seeing the effects available only for the webcam. You may also see a Microphone icon next to it, allowing you to access its effects. Navigating between effects is done using the dots and arrows on the right side. After you click or tap the Next Page arrow, you then see a Previous Page arrow.
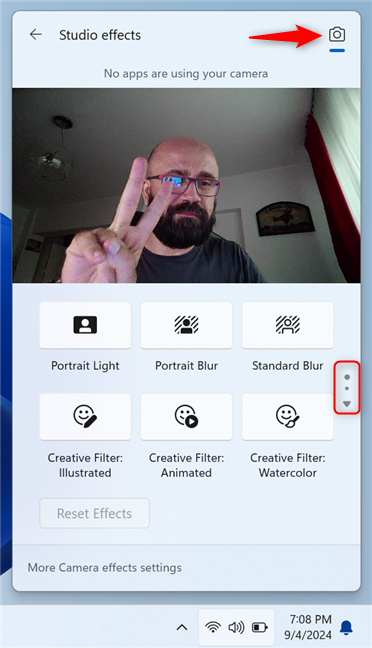
Navigating Studio effects in Quick Settings
If you want to enable an effect, simply click or tap on it. You immediately see a preview of what it does in the video feed above. You can also select multiple effects, like I did in the screenshot below.
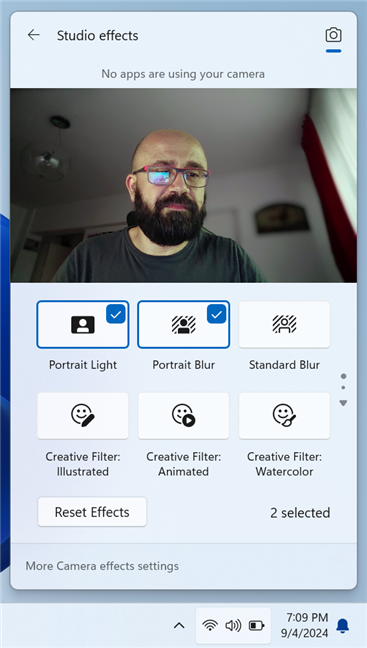
Enabling the video effects you want
You get a different list of Studio effects if you have a Copilot+ PC device with an AMD or Intel processor, like the ASUS Zenbook S 16 I used for this tutorial. As you can see, the list is organized differently, with a drop-down list and switches. There’s no need to navigate to a different page because all the video effects fit into one Quick Settings page.
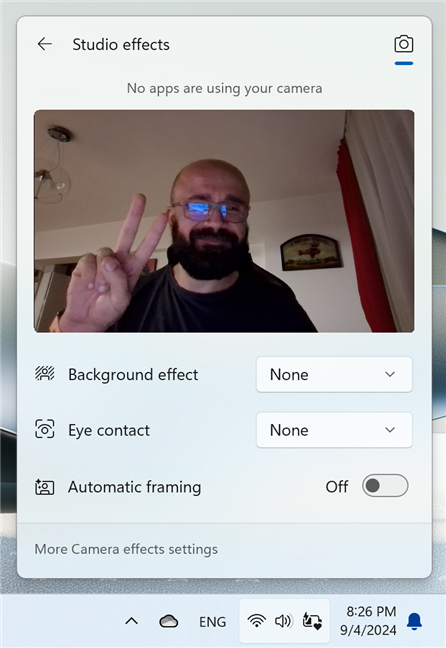
Navigating the more limited Studio effects experience
If you want to enable a Studio effect, click or tap on the drop-down list next to it and make your choice, or click or tap the switch next to its name.
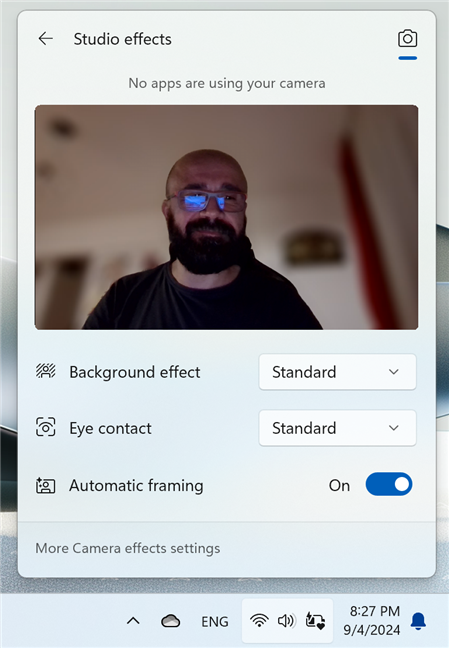
Enable Studio effects on a laptop with AMD Ryzen AI
TIP: After you enable the effects you plan to use, here’s how to test and use your webcam in Windows with the Camera app.
How to enable and configure Windows Studio Effects from Settings
While accessing the Windows Studio Effects from Quick Settings is fast and convenient, setting them up from the Settings app allows for more configuration. Here’s how it works:
First, open the Settings app in Windows 11 (Windows + I) and go to Bluetooth & devices > Cameras. Then, click or tap on the name of your webcam. In my situation, the webcam is named ASUS FHD webcam.
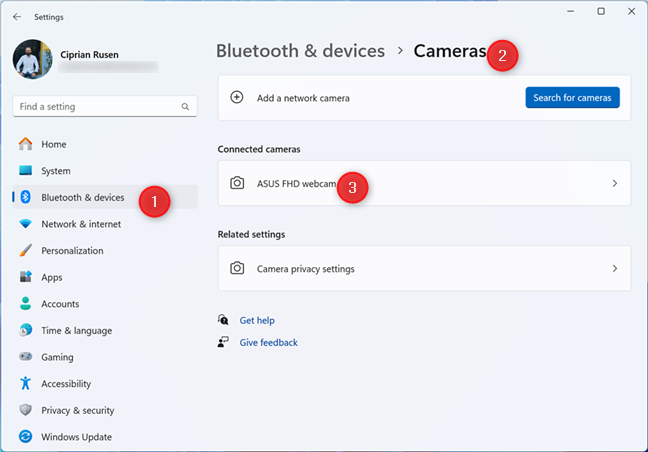
Accessing the webcam's settings
You then see a page with all the settings available for your webcam. This list varies from device to device, and you may see different settings. At the top, you also see a video feed that allows you to preview any changes you make on this page. Under the video feed, you see the Windows Studio Effects section, with switches for all the effects you can apply or disable.
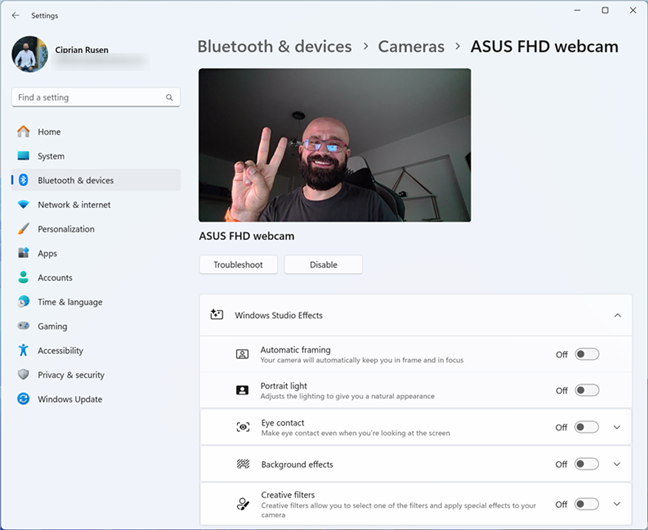
Windows Studio Effects in the Settings app
Click or tap the name of an effect to reveal different options. Select the setting you want, and then click or tap the switch next to the effect to turn it On.
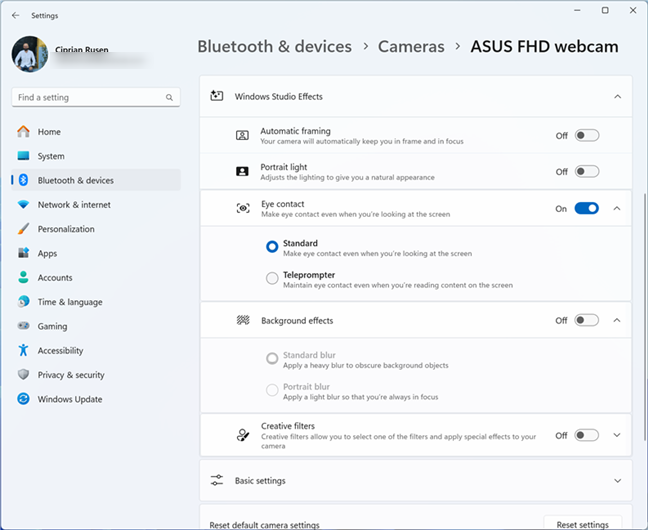
Enabling the effects you want to use
Scrolling down this page, you should also see a section named Basic settings. Click or tap on it to expand it and configure other settings for your webcam, like its Zoom level or Brightness.
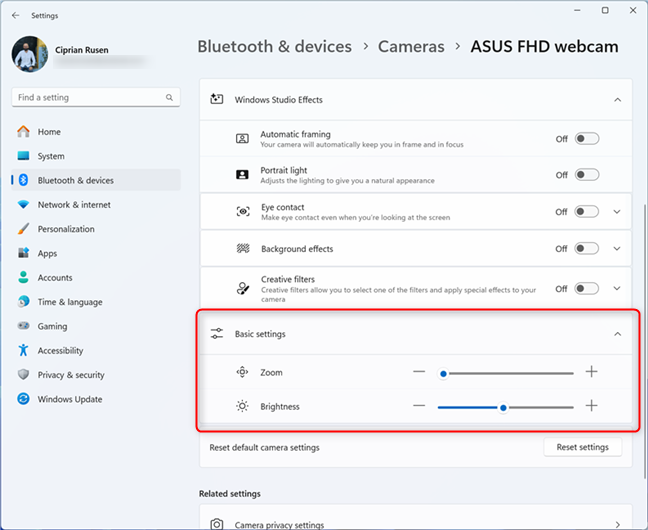
You get fewer basic settings on some devices
On Copilot+ PC devices with fewer Windows Studio Effects, the webcam’s settings page looks similar to the one in the screenshot below. As you can see, you get access only to three major visual effects.
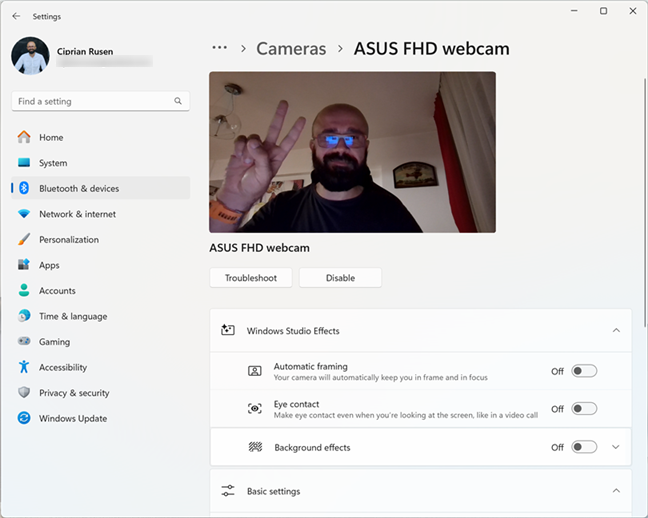
The more limited Windows Studio Effects experience
You can expand only the Background effects and choose the version you want. As in the previous example, enabling an effect involves clicking or tapping on the switch next to it and turning it On. One aspect I appreciated about the ASUS Zenbook S 16 that I’m using is that it offered me a lot more basic settings for controlling more aspects of the webcam: Brightness, Contrast, Sharpness, and Saturation.
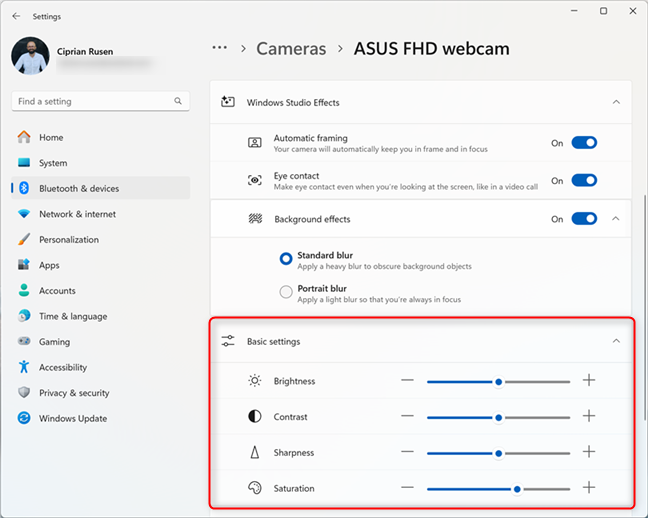
You get more basic settings on some devices
When you’re done setting the video effects, click or tap X to close Settings.
TIP: Did you know that on Copilot+ PC, your webcam detects whether you’re at your computer and turns off the screen automatically when you walk away, using a new feature called Presence Sensing?
How to enable Voice Focus for your microphone
In its initial demo of Windows Studio Effects, Microsoft shared how you can turn on the Voice Focus effect for your microphone straight from Quick Settings, as you do with the webcam effects. Unfortunately, on the devices I’ve been using, this option is missing, and enabling Voice Focus can be done only from Settings, like this:
Open Settings (press Windows + I) and go to System > Sound. Look for the Input section and click or tap on the name of your microphone. In my case, it’s Microphone Array.
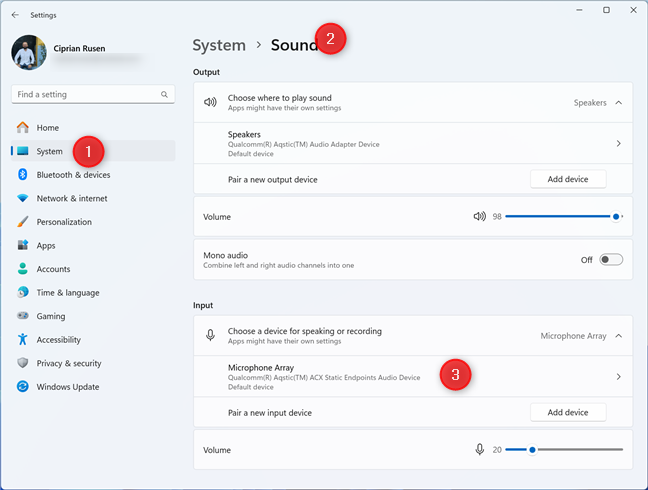
Accessing the properties of your microphone in the Settings app
You then see the properties of your microphone. Scroll down to Audio enhancements, click or tap on the drop-down list next to it, and choose Microsoft Windows Studio Voice Focus. Next, click or tap the switch next to Voice Focus to enable it.
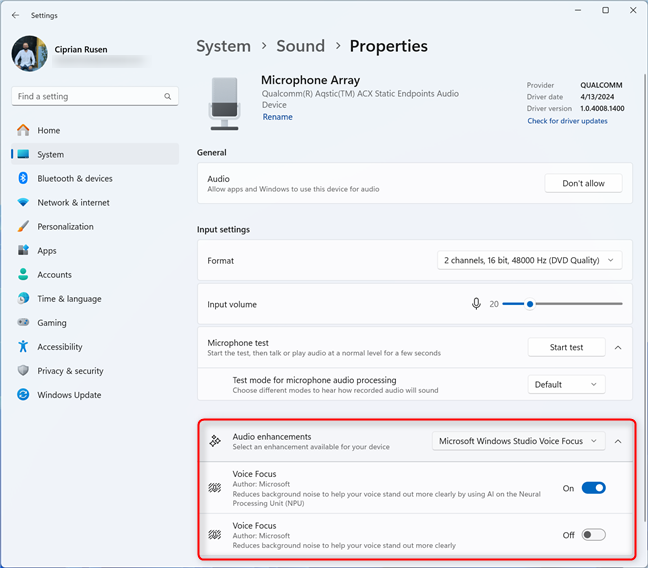
Choosing your Audio enhancements
As you can see in the screenshot above, there are two Voice Focus switches. The first enables this feature and processes it using the NPU, while the second uses your computer’s processor. Ensure that you enable the first Voice Focus option instead of the second for increased battery life and better performance.
If you have a Copilot+ PC device with an AMD or Intel processor, like the ASUS Zenbook S 16 I’m using, you may find it frustrating that there’s no Microsoft Windows Studio Voice Focus audio enhancement available. You can enable Voice Focus, but it won’t use the built-in NPU for improved performance and energy efficiency.
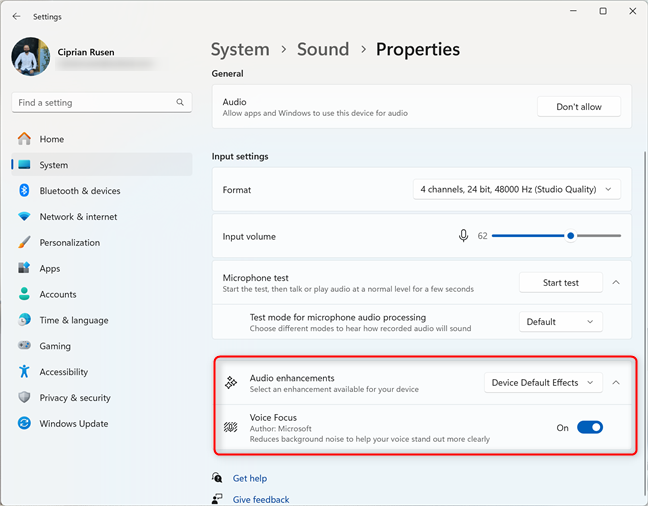
Enabling Voice Focus
This feels like an artificial limitation imposed by Microsoft to promote devices with Qualcomm Snapdragon X Elite and X Plus processors.
TIP: Here’s how to set the default microphone in Windows 11.
How to turn off Windows Studio Effects in Windows 11
Turning off Windows Studio Effects can also be done using Quick Settings and the Settings app. Again, I cover both situations, one after the other:
How to disable Windows Studio Effects from Quick Settings
Click or tap the Wi-Fi, Volume, or Battery icon in the bottom right corner of the taskbar to open Quick Settings. Alternatively, you can press Windows + A on the keyboard. Then, click or tap Studio effects.
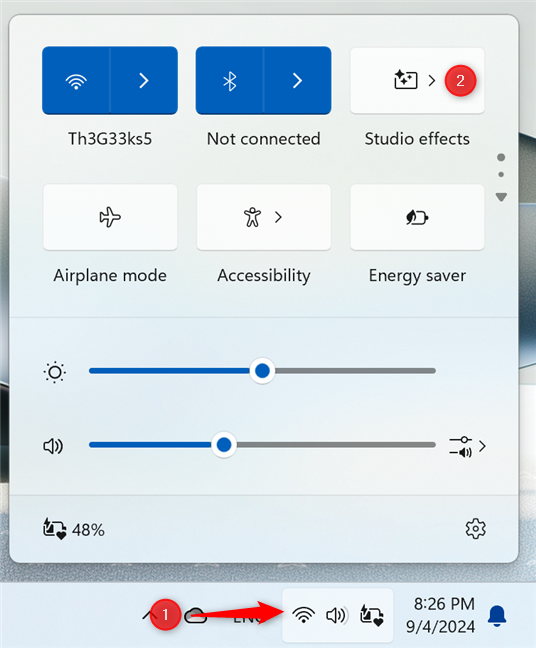
Disabling Studio effects from Quick Settings
If you can only see three major Studio effects, similar to the screenshot below, click or tap on the drop-down list next to each effect and choose None. Finally, set the switch for Automatic framing to Off.
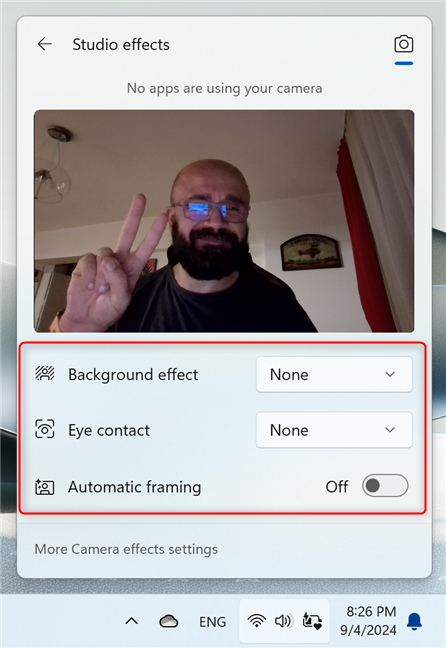
Set everything to None or Off
On devices with more effects, you see a Reset Effects button. Click or tap it, and all the selected effects are turned off immediately.
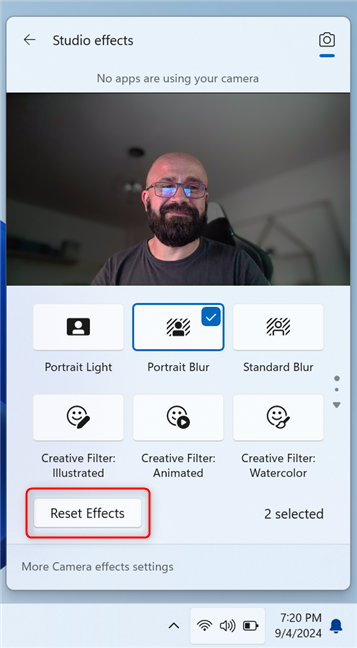
Click or tap Reset Effects
I wish all Copilot+ PC devices would get a Reset Effects button, not just some. Don’t you agree?
How to turn off Windows Studio Effects from Settings
I find that turning off Windows Studio Effects from the Settings app is more efficient because you can reset all your webcam’s settings to their defaults and start reconfiguring it from scratch. Here’s how it is done:
Open the Settings app (Windows + I) and go to Bluetooth & devices > Cameras. Then, click or tap the name of your webcam. In my situation, the webcam is named ASUS FHD webcam. Scroll down to the bottom of the settings page and find an entry named Reset default camera settings. Click or tap the Reset settings button next to it.
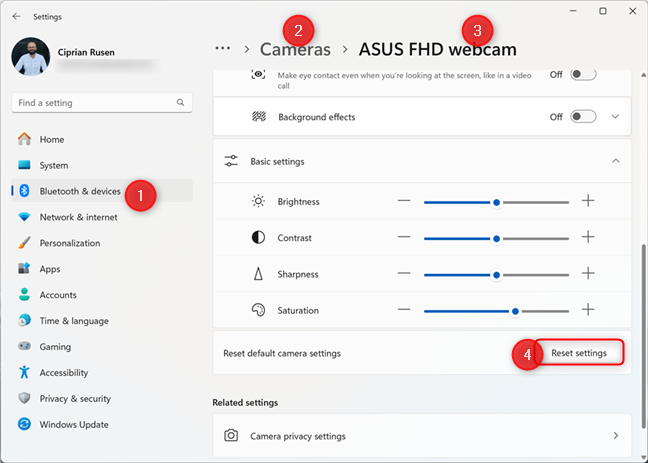
In the webcam's settings, click or tap Reset settings
As soon as you press this button, all effects are disabled, and all the basic settings of the webcam get reset to their defaults.
How to disable Voice Focus for your microphone
If you no longer want to use Voice Focus for the built-in microphone, open Settings (press Windows + I) and go to System > Sound. Look for the Input section and click or tap on the name of your microphone. You see the Properties page for your microphone. Click or tap the Voice Focus switch to turn it Off. You may also want to click or tap the drop-down list next to Audio enhancements and select something other than Microsoft Windows Studio Voice Focus.
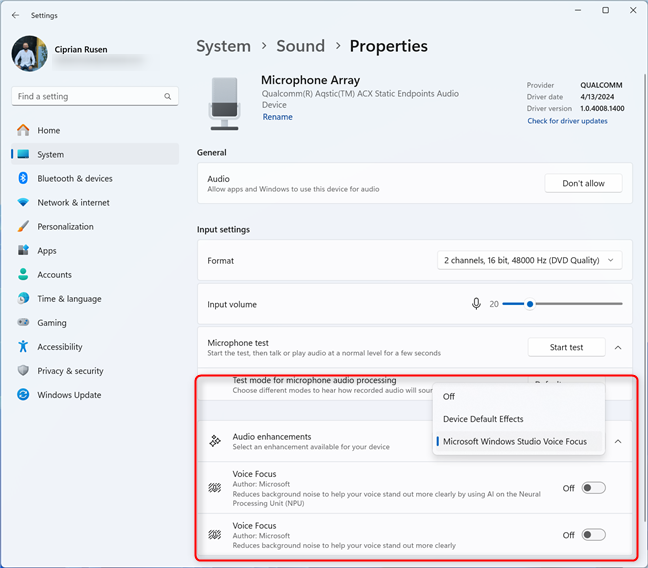
Turning off Voice Focus
Voice Focus is now turned off, and your microphone works using its default effects.
BONUS: Why is Windows Studio Effects not showing up?
If you access Quick Settings and don’t see a Studio Effects button like the one in my earlier screenshots, these are the possible scenarios:
- Your computer or device doesn’t have an NPU for processing AI-based tasks. You’ll never get access to this feature unless you upgrade to a new computer with an NPU.
- Your computer or device has an NPU, but you haven’t yet received the update necessary to enable this feature. Here’s how to check and install the latest updates for Windows 11.
- Your computer or device has an NPU, but you haven’t installed the appropriate drivers for your webcam and microphone. In this situation, check the support page for your device’s manufacturer and install the latest drivers. Then, try again and see if Studio effects shows up.
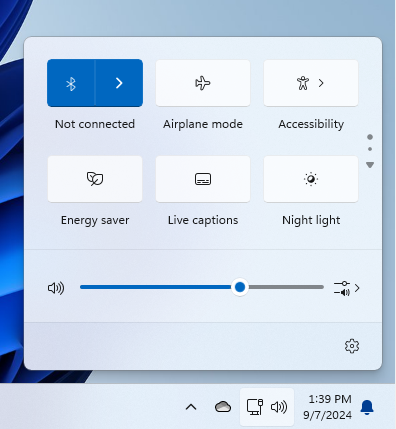
Windows Studio Effects not showing up
Do you like Windows Studio Effects?
Windows Studio Effects shows some promise, but its current implementation has limitations compared to Microsoft's initial demos. Unfortunately, device compatibility issues, potential app conflicts, and inconsistent features across Copilot+ PC architectures hinder this feature’s impact. Microsoft should aim for a more uniform experience and improved accessibility, such as adding Voice Focus to Quick Settings. If you have a compatible device, I encourage you to try Studio Effects and share your experience using the commenting options below.


 09.09.2024
