

When you plug in a new microphone on Windows 11, it usually becomes the default one. But if you frequently switch between different sound devices, you might notice that your usual mic for Skype or Discord stops working, or the settings don’t get restored properly. In this guide, I’ll show you a couple of simple ways to check and set the default microphone in Windows 11. I’ll also walk you through some easy steps for troubleshooting your microphone if it isn’t working. Sounds interesting? Then read on!
 Defaults for communication and audio can be different
Since they have different usage scenarios, you should know which one applies to your particular case, so here’s a short explanation:
Defaults for communication and audio can be different
Since they have different usage scenarios, you should know which one applies to your particular case, so here’s a short explanation:
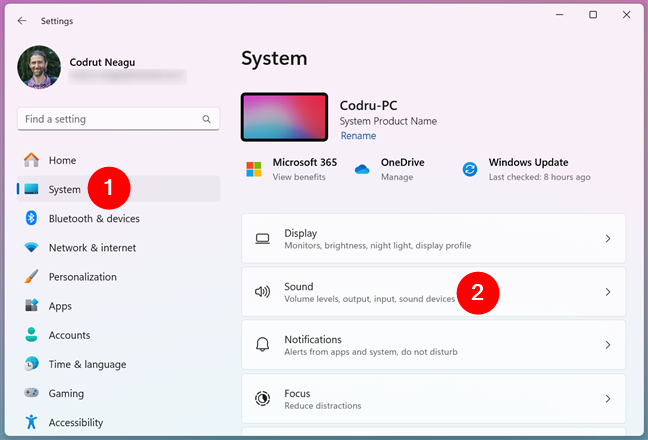
 Click on Sound in the System section of the Settings app
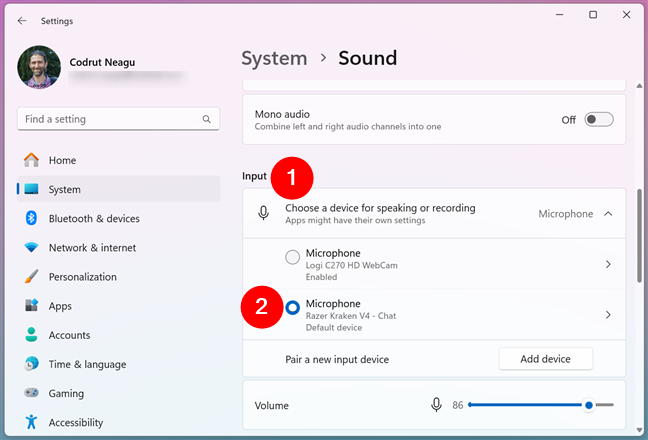
Next, scroll down to Input. There, you should have the list of available microphones. Set the one you want as the default recording device by clicking or tapping the round checkbox next to its name.
Click on Sound in the System section of the Settings app
Next, scroll down to Input. There, you should have the list of available microphones. Set the one you want as the default recording device by clicking or tapping the round checkbox next to its name.
 Click the box next to the microphone name to set it as default
If you need to, you can set different microphones for communication and for audio recordings. The first step to do this is clicking or tapping the microphone you want to configure in the list above. This opens the settings page for the chosen recording device. Locate the Set as default sound device option in the General section. Click or tap the button next to it to expand the list, then choose one of the two available options.
Click the box next to the microphone name to set it as default
If you need to, you can set different microphones for communication and for audio recordings. The first step to do this is clicking or tapping the microphone you want to configure in the list above. This opens the settings page for the chosen recording device. Locate the Set as default sound device option in the General section. Click or tap the button next to it to expand the list, then choose one of the two available options.
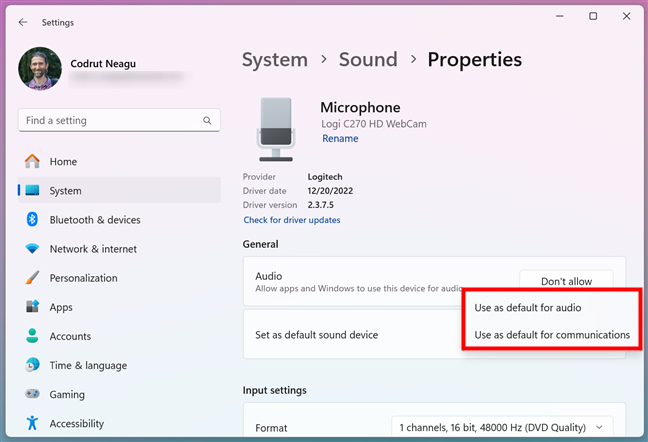
 The menu allows you to set defaults for audio and communications
NOTE: If the Set as default sound device option isn’t visible, the chosen microphone is already the default device for both communication and audio.
The menu allows you to set defaults for audio and communications
NOTE: If the Set as default sound device option isn’t visible, the chosen microphone is already the default device for both communication and audio.
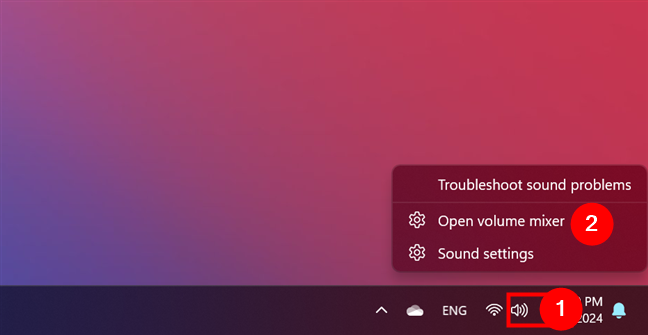
 Open the volume mixer from the taskbar
In the Volume mixer window, locate the Input device field and click or tap the dropdown menu next to it. In the list, select the microphone you want to use. Please note that this changes the default input device for audio only, not for communication.
Open the volume mixer from the taskbar
In the Volume mixer window, locate the Input device field and click or tap the dropdown menu next to it. In the list, select the microphone you want to use. Please note that this changes the default input device for audio only, not for communication.
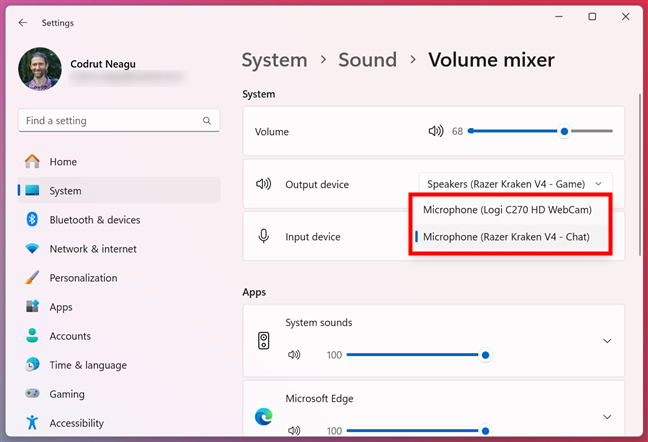 Expand the list next to Input device and select one of the items
If you want to change the microphone that each application uses, you can find the programs that have microphone access in the Apps section of the Volume mixer window. Find the app you’re interested in and click or tap the arrow on the right. This lets you specify the input and output devices for that application. Then, click or tap the button next to Input device.
Expand the list next to Input device and select one of the items
If you want to change the microphone that each application uses, you can find the programs that have microphone access in the Apps section of the Volume mixer window. Find the app you’re interested in and click or tap the arrow on the right. This lets you specify the input and output devices for that application. Then, click or tap the button next to Input device.
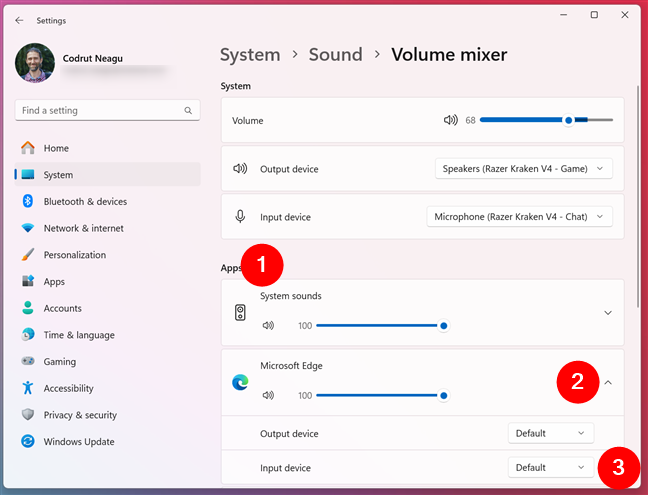
 Set the default microphone for each application in Windows 11
Finally, select the desired microphone.
Set the default microphone for each application in Windows 11
Finally, select the desired microphone.
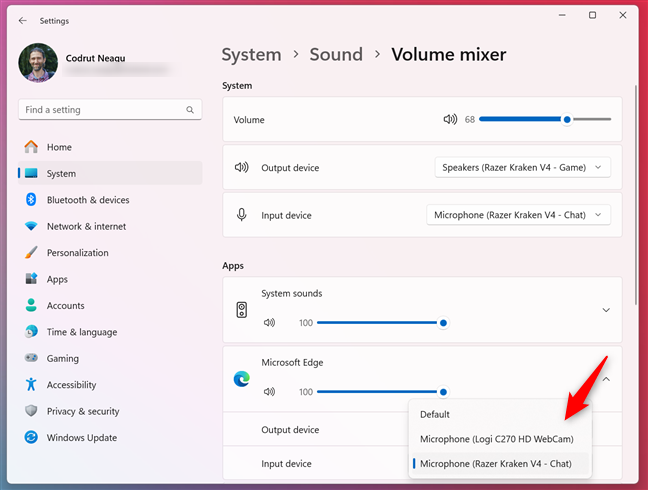
 The microphone used by a certain app in Windows 11
The changes are applied immediately.
The microphone used by a certain app in Windows 11
The changes are applied immediately.
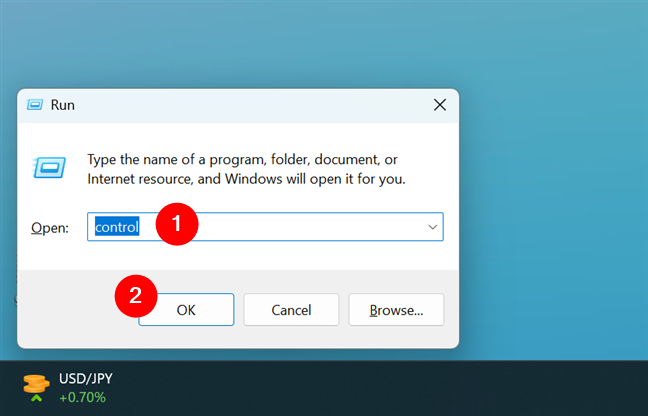
 Open the Control Panel using the Run window
In the Control Panel window, go to Hardware and Sound.
Open the Control Panel using the Run window
In the Control Panel window, go to Hardware and Sound.
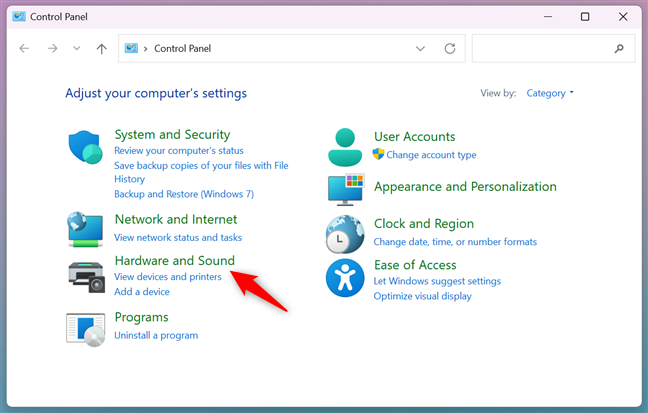
 Go to Hardware and Sound in the Control Panel
Locate the Sound section and either click or tap it or Manage audio devices. This opens the Sound window.
Go to Hardware and Sound in the Control Panel
Locate the Sound section and either click or tap it or Manage audio devices. This opens the Sound window.
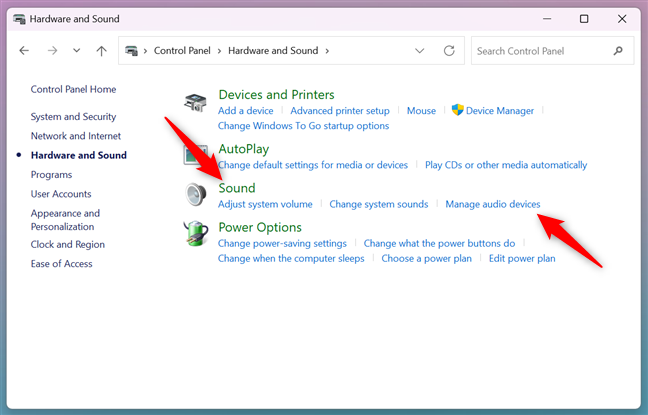
 Any of the two highlighted links opens the Sound window
HINT: You can quickly access the Sound window directly from the desktop by pressing Windows + R, typing mmsys.cpl and hitting Enter.
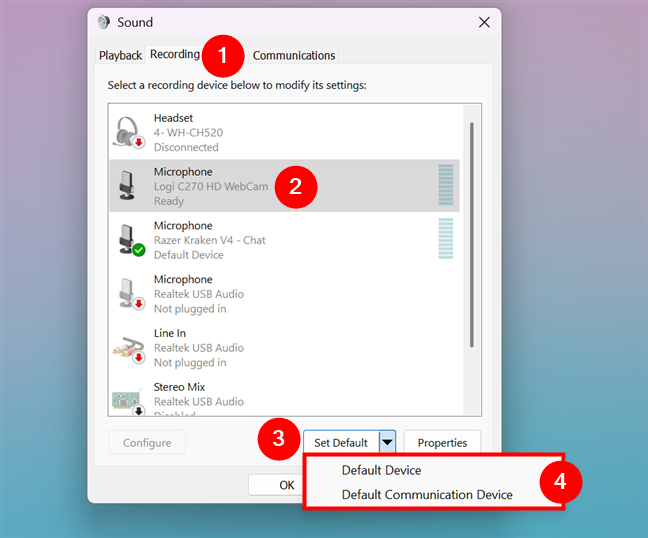
Next, go to the Recording tab. It lists all recording devices, including microphones and other audio inputs. It also shows which of the devices are set as default. Select the microphone you want to set as default and then press the Set Default button. If you want to set the microphone as default for audio or for communication only, press the arrow next to the Set Default button instead and choose one of the displayed options.
Any of the two highlighted links opens the Sound window
HINT: You can quickly access the Sound window directly from the desktop by pressing Windows + R, typing mmsys.cpl and hitting Enter.
Next, go to the Recording tab. It lists all recording devices, including microphones and other audio inputs. It also shows which of the devices are set as default. Select the microphone you want to set as default and then press the Set Default button. If you want to set the microphone as default for audio or for communication only, press the arrow next to the Set Default button instead and choose one of the displayed options.
 Setting the default output device using the Control Panel
Alternatively, you can right-click the microphone in the list, then select one of the options in the context menu. Press OK to close the Sound window.
Setting the default output device using the Control Panel
Alternatively, you can right-click the microphone in the list, then select one of the options in the context menu. Press OK to close the Sound window.

 Use the context menu to set the default microphone in the Sound window
The changes you’ve made are instantly applied.
Use the context menu to set the default microphone in the Sound window
The changes you’ve made are instantly applied.

 If your microphone isn't working, check the Input volume
If the bar next to your microphone isn’t moving, try the other steps to troubleshoot it.
If your microphone isn't working, check the Input volume
If the bar next to your microphone isn’t moving, try the other steps to troubleshoot it.
 If your microphone isn't working, enable the Microphone access switch
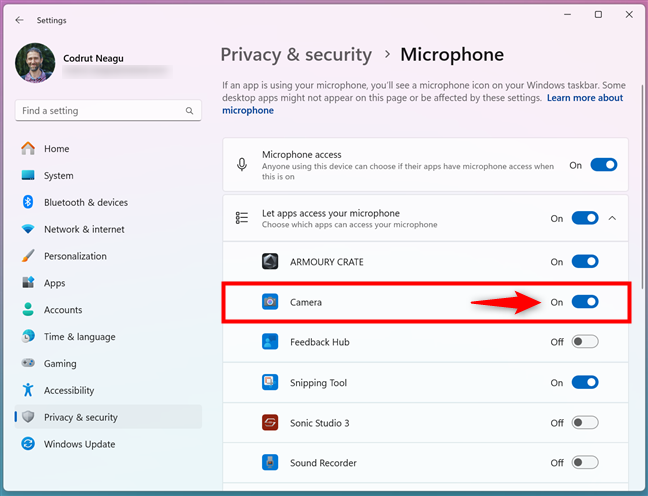
Then, check if the microphone starts working again. In case it refuses to work only in a particular application, check that the respective app has its switch turned On in the microphone’s privacy settings also. Like this:
If your microphone isn't working, enable the Microphone access switch
Then, check if the microphone starts working again. In case it refuses to work only in a particular application, check that the respective app has its switch turned On in the microphone’s privacy settings also. Like this:
 If your microphone isn't working, check the privacy settings
TIP: It doesn’t hurt checking that all the apps you want to use have permission to access your microphone. Oh, and if you want more details on this subject, you may want to also read this guide: How to allow or stop apps from accessing the microphone in Windows.
If your microphone isn't working, check the privacy settings
TIP: It doesn’t hurt checking that all the apps you want to use have permission to access your microphone. Oh, and if you want more details on this subject, you may want to also read this guide: How to allow or stop apps from accessing the microphone in Windows.
 If your microphone isn't working, open its Properties
In the Microphone Properties window, go to the Advanced tab and click or tap the Restore Defaults button.
If your microphone isn't working, open its Properties
In the Microphone Properties window, go to the Advanced tab and click or tap the Restore Defaults button.
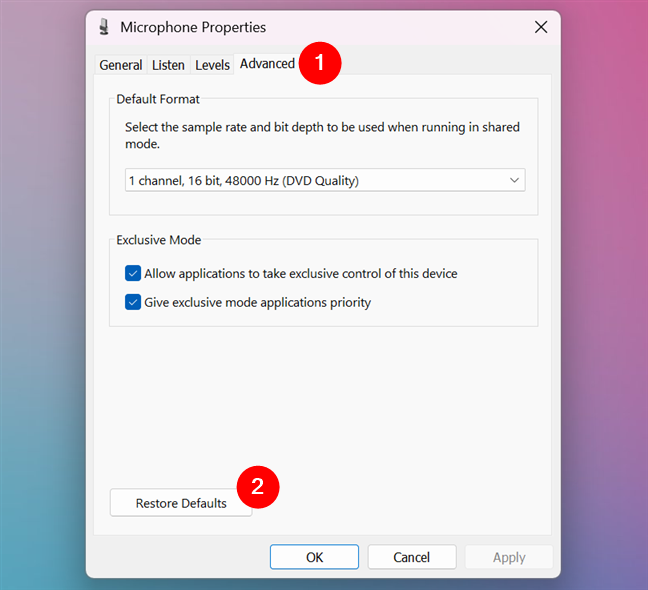
 How to reset the microphone settings in Windows 11
Press OK and close all the windows you’ve opened to get here. Then, check if your microphone is working again.
How to reset the microphone settings in Windows 11
Press OK and close all the windows you’ve opened to get here. Then, check if your microphone is working again.
Default audio device versus default communication device
Windows has separate settings for communication and audio, and you can see the two options when selecting a default. However, it does a poor job of explaining the differences between the two.- Default communication device - the device that Windows uses for calls and video calls in dedicated apps such as Microsoft Teams, Discord, or Skype.
- Default audio device - also displayed as Default device - the device used by Windows 11 for all other applications that need audio input and output.
1. How to change the default microphone in Windows 11 using the Settings app
A simple way to set the default microphone in Windows 11 is by using the Settings app. Open Settings by pressing Windows + I, select the System section, and then look for Sound. Click or tap Sound to access the related settings.2. How to set the default microphone in Windows 11 for each app using the volume mixer
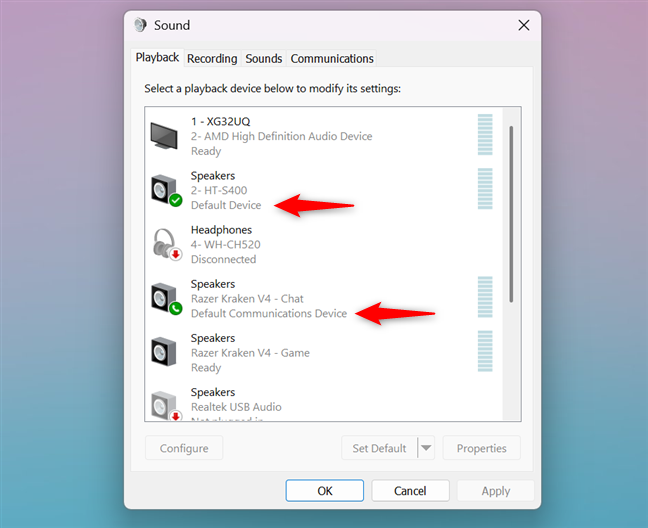
Another way to quickly change the microphone used as default is by right-clicking the volume icon on the taskbar and choosing Open volume mixer.3. How to view and change the default microphone in Windows 11 using the Control Panel
If you are used to working in the Control Panel, you can change the default microphone from it. First, open the Control Panel in Windows 11. One way to do this is by pressing Windows + R on your keyboard to open the Run window. Then, type control and hit Enter on your keyboard or press OK.Why is your microphone not working in Windows 11?
If your external or internal microphone isn’t working in Windows 11, there are some simple steps you can take in order to fix it. Here’s what you could try:1. Check your microphone’s connections
First, make sure your microphone is properly plugged in. If you’re using a USB microphone, try plugging it into a different USB port. Do the same if it’s a webcam’s built-in microphone. In case it’s a headset microphone, ensure the cable is securely connected to the correct port.2. Check the microphone’s settings
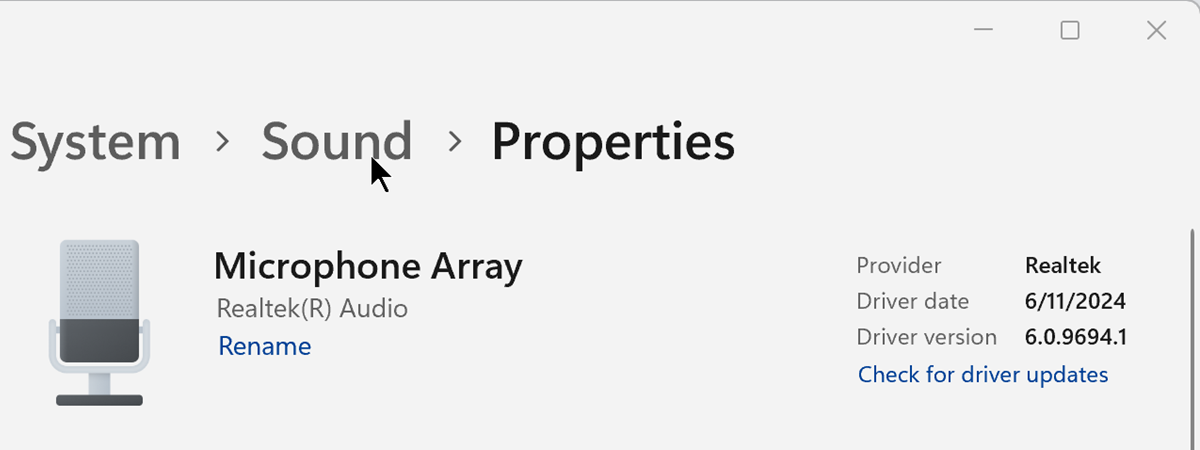
Follow the steps in the second chapter of this guide to open Settings, navigate to System > Sound, and access the Properties of your default microphone. Then, speak into the microphone to see if the bar next to Input volume moves. If it does, your microphone is working.3. Check the microphone privacy settings
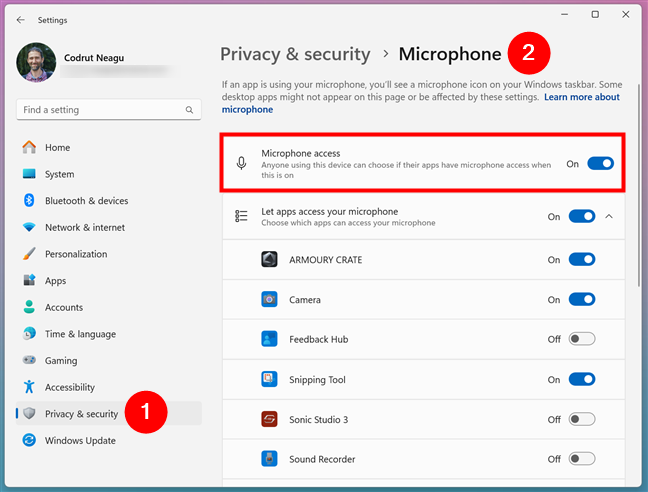
If your microphone isn’t working, Windows 11 may be blocking access to it. In this case, you should check its privacy settings. To do that, open the Settings app, go to Privacy & security > Microphone, and check that the Microphone access switch is On.4. Reset your microphone’s settings in Windows 11
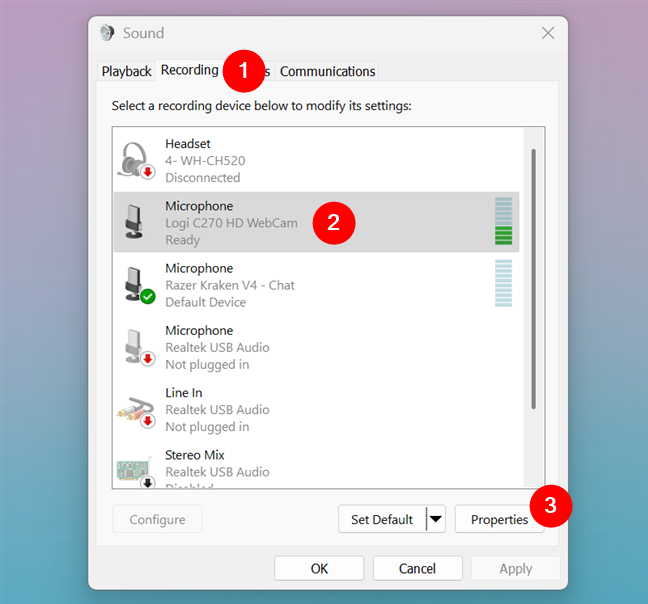
Your microphone might be misbehaving because some of its settings are poorly configured. You can make sure that’s not an issue by resetting your microphone settings in Windows 11. First, follow the steps in chapter 3 (named How to view and change the default microphone in Windows 11 using the Control Panel) to get to the Sound window. Then, in the Recording tab, select your microphone and click or tap the Properties button.

Discussion (1)
Thank you for the microphone tutorial. I’ve been using my laptop default microphone for meetings (usually Google Meet) ect and it stopped working. I followed the tutorials and again checked all the settings and I either get “microphone not found” or “no audio devices are installed” Is anyone else having this issue? Any other recommendations to try?