If you want to benefit from clear and high-quality audio during voice calls, video conferences, audio recordings, or while streaming content online, you need to configure and test your microphone. The good news is that Windows 11 gives you all the settings and tools you need to test your microphone, adjust mic sensitivity, and boost your microphone volume. In this guide, I’ll show how to find the microphone settings, how to configure, and how to test your microphone. Let’s waste no more time and get started:
How to get to the microphone settings in Windows 11
Open the Windows 11 Settings (Windows + I) and select System in the left sidebar. Then, click or tap Sound on the right side of the app.
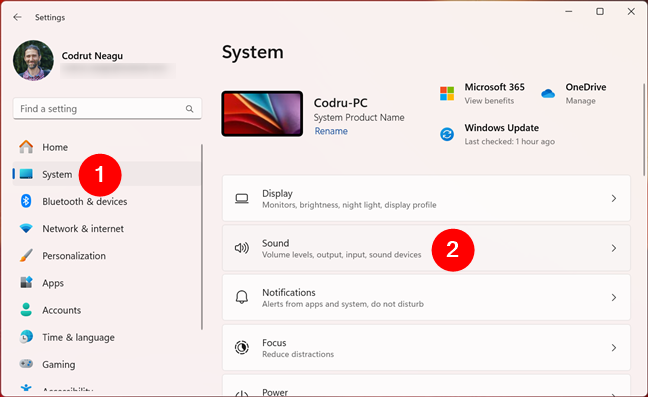
Open Settings, go to System, and click Sound
Now, scroll down to the Input section. There, you can see a drop-down labeled Choose a device for speaking or recording. This lists all the microphones connected to your system.
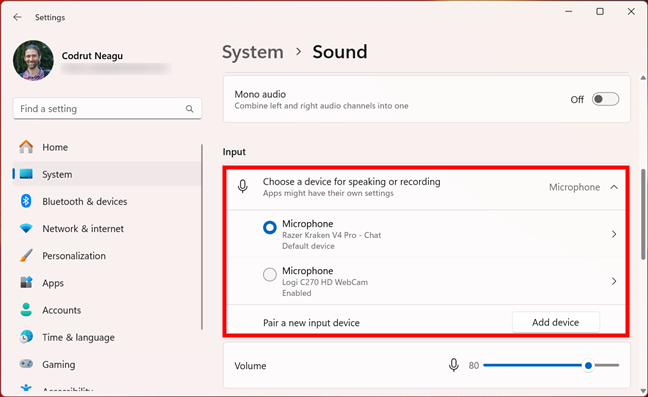
The microphones connected
In the screenshot above, you can see that I had two microphones available on my computer: one built into the Razer Kraken V4 Pro headset I’m using these days, and another built into my old Logitech C270 HD webcam. You could also have more microphones than you know available on your PC.🙂
How to select the default microphone in Windows 11
Select the microphone you want to configure by clicking or tapping the small radio button on its left. If you have multiple microphones (e.g., an external microphone and a built-in laptop mic), make sure to select the correct one.
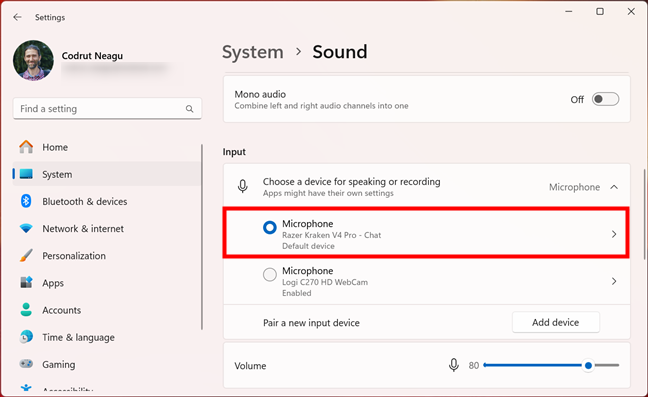
Choosing the default mic in Windows 11
TIP: Check out this guide for all the details and all the methods you can use to control which microphone is the default used on your Windows 11 computer.
Then, once you’ve selected the microphone, you can configure its settings and improve sound quality. Let’s get to it:
How to adjust the microphone settings in Windows 11
You should now be on the selected microphone’s Properties page in Settings. This is where you find the options for configuring the way your microphone works. First, let’s see…
How to rename your microphone
Before anything else, it’s worth noting that Windows 11 allows you to change the name of your microphone. If that’s something you want, click or tap the Rename link.
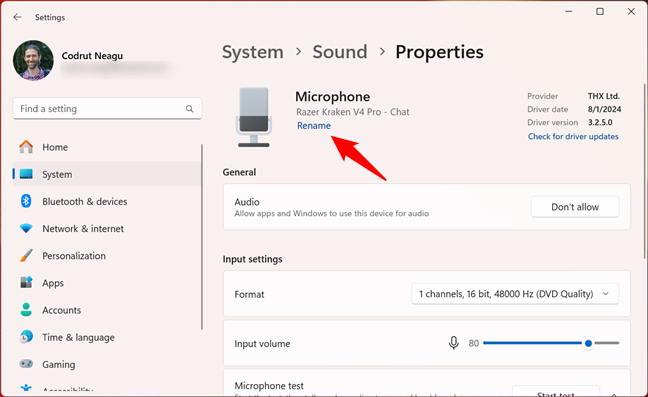
Click Rename under your mike
Type the name you want to assign to your microphone and press the Rename button.
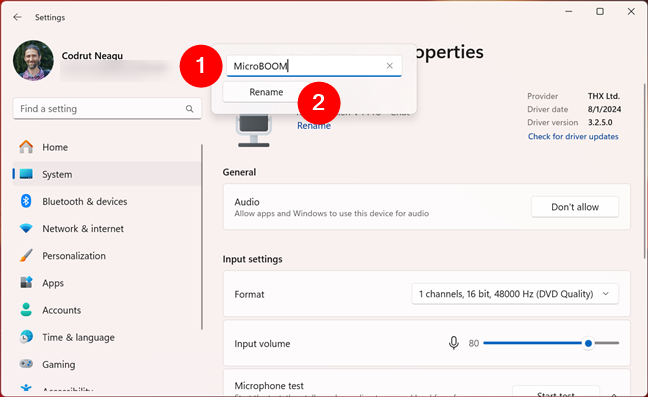
Set a new name for your microphone
After you save the microphone’s new name, you immediately see it listed in the Settings app.
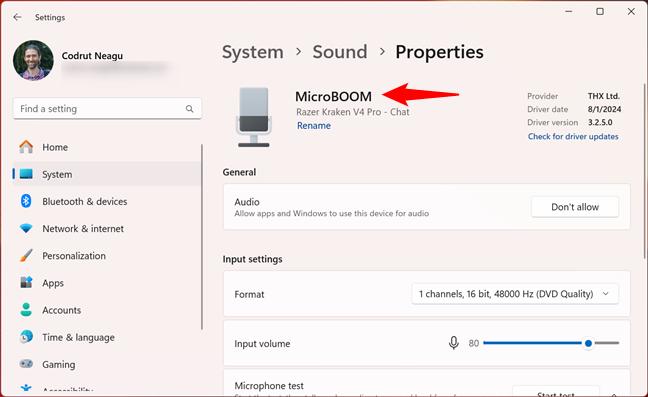
The mic has been renamed
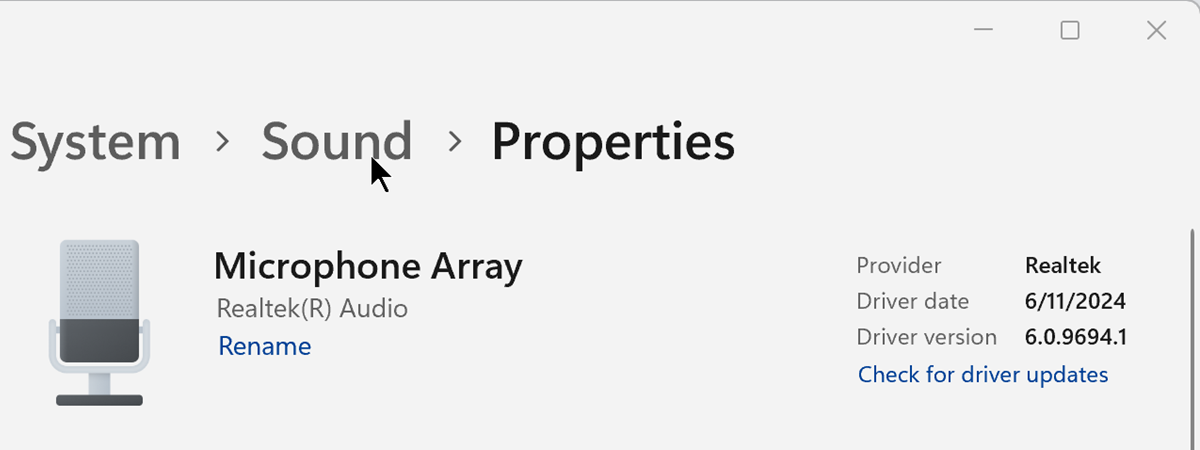
Next to the microphone’s name, you can also see a couple of details about the drivers used by Windows 11 for it, together with a Check for driver updates link.
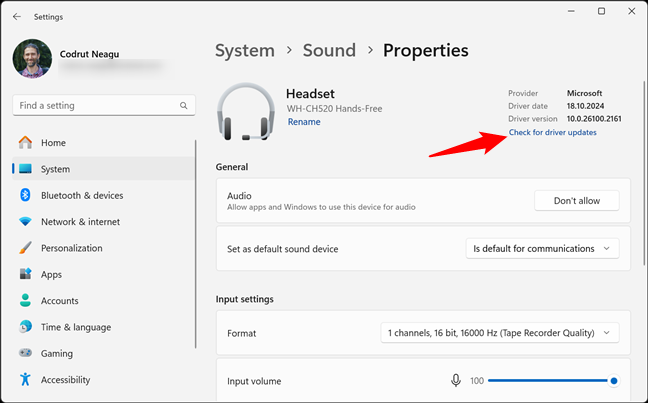
Check for driver updates
Clicking or tapping this link switches the Settings app to the Windows Update page and initiates a search for updates. If there are any new drivers available on Microsoft’s servers, they will be downloaded and installed on your computer.
How to enable or disable your microphone
Under the microphone name, you find the General section. It includes only one setting called Audio, that lets Windows 11 know whether you want to “Allow apps and Windows to use this device for audio.” In other words, it lets you disable or enable the selected microphone on your Windows 11 computer. If it’s turned on and you want it turned off, click or tap the Don’t allow button.
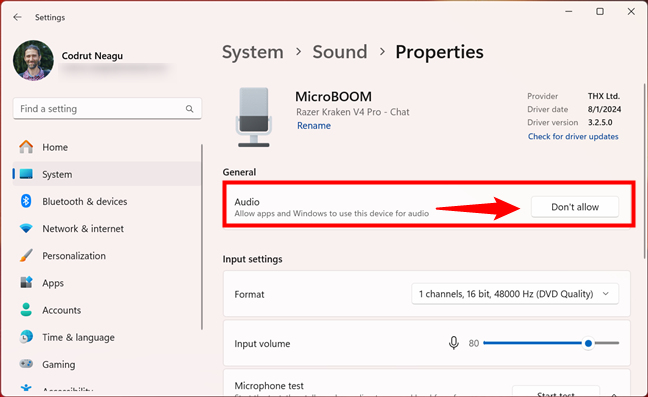
Disable the microphone
If you want to enable the microphone, press the Allow button next to Audio.
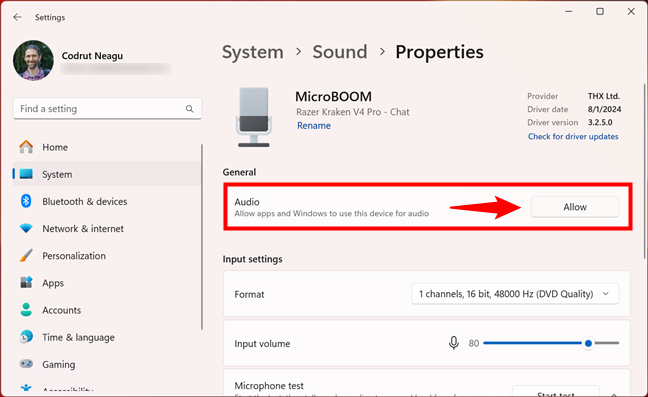
Allow apps to use the mike
How to change the audio format of microphone recordings
Next on the microphone Properties page, you find a setting called Format. On both microphones available on my Windows 11 computer, I have only one option to choose from here: 1 channels, 16 bit, 48000 Hz (DVD Quality). However, depending on your microphone’s specs, make, and model, you may get more than just one option for yours. For example, my colleague, Ciprian Adrian Rusen, uses an old Trust GXT 258 Fyru microphone, and he has six format quality options to choose from, the best being 2 channels, 16 bit, 48000 Hz (DVD Quality).
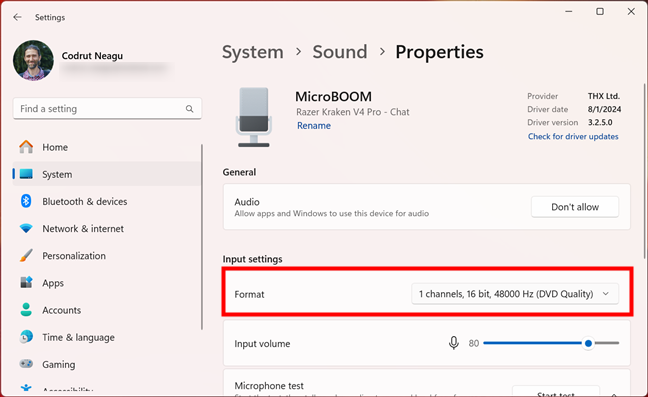
Choose a recoding format for the mic
How to change the microphone volume
Under the microphone audio Format, you find a slider labeled Input volume. Drag it to adjust the microphone’s sensitivity. If your microphone is too quiet, increase the volume. If it's too loud or distorted, decrease the volume.
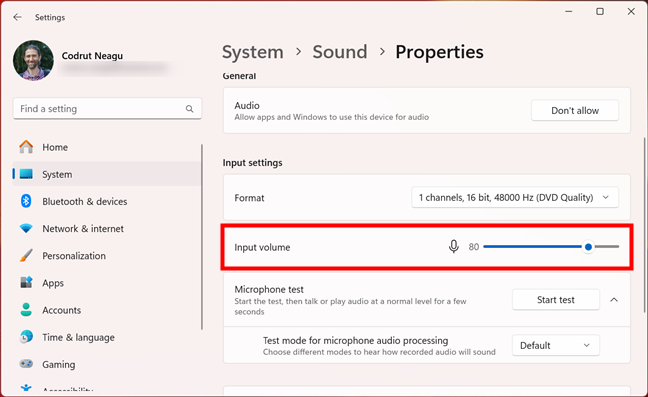
How to adjust the mic volume
How to enable or disable audio enhancements for your microphone
At the bottom of the microphone’s Properties page in Settings, you could also find a setting called Audio enhancements. This setting appears only if your microphone comes with special enhancements, like the THX Spatial Audio available on the Razer Kraken V4 Pro headset and seen in the next screenshot.
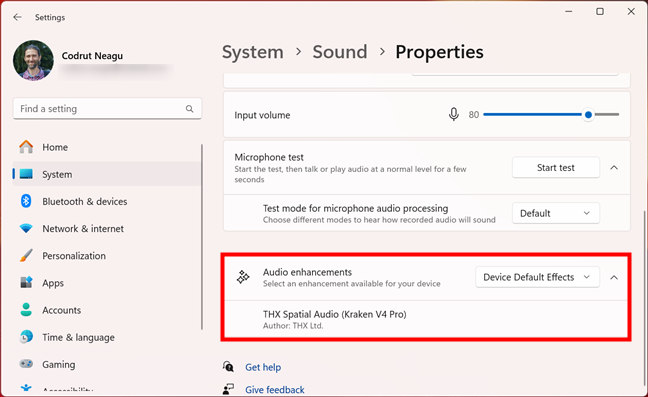
Enable and select audio enhancements for the microphone
Note that not all microphones support such special Audio enhancements. If yours does, but you don’t want to use them, you can disable the enhancements by clicking or tapping the Device Default Effects on the right and choosing Off.
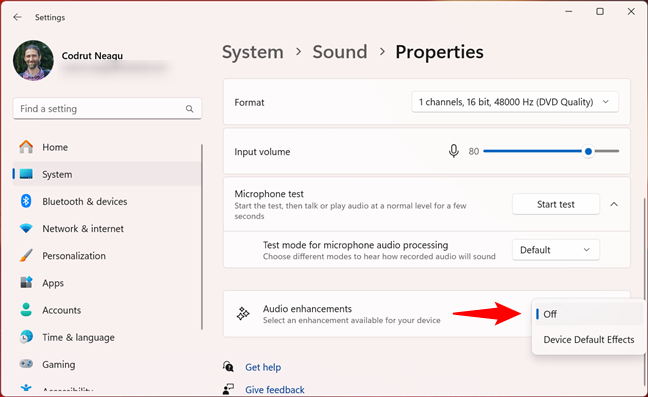
Turn mic effects off
Some computers, and especially Copilot+ PC devices like the ASUS Vivobook S 15, offer Voice Focus audio enhancements powered by artificial intelligence. If you’re using a Copilot+ PC device, here’s a detailed guide on how to enhance your video conferencing experience with Windows Studio Effects.
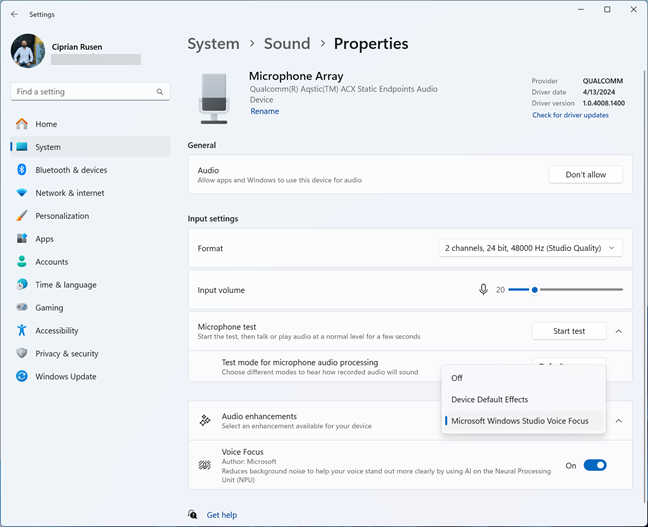
Copilot+ PC devices include Voice focus effects
Having said that, now that you’ve finished configuring your microphone, you might also want to test it. Here’s…
How to test your microphone in Windows 11
On the same Properties page of your selected microphone, you can see a section called Microphone test. There, Windows 11 instructs you to “Start the test, then talk or play audio at a normal level for a few seconds.”
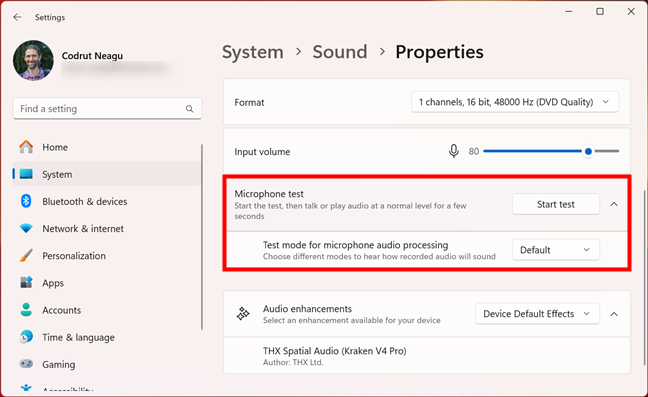
Testing the microphone in Windows 11
Before you actually test your microphone, however, you should first choose whether you want to test the microphone when recording audio with Default or Communications processing. Default mode is better for recording or streaming environments, and Communications mode is designed for speech during calls and video conferences. To select a processing mode, click or tap the option next to the Test mode for microphone audio processing setting, and choose Default or Communications.
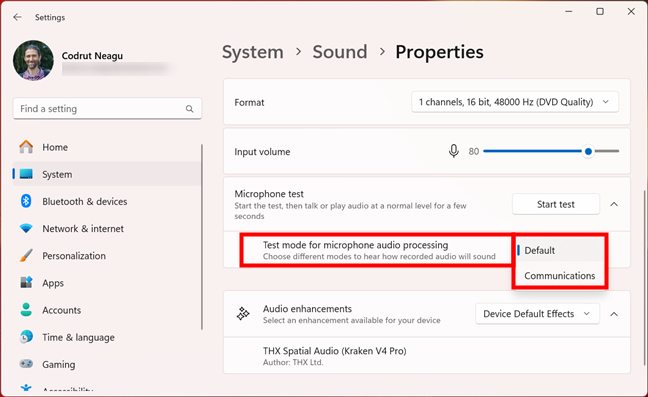
Test mode for microphone audio processing
Then, press the Start test button and speak into your microphone for a few seconds.
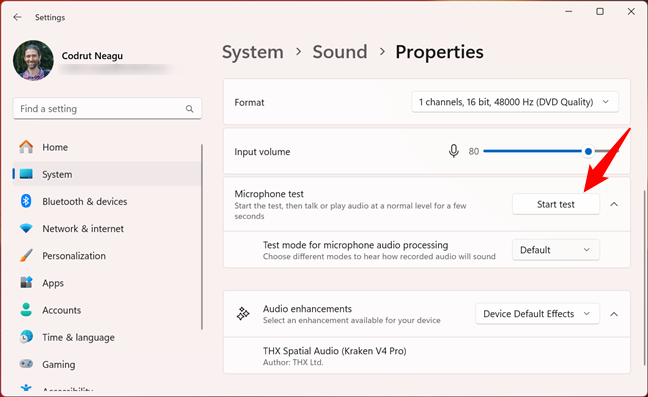
Start the mic test
After you’re done speaking, click or tap the Stop test button. Alternatively, you can simply wait, as Windows 11 will stop the recording by itself after a few seconds.
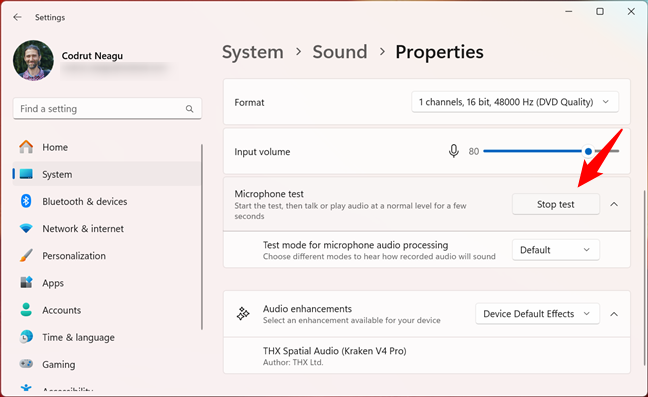
Stop the mic test
Either way, once the test is over, a new option shows up: Recorded sample. Click or tap the Play button next to it to listen to a sample of how the audio recorded by the microphone earlier sounds.
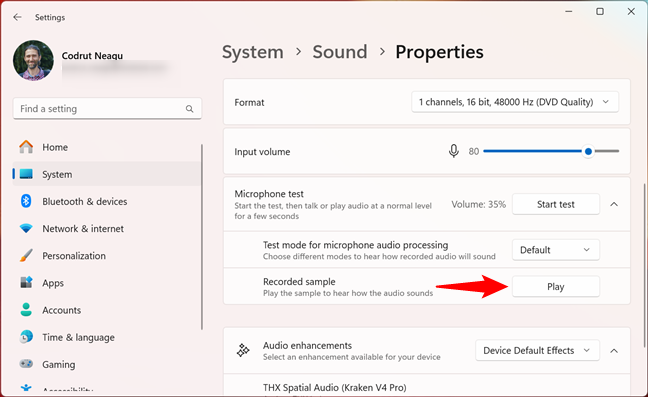
Play the mic test sample
NOTE: If no sound is coming out of your active speakers or headphones, check the Input volume slider above and make sure your microphone isn’t muted. Oh, and if the microphone works in some applications but fails to pick up sound in others, you may also want to check Windows 11’s microphone privacy settings.
Did you configure and test your microphone?
You now know how to easily adjust mic sensitivity and boost your microphone volume. You also know how to test your microphone in Windows 11. Regardless of whether you’ve added a new microphone or simply adjusted the settings of your old one, your microphone is now performing at its best, right? Out of curiosity, what are you using your microphone for? Is it for online meetings, gaming sessions, or old-school recordings? If you don’t mind spending a moment or two writing, let me know in the comments section below. Also, don’t hesitate to ask any questions you might have on this subject.


 08.11.2024