


Do you have two or more ASUS routers with AiMesh? Or maybe a ZenWiFi mesh system? Do you want to improve the coverage and bandwidth of your wireless network? In this case, consider tweaking the backhaul used by the ASUS routers or ZenWiFi units in your AiMesh network. A great idea would be to set them to use a faster wireless band. Or, even better, use Ethernet cables to connect the routers or mesh stations to one another. Here’s how to turn on and configure the wireless backhaul or the Ethernet backhaul for your ASUS routers or ZenWiFi systems:
 The topology of an AiMesh network made with ASUS routers
If you have tri-band or quad-band ASUS routers or ZenWiFi systems, turning on a dedicated wireless backhaul is a good choice because it delivers improved performance and WiFi coverage.
If you have dual-band ASUS routers or ZenWiFi systems, you should consider using a shared wireless backhaul or an Ethernet backhaul. Speaking of which…
If you need to build a network that should cover a large space or living area with many thick walls, wireless backhauls might be unable to do a great job. In that case, you can connect the units that are part of the AiMesh network using network cables and create an Ethernet backhaul, which is both speedy and very reliable.
TIP: To better understand the concept of a backhaul, I recommend reading: What is a Mesh Wi-Fi or a Whole-Home Wi-Fi system?
The topology of an AiMesh network made with ASUS routers
If you have tri-band or quad-band ASUS routers or ZenWiFi systems, turning on a dedicated wireless backhaul is a good choice because it delivers improved performance and WiFi coverage.
If you have dual-band ASUS routers or ZenWiFi systems, you should consider using a shared wireless backhaul or an Ethernet backhaul. Speaking of which…
If you need to build a network that should cover a large space or living area with many thick walls, wireless backhauls might be unable to do a great job. In that case, you can connect the units that are part of the AiMesh network using network cables and create an Ethernet backhaul, which is both speedy and very reliable.
TIP: To better understand the concept of a backhaul, I recommend reading: What is a Mesh Wi-Fi or a Whole-Home Wi-Fi system?
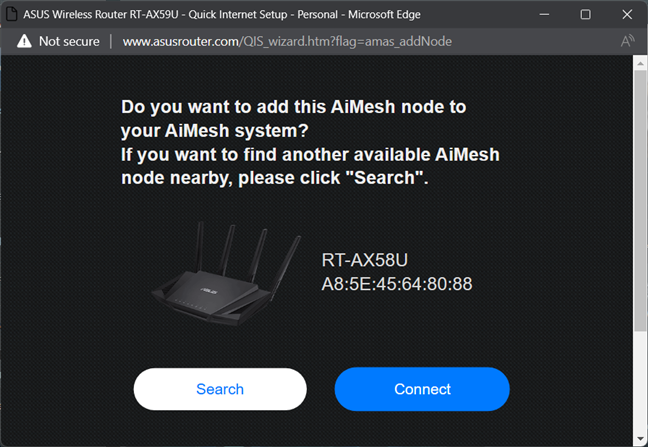
 Adding an AiMesh node to the network
After creating the AiMesh network, open a web browser on a computer connected to your network, visit www.asusrouter.com or the IP address of the main ASUS router or ZenWiFi station, and log in. For help with this task, here’s a detailed guide on how to log in to your ASUS router or ZenWiFi.
Adding an AiMesh node to the network
After creating the AiMesh network, open a web browser on a computer connected to your network, visit www.asusrouter.com or the IP address of the main ASUS router or ZenWiFi station, and log in. For help with this task, here’s a detailed guide on how to log in to your ASUS router or ZenWiFi.
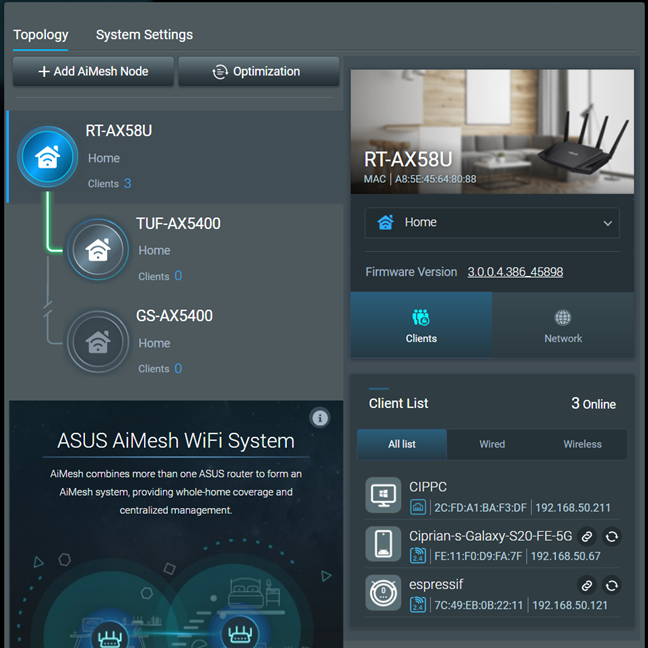
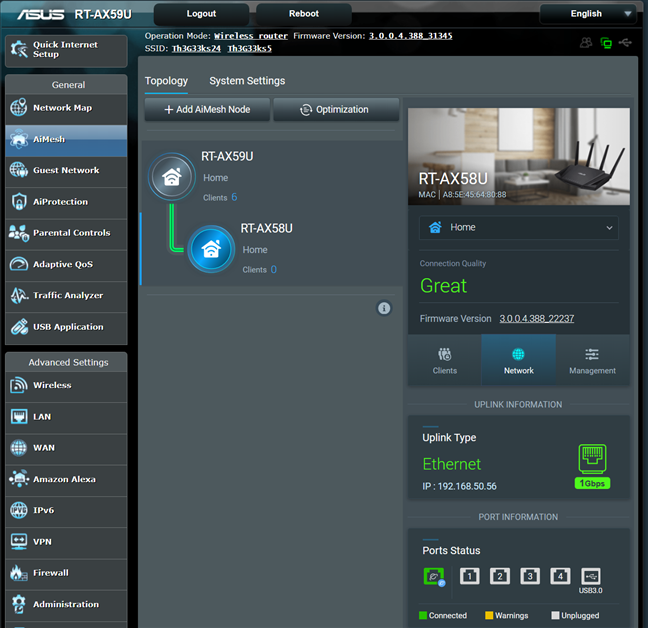
 Log in to your ASUS router or ZenWiFi
In the web administration interface, go to AiMesh >Topology and click or tap on the unit name for which you want to configure the backhaul. Then, access Management on the right.
Log in to your ASUS router or ZenWiFi
In the web administration interface, go to AiMesh >Topology and click or tap on the unit name for which you want to configure the backhaul. Then, access Management on the right.
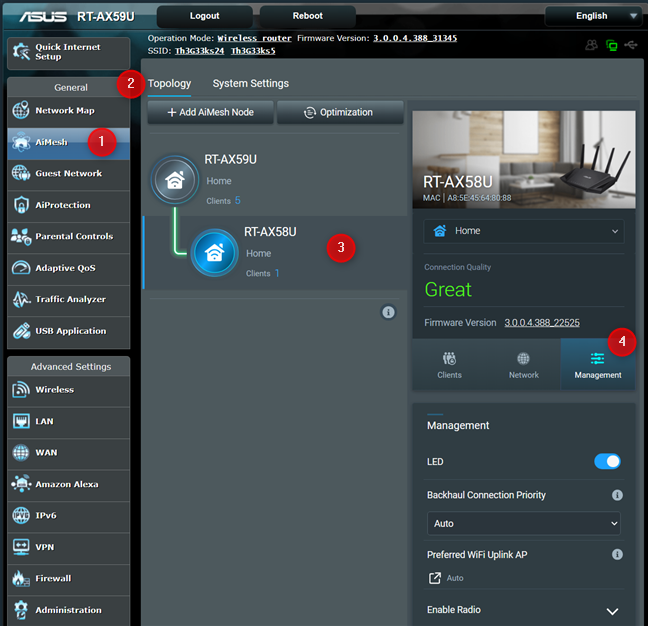
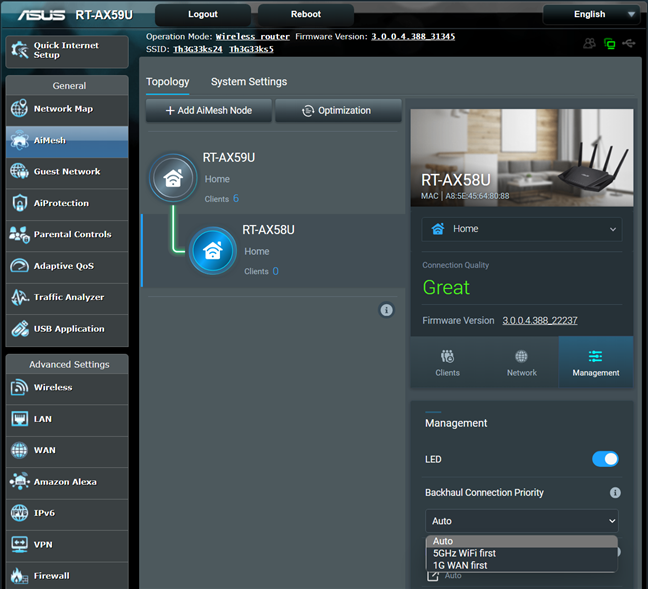
 Select the unit you want to configure
Click or tap the Backhaul Connection Priority dropdown list and choose 5GHz WiFi First if you want the fastest possible wireless connection.
On tri-band or quad-band ASUS routers or ZenWiFi systems, you also have options like 5GHz-2 WiFi First (the second 5 GHz band), 6GHz WiFi First, or 2.4GHz WiFi First. For maximum speed and solid coverage for the wireless backhaul, I recommend using one of the available 5 GHz options. If you’re using Wi-Fi 6E routers like the ASUS ROG Rapture GT-AXE11000, and you don’t need to cover a large area, 6 GHz WiFi First is also a great option. 2.4 GHz is a good option only when you need to prioritize having the widest possible range for your network and you don’t need a lot of speed or bandwidth.
Select the unit you want to configure
Click or tap the Backhaul Connection Priority dropdown list and choose 5GHz WiFi First if you want the fastest possible wireless connection.
On tri-band or quad-band ASUS routers or ZenWiFi systems, you also have options like 5GHz-2 WiFi First (the second 5 GHz band), 6GHz WiFi First, or 2.4GHz WiFi First. For maximum speed and solid coverage for the wireless backhaul, I recommend using one of the available 5 GHz options. If you’re using Wi-Fi 6E routers like the ASUS ROG Rapture GT-AXE11000, and you don’t need to cover a large area, 6 GHz WiFi First is also a great option. 2.4 GHz is a good option only when you need to prioritize having the widest possible range for your network and you don’t need a lot of speed or bandwidth.

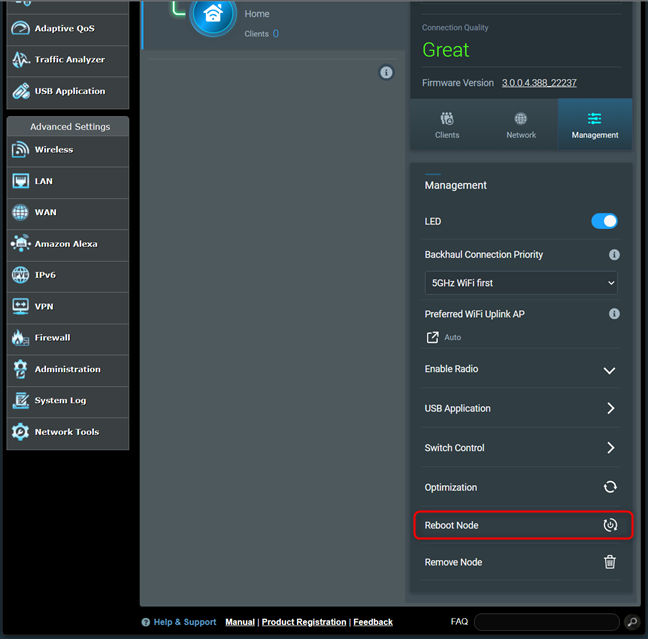
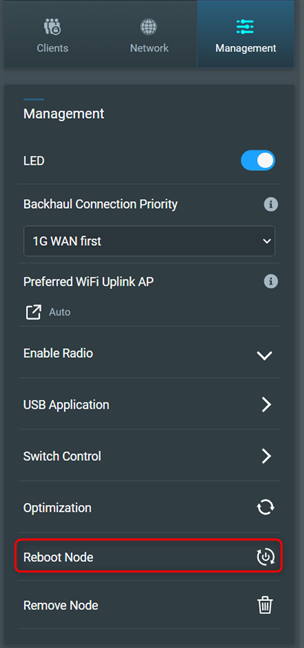
 Set the Backhaul Connection Priority
To apply your changes as soon as possible, in the Management tab on the right, click or tap Reboot Node.
Set the Backhaul Connection Priority
To apply your changes as soon as possible, in the Management tab on the right, click or tap Reboot Node.
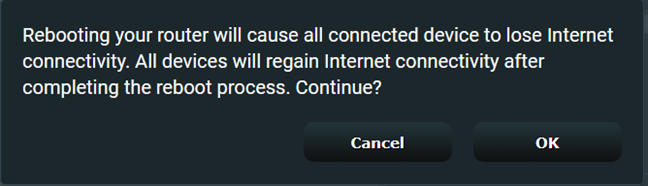
 Press Reboot Node
The firmware on the main unit informs you that rebooting this secondary unit will disconnect all connected devices from the internet. Click or tap OK to proceed.
Press Reboot Node
The firmware on the main unit informs you that rebooting this secondary unit will disconnect all connected devices from the internet. Click or tap OK to proceed.

 Click OK to go ahead
After the secondary unit reboots, it should apply your settings for its backhaul. Then, when you go to AiMesh > Topology and click on the unit’s name, followed by the Network tab on the right, you should see the band you selected displayed for the Uplink Type.
Click OK to go ahead
After the secondary unit reboots, it should apply your settings for its backhaul. Then, when you go to AiMesh > Topology and click on the unit’s name, followed by the Network tab on the right, you should see the band you selected displayed for the Uplink Type.
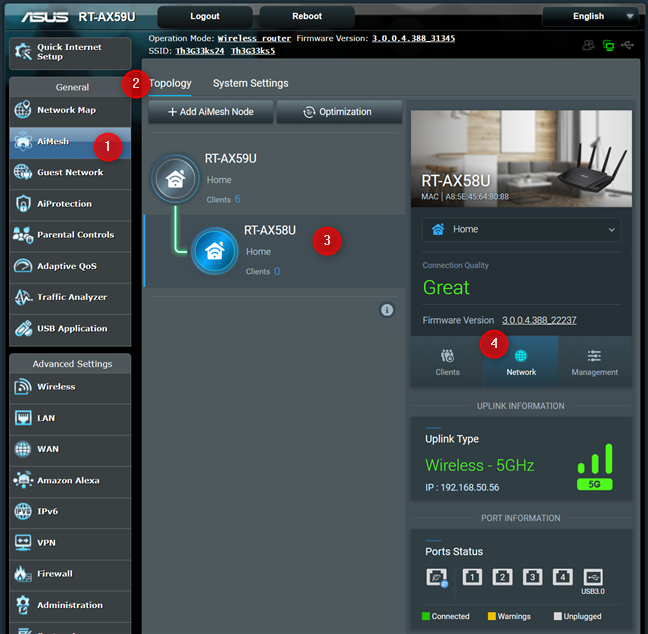
 Check the Uplink Type
You can repeat the same steps for all the units in your AiMesh network, and configure them individually.
Check the Uplink Type
You can repeat the same steps for all the units in your AiMesh network, and configure them individually.
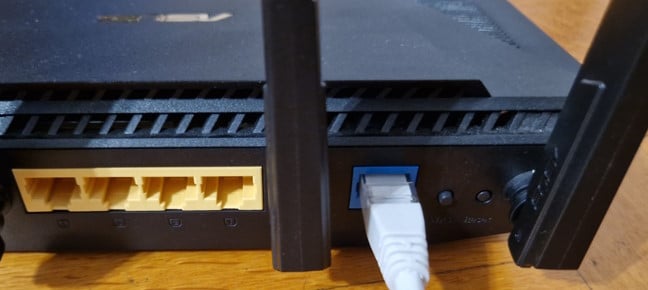
 Plug the Ethernet cable into the WAN port of the secondary unit
Next, open a web browser on a computer connected to your network and visit www.asusrouter.com or the IP address of the main ASUS router or ZenWiFi unit. Log in using the admin account and password you’ve set.
Plug the Ethernet cable into the WAN port of the secondary unit
Next, open a web browser on a computer connected to your network and visit www.asusrouter.com or the IP address of the main ASUS router or ZenWiFi unit. Log in using the admin account and password you’ve set.
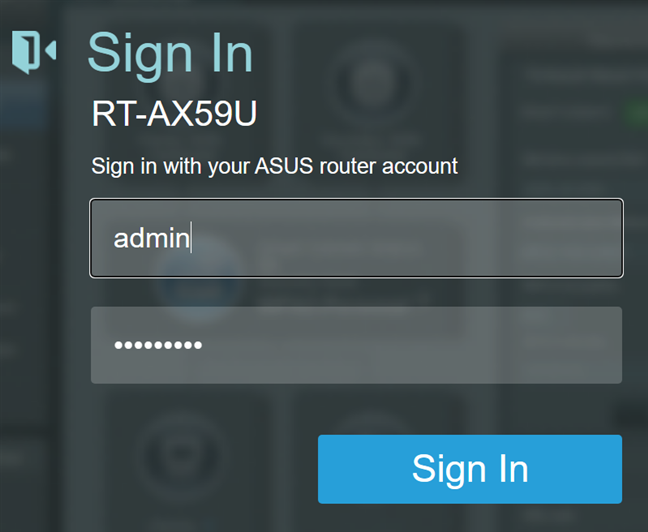
 Log in to your ASUS router or ZenWiFi
For the next stage, you can either set an Ethernet backhaul for all the units that make up your ASUS AiMesh network or just for individual units, but not all of them. Depending on what you want to do, read the next section or the one after it.
Log in to your ASUS router or ZenWiFi
For the next stage, you can either set an Ethernet backhaul for all the units that make up your ASUS AiMesh network or just for individual units, but not all of them. Depending on what you want to do, read the next section or the one after it.
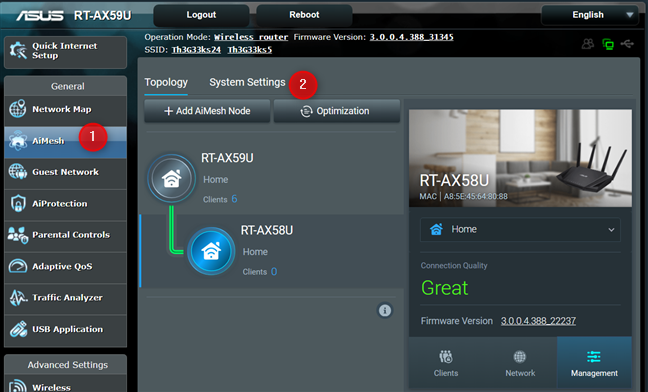
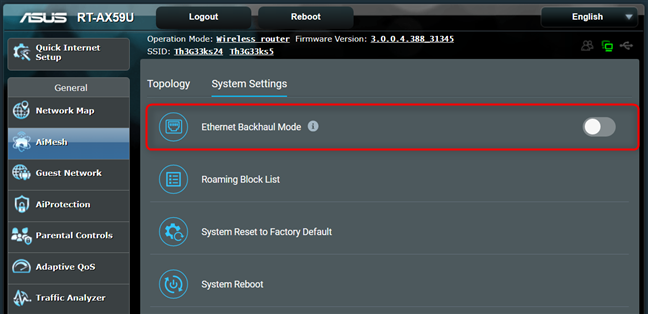
 Go to AiMesh > System Settings
You see a switch for Ethernet Backhaul Mode. Click or tap on it to set it to On.
Go to AiMesh > System Settings
You see a switch for Ethernet Backhaul Mode. Click or tap on it to set it to On.
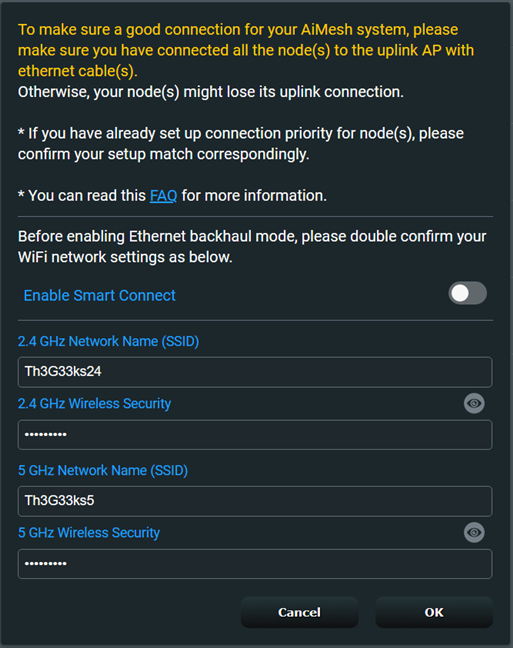
 Set Ethernet Backhaul Mode to On
ASUS reminds you to make sure that you have connected all the nodes with Ethernet cables to the main unit. Read the information displayed, and press OK to proceed.
Set Ethernet Backhaul Mode to On
ASUS reminds you to make sure that you have connected all the nodes with Ethernet cables to the main unit. Read the information displayed, and press OK to proceed.
 Click OK to go ahead
Applying your settings will take a couple of minutes and involve a reboot of all the units that make up your AiMesh network. The progress is displayed in your web browser, similar to the screenshot below.
Click OK to go ahead
Applying your settings will take a couple of minutes and involve a reboot of all the units that make up your AiMesh network. The progress is displayed in your web browser, similar to the screenshot below.
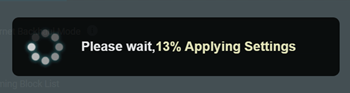
 Wait for your changes to be applied
When done, go back to AiMesh > System Settings. You should see the Ethernet Backhaul Mode switch enabled.
Wait for your changes to be applied
When done, go back to AiMesh > System Settings. You should see the Ethernet Backhaul Mode switch enabled.
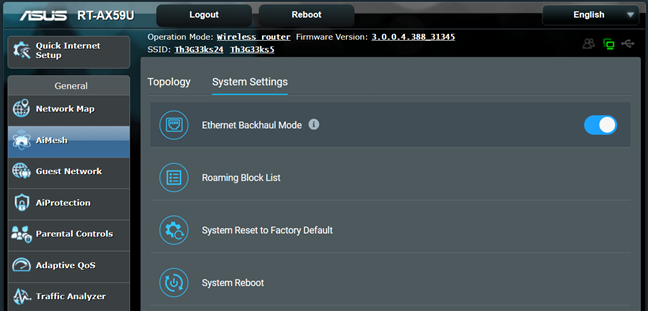
 Ethernet Backhaul Mode is enabled
TIP: To turn off an Ethernet backhaul, follow the same steps and disable the Ethernet Backhaul Mode switch. Then, unplug the network cables you’re using, and set the AiMesh network to use a wireless backhaul instead, using the instructions from the appropriate section.
Next, click Topology, followed by the name of a secondary unit in your AiMesh network. On the right, click or tap Network, and you should see Ethernet displayed for the Uplink Type.
Ethernet Backhaul Mode is enabled
TIP: To turn off an Ethernet backhaul, follow the same steps and disable the Ethernet Backhaul Mode switch. Then, unplug the network cables you’re using, and set the AiMesh network to use a wireless backhaul instead, using the instructions from the appropriate section.
Next, click Topology, followed by the name of a secondary unit in your AiMesh network. On the right, click or tap Network, and you should see Ethernet displayed for the Uplink Type.
 Check the Uplink Type
If this is shown for all the secondary units that make up the AiMesh network, then the Ethernet backhaul is fully enabled and utilized by all ASUS routers and ZenWiFi units in your network.
Check the Uplink Type
If this is shown for all the secondary units that make up the AiMesh network, then the Ethernet backhaul is fully enabled and utilized by all ASUS routers and ZenWiFi units in your network.
 Select the AiMesh unit you want to configure
Click or tap on the Backhaul Connection Priority dropdown list and choose 1G WAN first. On premium ASUS routers or ZenWiFi mesh systems, you may also have a 2.5 Gbps WAN port and a 2.5G WAN first option. Choose it if you intend to use that port for the best possible speed.
Select the AiMesh unit you want to configure
Click or tap on the Backhaul Connection Priority dropdown list and choose 1G WAN first. On premium ASUS routers or ZenWiFi mesh systems, you may also have a 2.5 Gbps WAN port and a 2.5G WAN first option. Choose it if you intend to use that port for the best possible speed.
 Change the Backhaul Connection Priority
To apply this setting right away, click the Reboot Node option.
Change the Backhaul Connection Priority
To apply this setting right away, click the Reboot Node option.
 Click or tap Reboot Node
You are informed that rebooting the selected unit will cause all connected devices to lose internet connectivity. Press OK to proceed.
Click or tap Reboot Node
You are informed that rebooting the selected unit will cause all connected devices to lose internet connectivity. Press OK to proceed.
 Confirm that you are OK to go ahead
After the secondary unit reboots, when you go to AiMesh >Topology and click or tap on its name, followed by Network, you should see Ethernet listed as the Uplink Type.
Confirm that you are OK to go ahead
After the secondary unit reboots, when you go to AiMesh >Topology and click or tap on its name, followed by Network, you should see Ethernet listed as the Uplink Type.
 Check the Uplink Type
Your change was applied, and an Ethernet backhaul is enabled for this unit. You can repeat this process for other units in your AiMesh network.
TIP: To undo this change and revert to a wireless backhaul, redo the same steps and choose Auto in the Backhaul Connection Priority dropdown list. Then, unplug the network cable from both the secondary unit and the main one.
Check the Uplink Type
Your change was applied, and an Ethernet backhaul is enabled for this unit. You can repeat this process for other units in your AiMesh network.
TIP: To undo this change and revert to a wireless backhaul, redo the same steps and choose Auto in the Backhaul Connection Priority dropdown list. Then, unplug the network cable from both the secondary unit and the main one.
What is an AiMesh backhaul?
A backhaul is a technical term borrowed from the world of telecommunications, which represents a connection or direct link between several elements of a whole. When dealing with ASUS routers and ZenWiFi systems, the backhaul connects the units, nodes, or devices that make up an AiMesh Wi-Fi system. By default, when creating a network with several ASUS routers or ZenWiFi units using AiMesh, all the units are linked to each other automatically through Wi-Fi. This is referred to as a wireless backhaul. A wireless backhaul can be a frequency band (typically the 5 GHz band) reserved for exclusive communication between the units that are part of the AiMesh network. In this situation, we’re dealing with a dedicated wireless backhaul, typical for tri-band or quad-band ASUS routers and ZenWiFi systems. However, when a band is used both for connecting the units from the AiMesh network and the devices (or network clients) connected to the network, we’re dealing with a shared wireless backhaul.How to configure the wireless backhaul for your ASUS router or ZenWiFi
By default, ASUS routers with AiMesh and ASUS ZenWiFi systems use a wireless backhaul to connect with each other. However, this backhaul may be shared with other devices or use the lower speed 2.4 GHz band. To configure the wireless backhaul, first, ensure you’ve created your AiMesh network and added all the routers or ZenWiFi units you want to use. To help you with this task, follow the instructions in this guide: What is an ASUS AiMesh network and how to create one?How to create an Ethernet backhaul for your ASUS router or ZenWiFi
ASUS routers and ZenWiFi mesh systems can use a wired backhaul between the stations that make up the AiMesh network. To create an Ethernet backhaul, first, add all the stations to the AiMesh network using the default settings and a wireless backhaul. Then, connect each secondary router or mesh unit to the main one using an Ethernet cable. Make sure you plug the network cable into the WAN port of the secondary units and not into any of their LAN ports. In parallel, each Ethernet cable should go into the LAN ports of the main unit.How to set an Ethernet backhaul for all ASUS AiMesh nodes
If you want to use an Ethernet backhaul for all the ASUS routers and ZenWiFi nodes in your AiMesh network, go to AiMesh > System Settings in the web admin interface.How to set an Ethernet backhaul for specific AiMesh nodes
You can also turn on the use of an Ethernet backhaul only for specific AiMesh nodes in your network and let others use a wireless backhaul. After you’ve connected the secondary AiMesh node with an Ethernet cable to the main ASUS router or ZenWiFi unit, go to AiMesh > Topology in the web admin interface and click or tap on the name of that specific unit. Then, click or tap on Management on the right.

Discussion (0)
Be the first to comment.