


VPN Fusion is one of the best features of ASUS extendable routers and ZenWiFi mesh systems. It allows users to connect their routers to multiple VPN servers and assign different network devices to specific VPN connections (or tunnels). For instance, your gaming console can be connected to a VPN server optimized for minimal latency when playing games online, while your Smart TV is connected to a VPN server from a region that provides access to more content on Netflix. VPN Fusion is compatible with many well-known services, including CyberGhost VPN, which stands out thanks to its affordable pricing, privacy features, and no-logs policy. If you are a CyberGhost VPN customer and want to set it up on your extendable ASUS router, here’s how it all works:
NOTE: In this tutorial, I’m using an ASUS RT-BE92U Wi-Fi 7 router, capable of managing a network with many simultaneously connected devices. The steps provided also apply to older Wi-Fi 6 ASUS routers and ASUS ZenWiFi mesh systems, even though the user interface may look slightly different.

 In your CyberGhost VPN account go to VPN > Configure Device
You’re now brought to the Manual setup page that you can see in the next screenshot. On it, you can start setting up the parameters you want CyberGhost VPN to use when your ASUS router connects to it. Begin by choosing the protocol you want (highlighted below as step 1). It’s a good idea to select Open VPN TCP, as this protocol is supported by most wireless routers.
IMPORTANT: Be careful NOT to select Open VPN here! If you do, your VPN Fusion setup fails when you try to connect and gets stuck at the “Initializing, please wait” stage. You may also encounter Authentication failed error messages. Check out this guide’s bonus chapter for more details about this issue.
Then, choose the Country you want to connect to (marked 2 below) and the type of Server Group (highlighted 3). For most people, choosing Premium Servers - OpenVPN via TCP is a good idea. However, if you’re gaming online a lot, you may want to choose Gaming Servers - OpenVPN via TCP instead. Next, set up a Device Name (4). Enter something suggestive, like the name of your router. Then, check the extra features (5) you might want to enable: blocking online tracking, protection against malicious websites, etc. Finally, when you’re done setting things up, click or tap Save Configuration (highlighted as step 6 in the next screenshot).
In your CyberGhost VPN account go to VPN > Configure Device
You’re now brought to the Manual setup page that you can see in the next screenshot. On it, you can start setting up the parameters you want CyberGhost VPN to use when your ASUS router connects to it. Begin by choosing the protocol you want (highlighted below as step 1). It’s a good idea to select Open VPN TCP, as this protocol is supported by most wireless routers.
IMPORTANT: Be careful NOT to select Open VPN here! If you do, your VPN Fusion setup fails when you try to connect and gets stuck at the “Initializing, please wait” stage. You may also encounter Authentication failed error messages. Check out this guide’s bonus chapter for more details about this issue.
Then, choose the Country you want to connect to (marked 2 below) and the type of Server Group (highlighted 3). For most people, choosing Premium Servers - OpenVPN via TCP is a good idea. However, if you’re gaming online a lot, you may want to choose Gaming Servers - OpenVPN via TCP instead. Next, set up a Device Name (4). Enter something suggestive, like the name of your router. Then, check the extra features (5) you might want to enable: blocking online tracking, protection against malicious websites, etc. Finally, when you’re done setting things up, click or tap Save Configuration (highlighted as step 6 in the next screenshot).

 Configure CyberGhost VPN account and click or tap Save Configuration
You now see the newly added ASUS router in the list of Active VPN Devices. Click or tap View next to your router to access the connection details that you’re going to need.
Configure CyberGhost VPN account and click or tap Save Configuration
You now see the newly added ASUS router in the list of Active VPN Devices. Click or tap View next to your router to access the connection details that you’re going to need.
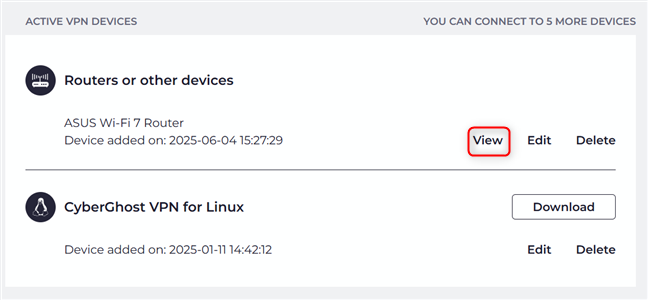
 Click or tap View
Copy and paste the CyberGhost username and password into Notepad or some other app to temporarily store this information. Then, click or tap Download Configuration.
Click or tap View
Copy and paste the CyberGhost username and password into Notepad or some other app to temporarily store this information. Then, click or tap Download Configuration.
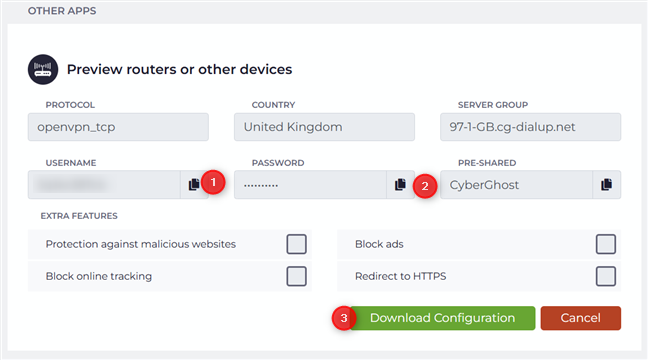
 Copy and paste the username and password to Notepad
Your browser then downloads a ZIP file with four configuration files you need during the next steps. Extract the ZIP file to access its content. You should see two security certificates, one key file, and one openvpn file, similar to the screenshot below.
Copy and paste the username and password to Notepad
Your browser then downloads a ZIP file with four configuration files you need during the next steps. Extract the ZIP file to access its content. You should see two security certificates, one key file, and one openvpn file, similar to the screenshot below.

 Extract the ZIP file with the configuration files from CyberGhost VPN
Now, it’s time to set up the ASUS router or ZenWiFi mesh system to connect to CyberGhost VPN automatically.
Extract the ZIP file with the configuration files from CyberGhost VPN
Now, it’s time to set up the ASUS router or ZenWiFi mesh system to connect to CyberGhost VPN automatically.

 Log in to your ASUS router
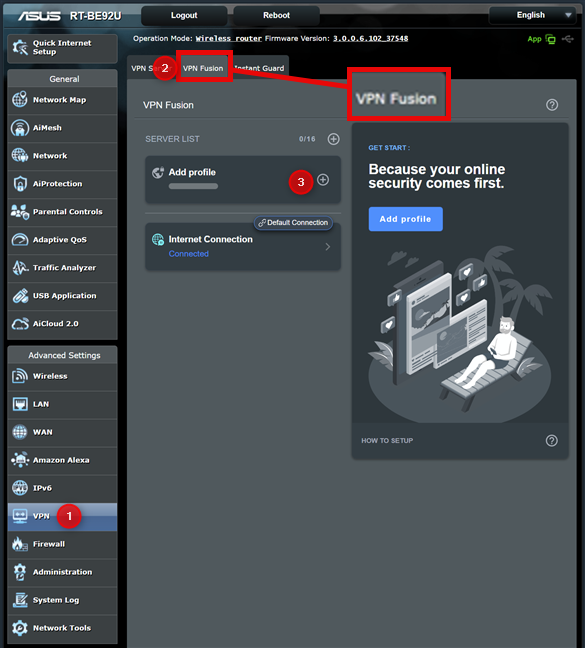
 Go to VPN > VPN Fusion > Add profile
Your ASUS router or ZenWiFi mesh system displays the Add profile prompt. This is where you can create a new VPN connection that can be used by one or more devices in your network. By default, Surfshark is selected as a VPN service. However, you can choose other services, including CyberGhost VPN.
Go to VPN > VPN Fusion > Add profile
Your ASUS router or ZenWiFi mesh system displays the Add profile prompt. This is where you can create a new VPN connection that can be used by one or more devices in your network. By default, Surfshark is selected as a VPN service. However, you can choose other services, including CyberGhost VPN.
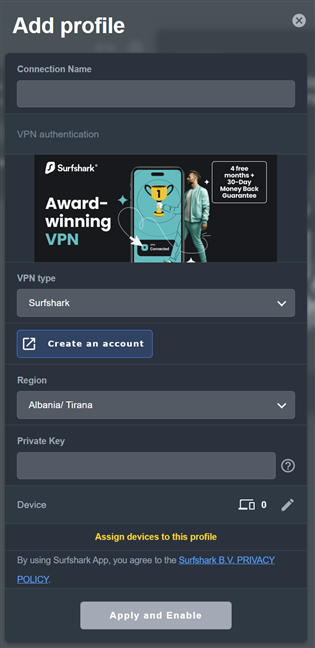
 Your options to add a VPN Fusion profile
Keep reading to see how to set up CyberGhost VPN in VPN Fusion.
Your options to add a VPN Fusion profile
Keep reading to see how to set up CyberGhost VPN in VPN Fusion.
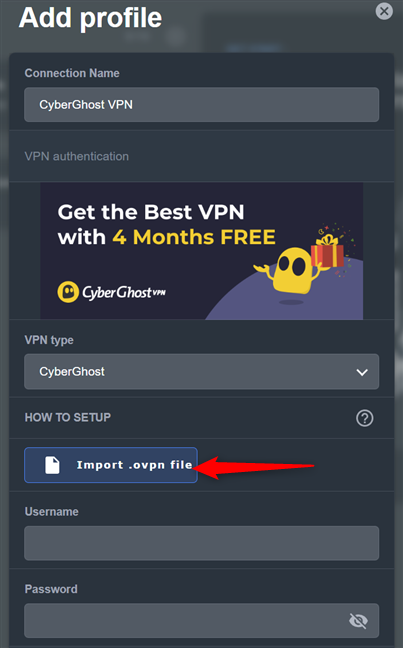
 Select CyberGhost and enter the necessary details
Next, click or tap Import CA file and select the ca.crt file you’ve downloaded from CyberGhost. Similarly, click or tap Import Client Certificate file and select the client.crt file. Finally, click or tap Import Client Key file and select the client.key from CyberGhost.
Select CyberGhost and enter the necessary details
Next, click or tap Import CA file and select the ca.crt file you’ve downloaded from CyberGhost. Similarly, click or tap Import Client Certificate file and select the client.crt file. Finally, click or tap Import Client Key file and select the client.key from CyberGhost.

 Import all the files that you've downloaded
By default, all devices connected to your network will automatically connect to CyberGhost VPN. If you don’t want this, click or tap the pencil icon (Edit) next to Device. You see the list of devices connected to the network and managed by your ASUS router or ZenWiFi mesh system. Select those you want to connect to CyberGhost VPN. They can be anything from a Smart TV to a laptop, smartphone, or gaming console. When you’re done making your selections, press OK.
Import all the files that you've downloaded
By default, all devices connected to your network will automatically connect to CyberGhost VPN. If you don’t want this, click or tap the pencil icon (Edit) next to Device. You see the list of devices connected to the network and managed by your ASUS router or ZenWiFi mesh system. Select those you want to connect to CyberGhost VPN. They can be anything from a Smart TV to a laptop, smartphone, or gaming console. When you’re done making your selections, press OK.
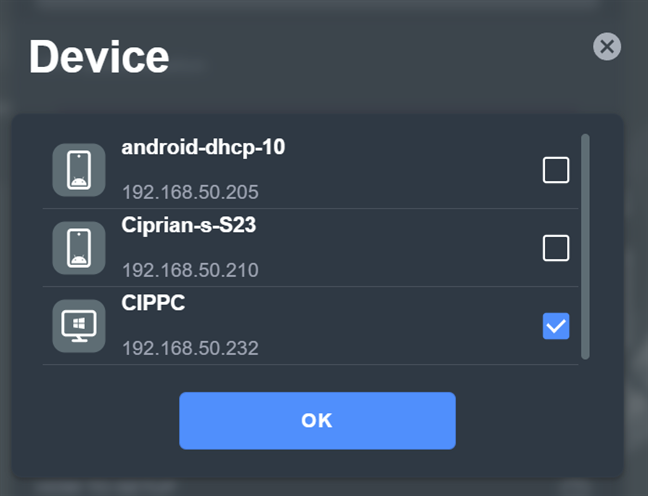
 Select the device(s) you want to connect to CyberGhost VPN
You’re back to the Add profile prompt shown earlier. Click or tap Apply and Enable. After a few seconds, VPN Fusion is configured to use CyberGhost VPN. When it’s done, you’re back to the VPN Fusion section, where you see CyberGhost VPN added to the server list, with the status Connected.
Depending on how you’ve set up the CyberGhost VPN profile, all your devices (or only those you selected) are connected and using this service.
Select the device(s) you want to connect to CyberGhost VPN
You’re back to the Add profile prompt shown earlier. Click or tap Apply and Enable. After a few seconds, VPN Fusion is configured to use CyberGhost VPN. When it’s done, you’re back to the VPN Fusion section, where you see CyberGhost VPN added to the server list, with the status Connected.
Depending on how you’ve set up the CyberGhost VPN profile, all your devices (or only those you selected) are connected and using this service.
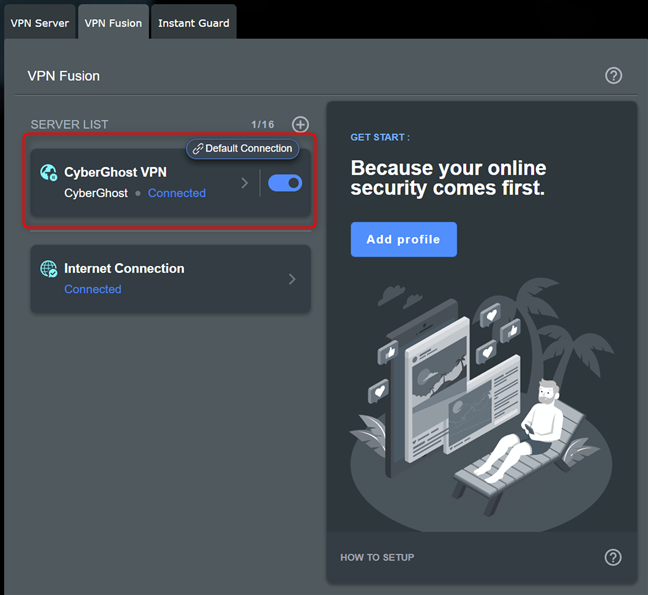
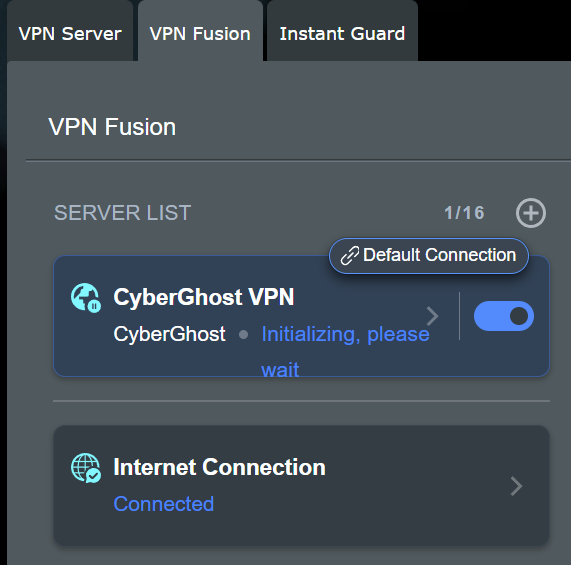
 VPN Fusion is now connected to CyberGhost
If you need to disconnect your devices from CyberGhost VPN, click or tap the switch next to it in VPN Fusion. After your devices are disconnected, you can change the settings for this profile, select other devices, or remove the CyberGhost VPN profile (if you no longer need it).
VPN Fusion is now connected to CyberGhost
If you need to disconnect your devices from CyberGhost VPN, click or tap the switch next to it in VPN Fusion. After your devices are disconnected, you can change the settings for this profile, select other devices, or remove the CyberGhost VPN profile (if you no longer need it).
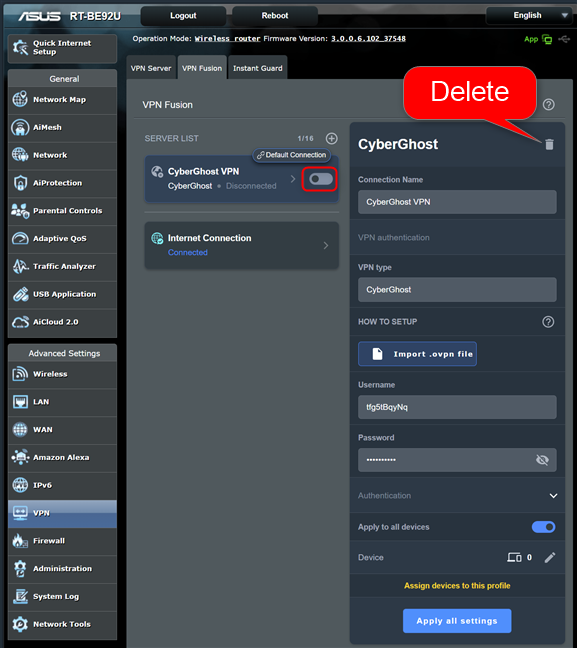
 Before deleting CyberGhost, disable the connection in VPN Fusion
It’s important to remember that you can’t change how the CyberGhost VPN profile works while it’s active and connected through VPN Fusion.
Before deleting CyberGhost, disable the connection in VPN Fusion
It’s important to remember that you can’t change how the CyberGhost VPN profile works while it’s active and connected through VPN Fusion.
 The wrong configuration leads to technical problems
While looking for help online, I noticed discussions on several forums where people encountered the same problem. Only after a lengthy conversation with CyberGhost’s support service did I realize that I had made the wrong choices when setting up CyberGhost VPN during this tutorial’s first step. Don’t repeat my mistake! If you get stuck in the “Initializing, please wait” phase or encounter Connection failed/Authentication failed messages, start over and pay a lot of attention to the settings you choose during Step 1. Then, ensure you import the correct files and copy and paste the correct username and password. They aren’t the same as those you use to log in to your CyberGhost account!
The wrong configuration leads to technical problems
While looking for help online, I noticed discussions on several forums where people encountered the same problem. Only after a lengthy conversation with CyberGhost’s support service did I realize that I had made the wrong choices when setting up CyberGhost VPN during this tutorial’s first step. Don’t repeat my mistake! If you get stuck in the “Initializing, please wait” phase or encounter Connection failed/Authentication failed messages, start over and pay a lot of attention to the settings you choose during Step 1. Then, ensure you import the correct files and copy and paste the correct username and password. They aren’t the same as those you use to log in to your CyberGhost account!
Step 1: Log in to CyberGhost and set up the connection
Before setting up VPN Fusion on your extendable ASUS router or ZenWiFi mesh system, you should log into your CyberGhost VPN account. In the left sidebar, under Products, choose VPN. On the right, click or tap Configure Device.Step 2: Log in to your ASUS router or ZenWiFi mesh system
Open a web browser to log in to your ASUS router or ZenWiFi mesh system. Navigate to www.asusrouter.com or the IP address of your ASUS router (usually, 192.168.50.1 or 192.168.1.1), then enter the administrator username and password. Finally, click or tap Sign In.Step 3: Access VPN Fusion on your ASUS router or ZenWiFi mesh system
Look for Advanced Settings in the left sidebar, and click or tap VPN. On the right, select VPN Fusion, then click the + (plus sign) next to Add profile.Step 4: Add CyberGhost VPN to VPN Fusion on your ASUS router or ZenWiFi mesh
In the Add profile prompt, type CyberGhost VPN (or anything else you want) in the Connection Name field. Then, click or tap the VPN type dropdown list and select CyberGhost. Continue by entering the username and password you’ve copied from your CyberGhost account during this tutorial’s first step. Then, click or tap Import .ovpn file, and select the openvpn.ovpn file included in the ZIP archive downloaded from CyberGhost.BONUS: Troubleshooting problems with VPN Fusion and CyberGhost VPN
While doing my testing for this tutorial, I encountered some problems because I didn’t configure CyberGhost VPN correctly during the first step. I selected Open VPN instead of Open VPN TCP when choosing the protocol. Then, when selecting the server, I didn’t have the option to connect to a group of servers via TCP. I was using UDP instead. If you make the same mistake, after you finish step 4 in this tutorial, VPN Fusion remains stuck and says: “Initializing, please wait.”


Discussion (0)
Be the first to comment.