

A few years ago, sending photos from an iPhone to an Android or the other way around was not easy. However, the situation has improved significantly, though not because of Apple’s efforts. Because no, you can’t AirDrop from an iPhone to an Android, nor can you Nearby Share from an Android to an iPhone. However, thanks to alternative solutions offered by Microsoft, Google, and other companies, you can transfer pictures between iPhones and Android smartphones in simple and convenient ways. In this article, I’ll show you the most straightforward methods that I know for sharing and sending photos between different mobile phones, both wirelessly and using cables:
NOTE: Except for the iCloud solution, which only works for sharing photos from an iPhone to an Android or another iPhone, all the other methods I’m showing you in this guide work in all possible situations. You can use any of them to send pictures from an Android to an iPhone, as well as transfer photos from an iPhone to an Android. Furthermore, you can also use them to transfer pictures from an iPhone to another iPhone, as well as send photos from an Android device to another.
 Selecting photos in Google Photos
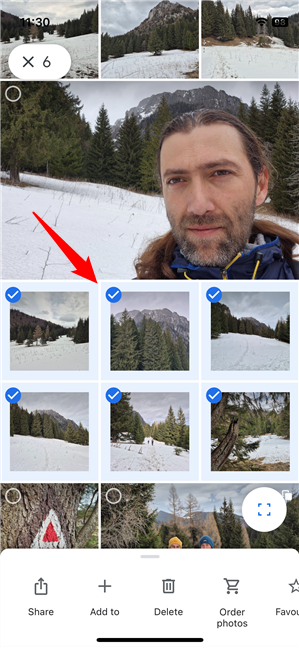
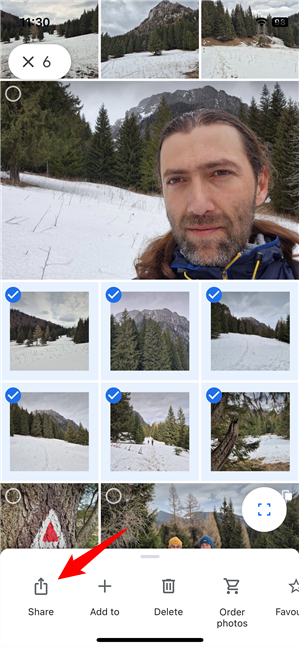
Once you’ve selected everything, tap the Share button from the bottom-left corner of the screen.
Selecting photos in Google Photos
Once you’ve selected everything, tap the Share button from the bottom-left corner of the screen.
 Choosing to share photos from iPhone
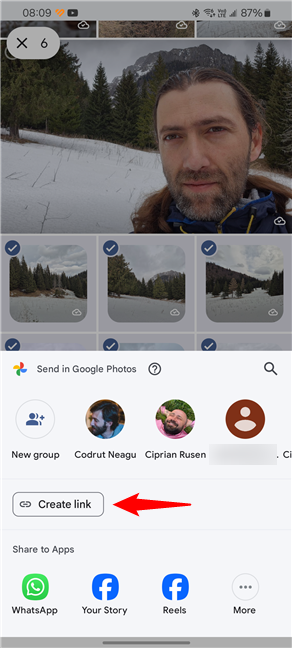
In the dialog that shows up at the bottom of the screen, choose Create link if you’re on Android, or Share to > Create link if you’re using an iPhone. This will automatically make an album with all the photos you’ve selected, and then give you a link to it that you can share with others.
Choosing to share photos from iPhone
In the dialog that shows up at the bottom of the screen, choose Create link if you’re on Android, or Share to > Create link if you’re using an iPhone. This will automatically make an album with all the photos you’ve selected, and then give you a link to it that you can share with others.
 Tap Create link
TIP: While creating a link is the easiest and most convenient method of sharing pictures with Google Photos, the app also lets you send photos from your Android or iPhone to people who are in your Google Contacts list. If you prefer this method, at the bottom of the screen, find the one to whom you want to transfer the photos, tap their name, and tap Send in Google Photos.
Once you’ve pressed the Create link button, Google Photos will need a few moments to ensure that your pictures are uploaded to the Google cloud servers and ready for sharing with other people. After that’s done, you’ll see a message that says “Link copied. Share it in an app.”
Tap Create link
TIP: While creating a link is the easiest and most convenient method of sharing pictures with Google Photos, the app also lets you send photos from your Android or iPhone to people who are in your Google Contacts list. If you prefer this method, at the bottom of the screen, find the one to whom you want to transfer the photos, tap their name, and tap Send in Google Photos.
Once you’ve pressed the Create link button, Google Photos will need a few moments to ensure that your pictures are uploaded to the Google cloud servers and ready for sharing with other people. After that’s done, you’ll see a message that says “Link copied. Share it in an app.”
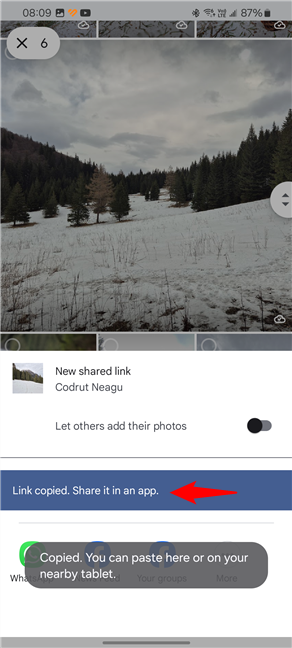 Link copied. Share it in an app.
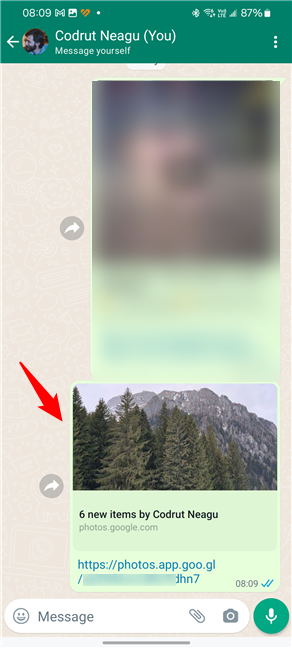
You can now exit the Google Photos app and use any means you prefer to paste the link and send it to the people you want to share your pictures with. For example, I’m choosing WhatsApp, but you can paste the link anywhere you want, whether that’s a chat app, an email, SMS, or something else. The people receiving your message will see a link similar to the one below. And all they have to do to access the pictures you’ve shared from your Android or iPhone is tap it.
Link copied. Share it in an app.
You can now exit the Google Photos app and use any means you prefer to paste the link and send it to the people you want to share your pictures with. For example, I’m choosing WhatsApp, but you can paste the link anywhere you want, whether that’s a chat app, an email, SMS, or something else. The people receiving your message will see a link similar to the one below. And all they have to do to access the pictures you’ve shared from your Android or iPhone is tap it.
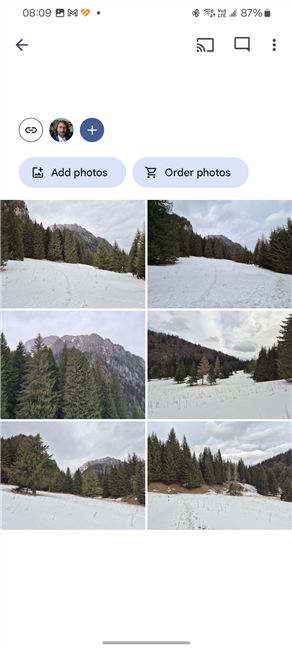
 Pictures shared with a link from Google Photos
If the one who receives your shared pictures has the Google Photos app installed, they will see them in the app, like in the next screenshot. If they don’t, they’ll see the same thing but in their web browser.
Pictures shared with a link from Google Photos
If the one who receives your shared pictures has the Google Photos app installed, they will see them in the app, like in the next screenshot. If they don’t, they’ll see the same thing but in their web browser.
 What shared photos look like
However, to actually have your photos stored locally on their smartphone, they must perform an additional step: download those pictures from the Google Photos app. To download a photo from the Google Photos app, they need to tap the More button (which looks like three dots) from the top-right corner of the screen. Alternatively, they can also slide a finger from the bottom of that photo.
What shared photos look like
However, to actually have your photos stored locally on their smartphone, they must perform an additional step: download those pictures from the Google Photos app. To download a photo from the Google Photos app, they need to tap the More button (which looks like three dots) from the top-right corner of the screen. Alternatively, they can also slide a finger from the bottom of that photo.
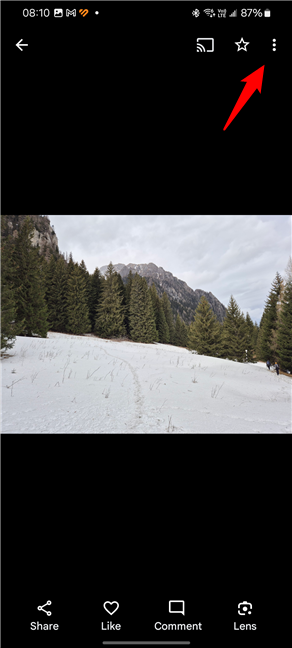 Tap the three-dot button
The previous action shows a series of options. Among them, a button called Download. The recipient must tap it, and Google Photos will save that photo locally in their smartphone’s storage space.
Tap the three-dot button
The previous action shows a series of options. Among them, a button called Download. The recipient must tap it, and Google Photos will save that photo locally in their smartphone’s storage space.
 Tap Download to get the photo in the phone's storage
Then, they’ll find all the downloaded photos in their Google Photos app Library > Download folder.
IMPORTANT: Although this is maybe the easiest way to share photos between iPhones and Androids, it doesn’t let you select multiple photos and download them all at once from the Google Photos mobile app. That’s a bummer for many people, so the next methods might be better if you’re one of them.
Tap Download to get the photo in the phone's storage
Then, they’ll find all the downloaded photos in their Google Photos app Library > Download folder.
IMPORTANT: Although this is maybe the easiest way to share photos between iPhones and Androids, it doesn’t let you select multiple photos and download them all at once from the Google Photos mobile app. That’s a bummer for many people, so the next methods might be better if you’re one of them.
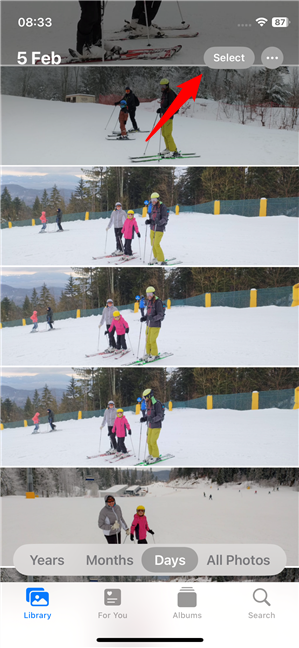
 Open the Photos app
Find the photos you want to share and tap the Select button in the top-right corner of the screen.
Open the Photos app
Find the photos you want to share and tap the Select button in the top-right corner of the screen.
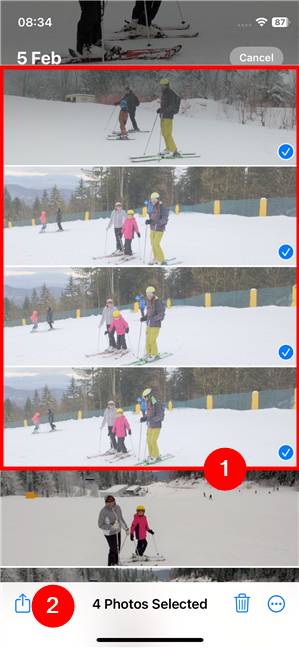
 Tap Select in the top-right corner
Select by tapping all the photos you want to share with iCloud from your iPhone, then tap the Share button in the bottom-left corner of the screen.
Tap Select in the top-right corner
Select by tapping all the photos you want to share with iCloud from your iPhone, then tap the Share button in the bottom-left corner of the screen.
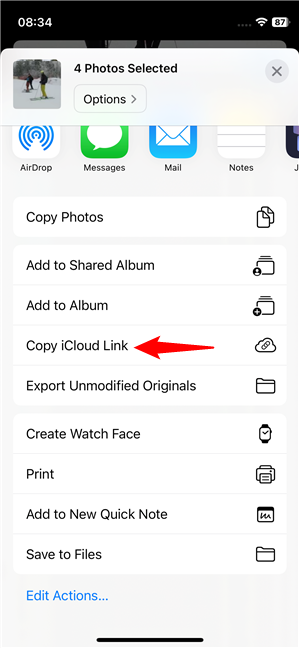
 Select the photos to share from your iPhone
In the list of options displayed, choose Copy iCloud Link.
Select the photos to share from your iPhone
In the list of options displayed, choose Copy iCloud Link.
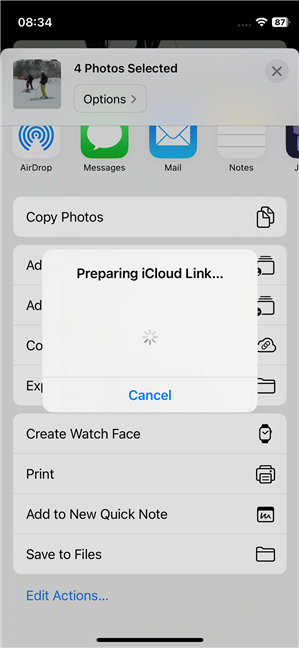
 Copy iCloud Link
Your iPhone will need a couple of moments to upload the selected pictures to your cloud storage. Wait until the “Preparing iCloud Link” message goes away.
Copy iCloud Link
Your iPhone will need a couple of moments to upload the selected pictures to your cloud storage. Wait until the “Preparing iCloud Link” message goes away.
 Preparing iCloud Link
When it’s done, the iCloud link is automatically copied into your iPhone’s clipboard. You can now leave the Photos app. Then, use any app (chat, e-mail, WhatsApp, etc.) to paste the link and send it to those you want to receive your shared photos. In the example below, you can see what it looks like to send an iCloud link via email.
Preparing iCloud Link
When it’s done, the iCloud link is automatically copied into your iPhone’s clipboard. You can now leave the Photos app. Then, use any app (chat, e-mail, WhatsApp, etc.) to paste the link and send it to those you want to receive your shared photos. In the example below, you can see what it looks like to send an iCloud link via email.
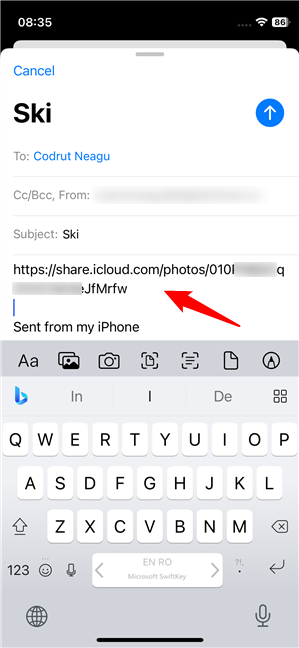 Sending the iCloud link in an email message
When the recipient receives the link, they can tap it to open, see, and download the photos you’ve shared from your iPhone. Here’s what the photos I’ve sent from my iPhone look like on my Android smartphone:
Sending the iCloud link in an email message
When the recipient receives the link, they can tap it to open, see, and download the photos you’ve shared from your iPhone. Here’s what the photos I’ve sent from my iPhone look like on my Android smartphone:
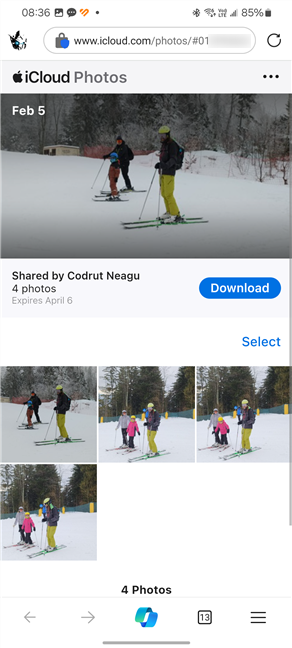 What photos shared via iCloud look like
IMPORTANT: Note, however, that if the recipient chooses to download the photos you’ve shared via iCloud, those pictures will not be downloaded as they are. They will be compressed in a single ZIP archive, that you have to unzip to actually see the photos.
What photos shared via iCloud look like
IMPORTANT: Note, however, that if the recipient chooses to download the photos you’ve shared via iCloud, those pictures will not be downloaded as they are. They will be compressed in a single ZIP archive, that you have to unzip to actually see the photos.
 Uploading photos to OneDrive
Then, navigate your phone to select the photos you want to transfer.
Uploading photos to OneDrive
Then, navigate your phone to select the photos you want to transfer.
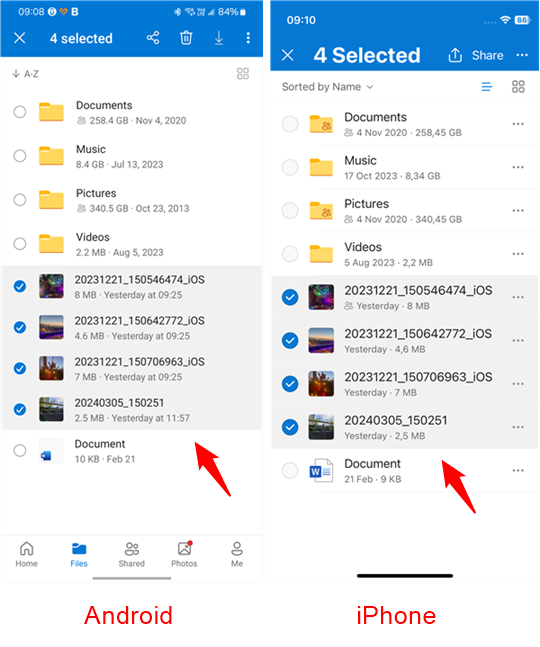 Selecting the photos to upload
Once you’ve selected all the pictures you want to send, tap the Share button in the top-right corner of the OneDrive app.
Selecting the photos to upload
Once you’ve selected all the pictures you want to send, tap the Share button in the top-right corner of the OneDrive app.
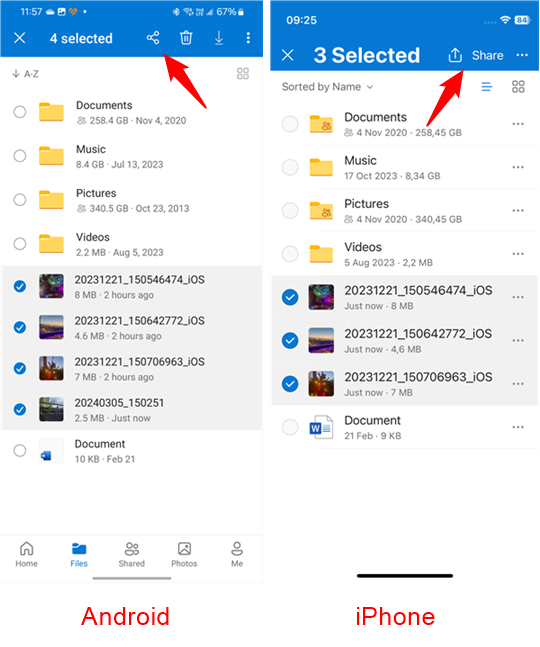 Share photos between Androids and iPhones with OneDrive
In the menu that shows up, tap the Copy link option.
Share photos between Androids and iPhones with OneDrive
In the menu that shows up, tap the Copy link option.
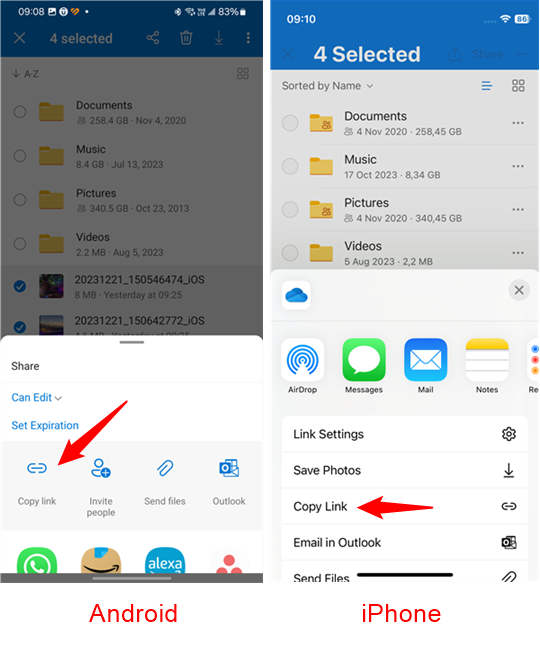 Tap Copy link to share the photos with OneDrive
OneDrive will then create a link to those pictures, and will automatically save it in your smartphone’s clipboard. You can now close OneDrive, paste that link into any email or chat message, and send it to whomever you want to be able to see and/or download your shared pictures.
NOTE: There are other ways to share files, including photos, with OneDrive. If you’d like to learn them all, read this guide: 4 ways to share files and folders from OneDrive.
Tap Copy link to share the photos with OneDrive
OneDrive will then create a link to those pictures, and will automatically save it in your smartphone’s clipboard. You can now close OneDrive, paste that link into any email or chat message, and send it to whomever you want to be able to see and/or download your shared pictures.
NOTE: There are other ways to share files, including photos, with OneDrive. If you’d like to learn them all, read this guide: 4 ways to share files and folders from OneDrive.
 Selecting photos in the Send Anywhere app
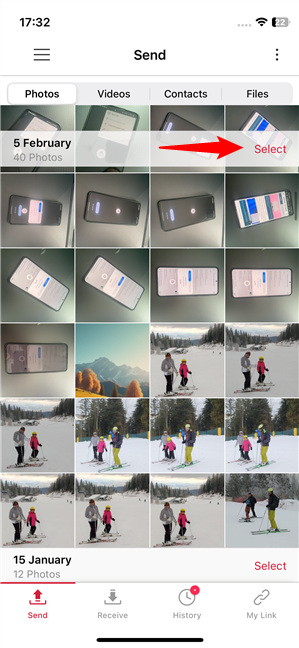
If you want, you can also select all the pictures from your iPhone or Android at once or select all the photos shot on a specific day using the appropriate buttons from the app’s interface.
Selecting photos in the Send Anywhere app
If you want, you can also select all the pictures from your iPhone or Android at once or select all the photos shot on a specific day using the appropriate buttons from the app’s interface.
 Other selection options in the Send Anywhere app
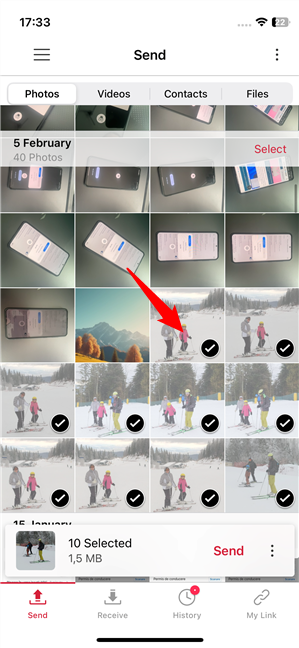
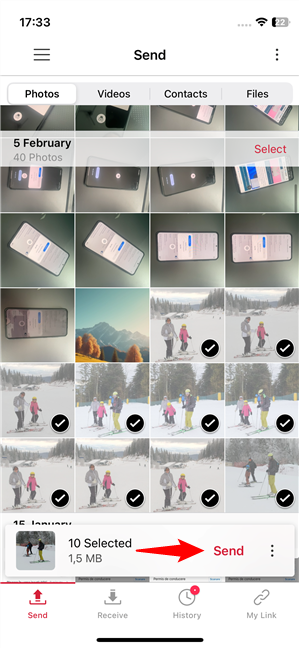
Once you’ve chosen the photos to transfer, tap the red Send button from the box shown at the bottom of the screen.
Other selection options in the Send Anywhere app
Once you’ve chosen the photos to transfer, tap the red Send button from the box shown at the bottom of the screen.
 How to send photos between an iPhone and an Android with Send Anywhere
The Send Anywhere app now shows you a 6-digit keycode, a QR code, a Share Link button, and a list of devices close by. You can use any of them to transfer the photos, but the easiest is the last option: at the bottom of the screen, you should see all the nearby devices running Send Anywhere. That’s where your other iPhone or Android should be displayed. All you have to do is tap on its name.
How to send photos between an iPhone and an Android with Send Anywhere
The Send Anywhere app now shows you a 6-digit keycode, a QR code, a Share Link button, and a list of devices close by. You can use any of them to transfer the photos, but the easiest is the last option: at the bottom of the screen, you should see all the nearby devices running Send Anywhere. That’s where your other iPhone or Android should be displayed. All you have to do is tap on its name.
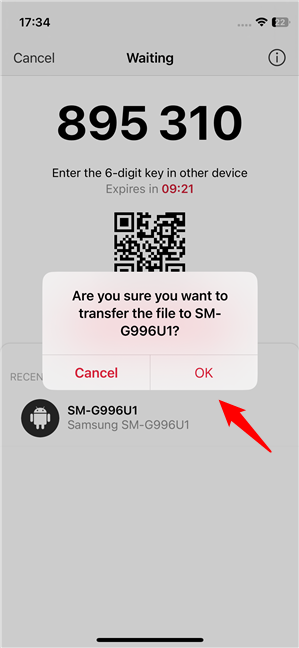
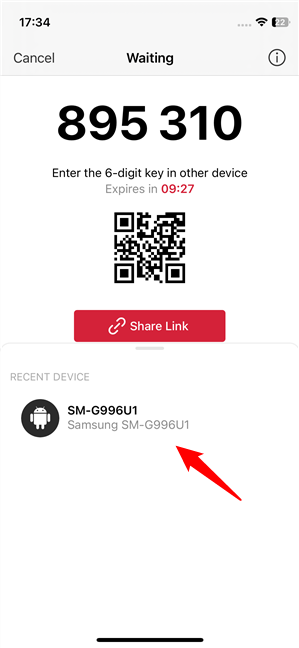 Nearby devices: the phone where photos are sent
You’re now going to be asked whether you’re sure you want to transfer the files to the other iPhone or Android smartphone. Choose OK.
Nearby devices: the phone where photos are sent
You’re now going to be asked whether you’re sure you want to transfer the files to the other iPhone or Android smartphone. Choose OK.
 Approving the photo transfer between your phones
The recipient iPhone or Android device will display a notification about the picture transfer.
Approving the photo transfer between your phones
The recipient iPhone or Android device will display a notification about the picture transfer.
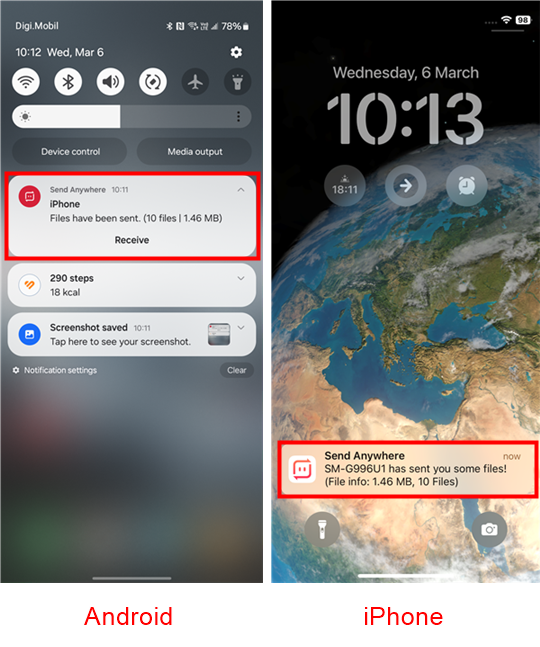 Notifications received when transferring pictures on Androids and iPhones
Accept and wait for all the photos that are being shared from your sending smartphone to be received.
Notifications received when transferring pictures on Androids and iPhones
Accept and wait for all the photos that are being shared from your sending smartphone to be received.
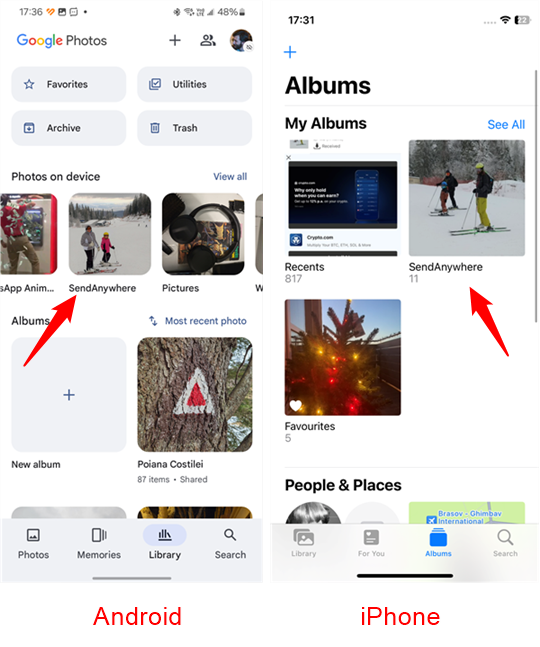 Where to find the photos transferred on Android and iPhone
NOTE: You can experiment with the app if you prefer the other ways of transferring photos. Regardless of whether you choose to use the 6-digit temporary password, a QR code, or the Share Link option, you should know that the transfers are all as safe as possible (all the transferred files are encrypted). For more details on how to work with the Send Anywhere app, you can also check its support page.
Where to find the photos transferred on Android and iPhone
NOTE: You can experiment with the app if you prefer the other ways of transferring photos. Regardless of whether you choose to use the 6-digit temporary password, a QR code, or the Share Link option, you should know that the transfers are all as safe as possible (all the transferred files are encrypted). For more details on how to work with the Send Anywhere app, you can also check its support page.
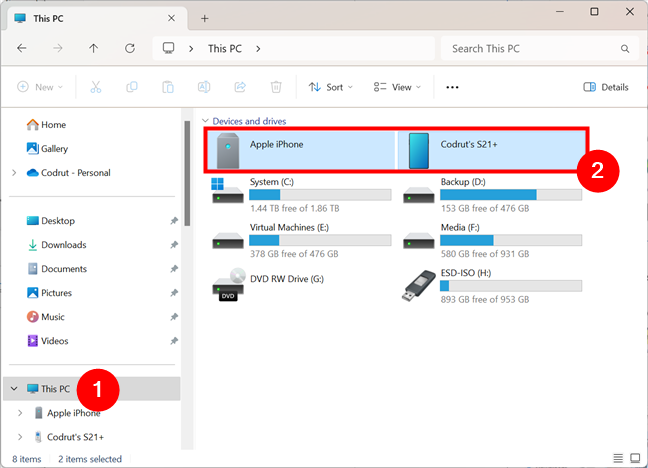
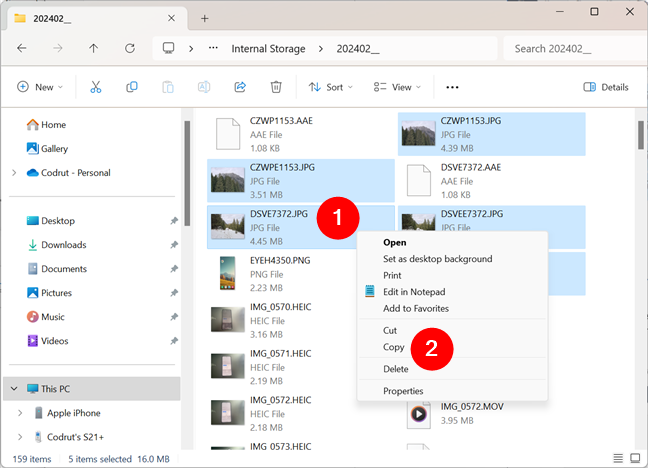
 iPhone and Android connected to a Windows PC
Browse through the sending phone’s memory, select the photos you want to transfer and copy them.
iPhone and Android connected to a Windows PC
Browse through the sending phone’s memory, select the photos you want to transfer and copy them.
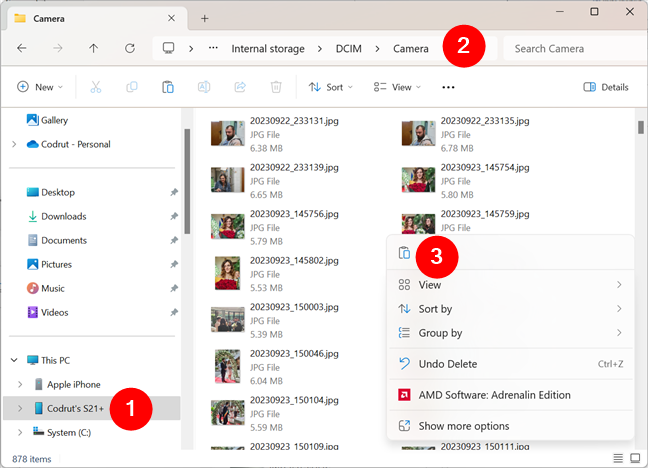
 Copying photos from the sending phone
Then go to the storage space of the recipient phone, find or create the folder where you want to transfer those photos and paste them.
Copying photos from the sending phone
Then go to the storage space of the recipient phone, find or create the folder where you want to transfer those photos and paste them.
 Transfer photos from one phone to another (iPhone or Android)
TIP: If the copy and paste commands don’t work directly, try copying the photos to your Windows desktop or another folder on your computer and then move them from there to the recipient device. When the photos have been transferred between your iPhone and Android or vice versa, you can disconnect both devices from your computer.
Transfer photos from one phone to another (iPhone or Android)
TIP: If the copy and paste commands don’t work directly, try copying the photos to your Windows desktop or another folder on your computer and then move them from there to the recipient device. When the photos have been transferred between your iPhone and Android or vice versa, you can disconnect both devices from your computer.
How to share photos from an iPhone or an Android
Sharing photos means giving another person access to view your pictures, but it’s their choice whether they download them or not. In that way, sharing differs from transferring photos, which usually means sending copies of your photos to others. If you’re wondering how to share photos from an iPhone to an Android device or the other way around, read the methods in this chapter. If you want to transfer photos to others, check the methods in the second chapter of this tutorial.1. How to share photos between an iPhone and an Android with Google Photos
Google’s Photos app offers a simple way to share photos from an iPhone to an Android or vice versa. On Android phones, Google Photos is installed by default, but on an iPhone, you need to get it yourself from Apple’s App Store, and you also need to sign in with your Google account (Gmail address). Note that Google Photos looks and works the same on both Android and iOS, so the next screenshots apply to both mobile operating systems. On the sending iPhone or Android device, use Google Photos to locate the pictures you want to share. Once you do, touch and hold any of them to enter the selection mode, and then tap all the other pictures you want to share.2. How to share pictures from an iPhone to an Android with iCloud
If you have an iPhone and want to share photos with someone else, you also have the option to use Apple’s iCloud. Unfortunately, there’s no iCloud for Android app, so if the receiver uses an Android smartphone, he or she will only be able to see and/or download the pictures you share in a web browser. Here’s how it works: On your iPhone, open the Photos app.3. How to send photos between an iPhone and an Android with OneDrive
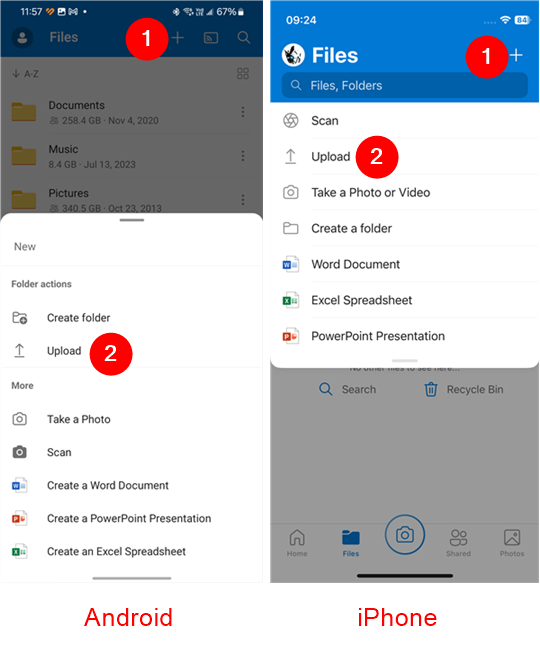
Yet another easy way to share photos from an iPhone to an Android or the other way around is to use a cloud storage app such as OneDrive or Dropbox. To illustrate these steps, I’m using OneDrive: First, download and install the OneDrive app on your iPhone or Android device. Next, use your Microsoft account to sign in to OneDrive. Once you’ve done that, on the sending phone, upload the photos that you want to transfer. Depending on what smartphone you’re sending the pictures from, you can follow the steps in one of these two tutorials: How to upload photos to OneDrive from your Android smartphone or tablet or How to upload photos to OneDrive from your iPhone or iPad. In short, you’ll have to: Open OneDrive on your Android smartphone or iPhone, tap the + (plus) button in the top-right corner of the screen, and select Upload in the list of options that shows up.How to transfer photos between Androids and iPhones
When you want to send your photos to someone else, you have two options: transfer or share. Transferring photos means copying the pictures from one smartphone to another, whether those are iPhones or Androids. Sharing photos usually means creating a link or an album allowing others to view or download your photos online. If you want to transfer pictures between phones, read the two ways in this chapter.4. How to transfer photos between Android and iPhones with an app like Send Anywhere
I’ll begin with what I believe is the easiest way to transfer photos between two smartphones. All you need is an app developed for this exact purpose. There are many available, but in my opinion, the best app to share photos from an iPhone to an Android or the other way around is Send Anywhere. You can get it for free on your iPhone from the App Store or from the Play Store on Android devices. It is important that you download, install, and open the Send Anywhere app on both phones that are going to be involved in the picture transfer. On the smartphone from where you’re sending pictures, go to the Photos tab from the Send Anywhere app and select the photos you want to transfer. Tap to select all the pictures you want to transfer.5. How to transfer pictures between iPhones and Androids with a cable and a PC
A safe method for transferring photos from an iPhone to Android or the other way around is by using a PC and USB cables. To illustrate the process, I’m using a Windows 11 computer, an iPhone, and an Android smartphone. What you need to do is connect the mobile devices to the computer using their USB cables and make sure that you let Windows access the data storage on your smartphones. If you do that, both the storage of the iPhone and that of the Android device will show up in File Explorer.

Discussion (1)
Shareit works well.