


Dynamic Lighting is a feature introduced in Windows 11’s 2023 Update (23H2), allowing us to control RGB lighting effects on compatible devices directly from the operating system’s settings. This feature makes it easier to customize lighting effects on a variety of devices, including gaming gear made by Razer. In this guide, I’ll show you how to enable Dynamic Lighting in Razer’s Synapse software and Windows 11, and I’ll also tell you a bit about the benefits of using this feature to control the RGB lights on your Razer devices. Let’s get started:
 Several Razer gaming accessories are compatible with Dynamic Lighting
The list of supported devices includes many other models of Razer keyboards and mice, such as the Razer DeathStalker V2, Razer Huntsman V3 Pro, Razer Ornata V3, Razer DeathAdder V2, or the Razer Naga Pro. You can find the complete list on Razer’s website here: Razer devices that work with Windows Dynamic Lighting. I expect this list to expand with other accessories that will be launched by the company in the future.
Several Razer gaming accessories are compatible with Dynamic Lighting
The list of supported devices includes many other models of Razer keyboards and mice, such as the Razer DeathStalker V2, Razer Huntsman V3 Pro, Razer Ornata V3, Razer DeathAdder V2, or the Razer Naga Pro. You can find the complete list on Razer’s website here: Razer devices that work with Windows Dynamic Lighting. I expect this list to expand with other accessories that will be launched by the company in the future.
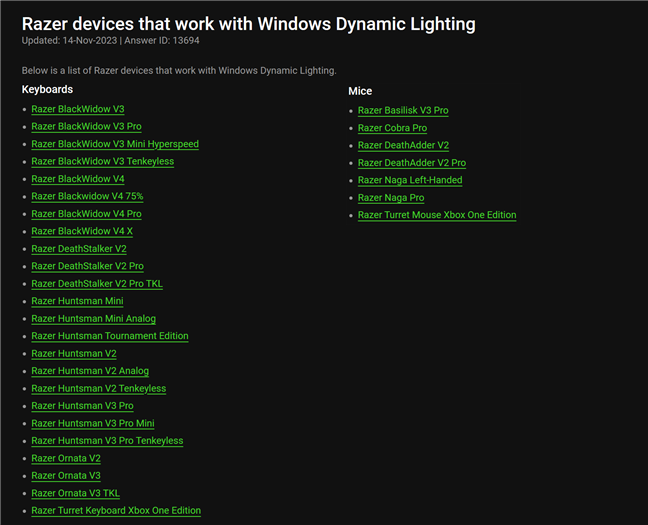
 List of Razer devices that work with Windows Dynamic Lighting
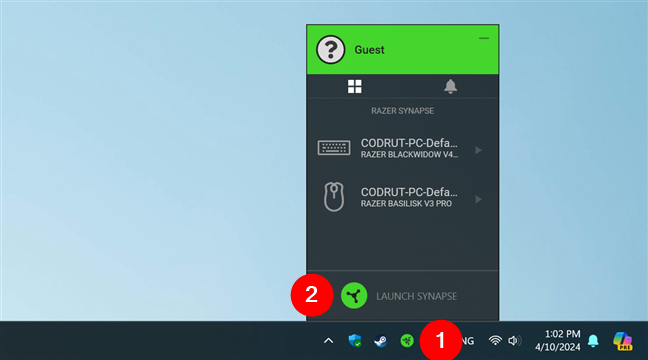
Once you’ve checked whether your Razer device works with Dynamic Lighting, make sure it’s connected to your Windows 11 computer. If it’s a wired device, plug it into a USB port. If it’s a wireless keyboard or mouse, use its wireless dongle to connect it to your PC. Don’t use Bluetooth, as such connections offer limited customization options, and as far as I can tell, Dynamic Lighting isn’t among them.
Next, you may think that you can just go into Windows 11’s Settings and turn on Dynamic Lighting for your Razer devices. However, that’s not the right way, and it will not work. Prior to that, you need to enable the Dynamic Lighting feature in Razer’s Synapse software. So, open the Synapse 3 app on your computer. You can either use its shortcut from the Start Menu or, more easily, you can click or tap the Synapse icon in the taskbar system tray, and select Launch Synapse from the list of options displayed.
List of Razer devices that work with Windows Dynamic Lighting
Once you’ve checked whether your Razer device works with Dynamic Lighting, make sure it’s connected to your Windows 11 computer. If it’s a wired device, plug it into a USB port. If it’s a wireless keyboard or mouse, use its wireless dongle to connect it to your PC. Don’t use Bluetooth, as such connections offer limited customization options, and as far as I can tell, Dynamic Lighting isn’t among them.
Next, you may think that you can just go into Windows 11’s Settings and turn on Dynamic Lighting for your Razer devices. However, that’s not the right way, and it will not work. Prior to that, you need to enable the Dynamic Lighting feature in Razer’s Synapse software. So, open the Synapse 3 app on your computer. You can either use its shortcut from the Start Menu or, more easily, you can click or tap the Synapse icon in the taskbar system tray, and select Launch Synapse from the list of options displayed.
 Launch Synapse in Windows 11
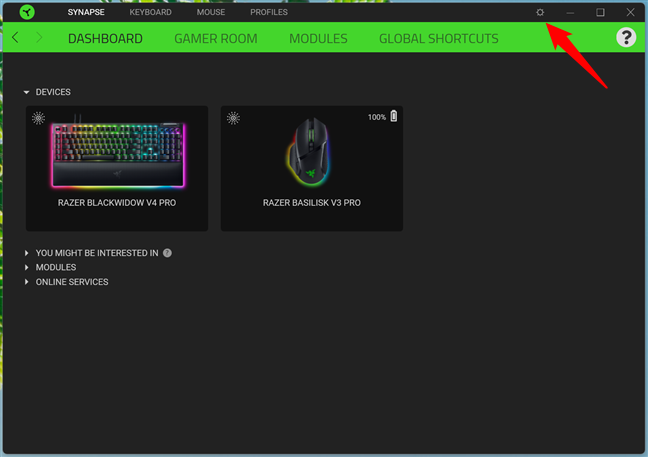
In Razer Synapse, click or tap the Settings icon in the top-right area of the window. The icon looks like a small gear or ship helm.
Launch Synapse in Windows 11
In Razer Synapse, click or tap the Settings icon in the top-right area of the window. The icon looks like a small gear or ship helm.
 Access the Settings in Razer Synapse
This opens the Settings options in Razer’s Synapse. Choose Device Lighting in the left sidebar, and click or tap the Dynamic Lighting button on the right.
Access the Settings in Razer Synapse
This opens the Settings options in Razer’s Synapse. Choose Device Lighting in the left sidebar, and click or tap the Dynamic Lighting button on the right.
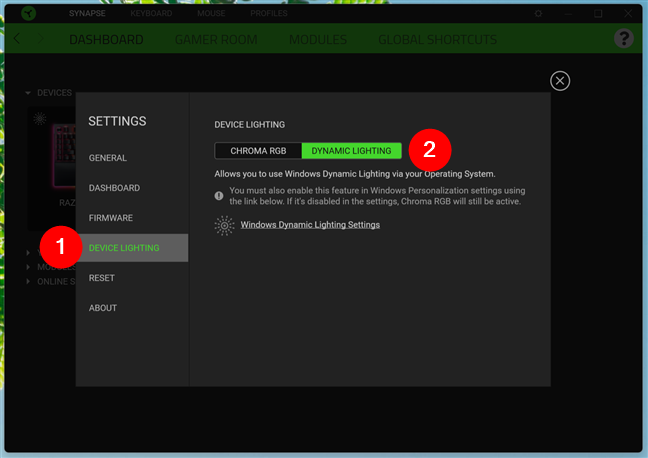
 Enable Dynamic Lighting in Razer Synapse
Dynamic Lighting is now activated in Razer’s Synapse, and you are told that “You must also enable this feature in Windows Personalization settings using the link below. If it’s disabled in the settings, Chroma RGB will still be active.” Quite clear, right? So let’s do that:
Enable Dynamic Lighting in Razer Synapse
Dynamic Lighting is now activated in Razer’s Synapse, and you are told that “You must also enable this feature in Windows Personalization settings using the link below. If it’s disabled in the settings, Chroma RGB will still be active.” Quite clear, right? So let’s do that:
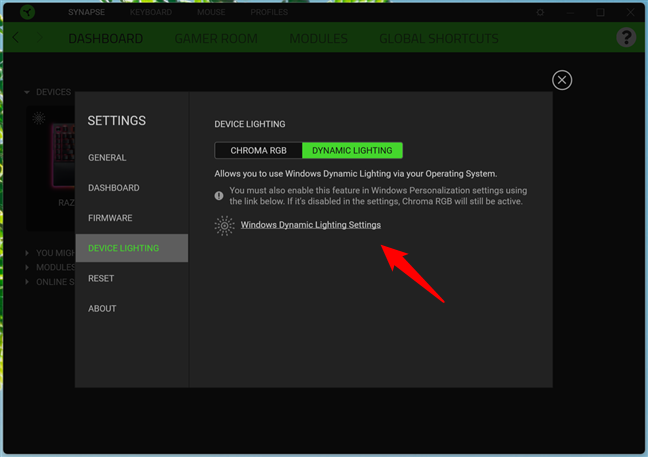 Click the Windows Dynamic Lighting Settings
However, you can also get there by opening Settings (Win + I). Select Personalization on the left sidebar, and click/tap Dynamic Lighting on the right.
Click the Windows Dynamic Lighting Settings
However, you can also get there by opening Settings (Win + I). Select Personalization on the left sidebar, and click/tap Dynamic Lighting on the right.
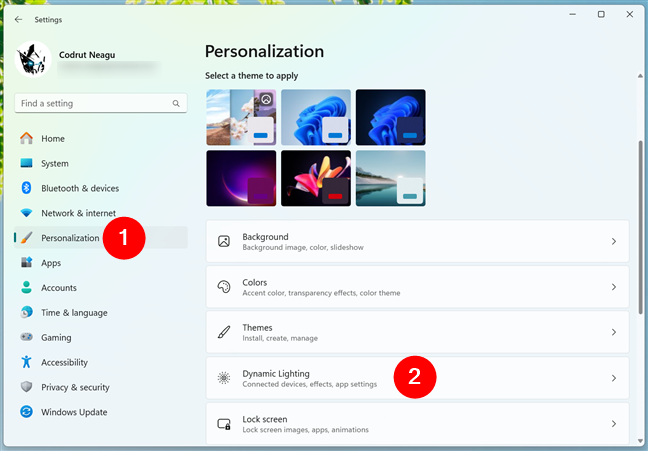
 Access Dynamic Lighting in Windows 11's Settings
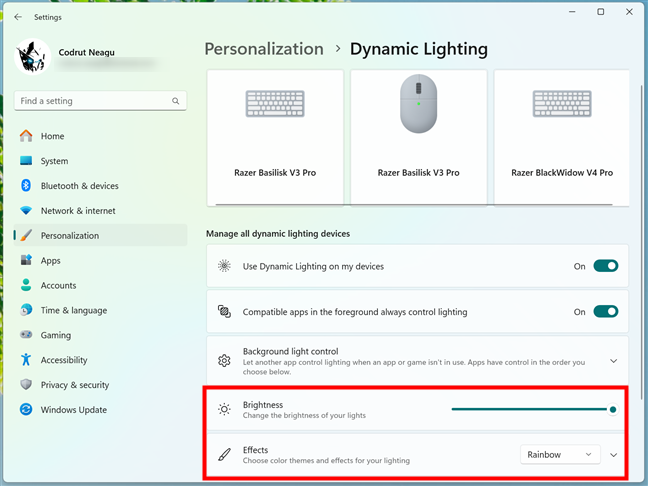
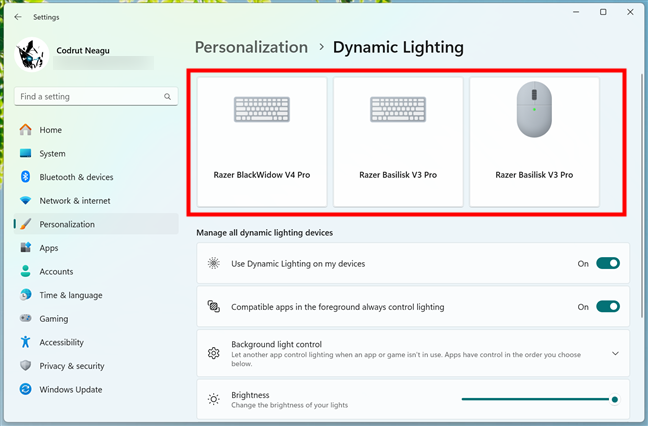
On the Dynamic Lighting page in Windows 11’s Settings, you’ll see all your Razer-compatible devices at the top of the window. Note that in my case, there are two devices listed as Razer Basilisk V3 Pro. That’s because Windows 11 identifies this mouse separately from its wireless dongle. Right under the list of compatible devices, make sure the “Use Dynamic Lighting on my devices” switch is turned on. This controls the global lighting effects on all your devices.
Access Dynamic Lighting in Windows 11's Settings
On the Dynamic Lighting page in Windows 11’s Settings, you’ll see all your Razer-compatible devices at the top of the window. Note that in my case, there are two devices listed as Razer Basilisk V3 Pro. That’s because Windows 11 identifies this mouse separately from its wireless dongle. Right under the list of compatible devices, make sure the “Use Dynamic Lighting on my devices” switch is turned on. This controls the global lighting effects on all your devices.

 Enable the Use Dynamic Lighting on my devices switch
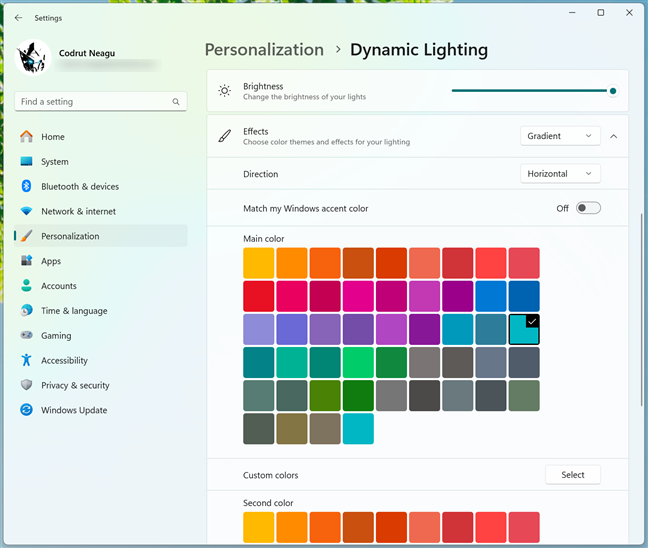
Then, use the Brightness slider to control how much light your Razer devices will give and choose a lighting effect from the dropdown menu next to Effects. I like Solid Color for simplicity, but you may prefer other effects like Rainbow, Wave, Wheel, or even Gradient.
Enable the Use Dynamic Lighting on my devices switch
Then, use the Brightness slider to control how much light your Razer devices will give and choose a lighting effect from the dropdown menu next to Effects. I like Solid Color for simplicity, but you may prefer other effects like Rainbow, Wave, Wheel, or even Gradient.
 Customize the brightness and choose a lighting effect
Depending on which one you activate, you’ll get additional options to personalize the effect, like choosing the colors, speed, or direction. The idea here is to try out different settings and play around with them until you’re happy.
Customize the brightness and choose a lighting effect
Depending on which one you activate, you’ll get additional options to personalize the effect, like choosing the colors, speed, or direction. The idea here is to try out different settings and play around with them until you’re happy.
 Customizing a lighting effect
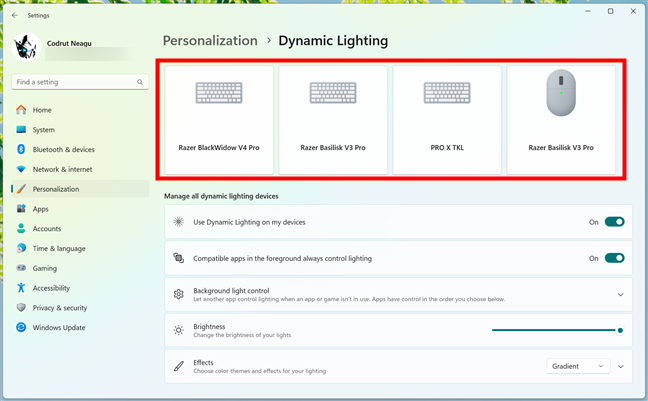
If you want to apply a different lighting effect or color to a certain Razer device, you can customize it independently from the others by selecting it from the row of devices at the top of the Dynamic Lighting page in Settings. To select a device, simply click or tap its name. You then see a list of settings that apply only to that device.
Customizing a lighting effect
If you want to apply a different lighting effect or color to a certain Razer device, you can customize it independently from the others by selecting it from the row of devices at the top of the Dynamic Lighting page in Settings. To select a device, simply click or tap its name. You then see a list of settings that apply only to that device.
 You can personalize devices individually too
TIP: If you need more details and instructions on how to customize the lighting effects on your Razer devices, you can find them all in this in-depth guide: How to change the RGB settings in Windows 11 with Dynamic Lighting.
When you’re done, you can close both the Settings app from Windows 11 and Razer’s Synapse software and enjoy your RGB lighting settings.
You can personalize devices individually too
TIP: If you need more details and instructions on how to customize the lighting effects on your Razer devices, you can find them all in this in-depth guide: How to change the RGB settings in Windows 11 with Dynamic Lighting.
When you’re done, you can close both the Settings app from Windows 11 and Razer’s Synapse software and enjoy your RGB lighting settings.
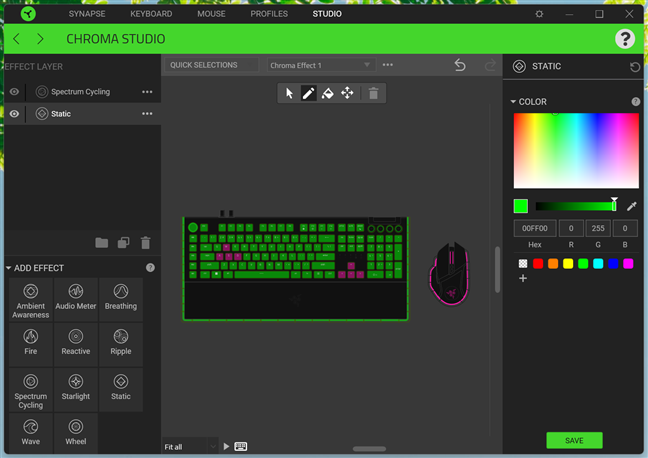 Customizing lighting effects in Razer's Synapse Chroma Studio
However, for users looking for a straightforward and unified approach, Windows 11’s Dynamic Lighting is an excellent feature, offering several benefits:
Customizing lighting effects in Razer's Synapse Chroma Studio
However, for users looking for a straightforward and unified approach, Windows 11’s Dynamic Lighting is an excellent feature, offering several benefits:
 Dynamic Lighting unifies the RGB lighting on all accessories
It’s a good idea to standardize RGB lighting in Windows 11, don’t you think?
Dynamic Lighting unifies the RGB lighting on all accessories
It’s a good idea to standardize RGB lighting in Windows 11, don’t you think?
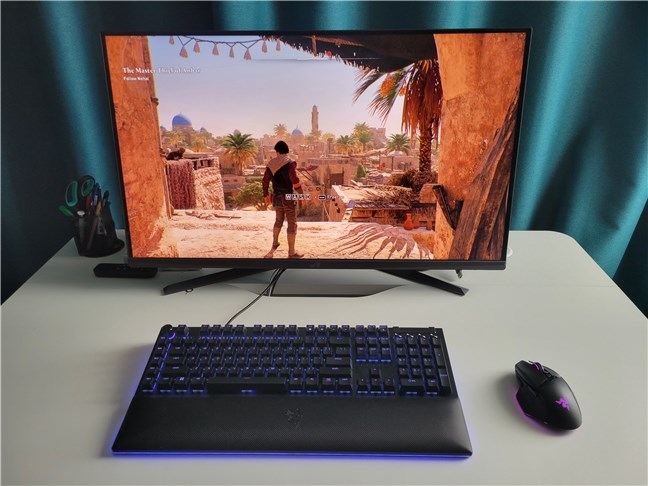
How to enable Dynamic Lighting on Razer devices
Razer, a leading brand in the gaming gear market, offers a range of devices that work with Windows 11’s Dynamic Lighting feature. To configure a Razer device for Dynamic Lighting, follow these steps:Step 1. Enable Dynamic Lighting in Razer Synapse
First and foremost, you should make sure that your Razer device is compatible with Windows 11's Dynamic Lighting. For example, the Razer Basilisk V3 Pro mouse and the Razer BlackWidow V4 Pro gaming keyboard that I’m using work perfectly with this feature.Step 2. Enable Dynamic Lighting in Windows 11
The second step to enable Dynamic Lighting for your Razer devices in Windows 11 is to turn on this feature in the operating system’s Settings. The fastest way to do this is to click or tap the Windows Dynamic Lighting Settings link in Synapse.The benefits of using Dynamic Lighting for your Razer devices
For those who prefer more intricate control over their RGB lighting, the dedicated Razer Synapse software offers a broader range of customization options than Dynamic Lighting. For instance, Synapse allows you to assign different RGB lighting configurations to different games or apps. Or you can use the Chroma Studio in Synapse to set individual effects and colors to individual keys. These are things you can do only with Razer’s Synapse; Windows 11’s Dynamic Lighting is much more basic in this respect.- Because it uses the open HID LampArray standard, device manufacturers like Razer can use one standardized firmware.
- Users can control lighting on multiple devices from a single interface inside the Settings app of Windows 11.
- It gives you the ability to synchronize lighting across different brands, not just Razer, creating a cohesive and immersive experience.

Discussion (0)
Be the first to comment.