

If you need to type without a keyboard, the On-Screen Keyboard in Windows might be helpful. It allows you to type by using a mouse. You can even set up and use this function without having a keyboard connected to your computer, which can be useful if your keyboard is unavailable. This article explains how to access the On-Screen Keyboard, how to operate it, how to use it to log on to a password-protected user account without using a physical keyboard, and how to use several of its options, including the predictive text function.
NOTE: This article is about the On-Screen Keyboard feature available in Windows 10 and Windows 11. These operating systems also include a touch keyboard feature. However, while the On-Screen Keyboard is an accessibility tool that can be used with a mouse, touch, a joystick, or even with a single key, the touch keyboard is designed for devices with a touchscreen and can be opened by tapping on a text box or selecting the touch keyboard icon on the taskbar. For more info about the latter, check this guide: How to enable or disable the touch keyboard in Windows 11.
 The On-Screen Keyboard shortcut for Windows 10
Alternatively, you can also use the search field on your taskbar to look for the On-Screen Keyboard.
The On-Screen Keyboard shortcut for Windows 10
Alternatively, you can also use the search field on your taskbar to look for the On-Screen Keyboard.
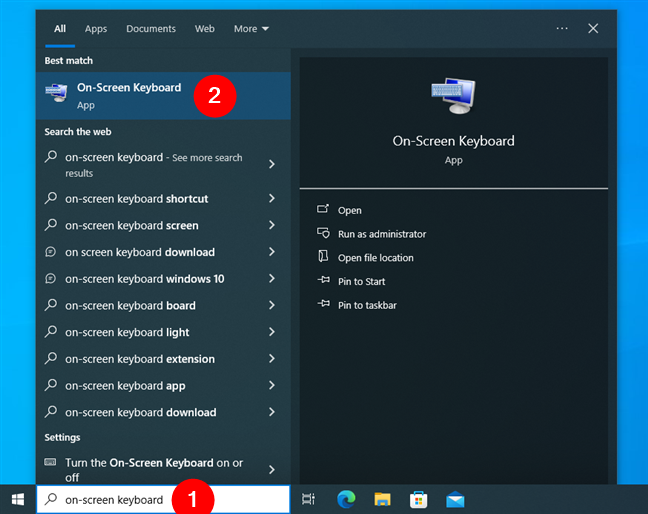
 Searching for the virtual keyboard in Windows 10
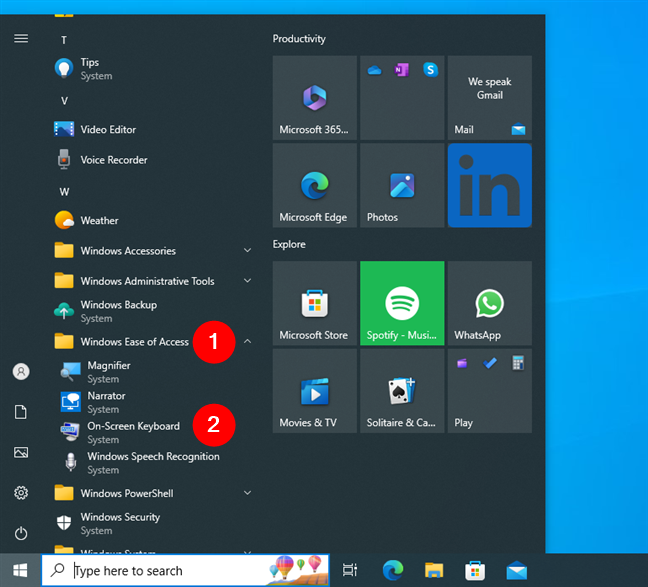
You can also access the On-Screen Keyboard from the Start Menu. Scroll until you get to the Windows Ease of Access folder, and click or tap the On-Screen Keyboard shortcut.
Searching for the virtual keyboard in Windows 10
You can also access the On-Screen Keyboard from the Start Menu. Scroll until you get to the Windows Ease of Access folder, and click or tap the On-Screen Keyboard shortcut.
 Start Menu shortcut to open the On-Screen Keyboard in Windows 10
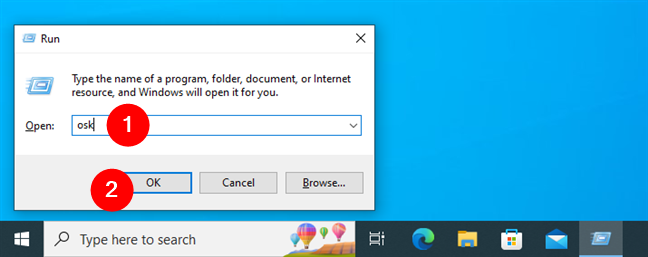
Another relatively fast way of accessing the On-Screen Keyboard in Windows 10 is to run this command in the Run window (Win + R):
Start Menu shortcut to open the On-Screen Keyboard in Windows 10
Another relatively fast way of accessing the On-Screen Keyboard in Windows 10 is to run this command in the Run window (Win + R):
 How to get the keyboard on-screen using a command
TIP: You can also run the osk command in Command Prompt, PowerShell, or even File Explorer.
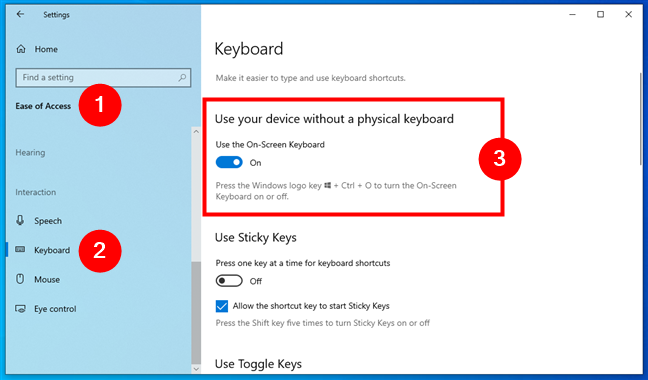
Finally, a slower yet reliable method to open the On-Screen Keyboard in Windows 10 is also made available by the Settings app. Open Settings, navigate to Ease of Access, select Keyboard on the left sidebar, and turn on the “Use the On-Screen Keyboard” switch.
How to get the keyboard on-screen using a command
TIP: You can also run the osk command in Command Prompt, PowerShell, or even File Explorer.
Finally, a slower yet reliable method to open the On-Screen Keyboard in Windows 10 is also made available by the Settings app. Open Settings, navigate to Ease of Access, select Keyboard on the left sidebar, and turn on the “Use the On-Screen Keyboard” switch.
 Use the On-Screen Keyboard in Windows 10
TIP: Did you know that both Windows 11 and Windows 10 also include a tool that makes it easier to see what’s on the screen, especially if you suffer from visual impairment? Here’s how to use Magnifier to zoom in on a Windows PC.
Use the On-Screen Keyboard in Windows 10
TIP: Did you know that both Windows 11 and Windows 10 also include a tool that makes it easier to see what’s on the screen, especially if you suffer from visual impairment? Here’s how to use Magnifier to zoom in on a Windows PC.
 The On-Screen Keyboard shortcut for Windows 11
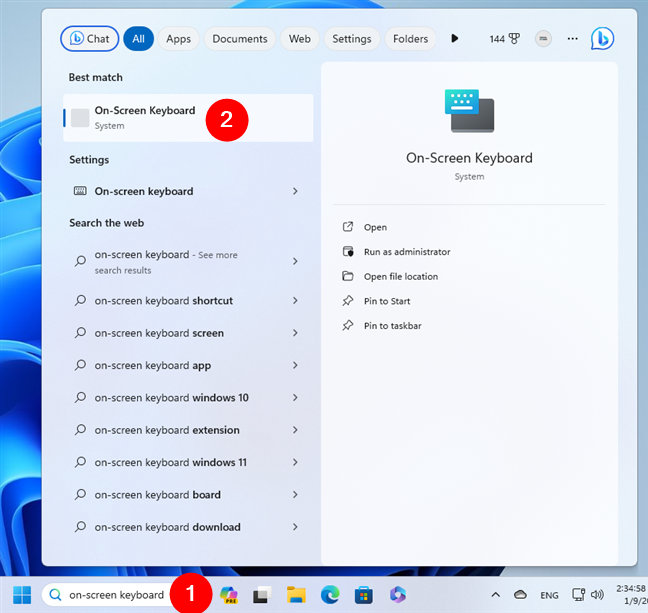
If you prefer, you can also get the On-Screen Keyboard in Windows 11 by using the search box on the taskbar.
The On-Screen Keyboard shortcut for Windows 11
If you prefer, you can also get the On-Screen Keyboard in Windows 11 by using the search box on the taskbar.
 Searching for the virtual keyboard in Windows 11
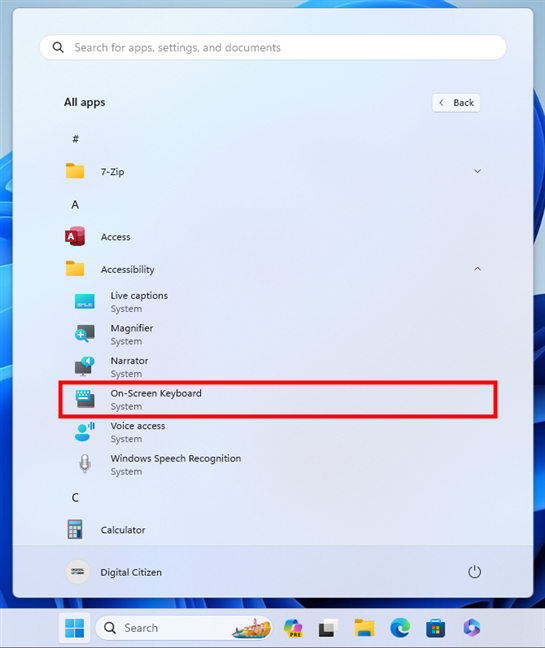
There’s also an On-Screen Keyboard shortcut available in the Start Menu. You can find it inside the Accessibility folder in the All apps list.
Searching for the virtual keyboard in Windows 11
There’s also an On-Screen Keyboard shortcut available in the Start Menu. You can find it inside the Accessibility folder in the All apps list.
 Start Menu shortcut to open the On-Screen Keyboard in Windows 11
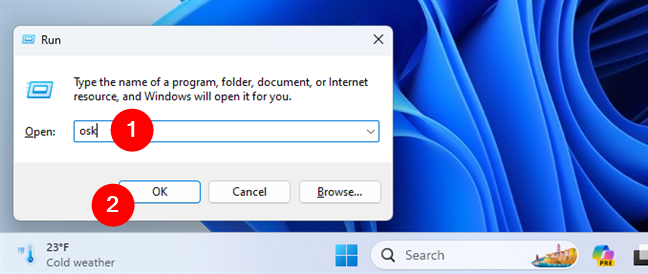
Alternatively, if you like using commands, you can also get the On-Screen Keyboard up and running by executing the following command in Windows 11’s Run window (Win + R) or Command Prompt:
Start Menu shortcut to open the On-Screen Keyboard in Windows 11
Alternatively, if you like using commands, you can also get the On-Screen Keyboard up and running by executing the following command in Windows 11’s Run window (Win + R) or Command Prompt:
 The command to get the keyboard on-screen in Windows 11
TIP: You can also execute the osk command in PowerShell, Windows Terminal, or even in File Explorer.
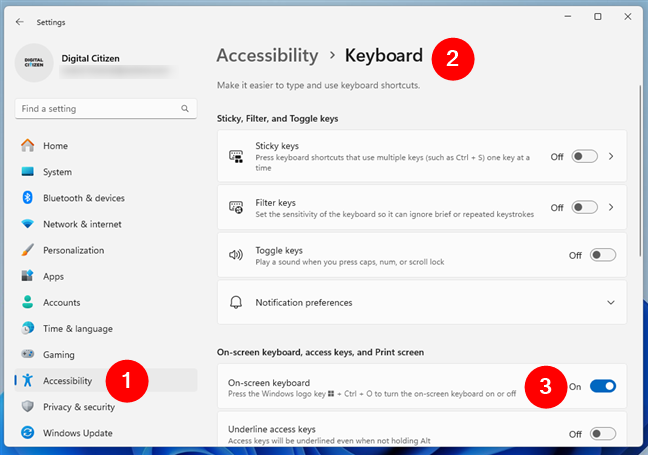
Last but not least, the slowest way to open the On-Screen Keyboard in Windows 11 is from the Settings app. Launch Settings (Win + I), select Accessibility on the left sidebar, click or tap on Keyboard in the Interaction section on the right, and turn on the “On-screen keyboard” switch.
The command to get the keyboard on-screen in Windows 11
TIP: You can also execute the osk command in PowerShell, Windows Terminal, or even in File Explorer.
Last but not least, the slowest way to open the On-Screen Keyboard in Windows 11 is from the Settings app. Launch Settings (Win + I), select Accessibility on the left sidebar, click or tap on Keyboard in the Interaction section on the right, and turn on the “On-screen keyboard” switch.
 Turn on the On-Screen Keyboard in Windows 11
TIP: In Windows 11, there’s also a new app called Voice Access that enables you to operate your computer with your voice. Microsoft developed it with the goal of assisting people with disabilities or limited mobility to access their computers more easily and independently, but anyone can benefit from it. Here’s how to use the Voice Access app in Windows 11.
Turn on the On-Screen Keyboard in Windows 11
TIP: In Windows 11, there’s also a new app called Voice Access that enables you to operate your computer with your voice. Microsoft developed it with the goal of assisting people with disabilities or limited mobility to access their computers more easily and independently, but anyone can benefit from it. Here’s how to use the Voice Access app in Windows 11.
 Access On-Screen Keyboard on the Windows 10 sign-in screen
Then, you can use the On-Screen Keyboard.
Access On-Screen Keyboard on the Windows 10 sign-in screen
Then, you can use the On-Screen Keyboard.
 Access On-Screen Keyboard on the Windows 11 lock screen
You can then use the On-Screen Keyboard to sign or unlock your Windows 11 PC.
NOTE: The On-Screen Keyboard works the same in both Windows 10 and Windows 11. All the next steps and instructions in this guide are identical in the two operating systems. And, to make things simpler, from here on, I’m going to use screenshots taken in Windows 10. Everything looks the same in Windows 11 too.
Access On-Screen Keyboard on the Windows 11 lock screen
You can then use the On-Screen Keyboard to sign or unlock your Windows 11 PC.
NOTE: The On-Screen Keyboard works the same in both Windows 10 and Windows 11. All the next steps and instructions in this guide are identical in the two operating systems. And, to make things simpler, from here on, I’m going to use screenshots taken in Windows 10. Everything looks the same in Windows 11 too.
 Selecting where to type
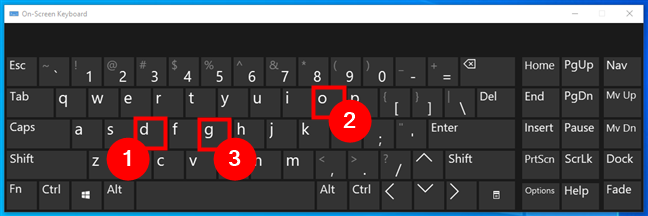
Then, simply maneuver the cursor over the On-Screen Keyboard’s keys and click them with the mouse. In the example below, the user would move the cursor with the mouse to click the letters on the On-Screen Keyboard.
Selecting where to type
Then, simply maneuver the cursor over the On-Screen Keyboard’s keys and click them with the mouse. In the example below, the user would move the cursor with the mouse to click the letters on the On-Screen Keyboard.
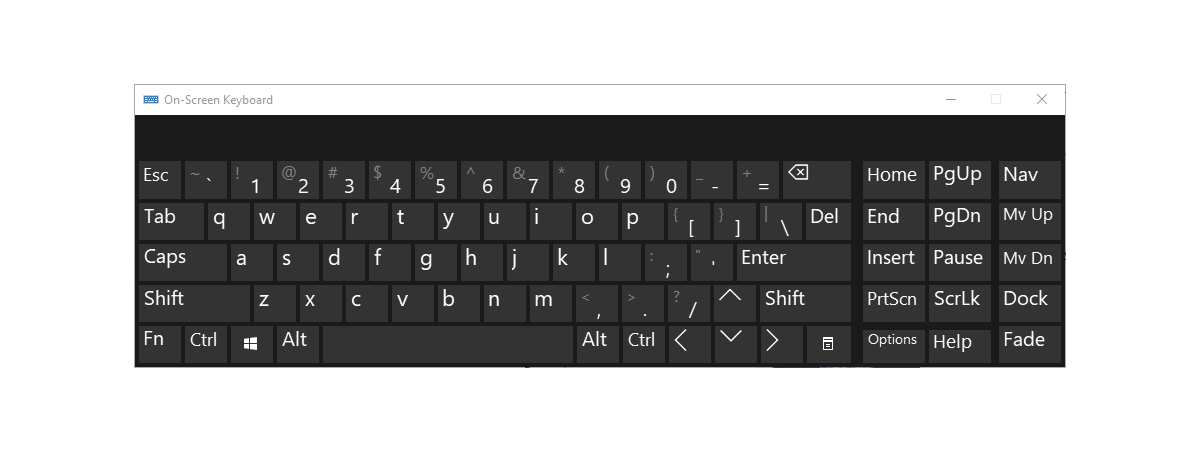
 Typing on the Windows virtual keyboard
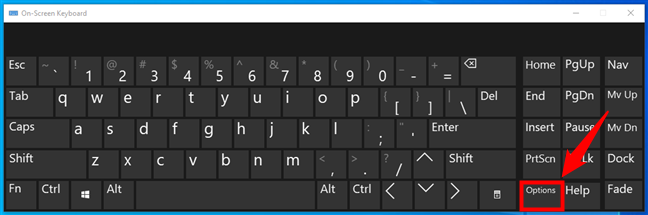
There are also options that allow you to press the keys by hovering over them with the cursor: we will discuss how to turn this on later in the tutorial. Several options can be accessed by clicking on the Options key on the virtual keyboard interface. This key is indicated in the screenshot below.
Typing on the Windows virtual keyboard
There are also options that allow you to press the keys by hovering over them with the cursor: we will discuss how to turn this on later in the tutorial. Several options can be accessed by clicking on the Options key on the virtual keyboard interface. This key is indicated in the screenshot below.
 On-Screen Keyboard Options

 The settings available for the Windows On-Screen Keyboard
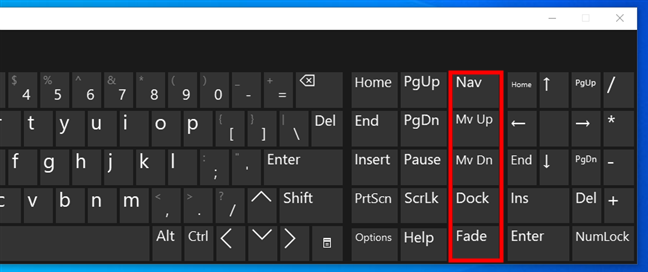
The next setting - “Show keys to make it easier to move around the screen” - shows a series of additional keys on the virtual keyboard that can be useful in certain situations. Next to the two columns with special buttons like Home or PgUp, you get a third column with the following controls:
The settings available for the Windows On-Screen Keyboard
The next setting - “Show keys to make it easier to move around the screen” - shows a series of additional keys on the virtual keyboard that can be useful in certain situations. Next to the two columns with special buttons like Home or PgUp, you get a third column with the following controls:
 Show keys to make it easier to move around the screen
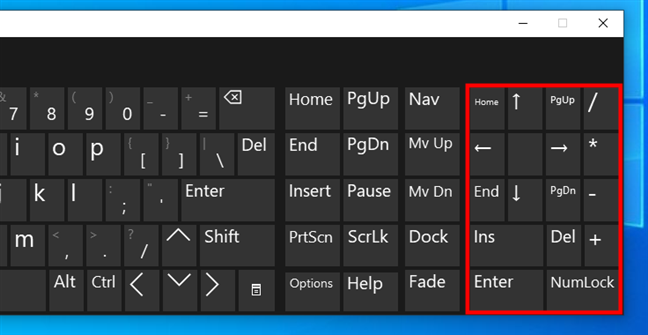
The “Turn on numeric key pad” box adds a data-entry style number pad to the right side of the virtual keyboard. You can see it below.
Show keys to make it easier to move around the screen
The “Turn on numeric key pad” box adds a data-entry style number pad to the right side of the virtual keyboard. You can see it below.
 Special buttons on the Windows virtual keyboard
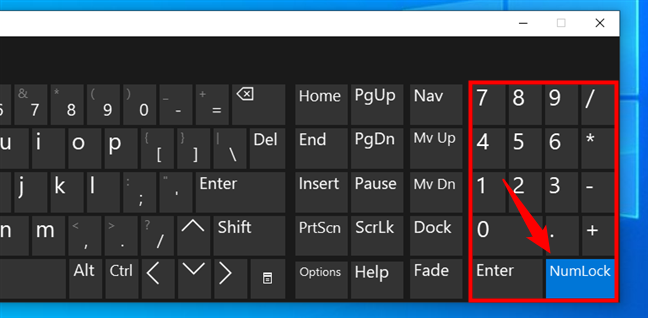
For the numeric keypad to actually display numbers, you must click the NumLock key, as indicated in the example below.
Special buttons on the Windows virtual keyboard
For the numeric keypad to actually display numbers, you must click the NumLock key, as indicated in the example below.
 Numerical keys on the On-Screen Keyboard in Windows
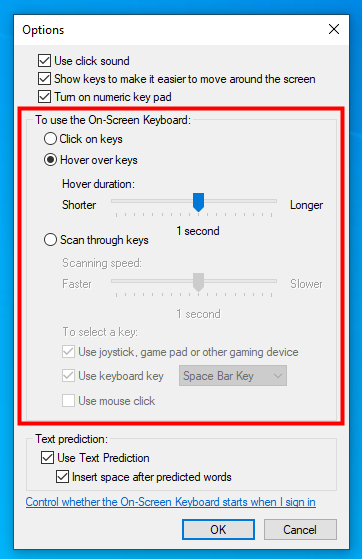
The default method for operating the On-Screen Keyboard is the “Click on keys” option. However, you can instead select “Hover over keys” if you’d prefer to operate the keyboard by having the cursor hover over the keys you wish to click. The “Scan through keys” option allows you to select letters by hitting a button of your choice as the computer scans through the available keys, row by row, and then key by key. Both of these alternatives have scroll bars that allow you to customize how long you need to hover over a key or how quickly you scan through the keys.
Numerical keys on the On-Screen Keyboard in Windows
The default method for operating the On-Screen Keyboard is the “Click on keys” option. However, you can instead select “Hover over keys” if you’d prefer to operate the keyboard by having the cursor hover over the keys you wish to click. The “Scan through keys” option allows you to select letters by hitting a button of your choice as the computer scans through the available keys, row by row, and then key by key. Both of these alternatives have scroll bars that allow you to customize how long you need to hover over a key or how quickly you scan through the keys.
 Options for how to type using On-Screen Keyboard
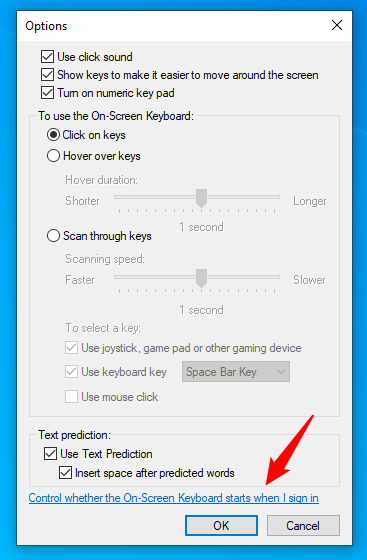
If you plan to use the On-Screen Keyboard often, you can set your computer to start up with the On-Screen Keyboard already activated once you log on. This can be set up by clicking on the “Control whether the On-Screen Keyboard starts when I sign in” link at the bottom of the Options panel.
Options for how to type using On-Screen Keyboard
If you plan to use the On-Screen Keyboard often, you can set your computer to start up with the On-Screen Keyboard already activated once you log on. This can be set up by clicking on the “Control whether the On-Screen Keyboard starts when I sign in” link at the bottom of the Options panel.
 Control whether the On-Screen Keyboard starts when I sign in
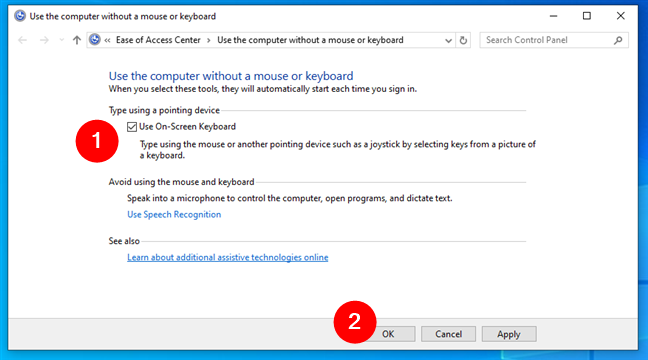
This brings up a panel where you can find a “Use On-Screen Keyboard” box in the “Type using a pointing device” section, as indicated below. Check this box, and your computer will start with the On-Screen Keyboard already opened for you.
Control whether the On-Screen Keyboard starts when I sign in
This brings up a panel where you can find a “Use On-Screen Keyboard” box in the “Type using a pointing device” section, as indicated below. Check this box, and your computer will start with the On-Screen Keyboard already opened for you.
 How to turn on the On-Screen Keyboard automatically
And now that you know how to turn on the On-Screen Keyboard automatically, there’s one more thing left to cover:
How to turn on the On-Screen Keyboard automatically
And now that you know how to turn on the On-Screen Keyboard automatically, there’s one more thing left to cover:
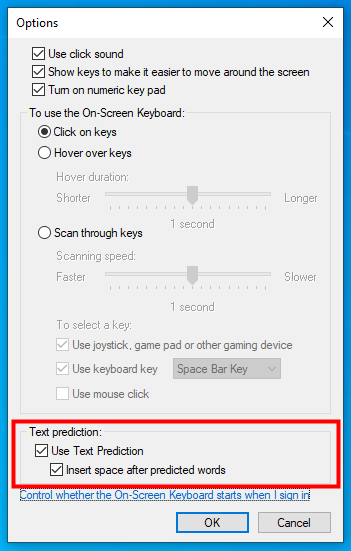
 Text prediction for On-Screen Keyboard in Windows
It’s recommended that you also check the “Insert space after predicted words” option. It saves you additional time by automatically hitting the spacebar for you after a word is predicted.
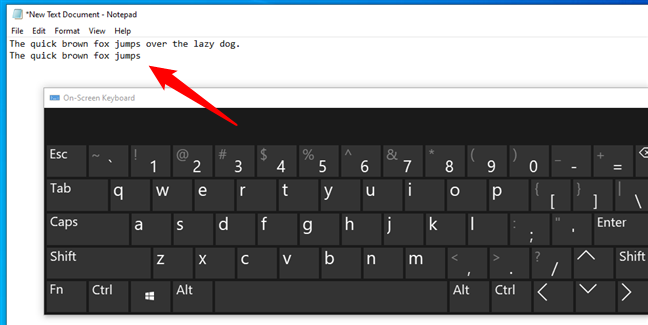
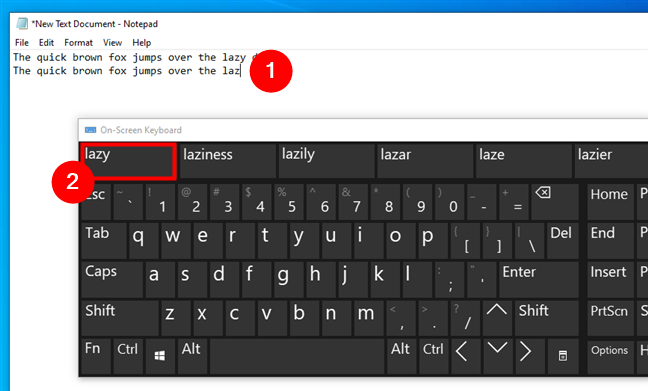
As you type, the function suggests words you may be typing at the top of the On-Screen Keyboard. If you see the word you are attempting to type, click it, and the program instantly completes the word for you. This can help you type words faster. For example, if you were typing the word “lazy,” the predictive text function may catch on to this and provide the word at the top of the On-Screen Keyboard, as indicated below. Then, simply click on the word, and it automatically completes it for you.
Text prediction for On-Screen Keyboard in Windows
It’s recommended that you also check the “Insert space after predicted words” option. It saves you additional time by automatically hitting the spacebar for you after a word is predicted.
As you type, the function suggests words you may be typing at the top of the On-Screen Keyboard. If you see the word you are attempting to type, click it, and the program instantly completes the word for you. This can help you type words faster. For example, if you were typing the word “lazy,” the predictive text function may catch on to this and provide the word at the top of the On-Screen Keyboard, as indicated below. Then, simply click on the word, and it automatically completes it for you.
 How text prediction works for On-Screen Keyboard
NOTE: The text prediction feature works only for English, French, Italian, German, and Spanish languages.
How text prediction works for On-Screen Keyboard
NOTE: The text prediction feature works only for English, French, Italian, German, and Spanish languages.
How to open the On-Screen Keyboard in Windows
The On-Screen Keyboard is a virtual keyboard that you can use to enter text without a physical keyboard. You can open it in Windows by following these steps:How to show the On-Screen Keyboard in Windows 10
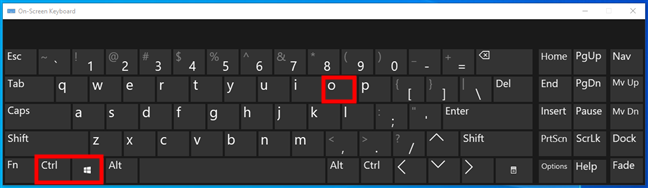
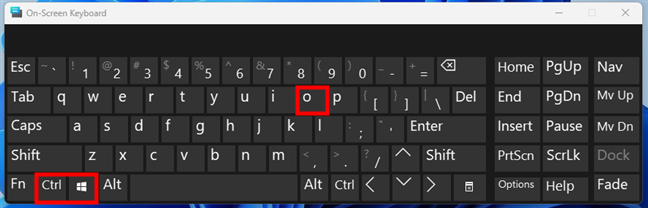
The fastest way to open the On-Screen Keyboard in Windows 10 is to use the operating system’s built-in virtual keyboard shortcut. This means you need to use your physical keyboard, but only for a (very) short while. 🙂 For the virtual keyboard to show up on your Windows 10 screen, simultaneously press these keys:Ctrl + Win + O
osk
How to show the On-Screen Keyboard in Windows 11
A quick way to get a keyboard on the screen of Windows 11 is to use the On-Screen Keyboard shortcut that the operating system provides. This requires you to use your physical keyboard, but only briefly. 🙂 All you have to do is simultaneously press these keys:Ctrl + Win + O
osk
How to open the On-Screen Keyboard from the sign-in screen
If you need to use the On-Screen Keyboard to log in to your Windows computer, you can. Here’s how to do it:How to get the On-Screen Keyboard on Windows 10’s sign-in/lock screen
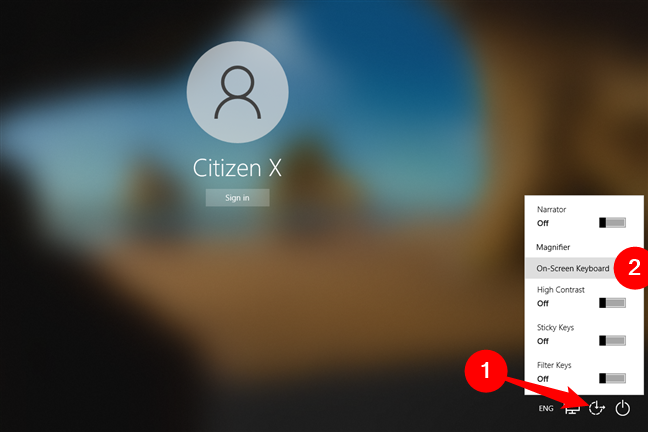
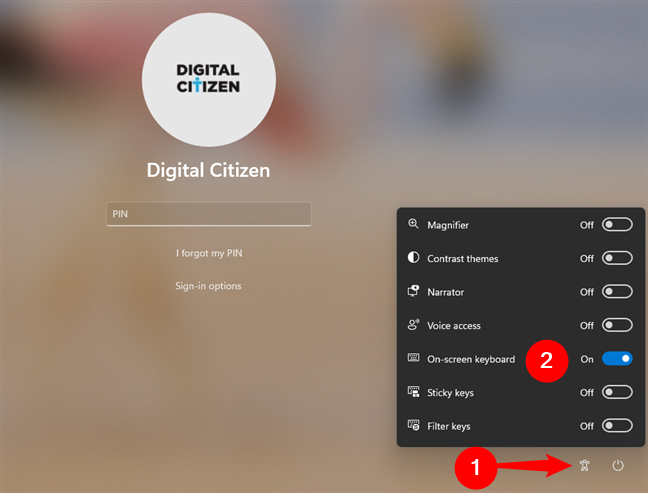
When logging in to Windows 10, select the user you want to log in with, and then press the Ease of Access logo from the bottom-right corner of the screen. A menu is shown with several options: select On-Screen Keyboard.How to get the On-Screen Keyboard on Windows 11’s sign-in/lock screen
To open the On-Screen Keyboard while signing in or unlocking your Windows 11 computer, press the Accessibility button in the lower-right corner of the screen and then enable the On-screen keyboard switch.How to use the On-Screen Keyboard in Windows
The On-Screen Keyboard is used by first opening the app or window you wish to type in. For example, you might open Notepad or your web browser of choice. Then, select with the mouse where you want to type, just like you normally would if you were to use a physical keyboard. Make sure the blinking line or cursor (that usually indicates where you will be typing in a given window) is in place.How to configure the On-Screen Keyboard
When you click the Options key on the virtual keyboard interface, as shown above, a panel pops up with several options to customize the On-Screen Keyboard for your personal use. If you check the box for “Use click sound” at the top of the Options panel, you should hear an audible clicking noise through your speakers when you click keys on the On-Screen Keyboard.- Nav – minimizes the keyboard and displays one row with keys used to navigate the operating system: Tab, Enter, Space, Up, Down, etc.
- Mv Up – moves the On-Screen Keyboard to the top side of the screen.
- Mv Dn – moves the On-Screen Keyboard to the bottom side of the screen.
- Dock – docks the On-Screen Keyboard to the bottom side of the screen.
- Fade – makes the On-Screen Keyboard transparent. However, it remains in the background, and you can still use it.
How to use text prediction with the On-Screen Keyboard
The predictive text function works a lot like similar functions featured on smartphones. Check the “Use Text Prediction” setting in the options panel to activate it.
Discussion (1)
I have tried the method you suggest for having the OSK come on with computer logon, but for some reason the setting does not ‘stick.’ I restart the PC as indicated and the setting is gone. Any ideas?