


Did your mouse malfunction, and do you need to use your computer now? Are you a laptop user who doesn’t like the built-in trackpad? Or maybe you have some motor issues that prevent you from using the mouse? In any of these situations, you’ll be happy to know that you can click, right-click, and navigate Windows using the keyboard. The operating system has some quick keyboard shortcuts you can use and a feature named Mouse Keys, which allows for complex interaction without using the mouse. Here’s how it all works:
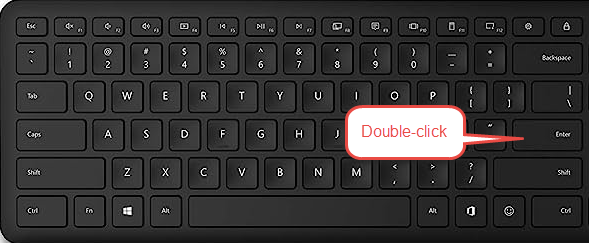
 Enter is the equivalent of double-click
TIP: You may want to read how long millions of keystrokes and clicks are in years.
Enter is the equivalent of double-click
TIP: You may want to read how long millions of keystrokes and clicks are in years.
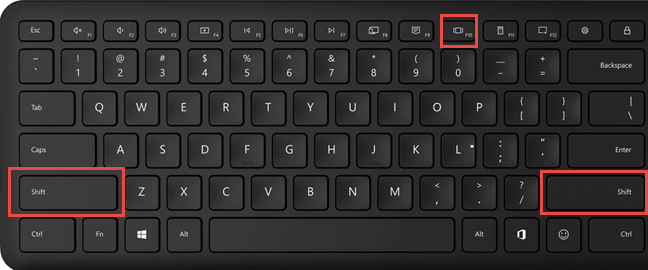
 SHIFT+F10 is the equivalent of right-click
It doesn’t matter if you’re using the SHIFT key on the left side of the keyboard or the one on the right.
Some keyboards have a “Context Menu” key on their bottom row, next to the right CTRL key. On this key, there’s a small icon depicting a menu. If you press it, it opens the right-click menu, acting like a right-click. Unfortunately, this key is missing on laptop and mobile keyboards.
SHIFT+F10 is the equivalent of right-click
It doesn’t matter if you’re using the SHIFT key on the left side of the keyboard or the one on the right.
Some keyboards have a “Context Menu” key on their bottom row, next to the right CTRL key. On this key, there’s a small icon depicting a menu. If you press it, it opens the right-click menu, acting like a right-click. Unfortunately, this key is missing on laptop and mobile keyboards.
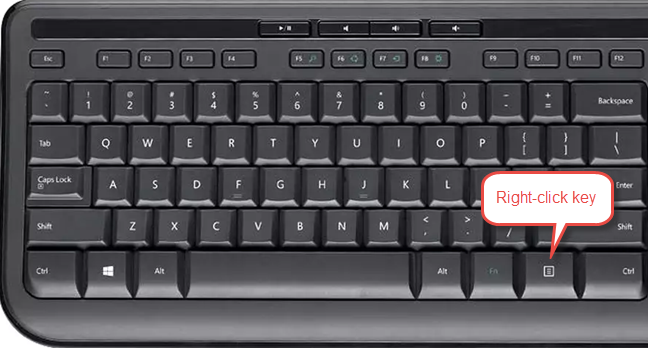
 Do you have a Menu key on your keyboard?
TIP: Do you like using the keyboard to enhance your productivity? Here’s a complete list of Windows 10 keyboard shortcuts. Most of them work in Windows 11 too. 🙂
Do you have a Menu key on your keyboard?
TIP: Do you like using the keyboard to enhance your productivity? Here’s a complete list of Windows 10 keyboard shortcuts. Most of them work in Windows 11 too. 🙂
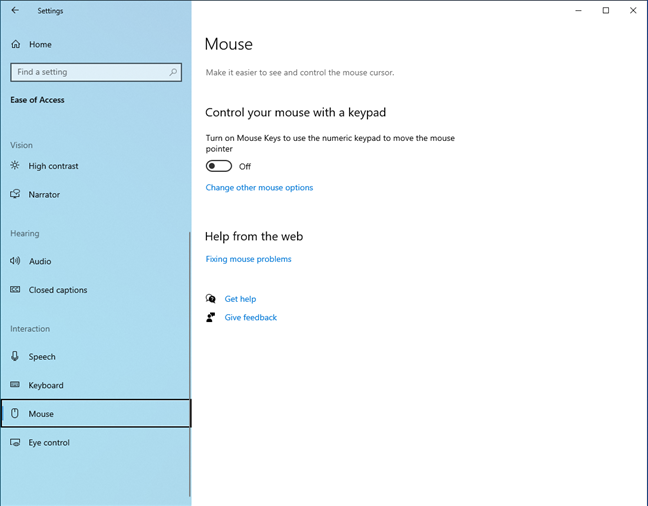
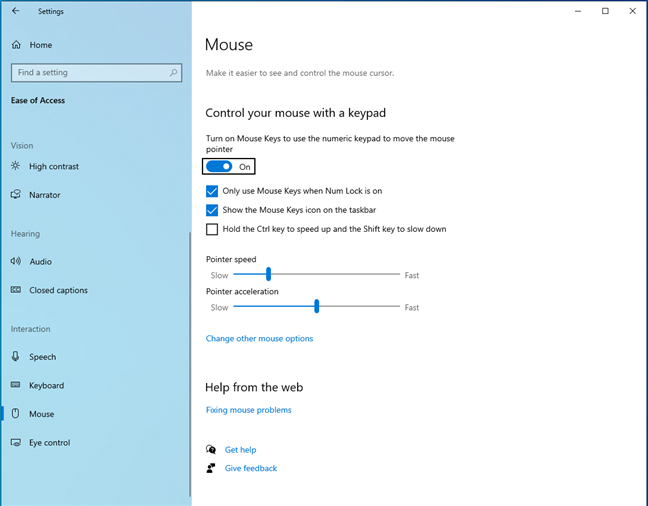
 In Windows 10 Settings, go to Ease of Access > Mouse
If you can use the mouse, you need to do the following: click Start, followed by Settings. In the Settings app, go to Ease of Access, scroll down the column on the left, and click Mouse.
Another way to get to the same place very fast using the keyboard is to press the Windows key on the keyboard, type mouse keys, and press Enter. This takes you straight to the Mouse page in the Settings app.
In Windows 10 Settings, go to Ease of Access > Mouse
If you can use the mouse, you need to do the following: click Start, followed by Settings. In the Settings app, go to Ease of Access, scroll down the column on the left, and click Mouse.
Another way to get to the same place very fast using the keyboard is to press the Windows key on the keyboard, type mouse keys, and press Enter. This takes you straight to the Mouse page in the Settings app.
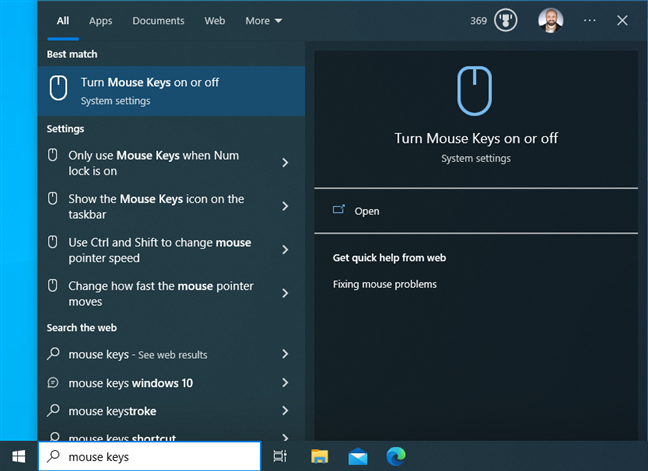
 Search for mouse keys
To get to the right side of the screen, press Tab one more time, and the “Control your mouse with a keypad” switch is selected. Press the Spacebar on your keyboard to enable it. If you can use the mouse to turn on this feature, simply click on this switch. Then, you can configure several options regarding Mouse Keys and their functioning.
Search for mouse keys
To get to the right side of the screen, press Tab one more time, and the “Control your mouse with a keypad” switch is selected. Press the Spacebar on your keyboard to enable it. If you can use the mouse to turn on this feature, simply click on this switch. Then, you can configure several options regarding Mouse Keys and their functioning.
 Enabling and configuring Mouse Keys in Windows 10
Navigate to each of them with the Tab key, and use the Spacebar to check or uncheck the options you want to enable. You also have sliders for configuring the speed of the pointer and its acceleration. Again, you navigate to them by pressing Tab and then use the navigation arrows to increase or decrease their value. Press SHIFT+Tab to go back to the previous item.
If you can use the mouse to configure Mouse Keys, everything is a lot easier: you just have to click on the options you want to enable or drag and drop the sliders to the desired position.
By default, the Mouse Keys feature displays an icon on the taskbar when it’s turned on. Initially, this icon may be hidden in the system tray. Here’s how to show or hide icons on the Windows 10 system tray.
Enabling and configuring Mouse Keys in Windows 10
Navigate to each of them with the Tab key, and use the Spacebar to check or uncheck the options you want to enable. You also have sliders for configuring the speed of the pointer and its acceleration. Again, you navigate to them by pressing Tab and then use the navigation arrows to increase or decrease their value. Press SHIFT+Tab to go back to the previous item.
If you can use the mouse to configure Mouse Keys, everything is a lot easier: you just have to click on the options you want to enable or drag and drop the sliders to the desired position.
By default, the Mouse Keys feature displays an icon on the taskbar when it’s turned on. Initially, this icon may be hidden in the system tray. Here’s how to show or hide icons on the Windows 10 system tray.
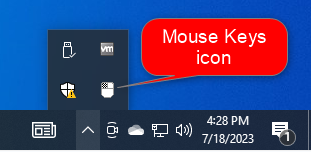
 The Mouse Keys icon in Windows 10
Press the Num Lock (or Num) key on your keyboard to temporarily turn off Mouse Keys. To activate it again, press the Num Lock key one more time. To completely disable Mouse Keys, follow the same steps used for enabling it, and turn its switch Off.
The Mouse Keys icon in Windows 10
Press the Num Lock (or Num) key on your keyboard to temporarily turn off Mouse Keys. To activate it again, press the Num Lock key one more time. To completely disable Mouse Keys, follow the same steps used for enabling it, and turn its switch Off.
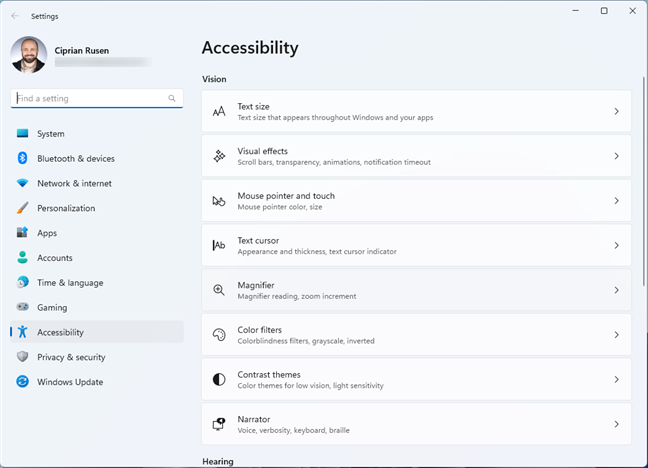
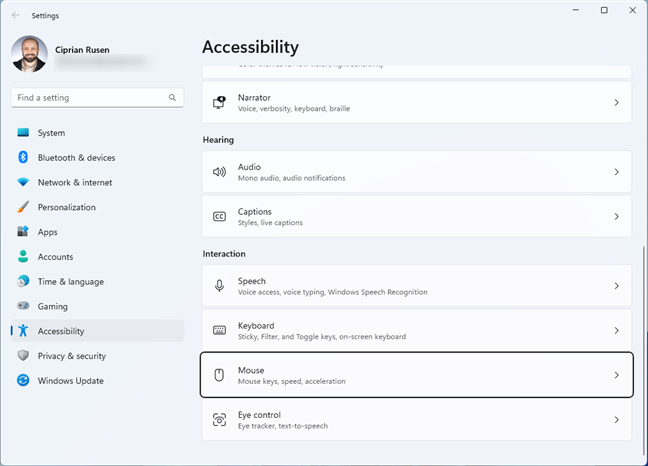
 In Windows 11 Settings, go to Accessibility
Then, press Tab once to select Accessibility in the column on the left. Press the Tab key again to select Accessibility on the top side of the Settings window. Press Tab to select the Vision section, then use the arrow keys to navigate toward the bottom of the list. To be more specific, you need to press the Down arrow key fifteen times until you see Mouse selected, under Interaction, as shown in the screenshot below. Press Enter to access the Mouse settings.
In Windows 11 Settings, go to Accessibility
Then, press Tab once to select Accessibility in the column on the left. Press the Tab key again to select Accessibility on the top side of the Settings window. Press Tab to select the Vision section, then use the arrow keys to navigate toward the bottom of the list. To be more specific, you need to press the Down arrow key fifteen times until you see Mouse selected, under Interaction, as shown in the screenshot below. Press Enter to access the Mouse settings.
 Go to Mouse in the Interaction section
If you can use your mouse or touchscreen to get here, things are simpler: click or tap Start, followed by Settings. In the Settings app, click or tap Accessibility on the left, then scroll down on the right until you find the Interaction section, where you click or tap on Mouse.
Another way to get to these settings with the keyboard is to press the Windows key, type mouse keys, and press Enter. This takes you straight to the Mouse Keys options in the Settings app.
Go to Mouse in the Interaction section
If you can use your mouse or touchscreen to get here, things are simpler: click or tap Start, followed by Settings. In the Settings app, click or tap Accessibility on the left, then scroll down on the right until you find the Interaction section, where you click or tap on Mouse.
Another way to get to these settings with the keyboard is to press the Windows key, type mouse keys, and press Enter. This takes you straight to the Mouse Keys options in the Settings app.
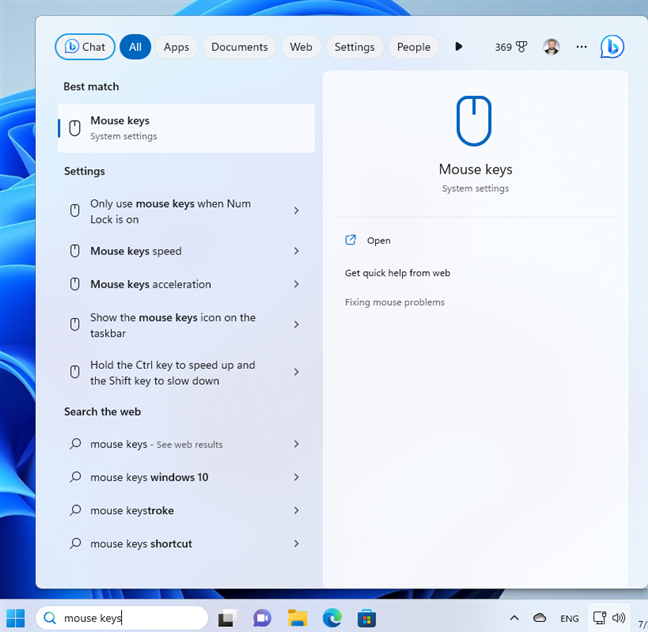
 Search for Mouse Keys
The switch for Mouse keys should be selected automatically. Press the Spacebar on your keyboard to turn On this switch and activate this accessibility feature.
Search for Mouse Keys
The switch for Mouse keys should be selected automatically. Press the Spacebar on your keyboard to turn On this switch and activate this accessibility feature.
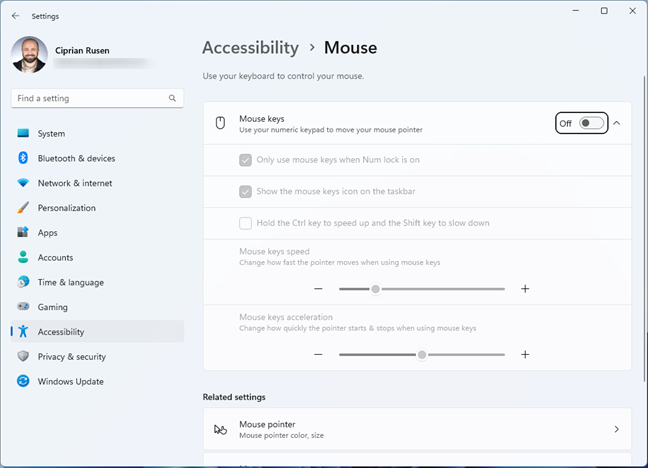 Activating Mouse Keys
Mouse Keys is now activated, and you can enable other functions. Press the Tab key to navigate through them and the Spacebar to check or uncheck the options you want:
Activating Mouse Keys
Mouse Keys is now activated, and you can enable other functions. Press the Tab key to navigate through them and the Spacebar to check or uncheck the options you want:
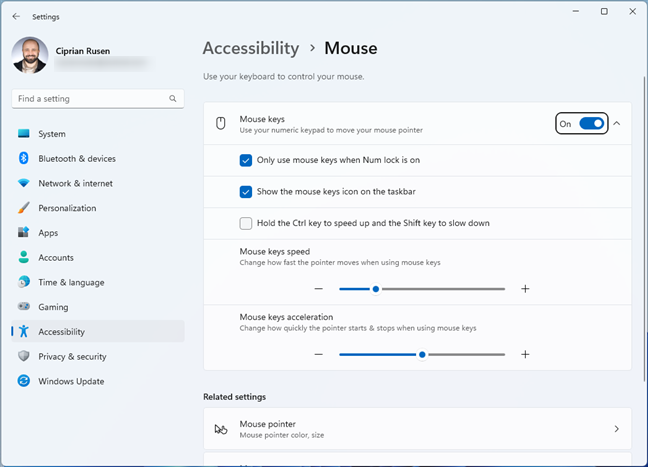
 Configuring Mouse Keys in Windows 11
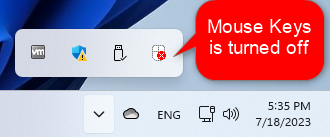
Unfortunately, when enabled, the Mouse Keys icon is hidden in the system tray, not shown directly on the taskbar. You must drag and drop it to the taskbar to see it at all times. This icon is useful because a red X symbol on it indicates that Mouse Keys is turned off, and you need to press the Num Lock key on your keyboard to activate it. When there’s no X on it, the feature is enabled and should work as expected. This icon also shows you the active mouse button, which is extremely important, as you’re about to find out in the next section.
Configuring Mouse Keys in Windows 11
Unfortunately, when enabled, the Mouse Keys icon is hidden in the system tray, not shown directly on the taskbar. You must drag and drop it to the taskbar to see it at all times. This icon is useful because a red X symbol on it indicates that Mouse Keys is turned off, and you need to press the Num Lock key on your keyboard to activate it. When there’s no X on it, the feature is enabled and should work as expected. This icon also shows you the active mouse button, which is extremely important, as you’re about to find out in the next section.
 The Mouse Keys icon in Windows 11
To turn off Mouse Keys completely, follow the same steps used for enabling the feature, and set the switch to Off.
The Mouse Keys icon in Windows 11
To turn off Mouse Keys completely, follow the same steps used for enabling the feature, and set the switch to Off.
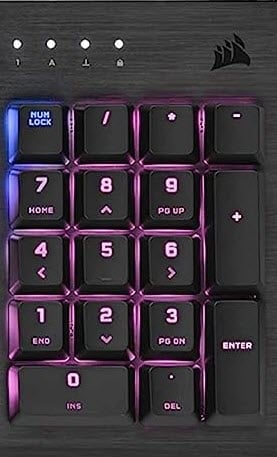
 The numpad has all your Mouse Keys
When Mouse Keys is active, all the numerical keys except for 0 and 5 move the mouse pointer in the direction shown in the picture below.
The numpad has all your Mouse Keys
When Mouse Keys is active, all the numerical keys except for 0 and 5 move the mouse pointer in the direction shown in the picture below.
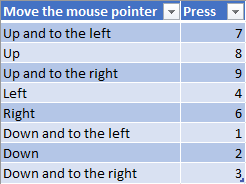
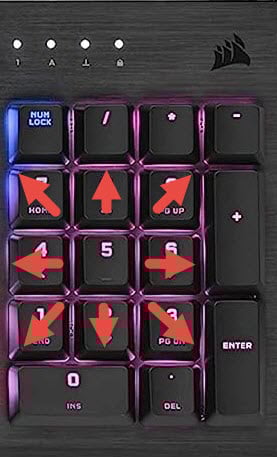 Moving the mouse pointer with the numpad
Take a look at the table below for a summary of what each key does when pressed:
Moving the mouse pointer with the numpad
Take a look at the table below for a summary of what each key does when pressed:
 The keys for moving the mouse pointer
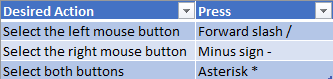
Before you use Mouse Keys to click items on your screen, select which mouse button you want active: the left-click button, the right-click one, or both. Press the corresponding key on your keyboard.
The keys for moving the mouse pointer
Before you use Mouse Keys to click items on your screen, select which mouse button you want active: the left-click button, the right-click one, or both. Press the corresponding key on your keyboard.
 Selecting the active mouse button
Clicking is always done by pressing the 5 key on your numpad after selecting the active mouse button. Therefore, to right-click, press minus (-) followed by 5. To click, press the forward slash (/) followed by 5. To double-click, press minus (-) and then the 5 key twice.
IMPORTANT: If you make the left or right mouse button the active button, it remains active until you choose another button. After you select a mouse button, you don’t need to make this selection again unless you want to use another mouse button.
When you want to drag and drop, use the following buttons:
Selecting the active mouse button
Clicking is always done by pressing the 5 key on your numpad after selecting the active mouse button. Therefore, to right-click, press minus (-) followed by 5. To click, press the forward slash (/) followed by 5. To double-click, press minus (-) and then the 5 key twice.
IMPORTANT: If you make the left or right mouse button the active button, it remains active until you choose another button. After you select a mouse button, you don’t need to make this selection again unless you want to use another mouse button.
When you want to drag and drop, use the following buttons:

 Drag and drop with Mouse Keys
NOTE: For more information on how this feature works, check this document published by Microsoft.
Drag and drop with Mouse Keys
NOTE: For more information on how this feature works, check this document published by Microsoft.
Which button is “double-click” on a keyboard?
By default, the equivalent of the double left-click is the Enter key on your keyboard. You can either use the Tab key on your keyboard to navigate between several items on your desktop and then press Enter to double-click on an item or use the navigation arrows on the keyboard to get to the desired place and press Enter to double-click.How do you right-click using the keyboard?
If you want to right-click using the keyboard, first navigate to the item you want to right-click on by either using the Tab key or the navigation arrows, and then, when the desired item is selected, press SHIFT+F10 on your keyboard.Can I use my keyboard as a mouse?
The simple answer is yes, you can use the keyboard as a mouse. This is done with the help of a feature named Mouse Keys, integrated in Windows, macOS, Linux, and other desktop operating systems.What are Mouse Keys in Windows?
Mouse Keys is a feature of many desktop operating systems that lets you use the keyboard and the numeric keypad as a pointing device, replacing the mouse. It was invented in 1984 and has been implemented in many operating systems, including macOS, Linux, and Windows. In the Windows world, this feature existed back in Windows 95 and continues to be available in the latest versions, like Windows 10 and Windows 11. The way it works and its options have improved over the years. However, the basic idea remains the same since its introduction: Mouse Keys allow you to use the numeric keypad on your keyboard to navigate items on the screen, select them, click, right-click, or double-click.How to enable and use Mouse Keys in Windows
Before you learn how to use Mouse Keys, here’s how to enable the feature, depending on your Windows version. I first cover Windows 10 and then Windows 11. Read the instructions that apply to your version of Windows.How to enable Mouse Keys in Windows 10
If you’re in a bind and must enable Mouse Keys with the keyboard, press Windows + U to open the Ease of Access section in the Windows 10 Settings app. Next, press the Tab key once, and then use the Down arrow on your keyboard to access the Mouse section under Interaction. Press Enter once you’re there.How to enable Mouse Keys in Windows 11
In Windows 11, the process for turning on Mouse Keys is slightly different. However, start by pressing Windows + U to open the Accessibility section in the Windows 11 Settings app.- Only use mouse keys when Num lock is on - if you enable this setting, the Mouse Keys are active only after you press the Num Lock key on the keyboard. If you turn off this setting, the Mouse Keys are active as long as their switch stays On inside the Settings app.
- Show the mouse keys icon on the taskbar - I recommend leaving this setting On to see this feature’s icon displayed on the taskbar and understand when it’s enabled. Keep reading to learn more about this icon.
- Hold the Ctrl key to speed up and the Shift key to slow down - this setting is self-explanatory, allowing you to speed up or slow down how you navigate using the Mouse Keys.
How to use your keyboard as a mouse with Mouse Keys
After turning on Mouse Keys, it’s time to use your keyboard for navigation instead of your mouse. If you haven’t changed the default settings, you turn Mouse Keys on and off using the Num Lock key on the numeric keypad of your keyboard.- 0 - for dragging the selected item
- . - for dropping the item where you want.

Discussion (0)
Be the first to comment.