22.01.2021
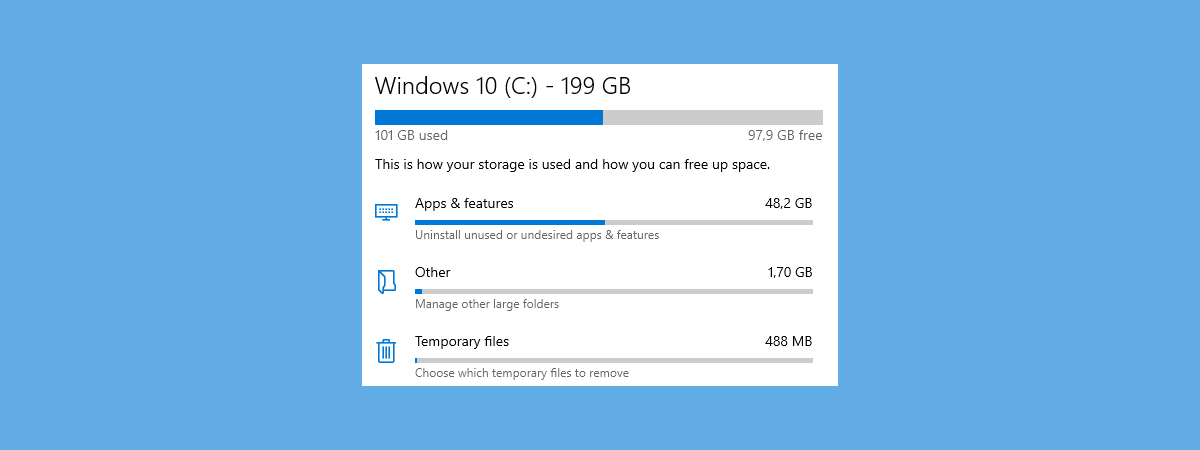
The Storage Sense from Windows 10 is an excellent tool for keeping tabs on the amount of data stored on your drives, as well as for cleaning the storage devices connected to your PC or device. If you filled your hard drive with lots of data, or if you have a Windows 10 device like a tablet or a 2-in-1 with a small storage capacity, the automatic cleaning of your drives might not be enough. This means that you might want to use the manual cleaning options that Storage Sense offers. Read on to learn how to clean up your drives and regain free space manually:
NOTE: This guide applies to Windows 10 October 2020 Update (20H2) or newer. Previous versions of Windows 10 include some of the features discussed in this guide, but not all. Also, note that this guide doesn’t refer to how to “manage Storage Spaces Windows 10” - while Storage Spaces might sound a lot like Storage Sense, it’s an entirely different tool.
How to get to the Storage Sense options from Windows 10
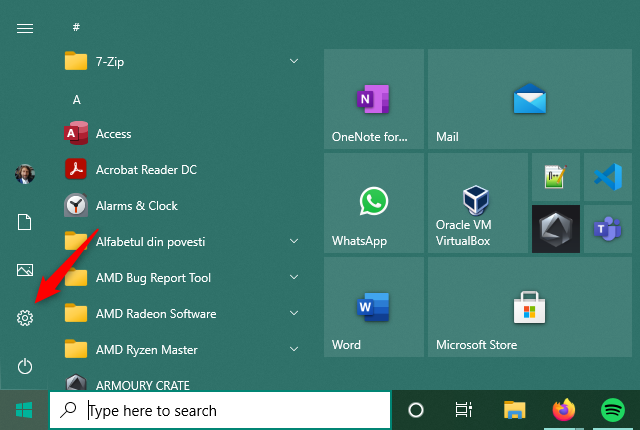
To get to the Storage Sense options, you have to open the Settings app. Click or tap on the gear button from the Start Menu, or follow any method described here: 15 ways to open Windows 10 Settings.
Opening Settings in Windows 10
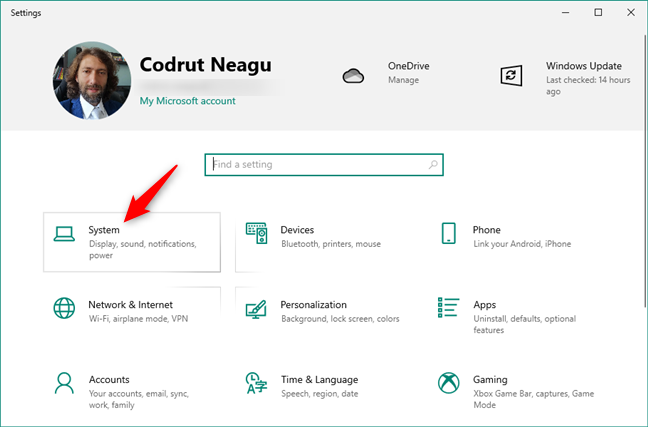
In the Settings app, open the System category.
The System category from the Settings app
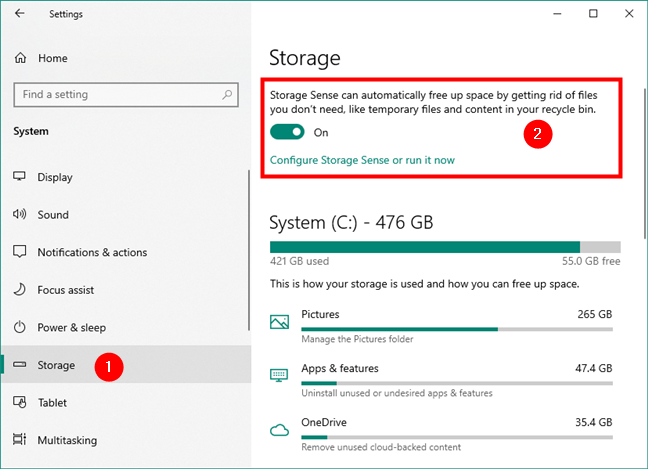
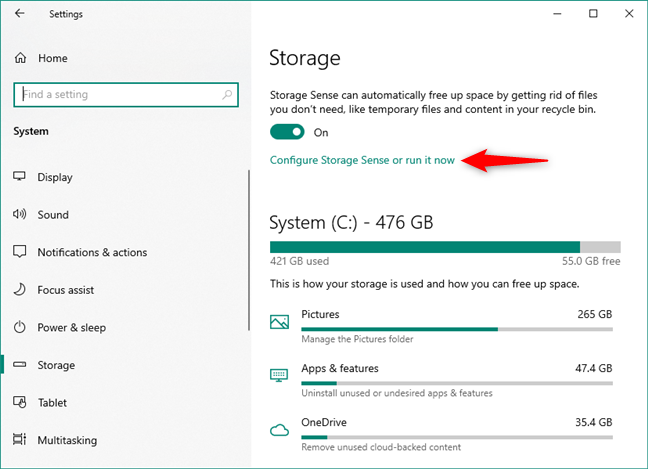
Select Storage on the left and, on the right side of the window, you should find Storage Sense right at the beginning.
The Storage Sense panel from Settings
How to manually clean up space with Storage Sense
In the Storage Sense section, there is a switch that you can use to turn it on or off. If you want to free up space automatically, you should enable it. For more information about how to clean storage spaces automatically, read: Set up Windows 10 to automatically clean up unnecessary files with Storage Sense.
For this guide’s purpose, click or tap on the “Configure Storage Sense or run it now” link under the Storage Sense switch.
Configure Storage Sense or run it now
In the “Configure Storage Sense or run it now” panel, you can set how Storage Sense works when cleaning your drives. First, scroll down to the Temporary Files section, and choose whether you want it to:
- “Delete temporary files that my apps aren’t using”
- “Delete files in my recycle bin if they have been there for over:” 1, 14, 30, 60 days or Never delete them
- “Delete files in my Downloads folder if they haven’t been opened for more than:” 1, 14, 30, 60 days or Never delete them
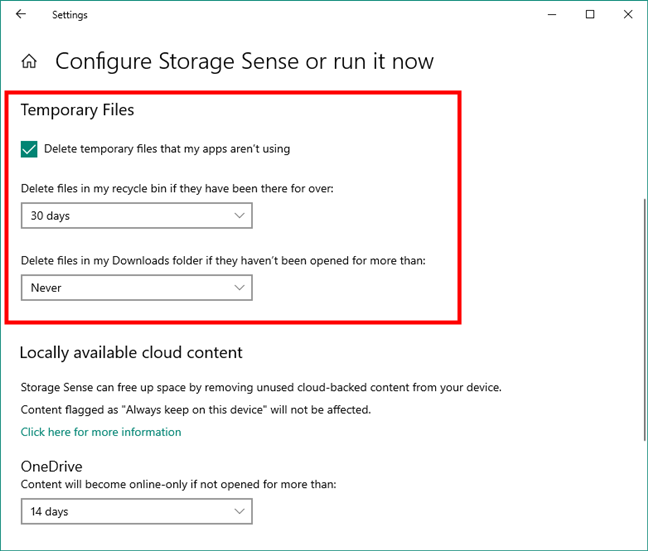
Temporary Files cleanup options in Windows 10's Storage Sense
Next, scroll a bit further down to find the OneDrive section. Here, Storage Sense tells you that it can make your content online-only if not opened for more than the number of days you specify. This can be especially helpful if you have lots of data in your OneDrive, taking a lot of storage space on your SSD or hard-disk drive. Just like for the temporary files, you can select between 1, 14, 30, 60 days, or Never.

OneDrive cleanup options in Windows 10's Storage Sense
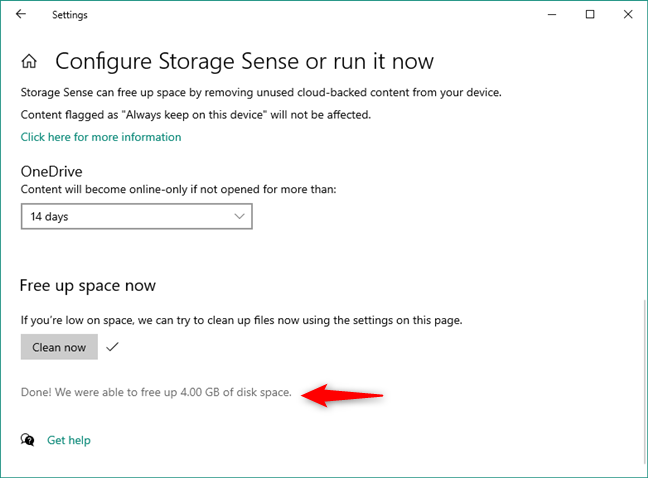
Typically, the settings we’ve talked about until now are used by Storage Sense for running automatic cleanups of your drives. However, toward the bottom of the window, there’s also an option called “Clean now.” It allows you to clean up storage manually, using the same settings you use for the automatic cleaning. As that’s exactly what you want to do, click or tap the Clean now button.
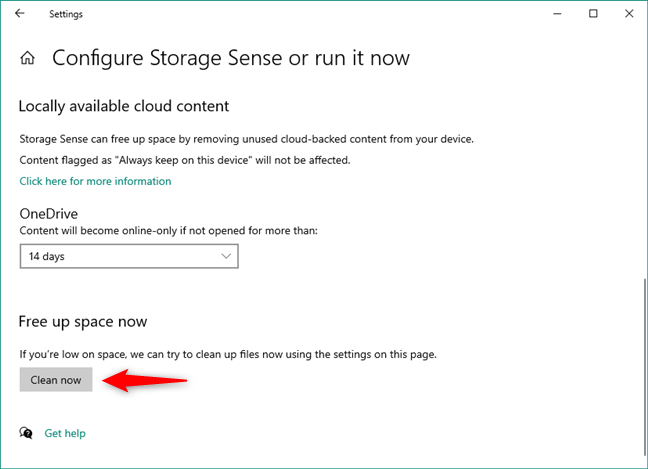
Cleanup Windows 10 with Storage Sense
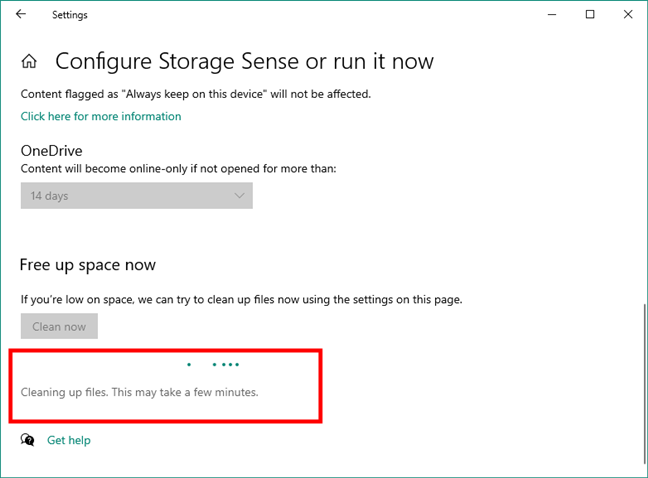
Once you click/tap the Clean now button, Storage Sense begins removing the temporary files and setting OneDrive files as online-only if they meet the criteria selected earlier. As long as it does that, you get the message seen in the screenshot below: “Cleaning up files. This may take a few minutes”.
Windows 10 is cleaning up files
When the process is finished, Windows 10 tells you how much space it managed to recover.
Windows 10's Storage Sense finished cleaning up your storage space
And that’s not all! There’s more:
How to delete previous versions of Windows
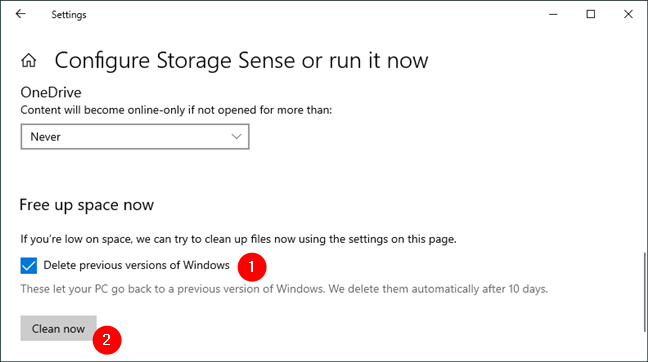
Additionally, if you recently upgraded to a new version of Windows, or you installed a major Windows 10 update, you can also check an option called “Delete previous versions of Windows.” If you choose to enable this setting too, any older version of Windows found on your device is getting deleted right now.
Delete previous versions of Windows (10)
If you do not need to go back to your older version, this option usually frees up a lot of space on your computer or device. If you do not select this option, Windows 10 deletes old Windows versions automatically anyway, but only after ten days.
Bonus: How to manually clean up space on individual drives
Windows 10 also lets you check how your PC’s storage space is split between various types of files. For instance, you can see how your storage space is used by apps and games, how much is used by the operating system, and so on. What’s more important is that you can also see how much space is occupied by temporary files and clean each type of temporary file manually, whenever you want.
To get access to all the information and options, in the Settings app, go back to the Storage section from the System category. There, on the right side of the window, you can see your C: system drive, on which Windows 10 is installed. You get to see its size, used space, and free space available. The data on the drive is categorized and split into different categories such as Pictures, Apps & features, OneDrive, Music, Temporary files, and so on. If you want to see even more categories than those displayed by default, you can click/tap on “Show more categories” at the end of the list.
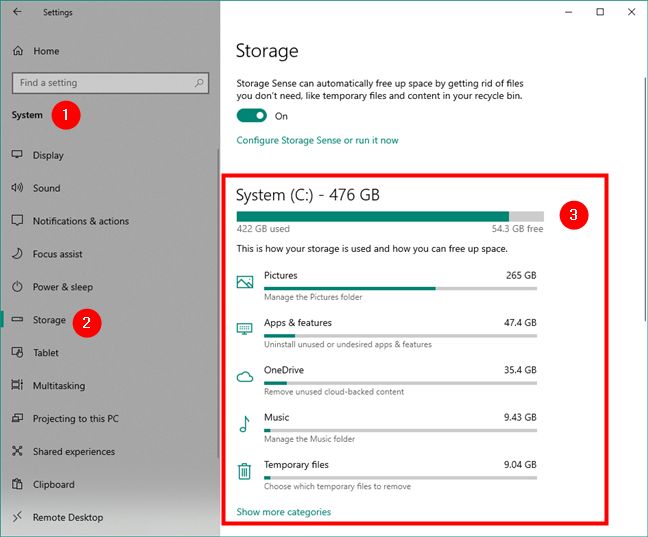
Storage usage for the Windows 10 system drive
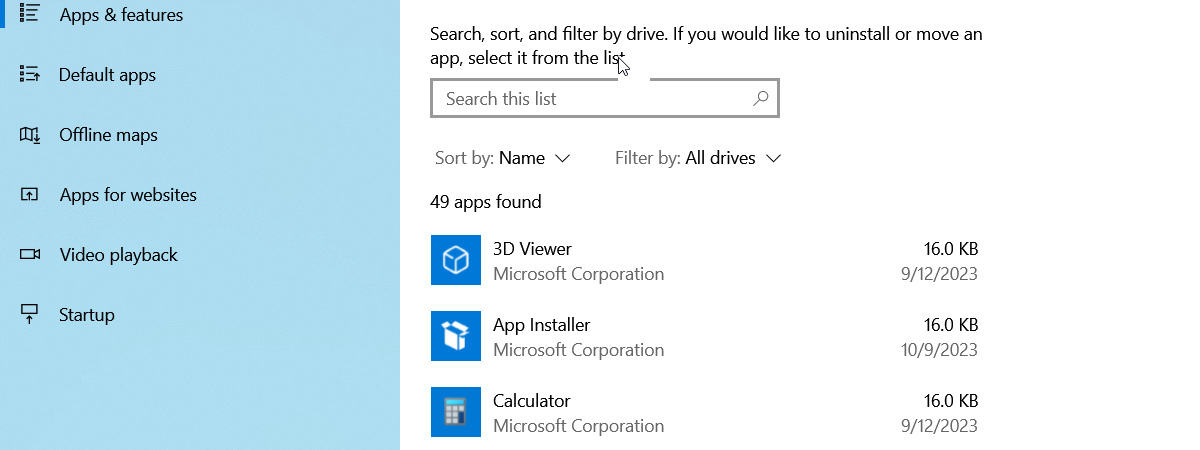
If you open these categories of data, each offers different information. For instance, if you open the Apps & features category, you are taken to the section with the same name from the Settings app, where you can uninstall desktop programs and apps from your Windows 10 PC. But, if you open a category like Pictures, all you get is information about its size and a button that opens the Pictures user folder in File Explorer.
All these can be useful to free up space on your computer manually by uninstalling apps that you no longer need or delete files that you no longer want. However, most people don’t want to delete pictures, videos, documents, or uninstall games, for instance. Most people prefer deleting temporary files that are not meant to be kept long anyway. So, click or tap on the Temporary files category.

Temporary files storage usage in Windows 10
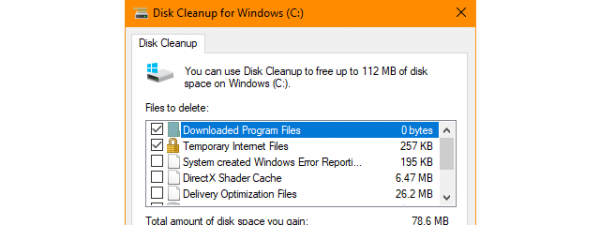
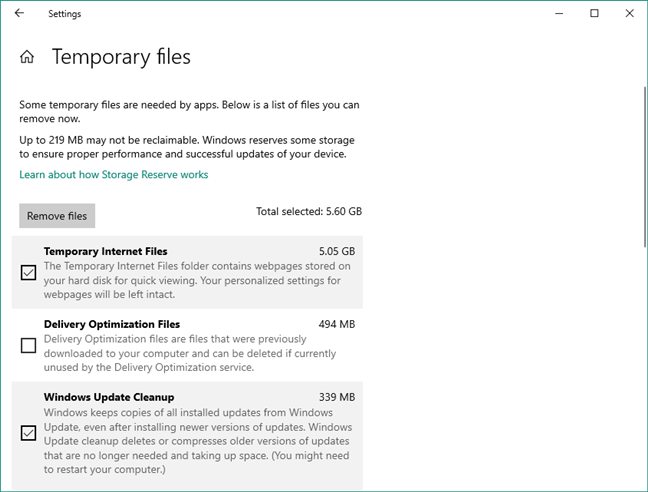
The Temporary files window lets you see how much space is occupied by temporary files found on your Windows 10 PC, and it also allows you to delete those files if you want to get rid of them. Here’s how this window looks:
Types of Temporary Files that can be cleaned up
You can check each type of temporary files that you want to be removed. For each of the temporary files categories, Windows 10 also shares information describing them:
- Temporary Internet Files: “The Temporary Internet Files folder contains webpages stored on your hard disk for quick viewing. Your personalized settings for webpages will be left intact.”
- Delivery Optimization Files: “Delivery Optimization files are files that were previously downloaded to your computer and can be deleted if currently unused by the Delivery Optimization service.”
- Windows Update Cleanup: “Windows keeps copies of all installed updates from Windows Update, even after installing newer versions of updates. Windows Update cleanup deletes or compresses older versions of updates that are no longer needed and taking up space. (You might need to restart your computer).”
- Thumbnails: “Windows keeps a copy of all of your picture, video, and document thumbnails so they can be displayed quickly when you open a folder. If you delete these thumbnails, they will be automatically recreated as needed.”
- Downloads folder: “Warning: These are files in your personal Downloads folder. Select this if you’d like to delete everything. This does not respect your Storage Sense configuration.”
- Recycle Bin: “The Recycle Bin contains files you have deleted from your computer. These files are not permanently removed until you empty the Recycle Bin.”
- DirectX Shader Cache: “Clean up files created by the graphics system which can speed up application load time and improve responsiveness. They will be re-generated as needed.”
- Windows error reports and feedback diagnostics: “Diagnostic files generated from Windows errors and user feedback.”
- Windows upgrade log files: “Windows upgrade log files contain information that can help identify and troubleshoot problems that occur during Windows installation, upgrade, or servicing. Deleting these files can make it difficult to troubleshoot installation issues.”
- Previous Windows installation(s): “Files from a previous Windows installation. Files and folders that may conflict with the installation of Windows have been moved to folders named Windows.old. You can access data from the previous Windows installations in this folder.”
Select the types of temporary files you want to remove and then click or tap on the Remove files button from the beginning of the list.
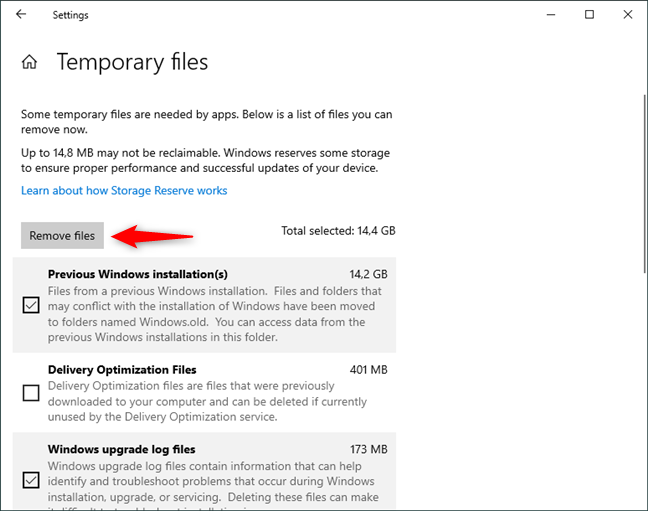
Removing the selected types of temporary files
Finally, in the Temporary files category, Windows 10 also shows you the storage space occupied by the operating system Updates.
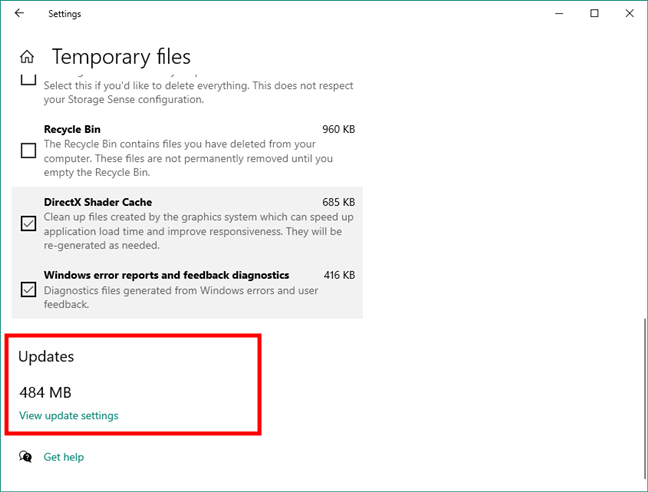
Windows 10 updates storage details
Under the size of the updates, there is a link called “View update settings.” Clicking or tapping on it takes you to the Windows Update section of the Settings app. There, you can click or tap on the “View update history” link, and then on “Uninstall updates.” The old Control Panel opens and takes you to Installed Updates. That’s the place where you can remove already installed operating system updates on your computer or device. It is a long road to do that, but it works nonetheless.
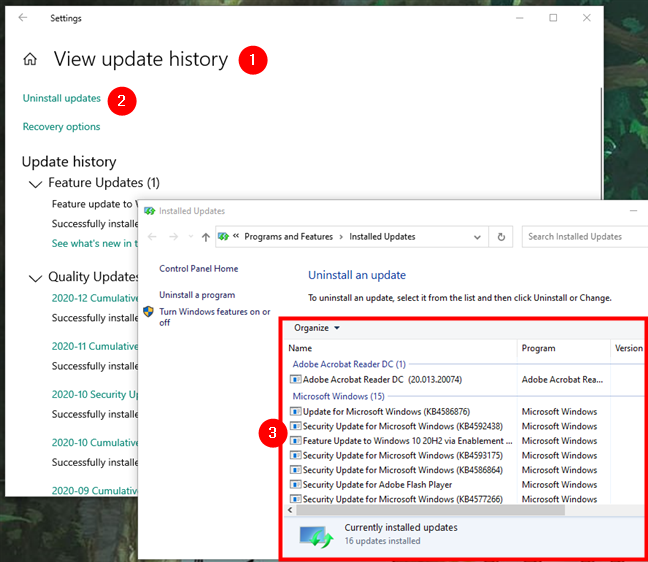
Uninstalling Windows 10 updates
NOTE: You can get access to the same information and options for your other drives too, by clicking/tapping on the “View storage usage on other drives” link under “More storage settings.”

View storage usage on other drives
How often do you clean up your Windows 10 using Storage Sense?
Now you know pretty much everything there is to know about how to manually clean up storage space with the Storage Sense feature from Windows 10. You know how to delete temporary files manually, and you also know how to get rid of old Windows versions. Do you like the way these tools work? How often do you clean up Windows 10 with Storage Sense? How would you improve this feature? Let us know in the comments section below.