From time to time, we stumble upon applications that are hard to remove or delete, as some users would say. Sometimes their Add/Remove Programs entries are deleted for whatever reason, or they do not have a handy Uninstall shortcut available. The problems vary from case to case. That is why we decided to make a roundup of all the methods that can be used to remove both desktop programs and modern apps, in Windows. Let's get started:
NOTE: This guide applies to Windows 10, Windows 7 and Windows 8.1.
1. Uninstall desktop apps from the Command Prompt (cmd.exe)
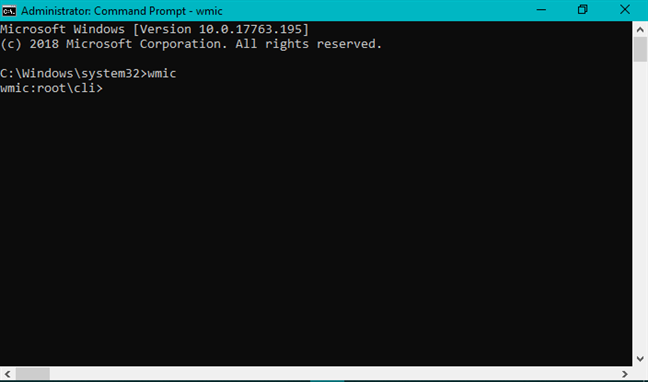
Let's start with a geeky way of removing apps from Windows. First, start the Command Prompt as administrator. In the Command Prompt window, type wmic and press Enter.
The wmic command in Command Prompt
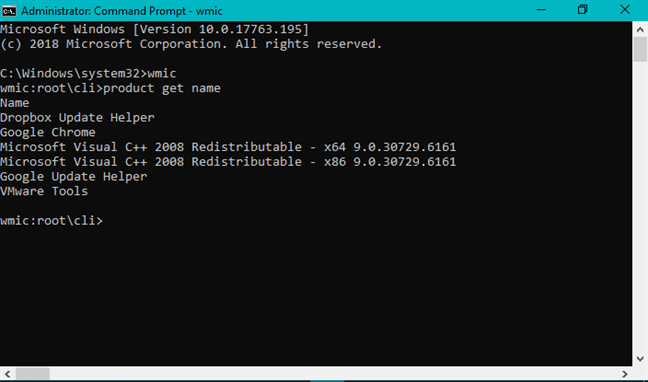
This command loads the Windows Management Instrumentation Command-line (WMIC) tool. Now you need to see which apps are identified by WMIC so that you can remove them from the Command Prompt. To do that, type the command "product get name" without the quotation marks and press Enter on the keyboard. The command lists all the desktop apps that can be removed with this method.
The product get name command in Command Prompt
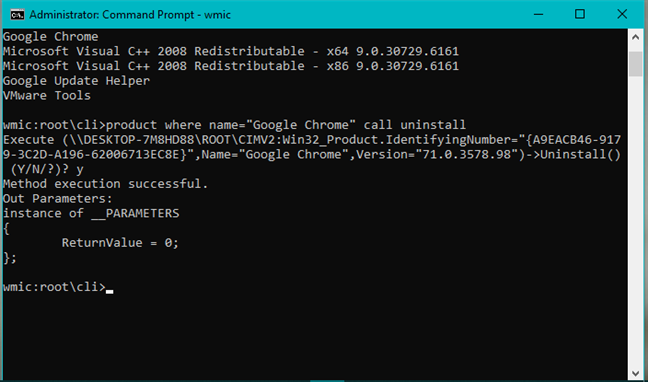
The list of apps shown is smaller than the total number of desktop apps that you have installed. If the app that you want to remove is shown here, continue and enter the command: product where name="name of program" call uninstall. Replace the string name of the program with the actual name of the desktop app that you want to remove, as shown in the list that was loaded previously in the Command Prompt. For example, we typed product where name="Google Chrome" call uninstall.
You are prompted to confirm that you want to uninstall the program. Type Y if you want to remove it or N if you have changed your mind.
Uninstalling an app using the Command Prompt
If the uninstallation is performed successfully, you should see a ReturnValue=0 and a message that says "Method execution successful."
Of all the methods in this guide, this one is the most complex and least useful. We introduced it because a surprising number of people search for it. For more efficient methods, continue reading this guide.
2. Uninstall desktop applications from the Control Panel
This is the method most people know about. It works great for all desktop apps, but it cannot be used for modern apps that are distributed through the Microsoft Store in Windows 10 and Windows 8.1.
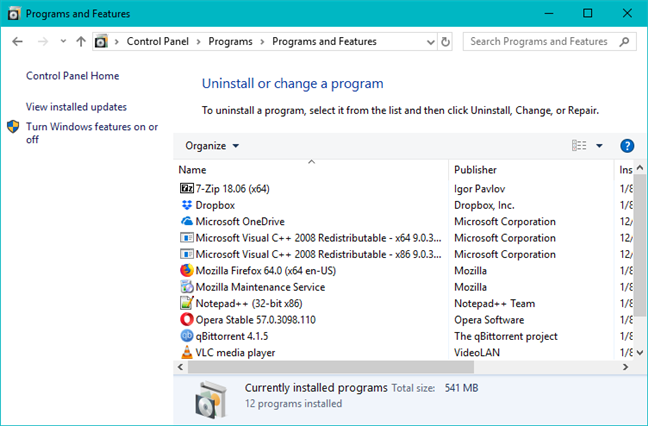
First, open the Control Panel. Then, go to "Programs -> Programs and Features."
The Control Panel from Windows 10
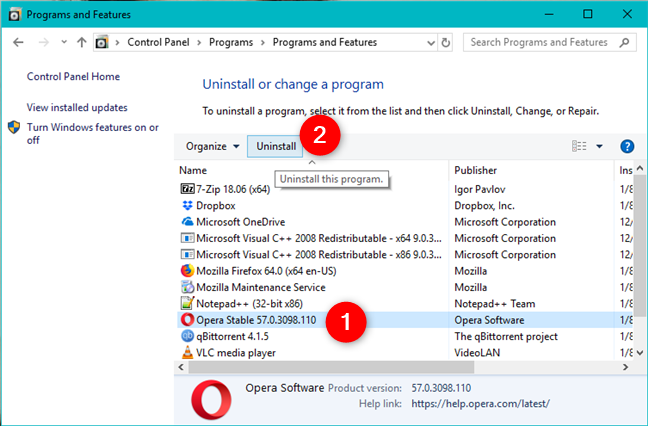
Select the desktop app that you want to remove, click or tap Uninstall and follow the wizard.
Uninstalling a program using the Control Panel
Please remember that the steps for uninstalling a program are different from program to program.
3. Uninstall desktop programs using their uninstall shortcuts
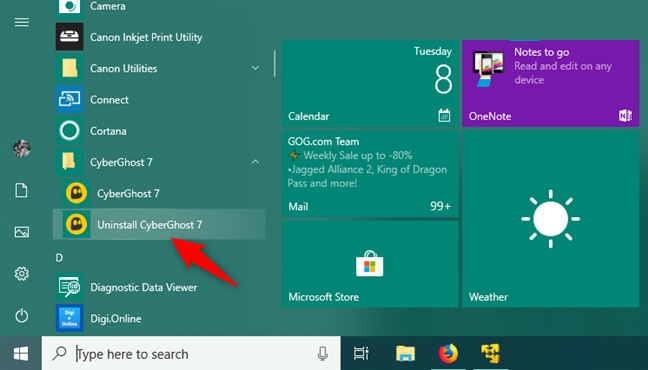
Some desktop applications, when installed, create an Uninstall shortcut. Usually, it is found in the application's folder from the Start Menu (in Windows 10 and Windows 7) or the Apps View (in Windows 8.1). Below you can see the Uninstall shortcut for CyberGhost, in Windows 10.
An uninstall shortcut shown in the Start Menu from Windows 10
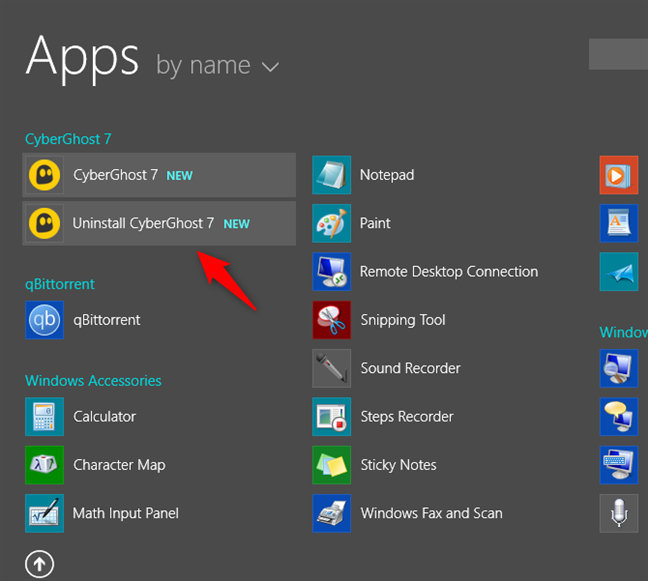
Here is the same shortcut in Windows 8.1:
An uninstall shortcut for an app, shown in the Start Menu from Windows 8.1
Click or tap the Uninstall shortcut to start the uninstallation wizard for the selected application.
4. Uninstall desktop apps using their Uninstall.exe file
Many desktop apps (especially those which create Uninstall shortcuts) have an executable file named uninstall.exe or something similar. This file is always found in the installation folder of that application. You can see below the uninstall.exe file for the 7-Zip.
The uninstall executable file inside a program's folder
Run it and follow the steps required to uninstall the program.
5. Uninstall desktop apps using their setup MSI file
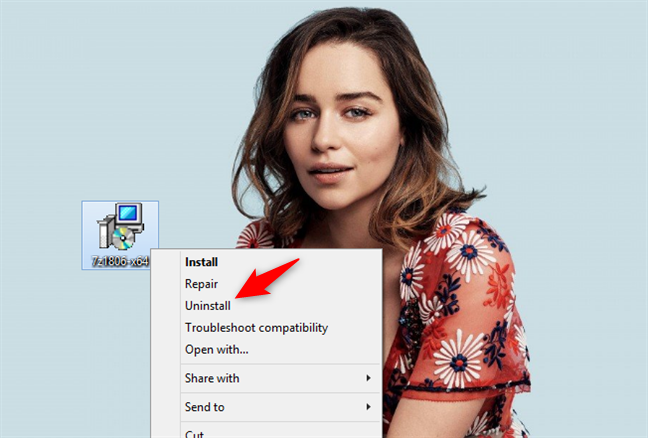
Some programs (like the 64-bit version of 7-Zip) do not use a setup.exe file for their installation. Instead, their setup file has the extension ".msi." This format is used by the Windows Installer, a special installation format created by Microsoft for its Windows operating systems. The desktop apps that use a ".msi" installer are easy to uninstall. Right-click or press and hold on their setup file and choose Uninstall.
The uninstall option shown in the right-click menu of an MSI file
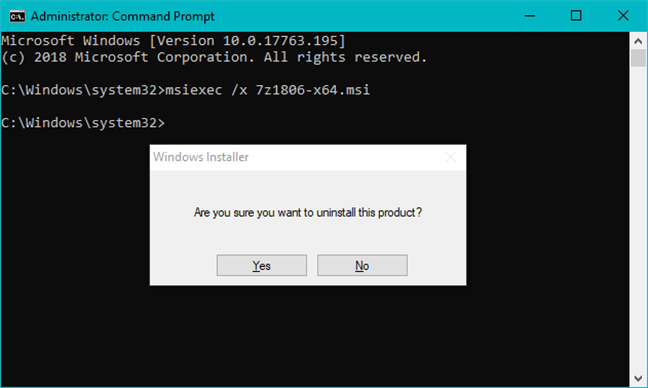
The removal can also be triggered from the command line. Open the Command Prompt as administrator and type "msiexec /x " followed by the name of the ".msi" file used by the program that you want to remove.
Uninstalling a program using the msiexec command on an MSI file
You can also add other command line parameters to control the way the uninstall is done. For more information, check this documentation from Microsoft: Msiexec (command-line options).
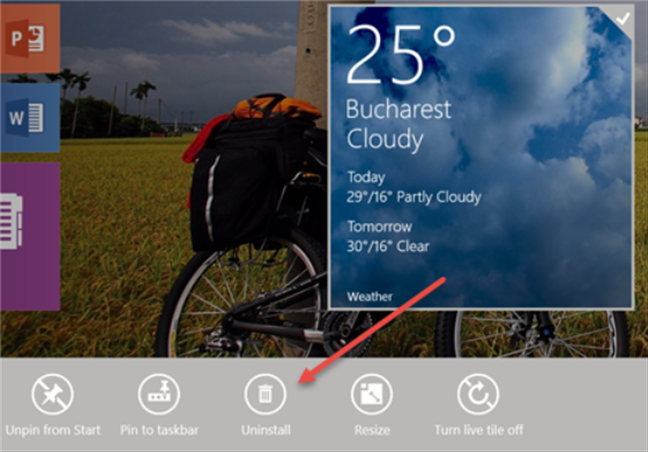
6. Uninstall universal apps from the Start screen or the Start Menu
All the methods covered so far apply only to traditional desktop applications. But what about Windows 10 and Windows 8.1 apps that are distributed through the Microsoft Store? How do you remove those?
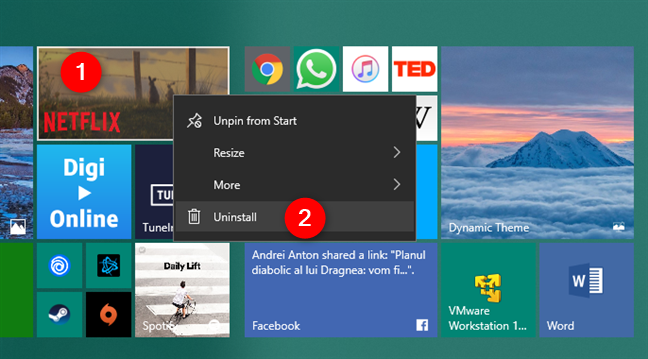
If you are using Windows 10, you can right-click or press and hold (if you are using touch) the app's tile. In the contextual menu, choose Uninstall.
Uninstalling an app using the Start Menu from Windows 10
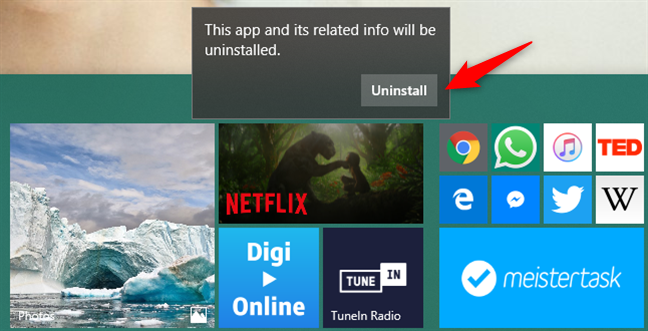
Next, you have to confirm that you want to remove the app, by pressing Uninstall.
Confirming the uninstall
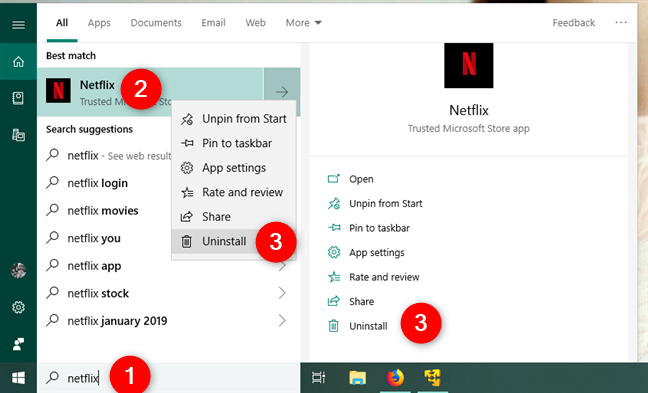
Another way is to use the search box on the Windows 10 taskbar, near the Start button. Type the name of the app that you want to remove, click or tap on it, and then press Uninstall on the preview panel from the right.
Alternatively, you can right-click or press and hold the app and Uninstall it from the contextual menu. Do not forget to confirm your choice.
Uninstalling an app using the search from Windows 10
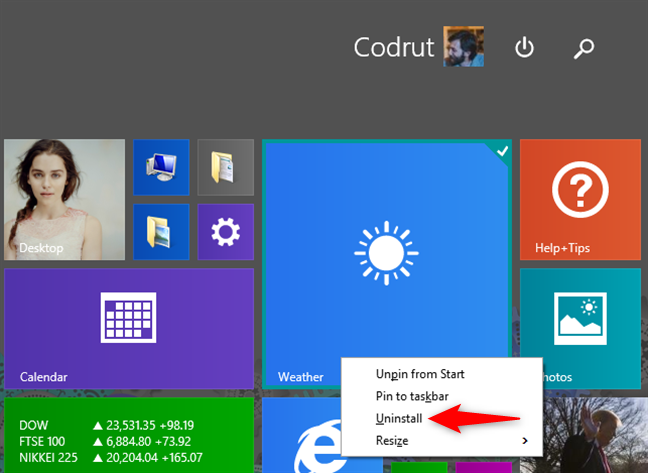
If you are using Windows 8.1, go to the Start screen. If you can find the tile of the app that you want to remove, right-click or press and hold on it, to bring up the contextual menu. Then, click or tap Uninstall.
Uninstalling an app using the Start screen from Windows 8.1
On traditional PCs without a touchscreen, Windows 8.1 displays a traditional right-click menu when you right-click the tile of a modern app. As expected, this menu includes the Uninstall option. The app is then removed in a few seconds without other prompts and confirmations.
Uninstalling an app using the Start screen from Windows 8.1, using a mouse
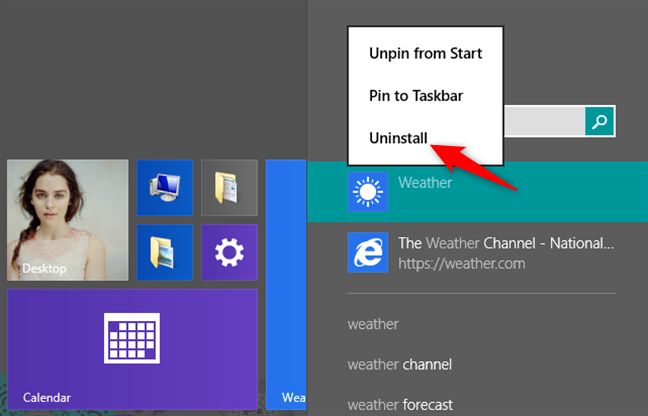
If an app no longer has a tile on the Start screen (in Windows 8.1), search for it. Once the search results are shown, right-click or press and hold the name of the app that you want to remove and then choose Uninstall.
Using search to find and uninstall an app from Windows 8.1
7. Remove universal apps using Settings (in Windows 10) or PC Settings (in Windows 8.1)
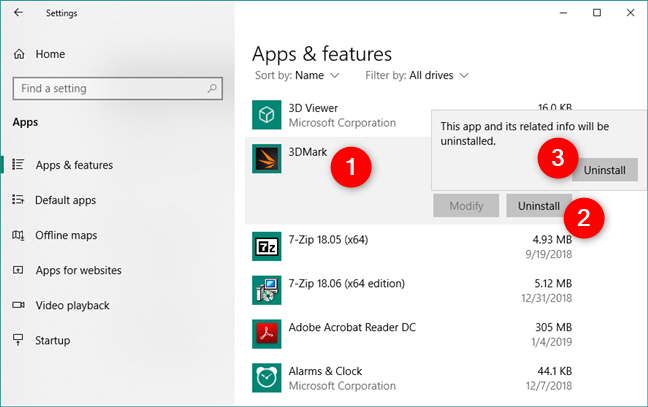
In Windows 10, open Settings and go to Apps. On the right side of the Settings window, a list is shown with all the apps available on your Windows 10 device. Scroll down the list and click or tap the app that you want to remove. Then, click or tap Uninstall, followed by Uninstall, to confirm your choice.
Uninstalling an app from Windows 10, using the Settings
The progress of the removal process is shown below the app's name When you are finished uninstalling apps, close the Settings window.
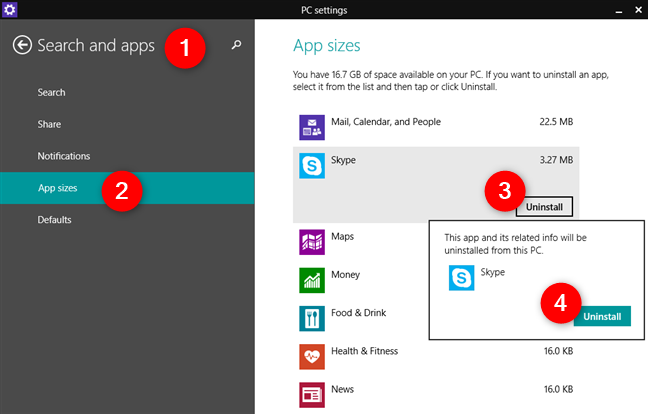
In Windows 8.1, you can use the PC Settings to remove universal apps from the Microsoft Store. Open PC Settings and go to Search and apps and then to App sizes. On the right, you can see a list with all the apps that are installed on your device. Select the one you want to remove, and the Uninstall button is displayed. Click or tap Uninstall and then again on Uninstall to confirm that you want to remove the app.
Uninstalling an app from Windows 8.1, using the PC Settings
Close PC Settings when you are done removing apps.
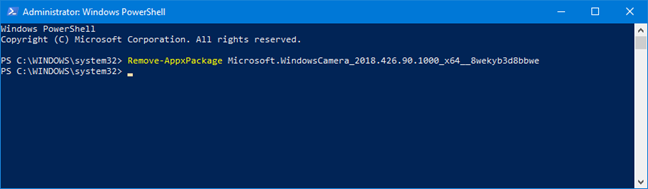
8. Remove universal apps, using PowerShell
Some touch-based apps (also known as UWP apps) that are built into Windows 10 and Windows 8.1 cannot be removed using the methods shared earlier. For example, in Windows 10, you cannot remove apps like Calendar, Mail, Camera, or Photos. To remove these apps, you must use PowerShell.
There are also specialized programs that can remove other programs. Some even delete leftovers from the uninstall process, both files and registry entries. Here are a few ideas to get you started:
If you are looking for a decent tool that can help with removing other programs, these articles should help you find what you are looking for. Although we published them a long time ago, they are still working today.
How do you uninstall your apps?
These are the methods we know for uninstalling both desktop apps and universal apps from Windows. If you know others, do not hesitate to share them in the comments section below. We are looking forward to updating this article and making it even more complete.
When using CMD and it comes back with a return value of 1603 instead of 0 what does that mean?
Marcelo Carvalho ·
The first method is the best one when all you have is a non GUI environment.
Thanks for that
Rob Hack ·
Personally I find command prompt quite useful and use it mostly to remove MS crap (that they try to keep you from removing) Once I get a grip on powershell I’ll prob use it more often. If you want a simple way to remove the junk try this: (Read thru it first and remove any programs you want to keep then paste it in an elevated command prompt. I believe a couple aren’t written correctly and won’t process so if anyone know the correct format please share:
REMOVE Change Windows Updates to “Notify to schedule restart”
reg add “HKLMSOFTWAREMicrosoftWindowsUpdateUXSettings” /v UxOption /t REG_DWORD /d 1 /f
REMOVE Disable P2P Update downlods outside of local network
reg add “HKLMSOFTWAREMicrosoftWindowsCurrentVersionDeliveryOptimizationConfig” /v DODownloadMode /t REG_DWORD /d 0 /f
REMOVE *** Hide the search box from taskbar. You can still search by pressing the Win key and start typing what you’re looking for ***
REMOVE 0 = hide completely, 1 = show only icon, 2 = show long search box
reg add “HKCUSOFTWAREMicrosoftWindowsCurrentVersionSearch” /v “SearchboxTaskbarMode” /t REG_DWORD /d 0 /f
REMOVE *** Disable MRU lists (jump lists) of XAML apps in Start Menu ***
reg add “HKEY_CURRENT_USERSOFTWAREMicrosoftWindowsCurrentVersionExplorerAdvanced” /v “Start_TrackDocs” /t REG_DWORD /d 0 /f
REMOVE *** Set Windows Explorer to start on This PC instead of Quick Access ***
REMOVE 1 = This PC, 2 = Quick access
REMOVE reg add “HKEY_CURRENT_USERSOFTWAREMicrosoftWindowsCurrentVersionExplorerAdvanced” /v “LaunchTo” /t REG_DWORD /d 1 /f
@rem NOW JUST SOME TWEAKS
REMOVE *** Show hidden files in Explorer ***
REMOVE reg add “HKEY_CURRENT_USERSOFTWAREMicrosoftWindowsCurrentVersionExplorerAdvanced” /v “Hidden” /t REG_DWORD /d 1 /f
REMOVE *** Show super hidden system files in Explorer ***
REMOVE reg add “HKEY_CURRENT_USERSOFTWAREMicrosoftWindowsCurrentVersionExplorerAdvanced” /v “ShowSuperHidden” /t REG_DWORD /d 1 /f
REMOVE *** Show file extensions in Explorer ***
reg add “HKEY_CURRENT_USERSOFTWAREMicrosoftWindowsCurrentVersionExplorerAdvanced” /v “HideFileExt” /t REG_DWORD /d 0 /f
also:
REM *** Disable Suggestions in the Start Menu ***
reg add “HKEY_CURRENT_USERSOFTWAREMicrosoftWindowsCurrentVersionContentDeliveryManager” /v “SystemPaneSuggestionsEnabled” /t REG_DWORD /d 0 /f
set high performance in powershell:
{
$HighPerf = powercfg -l | %{if($_.contains(“High performance”)) {$_.split()[3]}}
$CurrPlan = $(powercfg -getactivescheme).split()[3]
if ($CurrPlan -ne $HighPerf) {powercfg -setactive $HighPerf}
}
………………..
SERVICES THAT ARE SAFE TO DISABLE:
Adobe ARM Hyper-V Time Sync SSDP Discovery
AllJoyn router Hyper-V RDV UPnP Device Host
Application Layer Gateway Hyper-V VM IPHelper
BitLocker Drive encryption Hyper-V Heartbeat Volume Shadow copy
Block Lever Backup Engine Hyper-V Shutdown Windows Defender
Bluetooth Handsfree Hyper-V Guest Windows Connect now
BlueTooth Support Hyper-V KVP Exchange Windows Media Player Networking
SuperFetch Internet connection Windows Mobile hotspot
Diagnostics Policy iSCSI Initiator Windows Update
Diagnostics Service Microsoft Software Shadowing Windows Search
Diagnostics System Microsoft Storage Spaces WLAN AutoConfig
Diagnostics Tracking Network Services for Xbox WWAN AutoConfig
Extensible Authentication Network Location Awareness Xbox live verification management
Geo Location Network List Service
Google Update Service Offline files
HomeGroup Listener Optimize Drives
HomeGroup Provider Retail Demo Service
Hyper-V Host Sensor Monitoring
Hyper-V VSS Shell Hardware Detection
AND LASTLY, A HTML LINK TO tasks that slow your pc down that you can disable https://robbeekmans.net/wp-content/uploads/2017/02/4-scheduled-tasks-2017-02-04.html
**You should have no issues with anything I posted here but you should always backup your registry and create a restore point FIRST just to be safe. Again read thru items and remove any you must have.
Ishwar ·
Thanks a lot it helped me uninstall a program for which i was struggling for 2 hours.
Tommy Hjalmarsson ·
‘1. Uninstall desktop apps from the Command Prompt (cmd.exe)’
In my case, after upgrading from Win 7 to Win 10 I wanted to uninstall some HP bloatware that was left from Win 7, and they survived the upgrade. And I had not the right permission to do that as a administrator from the Control Panel or the other usual way.
‘wmic’ saved me.
From your text: …….most complex and least useful.
I say, very useful 🙂
Selvaprabhu N ·
Thank you, you saved my day
Christine ·
I use Regedit. But even that didn’t remove the pesky one I used this article to remove. Plarium Play is like a virus that roots itself into your computer even after running uninstall it stays implanted. Even after going through multiple registry files, deleting in wmic, and manually removing files from Explorer, the program remains in app data…uggghhhh
pq ·
seems like you like emilia clarke lol
Anonymous ·
The Mother of Dragons is quite beautiful, isn’t she? 🙂
Mahima ·
How to remove the virus like social2search installed automatically in win 10 and if no above method works for it?
Thrakorzog ·
I know you said it was the least useful, but the WMIC process was exactly what I was looking for.
Anonymous ·
Happy to help. 😉
Dr. Ken Rich ·
I’m sorry to say your list is VERY incomplete. They don’t really get rid of the apps. They all only remove them from view and use, but leave them there to clutter up your drive and take up a lot of space (up to 1.2Gb).
Taking Ownership is not enough. The following will finally free you up to make changes without the pesky interruptions you keep running into.
This is a quick instruction for total removal. I particularly am NOT giving the explicit step by step instructions involved in the next 2 steps. They aren’t hard, but I’d advise you to check some other source for those details.
1. Go to My PC and Rt-click on Drive C (OS drive). Go to the Security tab and Advanced button.
2. On the next screen click on Owner: Change. Then go through all the processes to change Ownership to yourself, then do the same for each of the tabs on that page. Follow all the instructions, accept that a few files (like pagefile.sys) won’t work and continue until you own everything, have Auditing and Effective Access to everything. This is about a 20 minute process – go get yourself a sandwich and drink.
3. Go to C:Program FilesWindowsApps folder and do the same thing for it individually.
Now you’ll find that all those uninstalled Apps are still there, just have been hidden from view and access. Most of this looks like the normal app structure you’ll find on any cell phone. Delete what you want and it’s now totally, permanently deleted and you’ve freed up to 1.2 Gb of space.
BEWARE – If you’re not familiar or comfortable with this process, don’t do it. I’ve done it for all kinds of computers over several Windows OS from XT on. Other than the risk of deleting or changing something you don’t understand or shouldn’t change AFTER you’ve done this, there really is no change or danger in what you’re doing. The result is that YOU NOW OWN your computer and OS and can do what you want with it other than tweaking the registry, which is a whole other issue.
RWilli ·
Personally if I can’t normally uninstall a program I use the Windows Uninstall Cleanup Tool.
I happened to save a copy of the tool a few years back and have used it with no problems up to this point. I always use Programs and Features to remove things first, but if I still have a problem I check the Tool to see if anything is remaining. Also I was unaware of the MS Fix it for that purpose thank you.
RWilli ·
Just for giggles I tried the MS Fix It program you left a link to and it is no longer available at least for Win 7×64.
anon ·
You shouldn’t be suggesting uninstaller shortcuts on Start or the desktop as those are non-standard and go against the UX guidelines. The fact that developers continue to do this goes to show how bad their lack of care for any good principles of good user experience is. At least WinRT, the Modern Shell and the Store don’t allow this for Modern apps.
Ciprian Adrian Rusen ·
Why shouldn’t we suggest these shortcuts? If they are there, use them. They work.
Your point has nothing to do with the correctness of this tutorial.
anon ·
Because they’re not the standard way of uninstalling software on Windows. Not to mention that the uninstaller shortcuts on Start have been hidden by the system since 8.1 (don’t remember how it was on 8).


Discussion (21)
When using CMD and it comes back with a return value of 1603 instead of 0 what does that mean?
The first method is the best one when all you have is a non GUI environment.
Thanks for that
Personally I find command prompt quite useful and use it mostly to remove MS crap (that they try to keep you from removing) Once I get a grip on powershell I’ll prob use it more often. If you want a simple way to remove the junk try this: (Read thru it first and remove any programs you want to keep then paste it in an elevated command prompt. I believe a couple aren’t written correctly and won’t process so if anyone know the correct format please share:
sc stop dmwappushservice
sc stop WMPNetworkSvc
sc stop WSearch
sc config DiagTrack start= disabled
sc config diagnosticshub.standardcollector.service start= disabled
sc config dmwappushservice start= disabled
sc config RemoteRegistry start= disabled
sc config TrkWks start= disabled
sc config WMPNetworkSvc start= disabled
sc config WSearch start= disabled
REMOVE sc config SysMain start= disabled
*** SCHEDULED TASKS tweaks ***
REMOVE schtasks /Change /TN “MicrosoftWindowsAppIDSmartScreenSpecific” /Disable
schtasks /Change /TN “MicrosoftWindowsApplication ExperienceMicrosoft Compatibility Appraiser” /Disable
schtasks /Change /TN “MicrosoftWindowsApplication ExperienceProgramDataUpdater” /Disable
schtasks /Change /TN “MicrosoftWindowsApplication ExperienceStartupAppTask” /Disable
schtasks /Change /TN “MicrosoftWindowsCustomer Experience Improvement ProgramConsolidator” /Disable
schtasks /Change /TN “MicrosoftWindowsCustomer Experience Improvement ProgramKernelCeipTask” /Disable
schtasks /Change /TN “MicrosoftWindowsCustomer Experience Improvement ProgramUsbCeip” /Disable
schtasks /Change /TN “MicrosoftWindowsCustomer Experience Improvement ProgramUploader” /Disable
schtasks /Change /TN “MicrosoftWindowsShellFamilySafetyUpload” /Disable
schtasks /Change /TN “MicrosoftOfficeOfficeTelemetryAgentLogOn” /Disable
schtasks /Change /TN “MicrosoftOfficeOfficeTelemetryAgentFallBack” /Disable
schtasks /Change /TN “MicrosoftOfficeOffice 15 Subscription Heartbeat” /Disable
REMOVE schtasks /Change /TN “MicrosoftWindowsAutochkProxy” /Disable
REMOVE schtasks /Change /TN “MicrosoftWindowsCloudExperienceHostCreateObjectTask” /Disable
REMOVE schtasks /Change /TN “MicrosoftWindowsDiskDiagnosticMicrosoft-Windows-DiskDiagnosticDataCollector” /Disable
REMOVE schtasks /Change /TN “MicrosoftWindowsDiskFootprintDiagnostics” /Disable *** Not sure if should be disabled, maybe related to S.M.A.R.T.
REMOVE schtasks /Change /TN “MicrosoftWindowsFileHistoryFile History (maintenance mode)” /Disable
REMOVE schtasks /Change /TN “MicrosoftWindowsMaintenanceWinSAT” /Disable
REMOVE schtasks /Change /TN “MicrosoftWindowsNetTraceGatherNetworkInfo” /Disable
REMOVE schtasks /Change /TN “MicrosoftWindowsPISqm-Tasks” /Disable
REMOVE The stubborn task MicrosoftWindowsSettingSyncBackgroundUploadTask can be Disabled using a simple bit change. I use a REG file for that (attached to this post).
REMOVE schtasks /Change /TN “MicrosoftWindowsTime SynchronizationForceSynchronizeTime” /Disable
REMOVE schtasks /Change /TN “MicrosoftWindowsTime SynchronizationSynchronizeTime” /Disable
REMOVE schtasks /Change /TN “MicrosoftWindowsWindows Error ReportingQueueReporting” /Disable
REMOVE schtasks /Change /TN “MicrosoftWindowsWindowsUpdateAutomatic App Update” /Disable
*** Remove Telemetry & Data Collection ***
reg add “HKLMSOFTWAREMicrosoftWindowsCurrentVersionDevice Metadata” /v PreventDeviceMetadataFromNetwork /t REG_DWORD /d 1 /f
reg add “HKLMSOFTWAREMicrosoftWindowsCurrentVersionPoliciesDataCollection” /v “AllowTelemetry” /t REG_DWORD /d 0 /f
reg add “HKLMSOFTWAREPoliciesMicrosoftMRT” /v DontOfferThroughWUAU /t REG_DWORD /d 1 /f
reg add “HKLMSOFTWAREPoliciesMicrosoftSQMClientWindows” /v “CEIPEnable” /t REG_DWORD /d 0 /f
reg add “HKLMSOFTWAREPoliciesMicrosoftWindowsAppCompat” /v “AITEnable” /t REG_DWORD /d 0 /f
reg add “HKLMSOFTWAREPoliciesMicrosoftWindowsAppCompat” /v “DisableUAR” /t REG_DWORD /d 1 /f
reg add “HKLMSOFTWAREPoliciesMicrosoftWindowsDataCollection” /v “AllowTelemetry” /t REG_DWORD /d 0 /f
reg add “HKLMSYSTEMCurrentControlSetControlWMIAutoLoggerAutoLogger-Diagtrack-Listener” /v “Start” /t REG_DWORD /d 0 /f
reg add “HKLMSYSTEMCurrentControlSetControlWMIAutoLoggerSQMLogger” /v “Start” /t REG_DWORD /d 0 /f
REMOVE Settings -> Privacy -> General -> Let apps use my advertising ID…
reg add “HKCUSOFTWAREMicrosoftWindowsCurrentVersionAdvertisingInfo” /v Enabled /t REG_DWORD /d 0 /f
REMOVE – SmartScreen Filter for Store Apps: Disable
reg add “HKCUSOFTWAREMicrosoftWindowsCurrentVersionAppHost” /v EnableWebContentEvaluation /t REG_DWORD /d 0 /f
REMOVE – Let websites provide locally…
reg add “HKCUControl PanelInternationalUser Profile” /v HttpAcceptLanguageOptOut /t REG_DWORD /d 1 /f
REMOVE WiFi Sense: HotSpot Sharing: Disable
reg add “HKLMSoftwareMicrosoftPolicyManagerdefaultWiFiAllowWiFiHotSpotReporting” /v value /t REG_DWORD /d 0 /f
REMOVE WiFi Sense: Shared HotSpot Auto-Connect: Disable
reg add “HKLMSoftwareMicrosoftPolicyManagerdefaultWiFiAllowAutoConnectToWiFiSenseHotspots” /v value /t REG_DWORD /d 0 /f
REMOVE Change Windows Updates to “Notify to schedule restart”
reg add “HKLMSOFTWAREMicrosoftWindowsUpdateUXSettings” /v UxOption /t REG_DWORD /d 1 /f
REMOVE Disable P2P Update downlods outside of local network
reg add “HKLMSOFTWAREMicrosoftWindowsCurrentVersionDeliveryOptimizationConfig” /v DODownloadMode /t REG_DWORD /d 0 /f
REMOVE *** Hide the search box from taskbar. You can still search by pressing the Win key and start typing what you’re looking for ***
REMOVE 0 = hide completely, 1 = show only icon, 2 = show long search box
reg add “HKCUSOFTWAREMicrosoftWindowsCurrentVersionSearch” /v “SearchboxTaskbarMode” /t REG_DWORD /d 0 /f
REMOVE *** Disable MRU lists (jump lists) of XAML apps in Start Menu ***
reg add “HKEY_CURRENT_USERSOFTWAREMicrosoftWindowsCurrentVersionExplorerAdvanced” /v “Start_TrackDocs” /t REG_DWORD /d 0 /f
REMOVE *** Set Windows Explorer to start on This PC instead of Quick Access ***
REMOVE 1 = This PC, 2 = Quick access
REMOVE reg add “HKEY_CURRENT_USERSOFTWAREMicrosoftWindowsCurrentVersionExplorerAdvanced” /v “LaunchTo” /t REG_DWORD /d 1 /f
Remove Apps
PowerShell -Command “Get-AppxPackage *3DBuilder* | Remove-AppxPackage”
PowerShell -Command “Get-AppxPackage *Getstarted* | Remove-AppxPackage”
PowerShell -Command “Get-AppxPackage *WindowsAlarms* | Remove-AppxPackage”
PowerShell -Command “Get-AppxPackage *WindowsCamera* | Remove-AppxPackage”
PowerShell -Command “Get-AppxPackage *bing* | Remove-AppxPackage”
PowerShell -Command “Get-AppxPackage *MicrosoftOfficeHub* | Remove-AppxPackage”
PowerShell -Command “Get-AppxPackage *OneNote* | Remove-AppxPackage”
PowerShell -Command “Get-AppxPackage *people* | Remove-AppxPackage”
PowerShell -Command “Get-AppxPackage *WindowsPhone* | Remove-AppxPackage”
PowerShell -Command “Get-AppxPackage *photos* | Remove-AppxPackage”
PowerShell -Command “Get-AppxPackage *SkypeApp* | Remove-AppxPackage”
PowerShell -Command “Get-AppxPackage *solit* | Remove-AppxPackage”
PowerShell -Command “Get-AppxPackage *WindowsSoundRecorder* | Remove-AppxPackage”
PowerShell -Command “Get-AppxPackage *windowscommunicationsapps* | Remove-AppxPackage”
PowerShell -Command “Get-AppxPackage *zune* | Remove-AppxPackage”
REMOVE PowerShell -Command “Get-AppxPackage *WindowsCalculator* | Remove-AppxPackage”
REMOVE PowerShell -Command “Get-AppxPackage *WindowsMaps* | Remove-AppxPackage”
PowerShell -Command “Get-AppxPackage *Sway* | Remove-AppxPackage”
PowerShell -Command “Get-AppxPackage *CommsPhone* | Remove-AppxPackage”
PowerShell -Command “Get-AppxPackage *ConnectivityStore* | Remove-AppxPackage”
PowerShell -Command “Get-AppxPackage *Microsoft.Messaging* | Remove-AppxPackage”
PowerShell -Command “Get-AppxPackage *Facebook* | Remove-AppxPackage”
PowerShell -Command “Get-AppxPackage *Twitter* | Remove-AppxPackage”
PowerShell -Command “Get-AppxPackage *Drawboard PDF* | Remove-AppxPackage”
@rem NOW JUST SOME TWEAKS
REMOVE *** Show hidden files in Explorer ***
REMOVE reg add “HKEY_CURRENT_USERSOFTWAREMicrosoftWindowsCurrentVersionExplorerAdvanced” /v “Hidden” /t REG_DWORD /d 1 /f
REMOVE *** Show super hidden system files in Explorer ***
REMOVE reg add “HKEY_CURRENT_USERSOFTWAREMicrosoftWindowsCurrentVersionExplorerAdvanced” /v “ShowSuperHidden” /t REG_DWORD /d 1 /f
REMOVE *** Show file extensions in Explorer ***
reg add “HKEY_CURRENT_USERSOFTWAREMicrosoftWindowsCurrentVersionExplorerAdvanced” /v “HideFileExt” /t REG_DWORD /d 0 /f
REMOVE *** Uninstall OneDrive ***
start /wait “” “%SYSTEMROOT%SYSWOW64ONEDRIVESETUP.EXE” /UNINSTALL
rd C:OneDriveTemp /Q /S >NUL 2>&1
rd “%USERPROFILE%OneDrive” /Q /S >NUL 2>&1
rd “%LOCALAPPDATA%MicrosoftOneDrive” /Q /S >NUL 2>&1
rd “%PROGRAMDATA%Microsoft OneDrive” /Q /S >NUL 2>&1
reg add “HKEY_CLASSES_ROOTCLSID{018D5C66-4533-4307-9B53-224DE2ED1FE6}ShellFolder” /f /v Attributes /t REG_DWORD /d 0 >NUL 2>&1
reg add “HKEY_CLASSES_ROOTWow6432NodeCLSID{018D5C66-4533-4307-9B53-224DE2ED1FE6}ShellFolder” /f /v Attributes /t REG_DWORD /d 0 >NUL 2>&1
echo OneDrive has been removed. Windows Explorer needs to be restarted.
pause
start /wait TASKKILL /F /IM explorer.exe
start explorer.exe
also:
REM *** Disable Suggestions in the Start Menu ***
reg add “HKEY_CURRENT_USERSOFTWAREMicrosoftWindowsCurrentVersionContentDeliveryManager” /v “SystemPaneSuggestionsEnabled” /t REG_DWORD /d 0 /f
set high performance in powershell:
{
$HighPerf = powercfg -l | %{if($_.contains(“High performance”)) {$_.split()[3]}}
$CurrPlan = $(powercfg -getactivescheme).split()[3]
if ($CurrPlan -ne $HighPerf) {powercfg -setactive $HighPerf}
}
………………..
SERVICES THAT ARE SAFE TO DISABLE:
Adobe ARM Hyper-V Time Sync SSDP Discovery
AllJoyn router Hyper-V RDV UPnP Device Host
Application Layer Gateway Hyper-V VM IPHelper
BitLocker Drive encryption Hyper-V Heartbeat Volume Shadow copy
Block Lever Backup Engine Hyper-V Shutdown Windows Defender
Bluetooth Handsfree Hyper-V Guest Windows Connect now
BlueTooth Support Hyper-V KVP Exchange Windows Media Player Networking
SuperFetch Internet connection Windows Mobile hotspot
Diagnostics Policy iSCSI Initiator Windows Update
Diagnostics Service Microsoft Software Shadowing Windows Search
Diagnostics System Microsoft Storage Spaces WLAN AutoConfig
Diagnostics Tracking Network Services for Xbox WWAN AutoConfig
Extensible Authentication Network Location Awareness Xbox live verification management
Geo Location Network List Service
Google Update Service Offline files
HomeGroup Listener Optimize Drives
HomeGroup Provider Retail Demo Service
Hyper-V Host Sensor Monitoring
Hyper-V VSS Shell Hardware Detection
AND LASTLY, A HTML LINK TO tasks that slow your pc down that you can disable
https://robbeekmans.net/wp-content/uploads/2017/02/4-scheduled-tasks-2017-02-04.html
**You should have no issues with anything I posted here but you should always backup your registry and create a restore point FIRST just to be safe. Again read thru items and remove any you must have.
Thanks a lot it helped me uninstall a program for which i was struggling for 2 hours.
‘1. Uninstall desktop apps from the Command Prompt (cmd.exe)’
In my case, after upgrading from Win 7 to Win 10 I wanted to uninstall some HP bloatware that was left from Win 7, and they survived the upgrade. And I had not the right permission to do that as a administrator from the Control Panel or the other usual way.
‘wmic’ saved me.
From your text: …….most complex and least useful.
I say, very useful 🙂
Thank you, you saved my day
I use Regedit. But even that didn’t remove the pesky one I used this article to remove. Plarium Play is like a virus that roots itself into your computer even after running uninstall it stays implanted. Even after going through multiple registry files, deleting in wmic, and manually removing files from Explorer, the program remains in app data…uggghhhh
seems like you like emilia clarke lol
The Mother of Dragons is quite beautiful, isn’t she? 🙂
How to remove the virus like social2search installed automatically in win 10 and if no above method works for it?
I know you said it was the least useful, but the WMIC process was exactly what I was looking for.
Happy to help. 😉
I’m sorry to say your list is VERY incomplete. They don’t really get rid of the apps. They all only remove them from view and use, but leave them there to clutter up your drive and take up a lot of space (up to 1.2Gb).
Taking Ownership is not enough. The following will finally free you up to make changes without the pesky interruptions you keep running into.
This is a quick instruction for total removal. I particularly am NOT giving the explicit step by step instructions involved in the next 2 steps. They aren’t hard, but I’d advise you to check some other source for those details.
1. Go to My PC and Rt-click on Drive C (OS drive). Go to the Security tab and Advanced button.
2. On the next screen click on Owner: Change. Then go through all the processes to change Ownership to yourself, then do the same for each of the tabs on that page. Follow all the instructions, accept that a few files (like pagefile.sys) won’t work and continue until you own everything, have Auditing and Effective Access to everything. This is about a 20 minute process – go get yourself a sandwich and drink.
3. Go to C:Program FilesWindowsApps folder and do the same thing for it individually.
Now you’ll find that all those uninstalled Apps are still there, just have been hidden from view and access. Most of this looks like the normal app structure you’ll find on any cell phone. Delete what you want and it’s now totally, permanently deleted and you’ve freed up to 1.2 Gb of space.
BEWARE – If you’re not familiar or comfortable with this process, don’t do it. I’ve done it for all kinds of computers over several Windows OS from XT on. Other than the risk of deleting or changing something you don’t understand or shouldn’t change AFTER you’ve done this, there really is no change or danger in what you’re doing. The result is that YOU NOW OWN your computer and OS and can do what you want with it other than tweaking the registry, which is a whole other issue.
Personally if I can’t normally uninstall a program I use the Windows Uninstall Cleanup Tool.
You mean this? https://support.microsoft.com/kb/290301
It’s deprecated and it has serious issues that could damage components you didn’t select. Furthermore, it’s not supported on Vista onwards.
The current tool with the same purpose is the Program Install and Uninstall Troubleshooter from Microsoft Fix it.
https://support.microsoft.com/mats/program_install_and_uninstall/
I happened to save a copy of the tool a few years back and have used it with no problems up to this point. I always use Programs and Features to remove things first, but if I still have a problem I check the Tool to see if anything is remaining. Also I was unaware of the MS Fix it for that purpose thank you.
Just for giggles I tried the MS Fix It program you left a link to and it is no longer available at least for Win 7×64.
You shouldn’t be suggesting uninstaller shortcuts on Start or the desktop as those are non-standard and go against the UX guidelines. The fact that developers continue to do this goes to show how bad their lack of care for any good principles of good user experience is. At least WinRT, the Modern Shell and the Store don’t allow this for Modern apps.
Why shouldn’t we suggest these shortcuts? If they are there, use them. They work.
Your point has nothing to do with the correctness of this tutorial.
Because they’re not the standard way of uninstalling software on Windows. Not to mention that the uninstaller shortcuts on Start have been hidden by the system since 8.1 (don’t remember how it was on 8).