You probably know that you can use special symbols and characters from fonts installed on your Windows computer or device. Character Map is the best tool for finding and selecting those. But what about making your own special characters in Windows instead of using symbols created by others? Yes, you can do that. In this guide, we will show you how to create and save your unique symbols using Private Character Editor. They can be inserted into any document, whenever you need, as long as you intend to use them for your own use only. If you are curious to see how it works, read this tutorial:
NOTE: You can run Private Character Editor only if you are an administrator.
Step 1. Start the Private Character Editor
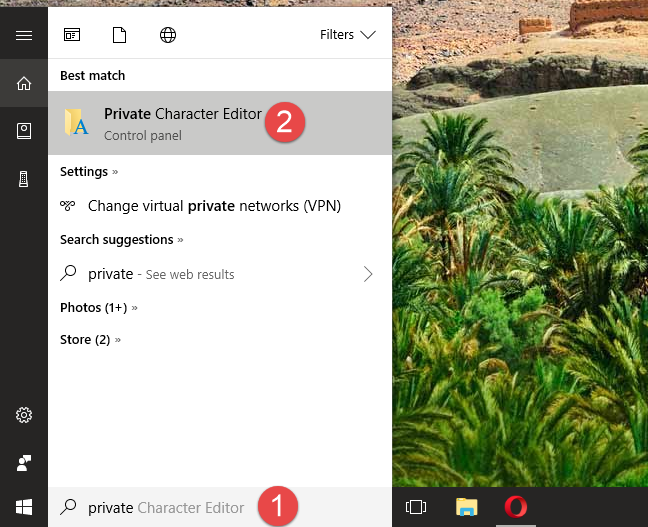
If you use Windows 10, the easiest way for you to open the Private Character Editor is to use Cortana's search feature. Enter the word "private" in her search box from the taskbar, and then click or tap on the Private Character Editor shortcut.
Private Character Editor, Windows
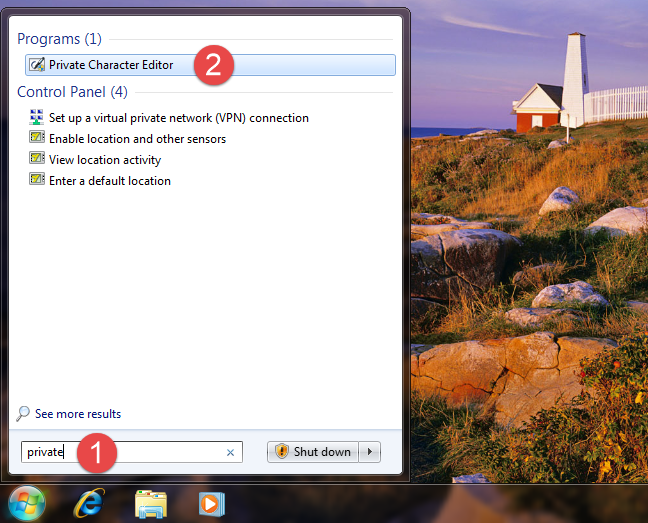
In Windows 7, you can write the word "private" in the Start Menu search box and then click on Private Character Editor.
Private Character Editor, Windows
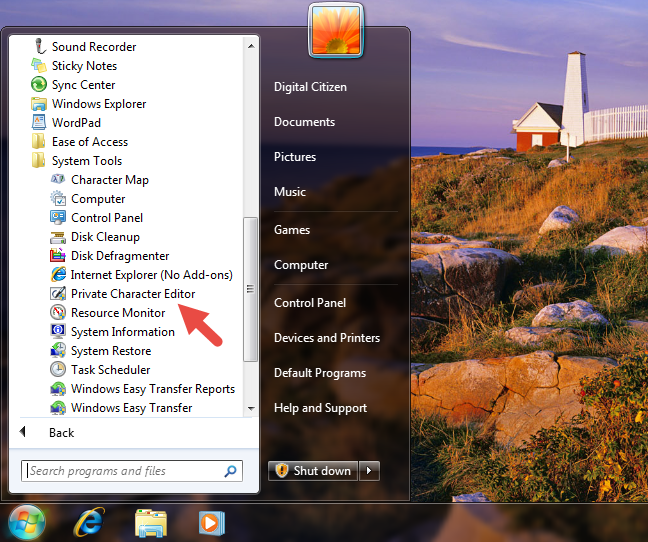
Alternatively, in Windows 7, you can also find a shortcut for Private Character Editor in the Start Menu. If you prefer this method, open the Start Menu, go to All Programs -> Accessories -> System Tools and then click on the Private Character Editor shortcut.
Private Character Editor, Windows
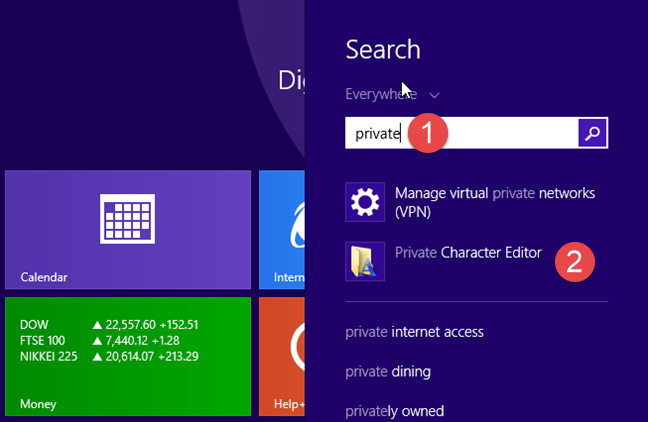
In Windows 8.1, there is no Private Character Editor shortcut in the All Apps list on the Start screen. However, you can use search to find it. While on the Start screen, type the word "private" and then click or tap on the Private Character Editor search result.
Private Character Editor, Windows
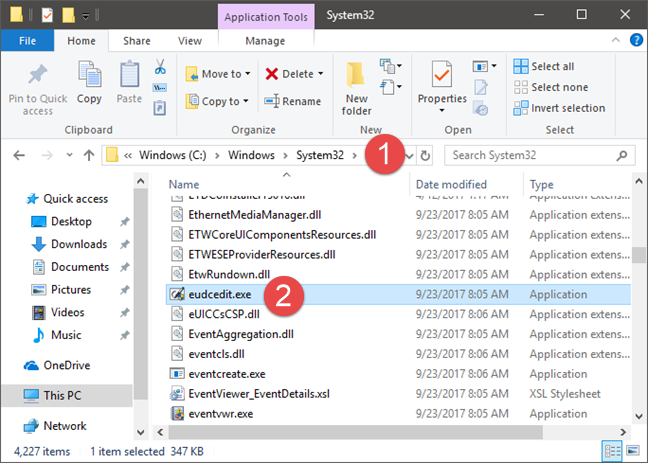
In all modern Windows versions - Windows 10, Windows 7 and Windows 8.1 - you can also use File/Windows Explorer to launch Private Character Editor. Start by opening the partition where the operating system is installed (in most cases it is the "C:" drive). Then, navigate to "C:WindowsSystem32" and look for a file named eudcedit.exe. Double-click or double-tap on it and the Private Character Editor opens.
Private Character Editor, Windows
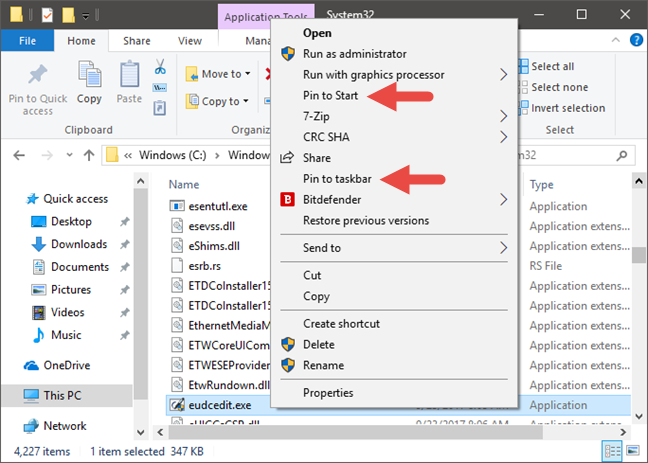
Note that, if you want to, you can even create a shortcut for the eudcedit.exe file on your desktop or taskbar (in all Windows versions). You could also pin the eudcedit.exe file to the Start Menu in Windows 10 or to the Start screen in Windows 8.1, or even pin it to the taskbar for faster access.
Private Character Editor, Windows
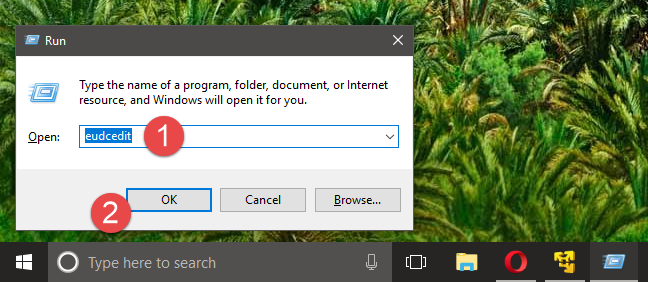
Finally, another method to open Private Character Editor that works in all Windows versions is to open the Run window, enter the command eudcedit and then press Enter or OK.
Private Character Editor, Windows
Regardless of the operating system that you have and the method that you use to launch Private Character Editor, once it opens you should see a window similar to the one in the screenshot below.
Private Character Editor, Windows
The Private Character Editor looks and works the same in all versions of Windows, so to keep things simple, from now on we will only use screenshots taken in Windows 10.
Step 2. Select the code for your new character
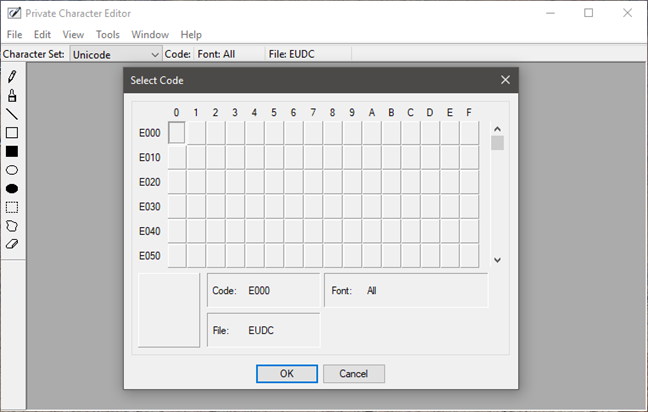
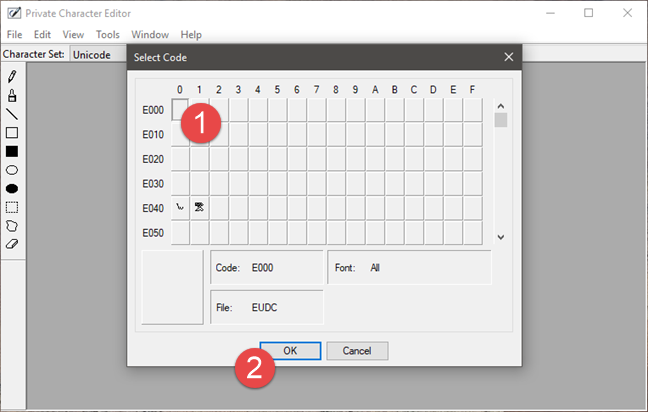
The first thing that you are requested is to choose a hexadecimal code that will be assigned to the new symbol that you are about to create. You have to do this because each character in a font has a hexadecimal code that is used to identify it uniquely.
Therefore, the new character that you are about to create must also be identified by a code. If you choose the first box, the code will be E000, if you choose the box from the second column and the first row, the code will be E001 and so on. It is up to you what code you choose for your new character.
Private Character Editor, Windows
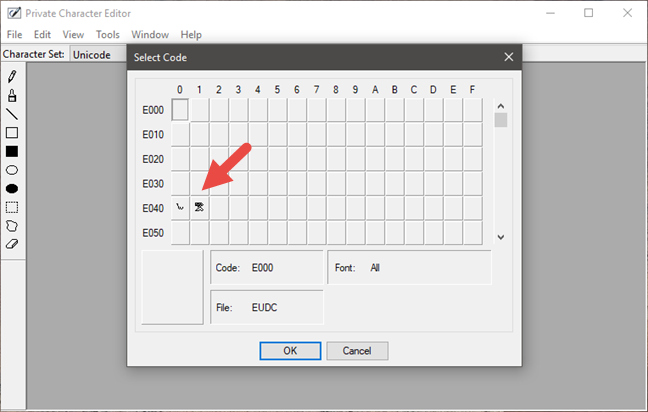
When you open the Private Character Editor for the first time, the whole grid is empty. However, after you create a character, you will see it in the corresponding box. For example, we have previously created 2 symbols: one with the code E040 and the other one with E041. Now each box shows the associated character.
Private Character Editor, Windows
Once you have chosen the hexadecimal code, you are free to create your own character.
Step 3. Use the available tools to draw a new character
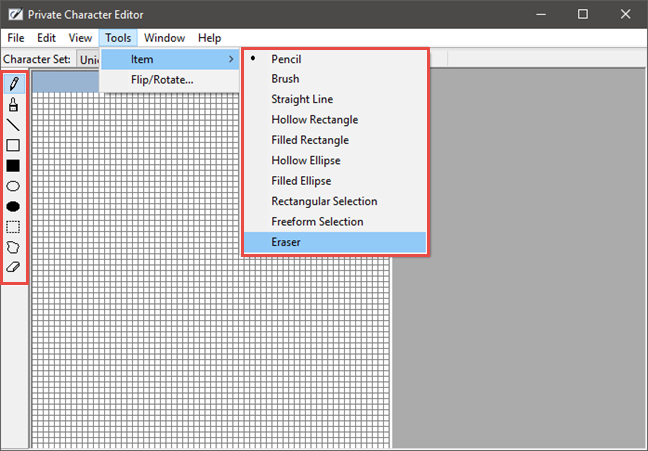
Your canvas is a 50x50 grid in which you can draw anything you like, just like you do in Paint. Private Character Editor gives you ten different tools that you can use to create characters. The tools can all be found on the left side of the window, or by opening the Tools -> Item menu.
Private Character Editor, Windows
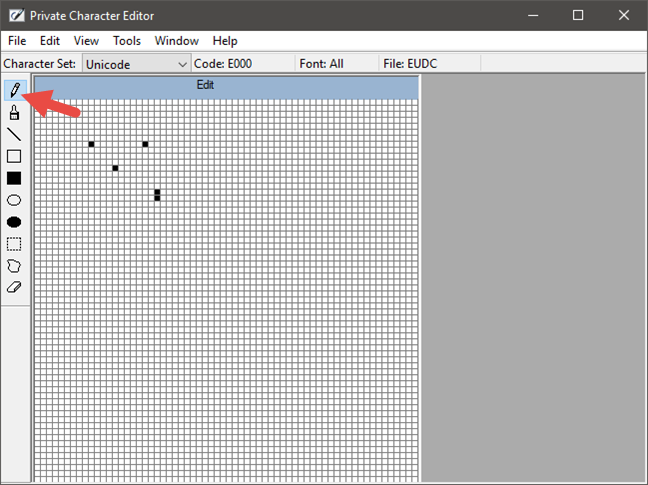
The default tool is the Pencil. Using it, you can only draw on one square at a time.
Private Character Editor, Windows
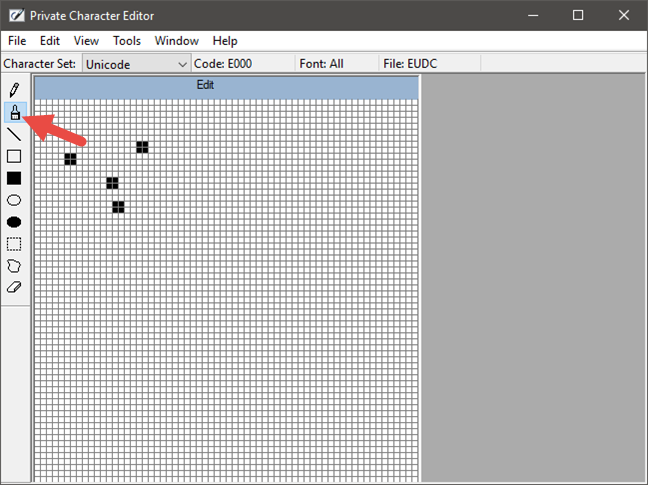
If you want to draw 2 x 2 squares, use the second tool, which is named Brush.
Private Character Editor, Windows
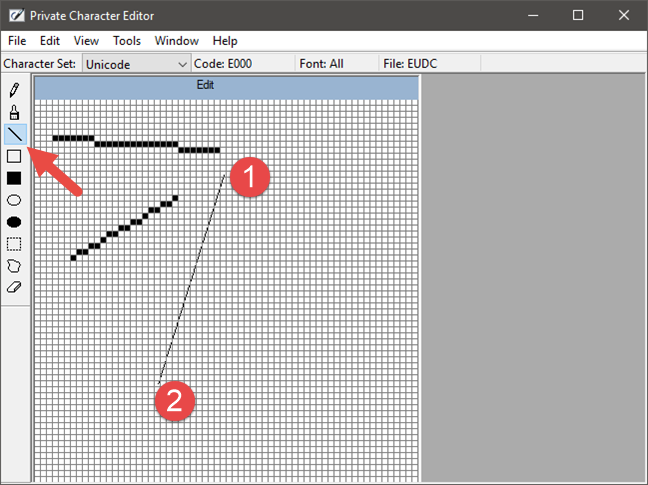
For lines, just like those in Paint, use the Straight Line tool. Hold down the left mouse button to the point where you want the line to start and release it at the line's end. If you have a touchscreen, you can simply drag your finger on the canvas.
Private Character Editor, Windows
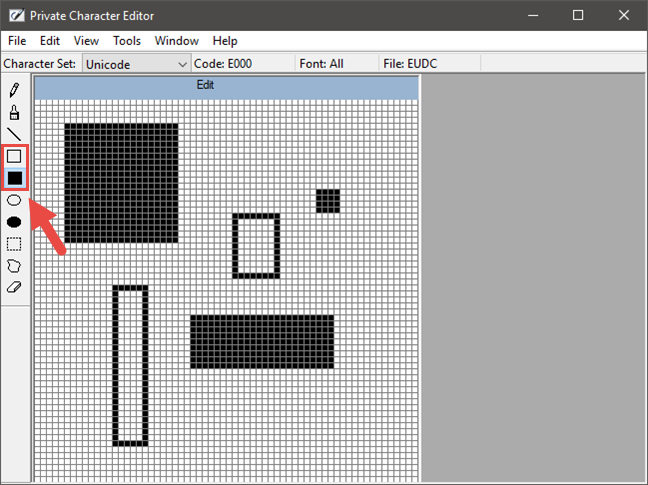
To draw rectangles of any type and size, use the Hollow Rectangle or the Filled Rectangle tool. Obviously, the Hollow Rectangle draws empty rectangles, while the Filled Rectangle draws filled rectangles.
Private Character Editor, Windows
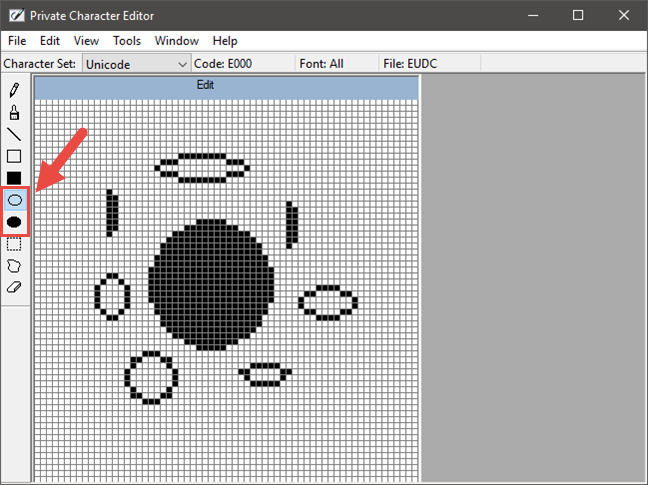
The Hollow Ellipse and the Filled Ellipse are the tools you need when you want to draw circles or any other rounded shape figures.
Private Character Editor, Windows
The Eraser tool, which you can find at the end of the tools list, simply removes 2 x 2 blocks from the drawing, no questions asked.
Private Character Editor, Windows
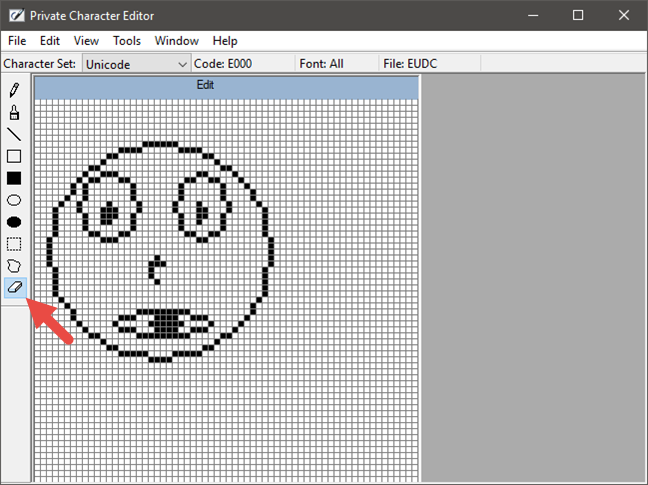
Step 4. Edit your new character
Sometimes you might also need to edit the character. For example, you might want to move a selection from one place to another, or you might want to delete entire parts of the character that do not look as you want them to. For that, use the next tools:
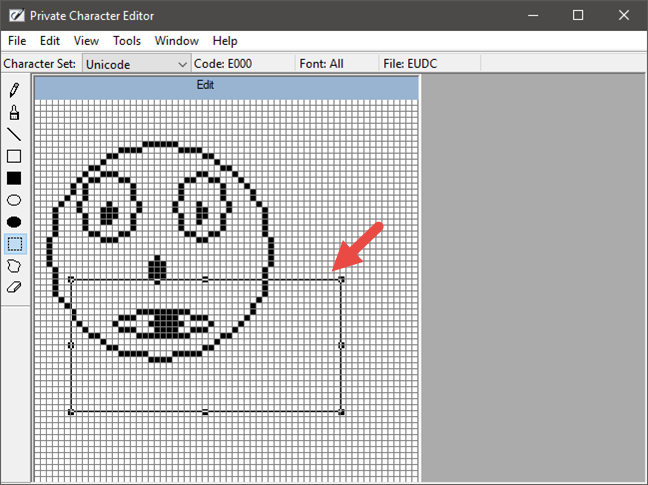
The Rectangular Selection tool from the left side of the window allows you to select a rectangle shaped area. Click or tap in the middle of the selected area to move it or drag its corners and sides to change its shape.
Private Character Editor, Windows
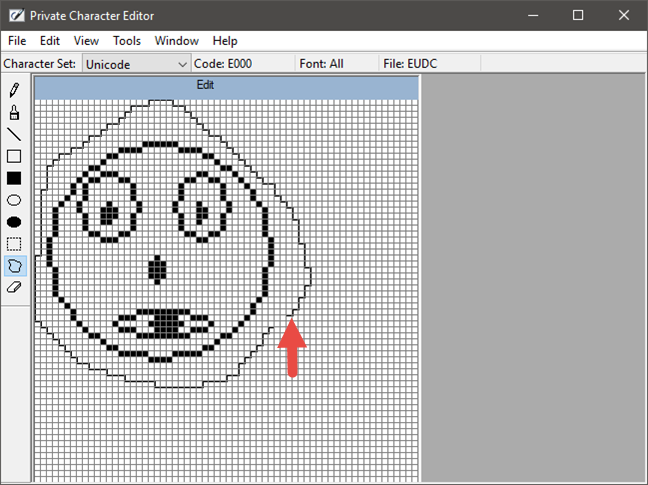
The Free Form Selection works similarly to the Rectangular Selection tool, but you can choose any shape you want to be selected.
Private Character Editor, Windows
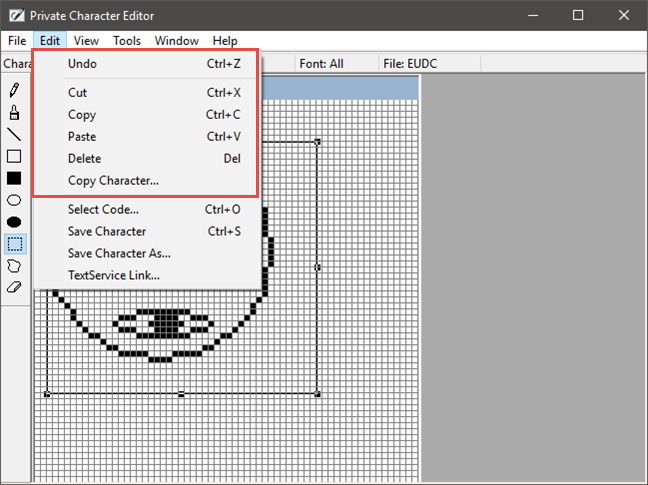
As you would expect, you can also cut, copy, paste or delete any selection from the character. To do so, open the Edit menu at the top of the window and choose the option you want to use.
Private Character Editor, Windows
Step 5. Link the character with one or more fonts
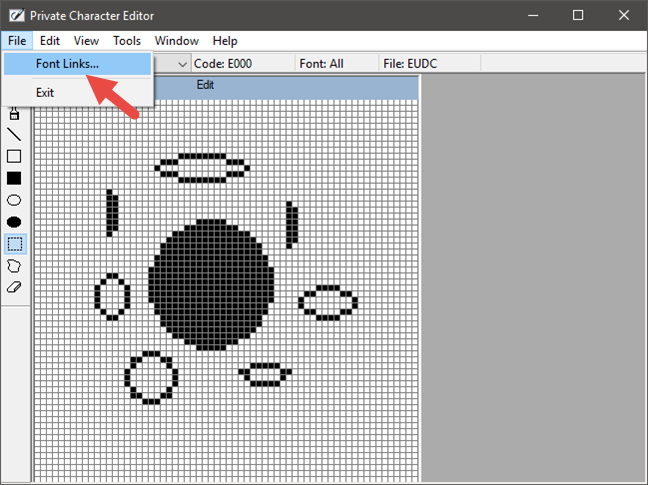
Private Character Editor allows you to link your character to either all fonts or a specific font. By doing this, the character is added to the selected font(s). To do this, open the File menu and click or tap on Font Links.
Private Character Editor, Windows
You are first asked if you want to save your character. Click or tap on Yes.
Private Character Editor, Windows
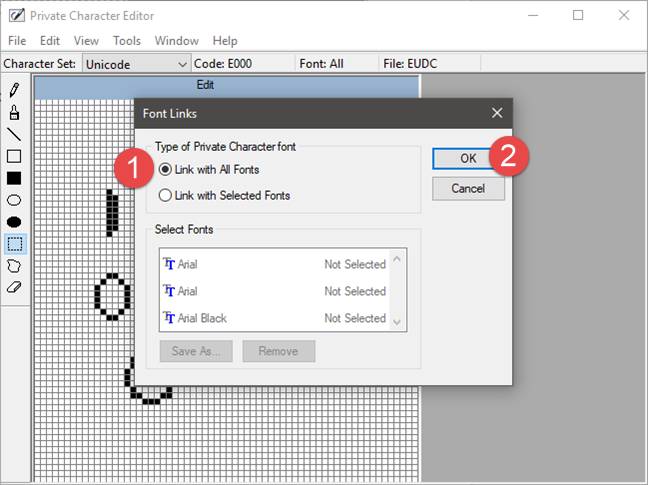
If you want to link the character with all fonts, select the "Link with All Fonts" option and press OK.
Private Character Editor, Windows
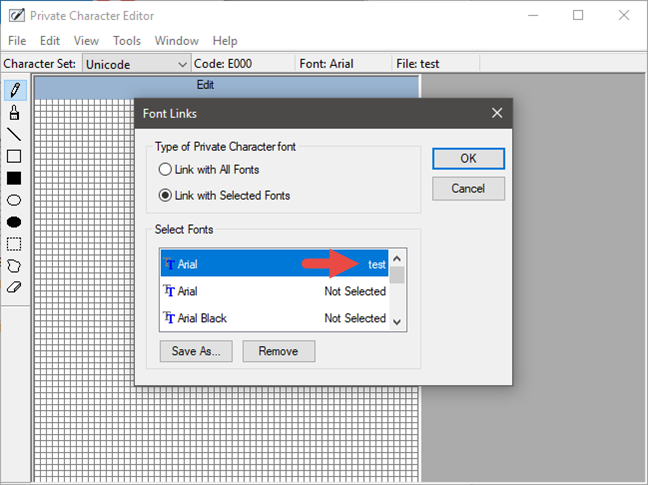
If you want to link your character to only one or more specific fonts, choose "Link with Selected Fonts," in the Font Links window. Select the fonts one by one and then click or tap "Save as" and choose a name for your custom character.
Private Character Editor, Windows
After you have chosen the name, it will be displayed as a character available with the font(s) you have selected. Press OK, and you are done.
Private Character Editor, Windows
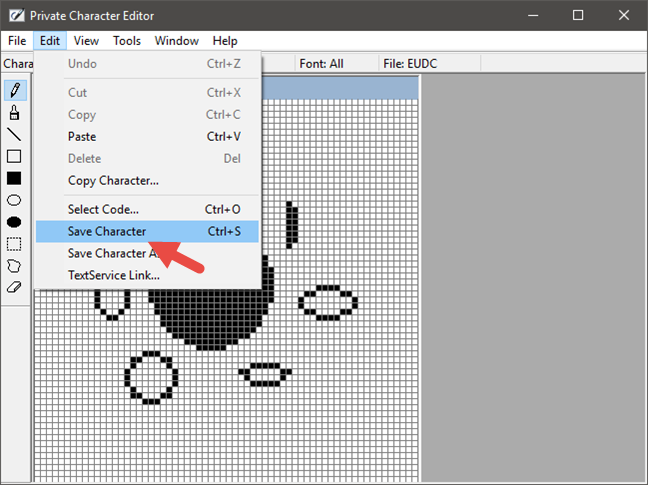
Step 6. Save your character
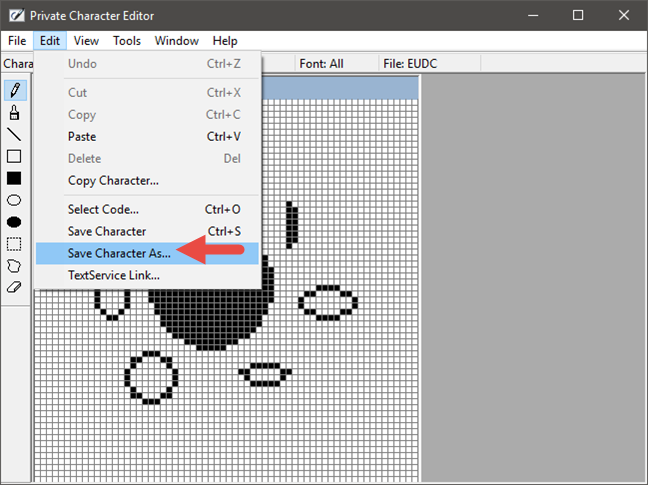
Now that you linked your character to a font, it is time to save it. Open the Edit menu and click or tap on "Save Character." Alternatively, you can also simultaneously press the Ctrl + S keys on your keyboard.
Private Character Editor, Windows
If you want to save it using a different hex code, go to Edit -> "Save Character As."
Private Character Editor, Windows
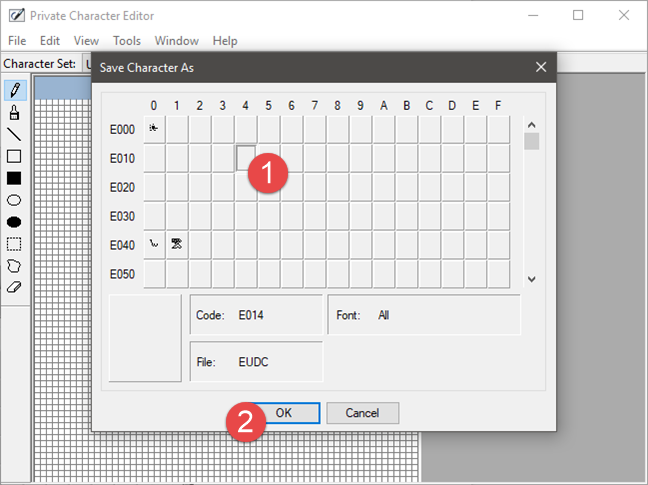
Choose the new hexadecimal code as its identifier and click or tap on OK.
Private Character Editor, Windows
Step 7. View and use your custom character
To see and then copy the new character you created into a document, open Character Map.
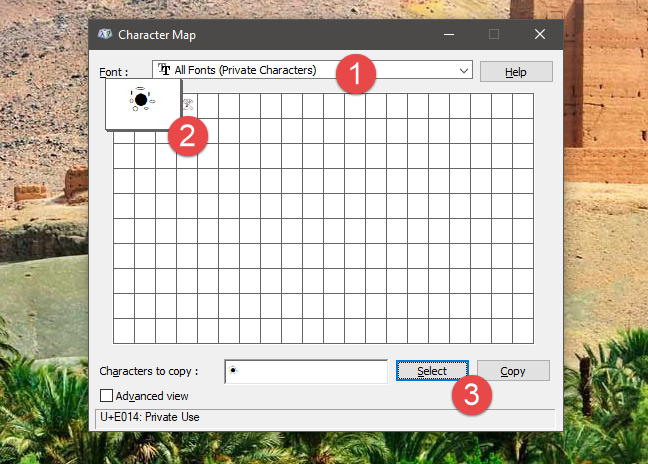
However, before you do that, make sure that you close Private Character Editor before searching for your symbol in Character Map. Otherwise, the search will not work. In Character Map, open the Fonts drop-down list and select "All Fonts (Private Characters)."
Private Character Editor, Windows
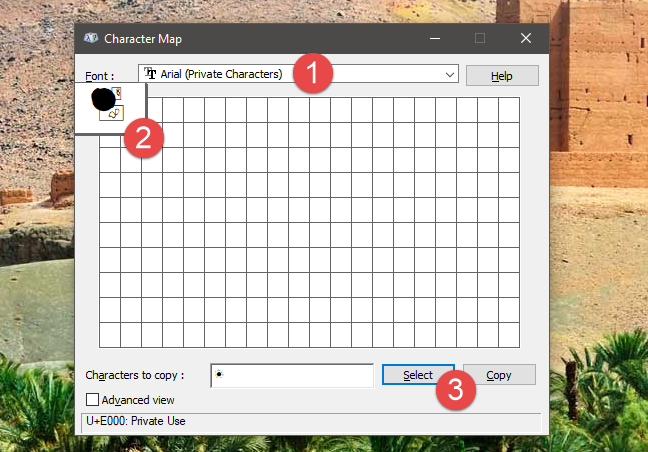
To find your new symbol in the Character Map, you can also select the Private Characters associated with the font to which it is linked. For example, we have saved the character from the next screenshot in the Arial font so that we will find it under Arial (Private Characters).
Private Character Editor, Windows
Now you can copy and paste it to any document, as shown in our Character Map guide.
Turn the page to learn how to use existing characters to create your own characters and how to also how to edit previously created private characters.
How to use existing characters to create your own characters
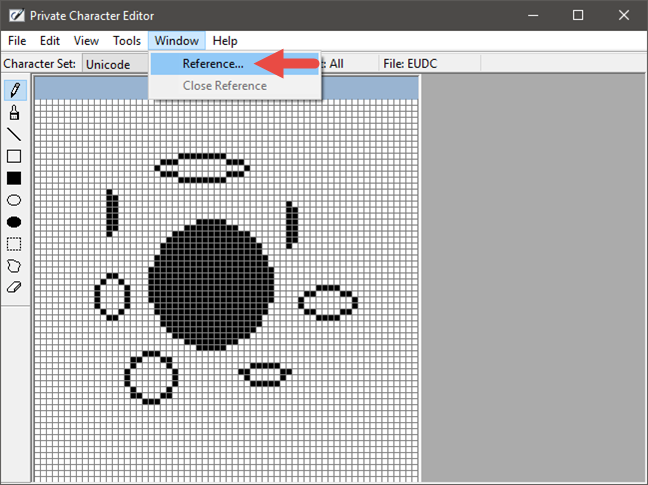
The Private Character Editor also allows you to select a pre-existing symbol to be used as a reference for your new character. Start by opening the Window menu and click or tap on Reference.
Private Character Editor, Windows
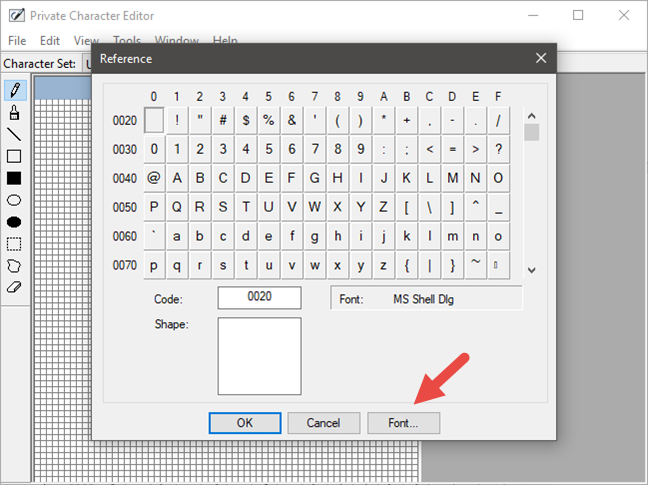
Click or tap the Font button to choose the font.
Private Character Editor, Windows
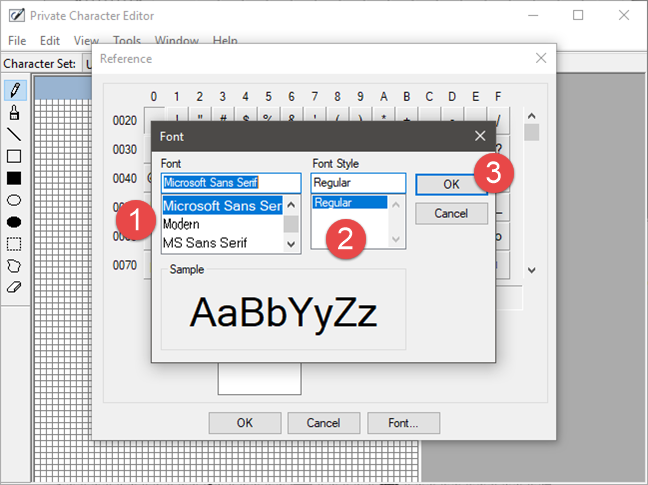
Select the font and the font style and then press OK.
Private Character Editor, Windows
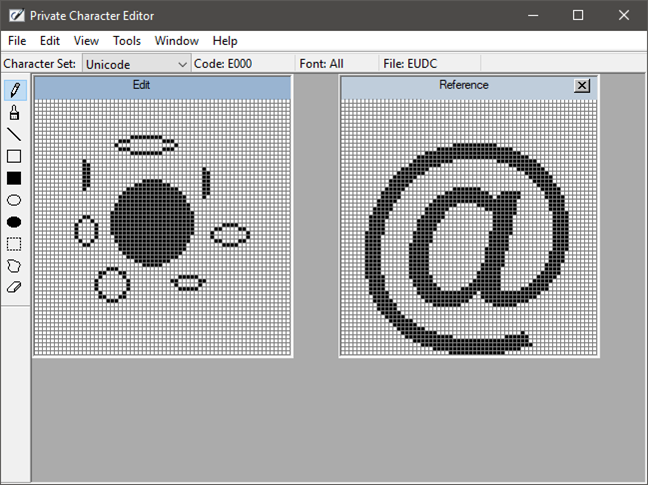
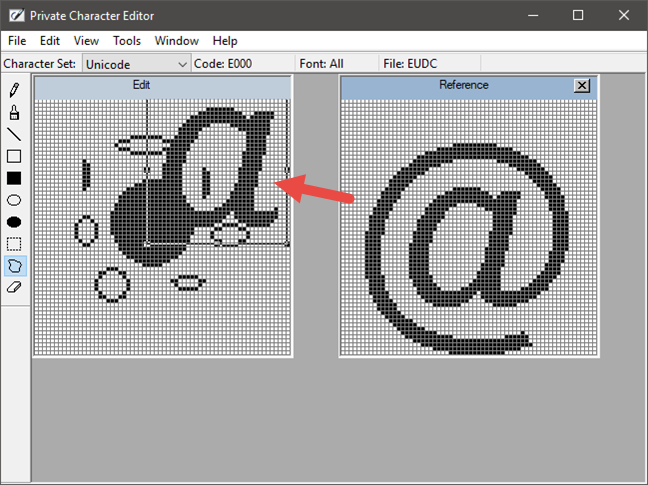
Then, select the character you want to use as a reference and press OK. The reference symbol is opened in a new 50x50 grid, on the right-hand side.
Private Character Editor, Windows
You can select any part of the reference character and copy it to your symbol. Select the area you are interested in and drag it on your canvas.
You should also be aware of the fact that you cannot modify the reference symbol.
Private Character Editor, Windows
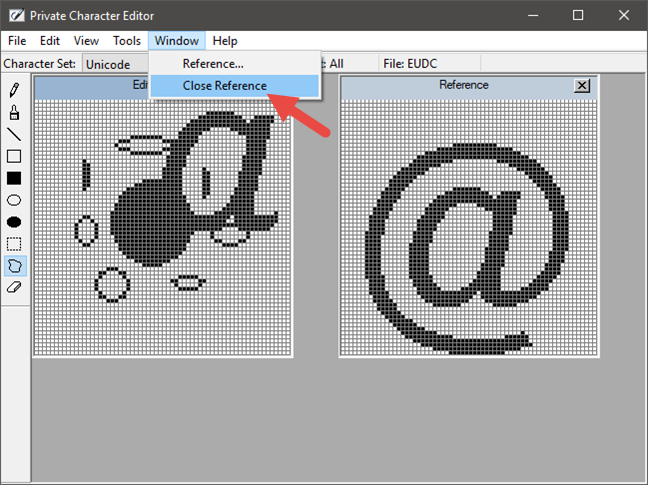
Once you have finished working with a reference character, open the Window menu again and click or tap on "Close reference" to close the symbol.
Private Character Editor, Windows
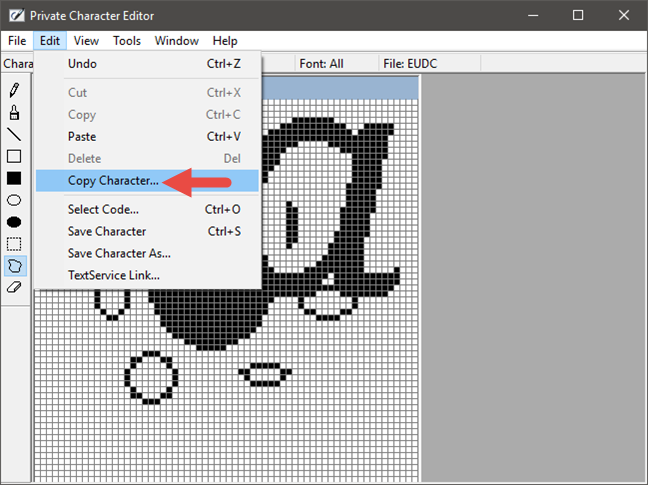
If you want your new character to be based on an existing character, the Private Character Editor gives you the option to copy it on the canvas. This will replace completely what you already have drawn. Open the Edit menu and click or tap on "Copy Character."
Private Character Editor, Windows
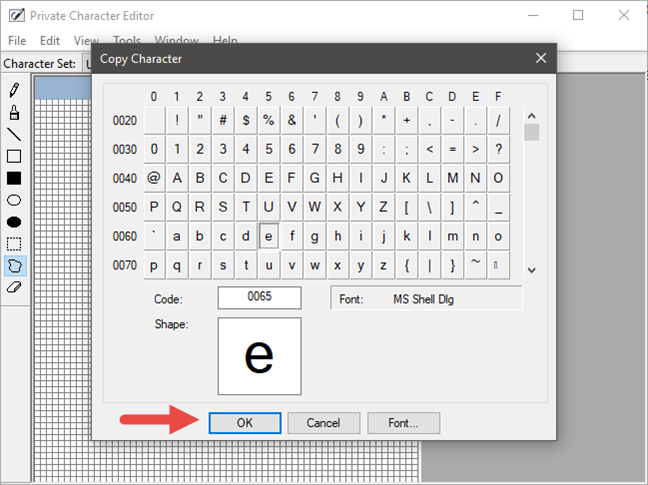
Click or tap on the Font button and select the desired font and font style. Then, select the character you want to copy and click OK.
Private Character Editor, Windows
The character you chose is loaded on your canvas, and you will now be able to edit it.
Private Character Editor, Windows
Once you have made your edits, you can save it as a new character, just like we have shown you on the previous page of this guide.
How to edit a previously created character
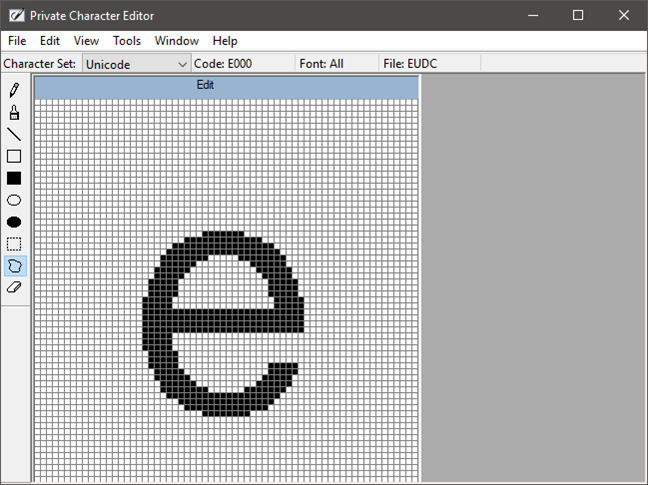
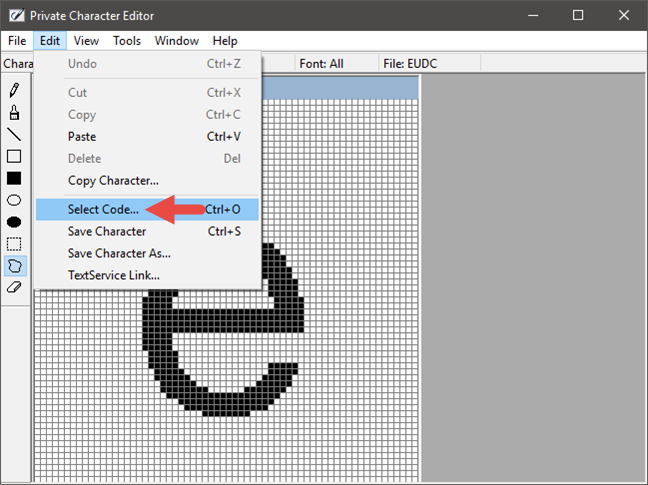
To edit a character you previously designed, open the Edit menu and click or tap "Select Code."
Private Character Editor, Windows
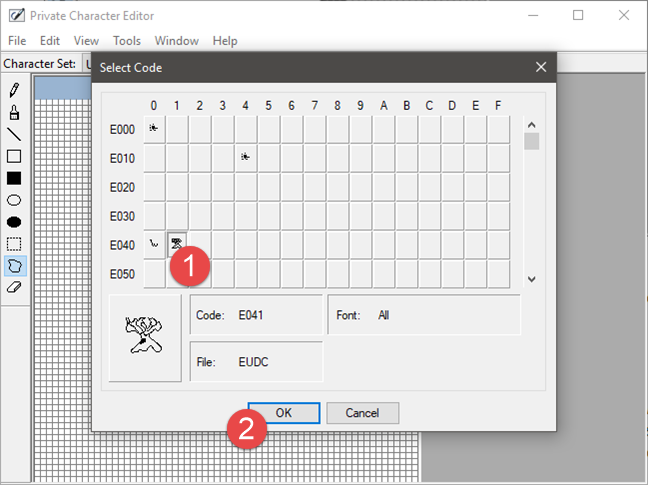
From the grid, pick the box associated with the character and click or tap on OK.
Private Character Editor, Windows
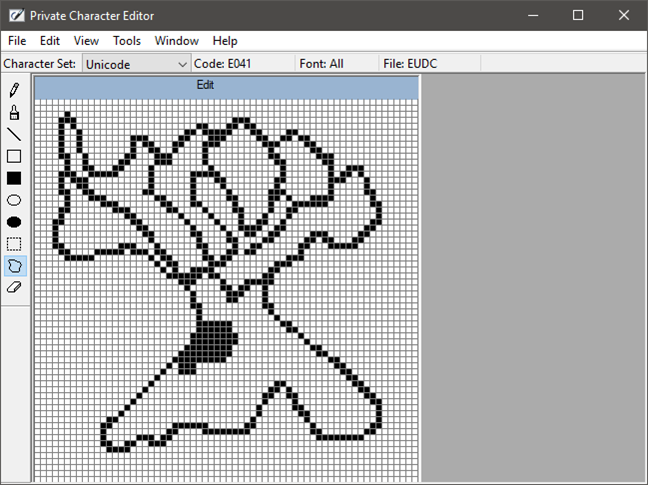
The character is now opened, and you can use the tools mentioned in the sections above to edit it.
Private Character Editor, Windows
This is it!
Frequently asked questions from readers
Some of our readers asked if you can associate a keyboard shortcut to private characters that you create using Private Character Editor. The answer is no; Windows does not offer a built-in feature for that. However, if you need such a feature, you could try looking at third-party alternatives such as AutoHotkey.
Others also asked about how to use the new characters they create in documents which they intend to send to other people. Unfortunately, the Private Character Editor is, first and foremost, a Private Character Editor: the symbols you create with it are intended only for personal use, not for distributing. You cannot use private characters on other computers, at least not by ordinary means.
Conclusion
Now you are free to test your designer skills and creativity by creating new symbols with the Private Character Editor. Play with each of the tools and options available and see how easy it is to make a new character. Next, insert your new characters into documents and give them a touch of originality.
please tell me how to use the character I created in eudcedit…so that I can use it anywhere like an own style symbol..please please reply to this…whenever I try to past it in email or in google..it appers like question mark…i made it to use it in free fire name…i know it seams like crazy..if u know anything that how can i create own symbol that can use in free fire/pubg names can it….reply
NguyenTrongQuang ·
This remains good.
Anonymous ·
Is there a way to do this on Mac Catalina?
Patrick ·
I still don’t know how to edit a character I created.
Hamel Novo ·
Hi, how i can close letter together?
How i can spread on website?
Nicole ·
I saw some similar problems below but did not find my answer.
I am struggling with getting my character to print, I can see it in word but I can not print to PDF or even just paper, it turns into boxes. The biggest struggle is that this works for other people in my company. It seems like when I switched my computer to Windows 10 machine, it stopped working correctly.
We use Phrase Express also and within Phrase Express, the character shows up as boxes, but when I use a phrase and insert it to Word, it works. When I then try to print, it is back to a box.
I have been working with IT for weeks on this and they have no answer for me. Please help!!!
Lonster ·
I am successful at creating a font and can even see it in the character editor.
I copy and paste it into Excel and it pastes nicely. I have the document set up to use the same character throughout my document. While this has been a success for me in the past, I now find that this one image does not seem to translate over to the other parts of the excel document. In fact, all that can be seen is a tiny square. I have done various things to alter the size of the character in PCE, but I still get the same results. Any ideas of what I’m doing wrong? Thanks!
Anonymous ·
You are not doing anything wrong. This is a feature that is poorly supported by Microsoft and its products. Such problems happen frequently.
Lonster ·
Here is how I resolved the problem:
(1) I noted the hex code.
(2) From within Excel, I went to the cell that would be used as a reference. Then I did , . Found the hex code within EDUC and inserted. Mind you, the symbol still does not show up.
(3) I clicked onto an accompanying cell that was formatted properly. Then I clicked , followed by clicking onto the cell with my newly created font. Voila! Not only did the symbol display properly in the reference cell, but it also displayed in shapes (as designated) throughout the rest of the Excel document.
I hope this helps!
Lonster ·
Let’s try this again since the last post made no sense. I noted the hex code from within PCE. Then, from the cell that was to be used as a reference in Excel, I selected “Insert Symbol”, chose EUDC, selected the correct hex code and inserted it. Next, I clicked onto a properly formatted cell, then clicked “Format Painter”. Finally, I clicked onto the reference cell. This resulted in the reference cell showing my font and transmitting it to all shapes needing the referenced cell. I hope this makes sense and helps!
Anonymous ·
Thank you for sharing the solution that you have found. Other readers may find it useful. 😉
Rambo ·
Excellent user friendly article. Thank you. You made my life easier.
Annie K ·
I can’t seem to find this all fonts thing everybody keeps referring me to. This is my second tutorial and still no luck. How do I get it? Great article but no help if things aren’t available to me.
John Morgan ·
This is a great help article. Although, I can not find anything on ( how to delete new characters that I made ) Any help would be greatly appreciated.
djiango ·
Select all with the rectangle tool, and press the ‘Delete’ button?
Can anyone tell me why people keep saying, that the character is 50x50px.?
Counting the grid, it has 64 points vertically and horizontally.
Selecting the whole character with the rectangle tool, and copying it with ‘CTRL + C’ and then pasting it to an image editor, confirms that the character is 64x64px.
Nova ·
Help, i’m making a new character, but all that shows up when i paste it is .
Zinnia ·
I am facing the same issue. All is see is a ox with a question mark in it.
Stephanie ·
It is worthless. Good article, but it is pointless. Neither facebook nor twitter will show it properly. It will only show it if you use the font you have embeded the private character in… Otherwise it shows nothing.
Woodpelt ·
my character map doesn’t have an “all fonts” section! help?
Anonymous ·
I find Private Character Editor to be ridiculous!…as every attempt to display a Private Character using the full 50×50 pixel allotment through Character Map, resulted in a distortion of the created final work! And this led me to speculate as to whether my PC pixel size, had anything to do with how the Private Character Editor gets converted to my specific PC pixel configuration!…and if so, every tutorial I’ve seen, makes no mention of this! But whatever the reason is for the translation failure, it’s a bloody waste of time to put effort into coming up with what appears through PCE as a work of art…but winds up, after translation, as a piece of shit! But, maybe part of the problem is saving the created Private Character as part of an existing Font!…or saving to “All Fonts”! Why can’t I save my created Font to a Font cache that’s specific to MY work!…named by ME!…and not filtered through someone else’s Font design, and description!
Please!…no emails!
Artemis Fowl ·
This is an interesting insight, but I have 2 very big factors that don’t work with this.
1. All the characters have a limit of 50×50 pixels when my characters specifically require 80×100 pixels in order to be seen optimally as they would be too small to see the details – which are quite important for my language.
2. You can NOT create any characters in colour and are restricted to monochrome/black & white characters. This is particularly difficult and annoying as it is highly imperative for each of my characters to be in colour as most of them look very similar and the colour differentiation is the key to understanding whether it’s an s, k, u, or p…
Nova ·
you cannot color characters on a website without the website doing the coloring. Thats just a computer/internet problem.
Noor ·
Hi,
I would like to know how these characters created in private character editor can be moved from one computer to another?
Is there any way?
Please help me
Thanks.
Megan Beiler ·
I’ve followed all your instructions, but when I go to the Fonts drop down menu in Character Map, there is no All Fonts (Private Characters) to select!
Salai Dhiraviyam ·
I created a private character and linked to particular uni-code font. I created a document with private character and it seems good in MS-Word. When I tried to print in “pdf” format some special characters printed instead of private characters.
Help me to print the private characters.
Thanks.
Neil Cook ·
I’m running Windows 7 Professional and I can’t locate the Private Character Editor. I’ve looked under All Programs, even check Control Panel, Programs and Features, Turn Windows Features on or off, with no luck. Obviously, I’m missing something (in your instructions or in my version of Windows 7 Pro).
Neil Cook ·
Sorry, followed the link to the Microsoft page on the editor and ran the exe. All works now. Put a shortcut for the exe on my desktop.
ttun ·
It’s located under Accessories->System Tools
Odean Hoss ·
You wrote a very helpful article about the Private Character Editor. It’s been pretty useful so far. My question for you is this: Although I can access PCE via Help in Win 8 Pro, have you been able to find a quicker way to find it, and if not, is there a way, other than “pinning it” to the Taskbar, to put it on the Start page? It appears to me that Microsoft is either phasing this tool out, or just doesn’t want us to find it (along with several other items like System Restore). This all started when I was searching for a simple “check mark” to insert. I started looking around, and found it in the Reference window, listed as #2714. (I tried including a link to a screen shot of this, but it triggered the SPAM filter) If you’ve already written an article covering this, could I have a link to it, please?
Ciprian Adrian Rusen ·
You want to pin the Private Character Editor to the Start screen?
Pin the file eudcedit.exe found in C:WindowsSystem32.
Odean Hoss ·
Perfect! Thank You. This has led me to many more of your tutorials, and many more fun things I never considered doing with my system.
Ciprian Adrian Rusen ·
Cool. I’m glad you discovered useful articles on our website. We’ve put a lot of work into it and we have lots of good articles on what to do with Windows 8. 🙂
G Gálvez ·
I can create a new character in Private Character Editor. And if I paste it individually in a Word document it looks fine. But if I want to paste it next to another letter or within a word it does not paste in the correct place. In short the tool Private Character Editor is entirely useless. Or, may be, I am not using it correctly. I am more inclined to believe it is useless. So a new font should be created from the ground up if we want to use special symbols. Am I correct? [email protected]
Glyn Davies ·
I have tried this with same result.
I went to Microsoft Technical Help
& eventually one of their staff tried it,
but had to admit defeat.
The trouble is that there is no tool to
move margins, as there is in Font Lab.
My solution has been to use the free demo
version of Font Lab & copy the same
character several times, so at least one
works well. (Wish I could afford the full
version of Font Lab, which is much the best
font creator.)
anand ·
how to copy pri
vate character form one system to another system
limfw ·
Once the character is created, may I know how can I use it on another computer?
I don’t see any reference to the private character file in the above. It is attached to a font in the character map, do I just copy that font and put on another computer.
Can I copy private fonts from Vista to Windows 7 (or even XP)?
Also, in a prior question, I see shortcuts for ASCI fonts, but not for Unicode fonts, I see reference number/code, but no way to type that in to get the character(in this case the private character).
Both answers are informative, but I don’t see that they answer the question?
Thanks in advance
Anonymous ·
shame they couldnt overwrite a ALT+0000 position so it can be accessed by a shortcut. ☺☺☺☺ s`ʎǝ|ıɯs ǝɯ dı|ɟ ʇuɐɔ dı|ɟ ʇxʇ
David ·
This tutorial is great and sheds more light on this Private Character Editor that I have recently discovered. Thanks.
I am very cautious about putting new fonts and characters in documents. Once I made a nice font, included it in some documents, and sent the documents to fellow workers. They did not have my home-made font in their Windows systems, so somehow, Windows detected a legendary font similar to my home-made font, and used that instead. Then I realized I would have to send my new font together with each Word document I send, and explain to each recipient how to install my new font. Things get more complicated if I make a change in my home-made font.
Concerning the Private Character Editor, I have some questions and concerns:
* Concerning the option to “Link with all Fonts” or “Link with Selected Fonts,” what is the best practice. What are the guidelines for making this selection – link it to a legendary font such as Arial, or all fonts?
* When I copy and paste my new character into a document, is it sent together with that document to other computers?
* Questions concerning the character code address – I am very very cautious about this.
# What would happen if, by accident, I selected an address that is a key figure, such as a capitol A, or a question mark? Would my new character overwrite that?
# What would happen if someone else made a special character and assigned it the same address as my character? Would his or her character overwrite my character?
# What if I need to make a change in my special characters? Do my changes get copied with the document and overwrite the old characters in the receivers computers?
Perhaps I’m overly cautious, but I’m scared of doing some damage someplace. Perhaps these potential complications are the reason why this neat feature is not flaunted by Microsoft, and remains relatively hidden.
Thanks again,
David
Anonymous ·
how to select the font in Microsoft Word created in Private Character Editor?
Ciprian ·
You cannot create fonts in Private Character Editor. You can create only characters and add them to an existing font collection. If you want to insert a character you created, use the keyboard shortcut you assigned to it. Read carefully, the tutorials covers also this. 😉
Anonymous ·
How can you make a keyboard short cut for your private character?


Discussion (44)
please tell me how to use the character I created in eudcedit…so that I can use it anywhere like an own style symbol..please please reply to this…whenever I try to past it in email or in google..it appers like question mark…i made it to use it in free fire name…i know it seams like crazy..if u know anything that how can i create own symbol that can use in free fire/pubg names can it….reply
This remains good.
Is there a way to do this on Mac Catalina?
I still don’t know how to edit a character I created.
Hi, how i can close letter together?
How i can spread on website?
I saw some similar problems below but did not find my answer.
I am struggling with getting my character to print, I can see it in word but I can not print to PDF or even just paper, it turns into boxes. The biggest struggle is that this works for other people in my company. It seems like when I switched my computer to Windows 10 machine, it stopped working correctly.
We use Phrase Express also and within Phrase Express, the character shows up as boxes, but when I use a phrase and insert it to Word, it works. When I then try to print, it is back to a box.
I have been working with IT for weeks on this and they have no answer for me. Please help!!!
I am successful at creating a font and can even see it in the character editor.
I copy and paste it into Excel and it pastes nicely. I have the document set up to use the same character throughout my document. While this has been a success for me in the past, I now find that this one image does not seem to translate over to the other parts of the excel document. In fact, all that can be seen is a tiny square. I have done various things to alter the size of the character in PCE, but I still get the same results. Any ideas of what I’m doing wrong? Thanks!
You are not doing anything wrong. This is a feature that is poorly supported by Microsoft and its products. Such problems happen frequently.
Here is how I resolved the problem:, . Found the hex code within EDUC and inserted. Mind you, the symbol still does not show up., followed by clicking onto the cell with my newly created font. Voila! Not only did the symbol display properly in the reference cell, but it also displayed in shapes (as designated) throughout the rest of the Excel document.
(1) I noted the hex code.
(2) From within Excel, I went to the cell that would be used as a reference. Then I did
(3) I clicked onto an accompanying cell that was formatted properly. Then I clicked
I hope this helps!
Let’s try this again since the last post made no sense. I noted the hex code from within PCE. Then, from the cell that was to be used as a reference in Excel, I selected “Insert Symbol”, chose EUDC, selected the correct hex code and inserted it. Next, I clicked onto a properly formatted cell, then clicked “Format Painter”. Finally, I clicked onto the reference cell. This resulted in the reference cell showing my font and transmitting it to all shapes needing the referenced cell. I hope this makes sense and helps!
Thank you for sharing the solution that you have found. Other readers may find it useful. 😉
Excellent user friendly article. Thank you. You made my life easier.
I can’t seem to find this all fonts thing everybody keeps referring me to. This is my second tutorial and still no luck. How do I get it? Great article but no help if things aren’t available to me.
This is a great help article. Although, I can not find anything on ( how to delete new characters that I made ) Any help would be greatly appreciated.
Select all with the rectangle tool, and press the ‘Delete’ button?
Can anyone tell me why people keep saying, that the character is 50x50px.?
Counting the grid, it has 64 points vertically and horizontally.
Selecting the whole character with the rectangle tool, and copying it with ‘CTRL + C’ and then pasting it to an image editor, confirms that the character is 64x64px.
Help, i’m making a new character, but all that shows up when i paste it is .
I am facing the same issue. All is see is a ox with a question mark in it.
It is worthless. Good article, but it is pointless. Neither facebook nor twitter will show it properly. It will only show it if you use the font you have embeded the private character in… Otherwise it shows nothing.
my character map doesn’t have an “all fonts” section! help?
I find Private Character Editor to be ridiculous!…as every attempt to display a Private Character using the full 50×50 pixel allotment through Character Map, resulted in a distortion of the created final work! And this led me to speculate as to whether my PC pixel size, had anything to do with how the Private Character Editor gets converted to my specific PC pixel configuration!…and if so, every tutorial I’ve seen, makes no mention of this! But whatever the reason is for the translation failure, it’s a bloody waste of time to put effort into coming up with what appears through PCE as a work of art…but winds up, after translation, as a piece of shit! But, maybe part of the problem is saving the created Private Character as part of an existing Font!…or saving to “All Fonts”! Why can’t I save my created Font to a Font cache that’s specific to MY work!…named by ME!…and not filtered through someone else’s Font design, and description!
Please!…no emails!
This is an interesting insight, but I have 2 very big factors that don’t work with this.
1. All the characters have a limit of 50×50 pixels when my characters specifically require 80×100 pixels in order to be seen optimally as they would be too small to see the details – which are quite important for my language.
2. You can NOT create any characters in colour and are restricted to monochrome/black & white characters. This is particularly difficult and annoying as it is highly imperative for each of my characters to be in colour as most of them look very similar and the colour differentiation is the key to understanding whether it’s an s, k, u, or p…
you cannot color characters on a website without the website doing the coloring. Thats just a computer/internet problem.
Hi,
I would like to know how these characters created in private character editor can be moved from one computer to another?
Is there any way?
Please help me
Thanks.
I’ve followed all your instructions, but when I go to the Fonts drop down menu in Character Map, there is no All Fonts (Private Characters) to select!
I created a private character and linked to particular uni-code font. I created a document with private character and it seems good in MS-Word. When I tried to print in “pdf” format some special characters printed instead of private characters.
Help me to print the private characters.
Thanks.
I’m running Windows 7 Professional and I can’t locate the Private Character Editor. I’ve looked under All Programs, even check Control Panel, Programs and Features, Turn Windows Features on or off, with no luck. Obviously, I’m missing something (in your instructions or in my version of Windows 7 Pro).
Sorry, followed the link to the Microsoft page on the editor and ran the exe. All works now. Put a shortcut for the exe on my desktop.
It’s located under Accessories->System Tools
You wrote a very helpful article about the Private Character Editor. It’s been pretty useful so far. My question for you is this: Although I can access PCE via Help in Win 8 Pro, have you been able to find a quicker way to find it, and if not, is there a way, other than “pinning it” to the Taskbar, to put it on the Start page? It appears to me that Microsoft is either phasing this tool out, or just doesn’t want us to find it (along with several other items like System Restore). This all started when I was searching for a simple “check mark” to insert. I started looking around, and found it in the Reference window, listed as #2714. (I tried including a link to a screen shot of this, but it triggered the SPAM filter) If you’ve already written an article covering this, could I have a link to it, please?
You want to pin the Private Character Editor to the Start screen?
If yes, read this tutorial: The Complete Guide to Pinning Everything to the Windows 8 Start Screen.
Pin the file eudcedit.exe found in C:WindowsSystem32.
Perfect! Thank You. This has led me to many more of your tutorials, and many more fun things I never considered doing with my system.
Cool. I’m glad you discovered useful articles on our website. We’ve put a lot of work into it and we have lots of good articles on what to do with Windows 8. 🙂
I can create a new character in Private Character Editor. And if I paste it individually in a Word document it looks fine. But if I want to paste it next to another letter or within a word it does not paste in the correct place. In short the tool Private Character Editor is entirely useless. Or, may be, I am not using it correctly. I am more inclined to believe it is useless. So a new font should be created from the ground up if we want to use special symbols. Am I correct? [email protected]
I have tried this with same result.
I went to Microsoft Technical Help
& eventually one of their staff tried it,
but had to admit defeat.
The trouble is that there is no tool to
move margins, as there is in Font Lab.
My solution has been to use the free demo
version of Font Lab & copy the same
character several times, so at least one
works well. (Wish I could afford the full
version of Font Lab, which is much the best
font creator.)
how to copy pri
vate character form one system to another system
Once the character is created, may I know how can I use it on another computer?
You should take the font to which you assigned that character and install it on the other computer. A tutorial which will be useful: How to Install, Remove and Hide Fonts in Windows 7.
I am a little slow I think,
I don’t see any reference to the private character file in the above. It is attached to a font in the character map, do I just copy that font and put on another computer.
Can I copy private fonts from Vista to Windows 7 (or even XP)?
Also, in a prior question, I see shortcuts for ASCI fonts, but not for Unicode fonts, I see reference number/code, but no way to type that in to get the character(in this case the private character).
Both answers are informative, but I don’t see that they answer the question?
Thanks in advance
shame they couldnt overwrite a ALT+0000 position so it can be accessed by a shortcut. ☺☺☺☺ s`ʎǝ|ıɯs ǝɯ dı|ɟ ʇuɐɔ dı|ɟ ʇxʇ
This tutorial is great and sheds more light on this Private Character Editor that I have recently discovered. Thanks.
I am very cautious about putting new fonts and characters in documents. Once I made a nice font, included it in some documents, and sent the documents to fellow workers. They did not have my home-made font in their Windows systems, so somehow, Windows detected a legendary font similar to my home-made font, and used that instead. Then I realized I would have to send my new font together with each Word document I send, and explain to each recipient how to install my new font. Things get more complicated if I make a change in my home-made font.
Concerning the Private Character Editor, I have some questions and concerns:
* Concerning the option to “Link with all Fonts” or “Link with Selected Fonts,” what is the best practice. What are the guidelines for making this selection – link it to a legendary font such as Arial, or all fonts?
* When I copy and paste my new character into a document, is it sent together with that document to other computers?
* Questions concerning the character code address – I am very very cautious about this.
# What would happen if, by accident, I selected an address that is a key figure, such as a capitol A, or a question mark? Would my new character overwrite that?
# What would happen if someone else made a special character and assigned it the same address as my character? Would his or her character overwrite my character?
# What if I need to make a change in my special characters? Do my changes get copied with the document and overwrite the old characters in the receivers computers?
Perhaps I’m overly cautious, but I’m scared of doing some damage someplace. Perhaps these potential complications are the reason why this neat feature is not flaunted by Microsoft, and remains relatively hidden.
Thanks again,
David
how to select the font in Microsoft Word created in Private Character Editor?
You cannot create fonts in Private Character Editor. You can create only characters and add them to an existing font collection. If you want to insert a character you created, use the keyboard shortcut you assigned to it. Read carefully, the tutorials covers also this. 😉
How can you make a keyboard short cut for your private character?
If someone looking for this tool in Win XP…
Here it is:
C:Windowssystem32eudcedit.exe