

Are the DNS servers offered by your Internet Service Provider (ISP) too slow? Are you concerned about online security? Or maybe you want to protect your children from inappropriate websites? Whatever the reason, changing your computer’s DNS servers to something new, like the public DNS servers maintained by Cloudflare, Google, or OpenDNS, can be helpful. Here are three ways to set DNS servers in Windows 10 and Windows 11:
NOTE: If you don’t know what DNS is, read: What is DNS? How is it useful?. Furthermore, if you want to understand why public DNS servers can be better than the ones provided by your ISP (Internet Service Provider), read: What is a third-party DNS server? 8 reasons to use public DNS servers. And last but not least, keep in mind that you can’t change DNS without admin rights in Windows 10 or Windows 11. You must use a user account that has administrator permissions.
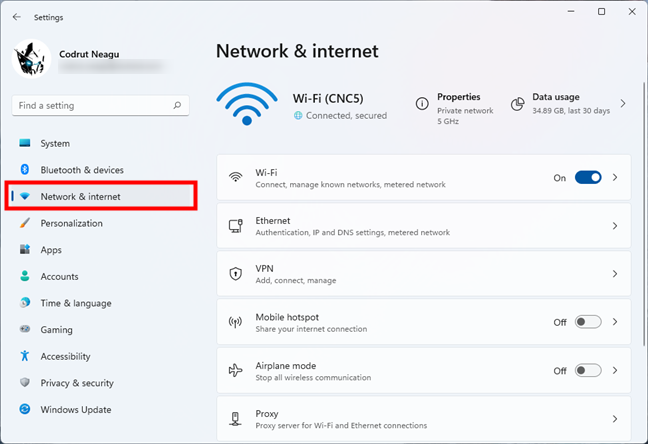
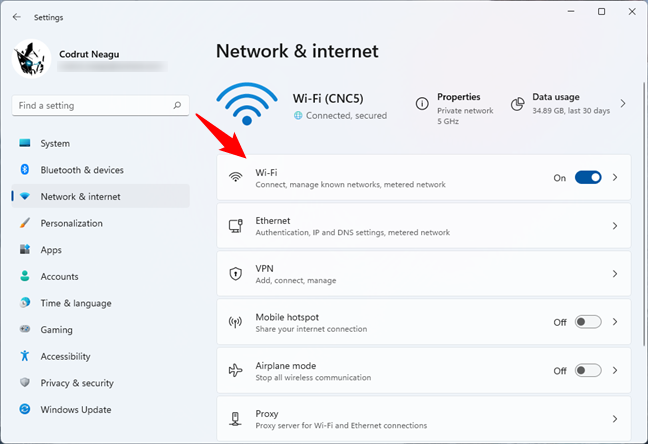
 Network & internet in Windows 11's Settings
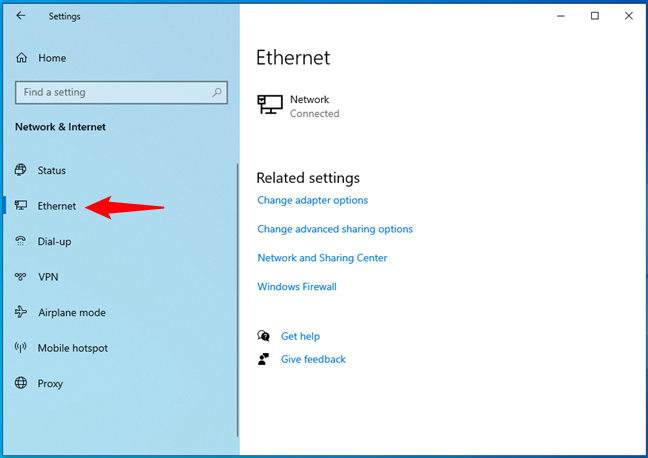
Next, if you want to change the DNS servers used by your Ethernet connection, click or tap on Ethernet. If you want to change the DNS servers used by your wireless connection, click or tap on Wi-Fi.
Network & internet in Windows 11's Settings
Next, if you want to change the DNS servers used by your Ethernet connection, click or tap on Ethernet. If you want to change the DNS servers used by your wireless connection, click or tap on Wi-Fi.
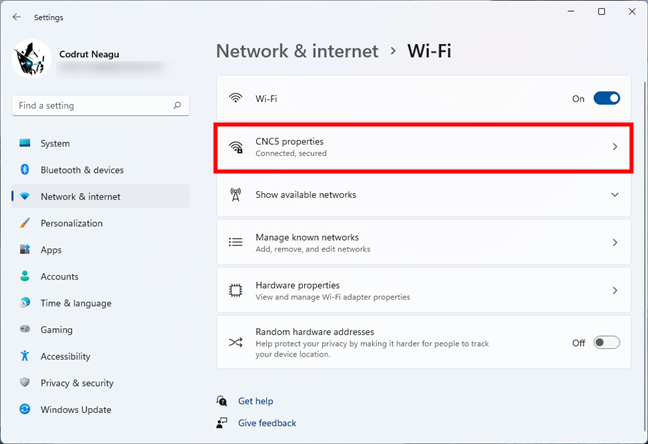
 Click on Wi-Fi or Ethernet
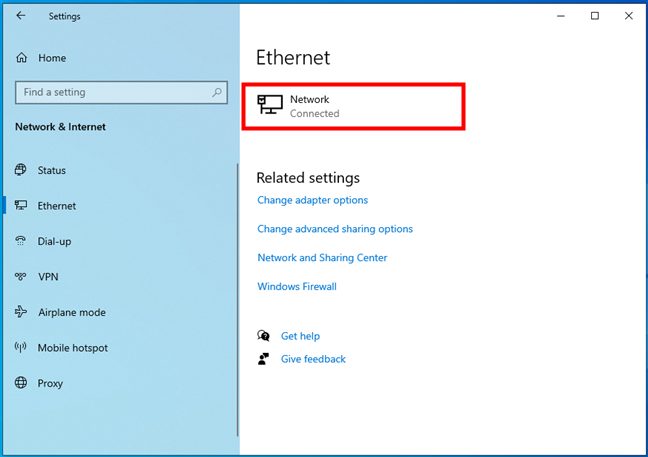
Then, regardless of whether you’re using a wired or wireless connection, click or tap on the entry bearing the name of your network connection.
Click on Wi-Fi or Ethernet
Then, regardless of whether you’re using a wired or wireless connection, click or tap on the entry bearing the name of your network connection.
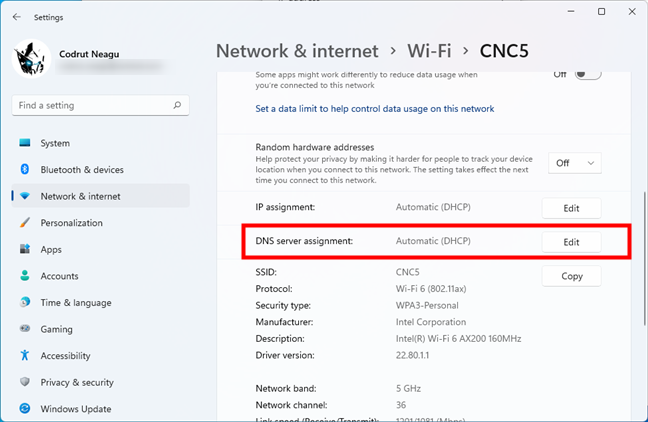
 Opening the properties of a network connection
On the network connection’s page, scroll until you find the DNS server assignment entry. When you do, click or tap the Edit button to the right.
Opening the properties of a network connection
On the network connection’s page, scroll until you find the DNS server assignment entry. When you do, click or tap the Edit button to the right.
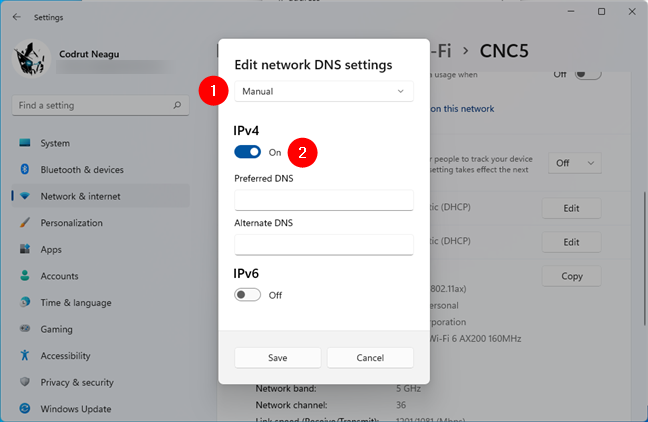
 Choosing to Edit the DNS settings in Windows 11
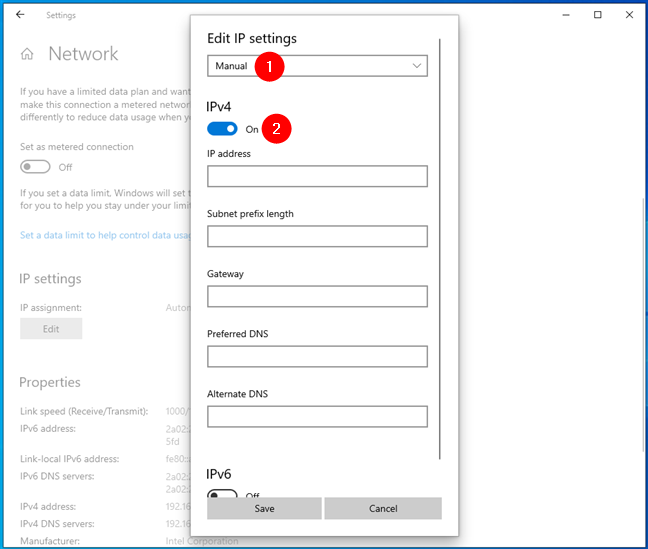
The Settings app opens a dialog box called “Edit network DNS settings.” In this box, select Manual and turn on the IPv4 or IPv6 switch, depending on what type of DNS servers you intend to use. Note that you can customize both if that’s what you want.
Choosing to Edit the DNS settings in Windows 11
The Settings app opens a dialog box called “Edit network DNS settings.” In this box, select Manual and turn on the IPv4 or IPv6 switch, depending on what type of DNS servers you intend to use. Note that you can customize both if that’s what you want.
 The IP settings are set to Manual, and the IPv4 switch is on
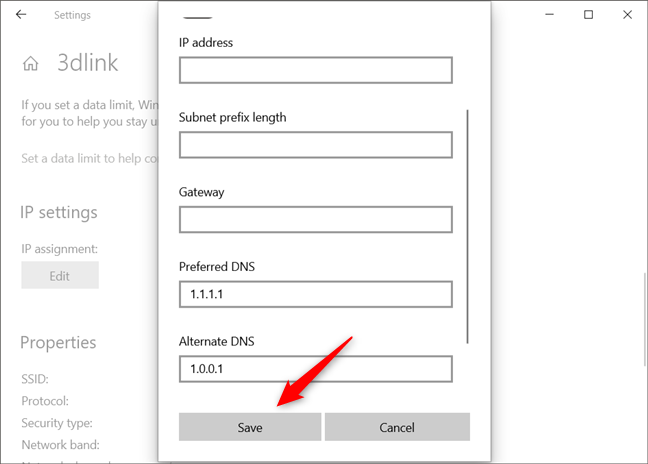
Next, in the Preferred DNS field, type the IP address of the DNS server you intend to use. If you want, you can also type a backup option in the Alternate DNS field. In the next screenshot, you can see that we chose to use Cloudflare’s public DNS servers.
The IP settings are set to Manual, and the IPv4 switch is on
Next, in the Preferred DNS field, type the IP address of the DNS server you intend to use. If you want, you can also type a backup option in the Alternate DNS field. In the next screenshot, you can see that we chose to use Cloudflare’s public DNS servers.
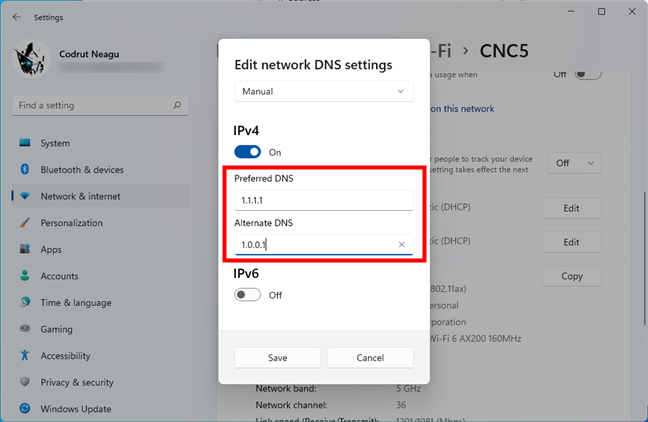 The Preferred DNS and Alternate DNS servers
When you’re done, press the Save button and restart your Windows computer or device to ensure the operating system uses the new DNS servers you set.
The Preferred DNS and Alternate DNS servers
When you’re done, press the Save button and restart your Windows computer or device to ensure the operating system uses the new DNS servers you set.
 Saving the new settings for the DNS servers
After Windows 11 restarts, it should use the DNS servers you set instead of the default ones provided by your router or ISP (Internet Service Provider).
Saving the new settings for the DNS servers
After Windows 11 restarts, it should use the DNS servers you set instead of the default ones provided by your router or ISP (Internet Service Provider).
 Network & Internet in Windows 10's Settings
To change the DNS servers used by your Ethernet connection, on the left side of the window, click or tap on Ethernet. To change the Wi-Fi DNS servers, click or tap on Wi-Fi.
Network & Internet in Windows 10's Settings
To change the DNS servers used by your Ethernet connection, on the left side of the window, click or tap on Ethernet. To change the Wi-Fi DNS servers, click or tap on Wi-Fi.
 The Ethernet network connection in Windows 10
On the right side of the window, no matter if you have a wired or Wi-Fi connection, click or tap on the name of your network connection.
The Ethernet network connection in Windows 10
On the right side of the window, no matter if you have a wired or Wi-Fi connection, click or tap on the name of your network connection.
 Opening the settings of a network connection
On the network connection details page, scroll until you find the IP settings section, and then click or tap the Edit button. It’s the only one there, so you can’t miss it.
Opening the settings of a network connection
On the network connection details page, scroll until you find the IP settings section, and then click or tap the Edit button. It’s the only one there, so you can’t miss it.
 Choosing to Edit the IP settings of a network connection
The Settings app opens a dialog box called “Edit IP settings.” In it, select Manual and turn on the IPv4 or IPv6 switch, depending on what type of DNS servers you want to use. Note that you can change DNS settings for both IPv4 and IPv6 if that’s what you want.
Choosing to Edit the IP settings of a network connection
The Settings app opens a dialog box called “Edit IP settings.” In it, select Manual and turn on the IPv4 or IPv6 switch, depending on what type of DNS servers you want to use. Note that you can change DNS settings for both IPv4 and IPv6 if that’s what you want.
 The IP settings are set to Manual, and the IPv4 switch is on
Next, scroll down until you get to the Preferred DNS and Alternate DNS fields. This is the place where you can specify the two DNS servers that you want to use for your network connection. In the Preferred DNS field, enter the IP address of the main DNS server you want to use. Then, if you want to have a backup option, type it in the Alternate DNS field.
The IP settings are set to Manual, and the IPv4 switch is on
Next, scroll down until you get to the Preferred DNS and Alternate DNS fields. This is the place where you can specify the two DNS servers that you want to use for your network connection. In the Preferred DNS field, enter the IP address of the main DNS server you want to use. Then, if you want to have a backup option, type it in the Alternate DNS field.
 The Preferred DNS and Alternate DNS servers
When you’re done, Save your settings and restart Windows to make sure that the new DNS servers are the ones you use.
The Preferred DNS and Alternate DNS servers
When you’re done, Save your settings and restart Windows to make sure that the new DNS servers are the ones you use.
 Saving the new settings for the DNS servers
TIP: This method also works in Windows 11, but it’s somewhat redundant considering that the operating system has a dedicated DNS server assignment option right next to the IP assignment entry from the Settings app. Still, you can use either one.
Saving the new settings for the DNS servers
TIP: This method also works in Windows 11, but it’s somewhat redundant considering that the operating system has a dedicated DNS server assignment option right next to the IP assignment entry from the Settings app. Still, you can use either one.
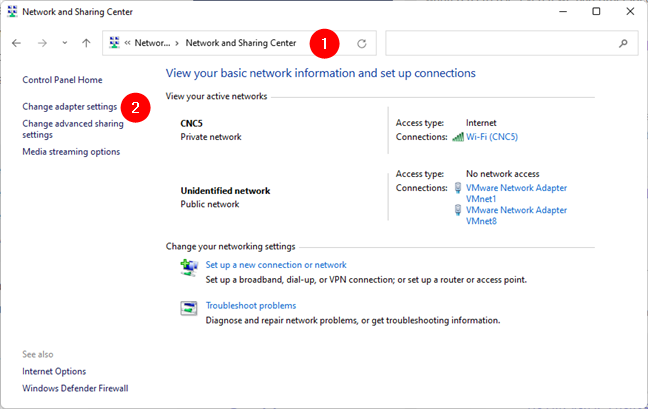
 The Change adapter settings link from the Network and Sharing Center
This opens a window called Network Connections. All the network adapters installed on your Windows PC are listed inside. Locate the network adapter you use to connect to the internet. Then, right-click on it and, in the context menu, select Properties.
The Change adapter settings link from the Network and Sharing Center
This opens a window called Network Connections. All the network adapters installed on your Windows PC are listed inside. Locate the network adapter you use to connect to the internet. Then, right-click on it and, in the context menu, select Properties.
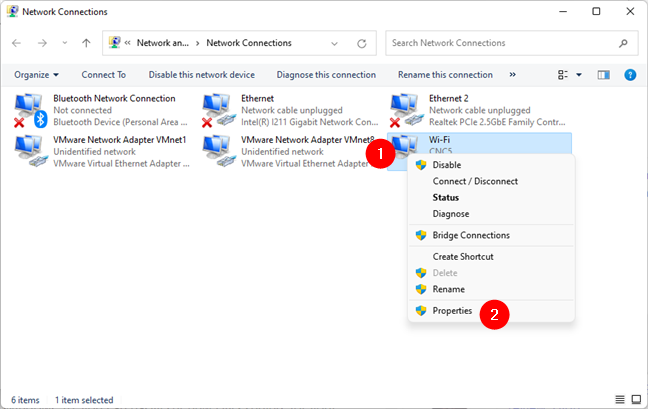 The Properties option from right-click menu of a network adapter
Then, Windows opens the Properties window of that network adapter. Make sure that you are on the Networking tab, and select “Internet Protocol Version 4 (TCP / IPv4)” from the list of items used by the network connection. Click or tap on the Properties button found below the list.
The Properties option from right-click menu of a network adapter
Then, Windows opens the Properties window of that network adapter. Make sure that you are on the Networking tab, and select “Internet Protocol Version 4 (TCP / IPv4)” from the list of items used by the network connection. Click or tap on the Properties button found below the list.
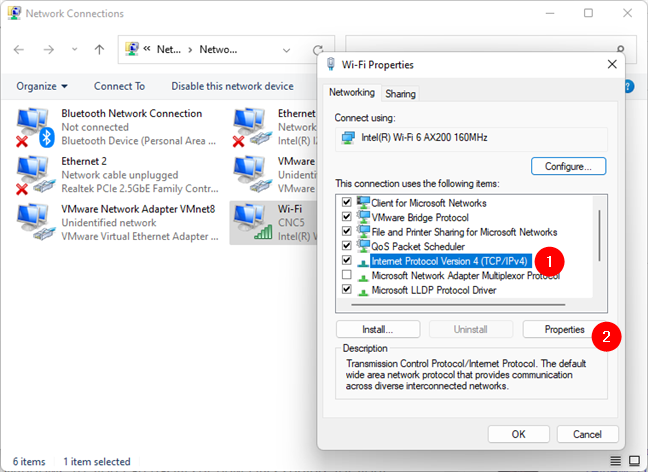
 Opening the Properties for the Internet Protocol Version 4 (TCP / IPv4)
Towards the bottom of the “Internet Protocol Version 4 (TCP / IPv4) Properties” window, the “Obtain[s] DNS server address automatically” setting is enabled by default. If you want to change the DNS servers used by your network adapter, select the “Use the following DNS server addresses” option and enter the IP addresses of the DNS servers you want to use on your Windows PC.
Opening the Properties for the Internet Protocol Version 4 (TCP / IPv4)
Towards the bottom of the “Internet Protocol Version 4 (TCP / IPv4) Properties” window, the “Obtain[s] DNS server address automatically” setting is enabled by default. If you want to change the DNS servers used by your network adapter, select the “Use the following DNS server addresses” option and enter the IP addresses of the DNS servers you want to use on your Windows PC.
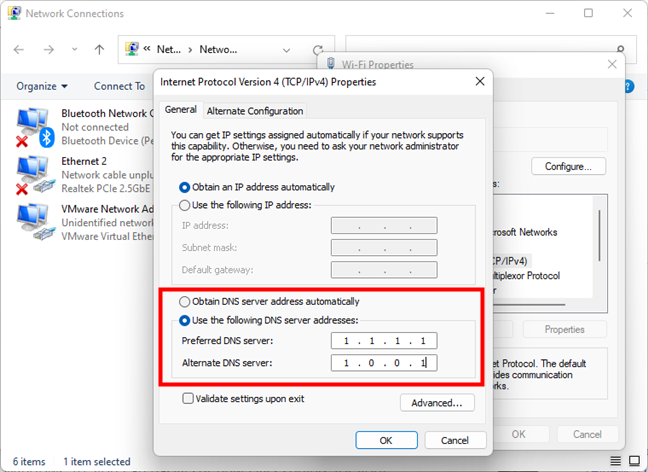 Setting new DNS servers
Repeat the same steps if you want to change the IPv6 DNS servers too. But, instead of selecting Internet Protocol Version 4 (TCP/IPv4) in the network connection’s Properties window, select Internet Protocol Version 6 (TCP/IPv6).
When you’re done, press OK and close all the windows you’ve opened throughout the process. Then, restart your Windows computer or device to ensure that the DNS changes have been applied.
Setting new DNS servers
Repeat the same steps if you want to change the IPv6 DNS servers too. But, instead of selecting Internet Protocol Version 4 (TCP/IPv4) in the network connection’s Properties window, select Internet Protocol Version 6 (TCP/IPv6).
When you’re done, press OK and close all the windows you’ve opened throughout the process. Then, restart your Windows computer or device to ensure that the DNS changes have been applied.
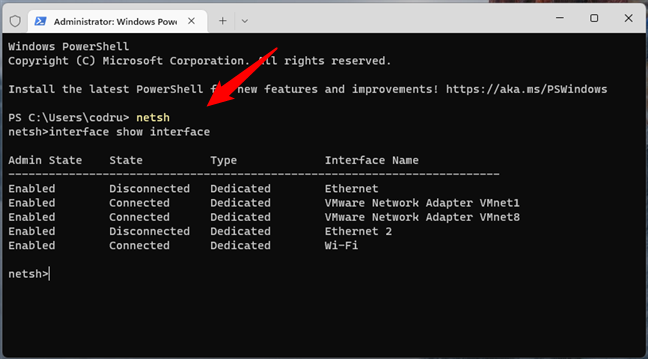
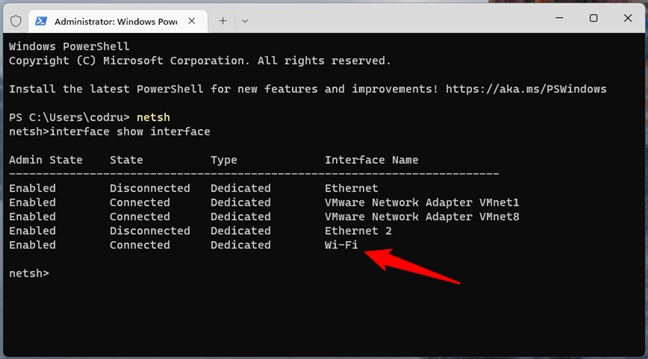
 Running netsh in PowerShell
Note the network connection for which you want to change the DNS servers: it’s probably the one that is Connected.
Running netsh in PowerShell
Note the network connection for which you want to change the DNS servers: it’s probably the one that is Connected.
 See network connections in command line
Next, type the following command:
See network connections in command line
Next, type the following command:
 How to change DNS from the command line
Press Enter on your keyboard, and the new DNS server is immediately set.
How to change DNS from the command line
Press Enter on your keyboard, and the new DNS server is immediately set.
1. How to change DNS in Windows 11 from the Settings app
You can easily set up new DNS servers for your network connection from Windows 11’s Settings app. First, open the Settings app: click or tap on its shortcut in the Start Menu or simultaneously press Windows + I on your keyboard. Then, go to Network & internet.2. How to change DNS in Windows 10 from the Settings app
If you’re using Windows 10, the IP assignment option from the Settings app offers a straightforward method to change your DNS. Open the Settings app by clicking/tapping on its button from the Start Menu or using the Windows + I keyboard shortcut. Then, go to Network & Internet.3. Change the DNS servers from the Network Connections in Control Panel
Windows 11 and Windows 10 also let you change the DNS servers used by a network connection from the Network Connections section in the Control Panel. To get to the Network Connections, open the Control Panel, navigate to Network and Internet, access the Network and Sharing Center, and click or tap on Change adapter settings on the left side of the window.4. How to change the DNS servers using commands
Some people prefer command-line environments to graphical interfaces. If you’re one of them, know that you can change the DNS servers used by your internet connection from the Command Prompt or PowerShell also. For that, first open the one you prefer, either as a tab in Windows Terminal or as a standalone window. However, make sure that you launch it as an administrator because you need elevated privileges for the next steps. The first commands you should run is:netsh
Then, run this second command:
interface show interface
.
This shows you all the network connections that are enabled on your Windows PC.
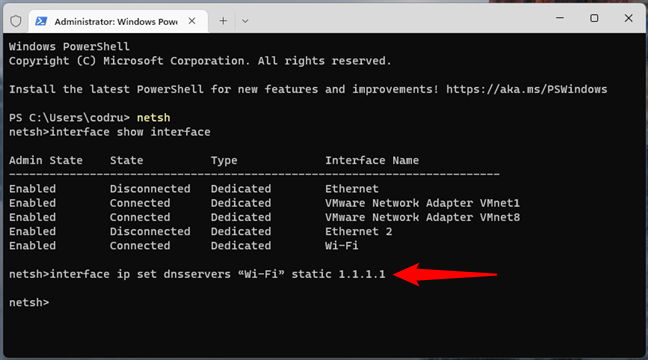
interface ip set dnsservers “Network Connection” static [DNS server IP address]
… where Network Connection is the name of your network adapter and [DNS server IP address] is replaced by the IP address of the DNS server you want to use.
For example, for the network connection called Wi-Fi, we wanted to set a DNS server from Cloudflare, which has the IP address 1.1.1.1. To do that, we had to type:
interface ip set dnsservers “Wi-Fi” static 1.1.1.1


Discussion (4)
How do I find alternate DNS servers addresses?
Some good options are the DNS servers maintained by Google, OpenDNS or Norton.
Who or what is 8.8.8.8 and 8.8.4.4?
These are the IP addresses of the DNS servers maintained by Google.