The Command Prompt is a powerful tool, and we enjoy using it. However, it does look somewhat boring and unfriendly. The good news is that you can customize Command Prompt aspects according to your needs and preferences, including its appearance and color scheme. This tutorial shows you all the different options you can tweak to make the Command Prompt not only look but also work the way you want it to. There is a lot to go through, so let's get started:
NOTE: The screenshots and the instructions in this guide apply to Windows 10 May 2019 update or newer. If you do not know what version of Windows 10 you have, read: How to check the Windows 10 version, OS build, edition, or type.
What is the Command Prompt?
Before graphical user interfaces and Windows, the most used operating system was DOS (Disk Operating System) - a text-based operating system, that allowed you to run programs by manually typing in commands. The launch of the Windows operating system simplified the whole computing experience by making it more visual. While DOS is no longer included in Windows operating systems since Windows ME (in 2000), we still have the Command Prompt application - the text command-line interpreter, analog of the command shell found in the old DOS operating system.
The Command Prompt is generally preferred by power users and IT staff, who use it to run all kinds of commands, from basics to the more advanced networking commands and disk management commands. The Command Prompt is also helpful if you want to view system information and manage running processes, to fix issues with your PC's boot records, or even to repair missing or corrupt Windows files. In spite of its lack of popularity among average users, the app was updated and improved, and its Properties window comes with more customization options than you might think.
How to access Command Prompt's Properties
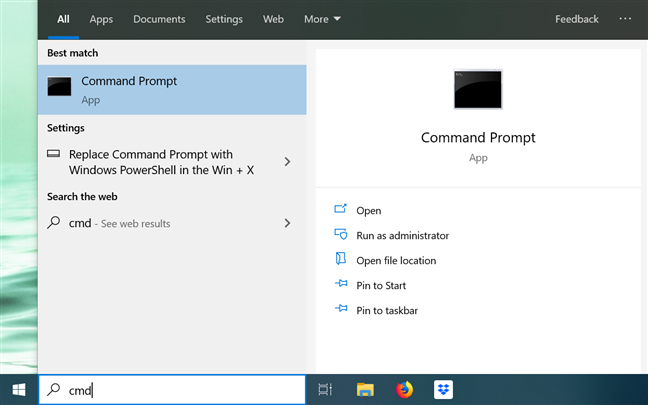
While there are many ways to launch the Command Prompt, we prefer to type "cmd" in our taskbar's search field, and then press Enter. Of course, you can also click or tap on the Command Prompt search result.
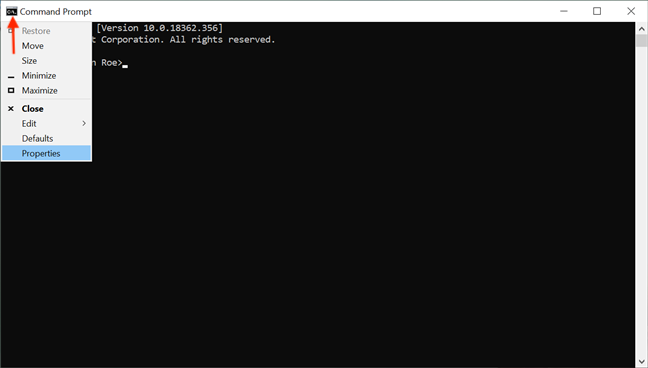
Once the app launches, you can either click or tap its "C:" icon on the top-left corner, or right-click or press-and-hold the title bar to reveal the app's menu. Then, choose Properties to start customizing the way the Command Prompt looks and works.
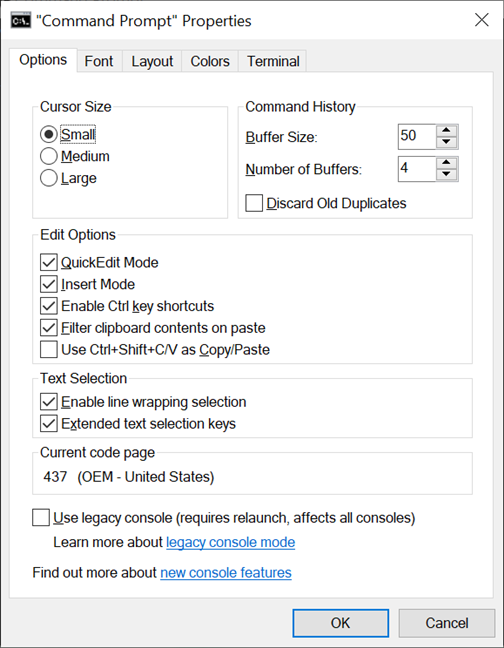
Alternatively, you can use the keyboard shortcut Alt + Space + P. The Properties window opens, displaying five tabs that can be used to configure the Command Prompt app in detail: Options, Font, Layout, Colors, and Terminal.
Customize the cursor's appearance in the Command Prompt
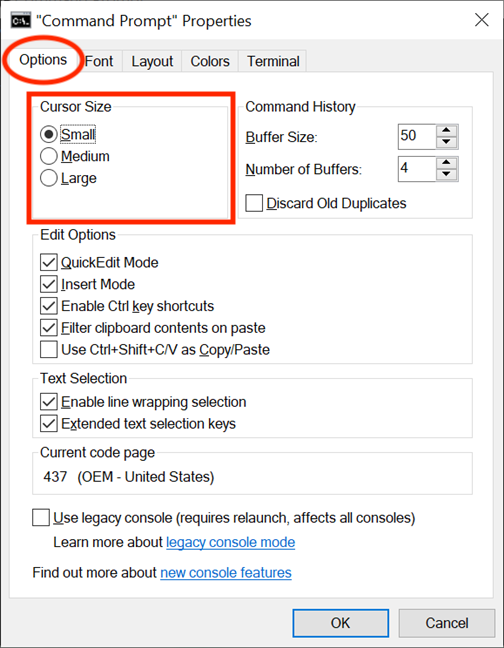
The first section of the Options tab, Cursor Size, controls the size of your blinking cursor when typing in the Command Prompt window. You can choose between Small (default), Medium, or Large.
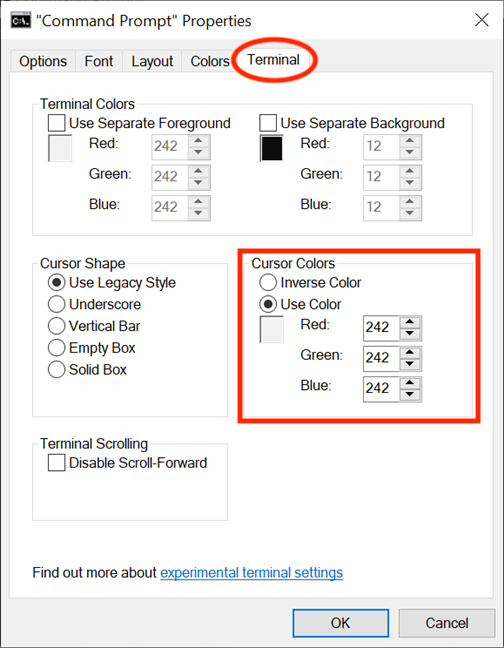
The cursor can also be tweaked from the Terminal tab's experimental settings. The Cursor Shape section allows you to select a different shape for the blinking cursor.
The first available option in this section is "Use Legacy Style," which displays a thick underscore in its default Small size, and a solid, square box when Medium-sized. When it is Large, the "Use Legacy Style" option is no different from the last option, called Solid Box option, which transforms the cursor into a solid vertical rectangle, regardless of its set size. None of the other shape options shows any differences based on the cursor's size, and, for most of them, their appearance is easy to figure out from their names: Underscore, Vertical Bar, and Empty Box, the latter being the outline of a vertical rectangle.

NOTE: Of course, you can always test them out, but keep in mind that the Cursor Shape currently resets to the default "Use Legacy Style" every time you access the Properties window again, so, if you make any changes in Command Prompt's Properties, make sure to select your desired Cursor Shape again, before clicking or tapping OK.
In the Cursor Colors section of the Terminal tab, you can select the experimental setting Use Color to choose a custom color for your cursor by inserting its RGB decimal color code. We were able to find an extensive list of codes here, but you can also use a search engine to find your favorite color, and the box under the option helps by offering a real-time preview of your choice. The Inverse Color option turns your cursor to a color complementary to the chosen background color. Once this option is selected, the cursor automatically changes color whenever you change the background color.
Customize the size and type of font used in the Command Prompt
The display font in the Command Prompt window can be easily changed from the Font tab. The first section gives you the option to alter the Size of the font used by the Command Prompt window. Either select one of the values from the list in the Size section or click (or tap) the Size box to enter a value between 5 and 72.
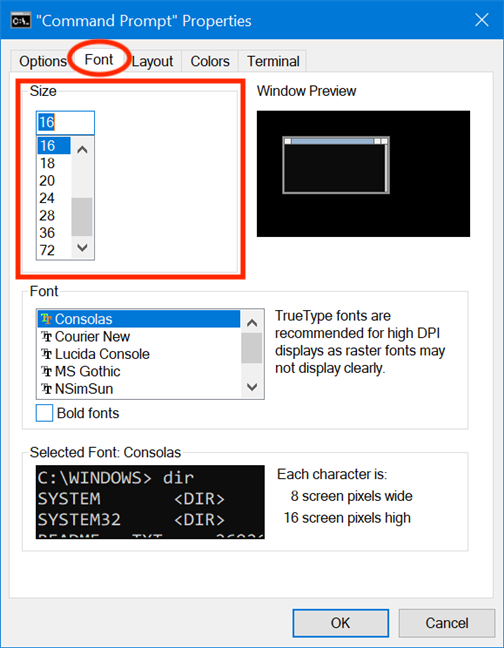
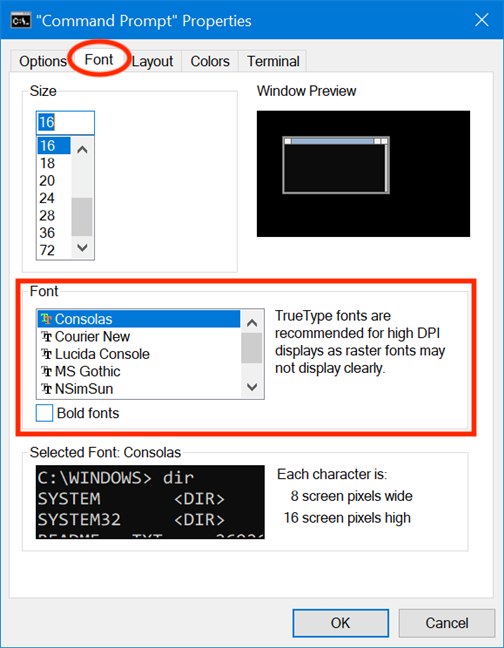
In the Font section, you can change the font type used by the Command Prompt. The list in this section displays seven fonts you can choose from: Consolas (default), Courier New, Lucida Console, MS Gothic, NSimSun, Raster Fonts, and SimSun-ExtB. Except for Raster Fonts, all other six list entries come with a bold-text effect, which can be enabled by checking the box next to Bold fonts.
The Selected Font box at the bottom offers a preview of your changes in real time, making it easier to decide. Keep in mind that selecting a new font size from the Size section also causes the Command Prompt window's dimensions to change, as illustrated by the Window Preview box in the top right corner. However, you can adjust the window's size by following the instructions in the next part of the tutorial.
Customize the layout, size, and position of the Command Prompt window
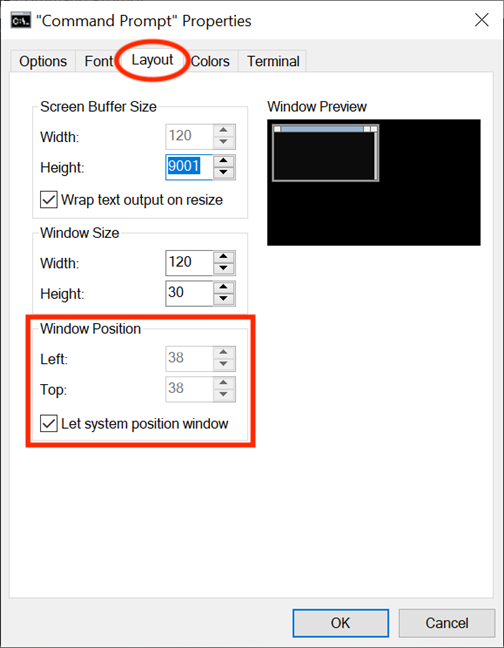
The Layout tab controls the Command Prompt window's position and size, while also letting you decide how the app's content is displayed. In the first section, "Screen Buffer Size," you can adjust the Width value to configure how many characters can fit on a line in the Command Prompt window, before the text gets displayed on the next line. The Height box adjusts the maximum number of lines stored and displayed by the app.
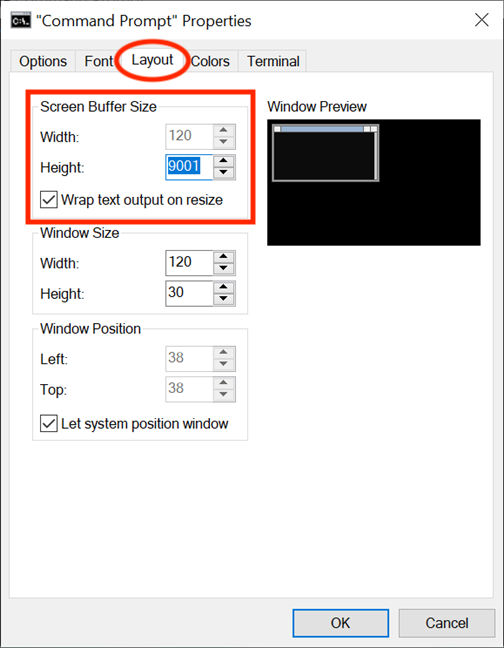
If the "Wrap text output on resize" box is checked, the Width parameter remains greyed out and can not be altered, because the text automatically wraps on resize to fit the Command Prompt window. We recommend keeping this option checked to ensure Command Prompt's text output is always visible in its entirety.
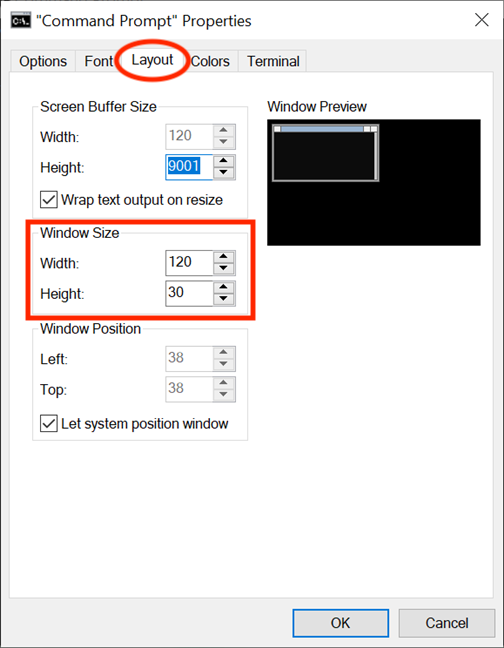
While you can always adjust the size of the Command Prompt window by grabbing its edges or corners and dragging them according to your preferences, those settings are only applied to that specific session and are lost when you close it. However, the app does remember the changes made in the Window Size section of the Layout tab. Keeping in mind that these parameters are based on character cells, not pixels, enter your desired values for the Width and Height of the Command Prompt window, and, on the right-hand side, you can see the Window Preview displaying your changes to scale.
With Window Position, you adjust precisely where the Command Prompt window spawns on the screen. You can do this by configuring, in pixels, the distance of the app's window from the Left and Top edges of the screen. Make sure that the "Let System Position Window" box is left unchecked; otherwise the fields in this section are greyed out. Once again, the Window Preview on the right displays the changes in real time.
Customize the colors used by the Command Prompt
The Command Prompt's yawn-inducing default color scheme clashes with the bright colors encountered in most Windows 10 apps. Luckily, we can have fun changing its appearance with the options in the Colors tab, which is all about customizing the colors used by the Command Prompt. The first thing you see in the upper-left corner of the tab are the four items you can customize: Screen Text, Screen Background, Popup Text, and Popup Background. While Screen Text changes the color of the text displayed in the Command Prompt window, and Screen Background changes the background for that text, the last two options are not of much interest, as popups are mostly encountered by developers.
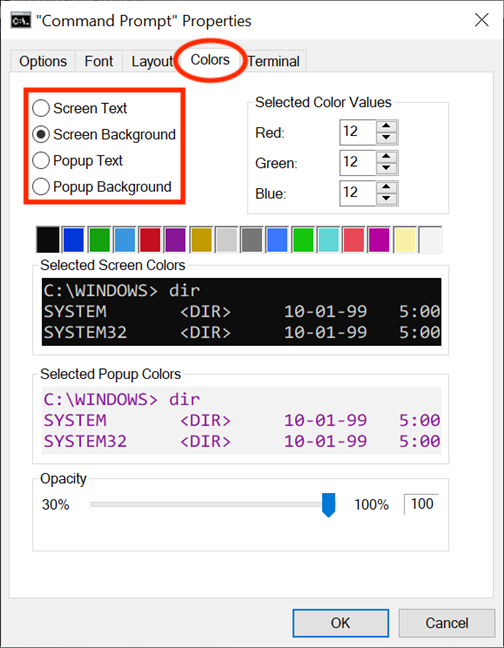
To change the color for any of these assets, first select it from the list. Then, you can either click or tap one of the preset colors displayed below, or use the Selected Color Values section to choose a custom color by inserting its RGB decimal color code. If you have a specific custom color in mind, you can use a search engine to find its RGB code, or check out this list of codes we came across.
If the set background for Command Prompt's window was the same color as the text, it would make things confusing for users, making it impossible to read any of the information displayed. Luckily, the Selected Screen Colors and the Selected Popup Colors boxes offer real-time feedback for your choices, making it easy to choose suitable colors. If you want to learn more about the Opacity setting at the bottom of the Colors tab, read How to make PowerShell and the Command Prompt transparent.
Under the Terminal tab, you can find more color-related options, presented as experimental settings. On top of the Cursor Colors section we already covered in the first part of this tutorial, there's the Terminal Colors section. When checked, the Use Separate Foreground option enables you to change the text color, and Use Separate Background lets you customize the background.
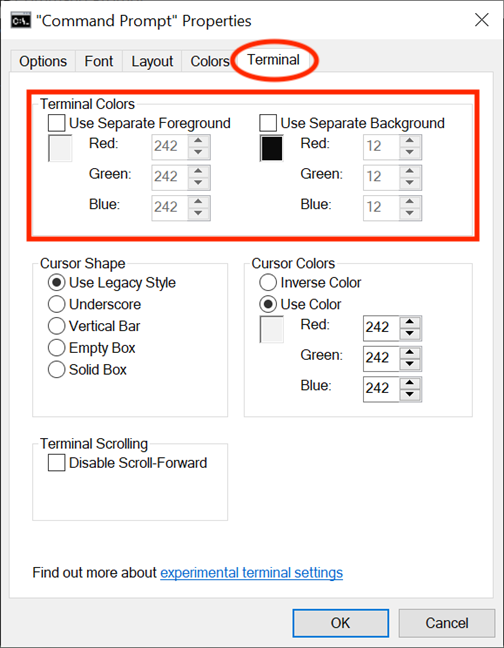
Use the RGB values to define any colors on the spectrum, observing the boxes under each option to get real-time previews of your color choices. If the Terminal Colors are enabled (i.e., their boxes are checked), the colors you set for your text and background from the Terminal tab take priority over the ones chosen from the Colors tab and override them.
Customize the Command Prompt buffers with historical records
A buffer serves as a historical record of the commands you have executed, and you can navigate the commands you previously entered in the Command Prompt with the Up and Down arrow keys. You can change the app's settings for buffers from the Command History section under the Options tab. Customize how many commands are retained in the command buffer by setting the Buffer Size. While the default value is 50 commands, you can set it as large as 999, but you should keep in mind this takes up RAM. Checking the "Discard Old Duplicates" option at the bottom of the section allows Windows 10 to remove duplicate command entries from the buffer.
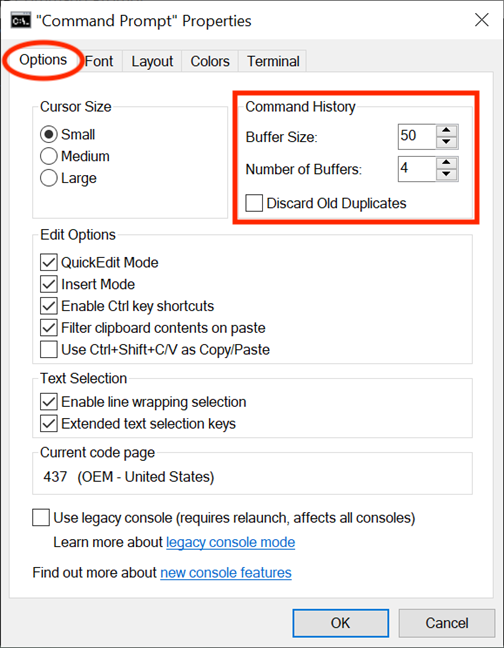
The second option, "Number of Buffers," determines the maximum number of concurrent instances to have their own command buffers. The default value is 4, so you can have up to four Command Prompt instances opened, each with its separate buffer. Your buffers are recycled for other processes after this limit.
Customize how you work with text in the Command Prompt
In the Options tab, the Edit Options and the Text Selection sections help you choose how you interact with the Command Prompt window. When enabled, the QuickEdit Mode option allows you to select and copy text from the Command Prompt window. First select the text area you want to copy, by using either your mouse or your finger, then right-click, press-and-hold, or press Enter. The text is copied into the clipboard.
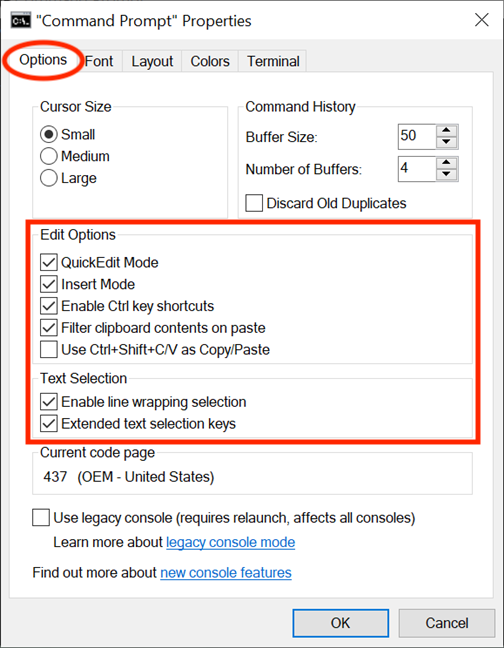
The second option - Insert Mode - has the same function as the Insert keyboard key: the cursor inserts a character at its current position, forcing all characters past it one position further. If Insert Mode is disabled, then your text overwrites any text that is already there.
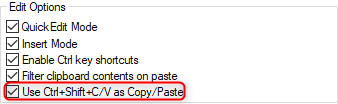
Windows 10 introduced keyboard shortcuts to the Command Prompt and, in order to use them, you need to check the boxes next to the "Enable Ctrl key shortcuts" option (in the Edit Options section), and to the "Extended text selection keys" option (in Text Selection). To learn more about the use of keyboard shortcuts in the Command Prompt, read 27 Useful Keyboard Shortcuts For The Windows 10 Command Prompt. You can also check the box next to the last option in the Edit Options section - "Use Ctrl+Shift+C/V as Copy/Paste" - to enable the use of this shortcut.
If you enable the "Filter clipboard contents on paste" option, whenever you paste content from the clipboard inside the Command Prompt, special characters, like tabs, are automatically removed, and smart quotes are converted to regular ones.
The first option in Text Selection is "Enable line wrapping selection" and, when activated, it enhances the way your Command Prompt handles text selection. Previous versions of the Command Prompt only allowed copying text from it in block mode, meaning that each time you pasted content from the Command Prompt into a text editor, you had to manually correct tabs, word wrapping, etc. If you enable this option, Windows 10 takes care of all that, so you don't have to correct the flow of text anymore.

Keep in mind that, if you check the box next to the "Use legacy console (requires relaunch, affects all consoles)" option at the bottom, you revert to the previous console version, which means that a lot of the options above are greyed out and that the Terminal tab is entirely gone.
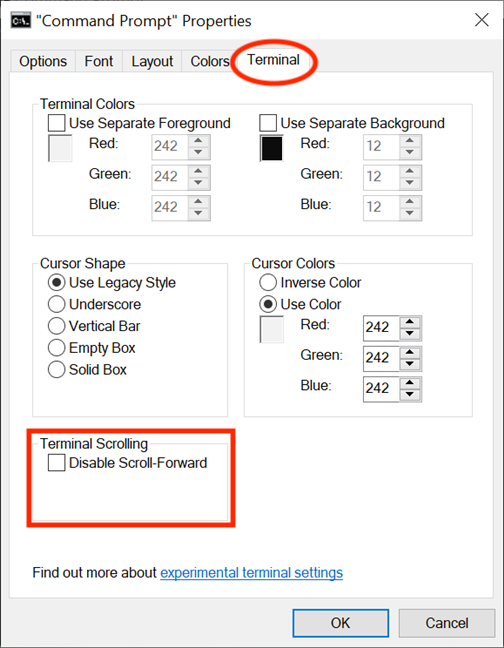
If you go to the Terminal tab, there is one more option that affects your use of the Command Prompt, under the Terminal Scrolling section at the bottom. Check the box next to the "Disable Scroll-Forward" option, and you can now no longer scroll down past the last command input.
When you are done changing your settings, all you need to do is click or tap OK to apply them. If your changes are not applied immediately, restarting the Command Prompt should take care of it.
What is the first thing you want to customize in the Command Prompt?
While most Windows 10 users never even open it, power users rely on the Command Prompt to handle specific tasks. The customization options we went over in this guide allow you to make the Command Prompt friendlier than it seems at first sight, so you can get the most out of using it. Before you close this tutorial, let us know which of the options above do you plan to tweak first. Comment below and let's discuss.