13.11.2024
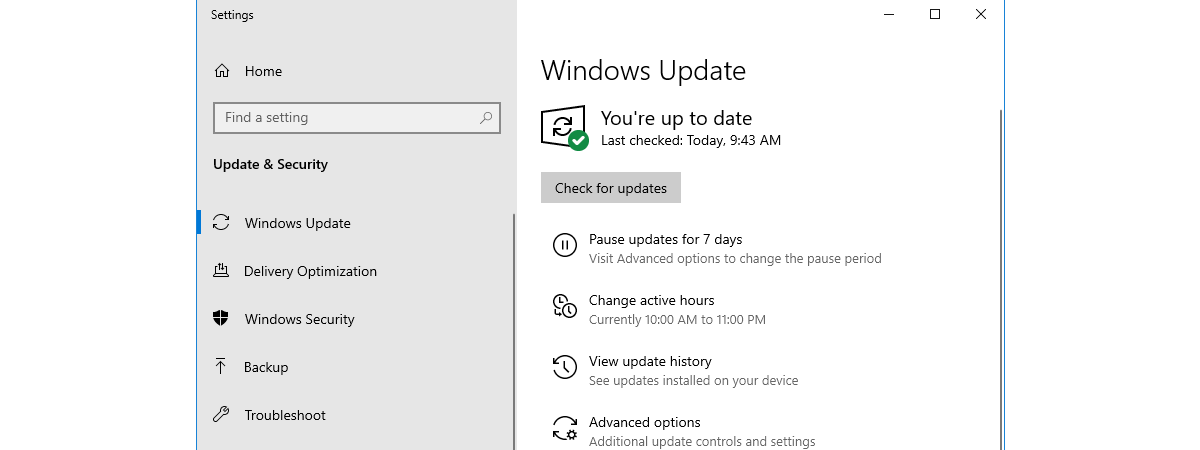
Traditionally, Windows updates were downloaded straight from Microsoft’s servers to your PC. This meant Microsoft had to have a huge infrastructure to deliver updates to millions of users worldwide, and sometimes, the speed of downloading updates was frustratingly slow. To improve the situation, Microsoft developed a feature called Delivery Optimization. Available in Windows 10 and Windows 11, it allows your computer(s) to grab updates from users on the local network or the internet and upload updates to other users. If you want to know more about what Delivery Optimization does, how it works, and whether to turn it on or off (in both Windows 10 and Windows 11), read this guide:
What is Delivery Optimization? What does it do?
Delivery Optimization is a feature of Windows 10 and Windows 11, which allows these operating systems to download updates using peer-to-peer (P2P) sharing on the local network or the internet. Its purpose is to use less bandwidth for downloading updates and speeding up Windows Update.
This feature can download Windows updates from other computers on the same network as you, or from other computers on the internet that are close to you. Delivery Optimization doesn’t stop at handling Windows updates more efficiently. It can also download updates for Microsoft Store apps, Microsoft Defender Antivirus updates, Microsoft 365 app updates, Microsoft Edge updates, Xbox Game Pass updates, and other items. For more information, I recommend this page from Microsoft: Types of download content supported by Delivery Optimization.
Delivery Optimization in Windows 10
When Windows 10 or Windows 11 download an update or app using Delivery Optimization, they look for other computers on your network or from the internet (depending on how you set this feature to work) that have already downloaded the same update or app. Delivery Optimization doesn’t download the entire file from one place. Instead, it breaks it into smaller parts. It gets parts of that update or app from the computers that have it, and parts from Microsoft, aiming to finish as quickly as possible. Delivery Optimization creates a local cache for updates, where it stores the files it has downloaded, but only for a short time. Those files are then available for upload to other computers on the network or the internet, depending on how you set this feature to work.
Delivery Optimization is available starting with Windows 10 version 20H2, and it’s also included in all versions of Windows 11. When enabled, you have two settings to choose from:
- PCs on my local network (in Windows 10) or Devices on my local network (in Windows 11) - it allows Windows to download updates from other computers on the same network as you. When you choose this option, it’s a good idea to set your network profile to Private instead of Public.
- PCs on my local network, and PCs on the Internet (in Windows 10) or Devices on the internet and my local network (in Windows 11) - allows Windows to download updates from other computers in your network, as well as other devices on the internet that are relatively close, and provide faster download speeds than Microsoft’s servers.
Delivery Optimization in Windows 11
Who benefits from Delivery Optimization?
Two parties benefit from enabling this feature:
- Microsoft lowers the bandwidth necessary to deliver updates to all Windows computers and devices with Delivery Optimization enabled. This means lower costs for the company’s internet bandwidth, less hardware resources utilized by Microsoft’s servers, and less energy used for this task.
- When enabling this feature, Windows users get updates faster and can save bandwidth costs at a network level. However, if your internet connection is billed based on your bandwidth usage, you need to consider how you configure Delivery Optimization. There are more details in the next section of this article.
Should I turn off Delivery Optimization?
If you search for Delivery Optimization on Google, Bing, and other search engines, you will find many articles that recommend turning off this feature. While doing this is easy, it’s not a great idea. This is the approach I recommend:
- If you are on a local network with two or more Windows computers using the same version, you should enable it and choose the settings you prefer.
- When your computer is not part of a network, or you have a laptop that connects to many networks, it’s a good idea to turn on Delivery Optimization and use the second setting: PCs on my local network, and PCs on the Internet (in Windows 10) or Devices on the internet and my local network (in Windows 11). This way, even if you can’t get updates from other computers on your local network, you can get updates from other computers on the internet. This setting should help your PC get updates faster than when Delivery Optimization is turned off. However, if your internet plan is billed based on bandwidth usage, you should never enable this second setting, because it allows other computers on the internet to download updates from you, which increases your costs.

Delivery Optimization turned off in Windows 10
How to turn on Delivery Optimization
If you decide to enable Delivery Optimization, I’ll show you how it is done. First, I’ll share the steps for Windows 10 and then for Windows 11:
How to turn on Delivery Optimization in Windows 10
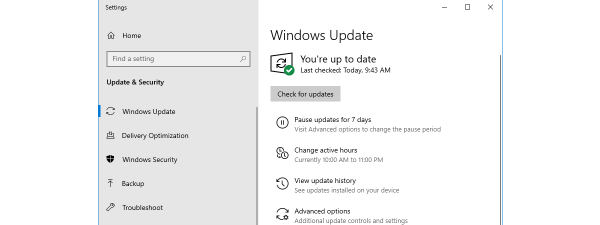
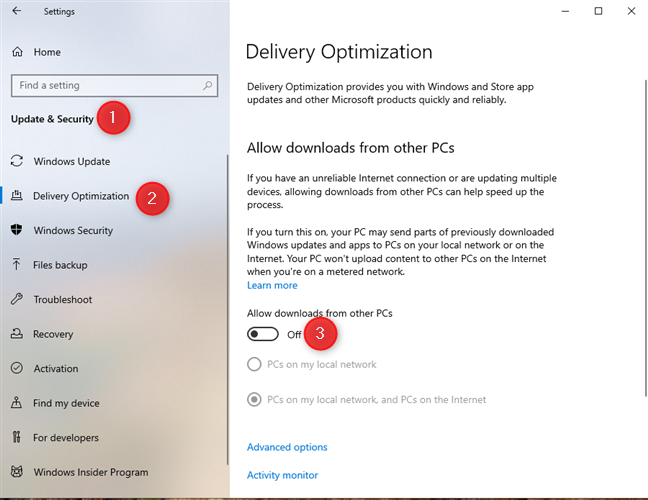
If you want Windows 10 to grab updates faster, enable Delivery Optimization. First, open the Settings app (Windows + I) and go to Update & Security.

In Windows 10 Settings, go to Update & Security
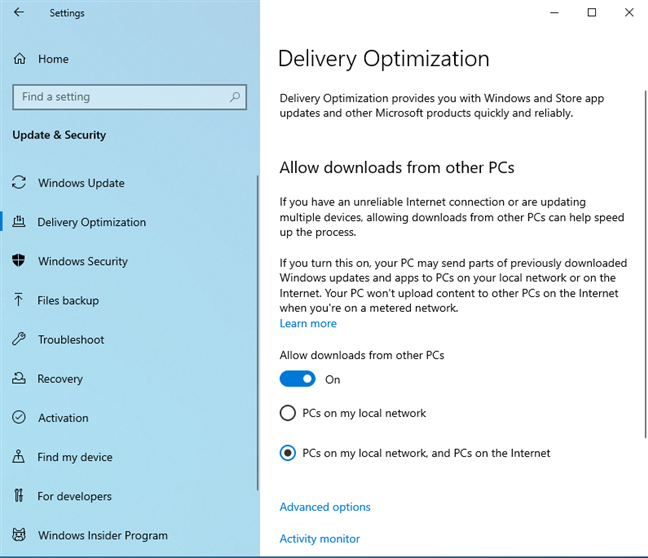
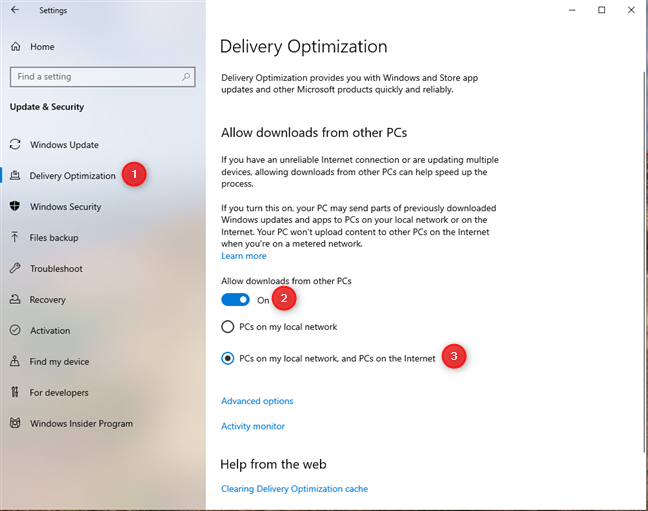
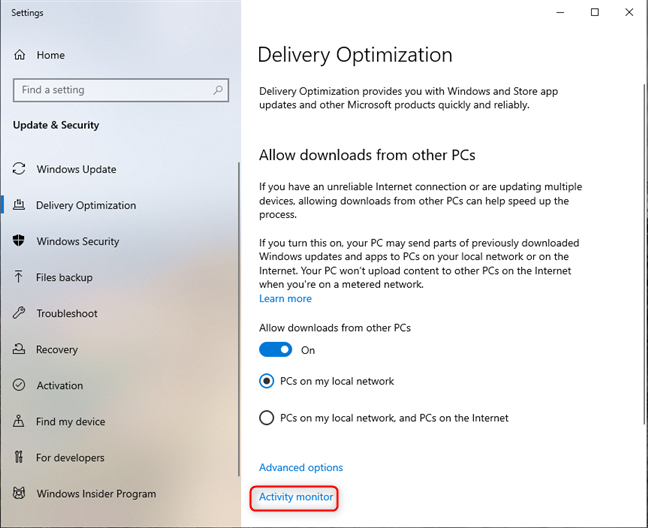
In the left sidebar, choose Delivery Optimization. Then, on the right, click or tap the “Allow downloads from other PCs” switch to enable it. Lastly, choose the setting you prefer:
- PCs on my local network
- PCs on my local network, and PCs on the Internet
Turning on Delivery Optimization in Windows 10
Delivery Optimization is turned on, and it should automatically download updates for Windows 10, Microsoft Store apps, Microsoft 365, Microsoft Edge, and others from other computers on the same network and/or the internet, depending on how you have set it.
TIP: For more information about managing updates in Windows 10, I recommend the complete guide to Windows 10 updates.
How to turn on Delivery Optimization in Windows 11
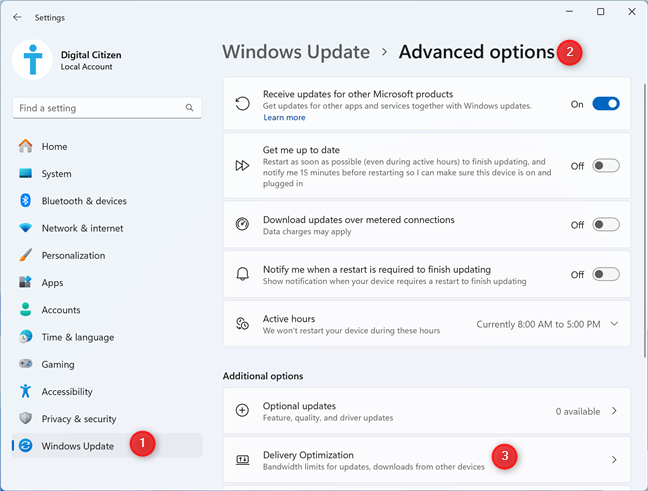
In Windows 11, the steps for enabling Delivery Optimization are different: open Settings (Windows + I). On the left, go to Windows Update; then, on the right, click or tap Advanced options.
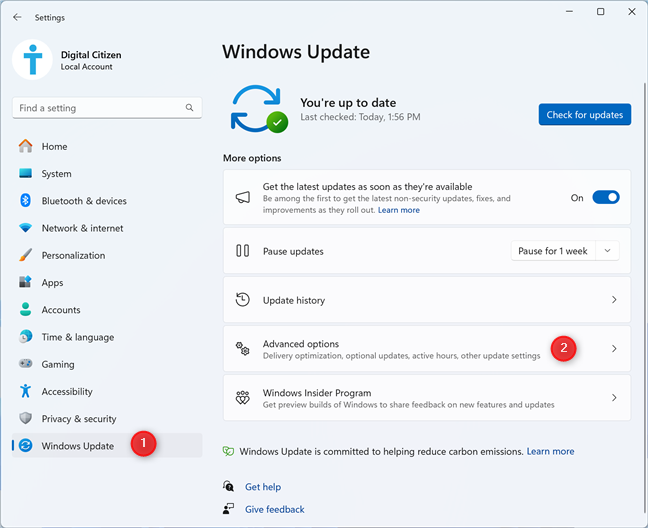
In Windows 11 Settings, go to Windows Update > Advanced options
Scroll down the list of advanced options for Windows Update until you see Delivery Optimization, and click or tap it. It is found in the Additional options section.
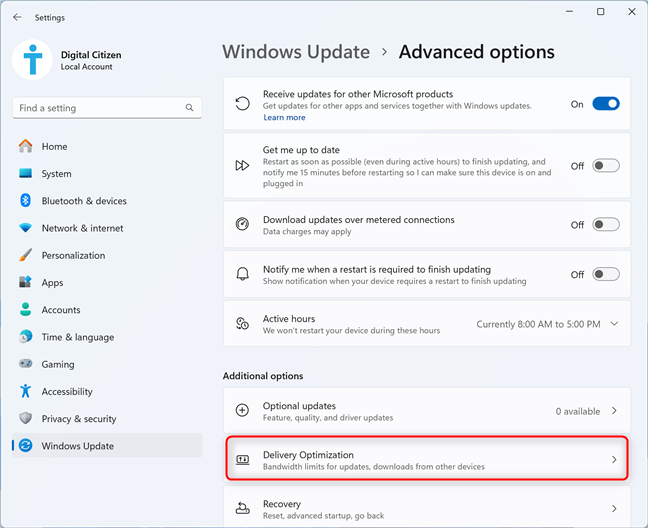
Click or tap Delivery Optimization
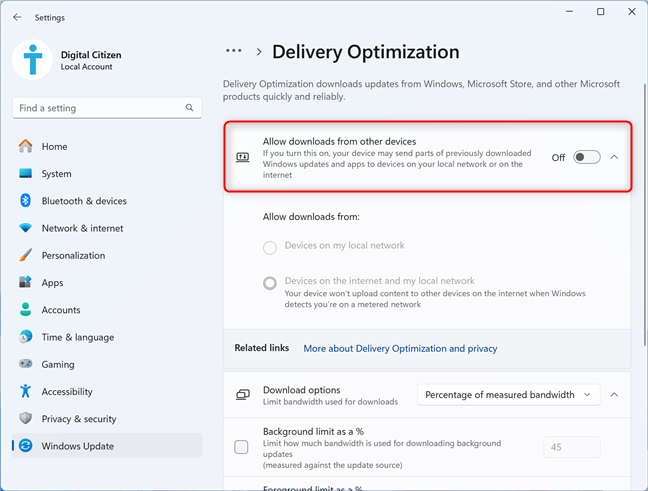
This is where you set whether Windows can grab updates online from others. To enable Delivery Optimization, enable the “Allow downloads from other devices” switch by clicking or tapping it. Then, choose if you want to allow downloads from:
- Devices on my local network
- Devices on the internet and my local network
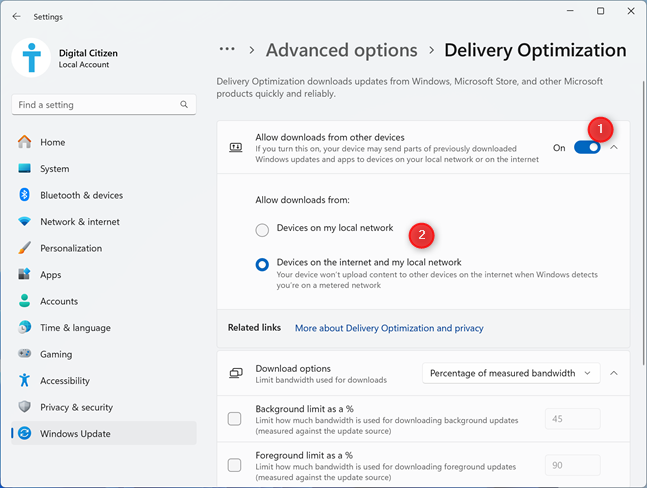
Turn on Delivery Optimization in Windows 11
Delivery Optimization is enabled, helping you get Windows 11 updates faster from other computers on your network and/or the internet, depending on how you’ve set it.
TIP: If you want to know more about managing updates in Windows 11, read the complete guide to Windows 11 updates.
How to turn off Delivery Optimization
Turning off Delivery Optimization is relatively easy. However, the necessary steps are different in Windows 10 and Windows 11. So let’s take them one by one again:
How to turn off Delivery Optimization in Windows 10
In Windows 10, open Settings (Windows + I) and go to Update & Security. In the column on the left, choose Delivery Optimization. On the right, turn off the “Allow downloads from other PCs” switch.
Turning off Delivery Optimization in Windows 10
Other computers on your network or the internet can no longer grab updates from your Windows 10 computer, and you can’t grab updates from them either. Your computer will download updates only from Microsoft’s servers.
How to turn off Delivery Optimization in Windows 11
The steps for turning off Delivery Optimization in Windows 11 go like this: open Settings (Windows + I) and choose Windows Update on the left. On the right, click or tap Advanced options. Then, scroll down to Delivery Optimization and click or tap it.
Go to Settings > Windows Update > Advanced options > Delivery Optimization
Turn off the “Allow downloads from other devices” switch.
Disabling Delivery Optimization in Windows 11
Delivery Optimization is now turned off, and you can only get updates from Microsoft, which could slow down the update process.
What happens if I turn off Delivery Optimization?
If you disable this feature, this is what happens:
- Microsoft can’t save bandwidth costs when delivering updates to your computer(s) or device(s).
- Delivery Optimization no longer creates a local cache for storing files used in sharing updates with other computers and devices.
- Your computer(s) download all updates straight from Microsoft’s servers, which means their download speed could be lower. You no longer save bandwidth like you do when using Delivery Optimization to download updates from other devices on your local network.
Why can't I turn off Delivery Optimization?
People using Windows 10 and Windows 11 on their home computers shouldn’t have any trouble disabling Delivery Optimization. Only those using business laptops and devices may encounter this problem, because the network administrators of their organization have enforced policies that disable the ability to turn off Delivery Optimization. If you’re using a work laptop, PC, or another device, speak with your organization’s technical support department and ask them about your problem. They should be able to provide you with useful information on this topic.
How to limit the bandwidth used for Delivery Optimization
If you enable Delivery Optimization and allow it to get and share updates with others on the internet, this feature’s use of your available bandwidth might be a concern. Luckily, Microsoft is providing you with the tools to set in detail how Delivery Optimization uses your bandwidth. Here’s how they work:
How to limit the bandwidth used for Delivery Optimization in Windows 10
If you’re using Windows 10, open Settings and go to Update & Security > Delivery Optimization using the steps shared in the earlier sections. Under the options for enabling Delivery Optimization, look for the Advanced options link and click or tap it.
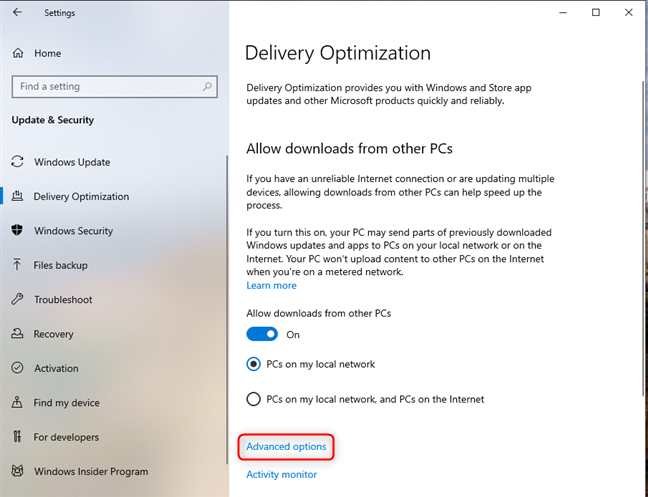
Click or tap Advanced options
You see several controls for limiting how Delivery Optimization uses your bandwidth for downloading and uploading updates. You can select Absolute bandwidth, check the boxes for limiting how much bandwidth is used, and specify how many megabits per second (Mbps) you want to use for downloading updates in the background (while the Windows Update page is hidden from view) and the foreground (when you keep the Windows Update page open as the main window on your desktop). You can also set the percentage of measured bandwidth used by Delivery Optimization.
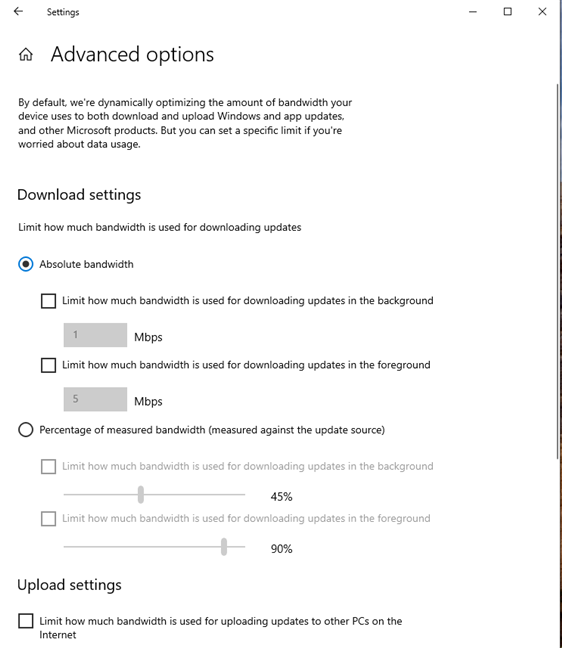
Set the bandwidth limits for Delivery Optimization in Windows 10
Scroll down to see controls for setting your bandwidth used by Delivery Optimization for uploading updates to other computers on the internet. Check the options that interest you and set them as you want. If you don’t want to spend too much bandwidth for uploading updates to other computers, you can check the Monthly upload limit and set the value you want.
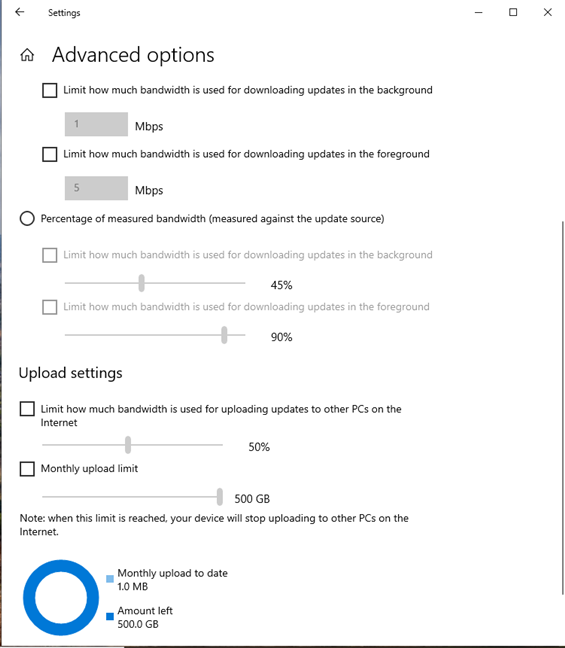
Limiting the upload bandwidth used by Delivery Optimization
When you’re done configuring your limits, close the Settings app.
How to limit the bandwidth used for Delivery Optimization in Windows 11
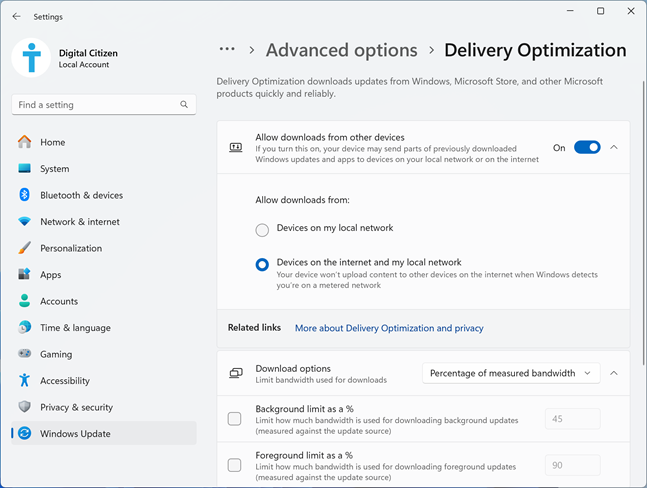
If you’re using Windows 11, open Settings and go to Windows Update > Advanced options > Delivery Optimization. You see the settings for controlling how Delivery Optimization uses your bandwidth to download and upload updates to and from others. If you click or tap the drop-down list next to Download options, you can choose to set the limit as a Percentage of measured bandwidth or Absolut bandwidth limit. Then, depending on your choice, you can set in percentages or Mbps the limits for downloading updates in the background (hidden from view while you do other things on your computer) or in the foreground (when the Windows Update window is front-and-center on your desktop).
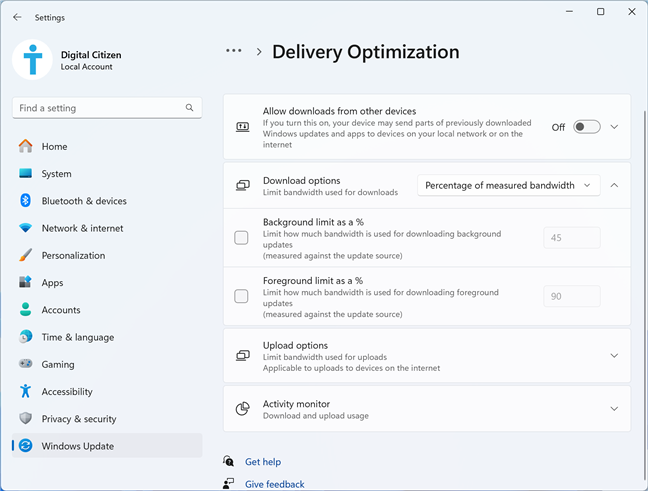
Set the download bandwidth limits for Delivery Optimization in Windows 11
Scroll down the list and click or tap Upload options to extend this section. You can then enable the switch for Limit as % of measured bandwidth and set the slider below at the percentage you want, or you can enter the maximum Monthly upload limit in Gigabytes (GB), depending on which you prefer.
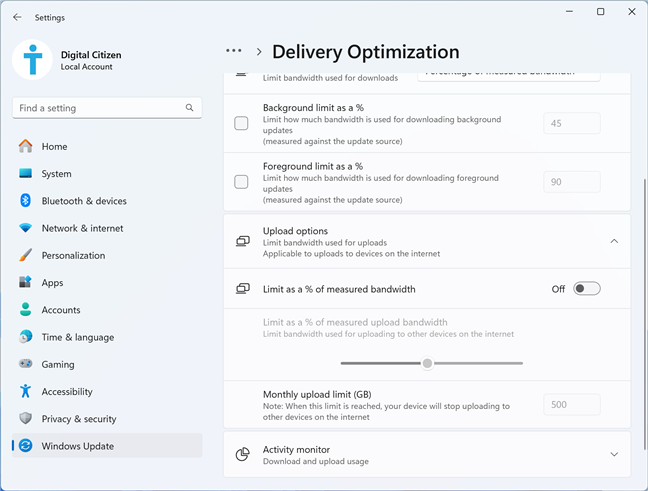
Setting the upload options for Delivery Optimization
When you are happy with your settings, close the Settings window.
Check how Delivery Optimization uses your bandwidth
When Delivery Optimization was implemented into Windows 10, some people complained they didn’t want to lose control over their internet bandwidth and increase costs uncontrollably. Many publications recommended users disable Delivery Optimization. In response to those worries, Microsoft also offers an Activity monitor, where users can see how many megabytes of updates are downloaded and uploaded each month. Here’s how to access those reports:
How to check how much bandwidth Delivery Optimization uses in Windows 10
Windows 10 users should open Settings and go to Update & Security > Delivery Optimization. Under the options for enabling Delivery Optimization, look for the Activity monitor link and click or tap it.
Click or tap Activity monitor
Now, you see charts with download and upload statistics. They show you which percentage of updates were downloaded from Microsoft, from Microsoft’s cache server, PCs on your local network, and PCs on the internet. For each source, you also see how many megabytes were downloaded. Then, you have a similar statistic for uploading updates to others. You see how many megabytes of updates were uploaded to PCs on the internet and to PCs on your local network.
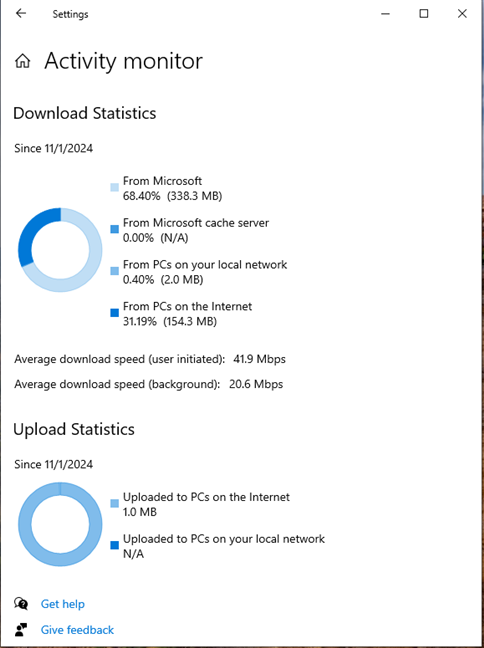
Check your download and upload statistics
If you think Delivery Optimization uploads too much data to others, you can use the settings shared in the earlier section to limit the bandwidth used by this feature.
How to check how much bandwidth Delivery Optimization uses in Windows 11
If you’re using Windows 11, open Settings and go to Windows Update > Advanced options > Delivery Optimization. Scroll down and then click or tap Activity monitor.
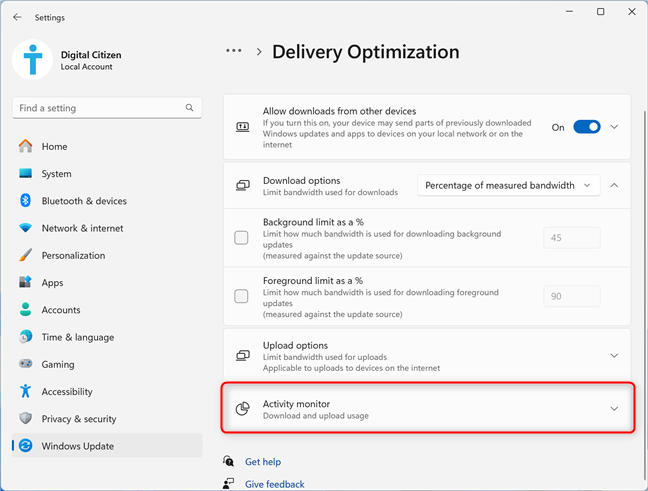
In Delivery Optimization, go to Activity monitor
This section extends and displays download and upload statistics for Delivery Optimization. However, the data shared differs from what you get in Windows 10. You can see how many updates in megabytes or gigabytes were downloaded from Microsoft, Microsoft’s cache server, PCs on your local network, and PCs on the internet. You also see the average download speed when updates were user initiated, or when performed in the background. Last but not least, you also see how many megabytes or gigabytes of data your computer has uploaded to others on your local network and on the internet.
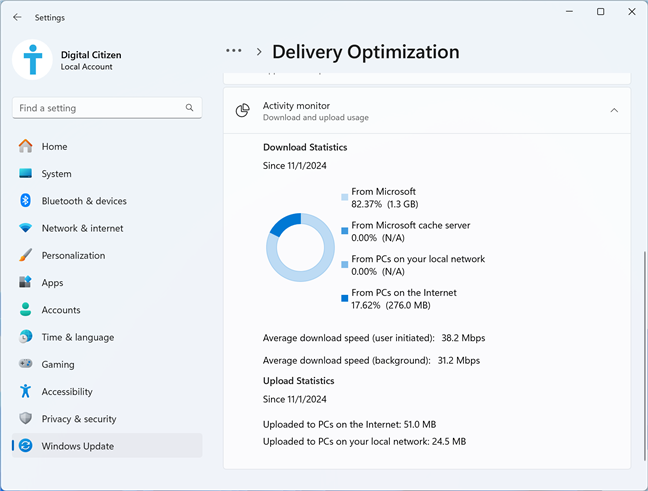
The statistics shown for Delivery Optimization in Windows 11
If you’re unhappy with the upload statistics, you can change the limits imposed on Delivery Optimization and how it uses your internet bandwidth.
Did you set Windows to download updates from the local network or the internet?
Now you know everything about the Delivery Optimization feature, how it works, and whether you should turn it on or off. I prefer to have it enabled. Since my local network isn’t exactly big in the number of PCs it includes, I allowed this feature to download and upload updates from/to other devices on the internet. What about you? Did you keep Delivery Optimization turned on? Do you want it to download updates only from other PCs on the local network or from the internet? Comment below and share your perspective.