A long time ago, Microsoft decided to end the development of Windows Movie Maker, a program that many Windows users used for creating videos. People were asking for a new tool and, although it took some time, in the versions of Windows 10 starting with Fall Creators Update (1709), Microsoft introduced a new tool that lets users create and edit videos. It is called Video Editor, and it offers more options and features than you'd expect. Here are twelve things that you can do with the Video Editor app from Windows 10:
How to open the Video Editor from Windows 10
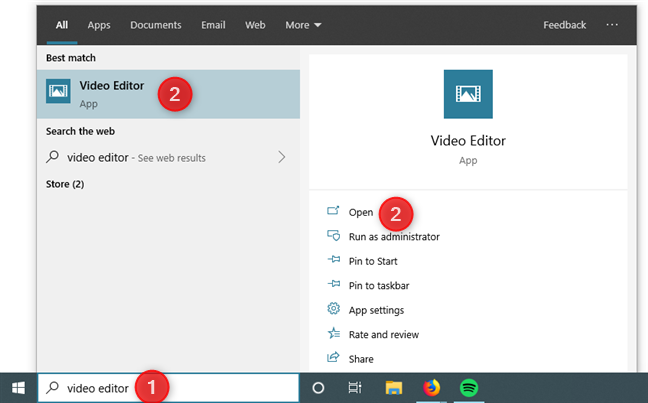
Before we show you what you can do with the Video Editor app from Windows 10, you should first know how to open it. Probably the fastest way to do it is to search for it: type "video editor" in the search box from the taskbar and then press Enter or click/tap on Video Editor.
Opening Video Editor with the search from Windows 10
You can also open Video Editor from other places, such as from the Start Menu or the Photos app, but it is slower.
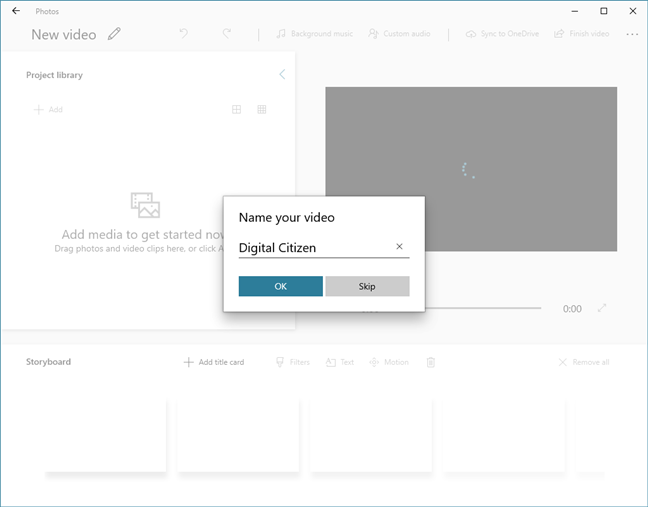
Once you've opened Video Editor, you can create a New video with a click or tap on the button with the same name, from the top side of the window. The app then asks you to choose a name for your new video project, and then you can start having fun creating and editing it.
Choosing a name for the new video in Video Editor
Next, let's see which are the best things that you can do with the Video Editor from Windows 10:
1. Add videos and images to your timeline using drag and drop or the Add button
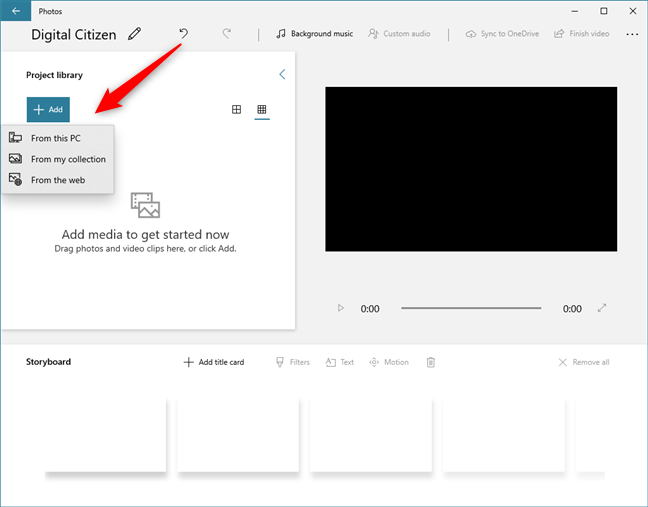
Video Editor is designed to make the video creation experience as easy and intuitive as possible. You can see that right from the start when you have to add videos and images to your project. One way to do it is to press the Add button and select the media from your computer or the web.
Using the Add button to add content to the project library
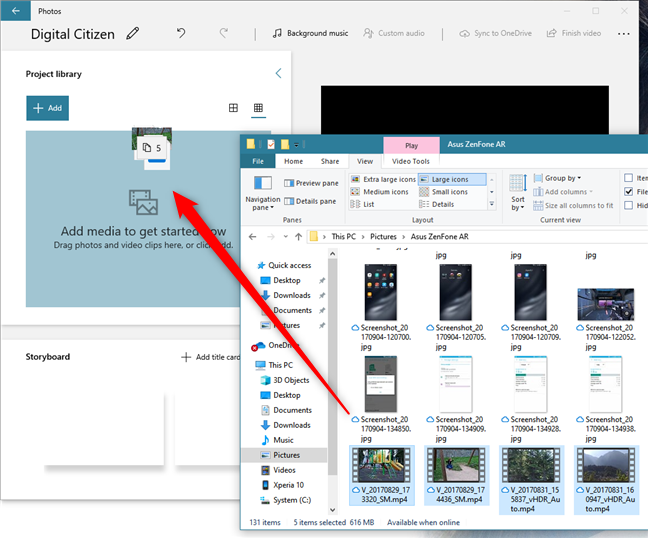
Alternatively, you can drag and drop the videos and images from File Explorer directly on the Project library section from the Video Editor.
Drag and drop videos and images to the project library
All the videos and images you add are then shown in your Project library. From there, you can drag and drop them to the Storyboard at the bottom of the window. In the timeline, you can rearrange the content as you want, as well as split videos, adjust the duration that images are shown, insert text and video effects, and so on.
The videos and images you choose to use are added to the storyboard
2. Insert title cards into your videos
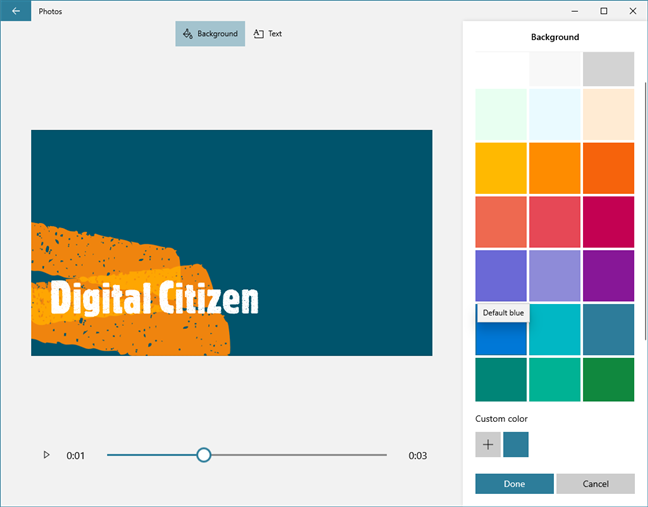
Besides adding text directly on the videos in your Storyboard, the Video Editor app also lets you insert title cards. Title cards are pieces of text displayed on the entire screen, for a duration of your choosing. Video Editor also lets you select their background colors, as well as the font used for them.
Title cards have configurable backgrounds
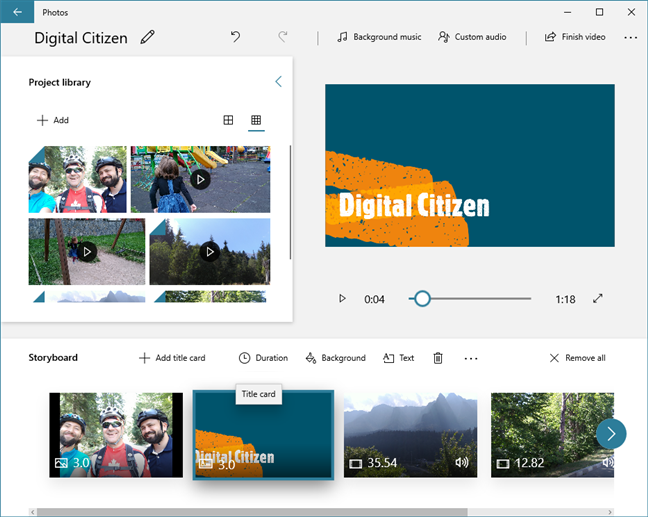
Once you create a title card, it's added to the Storyboard, and you can work with it just like with any video or image.
Title cards are part of the storyboard and behave just like images
3. Change the text style used in your videos
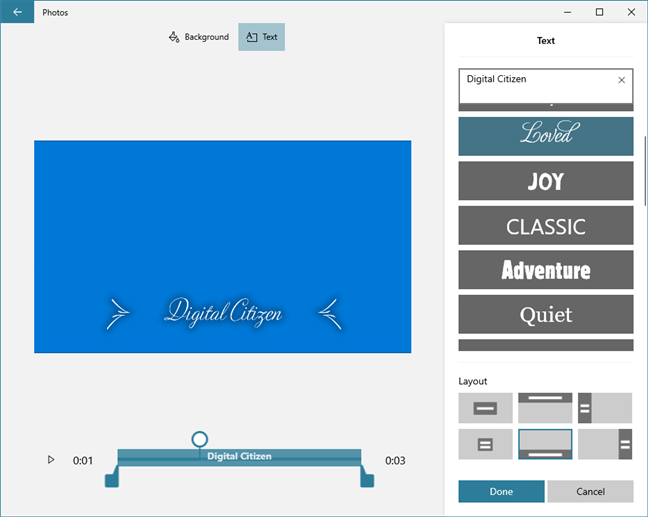
In Video Editor, you get various options for adjusting what the text looks like. You can edit the text styles both for the regular text that you add on your videos and images, as well as for the title cards you create.
There are many different options from which you can choose, depending on what kind of video you intend to create, to match its theme: funny, serious, nostalgia, love, etc.
Video Editor lets you customize the text styles
4. Trim or split long sections of your videos
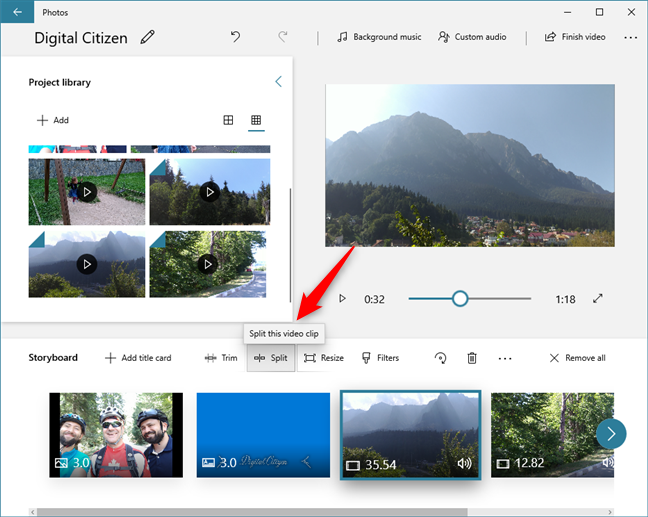
Some of the videos you add to your Storyboard might be too long, or you might want to use just some parts from them. Video Editor also includes the essential Split and Trim options. To use them, select the video that you want to edit from the Storyboard and then click or tap on the Trim or Split button.
In Video Editor, you can trim or split videos
Video Editor then opens the video that you selected and lets you trim or split it as you like. Choose where you want to trim or split the video and press the Done button. The trimmed or split videos are instantly added to the Storyboard.
Splitting a video with Video Editor
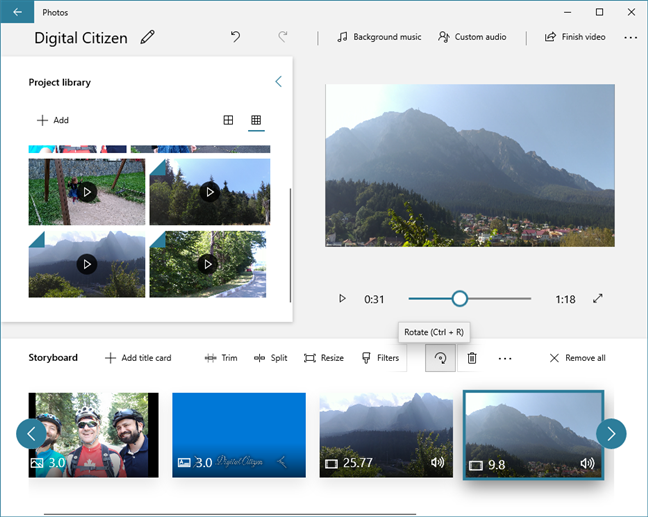
5. Rotate video sections with Video Editor
Sometimes, your videos might have the wrong orientation. This usually happens when you film videos with your smartphone. If you need to rotate a video in your project, Video Editor lets you do it easily: select that video and click or tap on the Rotate button until its orientation is the one you want.
The Rotate button from the Video Editor
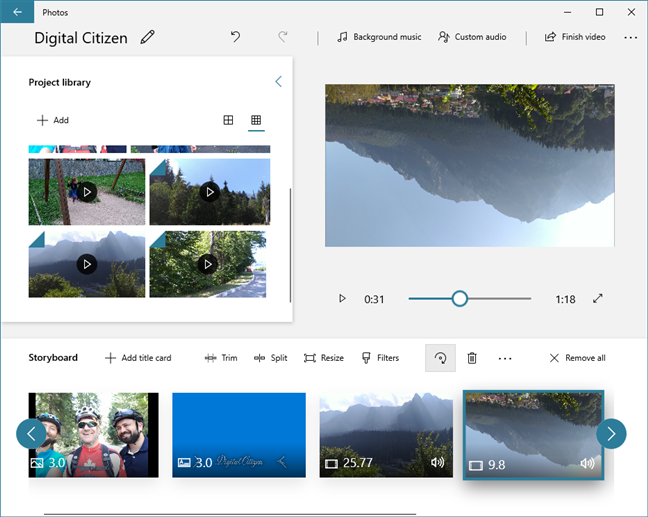
When you press the Rotate button, the selected video is rotated clockwise. Pressing four times on it brings the video back to its original orientation.
Rotating videos in Video Editor is easy
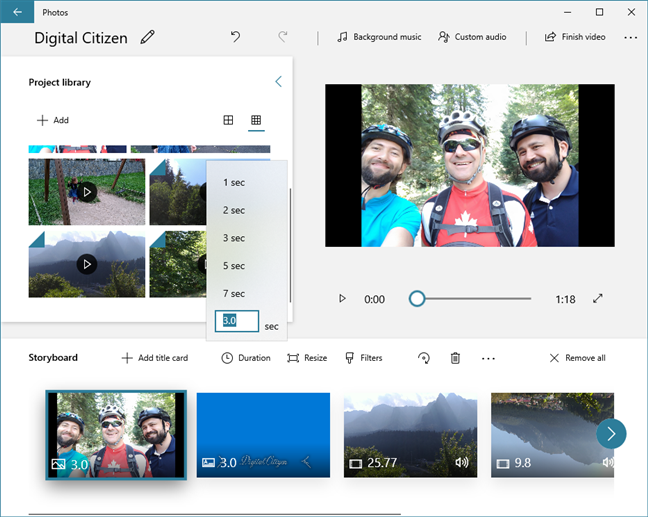
6. Adjust the duration an image or a title card appears in your video
The images and title cards that you add to a video project have a default display duration of 3 seconds. However, sometimes, you might want to display them for shorter or longer times. Video Editor lets you adjust that time: select the title card or image and click/tap on Duration. Then, choose from one of the predefined times, or type a custom time.
You can adjust the duration that an image or title card is displayed
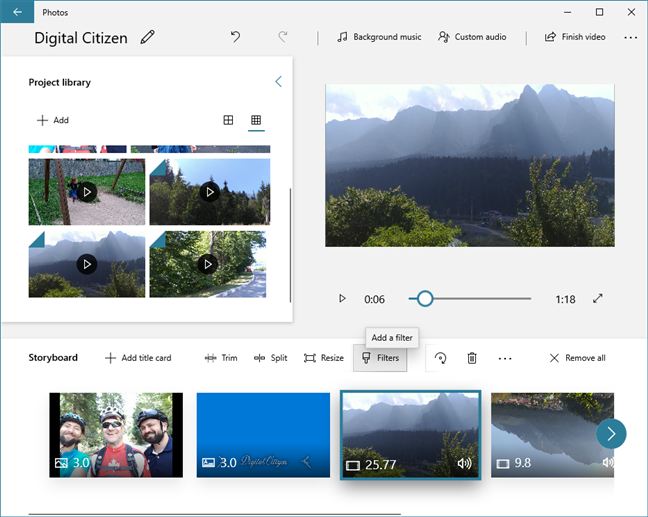
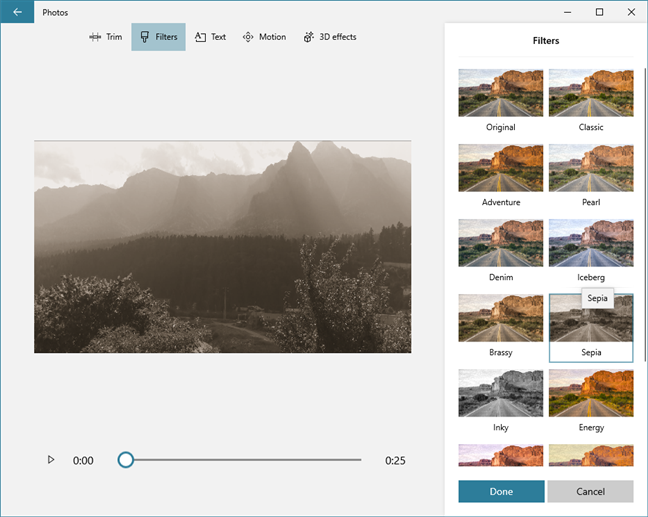
7. Add filters such as Sepia, Adventure, Inky, Arcade and more
If you are feeling creative and want to make a video that looks special, Video Editor also lets you add filters to your content. To do so, select the video or image that you want to change and click or tap on the Filter button from the Storyboard.
Video Editor lets you add filters to videos and images
Video Editor has a series of interesting filters which you can choose to use: Classic, Adventure, Pearl, Denim, Iceberg, Brassy, Sepia, Inky, Energy, Joy, Loved, Pixel, and Arcade.
The filters available in Video Editor
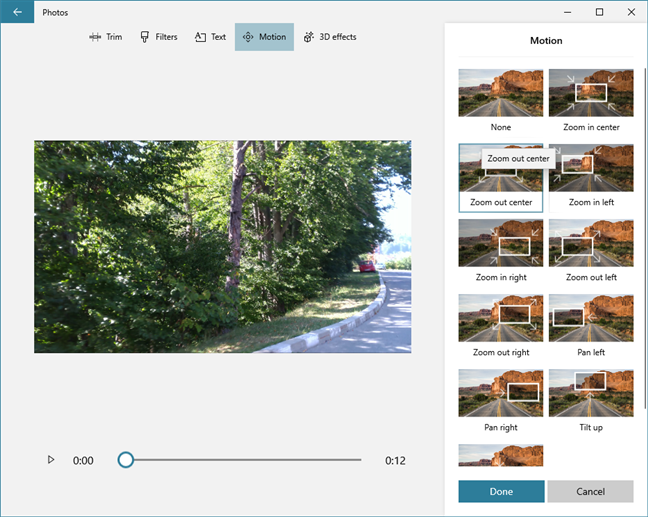
8. Apply motion effects to images and videos
Your images and videos may look better when they have a motion effect. Although some motion is automatically applied to images, Video Editor also lets you control the type of motion and the direction of the motion. It even lets you add motion to videos if you want to give them a sort of dynamic effect.
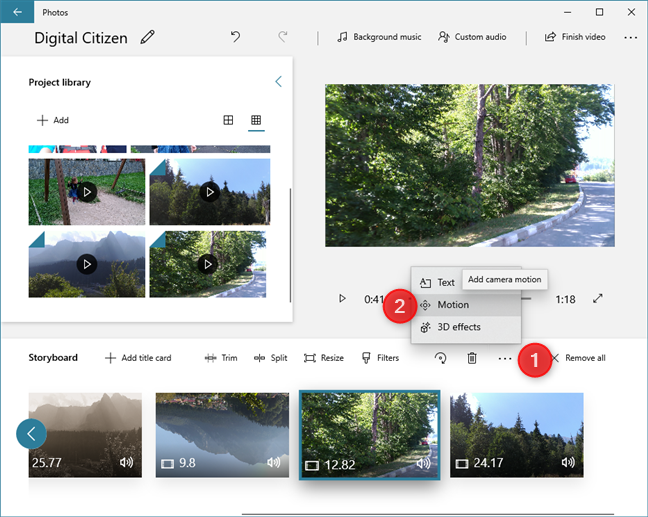
To do that, you select an image or video and click or tap the … (More) button. Then, press Motion.
Choosing to add motion effects to a video
Next, you get a preview of the video or image and a set of Motion settings to choose from. All you have to do is select the one you prefer and press Done.
The list of motion effects available in Video Editor
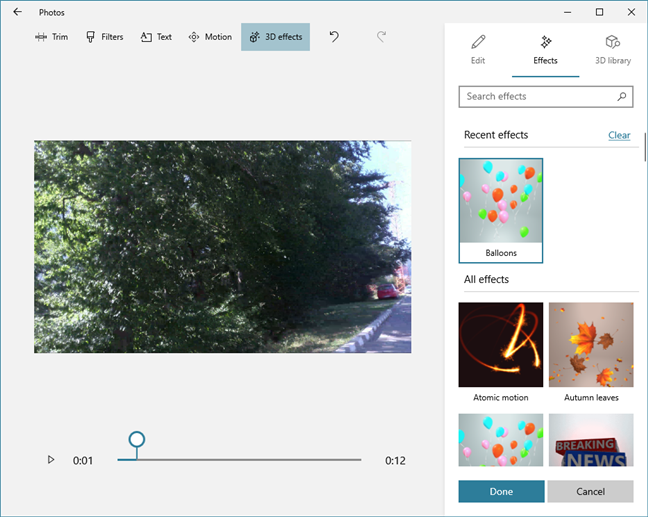
9. Insert 3D effects on videos from your timeline
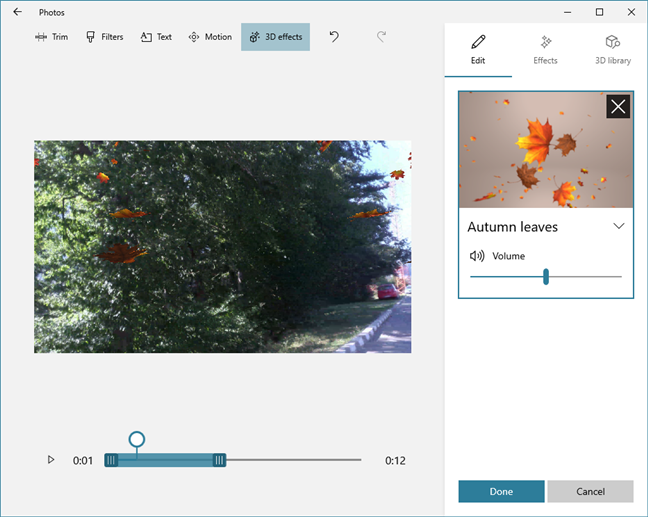
Similarly, but only for videos, you can use Video Editor to add 3D Effects to your project. Once you select the video that you want to edit, click or tap on … (More) and choose 3D Effects. Then, pick one of the 3D Effects available, such as Balloons, Autumn leaves, Bubbles, Breaking news, Campfire, Confetti shower, Dust explosion, Fireworks, Windy snowflakes and so on.
3D effects available in Video Editor
Here's a sample of what the Autumn leaves 3D effect looks like:
The Autumn leaves 3D effect
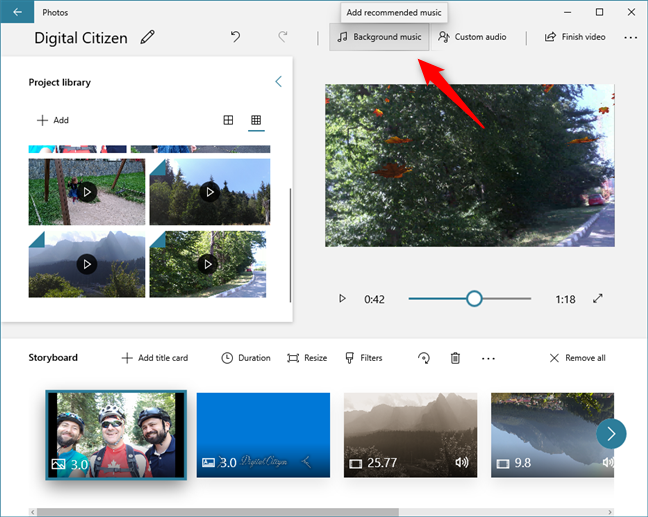
10. Add music to your videos with Video Editor
If you do not want to keep the original sound on your videos, you can use the Video Editor app to add different background music. To do so, press the Background music button from the top of the app.
Adding background music to a video
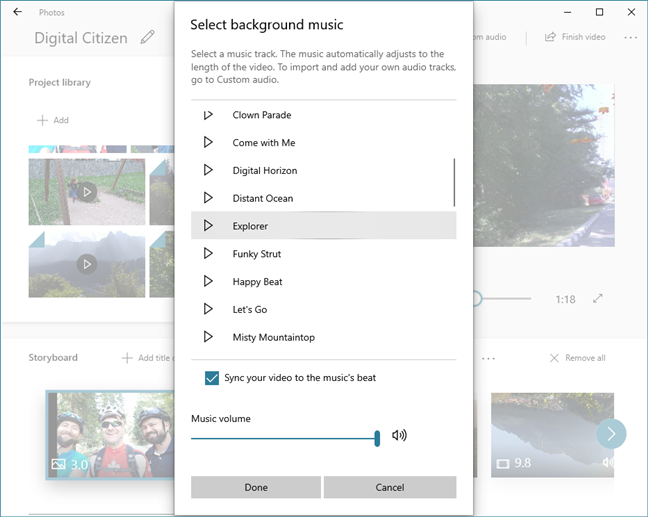
Then, Video Editor shows you a list of recommended built-in tracks you can choose from.
The list of built-in background music tracks
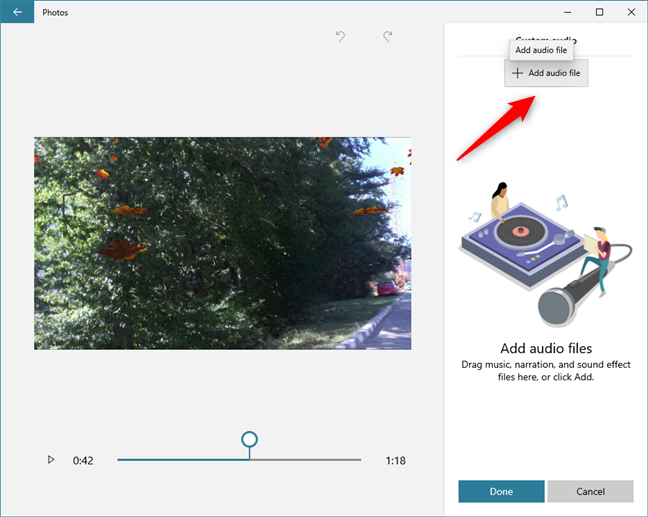
If you'd rather use your own music track for the video that you're creating, instead of pressing on the Background music button, click or tap on Custom audio at the top of Video Editor. Then, click or tap on "Add audio file" and browse through your PC to find the song that you want to use.
Video Editor lets you add custom audio tracks to videos
11. Duplicate video projects
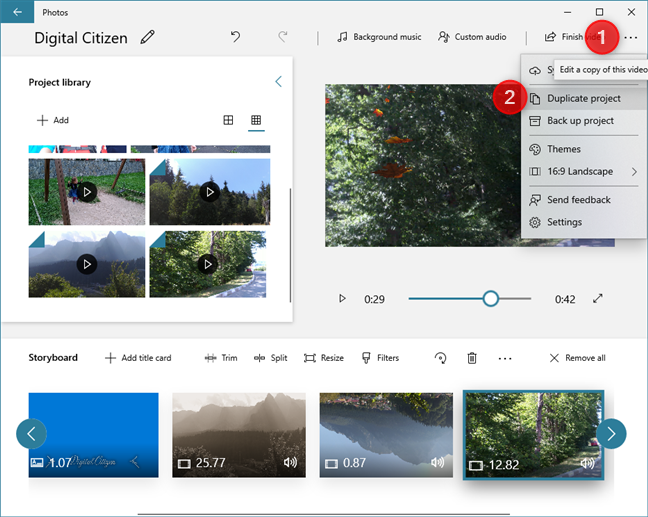
When you're creating a video with Video Editor, you might discover that you want to make different versions of it. In that case, you can, at any moment, duplicate your video project. That means that you're creating a copy of your project, on which you can later work differently. To duplicate a video project, press the … (See more) button from the top-right corner of the Video Editor window and choose Duplicate project in the menu that opens up.
In Video Editor, you can duplicate video projects
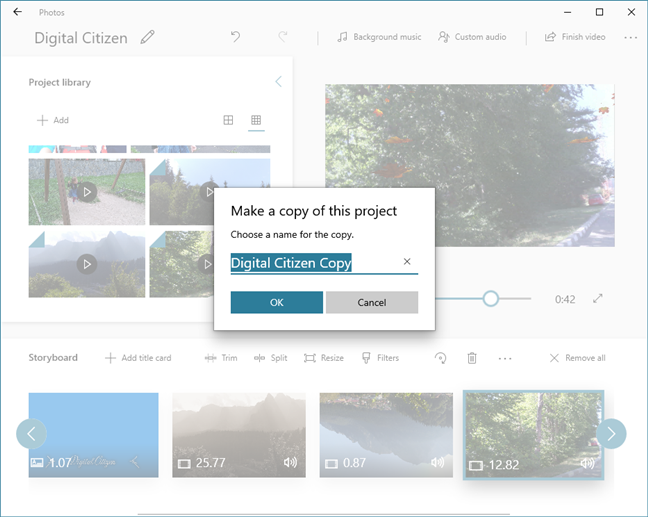
Video Editor should ask you to choose the name you want to give to your duplicated project. Type the one you want, press OK, and it is saved.
Choosing a name for a duplicated video project
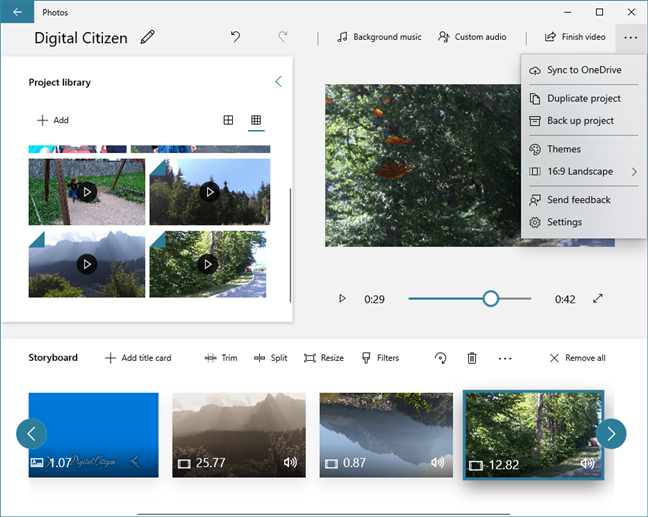
12. Sync projects to OneDrive or backup them to other media
Whether you don't have time to finish your project or if you want to continue working on another Windows 10 computer, Video Editor has you covered too. In its … (See more) menu, Video Editor has options to Sync to OneDrive and to Back up project. Sync to OneDrive saves your project in your OneDrive cloud space so that it automatically loads on all your Windows 10 computers and devices on which you are connected with the same Microsoft account. Back up project saves your project as it is, together with all the videos and images that you added to its library, on any storage drive such as a USB memory stick or a CD/DVD.
Video Editor can sync video projects to OneDrive and save them to other media
Do you like the Video Editor app from Windows 10?
The Video Editor app from Windows 10 offers plenty of customization options and enough features to help you create great home videos. It is probably better and faster than the old Windows Movie Maker, which many users all over the world loved. Before closing this tutorial, tell us your opinion about the Video Editor and whether you like it more than the old Windows Movie Maker. Comment below, and let's discuss.
NO FADE IN/FADE OUT
I easily created a great video and shared it to my friends. One person wrote back and said having a softer transition from slide to slide would make the video even greater, and more pleasing to watch. Then it dawned on me that this editor does Not have a soft transition feature. Fade in/Fade out is not in the editor. To have 12 great things available in the Editor, and not have this feature, is a real disappointment.
Steve McBride ·
We have existing files both video clips and regular clipe. Can we move and insert either one of these and insert the clips?
Janice O'Malley ·
I am using Video Editor for the first time and never used anything other than Smilebox in the past. I’m creating a slideshow for my mother’s memorial service next month. Smilebox now wants $140 for me to use their service without a watermark covering people’s faces in my photos to I went searching on the internet. I had no idea I had Video Editor on my PC! I figured out how to use it and my slide show is done unless I want to add more; perhaps a short video. I’d like to add my Mom’s photo to the title card but I haven’t figured out how to do that. Thank you for this wonderful software. I hope when it’s complete I can save it as an MP4.
LUCIANA BEASLEY ·
How to extend duration time on video?
G Irwin ·
I love this program, hope it doesn’t go away anytime soon. There are glitches in it but overall I really enjoy working with it. Thank you
Ciprian Adrian Rusen ·
It can be useful indeed, and so far Microsoft doesn’t have any plans to phase it out.
MIchael ·
You say: “The images and title cards that you add to a video project have a default display duration of 3 seconds. However, sometimes, you might want to display them for shorter or longer times. Video Editor lets you adjust that time: select the title card or image and click/tap on Duration.”
My experience has been that the text on title cards fades out after 3 seconds regardless of how long you set the duration for. I discovered a work-around however, which entails setting the duration for the title card to 2 seconds, then copying and pasting the title card in a continuous string as many times as needed. The text will flow seamlessly if it is set to 2 seconds, but not for 3 seconds, since it fades out. Hope that helps.
Ciprian Adrian Rusen ·
That is a bug. Don’t hesitate to report it to Microsoft, using the Feedback Hub from Windows 10. They should fix it.
Jane ·
useless without a timeline for syncing titles with music
Mitch ·
It used to be ok but as with most things, when its working good or better, it gets changed and turns not so good. Windows 10 Movie maker used to be so easy to use, chop and change stuff but for the life of me and I dont know why but Microsoft changed it and now its harder to use. All the easy stuff is now gone. If it is there, then they have moved it and hidden it well. Out of 10? In the past would’ve gone a 8/10 but now a 1/10
Julie M ·
I have just created a new video using my photos on your Photo App. One disappointing feature is the fact that it is not ChromeCast enabled and I am now unable to play this video through my TV.???? Please correct me if I am wrong. Otherwise program OK.
James ·
how to stabilize the video? There is function in Apple and android phone. I cannot find it in Window 10
Curt Baker ·
With movie maker I could do transitions between clips, fade in and fade out, click and drag text anywhere, etc. Video Editor will not do any of that. So why is it better?? Can’t even take screen shots with Video Editor. Please explain! Thank you.
Mike ·
This is way more complicated to use than the old live movie maker. Can’t even quickly set start and end points without using complicated set points. I guess these Microsoft wizzards thought everyone wants to make professional movies. My opinion is that they really Fked up when closing down 7 and not keeping the old editor
Donna ·
This is a joke. Great for pics of the grandkids, but totally useless for anything else. Nothing says amateur like falling leaves and sparkles! Discontinuing moviemaker was another in a growing catalog of dumb ass ideas from Microsoft
Anonymous ·
The old Movie Maker was useful and easy to use, indeed.
Kathy ·
I may be doing something wrong but the Exporting seems to take FOREVER!
aj ·
Bring back Movie Maker…!!!!
Anonymous ·
Many people love the old Movie Maker. Unfortunately it isn’t coming back. 🙁
K Pradeep Kumar Reddy ·
How to add background music only to title card and end card, not for the entire duration of the video ??
Jill ·
I want to remove some segments of a movie I made. That is not possible with this app it seems.
rina friedma ·
unfortunately you can save the video only as MP4, which is a problem.
RLN ·
I have been using Movie Maker for longer than 10 years and feel like it was easy to use, flexible enough for my applications, and improved with every show I produced. It was very disappointing to find it is no longer available and beyond frustrating why they would decide to discontinue the app. The Video Editor espoused herein is not even close to being usable for the scale I need and it annoys me every time I attempt to make it work.
Bob ·
unlike Windows Movie Maker I was unable to fade In and Out Photos and music.
Bill Yovino ·
It doesn’t seem as flexible as Movie Maker. You don’t have much control over title text other than selecting styles from a menu. I can’t find a way to add transitions, like crossfades between images and video scenes. There is also no Help that I could find. It appears that they just slapped this together with very little effort. Movie Maker was significantly more robust.
Will ·
I agree. I am trying to extend my audio selection to the duration of the project. I cannot find an option to this. This is not a good app at all. Movie maker was much better.


Discussion (27)
NO FADE IN/FADE OUT
I easily created a great video and shared it to my friends. One person wrote back and said having a softer transition from slide to slide would make the video even greater, and more pleasing to watch. Then it dawned on me that this editor does Not have a soft transition feature. Fade in/Fade out is not in the editor. To have 12 great things available in the Editor, and not have this feature, is a real disappointment.
We have existing files both video clips and regular clipe. Can we move and insert either one of these and insert the clips?
I am using Video Editor for the first time and never used anything other than Smilebox in the past. I’m creating a slideshow for my mother’s memorial service next month. Smilebox now wants $140 for me to use their service without a watermark covering people’s faces in my photos to I went searching on the internet. I had no idea I had Video Editor on my PC! I figured out how to use it and my slide show is done unless I want to add more; perhaps a short video. I’d like to add my Mom’s photo to the title card but I haven’t figured out how to do that. Thank you for this wonderful software. I hope when it’s complete I can save it as an MP4.
How to extend duration time on video?
I love this program, hope it doesn’t go away anytime soon. There are glitches in it but overall I really enjoy working with it. Thank you
It can be useful indeed, and so far Microsoft doesn’t have any plans to phase it out.
You say: “The images and title cards that you add to a video project have a default display duration of 3 seconds. However, sometimes, you might want to display them for shorter or longer times. Video Editor lets you adjust that time: select the title card or image and click/tap on Duration.”
My experience has been that the text on title cards fades out after 3 seconds regardless of how long you set the duration for. I discovered a work-around however, which entails setting the duration for the title card to 2 seconds, then copying and pasting the title card in a continuous string as many times as needed. The text will flow seamlessly if it is set to 2 seconds, but not for 3 seconds, since it fades out. Hope that helps.
That is a bug. Don’t hesitate to report it to Microsoft, using the Feedback Hub from Windows 10. They should fix it.
useless without a timeline for syncing titles with music
It used to be ok but as with most things, when its working good or better, it gets changed and turns not so good. Windows 10 Movie maker used to be so easy to use, chop and change stuff but for the life of me and I dont know why but Microsoft changed it and now its harder to use. All the easy stuff is now gone. If it is there, then they have moved it and hidden it well. Out of 10? In the past would’ve gone a 8/10 but now a 1/10
I have just created a new video using my photos on your Photo App. One disappointing feature is the fact that it is not ChromeCast enabled and I am now unable to play this video through my TV.???? Please correct me if I am wrong. Otherwise program OK.
how to stabilize the video? There is function in Apple and android phone. I cannot find it in Window 10
With movie maker I could do transitions between clips, fade in and fade out, click and drag text anywhere, etc. Video Editor will not do any of that. So why is it better?? Can’t even take screen shots with Video Editor. Please explain! Thank you.
This is way more complicated to use than the old live movie maker. Can’t even quickly set start and end points without using complicated set points. I guess these Microsoft wizzards thought everyone wants to make professional movies. My opinion is that they really Fked up when closing down 7 and not keeping the old editor
This is a joke. Great for pics of the grandkids, but totally useless for anything else. Nothing says amateur like falling leaves and sparkles! Discontinuing moviemaker was another in a growing catalog of dumb ass ideas from Microsoft
The old Movie Maker was useful and easy to use, indeed.
I may be doing something wrong but the Exporting seems to take FOREVER!
Bring back Movie Maker…!!!!
Many people love the old Movie Maker. Unfortunately it isn’t coming back. 🙁
How to add background music only to title card and end card, not for the entire duration of the video ??
I want to remove some segments of a movie I made. That is not possible with this app it seems.
unfortunately you can save the video only as MP4, which is a problem.
I have been using Movie Maker for longer than 10 years and feel like it was easy to use, flexible enough for my applications, and improved with every show I produced. It was very disappointing to find it is no longer available and beyond frustrating why they would decide to discontinue the app. The Video Editor espoused herein is not even close to being usable for the scale I need and it annoys me every time I attempt to make it work.
unlike Windows Movie Maker I was unable to fade In and Out Photos and music.
It doesn’t seem as flexible as Movie Maker. You don’t have much control over title text other than selecting styles from a menu. I can’t find a way to add transitions, like crossfades between images and video scenes. There is also no Help that I could find. It appears that they just slapped this together with very little effort. Movie Maker was significantly more robust.
I agree. I am trying to extend my audio selection to the duration of the project. I cannot find an option to this. This is not a good app at all. Movie maker was much better.
Thanks for sharing your experience with it.