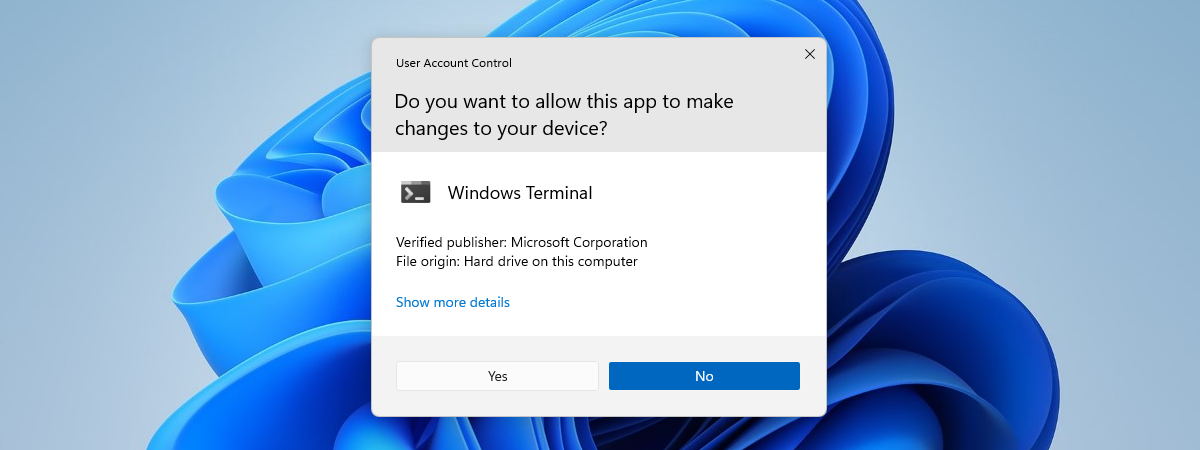
You may need to frequently run an app that requires administrator permissions, which always triggers a UAC (User Account Control) prompt. You do not want to click Yes or enter the administrator password every time, and you do not want to disable UAC either, because it protects your computer. This is especially annoying when using app updaters, command line tools or game launchers for online games like Fortnite or League of Legends. Game launchers update the game you are playing to the latest version, and often they trigger a UAC prompt. Here is how to stop UAC from asking for your permission for specific apps and games, without disabling UAC:
If you do not feel like reading another guide, a quick method is to search for "task scheduler" in Windows and click or tap the appropriate search result.
Step 2. Create a scheduled task for the app, game or file that you want to run without UAC prompts
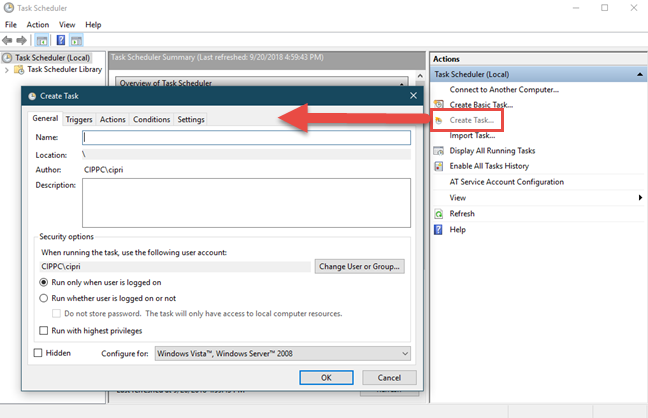
In the Task Scheduler window, click or tap "Create Task" in the Actions column on the right. The Create Task window is shown, where you create advanced tasks for your Windows computer.
Creating a new task in Task Scheduler
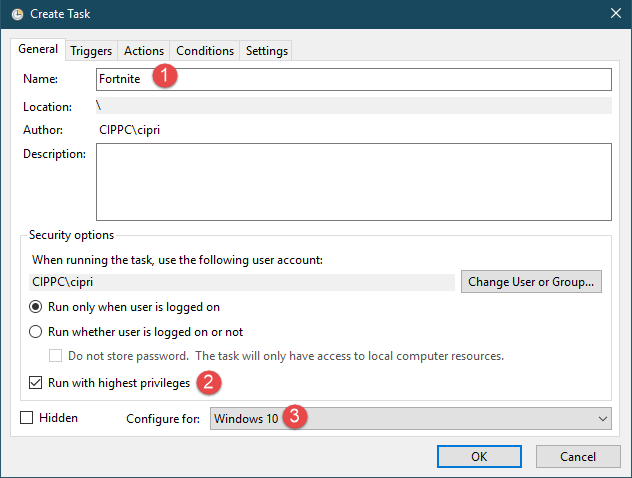
In the General tab of the Create Task window, type a name for your task in the Name field. Make it something short and easy to remember. You need the task name later, so write it down, if you tend to forget quickly. Then, make sure to check the box that says "Run with highest privileges" so that the task is run with administrative permissions. Then, use the "Configure for" drop-down list to select the version of Windows that you are using. In our case, it is Windows 10.
Creating a scheduled task with Task Scheduler
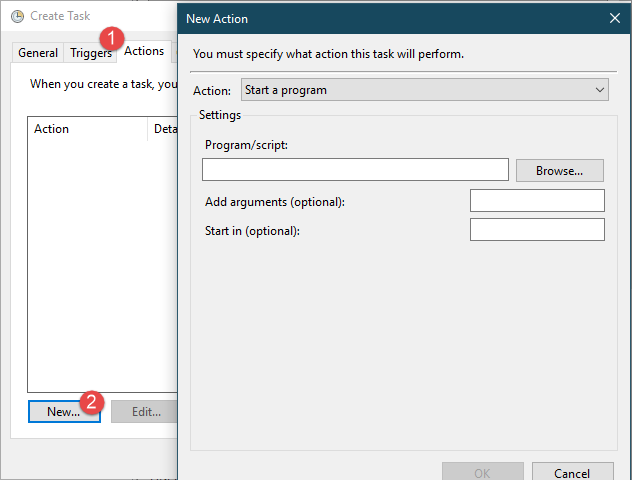
Go to the Actions tab in the Create Task window. There, click or tap the New button, to set an action that is performed by the task. The New Action window is shown.
Setting the action of the scheduled task
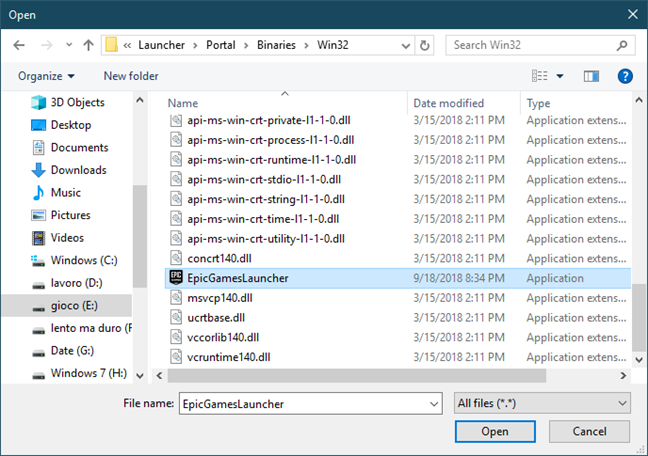
Click or tap Browse and choose the path to the file that you want the task to run. This can be the executable file of an app or game that you want to run without UAC prompts. In our example, we chose the EpicGamesLauncher.exe used in the Fortnite game. After you select the file, press Open.
Choose the file to run when the task is executed
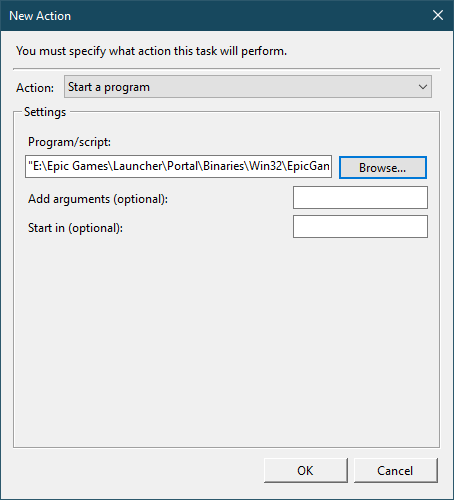
You are back to the New Action window. Here you see the path towards the file that you just selected. Press OK.
The path to the file that is run by the scheduled task
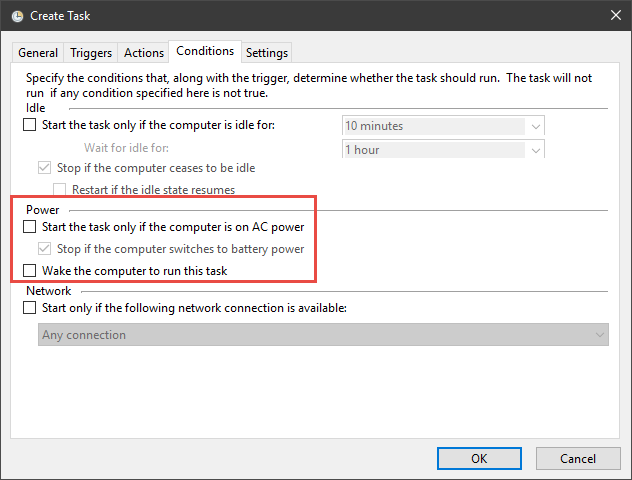
If you are scheduling the task on a laptop, tablet or some other device with a battery, go to the Conditions tab in the Create Task window. There, look for the Power section and uncheck the setting that says "Start the task only if the computer is on AC power." This ensures that the task runs at all times, no matter whether your laptop or tablet is using the battery or it is connected to a power plug.
The settings you must enable for the scheduled task
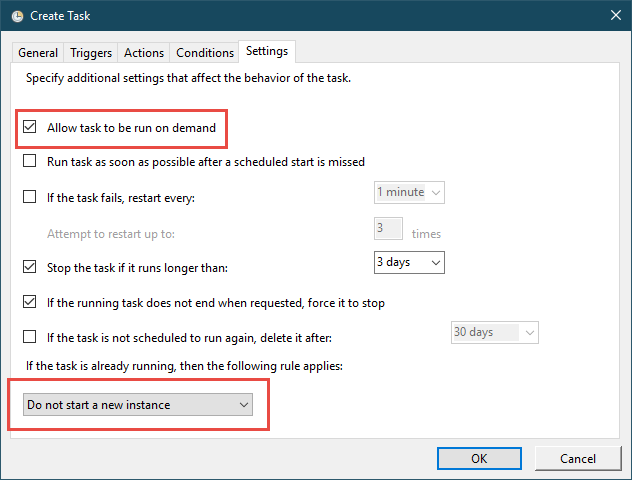
Go to the Settings tab in the Create Task window. Here make sure that the option "Allow task to be run on demand" is checked. This ensures that when you double-click on the shortcut that you create at the next step, the task is run. Also, on the bottom, choose "Do not start a new instance" if the task is already running. Click or tap OK.
The settings you must enable for the scheduled task
The task is created with the name and settings that you have provided.
Step 3. Test if the task runs well
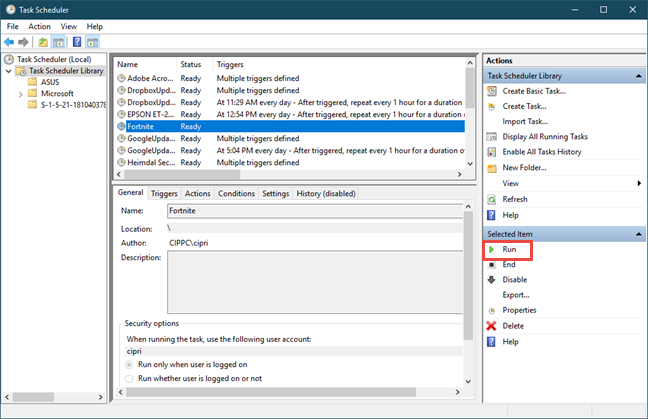
In Task Scheduler, double-click (or double-tap) on the Task Scheduler Library, in the column on the left. In the middle of the app window, you see all the tasks that exist. Find the one you created and click or tap on its name. Then, in the Actions panel on the right, click or tap Run.
Running the task from Task Scheduler
The task should run and launch the file that you selected, with administrative permissions, and without a UAC prompt. If it does not do that, then you should start over and pay attention to all our instructions, so that you do not miss something.
Step 4. Create a shortcut to the scheduled task
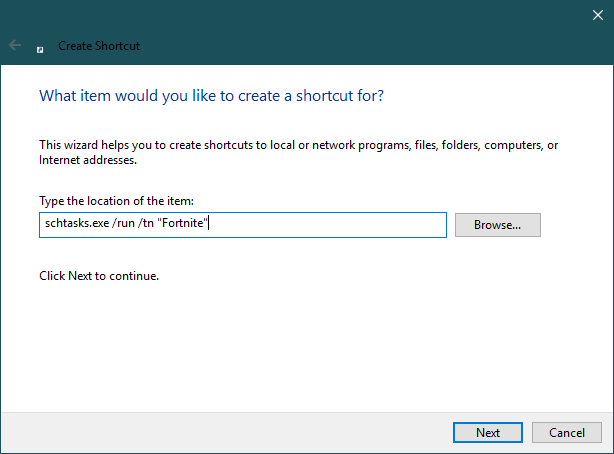
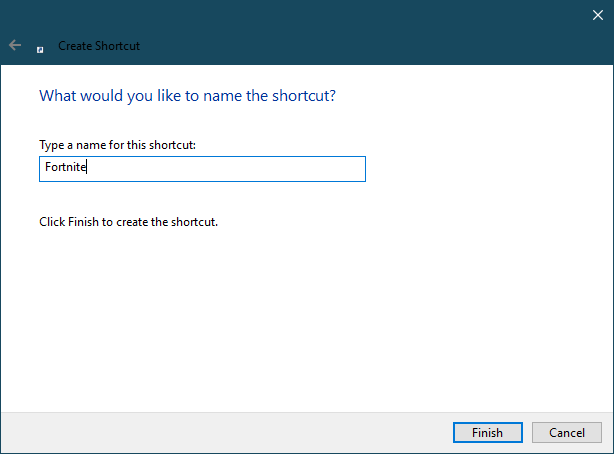
The next step is to use the Create Shortcut wizard to create a shortcut to the task you just created. We explain in detail how to create shortcuts in this guide: How to create shortcuts for apps, files, folders and web pages in Windows. When you create the shortcut, in the "Type the location of the item" field, type: schtasks.exe /run /tn "Task Name". Task Name needs to be the actual name of the task. In our case, we typed: schtasks.exe /run /tn "Fortnite".Then, press Next.
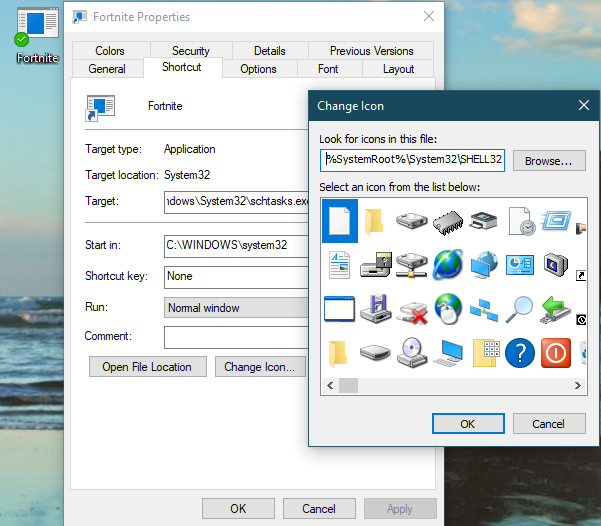
Changing the icon of the shortcut for the scheduled task
When you double-click or double-tap on the shortcut, it runs the selected file with administrator permissions, without triggering a UAC prompt. Enjoy!
What app, game or file do you run with this method?
This wasn't that hard, was it? A bit time consuming but definitely worth the effort, especially if you are often working with apps or files that require administrative permissions. This can be especially useful if you are a network administrator who runs Powershell as admin. Before closing this tutorial, tell us in a comment, which apps you are running using this method. We are curious to know.
I use this to open BlueStacks 5 directly into GooglePlayStore games. My favorite game at the moment is “Iron Maiden – Legacy of the Beast”
BlueStacks asks for UAT every time you open it. This really helps!
Ciprian Adrian Rusen ·
Thanks for sharing this. 😀
Ralph ·
Running “Dropbox” and “Everything”
Patwone ·
Thank you for the Task Scheduler I got that to work fine, when it comes to the short cut does not work nor from the task bar those two parts are not calling the application, it is like nothing is turning on. Any ideas to how to edit or the syntax, I am running Windows 10?
Claude Dumont ·
Thank you for this excellent article!
Running an app on Windows 10 without UAC prompt and admin rights is not such an easy procedure BUT your article helped me and works perfectly.
Kind regards,
Claude
Lionel ·
Recently got the free GTA V from epic games, however its a pain in the butt as the Epic launcher has to launch the rockstar launcher to play it and the rockstar launcher is always asking for admin rights, any suggestions how to work around this?
GabiBont ·
Total Commander…..
Ataktos ·
You/s are a god/s!!. Thank you!!. This is realy amazing. Now i can play my favorite games. Because of account restrictions i couldnt, but now i can thanks to you!.
Anonymous ·
Happy to help. 😉
Philip ·
Thanks. I used these techniques together with a program RapidEE to switch the system environment PATH variable between Python V2.7 and Python V3.7
Supun De Silva ·
Adding a few changes to this.
All the steps are correct in this
If you need to spawn a different application as a administrator, follow the steps in this.
In the ‘New Action’ window,
Add an argument as
/c
———————————————————-
P.S.
Switch to *nix platforms. Life gets a lot easier. I wasted hour of time to figure this out on my own.
*nix FTW.
jarze ·
For some reason, the task does not appear on the library (Win7 Ultimate). I thought there was an error creating the task, tried again, but it informed the task already exists. So, where is it?
John ·
Thanks alot, this explanation is crystal clear. I use the shortcut to run my laptop battery manager.
Ciprian Adrian Rusen ·
Happy to help. Don’t hesitate to subscribe to our newsletter and stay up-to-date with our tutorials.
Jeff Hunt ·
A related question: I have a task running with “highest privileges” and others running without that box checked. The other tasks don’t pop up a window, but the highest privileges one does. Is there anyway to turn that off or make it run in a minimized state? The task runs every 10 minutes and is disruptive to real work.
fouzi ·
Thank you very much sir
tcebob ·
Run program using Task Scheduler works fine on my Win 7. Is there a way to suppress the momentary flicker of the command prompt when running the shortcut?
joshieecs ·
I call schtasks with nircmd execmd specifically to avoid the brief popup. If you copy nircmd to the Windows directory, you can just make a shortcut with this target:
Thanks for the tip. (Took me a while to get used to nir command — no user interface.)
I’m trying to make a shortcut to a task which is in a subdirectory. Tried: C:WindowsSystem32schtasks.exe /run /tn “XUACCommandAdminXUAC” but doesn’t work. Any suggestions?
joshieecs ·
I’m not sure. I made a subfolder and task with the same name as yours and it works for me. This it the Target for my shortcut:
Note that I copied nircmd.exe to C:Windows beforehand. If you just run nircmd.exe it has a button to copy it there for you.
tcebob ·
Dunno what I was doing wrong. Works fine now. Nircmd makes it smoother. Thanks again.
Nix ·
Right click on the shortcut and select Properties.
Then click the drop down list for ‘Run:’ and select Minimized.
Click Apply.
Click OK.
Nix ·
Right click on the shortcut and select Properties.
Then click the drop down list for ‘Run:’ and select Minimized.
Click Apply.
Click OK.
This means no need to use NIRCMD.
santoshbattula ·
This works perfectly in windows 8.1
But in windows 7 Professional, while running the shortcut from non-admin user, it is terminating with an error message that the access is denied.
johncullin ·
Same result as santosh above.
Tyler ·
It required an admin to type in a password for me, and I am running windows 8.1
Amil ·
For standard users to run a task, they must be given read and execute permissions to the file C:WindowsSystem32Tasks”taskname”, and given read access to C:Windowssystem32Tasks


Discussion (28)
I use this to open BlueStacks 5 directly into GooglePlayStore games. My favorite game at the moment is “Iron Maiden – Legacy of the Beast”
BlueStacks asks for UAT every time you open it. This really helps!
Thanks for sharing this. 😀
Running “Dropbox” and “Everything”
Thank you for the Task Scheduler I got that to work fine, when it comes to the short cut does not work nor from the task bar those two parts are not calling the application, it is like nothing is turning on. Any ideas to how to edit or the syntax, I am running Windows 10?
Thank you for this excellent article!
Running an app on Windows 10 without UAC prompt and admin rights is not such an easy procedure BUT your article helped me and works perfectly.
Kind regards,
Claude
Recently got the free GTA V from epic games, however its a pain in the butt as the Epic launcher has to launch the rockstar launcher to play it and the rockstar launcher is always asking for admin rights, any suggestions how to work around this?
Total Commander…..
You/s are a god/s!!. Thank you!!. This is realy amazing. Now i can play my favorite games. Because of account restrictions i couldnt, but now i can thanks to you!.
Happy to help. 😉
Thanks. I used these techniques together with a program RapidEE to switch the system environment PATH variable between Python V2.7 and Python V3.7
Adding a few changes to this.
All the steps are correct in this
If you need to spawn a different application as a administrator, follow the steps in this.
In the ‘New Action’ window,
Add an argument as
/c
———————————————————-
P.S.
Switch to *nix platforms. Life gets a lot easier. I wasted hour of time to figure this out on my own.
*nix FTW.
For some reason, the task does not appear on the library (Win7 Ultimate). I thought there was an error creating the task, tried again, but it informed the task already exists. So, where is it?
Thanks alot, this explanation is crystal clear. I use the shortcut to run my laptop battery manager.
Happy to help. Don’t hesitate to subscribe to our newsletter and stay up-to-date with our tutorials.
A related question: I have a task running with “highest privileges” and others running without that box checked. The other tasks don’t pop up a window, but the highest privileges one does. Is there anyway to turn that off or make it run in a minimized state? The task runs every 10 minutes and is disruptive to real work.
Thank you very much sir
Run program using Task Scheduler works fine on my Win 7. Is there a way to suppress the momentary flicker of the command prompt when running the shortcut?
I call schtasks with nircmd execmd specifically to avoid the brief popup. If you copy nircmd to the Windows directory, you can just make a shortcut with this target:
nircmd execmd schtasks /run /tn “TaskName”
https://nircmd.nirsoft.net/
Thanks for the tip. (Took me a while to get used to nir command — no user interface.)
I’m trying to make a shortcut to a task which is in a subdirectory. Tried: C:WindowsSystem32schtasks.exe /run /tn “XUACCommandAdminXUAC” but doesn’t work. Any suggestions?
I’m not sure. I made a subfolder and task with the same name as yours and it works for me. This it the Target for my shortcut:
C:Windowsnircmd.exe execmd schtasks /run /tn “XUACCommandAdminXUAC”
Note that I copied nircmd.exe to C:Windows beforehand. If you just run nircmd.exe it has a button to copy it there for you.
Dunno what I was doing wrong. Works fine now. Nircmd makes it smoother. Thanks again.
Right click on the shortcut and select Properties.
Then click the drop down list for ‘Run:’ and select Minimized.
Click Apply.
Click OK.
Right click on the shortcut and select Properties.
Then click the drop down list for ‘Run:’ and select Minimized.
Click Apply.
Click OK.
This means no need to use NIRCMD.
This works perfectly in windows 8.1
But in windows 7 Professional, while running the shortcut from non-admin user, it is terminating with an error message that the access is denied.
Same result as santosh above.
It required an admin to type in a password for me, and I am running windows 8.1
For standard users to run a task, they must be given read and execute permissions to the file C:WindowsSystem32Tasks”taskname”, and given read access to C:Windowssystem32Tasks
Thanks, really helpful tutorial.