With the help of the Task Scheduler, you can create all kinds of automated tasks to be run by Windows. For example, you can schedule some apps to run at specific time intervals or display a message on your desktop when something happens. Unfortunately, not many people know about this tool, as Windows does not advertise it as much as it deserves. To help you get started working with it, we created this guide on how to use the basic task wizard offered by the Task Scheduler. Here is how it works:
How to access the Task Scheduler in Windows
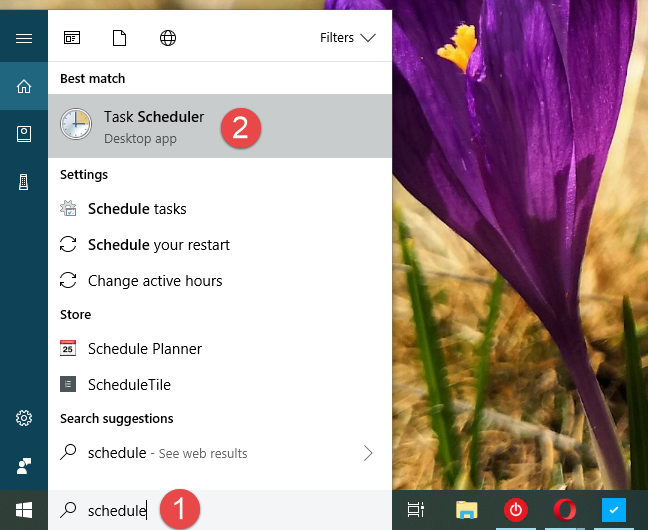
If you want to use the Task Scheduler, you must first know how to open it. If you do not know how, we have published a separate guide on this subject: 9 ways to start the Task Scheduler in Windows (all versions).
If you do not have the time required to read that tutorial too, a fast way to open the Task Scheduler in any modern version of Windows is to use the search. Type the word schedule in Cortana's search field on the taskbar in Windows 10, on the Start screen from Windows 8.1, or in the search field on the Start Menu, in Windows 7. Then, click or tap on the Task Scheduler search result.
Task Scheduler, Basic Task Wizard
Before going ahead, remember that Task Scheduler looks and works the same in Windows 10, Windows 7 and Windows 8.1. Because of that and also for simplicity, we are going to use screenshots taken mainly in Windows 10.
Step 1. Start the "Create Basic Task" wizard
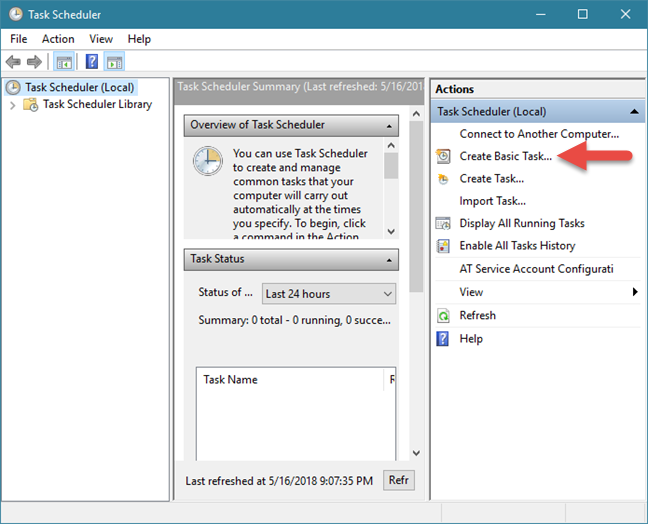
In the Task Scheduler window, go to the Actions column on the right. There, click or tap the "Create Basic Task" link, to open the wizard bearing the same name.
Task Scheduler, Basic Task Wizard
The wizard allows anyone to create basic tasks that are executed by Windows, at a given time or when a specific condition is met. To illustrate the whole process, let's assume that you want to create a task that periodically runs the Disk Cleanup tool.
Step 2. Name the task and give it a description
On the first step of the wizard, enter a name and a description for your new task. Then, click or tap the Next button.
Task Scheduler, Basic Task Wizard
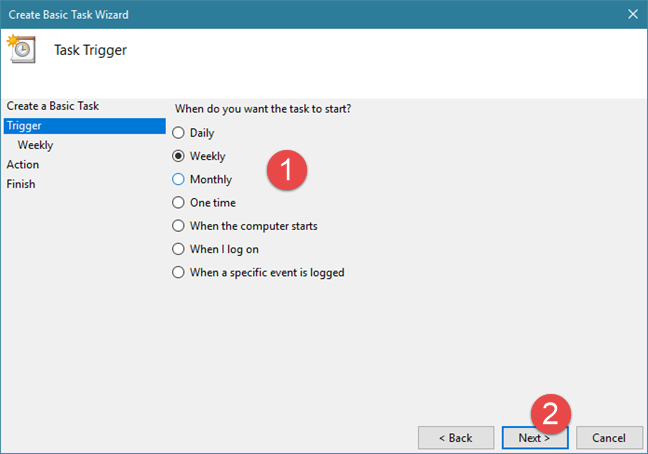
Step 3. Choose when to execute the new task
You have to decide when the task starts. There are many options for choosing when the task is run: every day, weekly, monthly, only once, each time your computer starts, every time you log on, or when a particular event takes place. This part of the process is called the task trigger and, in other words, it is what needs to happen for the task to run. Pick the option that you want and press Next.
Task Scheduler, Basic Task Wizard
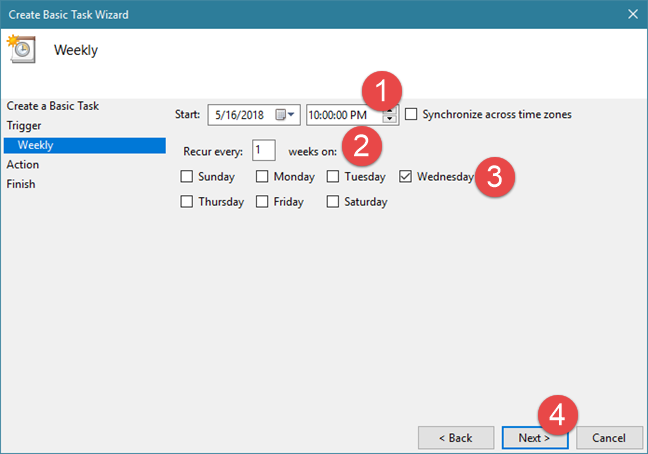
You must provide more details about the time when the task should run, depending on the option you have chosen previously.
For example, if you want the new task to be executed every Wednesday at 10:00 PM, you should choose Weekly and then make the following configuration:
Set the starting date and time next Wednesday, at 10:00 PM;
In the "Recur every" field, type 1, meaning that the task is going to be run weekly;
Choose the day of the week as Wednesday.
Task Scheduler, Basic Task Wizard
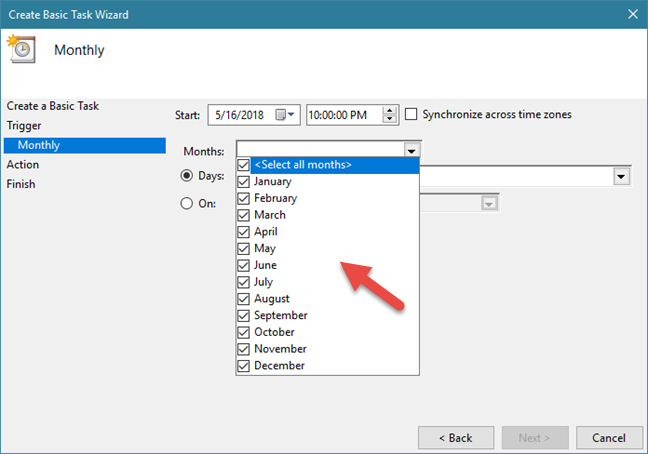
If you choose to execute the task Monthly, apart from the starting date and time, you must also choose the month when the task is executed. Click or tap on the Months drop-down menu to make the task run on several specific months, in all the months of the year, or in just one month.
Task Scheduler, Basic Task Wizard
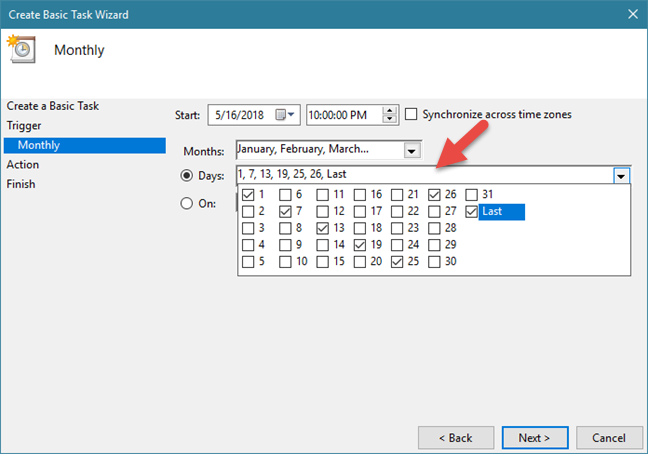
Then, you can choose the day or days of the month, by checking Days and typing the days, or by selecting them from the list.
Task Scheduler, Basic Task Wizard
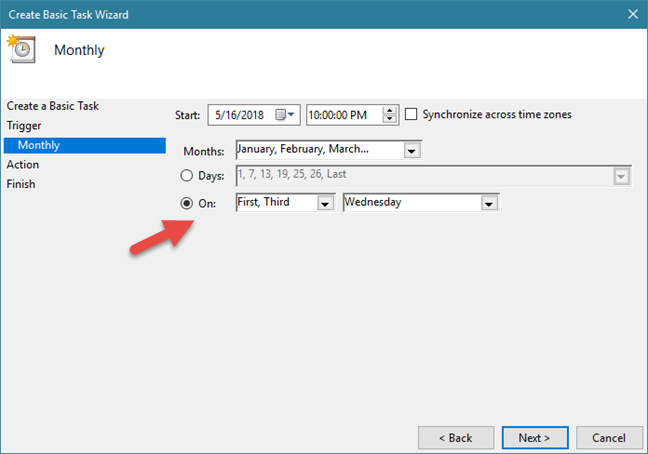
You can also set the task to run on a specific day of a specific week. To do that, click or tap the On option. Then, in the first drop-down list, choose the number of the week and in the second drop-down list, pick the day of the week.
Task Scheduler, Basic Task Wizard
After you are done setting when the task is going to be executed, click or tap Next.
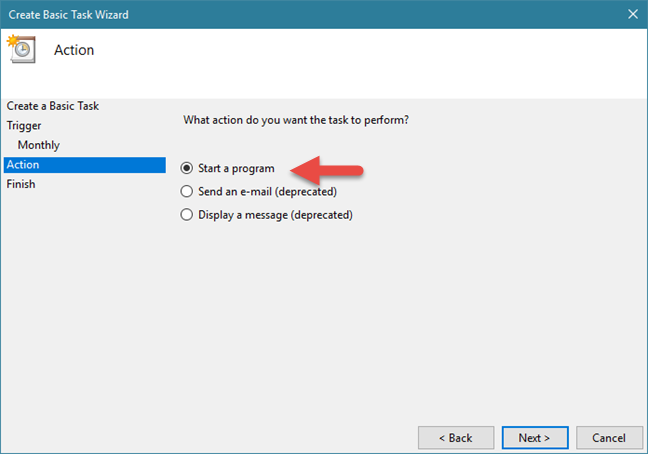
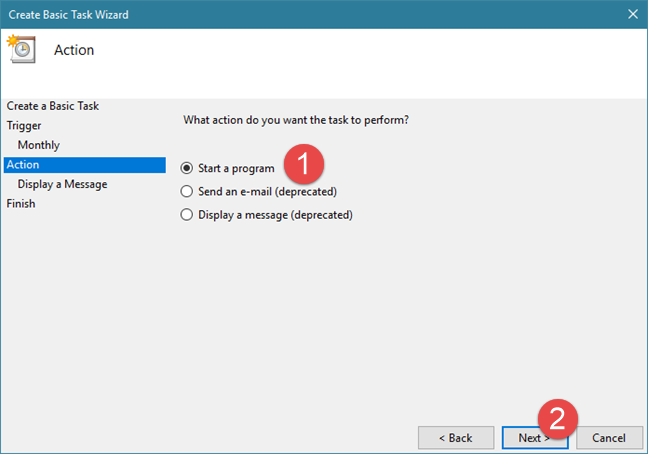
Step 4. Set the action that you want to be executed
On the next step, you must tell Task Scheduler the action to take: "Start a program," "Send an e-mail" or "Display a message."
Here, there is an essential difference between Windows 10 and Windows 8.1 on the one hand, and Windows 7, on the other hand. The three options are available in all these Windows versions, but the last two are highlighted as deprecated in Windows 10 and Windows 8.1, which means that they do not work in these operating systems.
Task Scheduler, Basic Task Wizard
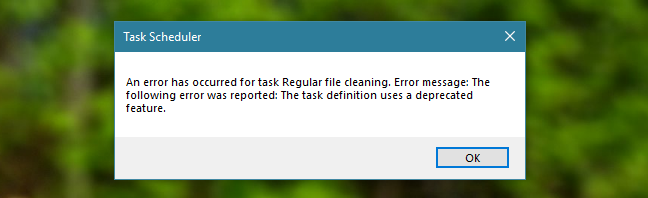
Even if you can follow the wizard and create a task that sends an e-mail or displays a message, just before the task is saved, you get an error message like the one below, which states that "The task definition uses a deprecated feature."
Task Scheduler, Basic Task Wizard
Therefore, in Windows 10 and Windows 8.1, you cannot create tasks that send e-mails or display messages, even if the wizard displays these options. You can create such tasks only in Windows 7. If you want to see how they work, read the last section of this guide.
However, let's continue the tutorial and see how to set the action that is going to be executed by the task:
If you want to run a program like Disk Cleanup, select "Start a program" and then click or tap Next.
Task Scheduler, Basic Task Wizard
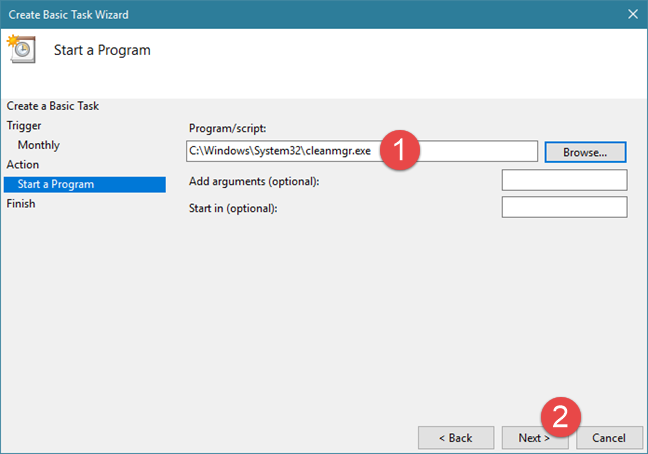
Click or tap Browse, select the program or the script that you want to be run, and then press Open. Alternatively, you can also type the location to the executable file of that program. If you want or need, you can add arguments and set the folder where the program/script starts. When you are done, press Next.
Task Scheduler, Basic Task Wizard
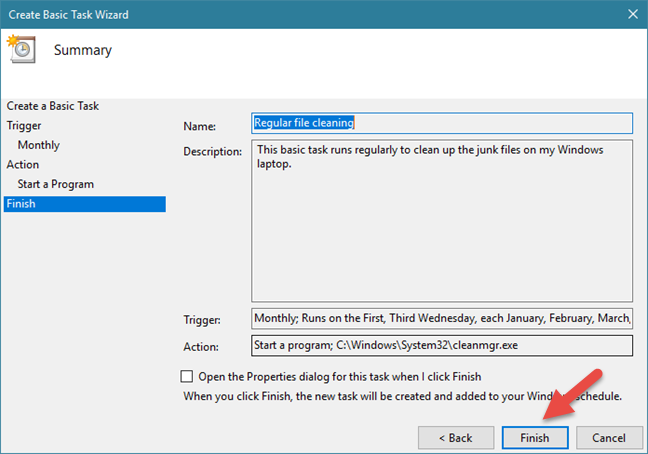
Step 5. Check the details of the new task and save it
Finally, you can see a summary of the task and the settings that you have made. Click or tap the Back button if you want to change anything. Otherwise, press the Finish button. This action saves the task and enables it to be run when you scheduled it.
Task Scheduler, Basic Task Wizard
How to use Task Scheduler to create tasks that send e-mails or display messages (only in Windows 7)
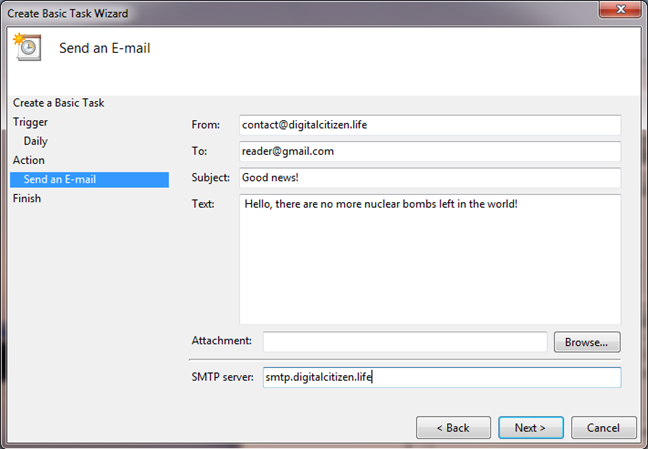
If you are using Windows 7, let's see how to set a "Send an e-mail" action:
After you choose to use this action and press the Next button, you have to enter the details of your message: sender, receiver, email subject and the text content. If you want, you can also attach a file. The last and most important step is providing the address of the SMTP server that sends the email. You should use the SMTP server of the email address you specified in the From field. However, the trouble is that most SMTP servers require authentication before sending anything, to prevent abuses and problems. The "Create Basic Task" wizard has no fields for providing the necessary authentication details. Therefore, the sending of the email is more than likely going to fail. It might work, but only if the SMTP server does not require authentication for sending email messages.
Task Scheduler, Basic Task Wizard
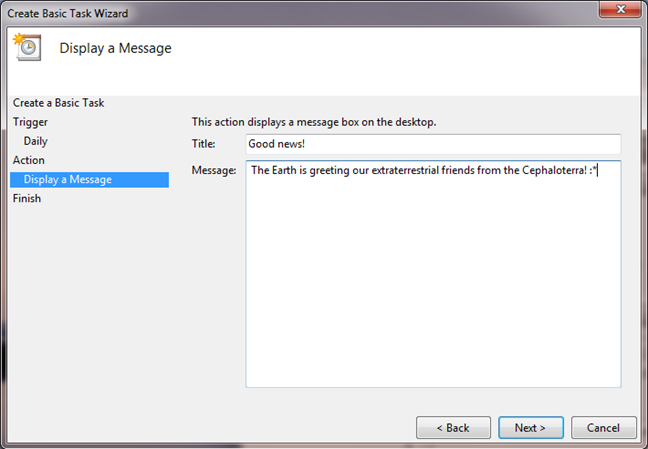
The other action that only works in Windows 7 is the one called "Display a message": If you choose this task action, all you have to do is type the title of the message and the text that you want to be displayed.
Task Scheduler, Basic Task Wizard
When done, click or tap Next and then Finish.
Conclusion
As you can see, creating basic scheduled tasks is easy in Task Scheduler. The wizard lets you choose many settings about the what triggers the task and what actions it should take when that happens. If you have any suggestions, questions or problems, leave us a comment below and let's talk.
Hi,
I need to create task scheduler to handle weekdays and weekend also,please suggest settings.
Nabhan ·
Say we have a task called Ping and you want a task called pong to run after it,But only after verifying that the first task is completed and at a particular time how is this done.
abhishek ·
thanks for sharing this
James ·
Hello and thank you for a very comprehensive and educative explanation of how to utilize the Windows Task Scheduler.
Jasna A ·
I’m trying to create basic task in Task Scheduler (Windows 10) and I’m stuck in Browsing Programs/script because I do not know what to select?
Anonymous ·
create a shortcut pointing to the following “%windir%system32taskschd.msc /s”
without the quotes
TheAncient ·
Dollar Sign ($) in File name
Here is a trick I found by accident: If you are passing a file name as an argument to a scheduled task, and that file name contains dollar signs, (e.g. “C:Sync Jobs$$ Daily”) you need to double up the dollar signs. Apparently the dollar sign is some sort of special character that needs to be ‘escaped’. Thus, to pass the above file name as an argument, it needs to be specified as “C:Sync Jobs$$$$ Daily”.


Discussion (7)
Hi,
I need to create task scheduler to handle weekdays and weekend also,please suggest settings.
Say we have a task called Ping and you want a task called pong to run after it,But only after verifying that the first task is completed and at a particular time how is this done.
thanks for sharing this
Hello and thank you for a very comprehensive and educative explanation of how to utilize the Windows Task Scheduler.
I’m trying to create basic task in Task Scheduler (Windows 10) and I’m stuck in Browsing Programs/script because I do not know what to select?
create a shortcut pointing to the following “%windir%system32taskschd.msc /s”
without the quotes
Dollar Sign ($) in File name
Here is a trick I found by accident: If you are passing a file name as an argument to a scheduled task, and that file name contains dollar signs, (e.g. “C:Sync Jobs$$ Daily”) you need to double up the dollar signs. Apparently the dollar sign is some sort of special character that needs to be ‘escaped’. Thus, to pass the above file name as an argument, it needs to be specified as “C:Sync Jobs$$$$ Daily”.