When you create large documents, you may need to add page numbers. They are useful for many reasons, and, depending on the type of document that you create, they may be mandatory. Microsoft Word offers several ways for you to add page numbers, and some may not be as intuitive as you might assume. Here is how to add page numbers in any Word document, starting at page one, two, three, or any other page:
NOTE: This tutorial was created using Microsoft Word from Office 365. It should work with Word from Microsoft Office 2019, 2016, and 2013.
How to add page numbers to a Word document, starting with the first page
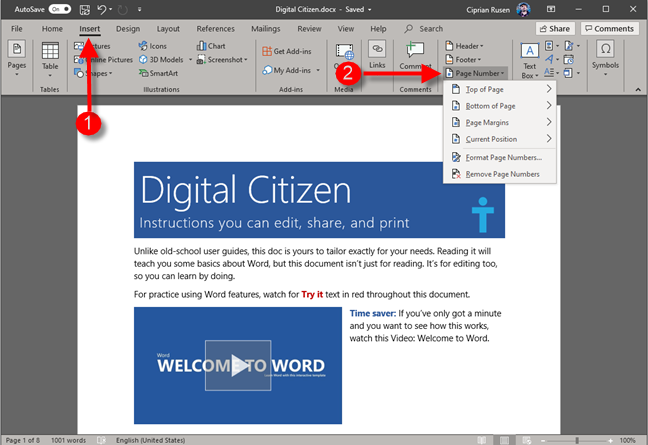
The most straightforward procedure is to add page numbers to all the pages in your Word document. To do that, in Microsoft Word, click or tap the Insert tab. In the Header & Footer section, click or tap the Page Number button. A menu opens, with choices on where to place the page numbers: Top of Page, Bottom of Page, Page Margins, and Current Position.
Microsoft Word - add page number
For most documents, the standard is to add the page number at the bottom of the page. If that is the case for you, go to Bottom of Page, and then select the exact position and format, using the previews shown by Microsoft Word. You can align the page numbers to the left, center, or right. You can also use accent bars, and so on. Choose what you want from the list.
Microsoft Word - choose the format for the page number
You are taken to the Footer (or Header) of the current page, where you see the page number added. By default, the numbering starts at 1.
Microsoft Word - page number added to the footer
The footer (or header, if you chose to add page numbers on the top of the page) is now editable. You can add other text if you wish. When you are satisfied with the result, click or tap the Close Header and Footer button on the ribbon, shown on the Design tab.
Microsoft Word - Close Header and Footer
Save your document to keep the newly added page numbers.
How to add page numbers to a Word document, starting with page two
Many Word documents have a cover, and the content starts on the second page. If that is the case for you too, the numbering should start on the second page of the document. To do that, first add the page numbers using the instructions from the previous section. Then, you have to format the page numbers according to your specific needs:
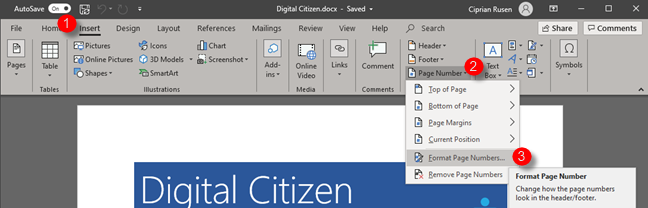
Make sure that you are on the very first page of the Word document, the one where you do not want the page number displayed. Then, click or tap the Insert tab, go to the Header & Footer section, and click or tap the Page Number button. In the menu that opens, click or tap Format Page Numbers.
Microsoft Word - Format Page Number
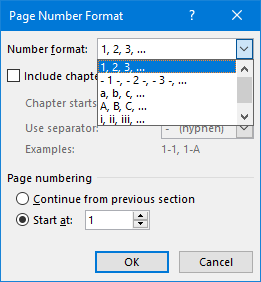
This action opens a window named Page Number Format. Here you can choose a different format for the pagination: using numbers, letters, and so on.
Microsoft Word - Page Number Format
To start the page numbers on page two of the document, choose to start page numbering at 0, and click or tap OK.
Microsoft Word - Page Number Format
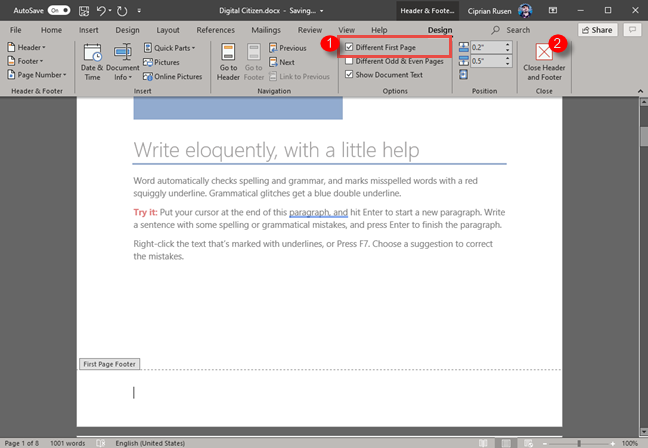
You now see the page numbering starting with page 0. To hide the "page 0" numbering, in the Design tab, go to the Options section and check the box next to the "Different First Page" option. Click or tap the Close Header and Footer button on the ribbon, shown on the Design tab.
Microsoft Word - Different First Page
Now the page numbering starts with page two, which has the number 1 on its header or footer, depending on where you chose to add the page numbers.
How to add page numbers to a Word document, starting with page three or later
Some documents may include a cover, and a long table of contents that is two pages long, or more. In that case, you may need to start numbering pages on page three or later. The procedure for doing that is different from the others shared in this guide. First, you need to separate the pages you want to be numbered from those that you don't, using a section break.
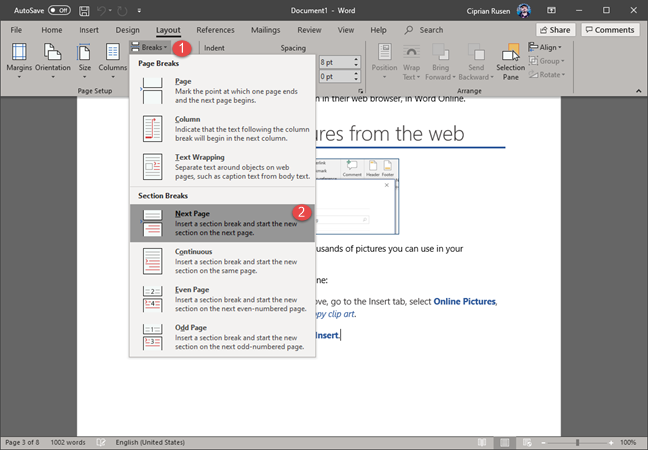
To do that, click at the beginning of the page where you want the numbering to begin, just before the first character on that page. Then, click or tap the Layout tab on the ribbon, in Microsoft Word.
Microsoft Word - Go to the Layout tab
In the Page Setup section, click or tap the Breaks button, and in the menu that opens, choose Next Page.
Microsoft Word - Adding page breaks
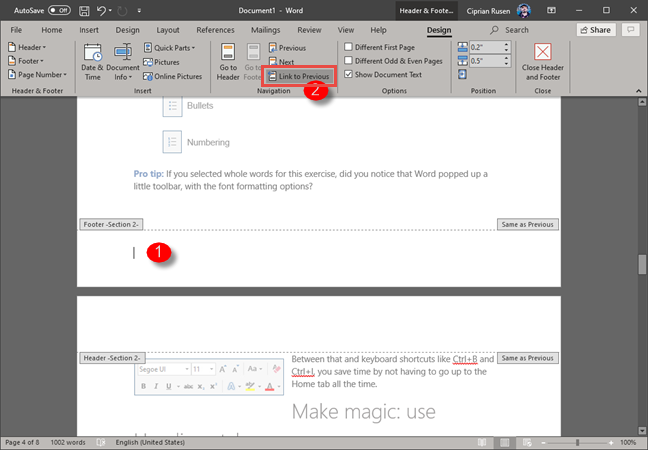
Double-click on the footer (or header) area on the first page where you want to display page numbers. This action makes the footer (or header) editable and opens the Design tab. In the Navigation section, click the "Link to Previous" button. This action turns off the link between the page you are on and the previous ones. Also, it unlinks the footer (or header) from the previous section that is going to be unnumbered.
Microsoft Word - Link to Previous
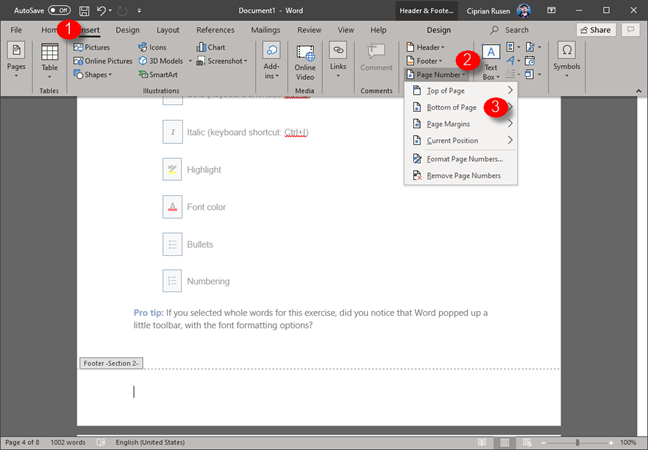
After the link is removed, go to the Insert tab and, in the Header & Footer section, click or tap the Page Number button, and choose where you want the page numbering to be placed.
Microsoft Word - Add page number
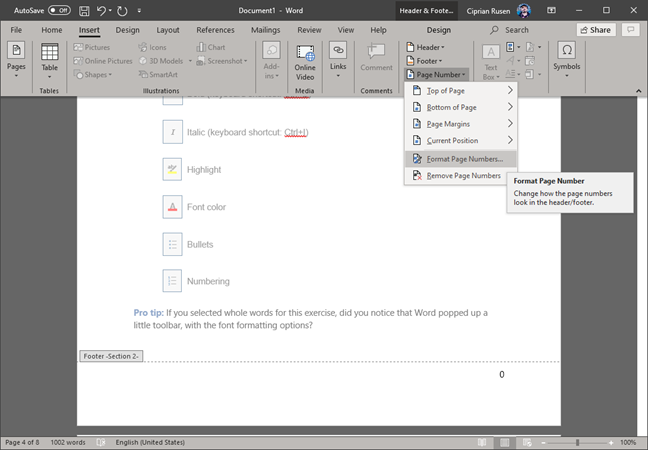
To edit the page numbering, and start it with 0, 1 or something else, click the Page Number button one more time, and choose Format Page Numbers.
Microsoft Word - Format Page Numbers
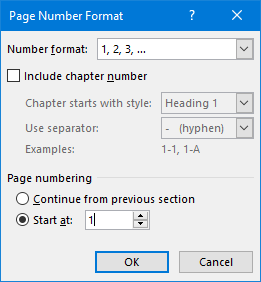
In the Page Number Format window, choose the number at which you want to start the page numbering and the format. Then, click or tap OK.
Microsoft Word - Page Number Format
Double-click outside the footer or header, to stop editing the page numbering and resume editing the Word document. Alternatively, go to the Design tab, and click or tap the Close Header and Footer button on the ribbon.
Did you add page numbers in your Microsoft Word document?
We hope that this guide has managed to help you add page numbers where you want in your Word document, starting with the page that you want. If you have questions or problems, do not hesitate to leave a comment below. Good luck in creating impressive documents in Microsoft Word!


Discussion (0)
Be the first to comment.