When you edit Microsoft Word documents, you may need to change the page layout for some of your pages, restart the automatic numbering or change the number of columns. In all these cases you need to introduce sections in your Word document. Read this tutorial and find how to add, remove and manage sections in all your Word documents:
NOTE: This tutorial applies to the desktop versions of Microsoft Word, found in Microsoft Office, and Office 365. It does not apply to the mobile versions of Word, like those found for free, on Windows 10 tablets, or on devices with Android and iOS.
What are section breaks in Word documents and why are they useful?
The section breaks divide your Word document into separate parts that allow you to treat these parts as separate documents, with different properties. The section breaks can act as a page break and force a new page in Word, or they can be continuous, and the content that comes after these section breaks continues on the same page.
Section breaks in Microsoft Word
Six features in Microsoft Word require section breaks. Four of them require a section break that acts as a page break:
Changing the page margins
Using different headers and footers
Changing the paper size or orientation
Changing the page numbering
Other two features require section breaks that continue on the same page:
Changing or restarting numbering schemes
Changing the number of columns
If you introduce a continuous section break and then apply to the next section one of the four changes that require a page break, Word modifies your section break type automatically, from continuous to next page.
Microsoft Word applies any of these changes only to the current section (the one where your cursor is). If you want to apply this type of formatting for the entire document, make sure to select the whole document before activating the change.
How to view existing section breaks in Microsoft Word
The section breaks are by default invisible when you edit Word documents. Just like the end of a line or page breaks, the section breaks are hidden because they serve to organize your content and are not meant to be displayed or printed in the final result. While you edit your document, you may need to see them.
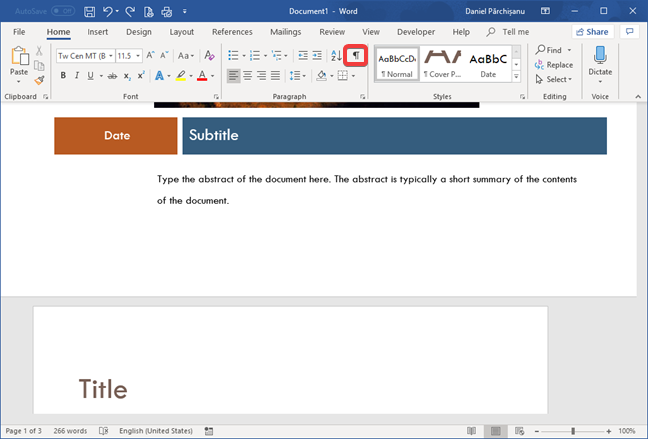
To do that, first, make sure that the Home tab is active in the ribbon. Look for the Paragraph section and, in the right-top corner, press the Show/Hide button for formatting marks (it has a Pilcrow sign - ¶ - on it).
The Pilcrow button in Microsoft Word
The next, odd or even page section break appears at the end of your document's pages.
Section break (Next page) in Microsoft Word
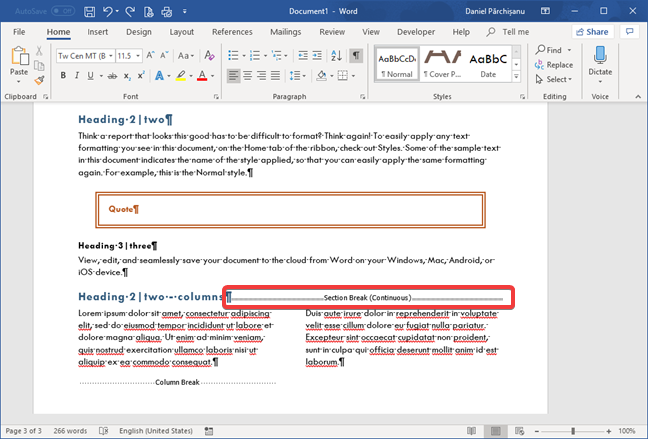
The continuous section breaks can show up anywhere in your document, as highlighted in the screenshot below.
Section break (Continuous) in Microsoft Word
How to insert section breaks in Microsoft Word documents
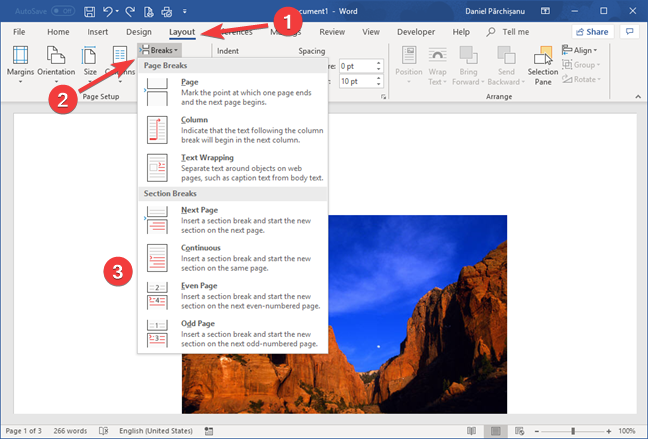
The section breaks can be inserted from the Layout tab. First, make sure you position the cursor in the document, in the place where you want to start a new section.
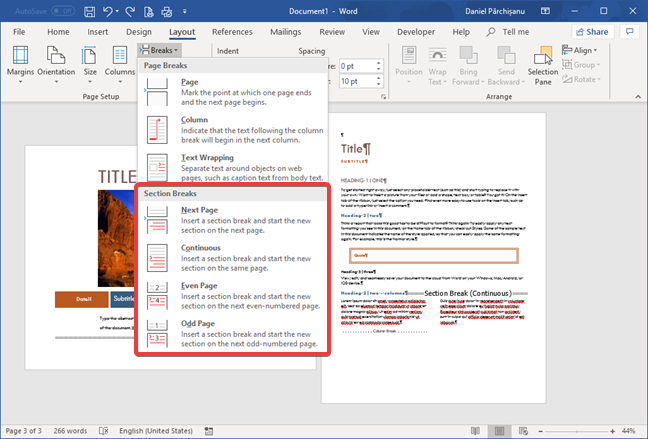
Click or tap the Layout tab on the ribbon. In the Page Setup section, locate the Breaks button and click or tap on it. A drop-down menu opens up, and the section breaks options are at the bottom.
Insert a section break in Microsoft Word
There are four types of section breaks:
Next Page - The new section after the break starts on a new page.
Continuous - The new section continues on the same page.
Even page/Odd page - They are similar to the Next Page break, except that it may insert a blank page to force the next page to be even or odd, depending on what you choose.
If you want to check what Word has done, press the Pilcrow (¶) button in the Home tab (follow the instructions from the previous section). You are now ready to apply separate page, columns or numbering formatting for each section.
How to remove section breaks in Microsoft Word
Since the section breaks are hidden by default in Word, you need to show the formatting marks to see them. Press the Pilcrow (¶) button in the Paragraph section from the Home tab.
The Pilcrow button in Microsoft Word
The section breaks show up in the document so that you can identify and remove them. Once you identify the section break you want to eliminate, you can treat it as any other character in the document. You can select it and delete it using the Delete or Backspace keys on your keyboard.
Section break (Continuous) in Microsoft Word
Microsoft Word stores the formatting specific to a section in the section break located at the end of it. If you delete the section break, the content of the section adopts the formatting of the next section immediately. Remember that every Word document starts with one default section and the end of the document, that acts as the section break for it. You cannot delete the end of the document in Microsoft Word. As a result, you cannot delete in one go the formatting specific to the last section.
It is not that complicated, isn't it?
The theory behind section breaks seems complicated, but it is easy to manage them once you start to practice. As a rule of thumb, never create more sections than strictly necessary because making changes later on in your Word document becomes tedious. Keep in mind that the Header/Footer features allow, for example, different header or footer for the first page or for even and odd pages. You can apply such formatting without inserting any new sections.
Enjoyed learning about Breaks in Microsoft Word. You have very clear steps, even for an old guy like me.
I’ve bookmarked this and the other article. I might as well subscribe, although I doubt if I have enough time to enjoy some of the other lessons, although I am retired, too many irons in the fire, etc.
Ciprian Adrian Rusen ·
We were happy to have helped. 😀
Vic N ·
It’s not that complicated? Well, hey – IT DOESN’T WORK!!!
I have both a ‘Section Break (Continuous)’ followed a couple of lines down by ‘Section Break (Next Page)’. I have wasted hours over MANY months trying to delete that stupid ‘Section Break (Continuous)’ and all it does is either nothing at all, or it simply pushes it back to the previous page.
Everyone seems to be claiming that you just highlight it and press delete. That doesn’t work, nor does pressing backspace. I’ve tried many of the ‘solutions’ including several from Microsoft Word, and even THEIR ‘easy’ solutions don’t work.
I’m at my wits end trying to fix it!!! I have no more time to spend on this annoying thing that shouldn’t even be a problem in the first place.
KT ·
That may work in your universe, but not in Office 365. I have a section break (next page) that I CANNOT replace with a section break (continuous). In all versions of Word prior to 2007 this was simple. Once again, Microsoft insists on upgrading to less useful software.
Anonymous ·
This tutorial was created using Office 365.
Tiffany ·
Thank you! This was very easy and straight forward AND for the “common folk.”
Anonymous ·
Happy to help. Do not hesitate to subscribe to our newsletter, for more useful articles.


Discussion (7)
Enjoyed learning about Breaks in Microsoft Word. You have very clear steps, even for an old guy like me.
I’ve bookmarked this and the other article. I might as well subscribe, although I doubt if I have enough time to enjoy some of the other lessons, although I am retired, too many irons in the fire, etc.
We were happy to have helped. 😀
It’s not that complicated? Well, hey – IT DOESN’T WORK!!!
I have both a ‘Section Break (Continuous)’ followed a couple of lines down by ‘Section Break (Next Page)’. I have wasted hours over MANY months trying to delete that stupid ‘Section Break (Continuous)’ and all it does is either nothing at all, or it simply pushes it back to the previous page.
Everyone seems to be claiming that you just highlight it and press delete. That doesn’t work, nor does pressing backspace. I’ve tried many of the ‘solutions’ including several from Microsoft Word, and even THEIR ‘easy’ solutions don’t work.
I’m at my wits end trying to fix it!!! I have no more time to spend on this annoying thing that shouldn’t even be a problem in the first place.
That may work in your universe, but not in Office 365. I have a section break (next page) that I CANNOT replace with a section break (continuous). In all versions of Word prior to 2007 this was simple. Once again, Microsoft insists on upgrading to less useful software.
This tutorial was created using Office 365.
Thank you! This was very easy and straight forward AND for the “common folk.”
Happy to help. Do not hesitate to subscribe to our newsletter, for more useful articles.