

The Volume Mixer was a great feature in Windows 10. However, in Windows 11, the new Volume Mixer looks and functions very differently. If you don’t like the new one and want to get the old Volume Mixer back in Windows 11, we have good news: it’s not gone yet, so you can still access it. Read this article to learn how:
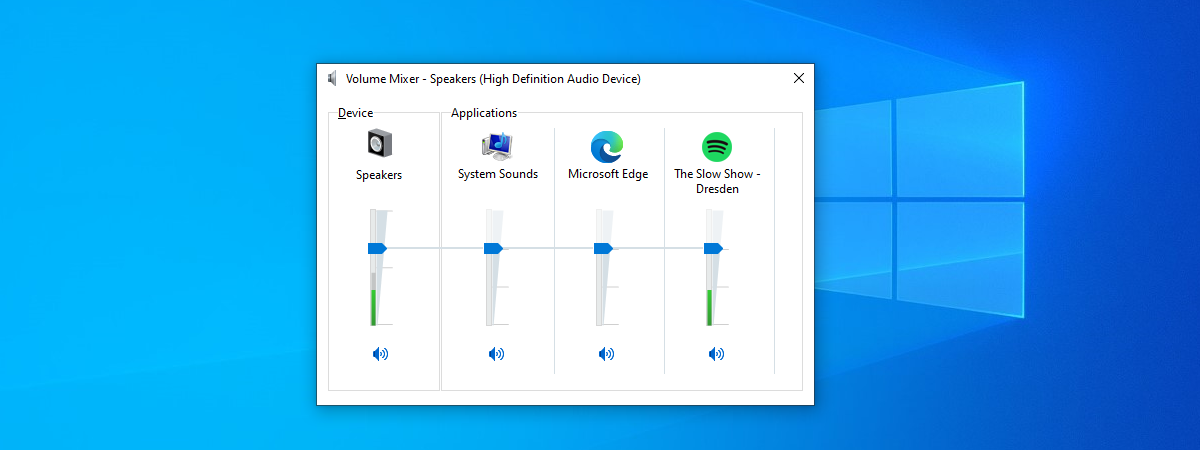
 The Volume Mixer in Windows 10
It was the easiest way to change the volume for each application and the global sound output device. Fast forward to Windows 11, and the same action gets you to this screen, which is called Volume Mixer.
The Volume Mixer in Windows 10
It was the easiest way to change the volume for each application and the global sound output device. Fast forward to Windows 11, and the same action gets you to this screen, which is called Volume Mixer.
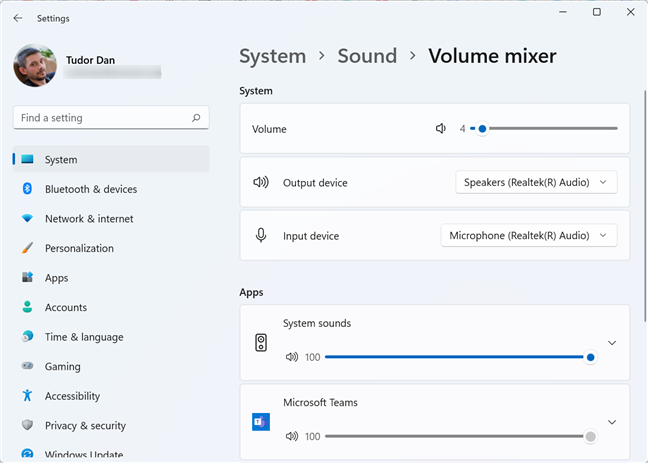
 The Volume Mixer in Windows 11
This is actually a page from the Settings app, one that, in Windows 10, was called “App volume and device preferences.” The look and functionality are identical, although the user interface looks a bit outdated in Windows 10:
The Volume Mixer in Windows 11
This is actually a page from the Settings app, one that, in Windows 10, was called “App volume and device preferences.” The look and functionality are identical, although the user interface looks a bit outdated in Windows 10:
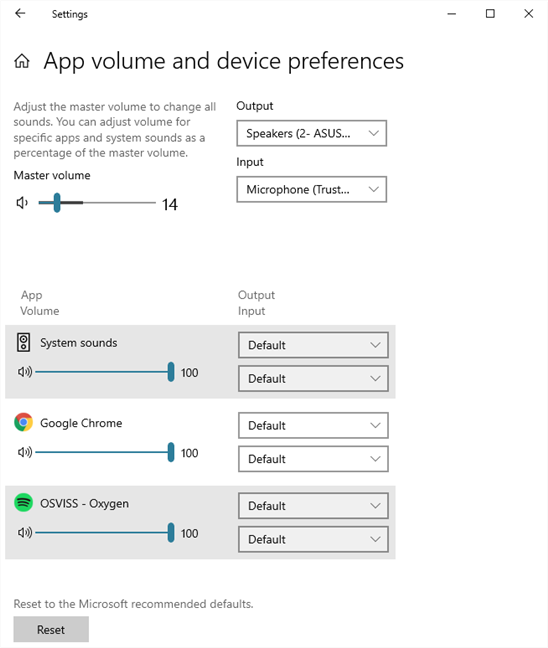
 The same page was also present in Windows 10 under another name
So what happened to the classic Volume Mixer? Well, it was part of the Control Panel, and as is the case with many Control Panel features that have disappeared from one Windows version to the next, the actual function is still present, it’s just hidden and hard to access. Let’s see how exactly to access the classic Volume Mixer in Windows 11:
The same page was also present in Windows 10 under another name
So what happened to the classic Volume Mixer? Well, it was part of the Control Panel, and as is the case with many Control Panel features that have disappeared from one Windows version to the next, the actual function is still present, it’s just hidden and hard to access. Let’s see how exactly to access the classic Volume Mixer in Windows 11:
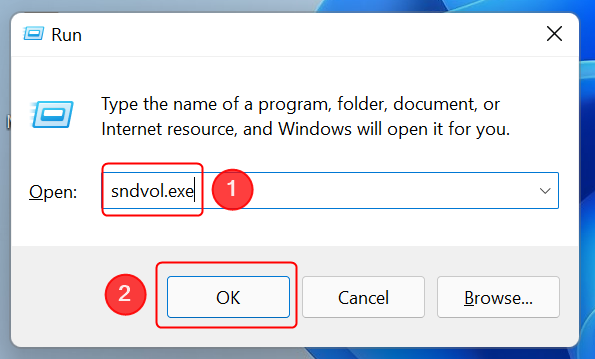
 Open the classic Volume Mixer in Windows 11 using the Run window
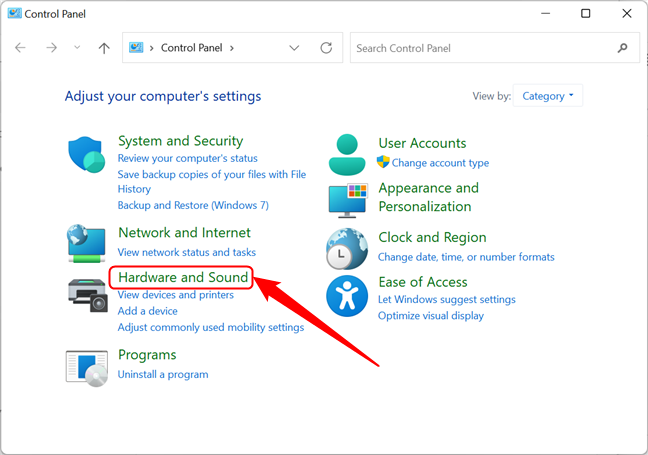
Another way to access it is by opening the Control Panel. Press Windows + R on your keyboard, then type “control” and press Enter. In the main window of the Control Panel, go to “Hardware and Sound.”
Open the classic Volume Mixer in Windows 11 using the Run window
Another way to access it is by opening the Control Panel. Press Windows + R on your keyboard, then type “control” and press Enter. In the main window of the Control Panel, go to “Hardware and Sound.”
 Go to Hardware and Sound in the Control Panel
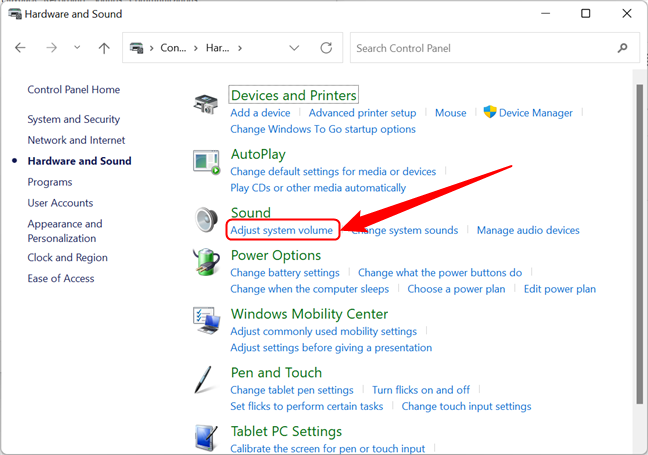
Finally, locate the Sound section and click on “Adjust system volume.” The old Volume Mixer should open.
Go to Hardware and Sound in the Control Panel
Finally, locate the Sound section and click on “Adjust system volume.” The old Volume Mixer should open.
 Open the classic Volume Mixer in Windows 11 from the Control Panel
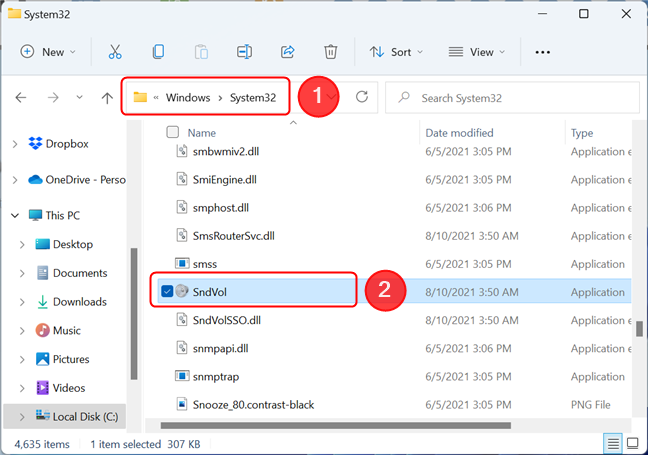
You can also access the classic Volume Mixer by locating and opening its executable. The file is stored on the Windows installation drive. In our case, it’s C:\. Open Explorer and go to C:\Windows\System32. Then, scroll down to sndvol.exe and double-click or double-tap on it.
Open the classic Volume Mixer in Windows 11 from the Control Panel
You can also access the classic Volume Mixer by locating and opening its executable. The file is stored on the Windows installation drive. In our case, it’s C:\. Open Explorer and go to C:\Windows\System32. Then, scroll down to sndvol.exe and double-click or double-tap on it.
 Accessing the old Volume Mixer location in Windows 11
While you can access it using the methods described above, the great thing about the classic Volume Mixer was that it was very easy to open from the desktop. So let’s see how to restore quick access to the classic Volume Mixer in Windows 11:
Accessing the old Volume Mixer location in Windows 11
While you can access it using the methods described above, the great thing about the classic Volume Mixer was that it was very easy to open from the desktop. So let’s see how to restore quick access to the classic Volume Mixer in Windows 11:
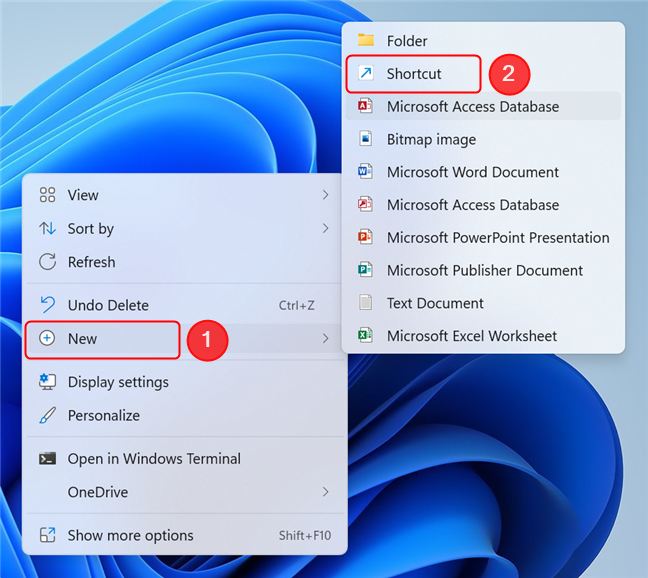
 Creating a shortcut for the classic Volume Mixer
In the Create Shortcut wizard, you need to provide the location of the item. Thankfully, Windows 11 is smart enough to recognize many programs by their name, so in the item location field, just type “sndvol.exe” and press Next.
Creating a shortcut for the classic Volume Mixer
In the Create Shortcut wizard, you need to provide the location of the item. Thankfully, Windows 11 is smart enough to recognize many programs by their name, so in the item location field, just type “sndvol.exe” and press Next.

 You don't need to type in the full path
Now, type the name of the shortcut. We went with “Volume Mixer.” Press Finish once you’re satisfied. The shortcut will now be created and will even have a nice icon resembling a speaker.
You don't need to type in the full path
Now, type the name of the shortcut. We went with “Volume Mixer.” Press Finish once you’re satisfied. The shortcut will now be created and will even have a nice icon resembling a speaker.
 The final step is to name the shortcut. Press Finish to create it.
TIP: Alternatively, you can download the shortcut from this article. Save the Volume Mixer file to your system, then unzip it and place it on your desktop.
The final step is to name the shortcut. Press Finish to create it.
TIP: Alternatively, you can download the shortcut from this article. Save the Volume Mixer file to your system, then unzip it and place it on your desktop.
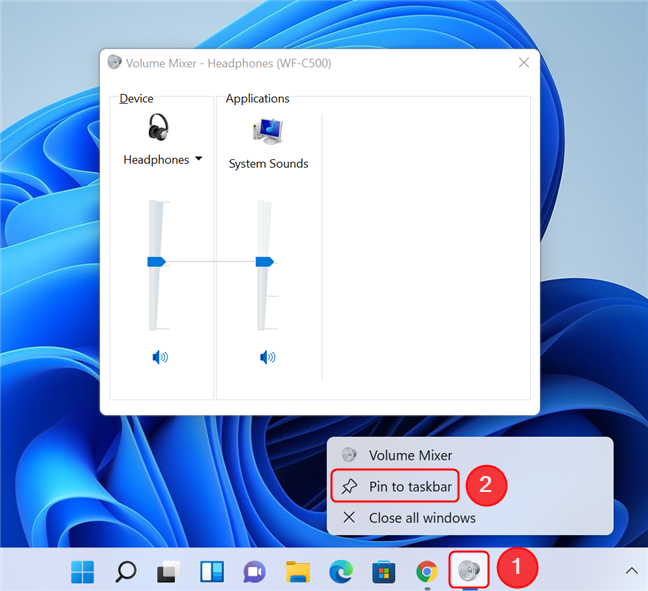
 Pinning the old Volume Mixer to the taskbar in Windows 11
You can go ahead and close the Volume Mixer. The icon should now stay on the taskbar even after you close it.
TIP: Did you know you can customize your taskbar to include the items you want? For details, check out our guide on adding and removing items from the Windows 11 taskbar.
Pinning the old Volume Mixer to the taskbar in Windows 11
You can go ahead and close the Volume Mixer. The icon should now stay on the taskbar even after you close it.
TIP: Did you know you can customize your taskbar to include the items you want? For details, check out our guide on adding and removing items from the Windows 11 taskbar.
What happened to the old Volume mixer in Windows 11?
Just like the new Windows 11 right-click menu, the Volume Mixer has changed radically in the new operating system. And while you can get the old right-click menu back, the old Volume Mixer is “missing in action” in Windows 11. In Windows 10, if you right-clicked the volume icon on the taskbar and then clicked on the Volume Mixer, you would get this:How to access the old Volume mixer
The quickest way to access the old Volume Mixer is by using the Run window. Open it by pressing Windows + R on your keyboard, then type “sndvol.exe” and press Enter or click/tap on OK.Adding a shortcut to the classic Volume Mixer to your Desktop
If you use the classic Volume Mixer frequently, you can create a shortcut to it on your desktop. To do this, right-click (or press and hold) on an empty space on your desktop. In the context menu, choose New, then Shortcut.Pin the old Volume Mixer icon to your taskbar
If you want the old Volume Mixer icon on your taskbar and not on your desktop, it’s really simple to add it. Just open the Volume Mixer using one of the methods described above, then right-click or press and hold its taskbar icon (the one looking like a speaker). In the context menu, choose Pin to taskbar.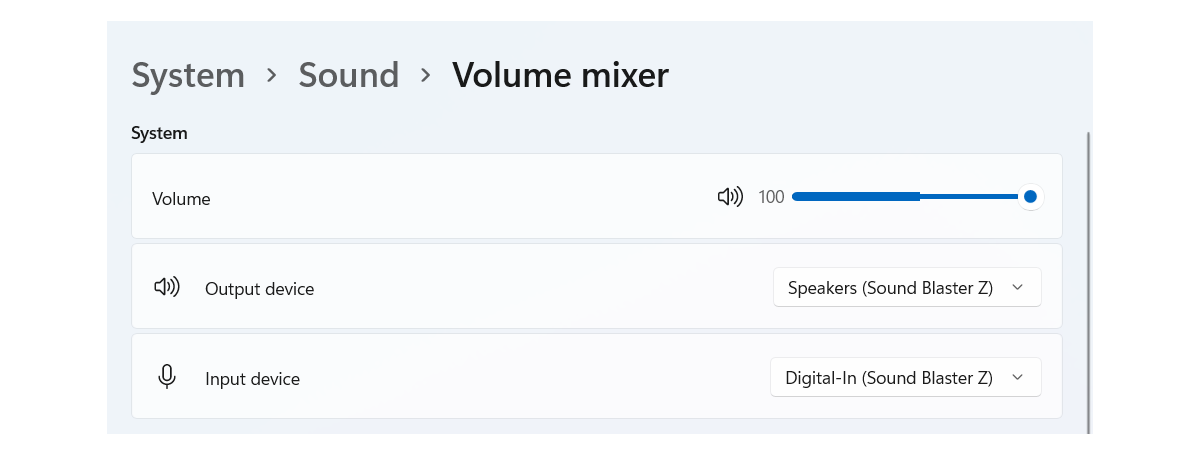
Discussion (0)
Be the first to comment.