


With iOS 17, Apple introduced a new feature for iPhones called StandBy. It’s something you may not have heard of before, but you may have stumbled across it while using your iPhone or while checking out what’s new in the Settings app. StandBy is quite a feature, one of the best things in Apple’s latest mobile operating system, at least in my opinion. It gives your iPhone a nightstand mode that displays useful information when it’s charging but not used. Want to know more? Read on to learn what iPhone's Standby is, how to use it, and how to customize it:
 An iPhone in StandBy mode
So, would you like to have your iPhone transform into a smart display whenever you put it on your nightstand? Or maybe each time you charge it during work hours, on your office desk? Here’s what you need to do:
An iPhone in StandBy mode
So, would you like to have your iPhone transform into a smart display whenever you put it on your nightstand? Or maybe each time you charge it during work hours, on your office desk? Here’s what you need to do:
 Open Settings and go to StandBy
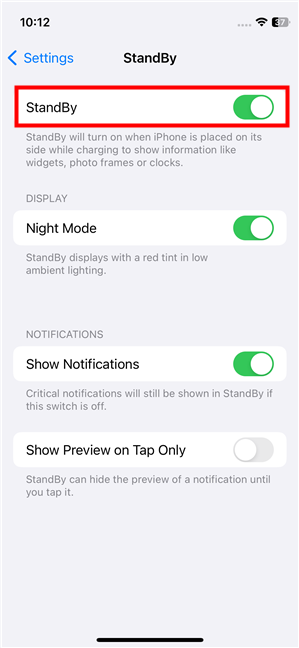
On the StandBy screen, turn the StandBy switch on to enable this feature. By the way, right under the switch, iOS 17 tells you exactly what this feature is all about: “StandBy will turn on when iPhone is placed on its side while charging to show information like widgets, photo frames or clocks.”
Open Settings and go to StandBy
On the StandBy screen, turn the StandBy switch on to enable this feature. By the way, right under the switch, iOS 17 tells you exactly what this feature is all about: “StandBy will turn on when iPhone is placed on its side while charging to show information like widgets, photo frames or clocks.”
 Turn on the StandBy mode on your iPhone
The StandBy page in your iPhone’s Settings also allows you to customize a few other options related to how it works:
Turn on the StandBy mode on your iPhone
The StandBy page in your iPhone’s Settings also allows you to customize a few other options related to how it works:
 Night Mode makes StandBy red in iOS 17
Now that you’ve enabled StandBy on your iOS 17 iPhone, how about putting it to the test? Here’s…
Night Mode makes StandBy red in iOS 17
Now that you’ve enabled StandBy on your iOS 17 iPhone, how about putting it to the test? Here’s…
 How to put an iPhone with iOS 17 in StandBy mode
The StandBy feature should turn on automatically once you do that. If this is the first time you do it, your iPhone will also display a brief “Welcome to StandBy” message. In case StandBy doesn’t start, you can tap the screen, press the side button, or gently nudge the nightstand or desk on which you’ve placed your iPhone. You can also try turning the StandBy feature off and on again from Settings, before placing your iPhone on its side.
TIP: If you have an iPhone 14 Pro, iPhone 14 Pro Max, iPhone 15 Pro, or iPhone 15 Pro Max with an Always-On display, the StandBy mode can stay on permanently. Here’s how to tell which iPhone you have.
How to put an iPhone with iOS 17 in StandBy mode
The StandBy feature should turn on automatically once you do that. If this is the first time you do it, your iPhone will also display a brief “Welcome to StandBy” message. In case StandBy doesn’t start, you can tap the screen, press the side button, or gently nudge the nightstand or desk on which you’ve placed your iPhone. You can also try turning the StandBy feature off and on again from Settings, before placing your iPhone on its side.
TIP: If you have an iPhone 14 Pro, iPhone 14 Pro Max, iPhone 15 Pro, or iPhone 15 Pro Max with an Always-On display, the StandBy mode can stay on permanently. Here’s how to tell which iPhone you have.
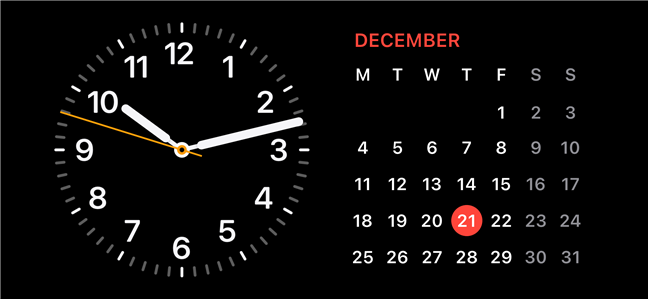
 The standard view of iPhone's StandBy
There are three views available in your iPhone’s StandBy mode:
The standard view of iPhone's StandBy
There are three views available in your iPhone’s StandBy mode:
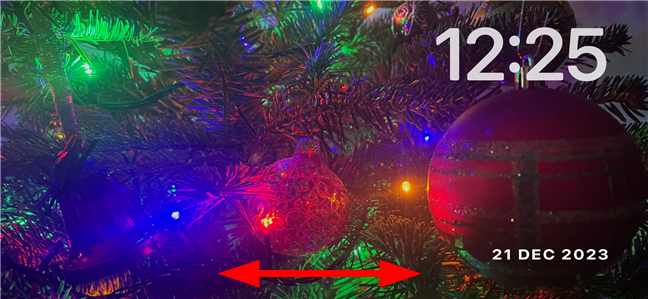 Swipe left or right to switch to a different StandBy layout
If you’re using the widgets view of StandBy, you can switch between the different widgets available by swiping up or down the screen. Swiping on the left side of the screen changes the widget shown in the left column, while swiping on the right side of the screen changes the widget in the right column.
Swipe left or right to switch to a different StandBy layout
If you’re using the widgets view of StandBy, you can switch between the different widgets available by swiping up or down the screen. Swiping on the left side of the screen changes the widget shown in the left column, while swiping on the right side of the screen changes the widget in the right column.
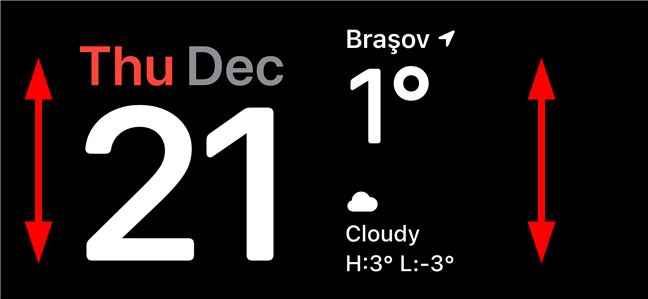 Swipe up or down to change the widgets displayed
Similarly, on the StandBy clock view, you can select a different skin for the clock by swiping up or down on the screen. There are five clock styles that you can pick: analog, digital, world, solar, and float.
Swipe up or down to change the widgets displayed
Similarly, on the StandBy clock view, you can select a different skin for the clock by swiping up or down on the screen. There are five clock styles that you can pick: analog, digital, world, solar, and float.
 Swipe up or down to select a different skin for the StandBy clock
While you can’t really personalize the clock view for your iPhone’s StandBy mode, you can customize the widgets and the photos view. Here’s…
Swipe up or down to select a different skin for the StandBy clock
While you can’t really personalize the clock view for your iPhone’s StandBy mode, you can customize the widgets and the photos view. Here’s…
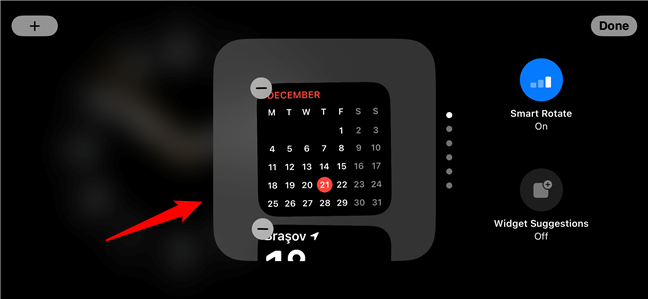
 Tap and hold on a widget column
After your identity is verified by Face ID or after you enter your PIN code, the widget column you tapped on becomes editable. You’ll know this because it moves to the center of the screen and the widgets in it start jiggling.
Tap and hold on a widget column
After your identity is verified by Face ID or after you enter your PIN code, the widget column you tapped on becomes editable. You’ll know this because it moves to the center of the screen and the widgets in it start jiggling.
 The editing mode for the StandBy widgets
While in editing mode, if you want to add new widgets to the column, tap the + (plus) button in the top-left corner of the screen.
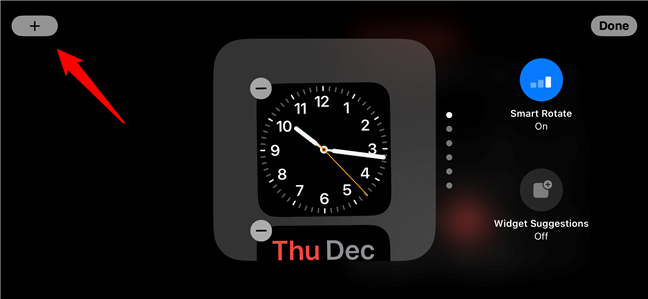
The editing mode for the StandBy widgets
While in editing mode, if you want to add new widgets to the column, tap the + (plus) button in the top-left corner of the screen.
 Tap plus to add a new widget to StandBy
After you press the + (plus) icon, your iPhone loads a new screen, where you can choose the new widget you’d like to add to StandBy. Scroll through the list or use the Search Widgets field at the top to find the one you want. Once you do, tap it, and it’s immediately inserted into the widgets column.
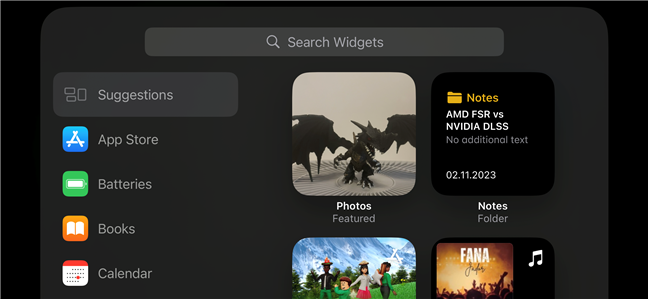
Tap plus to add a new widget to StandBy
After you press the + (plus) icon, your iPhone loads a new screen, where you can choose the new widget you’d like to add to StandBy. Scroll through the list or use the Search Widgets field at the top to find the one you want. Once you do, tap it, and it’s immediately inserted into the widgets column.
 Select the widget to add to StandBy
Back on the widgets editing page, on the right side of the screen, you’ll also find two separate switches called Smart Rotate and Widget Suggestions. When enabled, the first one - Smart Rotate - lets iOS 17 automatically rotate widgets in the column depending on how you use your iPhone. The second switch - Widget Suggestions - allows StandBy to automatically recommend widgets when editing a column.
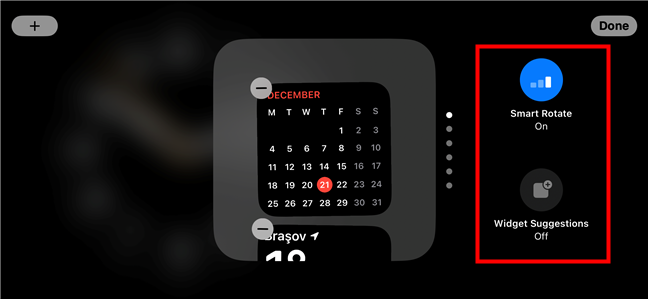
Select the widget to add to StandBy
Back on the widgets editing page, on the right side of the screen, you’ll also find two separate switches called Smart Rotate and Widget Suggestions. When enabled, the first one - Smart Rotate - lets iOS 17 automatically rotate widgets in the column depending on how you use your iPhone. The second switch - Widget Suggestions - allows StandBy to automatically recommend widgets when editing a column.
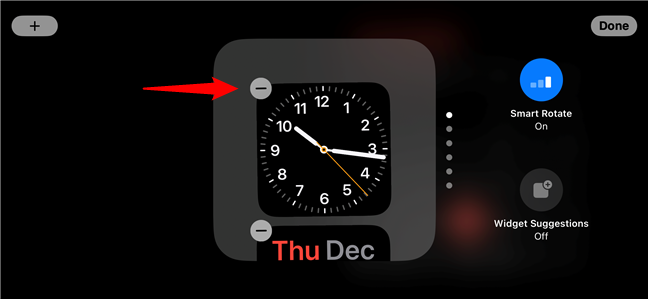
 Smart Rotate and Widget Suggestions for StandBy
Last but not least, if there’s a widget you don’t want in StandBy, you can delete it by tapping the small - (minus) button in its top-left corner while editing the column it’s found in.
Smart Rotate and Widget Suggestions for StandBy
Last but not least, if there’s a widget you don’t want in StandBy, you can delete it by tapping the small - (minus) button in its top-left corner while editing the column it’s found in.
 Delete a widget from StandBy
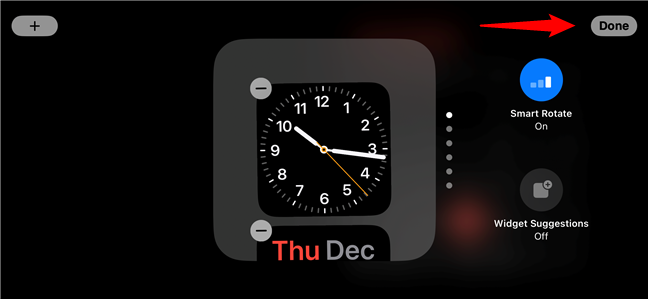
When everything’s to your liking, exit the editing mode by tapping the Done button in the top-right corner of the screen.
Delete a widget from StandBy
When everything’s to your liking, exit the editing mode by tapping the Done button in the top-right corner of the screen.
 Tap Done to save your settings
TIP: Would you like to know more about widgets on iPhones? Then, you should also read this guide: How to use interactive widgets on your iPhone.
Tap Done to save your settings
TIP: Would you like to know more about widgets on iPhones? Then, you should also read this guide: How to use interactive widgets on your iPhone.
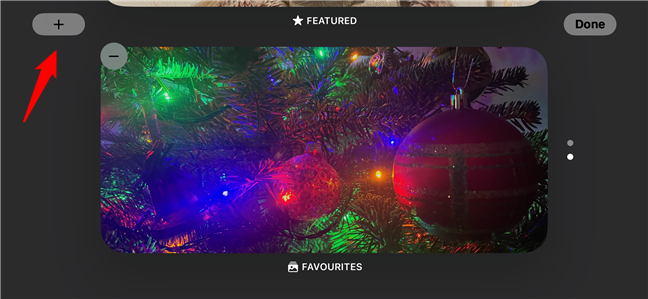
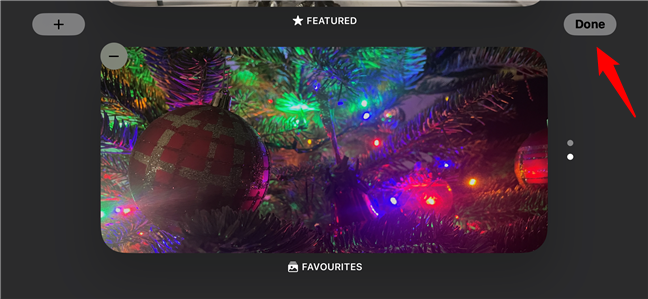
 Tap and hold the StandBy photos view to edit it
Once you do that, the currently displayed picture becomes slightly smaller, and two buttons show up at the top of the screen. In the left corner, you get a + (plus) icon, and in the right corner, a Done button. Tap the + (plus) button to add more albums to the photo gallery displayed when your iPhone is in StandBy mode.
Tap and hold the StandBy photos view to edit it
Once you do that, the currently displayed picture becomes slightly smaller, and two buttons show up at the top of the screen. In the left corner, you get a + (plus) icon, and in the right corner, a Done button. Tap the + (plus) button to add more albums to the photo gallery displayed when your iPhone is in StandBy mode.
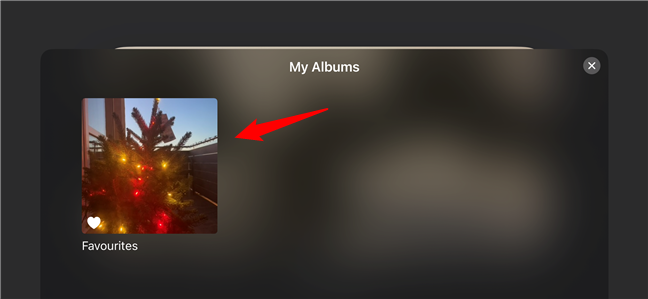
 Tap plus to add a new photo album to StandBy
This opens a new screen where you can see all the albums on your iPhone. Tap to select any that you want to add to the StandBy photos view.
Tap plus to add a new photo album to StandBy
This opens a new screen where you can see all the albums on your iPhone. Tap to select any that you want to add to the StandBy photos view.
 Tap the album to add to StandBy
When you’re happy with the results, tap the Done button in the top-right corner of the screen to save your new settings.
Tap the album to add to StandBy
When you’re happy with the results, tap the Done button in the top-right corner of the screen to save your new settings.
 Tap Done to save the setting for StandBy
That’s it!
Tap Done to save the setting for StandBy
That’s it!
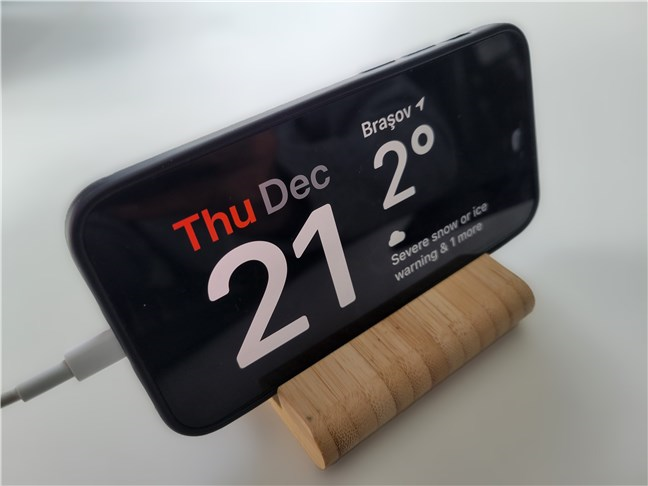
What is StandBy on your iPhone?
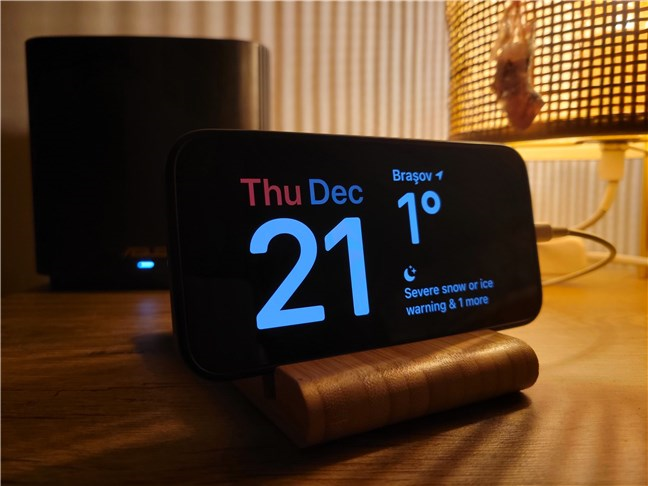
The new StandBy feature in iOS 17 is what I’d call an iPhone nightstand mode. I say that because StandBy allows you to turn your iPhone into a smart display that shows useful information while you charge and place it on a side in landscape mode. When these criteria are met, your iPhone will automatically show you different widgets, photos, or clock screens.How to enable StandBy on an iPhone
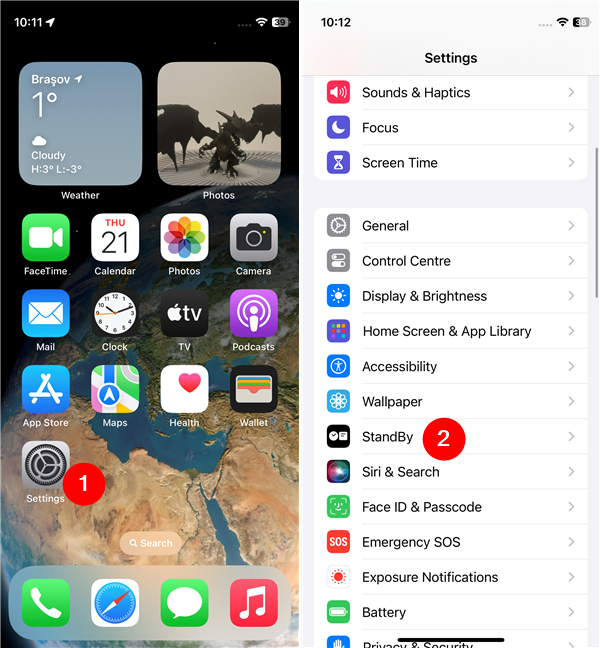
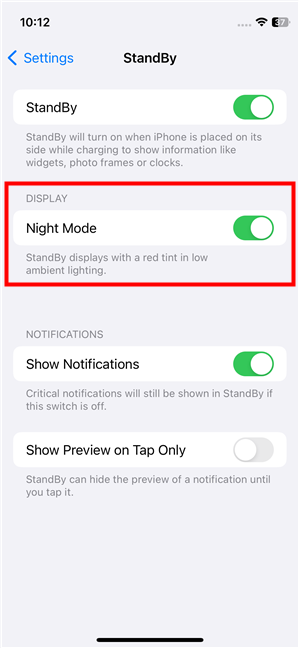
The StandBy feature should be enabled by default in iOS 17. However, if you want to make sure or if it somehow got turned off on your iPhone, you can turn it back on from the Settings app. Open Settings by tapping its icon on your Home Screen, then tap the StandBy entry.- Night Mode: This allows StandBy to change colors by using a red tint when the ambient light is low. I recommend turning Night Mode on, as it can help you avoid being disturbed by your iPhone’s StandBy feature when sleeping.
- Show Notifications: You can let StandBy display notifications you receive on your iPhone.
- Show Preview on Tap Only: Notification previews are not hidden by default, but you can choose to hide their content and see it only when you tap on them.
How to put your iPhone in StandBy
In order to make your iPhone enter the StandBy nightstand mode, you must do two things. Connect your iPhone to a charger and set it down on one of its sides. It doesn’t matter what type of charging you’re using, the StandBy mode works regardless of whether you’re using a wired charger, a wireless Qi charging plate, or a MagSafe.How to use and customize StandBy on your iPhone
The StandBy mode on iPhones running iOS 17 defaults to a screen that shows you a clock and a calendar, and it looks like this:- Widgets: This is the default view, with two columns of widgets that iOS 17 can automatically choose or which you can select and customize by yourself.
- Photos: This view displays pictures from your gallery, together with the current time and date. If you want, you can choose which albums from your iPhone are used.
- Clock: This one shows just the current time and date. Though you can’t customize this view, there are a couple of predefined skins you can choose from.
How to customize the StandBy widgets view on your iPhone
To change what’s shown on your iPhone’s StandBy widgets screen, tap and hold on either the left or right column of widgets.How to customize the StandBy photos views on your iPhone
The other StandBy view that you can customize on your iPhone is the photos screen. Just like the widgets, you can enter editing mode by tapping and holding while on the StandBy photos view.

Discussion (0)
Be the first to comment.