


Buying a NAS (Network Attached Storage) solution can be expensive and overkill for most home users. A more affordable option is to get an external hard drive or SSD and connect it to your router using the USB port. You can then set up the router to share the drive with your network or the internet to build your own "cloud storage." If you have an ASUS wireless router or an ASUS mesh Wi-Fi system, here's how to turn it into a NAS using a USB hard disk or SSD:
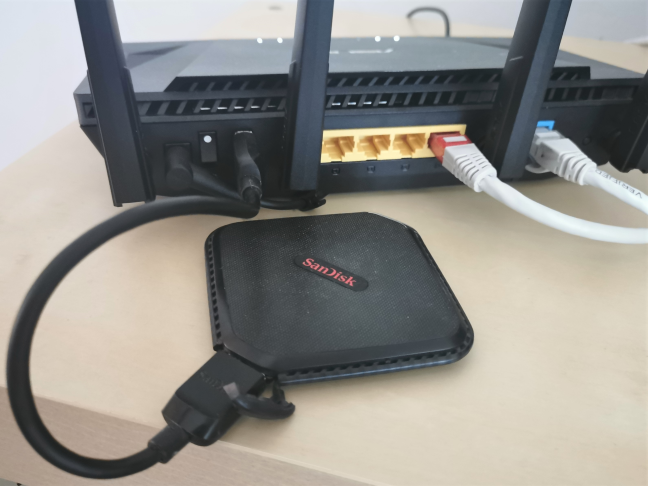
 Connecting an external SSD to an ASUS RT-AX58U router via USB
However, if your ASUS router is older and comes only with a USB 2.0 port, using an SSD is overkill because the USB port on your router can't reach the speeds necessary to take advantage of a fast storage drive. Therefore, for USB 2.0 ports, classic HDDs are just fine.
Connecting an external SSD to an ASUS RT-AX58U router via USB
However, if your ASUS router is older and comes only with a USB 2.0 port, using an SSD is overkill because the USB port on your router can't reach the speeds necessary to take advantage of a fast storage drive. Therefore, for USB 2.0 ports, classic HDDs are just fine.
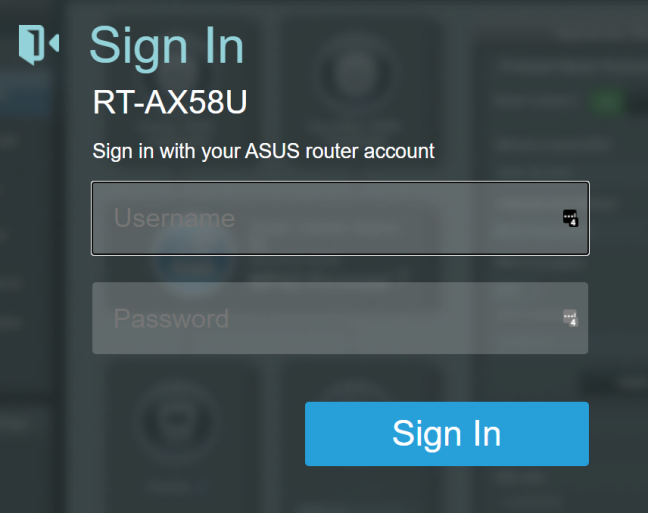
 Sign into your ASUS router admin interface
NOTE: If you need help with other ways to log in to your ASUS router, read: How to login to your ASUS router: Four ways that work.
Sign into your ASUS router admin interface
NOTE: If you need help with other ways to log in to your ASUS router, read: How to login to your ASUS router: Four ways that work.
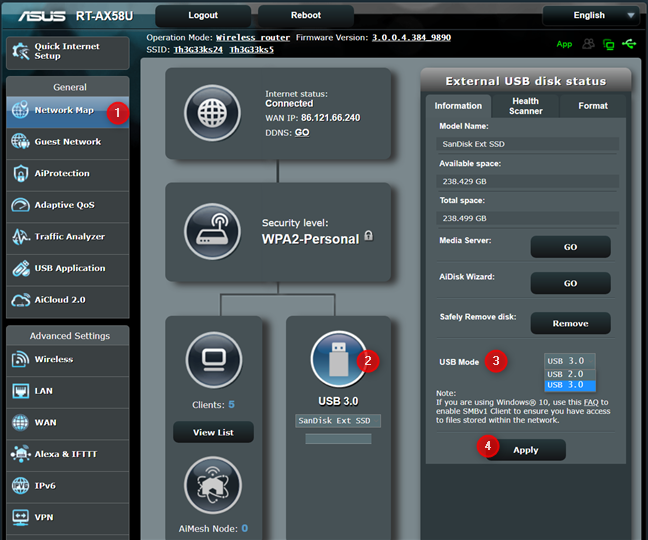
 Configure the USB Mode on your ASUS router
Then, in the "External USB disk status" panel, go to the Format tab, choose the file system you want in the Format type drop-down box, and click or tap Format. If you use Windows 10 in your network, it is a good idea to use NTFS as the file system for the external storage that you connected to your ASUS router. If you use Linux, HFS or FAT are better choices.
Configure the USB Mode on your ASUS router
Then, in the "External USB disk status" panel, go to the Format tab, choose the file system you want in the Format type drop-down box, and click or tap Format. If you use Windows 10 in your network, it is a good idea to use NTFS as the file system for the external storage that you connected to your ASUS router. If you use Linux, HFS or FAT are better choices.
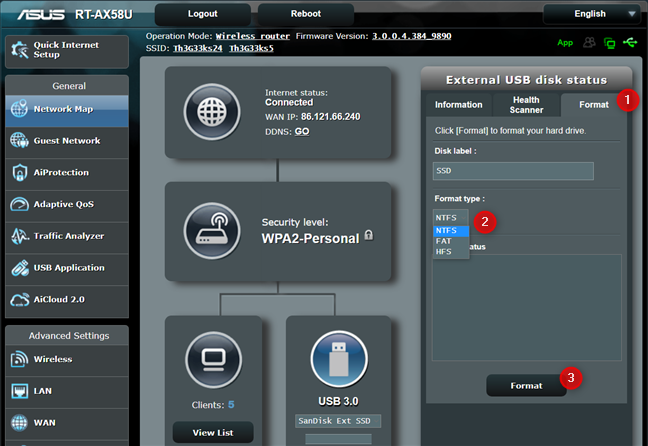
 Format the USB drive from your ASUS router
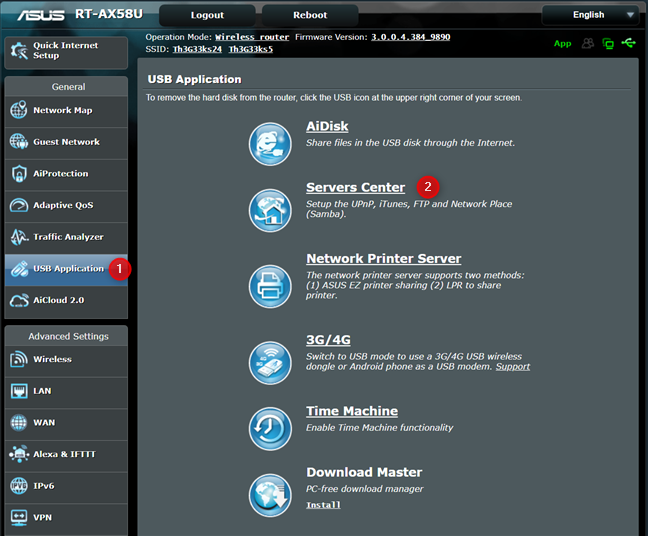
 Access the Servers Center on your ASUS router
This is where you configure how you want to share your external storage with your network. You can have it act like a media server, a network place, or an FTP share. Most people will want to use it as a network place, and we will cover this situation. Go to "Network Place (Samba) Share / Cloud Disk," and set the Enable Share switch to ON.
Access the Servers Center on your ASUS router
This is where you configure how you want to share your external storage with your network. You can have it act like a media server, a network place, or an FTP share. Most people will want to use it as a network place, and we will cover this situation. Go to "Network Place (Samba) Share / Cloud Disk," and set the Enable Share switch to ON.
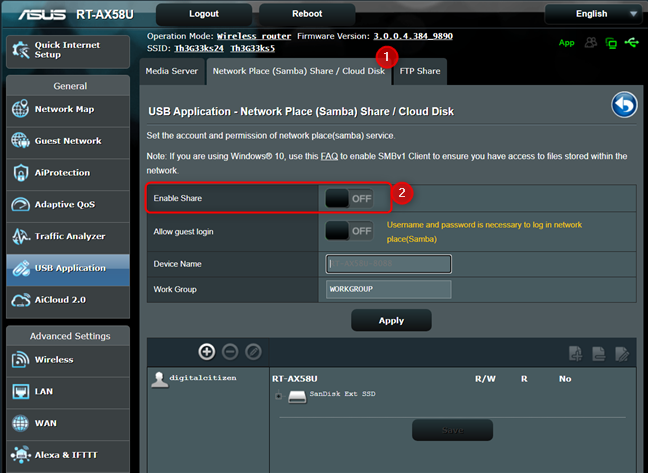
 Enable USB network sharing on your ASUS router
You are asked to confirm that you want to share the disk with the network. Click or tap on OK. In a couple of seconds, the storage drive is shared by your ASUS router with the network. If you want anyone from your network to access the storage on your router without a username and password, set the switch for "Allow guest login" to ON, confirm your choice, and skip to Step 5 from this tutorial.
Enable USB network sharing on your ASUS router
You are asked to confirm that you want to share the disk with the network. Click or tap on OK. In a couple of seconds, the storage drive is shared by your ASUS router with the network. If you want anyone from your network to access the storage on your router without a username and password, set the switch for "Allow guest login" to ON, confirm your choice, and skip to Step 5 from this tutorial.
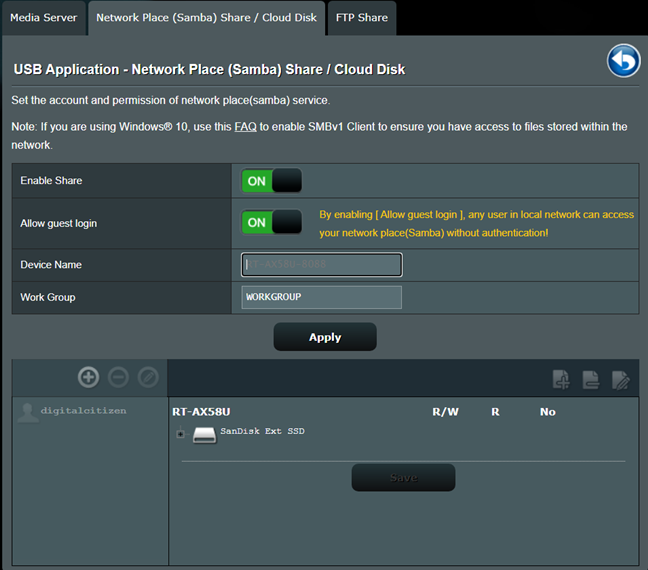
 Allow guest login on your USB drive
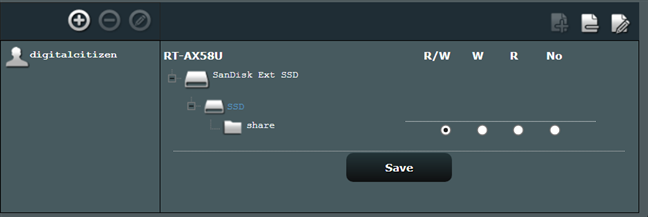
However, suppose you want a more secure approach. In that case, you need to add user accounts that can access the storage drive, create folders, and set permissions. To add a user, click the + sign above the users' list with access to your drive. Then, type an account name, set its password, and click or tap Add. To add a folder to your drive, navigate its content to the location where you want to create it and then click the + folder sign on the top-right. Then, enter the folder name that you want to use.
Allow guest login on your USB drive
However, suppose you want a more secure approach. In that case, you need to add user accounts that can access the storage drive, create folders, and set permissions. To add a user, click the + sign above the users' list with access to your drive. Then, type an account name, set its password, and click or tap Add. To add a folder to your drive, navigate its content to the location where you want to create it and then click the + folder sign on the top-right. Then, enter the folder name that you want to use.

 Add users and folders to the USB drive
After the folder is created, navigate to it and then select the permissions that you want to assign for the selected user: R/W (Read and Write), R (Read-only), or No (No access). Don't forget to Save your changes when you are done setting things up.
Add users and folders to the USB drive
After the folder is created, navigate to it and then select the permissions that you want to assign for the selected user: R/W (Read and Write), R (Read-only), or No (No access). Don't forget to Save your changes when you are done setting things up.
 Set access permissions for the folders on your USB drive
Now you are done setting up your router to share its USB storage with the network.
Set access permissions for the folders on your USB drive
Now you are done setting up your router to share its USB storage with the network.
 Access your network storage from Windows 10
Now, you can access the storage attached to your ASUS router as if it were a local drive, copy, paste files, etc.
TIP: If Windows 10 tells you that it can't access the network resource, you may need to change the network location from public to private. Here's how it is done: How to change the Windows 10 network location to private (or public).
Access your network storage from Windows 10
Now, you can access the storage attached to your ASUS router as if it were a local drive, copy, paste files, etc.
TIP: If Windows 10 tells you that it can't access the network resource, you may need to change the network location from public to private. Here's how it is done: How to change the Windows 10 network location to private (or public).
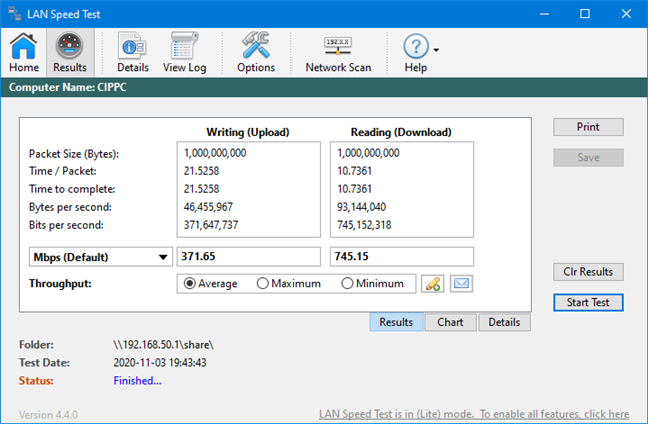
 The speed you get when using an SSD on ASUS RT-AX58U
Step 1. Plugin the external storage drive to your ASUS router or Mesh Wi-Fi
Take your external hard drive or SSD and plug it into the USB port on your ASUS router or Mesh Wi-Fi system. If your router has two ports, use the USB 3 port so that you can enjoy faster speeds. If you have a USB 3 port on your router, it is a good idea to use an SSD instead of an HDD.Step 2. Log in to the user interface of your ASUS router or mesh Wi-Fi
On your PC, open up your favorite web browser and navigate to router.asus.com or the IP address of your router. On modern models like ASUS RT-AX58U, the default IP address is 192.168.50.1. On older ASUS routers, the IP address is 192.168.1.1. Enter the username and password used to administer your ASUS router or mesh Wi-Fi, and click or tap Sign In.Step 3. Configure the USB mode and format the storage drive
On many modern ASUS routers and mesh Wi-Fi systems with USB 3 ports, you can configure the USB version you want to use for the storage drive that you just connected. To do that, go Network Map, and then click on the USB device listed. On the panel on the right, choose the USB Mode that you want (remember that USB 3.0 is faster than USB 2.0) and click or tap Apply. This step is necessary because the default mode is set to USB 2.0 even for USB 3.0 ports, on some ASUS router models.Step 4. Share the external storage from your ASUS router with the network
The next step is to go to the USB Application section and click or tap Servers Center.Step 5. Access the USB storage from your Windows 10 PCs
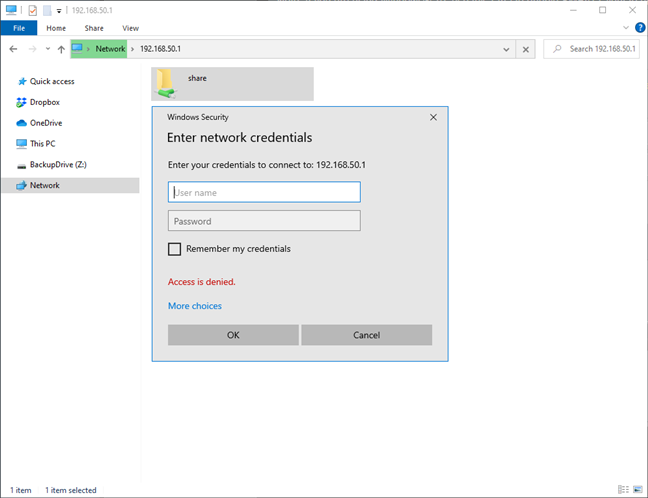
To access the USB storage attached to your ASUS router or mesh Wi-Fi, open File Explorer in Windows 10, and go to Network. There, enter the IP address of your router in the address bar, or click on the router's name if it’s displayed. If you set a username and password for accessing the USB storage, enter the necessary credentials, and click or tap OK.Bonus: What speed do I get when connecting USB storage to my ASUS router or mesh Wi-Fi?
How fast the USB storage is on your ASUS router depends on several factors:- If your USB drive is an HDD or SSD. Of course, an SSD is much faster.
- If your ASUS router or mesh Wi-Fi has a USB 3 port or a USB 2.0 port. USB 3 is faster.
- What USB mode your ASUS router uses.
- If you connect to the USB storage on your router wirelessly or through a Ethernet cable connection, the speed is going to be different. Cable connections tend to be a lot faster than wireless ones. To give you an idea, we used an SSD drive on a router with Wi-Fi 6 that we like a lot: ASUS RT-AX58U. Then, we wan the test below to measure the speed when using an Ethernet connection. As you can see below, we reached a download speed of 745.16 Mbps and an upload speed of 371.65 Mbps.
Discussion (20)
HI,
Thanks for your well written and composed article. It was very helpful and I was successful for for me 50% of the time. My Linux (Fedora 40) computer has no trouble accessing the USB drive I have plugged into the USB 3 port in my Asus RT-AX86U router. However, my computer running Windows 11 does not display the directory using File Explorer. I doubled checked the setting in the router software and it is configured according to the article.
Do you have any suggestions as to why I can access the drive through Linux and not Windows 11?
Thanks
Hi Bob,
This problem may be generated by the fact that the network connection in Windows 11 is not set as Private. If it is set as Public, file sharing isn’t available. Check out this guide on how to change the network location on your Windows 11 computer:
https://www.digitalcitizen.life/how-set-your-networks-location-private-or-public-windows-10/
I hope this helps,
Ciprian
Digital Citizen
I would like to do this exact same process, but my NAS is a networked RAID style small box, so has an IP or Domain name reference. Is the above process a “Port Forward”?
I’m having the same issue as others mentioned, after following the setup instructions, putting the router address into File Explorer results in opening the router log in page, not the USB drive. Following the router IP with the folders didn’t help.
I’d had this running and mapped the USB drive; but, when I upgraded the router firmware, it failed and I’ve not yet been able to get it to work–now on version 3.0.0.4.388_20558 on RT-AX88U. The network is set to private. I’ve tried both with and without guest access. I’m only looking for the seeing the drive over the network, not via FTP or using the media server function which are set to off.
When it was working, Windows 10 asked for my login credentials prior to connecting, when allowing guest access.
The router sees the drive connected (USB 2), will run health check successfully.
The documentation was easy to follow. Not sure why it isn’t working properly.
Ideas welcome.
Thanks for the clear tutorial! For people on a mac it works the same way. You can use a HFS formatted disk (Mac OS extended Journaled). I found that when I tried to format the disk HFS through the router it failed but if I used my already formatted disk it worked fine.
Thank you for sharing this information with others.
Hello
Is it posible to conect a powered usb hub to the router so i can ad more harddrives to the router?
I too have not managed to connect to the USB disk yet [all went well in the router] via the W10 File explorer ‘Network’ address field, my system simply opens up a browser for ASUS log on… BUT BEFORE THAT I would like to know if the router NAS feature is still available if I configure the router as an access point? I must keep my providers modem [cable] router so the ASUS will be second in line. I can go for Bridging or DMZ in the providers router but if the NAS option still works in AP mode it means I also kan keep my first router as Wifi station too [extending my Wifi coverage]
very clear
Very helpful. This gave me the hints I needed to make the attached USB drive accessible. Thanks.
Do I need to format the drive after connecting it to the router? I have a drive with files already on it that I would like to connect to the router and would prefer not to format it again if possible.
You need to format it only if the router doesn’t mount it correctly. Otherwise, the formatting should be not necessary.
Hi all!
How can i make from my usb hdd connected in asus RT AC58U a NAS ? From internet pass in two router´s ( First ISP router, second the Asus router) and access the disc in usb port. Thanks from you help and ideias.
Regards
H Rick
will the usb fdd sleep when unused?
I followed your instructions, but when I enter the IP address of the router (or click its name in Network), I’m brought to a login page for the router GUI. Any idea what’s wrong?
The disk is recognized and the media server setting is active. I’ve configured the disk to allow anonymous access.
Same happens to me tried with everything. It can see the disk as mediadriver but I cant access it to put in files, only open the router login page, if I try to map it it says I need smb2… have it on my computer, just checked with PowerShell that it was active but I guess the router not having it. No idea how to get this to work
same here.just goes to router login page.please advise.
How about one step further. I want to use Asus USB disk for LAN Access and cloud access on Android/ Apple smartphone. AICloud app allows upload via + sign but no direct Share function.
How could we use Asus USB SSD disk as cloud accessible via LAN ( already is – check) and with Share to function on smartphones?
One idea is to keep one’s PC local Copy on Asus USB SSD but have problems with permissions (Sync cloud) despite Guest login allowed.
What if I use a Mac computer? You only mention Windows or Linux system.
We don’t have a Mac available for this tutorial. Sorry about that.